1988 Vette hard brake line size to ABS
#1
Safety Car


Thread Starter
Greetings all,
1988 Vette coup - automatic.
Anyone have info on the SIZE of the HARD BRAKE LINES (not flex lines) that are connected to the ABS module?
They connect to the ABS module inside the car next to the drivers left rear wheel and I need to replace at least 1 hard line but, since all are pretty rusted, will replace all accessible lines. Haven't quite ducked down to see HOW they enter the car yet but, am dreading that!
I also need to know if the "connector nuts" that screw into the ABS that connect the hard lines to the module are metric or other and the SIZE of same.
I will be attempting this shortly as soon as I obtain a double flare line tool.......THANKS!
Last edited by Da Mail Man; 06-04-2018 at 04:52 PM.
#2
Safety Car


Don't know the sizes but I have seen IIRC stainless steel and steel replacements before.
Here's some a quick search brought up:
https://www.corvettecentral.com/c4-8...f%3fcount%3d18
https://www.mamotorworks.com/Corvett...steel-621018-1
There are more out there, you just need to do a search on them.
Here's some a quick search brought up:
https://www.corvettecentral.com/c4-8...f%3fcount%3d18
https://www.mamotorworks.com/Corvett...steel-621018-1
There are more out there, you just need to do a search on them.
#3
Race Director


I don't know the sizes. Good luck on all that. I do know that you best practice with the double flaring tool on some scrap tubing. I know that for sure.
The following users liked this post:
Da Mail Man (07-12-2018)
#4
Race Director


Yeah that's the best way to handle it really. Just be certain to slide the nuts on the tube before you make the flare …
#5
Yes to the 3/16 and reusing the old flare nuts BUT THE FLARE is an ISO 'bubble' not a double flare. IHBD notice I mentioned 'reuse' in the '13 thread also!!
Here's a thread from some time ago.
https://www.corvetteforum.com/forums...ake-lines.html
In the thread the image of 'bubble & double' is removed. Likely a PB deal. In the '13 thread I mentioned M10x1.0 and I'm quite sure that's correct. Buy a 3/16 - M10x1.0 for 'bubble' and confirm when you take the first off.
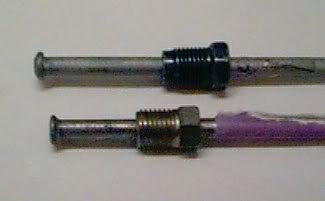
**Very dependent upon length you actually should be able to buy a length that will work for you with 3/16-M10x1 ISO nuts already installed at a good local auto parts store.
Here's a thread from some time ago.
https://www.corvetteforum.com/forums...ake-lines.html
In the thread the image of 'bubble & double' is removed. Likely a PB deal. In the '13 thread I mentioned M10x1.0 and I'm quite sure that's correct. Buy a 3/16 - M10x1.0 for 'bubble' and confirm when you take the first off.

**Very dependent upon length you actually should be able to buy a length that will work for you with 3/16-M10x1 ISO nuts already installed at a good local auto parts store.
Last edited by WVZR-1; 06-04-2018 at 10:05 PM.
The following users liked this post:
Da Mail Man (06-05-2018)
#6
Team Owner


Pro Mechanic
#7
Safety Car


Thread Starter
Don't know the sizes but I have seen IIRC stainless steel and steel replacements before.
Here's some a quick search brought up:
https://www.corvettecentral.com/c4-8...f%3fcount%3d18
https://www.mamotorworks.com/Corvett...steel-621018-1
There are more out there, you just need to do a search on them.
Here's some a quick search brought up:
https://www.corvettecentral.com/c4-8...f%3fcount%3d18
https://www.mamotorworks.com/Corvett...steel-621018-1
There are more out there, you just need to do a search on them.
Thanks for reply!
I did a brief look at the lines when I discovered the leak and only the section I have mentioned appears defective. I have also looked at a few u-tube vids and I may go with "NICOOP" lines which are DOT approved for such application and looks promising.
I will most likely slide vacuum hose over each line to prevent future damage. I did price out the complete set of replacement lines for the entire car and that runs between $220-$250.
#8
Safety Car


Thread Starter
#9
Safety Car


Thread Starter
Thanks for reply! Ya know, I didn't think about re-using the original nuts but, since I will be doing a repair of a section as opposed to the entire line, that may be a viable option although, will still have to purchase a few more in case of removal damage and, to make the union/splice with the existing line.
#10
Safety Car


Thread Starter
#11
Safety Car


Thread Starter
Yes to the 3/16 and reusing the old flare nuts BUT THE FLARE is an ISO 'bubble' not a double flare. IHBD notice I mentioned 'reuse' in the '13 thread also!!
Here's a thread from some time ago.
https://www.corvetteforum.com/forums...ake-lines.html
In the thread the image of 'bubble & double' is removed. Likely a PB deal. In the '13 thread I mentioned M10x1.0 and I'm quite sure that's correct. Buy a 3/16 - M10x1.0 for 'bubble' and confirm when you take the first off.
Attachment 48291596
**Very dependent upon length you actually should be able to buy a length that will work for you with 3/16-M10x1 ISO nuts already installed at a good local auto parts store.
Thanks for the reply!
I thought it was a double flare as opposed to any other?...Do the "standard" double flare kit(s) have the ability to do this "BUBBLE" you have mentioned?...Would it be accomplished by leaving out the final and last step for making a "double"?
#12
******************
Thanks for the reply!
I thought it was a double flare as opposed to any other?...Do the "standard" double flare kit(s) have the ability to do this "BUBBLE" you have mentioned?...Would it be accomplished by leaving out the final and last step for making a "double"?
Thanks for the reply!
I thought it was a double flare as opposed to any other?...Do the "standard" double flare kit(s) have the ability to do this "BUBBLE" you have mentioned?...Would it be accomplished by leaving out the final and last step for making a "double"?
In your FSM the ISO flare is illustrated FIG 10 @ 5-11. I've done ISO flares twice and both times I had access to a MasterCool higher end tool. There's very nice ISO/DIN flaring tools out there - the flaring tool needs to have the proper ISO inserts to accomplish a flare. Rather than provide you a link just use your searching skills.
I see you revived that older thread and I'd expect RQ to help you.
I had a friend doing some Saginaw fittings one time for a fuel system, I think 4 pipes and on 3 of the 4 he 'didn't forget' to put the flare nut on first but had them on 'backwards'. I was surprised he actually told me. I've seen that done more often I think than 'forgetting'.
Last edited by WVZR-1; 06-05-2018 at 07:58 AM.
#13
Safety Car


Thread Starter
Not all 'bar flaring tools' will do ISO. Today ISO flares are popular so easier to find.
In your FSM the ISO flare is illustrated FIG 10 @ 5-11. I've done ISO flares twice and both times I had access to a MasterCool higher end tool. There's very nice ISO/DIN flaring tools out there - the flaring tool needs to have the proper ISO inserts to accomplish a flare. Rather than provide you a link just use your searching skills.
I see you revived that older thread and I'd expect RQ to help you.
I had a friend doing some Saginaw fittings one time for a fuel system, I think 4 pipes and on 3 of the 4 he 'didn't forget' to put the flare nut on first but had them on 'backwards'. I was surprised he actually told me. I've seen that done more often I think than 'forgetting'.
Thanks for the reply!
Just got done looking at FSM and diagrams of the routing and bends of the lines - WHAT A NIGHTMARE!


 .
. I am wondering as to how much difficulty I will be having to "fish" the brake line(s) out from ABS unit. I imagine that I will be cutting the defective line(s) and then, detaching the lines one at a time from the ABS. Can probably use the section(s) of detached lines from the abs to make as close as possible bends for replacement tubing lines and then, "union-ize" them at the point of cut-off. Looks like an all-day-er to me (if not more)!
I was looking at ISO flare kits (bubble??) on ebay to get a better idea as to what was ahead of me and one thing I did notice was a milli-meter size mentioning (angle of the bubble??) which is all new to me......

#14
Safety Car


Thread Starter
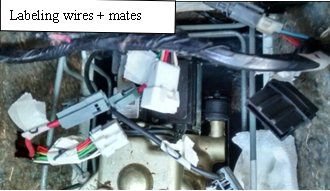
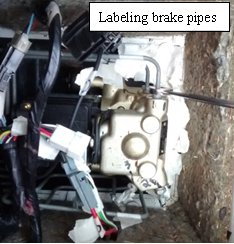
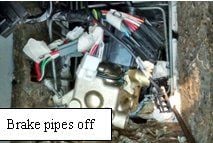
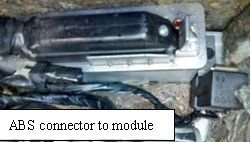

OK....
Started to remove ABS unit behind drivers seat today but, only was able to work a few hrs due to eminent rain.
Most of all the brake line fittings to ABS unit came loose w/out a fight BUT, the lower 2 on each side of the unit was a bitch.....Started labeling all the wires/connectors and their "mates" (yeah, I know, they can only connect to it's own mate) and then the brake lines themselves.
Started to lift out the ABS unit and tray it is attached to and found that I still had to "unplug" a large wire plug from the ABS computer module itself....Herein is my next issue---HOW is this attached to the computer module?....I have a spare ABS computer module, relay, and unit itself but, not sure if it is held in with a screw or two or some sort of a "pinch" wire/clip.
I see an aluminum end butt-end on the computer module housing but, not sure if the black plug displayed in pict is held in by wedging underneath. I don't see a clip...yet.
EDIT!.. was able to determine how the computer unit was mounted (with a 7mm bolt) and the other side had a clip that was difficult to see but, was do-able....Difficult in releasing relay clip from compartment but, that was accomplished also.
Last edited by Da Mail Man; 07-06-2018 at 03:42 PM. Reason: posted picts with text, spelling error
#15
Safety Car


Thread Starter
Unit out...
Made mistake on forgetting which line had hole in it so, I ran vacuum line from hard brake lines that connected to ABS unit, zip-tied them together and ran into plastic bowl...Then, pumped the brakes 2x's and saw that I had brake fluid in plastic bowl. I crawled under car and saw hole in line leaking fluid and marked it with a "bread-tie".
There is a plastic flap so-to-speak that has (2) 7mm bolts that fold a flap over onto where the brake lines exit the car that snapped off (will simply use an adhesive caulk or similar to affix). Behind that is some goop that surrounds the brake lines entering the car from the outside. I will gouge out the "goop" and cut the defective line inside the ABS compartment and attempt to fix....Game called on account of rain again!
Last edited by Da Mail Man; 07-26-2018 at 08:10 PM.
The following users liked this post:
Red 91 (07-07-2018)
#16
Safety Car


Thread Starter
ALMOST DONE....
Have to plug in connections to ABS and re-mount computer module.....Most of what I saw after I got into it was surface rust and nothing "deep".....Sanded down a few areas as "alternate sites" for cutting original lines just in case...Best to sand before cutting as this provides stability of the line while sanding....Getting the damned goop out of the area where the lines go through the bulkhead was lousy to say the least....Worse than that was trying to flare the new line entering the ABS compartment with limited room/space to do it in however, I think the flares came out ok......Will strap up the lines when all finished and will most likely cut lengths of rubber tubing (vac line) and "snap" over existing lines and tie-wrap as the lines are all bundled up and may appear to be rubbing....That is what I think caused the hole in my line. (Note- the plastic container with the tubing in one pict was done because I needed to verify which line was leaking by putting in some brake fluid in master cylinder and hitting it twice to get the line to leak and, the extra fluid had to have a place to go.
Have to plug in connections to ABS and re-mount computer module.....Most of what I saw after I got into it was surface rust and nothing "deep".....Sanded down a few areas as "alternate sites" for cutting original lines just in case...Best to sand before cutting as this provides stability of the line while sanding....Getting the damned goop out of the area where the lines go through the bulkhead was lousy to say the least....Worse than that was trying to flare the new line entering the ABS compartment with limited room/space to do it in however, I think the flares came out ok......Will strap up the lines when all finished and will most likely cut lengths of rubber tubing (vac line) and "snap" over existing lines and tie-wrap as the lines are all bundled up and may appear to be rubbing....That is what I think caused the hole in my line. (Note- the plastic container with the tubing in one pict was done because I needed to verify which line was leaking by putting in some brake fluid in master cylinder and hitting it twice to get the line to leak and, the extra fluid had to have a place to go.
Last edited by Da Mail Man; 07-26-2018 at 08:09 PM. Reason: spelling error
The following users liked this post:
Red 91 (07-08-2018)
#17
Instructor


I use this to make all my own lines for EVERYTHING
 and it's really the only way. The only easy repeatable way
https://www.mastercool.com/product/7...ring-tool-set/

 and it's really the only way. The only easy repeatable way
https://www.mastercool.com/product/7...ring-tool-set/
#18
Safety Car


Thread Starter
ALL DONE.
No runs - no drips - no errors!....I sleeved the hard lines (with vacuum hose) under the car today and any place that the lines would/could have been rubbing...Wheel is back on....Too damned hot today so I quit...Will do road test tomorrow and if all well, then pressure wash the undercarriage...I will attempt to take picts of sleeved lines and post w/in next 2 days....Now what is left is to replace glass hatch weatherstripping and rear overhead cockpit weatherstripping and then, floor board repairs........
No runs - no drips - no errors!....I sleeved the hard lines (with vacuum hose) under the car today and any place that the lines would/could have been rubbing...Wheel is back on....Too damned hot today so I quit...Will do road test tomorrow and if all well, then pressure wash the undercarriage...I will attempt to take picts of sleeved lines and post w/in next 2 days....Now what is left is to replace glass hatch weatherstripping and rear overhead cockpit weatherstripping and then, floor board repairs........
Last edited by Da Mail Man; 07-10-2018 at 07:14 PM.
#19
Safety Car


Thread Starter
All put back together and...and.....and...... MY BRAKES SUCK!...Well, to be honest, I didn't think they would improve any at all since they sucked from day one of ownership!
After driving around with my other car which has good brakes and now hitting these, makes me want to "park it"....Entire system bled out well......Pads are Brembo....I even tried slamming on the brakes (at low speed) and didn't hear ABS "grumble" (could be because of too low a speed?)....I can pump pedal when car off and discharge vacuum from booster and pedal feels harder prior to when I had brake line failure.....Master cylinder is NEW....Almost feels like I have no power assist from booster at all....Last time I checked, the Vac Booster was good as well as the Vac Valve in same but, will do again.....Anyway, more/last picts of lines.
After driving around with my other car which has good brakes and now hitting these, makes me want to "park it"....Entire system bled out well......Pads are Brembo....I even tried slamming on the brakes (at low speed) and didn't hear ABS "grumble" (could be because of too low a speed?)....I can pump pedal when car off and discharge vacuum from booster and pedal feels harder prior to when I had brake line failure.....Master cylinder is NEW....Almost feels like I have no power assist from booster at all....Last time I checked, the Vac Booster was good as well as the Vac Valve in same but, will do again.....Anyway, more/last picts of lines.
Last edited by Da Mail Man; 07-26-2018 at 08:11 PM. Reason: additional
#20
Safety Car


Thread Starter
Back again----
Had to move car from driveway to locate power steering leak on my other car. When I did this, I noticed that I have a brake light indicator on at the center console dash. could not figure out why this is and it didn't appear previously. Checked for leaks and there are none. Checked connection of low brake light switch plug on the master cylinder which was replaced before repairing my line(s). I pulled codes with an Auto X-Ray and found no codes and no pending codes.
A long time ago, I was moving the parking brake lever since it never gets used and simply wanted to "exercise" it and the light stayed on. I had to work the lever a few times to get the light to turn off. In this case yesterday, I would look at the dash and the light got a tiny bit brighter when I pulled the parking brake which makes me think the issue may be located someplace else. I will go out today and beat the $hit out of it and see if it shuts off.....Any ideas?
Last edited by Da Mail Man; 07-20-2018 at 07:55 AM.


