How to port and polish intake
 11-27-2010, 04:48 PM
#1
Advanced

Thread Starter
Member Since: Dec 2005
Location: Utica In
Posts: 65
Likes: 0
Received 0 Likes
on
0 Posts
Are there any good articles or you tube vids on how to port and polish intake on a LT5.
I have experience port matching and light cleanup but do not consider myself a "porter or polisher". I do plan on putting together a plan and then porting and polishing my intake on my 1990. Then after successful the heads.
I want to get a dyno run as a baseline then, port intake and later heads.
Anyone have any good resources? Also what is the best tooling and abrasives
Thanks in advance.
Brandon
 11-27-2010, 05:04 PM
#2
Drifting


Place your intake in a box, send it to me and viola(ok plus $450)....ported intake.
You need a die grinder, some decent sized carbide bits....etc. Alot of write ups on the ZR1.net use the search function. I offer a Stage I port for $450 and $700 for a full 36MM port
Stage one is Plenum ported to 36MM, and IH opened to 36MM at the top tapering to stock size(slightly opened) at the IH to head face.
My 92 produces 391rwhp with a Doug Rippie off the shelf tune.
I have done 8 LT-5 intakes...most see a 30rwhp gain with the 36MM....but needs to be port matched the heads. Porting takes time and its messy...and lots of aluminum splinters.
Last edited by lgaff; 11-27-2010 at 05:09 PM.
 11-28-2010, 10:33 AM
#3
Drifting
If you are dead set on DIY send me a PM and I would be happy to help you over the phone, I know some people like to make it their car by doing the work....I can respect that.
11-28-2010, 10:49 AM
#4
Le Mans Master

Member Since: Oct 2004
Location: South-central Missouri
Posts: 6,314
Received 500 Likes
on
395 Posts

Having BTDT, I would encourage anyone with some basic skills with (the proper) power tools to give it a try. The LT5 responds beautifully to a little more air, and pays great dividends to those willing to "do a little porting"! So, if you have the right tools and a coach and proper "road map" or model to follow, AND a skilled aluminum welder (familiar with the porosity issues associated with aluminum - heads especially) backing you up in case of an "oops" or two, the plenum and IHs are really not too bad at all. Porting the heads...is a bit tricky, as there are some thin spots along the runners you want to be aware of and fixing a leak in a head can get expensive...trust me.
Do a search on the ZR-1 Net Registry for some excellent tips on tools and some different ideas and methods shared by those (besides me) that have done it and do it for hire. But, just to get you thinking, here is just a sample of some picks n pointers I found that might help the intrepid person venture forth!
Tools:
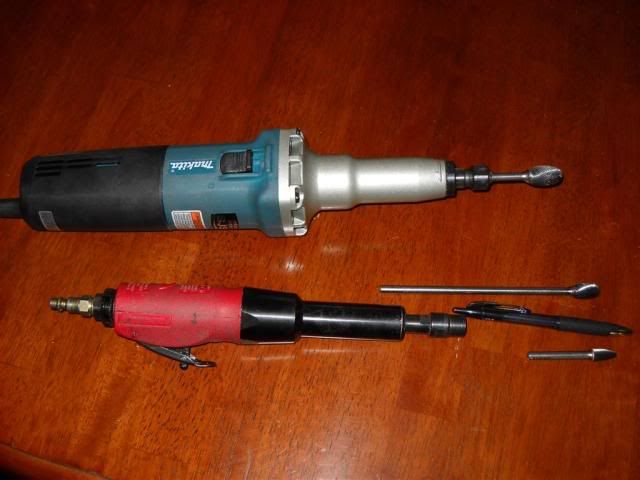
Starting with die grinders, some prefer electric, but most that do it for hire prefer pneumatic grinders. (I've used one of the best electrics out there and a variety of pneumatics (cheap to pricy) and personally prefer the pneumatics for the bulk of the work, but find the electric griders have their place - especially when porting heads.)
If you don't have an adequate air compressor to support air tools, and you're just doing this one job, then I would highly recommend you consider the (constant speed) Makita 0800 die grinder. Amazon and other places have it for sale. The cheapest place I found cost me $225, but they run as high as $400, depending on the seller. Point is, this machine has the constant speed control built in, it has special clutches in it should the burr get caught, and lordy does it have torque - even at low speeds!
The Makita is the blue/silver tool at the top. However, for dynamic and instant control of the speed, and after using both for some time, my favorite turns out to be the pneumatic red/black Snap-On grinder below it.
This is one of the burs that does the heavy lifting. It is a 5/8" diameter by 1-1/4" long carbide, single cut bur w/ a 2-1/2" shank.
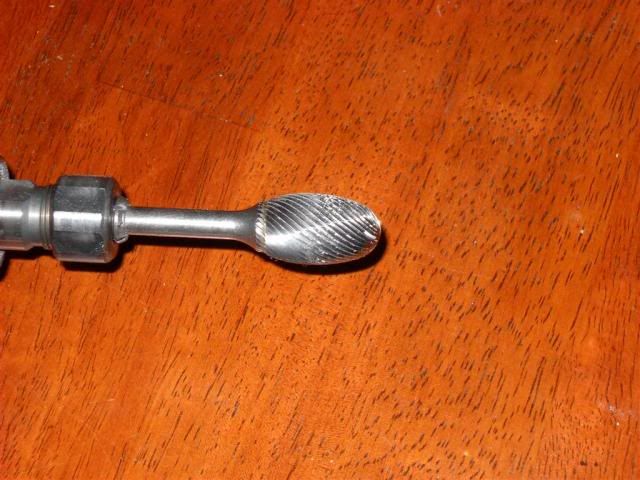
Some other burs...
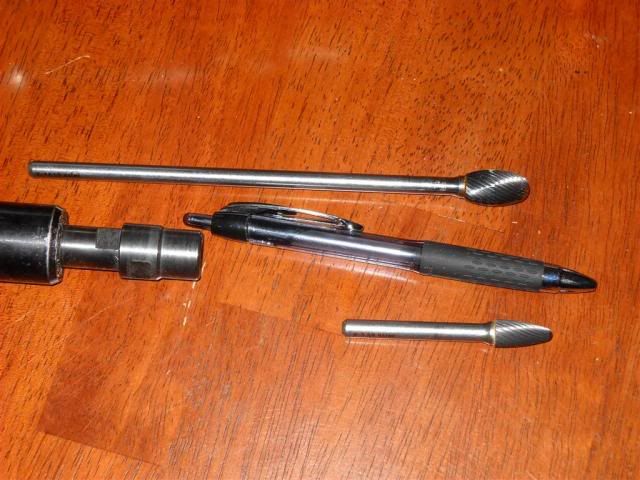
One bur I don't have that I think would be ideal in many situations is a 3/4" or maybe even a 1" carbide ball on a 6" shaft, cut to proper length.
Ball gauges!
Steel bearings - 35mm for sure, and a 36mm also, depending of course on dimensions to be achieved.
Snap gauge
80-grit 2" long by 1" diameter sanding rolls - used to squeeze out the last MM or two to get to final dimensions and smooth out nicks left by the burs
1" 60 grit flap wheels - puts the final "polish" to the runner - a little roughness = better flow (believe it or not - boundary layer and laminar flow, etc.).
I used WD-40 extensively as a lube to keep the bur from loading up and to promote fast cutting. However, I may have exacerbated issues with welding some "booboos" as the aluminum is porous and oil will contaminate the aluminum, making it more difficult to weld. There are some water-based lubes available for the purpose at the machine supply stores where you will be buying your carbide bits. Perhaps that is the direction I should have gone, but that is behind me now.
As for the actual shape of the bore itself, theories abound. However, being able to determine the desired centerline in relation to the actual centerline at any one moment, is where things can get dicey. If you decide to DIY, more can be said on that at that time. Or, you can just spend a little more than it would cost for tooling (or less, if you have to pay for fixing a mistake or two ) and have someone do it for you.
I enjoy learning by doing, and I made my share of mistakes in the process. But, in the end I have to admit I really enjoyed the entire process; the planning, the tool selection, the actual work, and most especially the results!! Maybe not for everybody, but DIY has its own rewards!
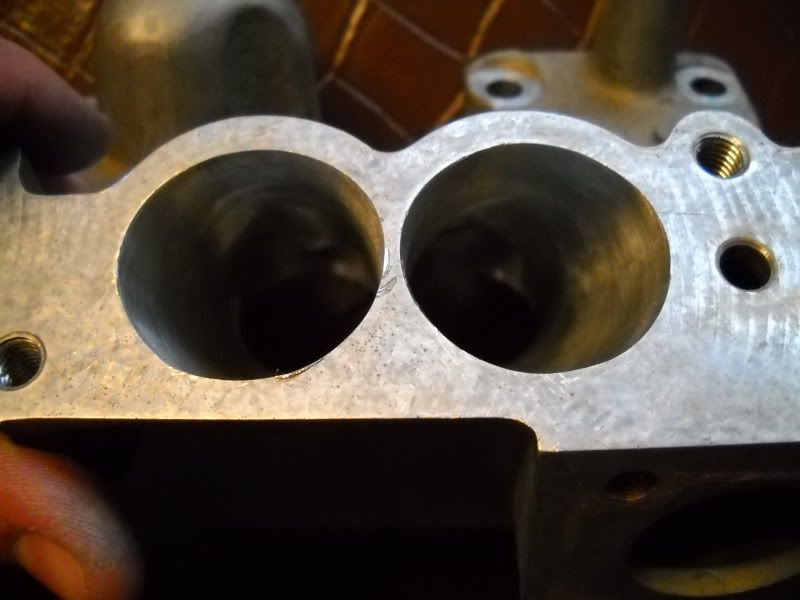
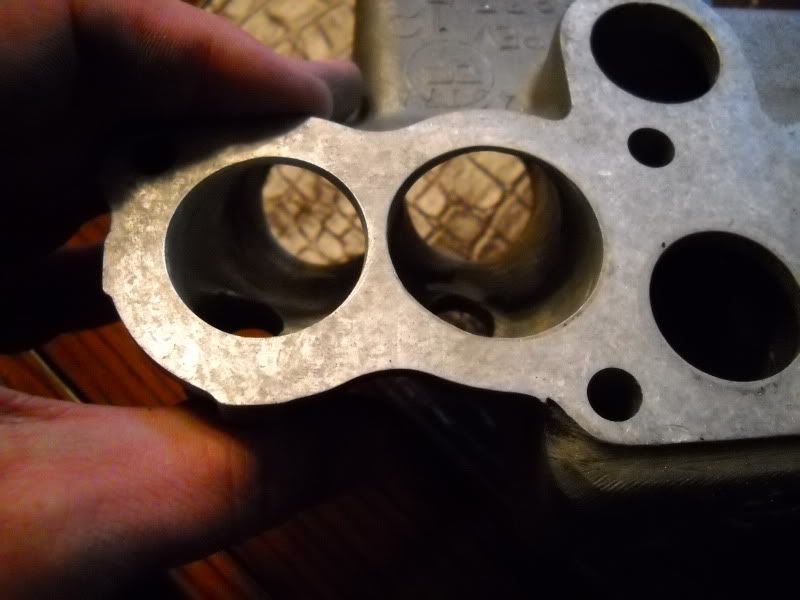
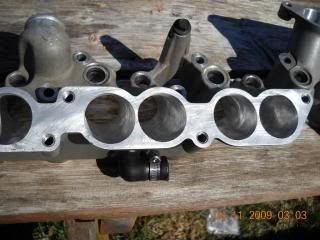
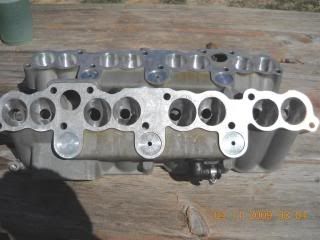
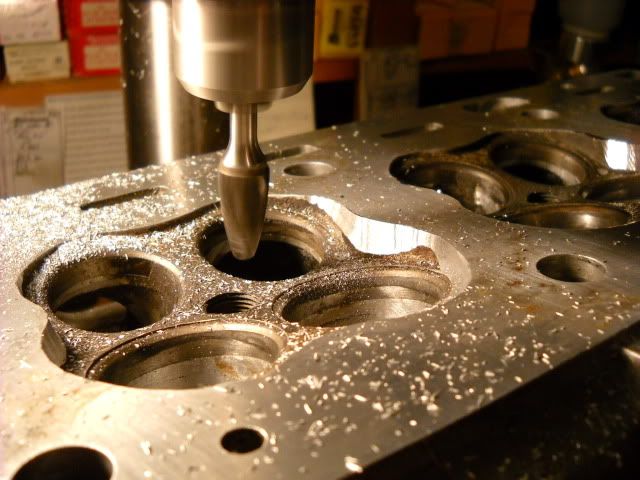
Some pix of the work in progress - prior to final polishings.
The IHs
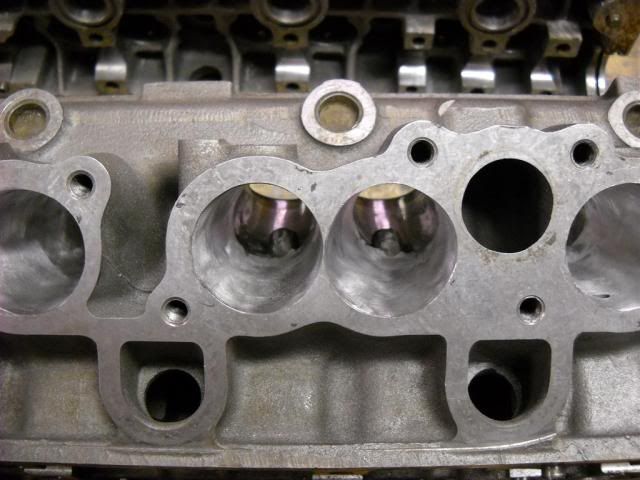
Porting the heads - in progress...
Well, hopefully I didn't scar ya away. But, then again, it is not an undertaking just anybody should attempt!
P.
P.
Do a search on the ZR-1 Net Registry for some excellent tips on tools and some different ideas and methods shared by those (besides me) that have done it and do it for hire. But, just to get you thinking, here is just a sample of some picks n pointers I found that might help the intrepid person venture forth!
Tools:
Starting with die grinders, some prefer electric, but most that do it for hire prefer pneumatic grinders. (I've used one of the best electrics out there and a variety of pneumatics (cheap to pricy) and personally prefer the pneumatics for the bulk of the work, but find the electric griders have their place - especially when porting heads.)
If you don't have an adequate air compressor to support air tools, and you're just doing this one job, then I would highly recommend you consider the (constant speed) Makita 0800 die grinder. Amazon and other places have it for sale. The cheapest place I found cost me $225, but they run as high as $400, depending on the seller. Point is, this machine has the constant speed control built in, it has special clutches in it should the burr get caught, and lordy does it have torque - even at low speeds!
The Makita is the blue/silver tool at the top. However, for dynamic and instant control of the speed, and after using both for some time, my favorite turns out to be the pneumatic red/black Snap-On grinder below it.
This is one of the burs that does the heavy lifting. It is a 5/8" diameter by 1-1/4" long carbide, single cut bur w/ a 2-1/2" shank.
Some other burs...
One bur I don't have that I think would be ideal in many situations is a 3/4" or maybe even a 1" carbide ball on a 6" shaft, cut to proper length.
Ball gauges!
Steel bearings - 35mm for sure, and a 36mm also, depending of course on dimensions to be achieved.
Snap gauge
80-grit 2" long by 1" diameter sanding rolls - used to squeeze out the last MM or two to get to final dimensions and smooth out nicks left by the burs
1" 60 grit flap wheels - puts the final "polish" to the runner - a little roughness = better flow (believe it or not - boundary layer and laminar flow, etc.).
I used WD-40 extensively as a lube to keep the bur from loading up and to promote fast cutting. However, I may have exacerbated issues with welding some "booboos" as the aluminum is porous and oil will contaminate the aluminum, making it more difficult to weld. There are some water-based lubes available for the purpose at the machine supply stores where you will be buying your carbide bits. Perhaps that is the direction I should have gone, but that is behind me now.
As for the actual shape of the bore itself, theories abound. However, being able to determine the desired centerline in relation to the actual centerline at any one moment, is where things can get dicey. If you decide to DIY, more can be said on that at that time. Or, you can just spend a little more than it would cost for tooling (or less, if you have to pay for fixing a mistake or two
) and have someone do it for you.I enjoy learning by doing, and I made my share of mistakes in the process. But, in the end I have to admit I really enjoyed the entire process; the planning, the tool selection, the actual work, and most especially the results!! Maybe not for everybody, but DIY has its own rewards!
Some pix of the work in progress - prior to final polishings.
The IHs
Porting the heads - in progress...
Well, hopefully I didn't scar ya away. But, then again, it is not an undertaking just anybody should attempt!
P.
P.
11-28-2010, 01:38 PM
#5
Team Owner


Member Since: Oct 2004
Location: altered state
Posts: 81,242
Received 3,043 Likes
on
2,602 Posts
St. Jude Donor '05
http://www.ruffstuff.com/pages/high.html
Got a few of those 6 inchers I cut to size for both LT5 and TPI parts.
4" or so still gives you reach and good control
The oval helix is a sick bit, very agressive removes material quick but does not grab or skip around, clean up work is minimal . The cheaper off brand bits out there will do that. High torque low speed (adjustable is preferrable).
MSC industrial supply sells some decent ones also
No home depot/harbor frieght dremels!
Good lighting and eye protection for sure
Their Opti Cut lubricant works great, Dye Kem and a scribe are a great thing to have.
To the OP....if youre just learning stay away from the heads theres so much more to it than 'making them big" or "hogging them out", thats for hackers who dont know any better. Not saying thats what youll personally want to do but you hear it so much on forums Iwant to gouge my eyes out when I see that. lol
Its my opinion that most overport their pieces, heck Ive done it too a time...or 3.
VERY easy to turn them into doorstops if you are green to it; or worse yet hurting flow and not realizing it.
Just my .02. Theres a guy by the name of Pete who Im not sure is on here anymore...he has wrung out about all you can out of a stock displacement LT5. Think hes on zr1net registry. Knows his chit with the LT5
Spend your money on the best valve job money can buy, rather see that and some porting in the right places than grinding too much and getting a crap valve job imo youll get better results with less work. Dr J's performance does super nice work in that area.
If you get the right stuff up front youll need to buy very little of it. Box of tootsie rolls, carbide or two thats it.
Dye Kem, digital mic and a scribe will help you quite a bit only takes a minute to do.
now if only Santa would send me a sonic tester and a good tig welder...
Last edited by cv67; 11-28-2010 at 02:33 PM.
11-28-2010, 02:01 PM
#6
Team Owner
Member Since: Oct 2004
Location: altered state
Posts: 81,242
Received 3,043 Likes
on
2,602 Posts
St. Jude Donor '05
Paul looks like you got into the chamber wall some, how much are you going to mill them down? Special plans for the motor? 
11-28-2010, 02:26 PM
#7
Le Mans Master
Member Since: Oct 2004
Location: South-central Missouri
Posts: 6,314
Received 500 Likes
on
395 Posts
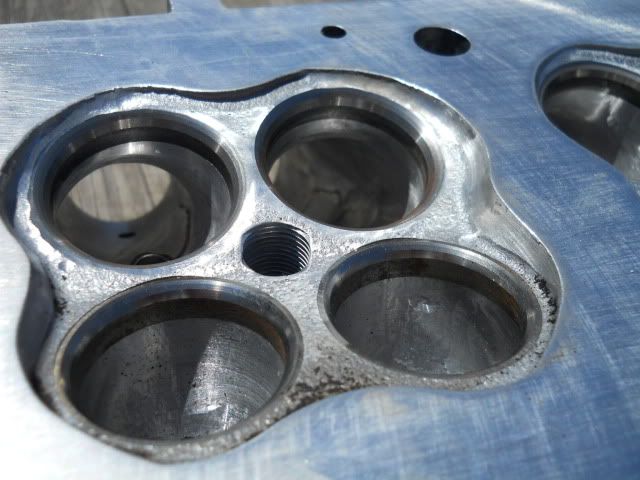
Note: Distortion by the wide angle lens and camera angle makes the near valves - the exhaust ports actually - look bigger than the far side intake ports. In any case the radius can clearly be seen.
Offsetting the compression reduction due to relieving, the heads were milled .020", actually netting another 1/2 point (11.5) compression in total.
The engine is now assembled, and is making above average power for similar efforts. You might say the upgrade mods have many (FBI) fathers. I may someday fuss with bigger cams. But, for now, I like 'er just fine!
P.
11-28-2010, 02:34 PM
#8
Instructor
Member Since: Mar 2008
Location: Cartersville GA
Posts: 103
Likes: 0
Received 0 Likes
on
0 Posts

[QUOTE=lgaff;1576049971]Place your intake in a box, send it to me and viola(ok plus $450)....ported intake.
You need a die grinder, some decent sized carbide bits....etc. Alot of write ups on the ZR1.net use the search function. I offer a Stage I port for $450 and $700 for a full 36MM port
Stage one is Plenum ported to 36MM, and IH opened to 36MM at the top tapering to stock size(slightly opened) at the IH to head face.
After I get my interior project done, I plan on sending my plenum and ih to Lee to have him do the stage 1. I have heard that Lee does a good job and for $450 it's a good deal!
11-28-2010, 03:27 PM
#9


After I get my interior project done, I plan on sending my plenum and ih to Lee to have him do the stage 1. I have heard that Lee does a good job and for $450 it's a good deal![/QUOTE]
Smoking deal, I like to do stuff myself sometimes as well but there is a learning curve. It's not exactly a fun job and by the time you buy all the equipment, its just easier to have an expert do it.

[/QUOTE]Smoking deal, I like to do stuff myself sometimes as well but there is a learning curve. It's not exactly a fun job and by the time you buy all the equipment, its just easier to have an expert do it.
11-28-2010, 07:53 PM
#10
Instructor
Member Since: Mar 2008
Location: Cartersville GA
Posts: 103
Likes: 0
Received 0 Likes
on
0 Posts
[/QUOTE]
Yes, I like to do a lot of my own work but I can see myself drilling holes through the plenum.
 I hear they don't work so good after that.
 11-28-2010, 09:12 PM
#11
Team Owner
Member Since: Oct 2004
Location: altered state
Posts: 81,242
Received 3,043 Likes
on
2,602 Posts
St. Jude Donor '05
450 isnt bad, last one I did was 850 for plenum IH and giving the airhorn some love.
Would volunteer but (not going to step on anyones toes) buried in porting work through Jan sometime looks like. Keep us posted on how things come along.
Would volunteer but (not going to step on anyones toes) buried in porting work through Jan sometime looks like. Keep us posted on how things come along.