
Alignment issues how should I fix this..
 02-23-2014, 11:39 AM
#1
Race Director

Thread Starter

I sent Josh at A&A the same thing but the more the better...It's a 2001 D1SC Procharger on a A&A second gen bracket..Basically I may just need a longer bolt maybe I'm overthinking it.
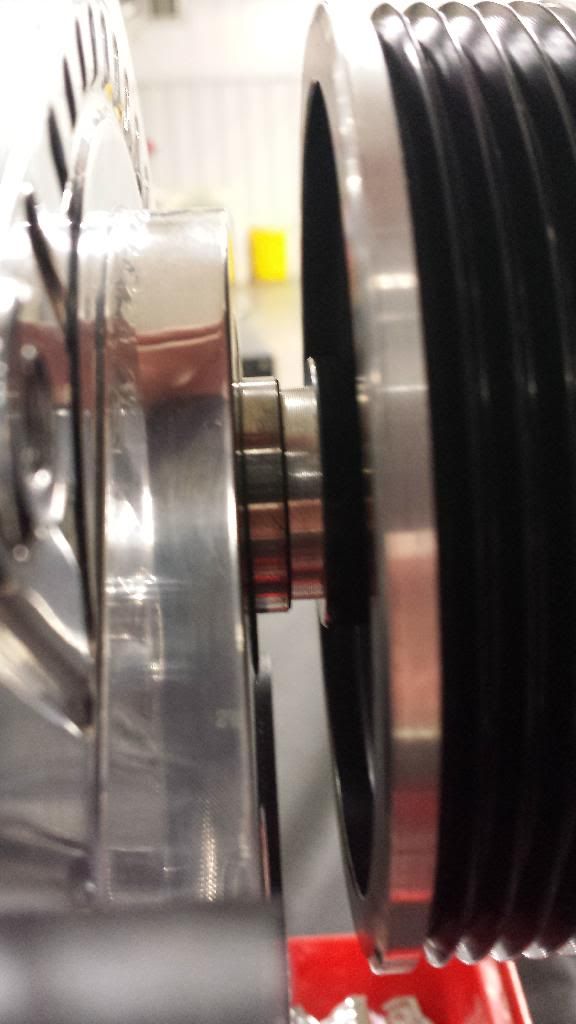
I hope I explain this correctly with the pics. I was shredding belts and lasered it and seen I was off. I thought it was the crank pulley while I was down there figured I would do a cam swap. Got the cam in and putting everything back together. I measured the crank snout to the balancer with a micrometer and I am within spec. It read 0.135..spec is 0.094-0.176" so I know I am gtg..
I need to push the SC out towards the radiator but if I add the spacer then try to thread the bolt through that has a washer on the end I can't get enough bite on the sc headunit threads(I stripped one gonna helicoil it) So you know on the bracket you have the bolt and washer. Well I used that washer to push the head unit forward and it lines up perfect and gets enough threads into the head unit. The only problem is now I don't have a washer on the bolt that goes through the bracket. DO I just need to get a longer bolt that way I can use washers on both ends? here is what I'm talking about.
So in this pic you see the back spacer closer to that sensor? See how I have the washer in between the head unit and spacer but not one on the bolt head side. If I use this method on all of them it aligns it correctly to the crank when I laser it..
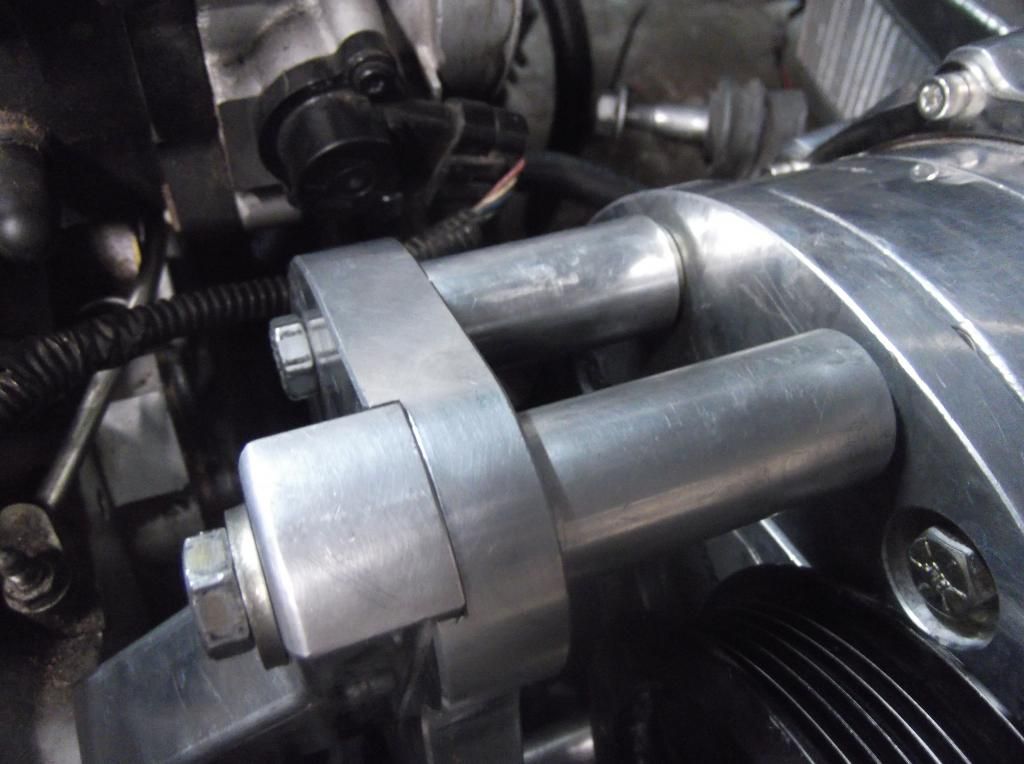
in this pic you can see how i have the head bolt washesr where it's supposed to be but I have the gap in between I need to add a washer but the bolt isn't long enough..
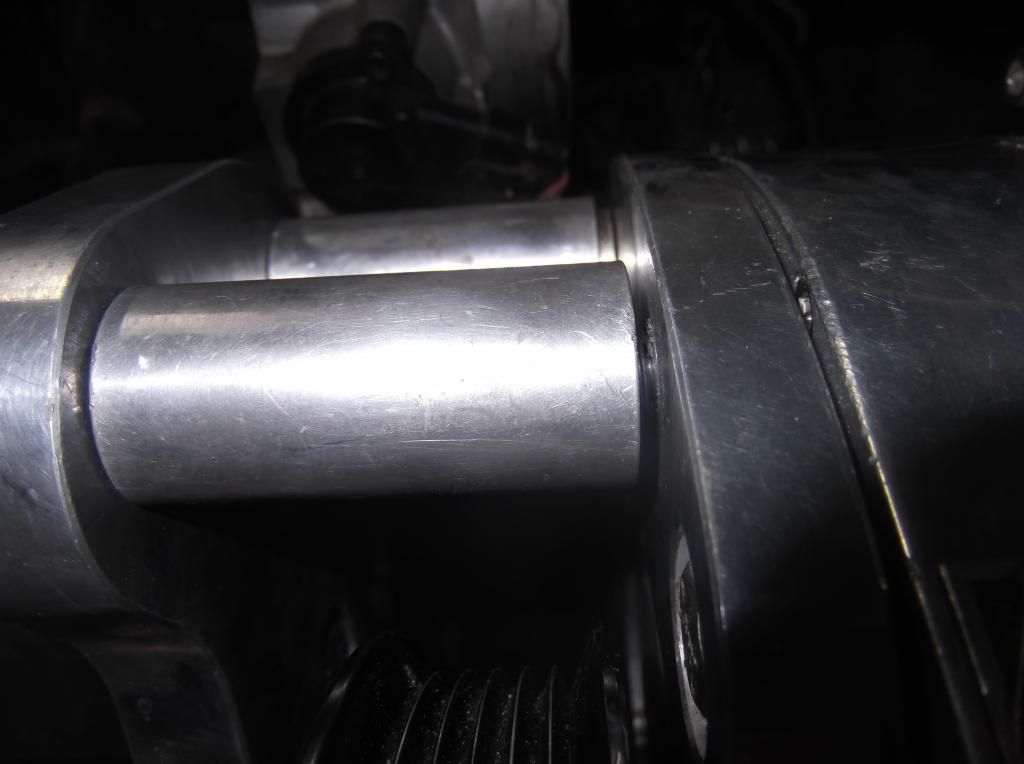
This is the bottom spacer and I have the spacer in it to space it out correctly..
it has a washer on the bolt head side but it's very very thin.. You can see it here

This is with the spacer between the sc and spacer it's dead on
So how should I go about this? Should I get a longer bolt to use the spacers that it origanlly is supposed to use like the top second pic? Should I just use really thin washers on all the bolts heads like the bottom pic or should I not use any washers at all like the top pic the one closer to the tb? Thanks
I hope I explain this correctly with the pics. I was shredding belts and lasered it and seen I was off. I thought it was the crank pulley while I was down there figured I would do a cam swap. Got the cam in and putting everything back together. I measured the crank snout to the balancer with a micrometer and I am within spec. It read 0.135..spec is 0.094-0.176" so I know I am gtg..
I need to push the SC out towards the radiator but if I add the spacer then try to thread the bolt through that has a washer on the end I can't get enough bite on the sc headunit threads(I stripped one gonna helicoil it) So you know on the bracket you have the bolt and washer. Well I used that washer to push the head unit forward and it lines up perfect and gets enough threads into the head unit. The only problem is now I don't have a washer on the bolt that goes through the bracket. DO I just need to get a longer bolt that way I can use washers on both ends? here is what I'm talking about.
So in this pic you see the back spacer closer to that sensor? See how I have the washer in between the head unit and spacer but not one on the bolt head side. If I use this method on all of them it aligns it correctly to the crank when I laser it..

in this pic you can see how i have the head bolt washesr where it's supposed to be but I have the gap in between I need to add a washer but the bolt isn't long enough..

This is the bottom spacer and I have the spacer in it to space it out correctly..

it has a washer on the bolt head side but it's very very thin.. You can see it here

This is with the spacer between the sc and spacer it's dead on

So how should I go about this? Should I get a longer bolt to use the spacers that it origanlly is supposed to use like the top second pic? Should I just use really thin washers on all the bolts heads like the bottom pic or should I not use any washers at all like the top pic the one closer to the tb? Thanks
Last edited by Chicago1; 02-24-2014 at 08:37 AM.
 02-23-2014, 12:08 PM
#2

I think this is a common problem with Prochargers and A&A brackets. Usually its when people try to run the F1 though. I think the solution is to machine 1 ribs with off the pulley so it sit in towards the supercharger further.
PM joshtownsend on here I think he went through this too
PM joshtownsend on here I think he went through this too
02-23-2014, 12:48 PM
#3
Race Director

Member Since: Dec 2010
Location: Atlanta, GA
Posts: 10,426
Received 1,260 Likes
on
1,055 Posts
2020 Corvette of the Year Finalist (performance mods)
C5 of Year Winner (performance mods) 2019

do you have a spacer behind your blower pulley?... if you do you might be able to either shave that down enough to line it up or remove it completely
02-23-2014, 02:19 PM
#4
Race Director
Thread Starter
I think this is a common problem with Prochargers and A&A brackets. Usually its when people try to run the F1 though. I think the solution is to machine 1 ribs with off the pulley so it sit in towards the supercharger further.
PM joshtownsend on here I think he went through this too
PM joshtownsend on here I think he went through this too
no spacer it's just keyed in there not sure if I could do anything to that area Ill take a pic tonight
02-23-2014, 04:10 PM
#5
Race Director
Member Since: Dec 2010
Location: Atlanta, GA
Posts: 10,426
Received 1,260 Likes
on
1,055 Posts
2020 Corvette of the Year Finalist (performance mods)
C5 of Year Winner (performance mods) 2019
I wonder if somehow you have the wrong pulley?... the pulley I have has no shoulders and looks a lot different than yours and I have a d1sc also... here is a pic of the spacer I should have had from the beginning and you can see the difference in our pulleys... I was informed by another member that my kit is set up to run an 8 rib pulley if I upgrade down the road so I should have had this spacer sent to me with my kit in the first place since I'm running a 6 rib
02-23-2014, 04:44 PM
#6
Race Director
Thread Starter
Ill take a pic when I get home I looked through my insall thread and thought I had some but don't. I can't recall what it looks like. I know it has a 4.5 pulley on it. I was going to go with a 3.6 or 3.8 I was trading with someone. Worst comes to worst I just add spacers but just wondering why and if anyone needed longer bolts. I just want the damn thing running already
02-23-2014, 05:03 PM
#7
Race Director
Member Since: Dec 2010
Location: Atlanta, GA
Posts: 10,426
Received 1,260 Likes
on
1,055 Posts
2020 Corvette of the Year Finalist (performance mods)
C5 of Year Winner (performance mods) 2019
trust me I know how you feel, I was in the same boat... my car was down for 4 months due to a stupid yet simple belt issue and having troubles with the company I bought the parts from... if I had the right stuff from the beginning it would have been done way sooner than that... I am sure your issue is something simple, if you recall I went so far as to shaving my bracket spacers which created other problems when all I needed was one simple spacer... how much boost do you plan on making?... I have a 4.38 pulley on mine with a restrictor plate in my inlet filter and was making about 8psi at 5k rpm when my clutch started slipping... I would assume 10-11psi at redline... a 3.6 or 3.8 might make more boost than you want to make right now
02-23-2014, 05:16 PM
#8
Race Director
Thread Starter
I figured a 3.6 or 3.8 will net me about 10# up at my altitude with the headers and the cam. I figured they can lower the timing if need be but I am still up in the air with that. Maybe I should just start with 4.0 and go from there? Technically if I add spacers I would be gtg but just knowing if I take the blower off the spacers fall out everywhere since A&A said to place them between the blower and pulley I figured that wouldn't matter though. I remember you shaving those it was crazy after that. I almost was going to do the same but seen after putting the stock water pump back on things went the opposite way for me.
02-23-2014, 05:26 PM
#9
Race Director
Member Since: Dec 2010
Location: Atlanta, GA
Posts: 10,426
Received 1,260 Likes
on
1,055 Posts
2020 Corvette of the Year Finalist (performance mods)
C5 of Year Winner (performance mods) 2019
I didn't even think about your altitude so you might be right about that, I guess the only way to know for sure is to find out haha... well hmm, do you happen to have a micrometer?... measure the length of your spacers and then measure the thickness of your washer and get in touch with Andy to see if your spacers are the correct length that he normally sends out and I'm sure he could machine you some new ones that are longer to compensate for the washer and supply you with slightly longer bolts... a local machine shop might even be able to make them for you and save some time, just tossing out ideas
 02-23-2014, 07:51 PM
#11
Team Owner


If it all lines up good and well now then I would suggest purchasing the correct bolt length you need and be done with it!
Spaced out good, aligned good, bolts length needed is all that is left to do!
Thanks,Matt
Spaced out good, aligned good, bolts length needed is all that is left to do!
Thanks,Matt
 02-24-2014, 08:26 AM
#14
Race Director
Thread Starter
I'm a idiot....
Milan, thanks for getting me in touch with joshtownsend and other suggesting the pulley. joshtownsend sent me his number and said "Did you know the pulley can be turned around?" I said no because one side is grooved and the other side has that silver spacer/hat that goes into the pulley where the bolt goes through to tighten down the pulley on the SC.
So to me it can only slide in one way. Well I took the pulley out and noticed the snout was shorter on one side vs the other by you guessed it .125". Stuck a screwdriver in the hole and popped out that silver part. Flipped it around and the skies opened up and birds sang from the heaven above. ****ing A man can't believe I didn't know that would of saved me so much headaches and time. Oh well lesson learned. Issue is fixed I must of lasered it 9 or 10 times just to visually see it was all gtg..I'm embarrassed but glad it's fixed.

 02-24-2014, 09:57 AM
#17
Race Director
Member Since: Dec 2010
Location: Atlanta, GA
Posts: 10,426
Received 1,260 Likes
on
1,055 Posts
2020 Corvette of the Year Finalist (performance mods)
C5 of Year Winner (performance mods) 2019


