
Headlight gear fix (highly pictorialized)


 01-06-2010, 08:25 PM
#62
Team Owner


Thread Starter


Disable the Twilight Sentinel on Canadian Model C5s
It turned out to be VERY easy to do. The only minor difficulties I encountered were:
a) due to the limited distance I could pull the sensor and its lead from the wiring harness out to facilitate working on it (about 4"), and
b) the fact that one has to work in fairly close quarters down low at the base of the windshield. To make this easier, I moved the seat(s) as far forward as possible when actually doing the work.
Following information obtained on the forum, I did it as follows:
1. I used a CREDIT CARD to 'work'/loosen and 'pop out' the dash top defroster grill.
2. The Twilight Sentinel (TS) sensor itself comes in a base/housing that plugs into a female socket on the left hand underside of the defroster grill. It simply screws into its defroster grill socket, requiring only a 1/4 clockwise turn to 'lock' it into place like (eg.) a tail light bulb into its socket.
3. Before I did ANYTHING (even unscrewed the sensor from the grill), I tied some *black* fishing line (about 4 feet worth) around the ACTUAL WIRE connecting the sensor to the harness, ***JUST IN CASE the whole thing should accidentally slip down into the dash during the process***, so I could pull it up again... (THAT WOULD BE A PAIN - the head lights would then ALWAYS be on when the car was running, and trying to fish it out again looked like it would NOT be easy...).
4. I THEN unscrewed the sensor from the defroster grill.
5. THEN, the sensor itself simply plugs into a male connector on the end of the wiring harness lead, so I unplugged the sensor from its harness connector. (I used a small jeweller's screwdriver to release a clip to allow the parts to be separated).
6. I then reinstalled the (now disconnected) sensor back into the defroster grill (for 'looks' only, since it's now non-functional).
7. Next, I bent the leads on a 4.7K OHM � Watt resistor that I picked up today (6-pak for $1.49; needed only one), and plugged the resistor leads into the contacts on the end of the male wiring harness connector. (Real nice fit - tight but not too tight).
8. I then taped the resistor/connector up to prevent shorts and provide further insurance against them coming apart, using black electrical tape.
9. I then ***taped the connector to the sensor housing*** , the objective being to help ensure that it wouldn't flop around/rattle/make noise if simply left loose.
10. I then looped and tied the fishing line through a couple of bars in the defroster grill, leaving only about 4" of slack to its tie point back on the wiring harness, and cut off the surplus line with scissors - JUST IN CASE THE ELECTRICAL TAPE SHOULD EVER SOFTEN/COME LOOSE FROM HEAT IN THE CAR and the resistor/lead might decide to separate from the sensor and drop down into the dash as mentioned above and cause noise/be difficult to retrieve.
11. I then reinstalled the defroster grill and 'voila'.
Now *I RULE*.
Based upon admittedly limited testing (since I just finished the job and only tested things out an hour or so ago in my garage), I now (seem to) have TOTAL CONTROL over when I want the headlights up/on or down/off, regardless of ambient light levels. (***Again, based on my limited testing to date*** - although I simply followed information posted many times on the forum (specifically about the 4.7K � Watt resistor) and can't see WHY this 'resistor-subbing' should not work or screw anything ELSE up. As far as the 'computer' knows, it's simply always daylight now...).
Maybe the above will help/encourage others who wish to do the same thing. It only took me 20 minutes or so to do the whole job and I didn't even try to rush.
01-13-2010, 01:14 PM
#64
Tech Contributor


Member Since: Dec 1999
Location: Anthony TX
Posts: 32,736
Received 2,180 Likes
on
1,583 Posts
CI 6,7,8,9,11 Vet
St. Jude Donor '08

Great wright up.
BC
BC
01-13-2010, 02:07 PM
#65
Safety Car


I'm pretty sure it is possible to rotate the damaged plastic gear 180* and reinstall it so an undamaged portion of the teeth is facing the worm gear.
That way you can fix it for free, at least until the other side of the gear wears out as well.

That way you can fix it for free, at least until the other side of the gear wears out as well.
01-27-2010, 09:22 PM
#66
Melting Slicks

 01-27-2010, 09:51 PM
#67
Safety Car
http://www.bfranker.badz28.com/headl....htm#FreeGuide
It is my understanding that the Firebird and C5 use the same (or almost the same) headlight motors.
The "free" fix is very commonly used by Firebird owners. I'm fairly sure, though not 100% that it should work on the C5.
It is my understanding that the Firebird and C5 use the same (or almost the same) headlight motors.
The "free" fix is very commonly used by Firebird owners. I'm fairly sure, though not 100% that it should work on the C5.
01-27-2010, 09:59 PM
#68
Safety Car
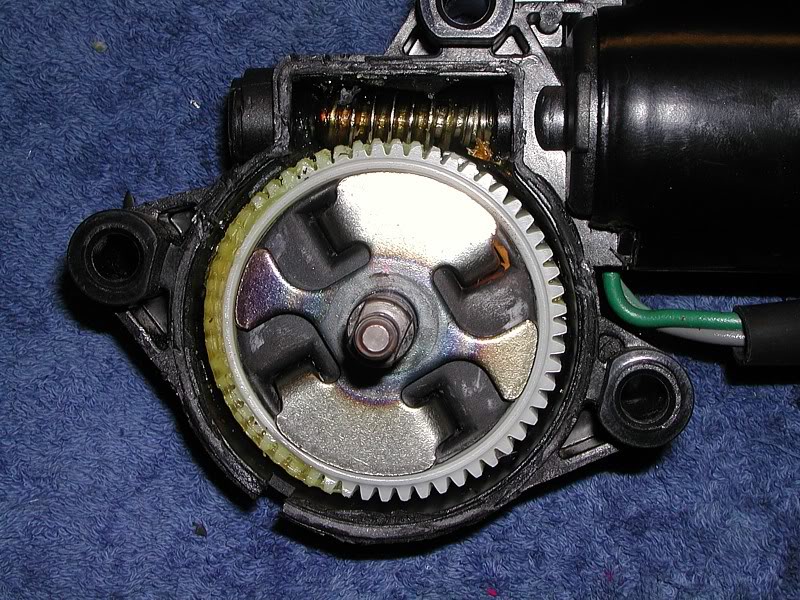
Here is the picture from the beginning of this thread of a C5 headlight motor with output shaft shown.
The output shaft is identical to the Firebird one. I'm now 99% sure the "free" firebird fix will work on the C5.
The output shaft is identical to the Firebird one. I'm now 99% sure the "free" firebird fix will work on the C5.
01-28-2010, 12:22 AM
#69
Intermediate

Member Since: Nov 2009
Location: Danville CA
Posts: 39
Likes: 0
Received 0 Likes
on
0 Posts
Cheers.
01-28-2010, 12:33 AM
#70
Safety Car
Did you read the link I posted?
This fix is performed without removing the headlight motor from the car. All you do is remove the control arm from the motor, rotate the motor by hand using the manual **** until the output shaft is 180 degrees around then put the control arm back on.
The gear is good as OEM new on the unused side, so how can it not be "Vette quality"?
This fix is so quick and easy you barely get your hands dirty. How can you beat that? You don't think that because it does not cost alot of money it can't possibly be good, do you?
The following users liked this post:
tracker821 (02-08-2020)
01-28-2010, 03:26 AM
#71
Le Mans Master

Member Since: May 2006
Location: DuBois PA
Posts: 5,987
Likes: 0
Received 18 Likes
on
16 Posts
St. Jude Donor '11-'12-'13-'14-'15

Did you read the link I posted?
This fix is performed without removing the headlight motor from the car. All you do is remove the control arm from the motor, rotate the motor by hand using the manual **** until the output shaft is 180 degrees around then put the control arm back on.
The gear is good as OEM new on the unused side, so how can it not be "Vette quality"?
This fix is so quick and easy you barely get your hands dirty. How can you beat that? You don't think that because it does not cost alot of money it can't possibly be good, do you?
This fix is performed without removing the headlight motor from the car. All you do is remove the control arm from the motor, rotate the motor by hand using the manual **** until the output shaft is 180 degrees around then put the control arm back on.
The gear is good as OEM new on the unused side, so how can it not be "Vette quality"?
This fix is so quick and easy you barely get your hands dirty. How can you beat that? You don't think that because it does not cost alot of money it can't possibly be good, do you?
01-28-2010, 11:33 AM
#72
Intermediate
Member Since: Nov 2009
Location: Danville CA
Posts: 39
Likes: 0
Received 0 Likes
on
0 Posts
Did you read the link I posted?
This fix is performed without removing the headlight motor from the car. All you do is remove the control arm from the motor, rotate the motor by hand using the manual **** until the output shaft is 180 degrees around then put the control arm back on.
The gear is good as OEM new on the unused side, so how can it not be "Vette quality"?
This fix is so quick and easy you barely get your hands dirty. How can you beat that? You don't think that because it does not cost alot of money it can't possibly be good, do you?
This fix is performed without removing the headlight motor from the car. All you do is remove the control arm from the motor, rotate the motor by hand using the manual **** until the output shaft is 180 degrees around then put the control arm back on.
The gear is good as OEM new on the unused side, so how can it not be "Vette quality"?
This fix is so quick and easy you barely get your hands dirty. How can you beat that? You don't think that because it does not cost alot of money it can't possibly be good, do you?
BTW, this fix can not be accomplished with the glued housing units (for later year vehicles) and can only be applied to the passenger side headlight (as per your instructions) unless you remove the entire unit for the driver side.
01-28-2010, 11:48 AM
#73
Safety Car
You are not resolving the issue. Only delaying a future failure. Your choice.
BTW, this fix can not be accomplished with the glued housing units (for later year vehicles) and can only be applied to the passenger side headlight (as per your instructions) unless you remove the entire unit for the driver side.
BTW, this fix can not be accomplished with the glued housing units (for later year vehicles) and can only be applied to the passenger side headlight (as per your instructions) unless you remove the entire unit for the driver side.
Why can't it be accomplished in the later glued housing units? The fix does not require opening the housing. Help me understand.
01-28-2010, 11:57 AM
#74
Intermediate
Member Since: Nov 2009
Location: Danville CA
Posts: 39
Likes: 0
Received 0 Likes
on
0 Posts
I understand it is only delaying a future failure, but when you bought the car you paid for both side of the nylon gear, so why not use both sides before replacing it with a brass gear?
Why can't it be accomplished in the later glued housing units? The fix does not require opening the housing. Help me understand.
Why can't it be accomplished in the later glued housing units? The fix does not require opening the housing. Help me understand.
You're right about the glued housing. As long as there is no need to open it, you are good to go.
My comment is based on:
1) I just don't like waiting for a failure if I can avoid it
2) I don't like doing a job twice (even if the job is a subset of required effort)
If your focus is on saving money, then your approach has merit.
Sometimes there are different paths to the same destination.
Cheers.
01-28-2010, 03:58 PM
#75
Safety Car
Ooops!
You're right about the glued housing. As long as there is no need to open it, you are good to go.
My comment is based on:
1) I just don't like waiting for a failure if I can avoid it
2) I don't like doing a job twice (even if the job is a subset of required effort)
If your focus is on saving money, then your approach has merit.
Sometimes there are different paths to the same destination.
Cheers.
If one half of the gear lasted 5 years, there is no reason using the free fix it should not last 5 more years with just minimal effort.
01-28-2010, 11:53 PM
#77
Burning Brakes

Did the free fix a couple years ago on my DD. Still working great. I wish I would have known about just turning the shaft 180, I took it apart moved the gear and glued it back together. It was probably a good idea to get the broken pieces out anyway.
 01-30-2010, 01:05 AM
#78
Tech Contributor
Member Since: Dec 1999
Location: Anthony TX
Posts: 32,736
Received 2,180 Likes
on
1,583 Posts
CI 6,7,8,9,11 Vet
St. Jude Donor '08
Did you read the link I posted?
This fix is performed without removing the headlight motor from the car. All you do is remove the control arm from the motor, rotate the motor by hand using the manual **** until the output shaft is 180 degrees around then put the control arm back on.
The gear is good as OEM new on the unused side, so how can it not be "Vette quality"?
This fix is so quick and easy you barely get your hands dirty. How can you beat that? You don't think that because it does not cost alot of money it can't possibly be good, do you?
This fix is performed without removing the headlight motor from the car. All you do is remove the control arm from the motor, rotate the motor by hand using the manual **** until the output shaft is 180 degrees around then put the control arm back on.
The gear is good as OEM new on the unused side, so how can it not be "Vette quality"?
This fix is so quick and easy you barely get your hands dirty. How can you beat that? You don't think that because it does not cost alot of money it can't possibly be good, do you?
BRAVO! Well said. Not everyone has the skills to preform disassembly repairs or sometimes the funds to have their Corvette repaired. If a quick free fix works, whats the issue. I did this to my C4 and will soon just do it to my ZO6 just so the gear wont wear out.
To tell you the truth, this is an old C4 fix also. Once you dissect one of those old C4 headlight motors, you will be amazed how very similar they are to the C5 motors. The C4 motor have breaker point contacts in them that are actuated by the torque of the motor armature when it drives in either direction.
The C5 motors are void of the breaker points and the headlight module senses motor current to control motor turn off that the up and down limits.
bigleman
I recommend that you remove the headlight motor that is having the JAM issue and examine the worm gear / drive gear tooth contact. If, the motor is LOOSE where it connects to the drive gear case, the clearance between the worm and drive gear will be excessive and the teeth will misalign and jam. Adjust the metal tabs that secure the motor to the drive case so that the motor is more secure to the drive gear case.
If the motor is tight, examine the bearing area where the end of the worm gear fits into the drive gear case. It could be worn allowing the worm gear to push away from the drive gear.
Bill
