
In process of installing TPE remote clutch bleeder w/o drive train removal.
 12-31-2010, 07:07 PM
#41
Burning Brakes

Thread Starter
I kept the plastic zip ties down at the clutch line disconnect and forward up to the engine bay.
I also noticed a stud down on the frame with a nut on it that points up just adjacent to some round/rectangular square thing mounted on the frame (looking down in the engine bay at the new bleed nipple).
I put a rubber vacuum cap on the top of the stud so that it couldn't rub on the clutch bleeder line & sheath.
Now comes blowing out the clutch with compressed air, then re-assemble.
I think this was a good project to do all three things since you've got it all apart.
[1] spark plugs
[2] TPE remote clutch bleeder kit
[3] upgrade the tunnel plate.
The plugs were not the easiest thing to do, but your tip on using a old spark plug boot was priceless. It would be a bear without using this. Removing the old spark plug heat shields really need spark plug pliers - I beat the crap out of the $9 set. They are pretty twisted up from me wrestling and twisting to get the old spark plug heat shields off.
Thanks again bro - owning a Vette for all it is is priceless, icing on the cake is the good bunch of people on this board.
Andy
Last edited by andrewdonald1; 12-31-2010 at 07:13 PM.
 12-31-2010, 07:33 PM
#42
Le Mans Master


Member Since: May 2007
Location: Belleville Mich.
Posts: 5,393
Likes: 0
Received 15 Likes
on
14 Posts

Well how did you like your vacation? LOL
The first year that I had my Z, I was off for around a week or so for Christmas break.
I was all ready lined up with my parts and install ed LG long tubes, 3" x pipe, Hurst shifter & Vararam.
I really like those kind of mod vacations.
Do you still have your stock valve springs? Might want to seriously consider changing them out in the near future if they are the originals.
Just did mine in late fall.
12-31-2010, 07:47 PM
#43
Burning Brakes
Thread Starter
Well how did you like your vacation? LOL
The first year that I had my Z, I was off for around a week or so for Christmas break.
I was all ready lined up with my parts and install ed LG long tubes, 3" x pipe, Hurst shifter & Vararam.
I really like those kind of mod vacations.
Do you still have your stock valve springs? Might want to seriously consider changing them out in the near future if they are the originals.
Just did mine in late fall.
The first year that I had my Z, I was off for around a week or so for Christmas break.
I was all ready lined up with my parts and install ed LG long tubes, 3" x pipe, Hurst shifter & Vararam.
I really like those kind of mod vacations.
Do you still have your stock valve springs? Might want to seriously consider changing them out in the near future if they are the originals.
Just did mine in late fall.
Actually I like wrenching as a hobby. My work (I manage commercial mechanical construction) doesn't allow me to work with my hands, only my head. I find it very rewarding to work with the hands.
I am leaving the C5Z pretty well stock power train wise. Suspension has already taken a big mod (just take a look at my C5Z suspension upgrade thread). I think 405 HP is plenty on the street (heck I can lay rubber in 2nd, and its a 200K mile reliable engine). I am trying to modify for handling/braking/misc electronics [I did a Double Din Pioneer Z3 Nav unit last spring] and reliability only.
Ok, I've considered some LG longtubes that were on Craigslist, but I am not sure if the high flow cats give the ground clearance like the stock ones. I would match it up to a Callaway Honker intake, but that's about it. That's probably a pipe dream for now though.
Last edited by andrewdonald1; 12-31-2010 at 07:50 PM.

 I like. Sending pm.
01-01-2011, 04:39 PM
I like. Sending pm.
01-01-2011, 04:39 PM
#46
Burning Brakes
Thread Starter
The verdict after a small test ride (its 37 deg/sunny/dry now so I am being careful as there is black ice in the shade still).
Clutch way better. When I get on it, it no longer has a weird feeling to it letting out the clutch after shifting gears. I think I'll change the tranny fluid down the road.
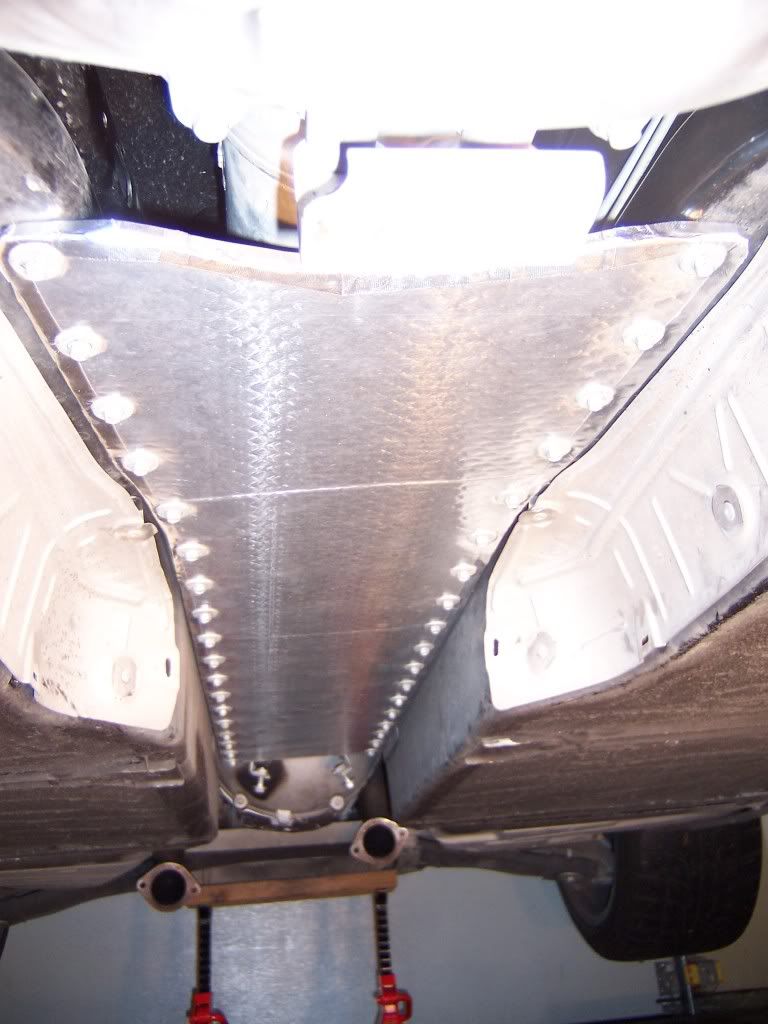
Tunnel Plate Upgrade: Excellent. While I couldn't test to see if it improved the structural integrity of the car, there was a very noticeable reduction in tunnel temps at the shift boot/active handling button/radio bezel area in the cabin. In fact, I couldn't notice any increase in surface temperature from the rest of the interior of the car.
Excellent mod just from a interior temperature reduction.
Clutch way better. When I get on it, it no longer has a weird feeling to it letting out the clutch after shifting gears. I think I'll change the tranny fluid down the road.
Tunnel Plate Upgrade: Excellent. While I couldn't test to see if it improved the structural integrity of the car, there was a very noticeable reduction in tunnel temps at the shift boot/active handling button/radio bezel area in the cabin. In fact, I couldn't notice any increase in surface temperature from the rest of the interior of the car.
Excellent mod just from a interior temperature reduction.
01-01-2011, 08:16 PM
#47
Burning Brakes
Thread Starter
2nd run: a little longer running around.
Clutch: much improved. Installing the TPE remote clutch bleeder IS worth the effort of the install. My confidence is back that I can work the car again and I am not going to trash the transmission (I had the fear that the clutch may not be fully disengaging even though it was).
Tunnel Plate: Same comments as above. I noticed a squeak in the drivers door where it meets the weather stripping. I'll clean and lube these up. The Tunnel Plate upgrade is worth the effort.
Spark plugs & wires: #3 & #7 spark plug boots (at the plugs) were loose but not sure if I knocked them off installing the engine cover before this run but after the 1st run. I re-attached these. My first run out, a little of the di-electric grease was burning off inside #3 spark plug boot. Not sure if this was a coincidence or not that these had loose connections. But I'll check the connections at the plugs in the morning again after it cools off over night. This was worth it. The car rev's smoother now.
There ya have it folks.
YOU CAN do the TPE Remote Clutch Bleeder w/o removing the drive train with minimal tool fabrication and on jack stands in the garage. Probably a 2 day affair w/o doing the other upgrades above, but you will be glad you did all of this at once when you are done.
Andy
Last edited by andrewdonald1; 01-01-2011 at 10:26 PM.
01-02-2011, 06:24 PM
#48
Burning Brakes
Thread Starter
Little running around today.
Spark plug boots are fine now. Must have knocked them off trying to get the passenger engine cover on.
Engine is a lot smoother.
Clutch is back to normal. Rear tires should start taking a beating again.
Its the last of the Firestone Wide Ovals.
Tunnel Plate: Yep no heat coming in the interior. Still can't notice any structural difference. But its too cold to work the car.
03-15-2011, 06:46 PM
#49
Racer

Great write up. Followed your instructions and got the job done. Tried to do it without removing the inspection plate. I didn't want to take off my headers. Dropped the new fitting into the bell housing. Dropped the headers and finished the job. It really was not that hard to do. Good hand dexterity and patience and your done. Got all kinds of really dirty fluid out of my slave when I bled it.
thanks for the great write up.
thanks for the great write up.
04-07-2011, 10:15 PM
#50
Burning Brakes
Thread Starter
Great write up. Followed your instructions and got the job done. Tried to do it without removing the inspection plate. I didn't want to take off my headers. Dropped the new fitting into the bell housing. Dropped the headers and finished the job. It really was not that hard to do. Good hand dexterity and patience and your done. Got all kinds of really dirty fluid out of my slave when I bled it.
thanks for the great write up.
thanks for the great write up.
Andy
01-14-2012, 12:31 AM
#51
Drifting

I have a question. If the nipple that goes into the slave was designed longer, would it stick out of the bell housing, making it easier to tighten and simpler to connect the hose?
02-10-2012, 01:03 AM
#52

In fact, Even that TPE long nipple would be fine by itself if it functioned like a regular nipple. I'm going to ask TPE if they can make one. Should be a lot cheaper too. That way a deep socket with the clear plastic drain line going thru the middle ratchet hole could be operated by the fingers once the nipple is loosened up. Hope to read more replies.
07-06-2012, 01:02 PM
#53
Burning Brakes

Just finished installing my TPE remote bleeder without drivetrain removal on my 02 C5Z. OP's instructions are dead-on. I will add a few of my own pointers, putting emphasis on the OP's good instructions. 
I removed:
H Pipe (no headers on my car)
Tunnel plate
Clutch inspection cover
Disconnected clutch hydraulic line at the quick disconnect fitting.
I did not have to loosen the slave cylinder to gain clearance.
The job is not terribly difficult. I'm 6'5" and my big paws got in there okay. I did not have a 3/8" socket cap and never needed one before. I used a standard 1/4" drive 7/16" deep and 1/4" breaker bar. This worked, but sucked, requiring multiple repositions of the breaker bar and socket to get a sufficient arc to move the fitting. I would get a 1/4" drive socket cap next time and use a combo wrench to turn it.
I did have a Craftsman 1/2" stubby combo wrench laying around and modified it as the OP suggested. This worked EXCELLENT and allowed me to tighten the line fitting easily. The only problem I had was as I got the fitting tight, the line kept moving. I used a 21 mm box wrench on the braided line fitting to hold it in position. If you do this, be very careful not to bend it.
Once everything was tight, I left the bleeder end of the remote bleeder unmounted, and opened the bleeder allowing the clutch to gravity bleed. I ran a good 24 oz through the system and it's still got some crap in it! Future bleeds will go very easy with this setup. Highly recommended and not that difficult.
Update after some driving: The car shifts immensely better...I guess I wasn't getting full disengagement. I would have done this much sooner had I known..Huge improvement from just the bleed.
I'll add my pics to the thread. They show the modified stubby and the angle of the remote bleeder line compared to the clutch hydraulic supply line
Last edited by ZedO6; 07-08-2012 at 10:54 PM.
07-06-2012, 01:08 PM
#54
Le Mans Master
Member Since: May 2007
Location: Belleville Mich.
Posts: 5,393
Likes: 0
Received 15 Likes
on
14 Posts
Zed06,
The key words in being able to do the install in this manner is
No Longtube Headers
That is a great way to add the remote bleeder with out having to drop allot of junk.
Thanks for the write up.
The key words in being able to do the install in this manner is
No Longtube Headers
That is a great way to add the remote bleeder with out having to drop allot of junk.
Thanks for the write up.
07-07-2012, 04:07 AM
#55
Le Mans Master
I would like to add to this thread, if adding a remote bleeder, get the TPE kit. I originally purchased the TICK also. The TPE is a far superior product with the included engine compartment mounting bracket and the speed bleeder. I've had mine in for several months and it does not leak. Takes about five minutes to bleed your clutch by yourself.
07-07-2012, 11:38 AM
#56
Burning Brakes
I would like to add to this thread, if adding a remote bleeder, get the TPE kit. I originally purchased the TICK also. The TPE is a far superior product with the included engine compartment mounting bracket and the speed bleeder. I've had mine in for several months and it does not leak. Takes about five minutes to bleed your clutch by yourself.
Since I don't expect to hear back from TPE, (it took me two weeks of phone calls and emails to even get someone on the phone so I could place my order! WTF?) I will fab my own mounting bracket form aluminium. TPE's customer service leaves a lot to be desired.

Last edited by ZedO6; 07-07-2012 at 11:40 AM.

 06-10-2014, 09:35 AM
#58
Bought a remote bleeder. Went to install while I put in headers. There's no way. I have small hands and I can't get a socket on the bleeder screw. I can't see how you'd get a deep socket or small wench up there either as there isn't enough clearance. I'm punting until I need a clutch done. I've tried the ranger method which helped a little.
04-14-2018, 03:56 PM
#59
Does anyone know whether this same approach will work with the Katech remote bleeder?
Thanks!
Thanks!
04-14-2018, 05:15 PM
#60
Race Director


Member Since: Dec 2010
Location: Atlanta, GA
Posts: 10,426
Received 1,260 Likes
on
1,055 Posts
2020 Corvette of the Year Finalist (performance mods)
C5 of Year Winner (performance mods) 2019

if the fitting that screws into the slave protrudes past the bellhousing then you can probably do it but if it's recessed in the bellhousing there may not be enough room to get a wrench on the line to tighten it to that fitting

