
In process of installing TPE remote clutch bleeder w/o drive train removal.
 12-28-2010, 12:17 AM
#1
Burning Brakes

Thread Starter

Gents: Just giving you a heads up.
It looks like it is possible to install the TPE clutch remote bleeder without removing the drive train.
There is a little special tool that I had to build (modified from the Patches write up).
1st bleed nipple goes in dead easy to the slave.
2nd with the line attached is a b*tch.
Hopefully have it finished up tomorrow.
Last edited by andrewdonald1; 12-28-2010 at 07:23 PM.


 12-28-2010, 12:29 PM
#7
Burning Brakes
Thread Starter
Can I unbolt the two slave cylinder mounting bolts to rotate the slave slightly??
I have the clutch line disconnected at the quick disconnect, and I have no hydraulic pressure in the slave.
It appears it shouldn't be a problem
Never mind. Done.
I have the clutch line disconnected at the quick disconnect, and I have no hydraulic pressure in the slave.
It appears it shouldn't be a problem
Never mind. Done.
Last edited by andrewdonald1; 12-28-2010 at 12:44 PM.
12-28-2010, 03:01 PM
#8
Administrator


Member Since: Mar 2001
Location: In a parallel universe. Currently own 2014 Stingray Coupe.
Posts: 342,705
Received 19,227 Likes
on
13,933 Posts
C7 of the Year - Modified Finalist 2021
MO Events Coordinator
St. Jude Co-Organizer
St. Jude Donor '03-'04-'05-'06-'07-'08-'09-'10-'11-'12-'13-'14-'15-'16-'17-'18-'19-
'20-'21-'22-'23-'24
NCM Sinkhole Donor
CI 5, 8 & 11 Veteran


Good luck. Hope it all works out OK for you.
12-28-2010, 03:12 PM
#9
Burning Brakes
Thread Starter
touch down gentlemen.
I abandoned the modified patches tool I made up. Found a very easy solution for tightening up the 2nd nut that fastens the 2nd line on the new nipple.
Here's the weapons of choice - less the 3/8" socket cap as I used this on my patches modified tool originally. I also do not show the 3/8" drive x 7/16" deep socket.
Anywho:
[1] prep car like you are doing the old school GM manual bleed. Including taking off the inspection cover.
[2] Get lots of light under the car. I used a couple halogens pointing up into the inside of the bell housing
[3] De-couple clutch line quick disconnect.
[4] remove original OEM bleed nipple (I used a ratcheting style wrench - I think it was 7/16". No clutch fluid came out of the slave bleed area since the slave cylinder is higher than the quick disconnect on the same line.
[5] Use 7/16" deep socket with the 3/8" socket cap on top. Use ratcheting type wrench and install only the new nipple to the slave. This is easy and there is enough room to get your hands in there (my feet were pointing toward the front of the car, left hand reaching up behind the bell housing area (behind and drivers side).
[6] run the TPE line up into the bell housing from under the car following the same general path as the OEM clutch line. Don't install at the front of the car or run down thru the frame/steering rod area yet. You want to be able to jiggle the line around while you hand tighten the 2nd nut.
[7] look up inside the bell housing when you start threading on the 2nd nut onto the nipple (please do this by hand). Take your time and make sure it doesn't cross thread. Get the nut installed as much as possible using your left hand up above the bell housing. You'll still have a full rotation or so by the wrench afterwards.
[7.1] once you've got the nut threaded on as far as you can by hand, go ahead and run the other end of the clutch line up into the engine bay but leave everything loose.
[8] I purchased a stubby 1/2" 12-point wrench from Sears.
[8.1] Cut just enough of the boxed end out to create a flared style wrench that will allow you to put this on around the hard part of the clutch line fitting. Don't cut too much out as you need to make sure it will grip the nut, use a 1/2" nut and insert into the boxed end wrench to confirm how much you can cut out.
[9] With the top of my head facing the front of the car, reach up with your right hand up over the top of the front drivers side of the bell housing and install boxed end wrench on the nut. The open end side of the wrench will be pointing towards the back of the car.
[10] look up inside the bell housing and confirm you've got a good grip on the nut. Start tightening. It goes pretty quick and you get about a 1/8 or 1/4 turn before resetting the wrench.
[11] watch how much the clutch line rotates during the final tightening.
** I had to rotate my slave cylinder just slightly (I loosened the two 10mm mounting bolts then just nudged the slave using only the tolerance of the 10mm bolts and the slave mounting bolt holes) as the bell housing hole is not perfectly round to allow clearance of the modified patches tool, in essence I was getting the nipple more concentric with the bellhousing hole.
You may have to do this with the 1/2" boxed wrench below, but not sure. I already had it done.
Just put the wrench up there and use a mirror and flashlight and look around and take your time.
I'll confirm this afternoon that I don't have any leaks, but I feel pretty confident everything is nice and tight at the slave.
This isn't that bad of a job once you have the right tools figured out, take your time, and make sure you understand what the problem is if something isn't going right.
You need patience for this little job.
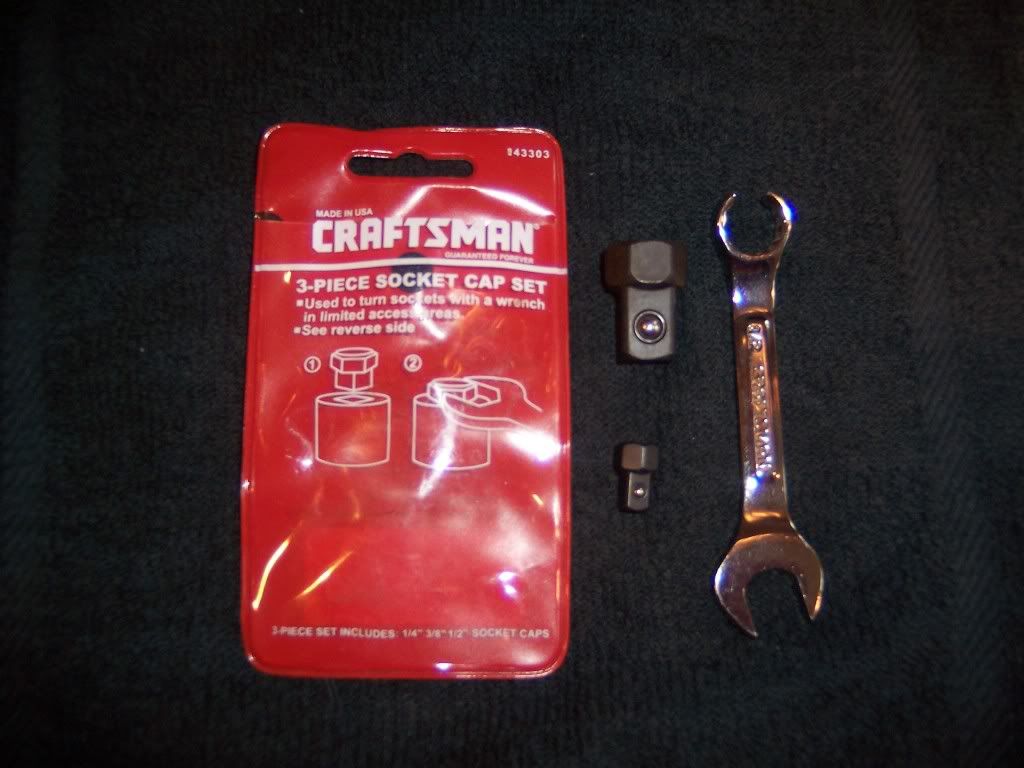
Last edited by andrewdonald1; 12-28-2010 at 07:29 PM.
The following 3 users liked this post by andrewdonald1:
12-28-2010, 03:53 PM
#10
Le Mans Master


Member Since: May 2007
Location: Belleville Mich.
Posts: 5,393
Likes: 0
Received 15 Likes
on
14 Posts

Nice job & thanks for sharing.
One of my winter mods is to do a Tic clutch adjustable Master cylinder & Tic clutch bleeder.
I'm wondering if both bleeders are equal or one is a benefit over the other?
I guess it would be a great time to do a 1/4" tunnel plate with thermal jacket, if I can pick one up reasonably priced.
Thanks again for showing us another way of doing this job, without alot of down time.
12-28-2010, 04:07 PM
#11
Burning Brakes
Thread Starter
Nice job & thanks for sharing.
One of my winter mods is to do a Tic clutch adjustable Master cylinder & Tic clutch bleeder.
I'm wondering if both bleeders are equal or one is a benefit over the other?
I guess it would be a great time to do a 1/4" tunnel plate with thermal jacket, if I can pick one up reasonably priced.
Thanks again for showing us another way of doing this job, without alot of down time.
One of my winter mods is to do a Tic clutch adjustable Master cylinder & Tic clutch bleeder.
I'm wondering if both bleeders are equal or one is a benefit over the other?
I guess it would be a great time to do a 1/4" tunnel plate with thermal jacket, if I can pick one up reasonably priced.
Thanks again for showing us another way of doing this job, without alot of down time.
If I remember right, there are crush washer's etc that add to the equation for potential leaks and alignment issue's.
The TPE nipple has a taper thread fitting and also the nipple has enough length to give you enough of the 2nd nut outside the bell housing to do what I just did.
I am not sure if you could do this with the Tic, if you can you'll have to make up a little patches custom tool and that technique was a b*tch at least with the TPE as the TPE has larger fittings where the hose meets up to the hard connection line at the 2nd nut - I abandoned that method because it was way to hard resetting the tool with your hands up in there/getting a wrench up there high just next to the bottom of the car body etc.
Once I get this bled up today and prove its successful, right now I would strongly suggest going with the TPE.
I would say this is a 1 - 2 day job from prepping the car and getting to this point. Probably 1 day now that the tools and technique are figured out.
Last edited by andrewdonald1; 12-28-2010 at 04:12 PM.
12-28-2010, 07:09 PM
#13
Burning Brakes
Thread Starter
We are good to go.
I was amazed at how much more black fluid came out even after doing the ranger method a month ago.
Bleeding now is very simple and convenient with the speed bleeder in the engine bay. Just be careful, I thought I had it tight, but it wasn't tight enough. I had to just flush the engine area with a bucket of water in the garage with a big catch basin below.
A big burden off my back now that I can bleed it correctly and with no drama as I am a DD.
I would like to thank Keith (username: kmcoldcars) who lives up the street from me and offered to sell me his TPE kit that he had sitting around. I couldn't have done this the last couple days while I am on vacation without him. THANKS KEITH!
Next stop: trace out/cut/drill & install my 1/4" aluminum sheet for a upgraded but cheap tunnel plate - that's tomorrow.
Andy
PS: Better buy your TPE kit now before they back order!
No I don't work for them or have any relationship with them.
It is a quality kit though.
Its worth the money especially now that we know its a fairly easy job to install and can be installed successfully with minimal tool fabrication.
Last edited by andrewdonald1; 12-28-2010 at 07:42 PM.
 12-28-2010, 11:41 PM
#15
Burning Brakes
Thread Starter

 How true.
12-29-2010, 12:31 AM
How true.
12-29-2010, 12:31 AM
#17
Burning Brakes
Thread Starter
Thanks, you were my inspiration to venture out and experiment to see if it could be done.
Thanks for planting the seed.
Being new to a Vette, when I found out you can't easily bleed the slave, my first reaction was WTF on a car this well engineered???
We shouldn't have to live with clutch woos on this awesome car.
Hopefully this will give folks the courage to go for it rather than having that same thought in the back of their minds.
Its not that bad of a job.
Last edited by andrewdonald1; 12-29-2010 at 12:41 AM.
12-29-2010, 09:34 AM
#18
Drifting

Great write-up!
To tell you the truth,I didn't think it was possible -I've done a clutch & slave,and just looking at it from under there with the drive train still in place, I just said "no way".
Good to find out that I'm wrong,in case my remote bleeder ever starts to leak or something.
(I must've missed Patches thread)
Thanks again!
12-29-2010, 09:56 AM
#19
Le Mans Master
Member Since: May 2007
Location: Belleville Mich.
Posts: 5,393
Likes: 0
Received 15 Likes
on
14 Posts
I Probably just overlooked while reading the posts, but is it best to cover the bleeder line with hose or heat wrap/sock to buffer it from rubbing against other things & to keep the heat off of it?
Is there a place that you can clip the top of the bleeder line to?
Sorry if these are dumb questions.
Is there a place that you can clip the top of the bleeder line to?
Sorry if these are dumb questions.
12-29-2010, 10:34 AM
#20
Burning Brakes
Thread Starter
One of my to do's today is finish up the final strapping of the line, take a good look and see if I should wrap it (I am thinking of using the reflective metal HVAC tape at Lowe's/Home Depot).
I assume you are referring to the engine bay end of the line?
Yep, the TPE come with a nice powder coated bracket assembly that bolts right up to one of the mounting bolts for the brake booster. It is a well finished professional product.
I finished mine up with a nice little vacuum cap over the speed bleeder nipple.. looks great!