
replacing a Fog Light bulb
 08-15-2011, 08:48 PM
#1
Burning Brakes

Thread Starter
i inadvertently pulled out and broke the driver's side fog light and would love to know how in God's name to get it back in!! it is impossible to get one's hand/arm into that area. a bit closer when the headlights are up. but still can't "squish" my hands down there. do i have to rip apart the underside and go that route? HELP!! 
 08-15-2011, 08:50 PM
#2
Race Director

Member Since: Jul 2007
Location: Reno is so close to Hell you can see Sparks , State Of Confusion
Posts: 18,681
Likes: 0
Received 38 Likes
on
23 Posts
St. Jude Donor '12-'13-'14
Did you try from the access panel under the car?, There is one under each fog light. Very easy to remove the access panels.
08-15-2011, 08:57 PM
#3
Burning Brakes
Thread Starter
is that the panel i would have taken off before to add my blackouts to the parking lights? where i had to pull out the brake cooling ducts?


 08-16-2011, 03:09 AM
#9
Tech Contributor
Member Since: Dec 2003
Location: Horncastle Lincolnshire, England
Posts: 19,384
Likes: 0
Received 79 Likes
on
61 Posts
2023 C5 of the Year Finalist - Unmodified

I would also go in through the lower access panel for that one
Document ID# 780025
2002 Chevrolet Corvette
________________________________________
Fog Lamp Bulb Replacement - Front
Removal Procedure
1. Raise and support the vehicle. Refer to Lifting and Jacking the Vehicle in General Information.
2. Remove the front fascia lower close out panel. Refer to Close Out Panel - Front Bumper Fascia Lower in Bumpers.

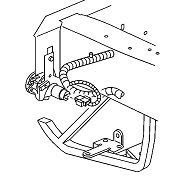
3. Release the brake caliper cooling duct from the front fascia and position the duct aside.

4. Disconnect the front fog lamp electrical connector from the fog lamp bulb/socket.
Caution
Halogen bulbs contain gas under pressure. Handling a bulb improperly could cause it to shatter into flying glass fragments. To help avoid personal injury:
o Turn off the lamp switch and allow the bulb to cool before changing the bulb.
o Leave the lamp switch OFF until the bulb change is complete.
o Always wear eye protection when changing a halogen bulb.
o Handle the bulb only by its base. Avoid touching the glass.
o Keep dirt and moisture off the bulb.
o Properly dispose of the used bulb.
o Keep halogen bulbs out of the reach of children.
5. Remove the fog lamp bulb/socket from the fog lamp.
6. Rotate the fog lamp bulb/socket counter-clockwise to release it from fog lamp.
Installation Procedure
1. Install the fog lamp bulb/socket to the fog lamp.
2. Rotate the fog lamp bulb/socket clockwise to secure it to the fog lamp.
3. Connect the front fog lamp electrical connector to the fog lamp bulb/socket.
4. Position the brake caliper cooling duct to the front fascia, and press to secure.
5. Install the front fascia lower close out panel. Refer to Close Out Panel - Front Bumper Fascia Lower in Bumpers.
6. Lower the vehicle.
7. Check and adjust fog lamp aim as necessary. Refer to Fog Lamp Aiming Procedure
Fog Lamp Aiming
There is no horizontal aiming for the C5 foglamps
Preparation:
Prepare the aiming area. You can use the garage wall providing its at least 25’ from the car and the ground is level. Make sure the tire pressures are correct and the tank is full or the calibration may be out. Park the vehicle square with the aiming surface. Close the doors and rock the car to stabilise the suspension.
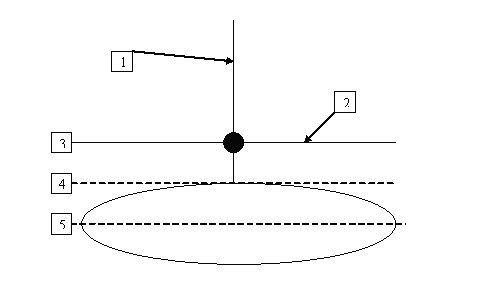
Mark some calibration lines using chalk or masking tape:
Find the center of the headlight and measure the distance to the ground. Mark a horizontal line on the surface (garage door or wall) using masking tape at the same distance from the ground.
Stick a piece of tape in the center of the windscreen and another on the rear glass to use as reference marks.
Line these up from behind the car and use them to mark the centerline of the car on the wall.
Measure the distance between the center of both headlight lenses and use this to measure from the center point you just marked on the surface.
Adjustment
Raise the hood.
Raise the headlamps.
Turn on the low beam lamps. The service manual advises leaving headlights on and blocking the beam. It works just as well by selecting park or backing off the headlight switch to the park position to turn off the headlights.
Turn on the fog lamps
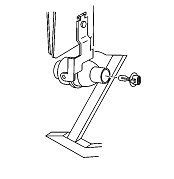
Insert a torx driver through the front fascia deflector access hole to reach the fog lamp vertical adjustment screw
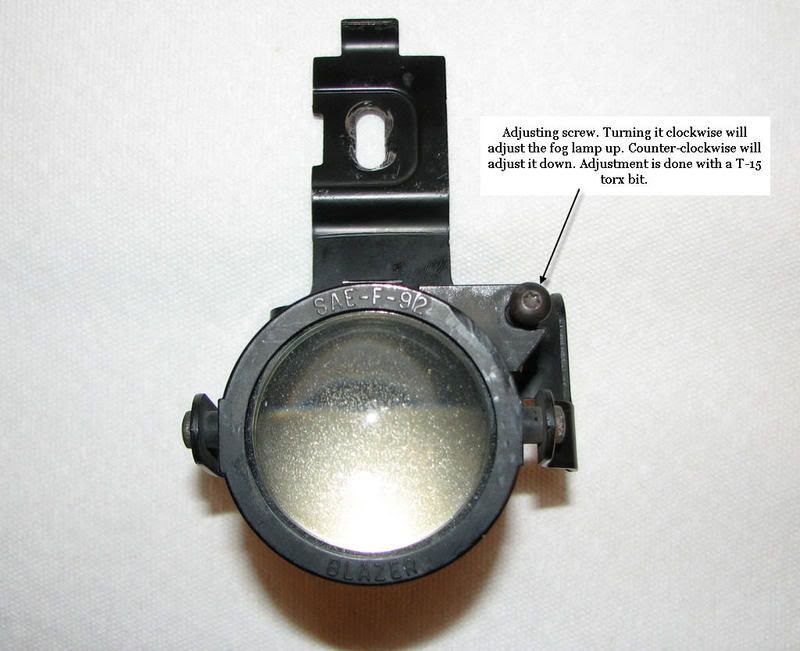
Adjust the fog lamp up or down until the top edge of the high intensity zone is 4” below the horizontal centre line.
Turn off all the lights.
For Z06 owners, you can use a long shafted torx screwdriver slotted through the grille to get to the adjustment screw.
Thanks to Junkman for his pic
Document ID# 780025
2002 Chevrolet Corvette
________________________________________
Fog Lamp Bulb Replacement - Front
Removal Procedure
1. Raise and support the vehicle. Refer to Lifting and Jacking the Vehicle in General Information.
2. Remove the front fascia lower close out panel. Refer to Close Out Panel - Front Bumper Fascia Lower in Bumpers.
3. Release the brake caliper cooling duct from the front fascia and position the duct aside.
4. Disconnect the front fog lamp electrical connector from the fog lamp bulb/socket.
Caution
Halogen bulbs contain gas under pressure. Handling a bulb improperly could cause it to shatter into flying glass fragments. To help avoid personal injury:
o Turn off the lamp switch and allow the bulb to cool before changing the bulb.
o Leave the lamp switch OFF until the bulb change is complete.
o Always wear eye protection when changing a halogen bulb.
o Handle the bulb only by its base. Avoid touching the glass.
o Keep dirt and moisture off the bulb.
o Properly dispose of the used bulb.
o Keep halogen bulbs out of the reach of children.
5. Remove the fog lamp bulb/socket from the fog lamp.
6. Rotate the fog lamp bulb/socket counter-clockwise to release it from fog lamp.
Installation Procedure
1. Install the fog lamp bulb/socket to the fog lamp.
2. Rotate the fog lamp bulb/socket clockwise to secure it to the fog lamp.
3. Connect the front fog lamp electrical connector to the fog lamp bulb/socket.
4. Position the brake caliper cooling duct to the front fascia, and press to secure.
5. Install the front fascia lower close out panel. Refer to Close Out Panel - Front Bumper Fascia Lower in Bumpers.
6. Lower the vehicle.
7. Check and adjust fog lamp aim as necessary. Refer to Fog Lamp Aiming Procedure
Fog Lamp Aiming
There is no horizontal aiming for the C5 foglamps
Preparation:
Prepare the aiming area. You can use the garage wall providing its at least 25’ from the car and the ground is level. Make sure the tire pressures are correct and the tank is full or the calibration may be out. Park the vehicle square with the aiming surface. Close the doors and rock the car to stabilise the suspension.
Mark some calibration lines using chalk or masking tape:
Find the center of the headlight and measure the distance to the ground. Mark a horizontal line on the surface (garage door or wall) using masking tape at the same distance from the ground.
Stick a piece of tape in the center of the windscreen and another on the rear glass to use as reference marks.
Line these up from behind the car and use them to mark the centerline of the car on the wall.
Measure the distance between the center of both headlight lenses and use this to measure from the center point you just marked on the surface.
Adjustment
Raise the hood.
Raise the headlamps.
Turn on the low beam lamps. The service manual advises leaving headlights on and blocking the beam. It works just as well by selecting park or backing off the headlight switch to the park position to turn off the headlights.
Turn on the fog lamps
Insert a torx driver through the front fascia deflector access hole to reach the fog lamp vertical adjustment screw
Adjust the fog lamp up or down until the top edge of the high intensity zone is 4” below the horizontal centre line.
Turn off all the lights.
For Z06 owners, you can use a long shafted torx screwdriver slotted through the grille to get to the adjustment screw.
Thanks to Junkman for his pic
The following users liked this post:
ArmchairArchitect (06-06-2017)
08-16-2011, 09:54 AM
#10
Burning Brakes
Thread Starter
I would also go in through the lower access panel for that one
Document ID# 780025
2002 Chevrolet Corvette
________________________________________
Fog Lamp Bulb Replacement - Front
Removal Procedure
1. Raise and support the vehicle. Refer to Lifting and Jacking the Vehicle in General Information.
2. Remove the front fascia lower close out panel. Refer to Close Out Panel - Front Bumper Fascia Lower in Bumpers.
3. Release the brake caliper cooling duct from the front fascia and position the duct aside.
4. Disconnect the front fog lamp electrical connector from the fog lamp bulb/socket.
Caution
Halogen bulbs contain gas under pressure. Handling a bulb improperly could cause it to shatter into flying glass fragments. To help avoid personal injury:
o Turn off the lamp switch and allow the bulb to cool before changing the bulb.
o Leave the lamp switch OFF until the bulb change is complete.
o Always wear eye protection when changing a halogen bulb.
o Handle the bulb only by its base. Avoid touching the glass.
o Keep dirt and moisture off the bulb.
o Properly dispose of the used bulb.
o Keep halogen bulbs out of the reach of children.
5. Remove the fog lamp bulb/socket from the fog lamp.
6. Rotate the fog lamp bulb/socket counter-clockwise to release it from fog lamp.
Installation Procedure
1. Install the fog lamp bulb/socket to the fog lamp.
2. Rotate the fog lamp bulb/socket clockwise to secure it to the fog lamp.
3. Connect the front fog lamp electrical connector to the fog lamp bulb/socket.
4. Position the brake caliper cooling duct to the front fascia, and press to secure.
5. Install the front fascia lower close out panel. Refer to Close Out Panel - Front Bumper Fascia Lower in Bumpers.
6. Lower the vehicle.
7. Check and adjust fog lamp aim as necessary. Refer to Fog Lamp Aiming Procedure
Fog Lamp Aiming
There is no horizontal aiming for the C5 foglamps
Preparation:
Prepare the aiming area. You can use the garage wall providing its at least 25� from the car and the ground is level. Make sure the tire pressures are correct and the tank is full or the calibration may be out. Park the vehicle square with the aiming surface. Close the doors and rock the car to stabilise the suspension.
Mark some calibration lines using chalk or masking tape:
Find the center of the headlight and measure the distance to the ground. Mark a horizontal line on the surface (garage door or wall) using masking tape at the same distance from the ground.
Stick a piece of tape in the center of the windscreen and another on the rear glass to use as reference marks.
Line these up from behind the car and use them to mark the centerline of the car on the wall.
Measure the distance between the center of both headlight lenses and use this to measure from the center point you just marked on the surface.
Adjustment
Raise the hood.
Raise the headlamps.
Turn on the low beam lamps. The service manual advises leaving headlights on and blocking the beam. It works just as well by selecting park or backing off the headlight switch to the park position to turn off the headlights.
Turn on the fog lamps
Insert a torx driver through the front fascia deflector access hole to reach the fog lamp vertical adjustment screw
Adjust the fog lamp up or down until the top edge of the high intensity zone is 4� below the horizontal centre line.
Turn off all the lights.
For Z06 owners, you can use a long shafted torx screwdriver slotted through the grille to get to the adjustment screw.
Thanks to Junkman for his pic
08-17-2011, 05:45 PM
#11
Melting Slicks


I pulled the 37W bulbs about 5 years ago and put in 885 50 W bulbs.
Then reaim using your low beams as a guide. Can almost drive at night without headlights. Got to mine by removing a few screws from the black cardboard like splash panels underneath.
Then reaim using your low beams as a guide. Can almost drive at night without headlights. Got to mine by removing a few screws from the black cardboard like splash panels underneath.
08-17-2011, 09:00 PM
#12
Racer

Member Since: Nov 2009
Location: Katy Texas
Posts: 283
Likes: 0
Received 0 Likes
on
0 Posts
YOu have not had any trouble with the higher wattage bulbs?
08-18-2011, 05:19 PM
#15
Melting Slicks
No problem with heat either. Won't melt anything. Wires pleanty big for another amp of current. Just MUCH BRIGHTER. Reaim fogs as they are set WAY TOO LOW from the factory.