
Oil Pressure Sending Unit on a 1998?
 02-16-2012, 10:10 PM
#1
Burning Brakes

Thread Starter

So, my oil pressure sending unit went up (100% sure that's what it is). I saw the video online of the guy who was able to remove it without removing the intake.
http://www.youtube.com/watch?v=5PvlD...layer_embedded
After trying dilligently for about 45 minutes, I've concluded that there is an obsticle in the way [text is not mine]:
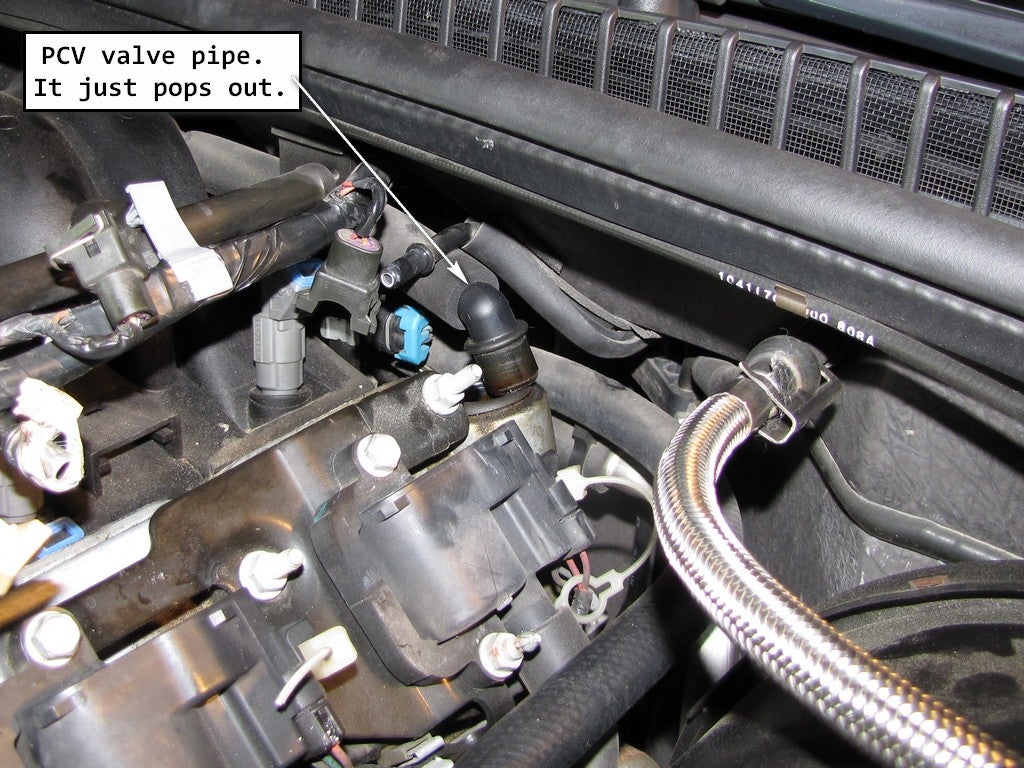
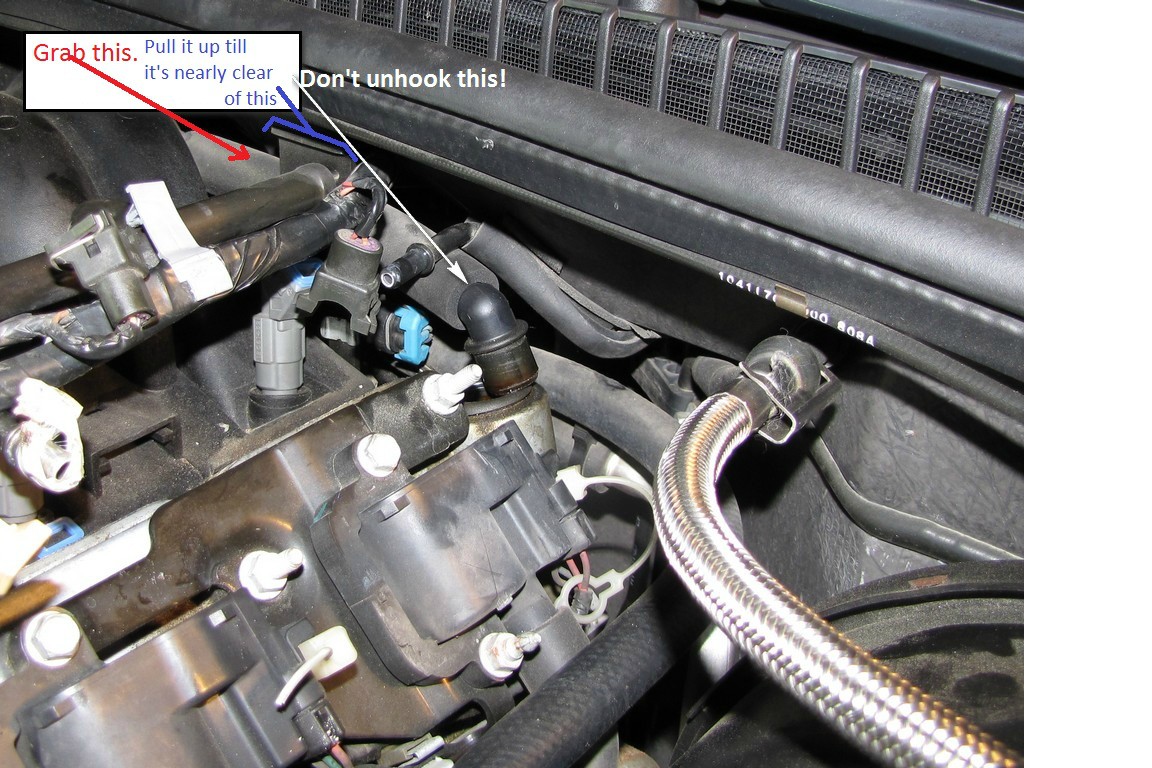
Can whatever wire is wrapped in that foam thing just be unplugged and moved? Without doing that, it is not possible for the socket to fit down to where the sensor is.
Or am I trying something impossible from the get-go. I notive the video is of the later C5 engine with only one fuel line on the driver's side. Is it sufficiently different that this method of switching the sensor is impossible? I can take the intake off, but I really don't want to.
http://www.youtube.com/watch?v=5PvlD...layer_embedded
After trying dilligently for about 45 minutes, I've concluded that there is an obsticle in the way [text is not mine]:
Can whatever wire is wrapped in that foam thing just be unplugged and moved? Without doing that, it is not possible for the socket to fit down to where the sensor is.
Or am I trying something impossible from the get-go. I notive the video is of the later C5 engine with only one fuel line on the driver's side. Is it sufficiently different that this method of switching the sensor is impossible? I can take the intake off, but I really don't want to.
Last edited by Endeka; 02-16-2012 at 10:16 PM.
 02-16-2012, 10:30 PM
#2
Team Owner


Member Since: Jan 2007
Location: cookeville tennessee
Posts: 28,846
Received 1,762 Likes
on
1,529 Posts

So, my oil pressure sending unit went up (100% sure that's what it is). I saw the video online of the guy who was able to remove it without removing the intake.
http://www.youtube.com/watch?v=5PvlD...layer_embedded
After trying dilligently for about 45 minutes, I've concluded that there is an obsticle in the way [text is not mine]:
Can whatever wire is wrapped in that foam thing just be unplugged and moved? Without doing that, it is not possible for the socket to fit down to where the sensor is.
Or am I trying something impossible from the get-go. I notive the video is of the later C5 engine with only one fuel line on the driver's side. Is it sufficiently different that this method of switching the sensor is impossible? I can take the intake off, but I really don't want to.

 02-16-2012, 10:44 PM
#4
Race Director

Member Since: Jul 2007
Location: Reno is so close to Hell you can see Sparks , State Of Confusion
Posts: 18,681
Likes: 0
Received 38 Likes
on
23 Posts
St. Jude Donor '12-'13-'14
You can have the intake off in 15-20 mins, Very easy to do.
You been working on yours for 45 mins and still not even close.
You been working on yours for 45 mins and still not even close.
02-16-2012, 11:08 PM
#6
Administrator


Member Since: Mar 2001
Location: In a parallel universe. Currently own 2014 Stingray Coupe.
Posts: 342,579
Received 19,186 Likes
on
13,910 Posts
C7 of the Year - Modified Finalist 2021
MO Events Coordinator
St. Jude Co-Organizer
St. Jude Donor '03-'04-'05-'06-'07-'08-'09-'10-'11-'12-'13-'14-'15-'16-'17-'18-'19-
'20-'21-'22-'23-'24
NCM Sinkhole Donor
CI 5, 8 & 11 Veteran


I think I would just pull the intake and then do the TPE relocation mod.
02-17-2012, 10:00 AM
#9
Burning Brakes
Sorry to hear the video didn't help. I agree with Vetteman Jack. I would consider the TPE relocation kit. That way the job would be a snap the next time. Other than the job at hand, I hope you're lovin that NB "98 Coupe.
02-17-2012, 10:25 AM
#10
Melting Slicks

When I did my '98, I just slid the manifold forward 2-3 inches after removing the manifold and fuel line bolts. I don't think I even had to remove the fuel lines. I kept the same gaskets with no problems.
You'll want to extend that short, small vacuum (?) hose on the back passenger side while you're at it. It makes it a lot easier to reinstall the manifold when you have a bit more length on that hose.
You'll want to extend that short, small vacuum (?) hose on the back passenger side while you're at it. It makes it a lot easier to reinstall the manifold when you have a bit more length on that hose.
02-17-2012, 10:36 AM
#11
Burning Brakes
Thread Starter
No silicone is needed, In most cases you can use the o-rings again, If you can afford it I would get new o-rings to be safe.
Mr.Bill
Mr.Bill
02-17-2012, 11:33 AM
#12
Race Director
Member Since: Jul 2007
Location: Reno is so close to Hell you can see Sparks , State Of Confusion
Posts: 18,681
Likes: 0
Received 38 Likes
on
23 Posts
St. Jude Donor '12-'13-'14
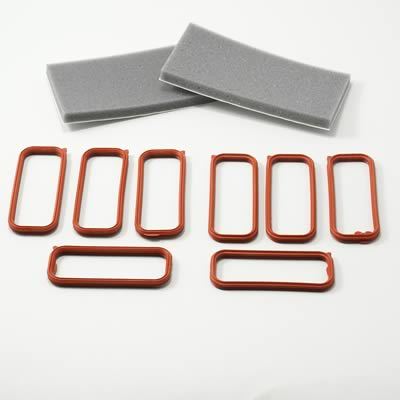
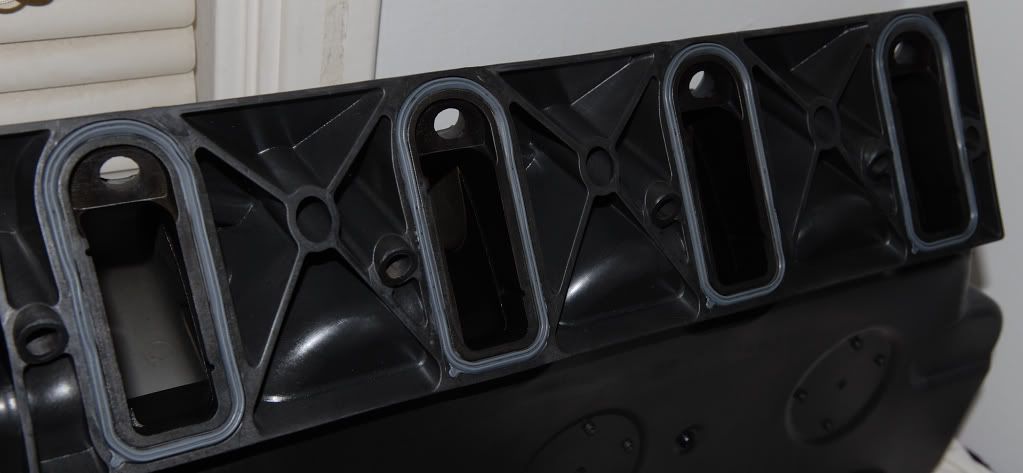
The LS1/LS6 intake doesn't have a gasket like the older motors, They have rubber o-ring gaskets, Not sure of part number, Any parts store can tell you the number.
This picture is of a FAST intake, I believe the gaskets are the same.
Mr.Bill
This picture is of a FAST intake, I believe the gaskets are the same.
Mr.Bill
I think the Fel-Pro # is QMS92438 about 25 bucks.
Last edited by Mr.Bill; 02-17-2012 at 11:39 AM.
02-17-2012, 08:12 PM
#13
Burning Brakes
Thread Starter
Alright guys; I did it. I did it without removing the intake, because I was feeling stubborn, using the video's instructions. That video is SEVERELY deficient in a couple areas. Honestly, it took me about an hour to do it (not counting the hour I wasted last night trying to figure out what was going on), but no joke, I could do it again in 25 minutes knowing what I know now.
The problem with the video is really twofold. First, that the insertion of the socket is harder than he makes it out to be; that foam hose I indicated has to be pulled up the firewall till its almost out of the bracket on the back of the fuel rail, then the ratchet will go in where it needs to. Once it's back there, it goes on the sender almost by magic; it's the only thing that sticks up in that area.
Second, and this was far more heinous of an oversight, I'm 6'3", and the guy that made that video must literally be the size of my shoe to have gotten even one finger into that hole. Not only couldn't I do it, but my 7% body fat fitness-freak wife couldn't get more than two fingers down there, and went back inside saying "I can't believe there's someone on earth who can get their hand in that space." I needed a new game plan. The silver bullet, that makes it all happen, is a set of these:
http://buy1.snapon.com/catalog/item....re&dir=catalog
(I got a MUCH cheaper set at Tru-Value, since its right down the road, and I don't anticipate needing them frequently).
With these, extracting the dropped old sensor, and plugging in the wire all took 10 minutes. That was the breakthrough that made the whole thing work. Here's a run-down of what I did:
1. Mark the new pressure sensor with a strip of bright, high visibility nail polish, or white-out, on the region where the clip attaches. This will help you figure out how to attach the clip once the sensor is inside.
2.
3. Then, use a coat hanger to grab the tab of the wire and pull it off. This took 5 seconds on the first try. The wire connects high up, so you don't even need to worry about losing the end down there. Just drag it up and out of the way.
4. Take a half inch drive ratchet, and connect it directly to a ten-inch extension, connected to a 1/2" wobble, connected to a 1&1/16" deep socket. Insert the socket that cranny, maneuver it down, and into the region of the sensor it went right on for me, after about a minute. It might be helpful to take the socket off the wobble, and push that down and towards the passenger side, until you get the end past that PCV hose, then carefully re-attach the wobble and push the socket down the rest of the way. Like I said, it went right on after 1-2 quick re-seatings. You'll know you've got it when you feel resistance.
5. Pull the assembly out. Be careful that the socket chain doesn't break, but if it does, you can easily grab the pieces with the pliers I showed above, since the mess of wires there landed everything I dropped on the lip with the oil pressure sensor, all 6-7 times I dropped it. Maybe it's possible for the chain to fall into the abyss, but it never did while I was doing it. Now that I know what stress it can take, I wouldn't lose it again.
6. Since, as we established, you have to be literally 4 feet tall to be able to reach the socket into its place with your fingers, I suggest you grab it with the pliers and get it started. Alternately, you can do what I stupidly did before I bought the pliers, which was to pack the 1&1/16" socket about 1/3 full with very tightly packed (rammed down with a screw-driver) toilet paper, and then seat the new pressure sensor on top of that, so that the threads just stick out the bottom, but no part of the hex bolt part of the sensor does. I also made a loop of single-sided scotch tape, with the sticky side out (like you'd use to affix a birthday card to a package) that was the size of the metal hex-part of the sensor, and stuck it inside the tip of the ratchet. This held the sensor in so it didn't drop out (the sticky part never touched the sensor, it was just the added size of the tape made the fit of the sensor in the socket much more snug). However, even though I didn't do it this way when I did it, the pliers should work much, much easier.
7. Insert the ratchet chain (with the sensor in the tip, if not already inserted). Find the hole by trial and error (took about 2 minutes of shuffling around), and tighten down. Again, you'll know you've cracked it when it gets tight.
8. pull the assembly off. It should come right off if you didn't load the socket with all that crap like I did, but if you did, the pliers will bring it up in as many pieces as are left down there, in seconds. It took me 1 minute to extract it.
9. Look at the new, seated sensor. Look for your mark. If you can't see it, it's in a very small, 30� region that is not visible, and that region is where the clip goes. Now situate your wire accordingly so it is in the right position to go on. Then, (and this is important), if you want to get the wire on easily, don't grab it by the plastic parts (any of them); grab it by the wire directly above the plastic plug. That will give you the firmest hold and the best position to shove it in. I was able to re-insert it in about 45 seconds.
Remove your tools, push that PCV pipe back down to where it was (just to be safe), and fire her up. Fixed!
Final note: If the pliers were the MVP of this job, this was a close second:

Take the mini-maglite, pull the top off and put it aside (not on the bottom). Then tie dental floss, twine or similar around the string hole in the end, and tie the other end to the oil filler cap, or anything else convenient. Then you can stick it or dangle it wherever you need. Excellent light for this job, though I strongly suggest attempting the job outside, during the day. You can't beat the sun's overpowering, diffuse light with anything that plugs into your house.
In summary:
Removing the wiring harness and securing it: seconds.
figuring out how to get the socket in the hole-1 hour 30 minutes, but mostly because of timidity and being unfamiliar with the LS1's layout.
Removing the old sensor-about 10 minutes.
Packing the socket to deliver the new sensor, and getting it in-about 15 minutes.
Re-attaching the wiring harness-seconds.
So you're looking at like a half hour job tops, if you don't make the mistakes I made. Sorry for no pics, it was abysmally dark when I did this, but if it ever goes up again, I'll use my Go-Pro Hero 2 to make an HD video with no cut-outs that illustrates what the original video did, but in much more detail, and without glitzing over the parts that are actually hard. I'll save taking the intake off for when I get the fast LSX intake.
The problem with the video is really twofold. First, that the insertion of the socket is harder than he makes it out to be; that foam hose I indicated has to be pulled up the firewall till its almost out of the bracket on the back of the fuel rail, then the ratchet will go in where it needs to. Once it's back there, it goes on the sender almost by magic; it's the only thing that sticks up in that area.
Second, and this was far more heinous of an oversight, I'm 6'3", and the guy that made that video must literally be the size of my shoe to have gotten even one finger into that hole. Not only couldn't I do it, but my 7% body fat fitness-freak wife couldn't get more than two fingers down there, and went back inside saying "I can't believe there's someone on earth who can get their hand in that space." I needed a new game plan. The silver bullet, that makes it all happen, is a set of these:
http://buy1.snapon.com/catalog/item....re&dir=catalog
(I got a MUCH cheaper set at Tru-Value, since its right down the road, and I don't anticipate needing them frequently).
With these, extracting the dropped old sensor, and plugging in the wire all took 10 minutes. That was the breakthrough that made the whole thing work. Here's a run-down of what I did:
1. Mark the new pressure sensor with a strip of bright, high visibility nail polish, or white-out, on the region where the clip attaches. This will help you figure out how to attach the clip once the sensor is inside.
2.
3. Then, use a coat hanger to grab the tab of the wire and pull it off. This took 5 seconds on the first try. The wire connects high up, so you don't even need to worry about losing the end down there. Just drag it up and out of the way.
4. Take a half inch drive ratchet, and connect it directly to a ten-inch extension, connected to a 1/2" wobble, connected to a 1&1/16" deep socket. Insert the socket that cranny, maneuver it down, and into the region of the sensor it went right on for me, after about a minute. It might be helpful to take the socket off the wobble, and push that down and towards the passenger side, until you get the end past that PCV hose, then carefully re-attach the wobble and push the socket down the rest of the way. Like I said, it went right on after 1-2 quick re-seatings. You'll know you've got it when you feel resistance.
5. Pull the assembly out. Be careful that the socket chain doesn't break, but if it does, you can easily grab the pieces with the pliers I showed above, since the mess of wires there landed everything I dropped on the lip with the oil pressure sensor, all 6-7 times I dropped it. Maybe it's possible for the chain to fall into the abyss, but it never did while I was doing it. Now that I know what stress it can take, I wouldn't lose it again.
6. Since, as we established, you have to be literally 4 feet tall to be able to reach the socket into its place with your fingers, I suggest you grab it with the pliers and get it started. Alternately, you can do what I stupidly did before I bought the pliers, which was to pack the 1&1/16" socket about 1/3 full with very tightly packed (rammed down with a screw-driver) toilet paper, and then seat the new pressure sensor on top of that, so that the threads just stick out the bottom, but no part of the hex bolt part of the sensor does. I also made a loop of single-sided scotch tape, with the sticky side out (like you'd use to affix a birthday card to a package) that was the size of the metal hex-part of the sensor, and stuck it inside the tip of the ratchet. This held the sensor in so it didn't drop out (the sticky part never touched the sensor, it was just the added size of the tape made the fit of the sensor in the socket much more snug). However, even though I didn't do it this way when I did it, the pliers should work much, much easier.
7. Insert the ratchet chain (with the sensor in the tip, if not already inserted). Find the hole by trial and error (took about 2 minutes of shuffling around), and tighten down. Again, you'll know you've cracked it when it gets tight.
8. pull the assembly off. It should come right off if you didn't load the socket with all that crap like I did, but if you did, the pliers will bring it up in as many pieces as are left down there, in seconds. It took me 1 minute to extract it.
9. Look at the new, seated sensor. Look for your mark. If you can't see it, it's in a very small, 30� region that is not visible, and that region is where the clip goes. Now situate your wire accordingly so it is in the right position to go on. Then, (and this is important), if you want to get the wire on easily, don't grab it by the plastic parts (any of them); grab it by the wire directly above the plastic plug. That will give you the firmest hold and the best position to shove it in. I was able to re-insert it in about 45 seconds.
Remove your tools, push that PCV pipe back down to where it was (just to be safe), and fire her up. Fixed!
Final note: If the pliers were the MVP of this job, this was a close second:
Take the mini-maglite, pull the top off and put it aside (not on the bottom). Then tie dental floss, twine or similar around the string hole in the end, and tie the other end to the oil filler cap, or anything else convenient. Then you can stick it or dangle it wherever you need. Excellent light for this job, though I strongly suggest attempting the job outside, during the day. You can't beat the sun's overpowering, diffuse light with anything that plugs into your house.
In summary:
Removing the wiring harness and securing it: seconds.
figuring out how to get the socket in the hole-1 hour 30 minutes, but mostly because of timidity and being unfamiliar with the LS1's layout.
Removing the old sensor-about 10 minutes.
Packing the socket to deliver the new sensor, and getting it in-about 15 minutes.
Re-attaching the wiring harness-seconds.
So you're looking at like a half hour job tops, if you don't make the mistakes I made. Sorry for no pics, it was abysmally dark when I did this, but if it ever goes up again, I'll use my Go-Pro Hero 2 to make an HD video with no cut-outs that illustrates what the original video did, but in much more detail, and without glitzing over the parts that are actually hard. I'll save taking the intake off for when I get the fast LSX intake.
Last edited by Endeka; 02-17-2012 at 08:27 PM.
The following 3 users liked this post by Endeka:
01-24-2013, 06:17 AM
#15
1st Gear


Member Since: Jan 2013
Posts: 1
Likes: 0
Received 0 Likes
on
0 Posts
Hey guys! I know that this subject has been beat to death but I'd just like to say DO NOT CUT THE COWL on your car to replace the oil pressure sending unit. Remove the intake and install a relocate kit if it makes you happy. YOU DON'T HAVE TO DRAIN ANY FLUID (just pinch the hose off with vise grips) and you DON'T have to remove the fuel rail. Once everything's disconnected you will have ample room if you just pull the intake forward and swing it out of the way. For those pesky 2 rear intake bolts, put a tie wrap around them, pull them up and tighten the tie wrap. This will keep them from falling back into their respective holes when pulling the manifold forward. As for the little vacuum hose at the rear of the manifold that everyone forgets to reconnect...use a pair of hemostats to remove it then leave them crimped on the hose..they will be in your way so you won't be able to forget about reconnecting the hose. I hope this helps someone.
01-30-2013, 12:15 PM
#16

Thanks for the info.I have to say it was very easy.It took only 15 teen minutes from the time I opened the hood to the time I closed the hood.What I think that helped the most was the sending unit socket from napa auto parts part number 3458. It was very thin walled and locked in the sending unit. One flash light ,one wire similar to a coat hanger about a foot long. Socket,swivel,exstention,rachet. THANKS for the Help.
01-30-2013, 12:58 PM
#17
Melting Slicks
Hey guys! I know that this subject has been beat to death but I'd just like to say DO NOT CUT THE COWL on your car to replace the oil pressure sending unit. Remove the intake and install a relocate kit if it makes you happy. YOU DON'T HAVE TO DRAIN ANY FLUID (just pinch the hose off with vise grips) and you DON'T have to remove the fuel rail. Once everything's disconnected you will have ample room if you just pull the intake forward and swing it out of the way. For those pesky 2 rear intake bolts, put a tie wrap around them, pull them up and tighten the tie wrap. This will keep them from falling back into their respective holes when pulling the manifold forward. As for the little vacuum hose at the rear of the manifold that everyone forgets to reconnect...use a pair of hemostats to remove it then leave them crimped on the hose..they will be in your way so you won't be able to forget about reconnecting the hose. I hope this helps someone.
 02-05-2013, 06:32 PM
#19
Team Owner
I just did the sensor swap the easy way just like the youtube video shows. My oil pressure sensor went out so I had to fix it.
It's really not that hard if you get the long nose pliers. The Youtube video does not mention that.
I really didn't want to cut anything under the wipers and I really didn't want to remove the intake.
I figured if the guy on youtube could do it, so could I.
It's a little tricky putting the socket into the small opening. But that really is the only hard part. As has been mentioned.
I also used a long flat blade screwdriver to help position the new sensor in place. Then I was able to use my fingertips to just barely touch the top of the sensor and get it started into the hole. I wear a XL glove, so it is possible to do this. The sensor only needs to barely start into the hole. It goes right in.
So there is no need to cut anything or remove the intake to replace the oil pressure sensor.
I'm sure I could do it in less than 30 minutes start to finish. It took me a little longer because the video didn't mention the long nose pliers and I had to figure that part out. I wish I had read this whole thread before I started. I see the OP already mentions that part.
Good job and write up Endeka.
Oh, and I have a 2000 FRC.
Last edited by TwoSmoke; 02-05-2013 at 09:40 PM.


