Notices
C5 General General C5 Corvette and C5 Z06 Discussion not covered in Tech
Sponsored by:
Sponsored by:

How I powder coated my C5 Alternator

Thread Tools
 
Search this Thread
 
Old 01-17-2018, 11:07 AM
  #1  
NebraskaTrevor
Instructor
Thread Starter
 
NebraskaTrevor's Avatar
 
Member Since: Jul 2013
Location: Lincoln Nebraska
Posts: 103
Received 39 Likes on 20 Posts
Default How I powder coated my C5 Alternator

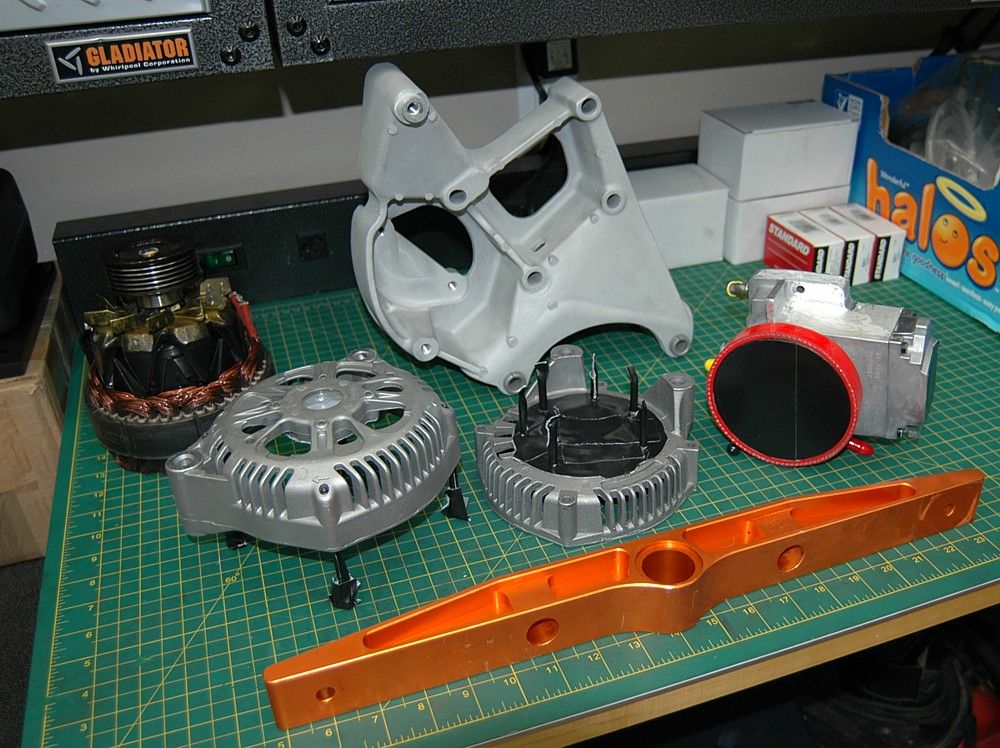
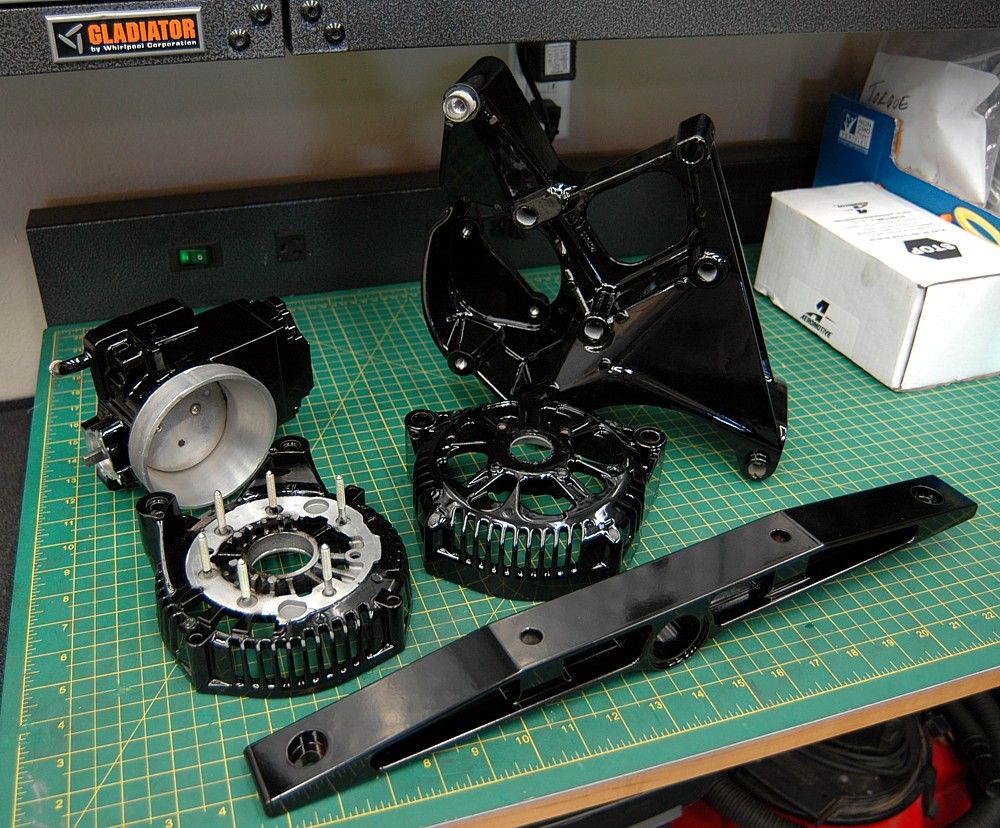
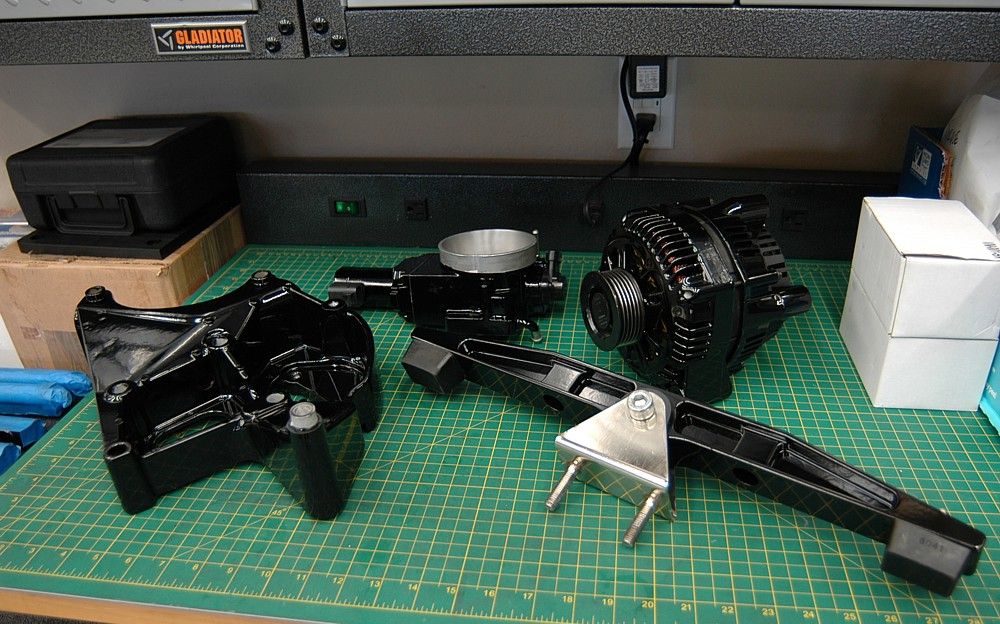
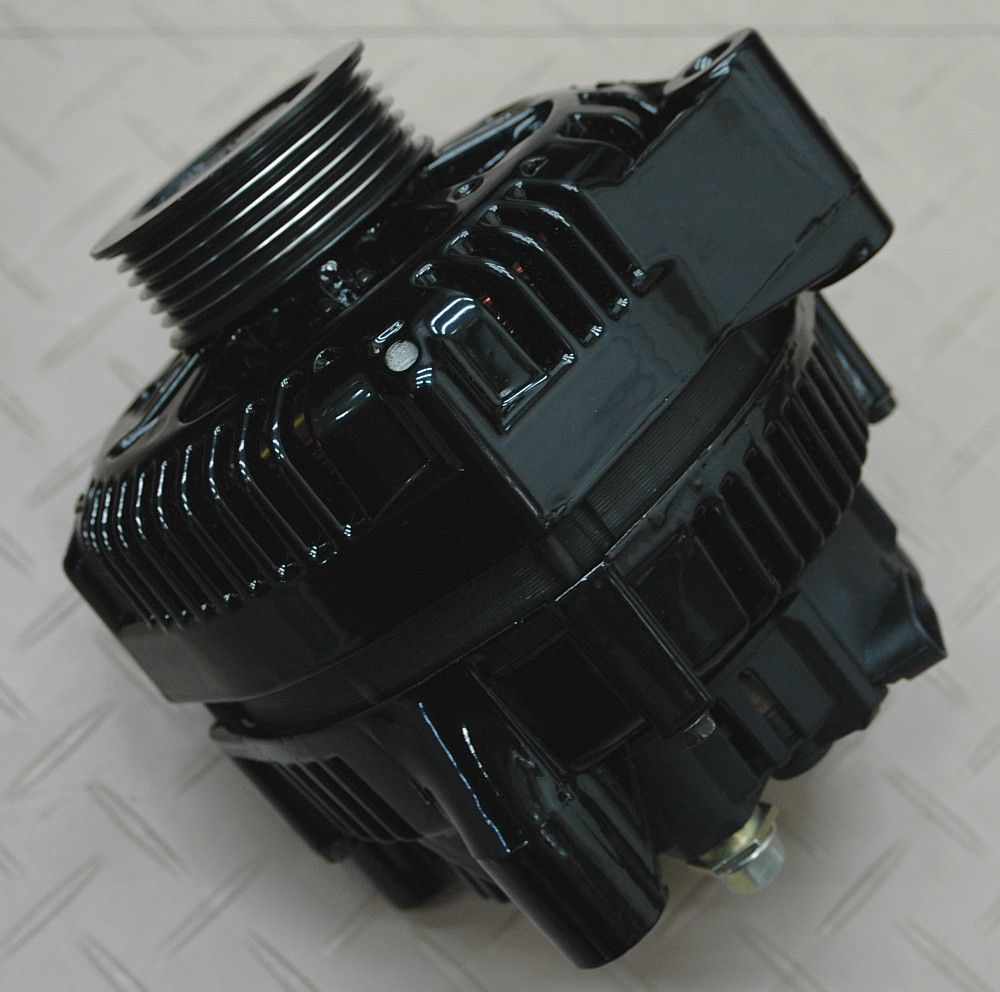
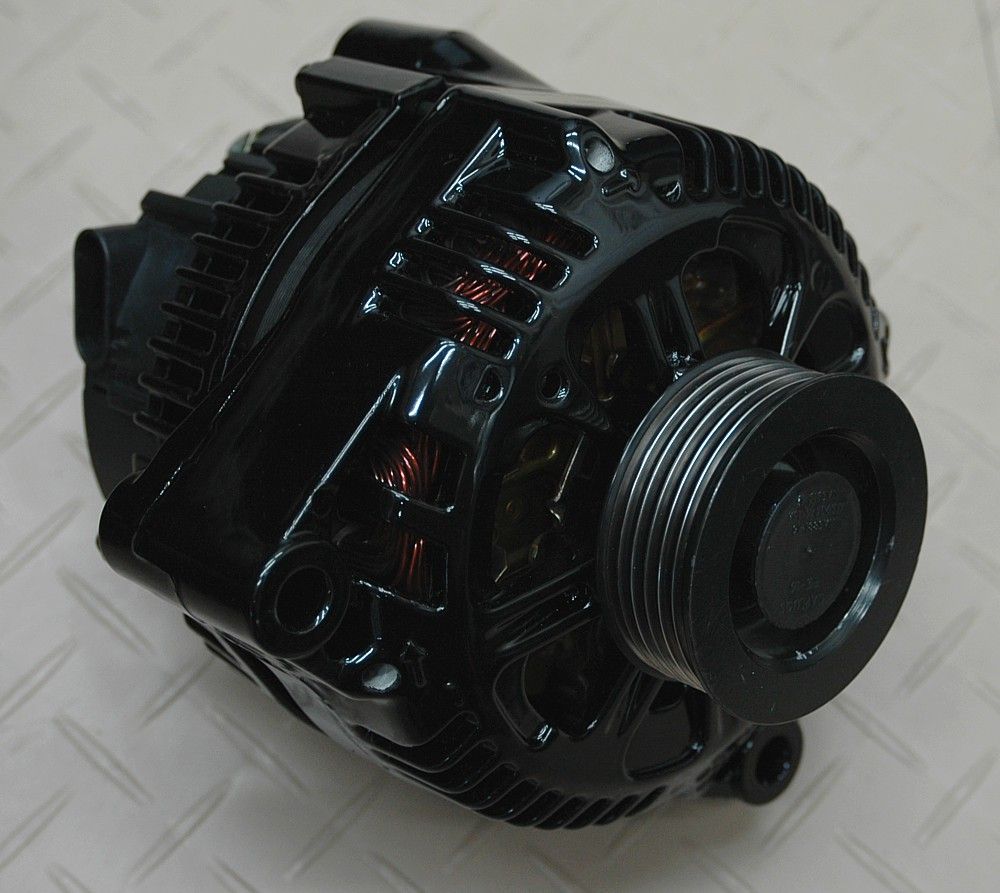
For years my silver alternator has bothered me. I have been meaning to remove it and powder coat it texture black for the last 3 winters and I finally got around to it last week. I took a few pics and thought I would post them there. Removal is super easy, disassembly is a bit complicated, but by no means super difficult, and reinstall is of course super easy. I took the alternator off and completely disassembled it ti allow the cast aluminum halves to be cleaned and then powder coated. Since the castings will get a touch over 400 deg F during the process everything needs to be removed from the front and back half of the cases. It is pretty straight forward aside from desoldering the 3 phase leads from the voltage regulator board. These are soldered with some crazy solder that even at 900 deg will only reluctantly melt. They are also crimped in place complicating matters just a bit more. The internet tells me you want a 250 W minimum iron to do this and I agree after suffering thru it with only a 200 w soldering gun which got the job done but was not the right tool for the job. After things were all apart I spent a bit of time sanding down and removing burrs, flash and ugly seams from the alternator case halves. If you look at the alternator it really is an ugly beast that has no place under the pretty hood. I then masked the surfaces that I wanted to remain bare metal such as the heat sink interface for the voltage regulator/ rectifier circuit and the mounting bosses where it attaches to the bracket on the car. A quick preheat after cleaning and they were ready to coat. I used a texture black that has some shine to it but not too much, I am pretty fond of it even if it is a bit too understated for most chrome loving Vette owners. After the parts cooled reassembly was simple aside from the fact that I broke both of the brushes off when I dropped the VR assembly.....dont do that. It turns out that the brushes are non replaceable and you need to replace the entire Voltage regulator. I was having none of that so I acquired a set of brushes that was just slightly too large and milled them down to exactly the right size in the milling machine. I then de soldered the factory brushes and fished in and soldered in place the new brushes. I would strongly suggest you skip this step as it was a 4 hour diversion that I could have done without! The rest of assembly was a snap and before long it was mounted back on the car. I will include some pics below. To say that I am pleased with it is an understatement! Next up a black cover for the alternator mounting bracket ( removal is a huge PITA so not an option for me ) and then my throttle body is going under the knife next to get the same blackout procedure. Pics to follow below.
The following users liked this post:
av8or (05-16-2018)
Old 01-17-2018, 11:16 AM
  #2  
NebraskaTrevor
Instructor
Thread Starter
 
NebraskaTrevor's Avatar
 
Member Since: Jul 2013
Location: Lincoln Nebraska
Posts: 103
Received 39 Likes on 20 Posts
Default

Starting with before pics.


Before


Regulator removed


Voltage regulator connections
Old 01-17-2018, 11:18 AM
  #3  
NebraskaTrevor
Instructor
Thread Starter
 
NebraskaTrevor's Avatar
 
Member Since: Jul 2013
Location: Lincoln Nebraska
Posts: 103
Received 39 Likes on 20 Posts
Default During

During


completely disassembled


Masking


First piece


Brushes are missing
Old 01-17-2018, 11:19 AM
  #4  
NebraskaTrevor
Instructor
Thread Starter
 
NebraskaTrevor's Avatar
 
Member Since: Jul 2013
Location: Lincoln Nebraska
Posts: 103
Received 39 Likes on 20 Posts
Default after

reassembly/ mounting


bearing reinstalled


Back together


Pulley mounted


Installed


Installed/ That mount sure needs covered up now!
The following 4 users liked this post by NebraskaTrevor:
50 ANV C5 (01-19-2018), oneandgone (05-17-2018), SG Lou (05-21-2018), Tusc (06-19-2020)
Old 01-17-2018, 11:29 AM
  #5  
InfiniteReality
Racer
 
InfiniteReality's Avatar
 
Member Since: Jun 2008
Location: Louisiana
Posts: 304
Received 60 Likes on 50 Posts

Default

Huge difference! Well worth the effort!

Bookmarking this for reference when I decided to copy for the SLC's LS3

Last edited by InfiniteReality; 01-17-2018 at 11:35 AM.
The following users liked this post:
NebraskaTrevor (01-17-2018)
Old 01-17-2018, 11:33 AM
  #6  
Vetteman Jack
Administrator

Support Corvetteforum!
 
Vetteman Jack's Avatar
 
Member Since: Mar 2001
Location: In a parallel universe. Currently own 2014 Stingray Coupe.
Posts: 342,880
Received 19,281 Likes on 13,959 Posts
C7 of the Year - Modified Finalist 2021
MO Events Coordinator
St. Jude Co-Organizer
St. Jude Donor '03-'04-'05-'06-'07-'08-'09-'10-'11-'12-'13-'14-'15-'16-'17-'18-'19-
'20-'21-'22-'23-'24
NCM Sinkhole Donor
CI 5, 8 & 11 Veteran


Default

Great job, Trevor.
The following users liked this post:
NebraskaTrevor (01-17-2018)
Old 01-17-2018, 12:53 PM
  #7  
knewblewkorvette
Race Director

Support Corvetteforum!
 
knewblewkorvette's Avatar
 
Member Since: May 2003
Location: Iowa
Posts: 13,995
Received 2,706 Likes on 1,668 Posts
St. Jude Donor '03-'04-'05-'06-'07-'08-'09-'10-'11-'12-'13-'14-'15-'16'-'17-‘18-'19-'20-'21-'22-
'23-'24


Default

Wow, good job and nice write up.
The following users liked this post:
NebraskaTrevor (01-17-2018)
Old 01-17-2018, 02:50 PM
  #8  
GRAND SPORT GUY
Racer

Support Corvetteforum!
 
GRAND SPORT GUY's Avatar
 
Member Since: Nov 2015
Location: TINLEY PARK, IL
Posts: 437
Received 237 Likes on 125 Posts
Default

That looks absolutely fabulous! I'm in a neck brace right now from a C-Spine fusion, otherwise I would start that project for my C5 today!

-It'll make a great early spring project!

Great Job!
Old 01-17-2018, 03:00 PM
  #9  
The Rabbi
Melting Slicks
Support Corvetteforum!
 
The Rabbi's Avatar
 
Member Since: Jul 2010
Location: Leesburg Fl
Posts: 2,793
Received 333 Likes on 236 Posts
2018 C5 of Year Finalist
St. Jude Donor '14,'18

Default

Fascinating and great write up. You must have a machine shop.
The following users liked this post:
NebraskaTrevor (01-17-2018)
Old 01-17-2018, 03:23 PM
  #10  
usgecko
Pro
 
usgecko's Avatar
 
Member Since: Nov 2011
Location: Atlanta Georgia
Posts: 597
Received 24 Likes on 22 Posts
St. Jude Donor '13,'14
Default

Looks great
The following users liked this post:
NebraskaTrevor (01-17-2018)
Old 01-17-2018, 06:15 PM
  #11  
1bdvet
Team Owner

 
1bdvet's Avatar
 
Member Since: May 2000
Location: Plantation Florida USAF(Retired) 1966-1990
Posts: 47,878
Received 4,504 Likes on 3,589 Posts
U.S. Air Force
St. Jude Donor '05-'06-'07-'08-'09-'10-'11-'12-'13-'14-'15-'16-'17-'18-'19-'20-'21-'22-'23-'24
NCM Sinkhole Donor


Default

Sweet!
The following users liked this post:
NebraskaTrevor (01-17-2018)
Old 01-17-2018, 06:26 PM
  #12  
alcoed
Racer
 
alcoed's Avatar
 
Member Since: Nov 2015
Location: Port Charlotte Florida
Posts: 385
Received 106 Likes on 50 Posts
Default black?

Sorry, but not my cup of tea. I realize it was a lot of work and you did a quality conversion, but, to me it looks like a aftermarket alternator that is spray painted to hide tarnished metal.
I know many like the change, but not me. Different strokes for different folks!
Old 01-17-2018, 08:57 PM
  #13  
Mike94ZLT1
Le Mans Master
 
Mike94ZLT1's Avatar
 
Member Since: Jun 2002
Location: In the pit, trying to love someone.
Posts: 8,345
Received 96 Likes on 60 Posts

Default

Originally Posted by alcoed
Sorry, but not my cup of tea. I realize it was a lot of work and you did a quality conversion, but, to me it looks like a aftermarket alternator that is spray painted to hide tarnished metal.
I know many like the change, but not me. Different strokes for different folks!
Hell of a lot better than that polished stainless steel crap some guys stick on everything under the hood and make it look like there's a kitchen appliance in there.
The following 4 users liked this post by Mike94ZLT1:
ArmchairArchitect (01-19-2018), chasboy (05-21-2018), InfiniteReality (01-19-2018), NebraskaTrevor (01-17-2018)
Old 01-17-2018, 10:00 PM
  #14  
NebraskaTrevor
Instructor
Thread Starter
 
NebraskaTrevor's Avatar
 
Member Since: Jul 2013
Location: Lincoln Nebraska
Posts: 103
Received 39 Likes on 20 Posts
Default

[QUOTE=Shark 82' CE;1596396876]That looks absolutely fabulous! I'm in a neck brace right now from a C-Spine fusion, otherwise I would start that project for my C5 today!

-It'll make a great early spring project!

Great Job![/QUOTE

Yikes get better soon so you can get back to wrenching and driving!
Old 01-17-2018, 10:02 PM
  #15  
NebraskaTrevor
Instructor
Thread Starter
 
NebraskaTrevor's Avatar
 
Member Since: Jul 2013
Location: Lincoln Nebraska
Posts: 103
Received 39 Likes on 20 Posts
Default

Originally Posted by alcoed
Sorry, but not my cup of tea. I realize it was a lot of work and you did a quality conversion, but, to me it looks like a aftermarket alternator that is spray painted to hide tarnished metal.
I know many like the change, but not me. Different strokes for different folks!
You could always choose another color? My car is all black yellow and carbon. Not many traces of silver, and zero chrome and polish, like you said different strokes. I think we can all agree in stock form the alternator is ugly!
Old 01-17-2018, 10:04 PM
  #16  
NebraskaTrevor
Instructor
Thread Starter
 
NebraskaTrevor's Avatar
 
Member Since: Jul 2013
Location: Lincoln Nebraska
Posts: 103
Received 39 Likes on 20 Posts
Default


Chipboard mockup


Black textured abs
Old 01-17-2018, 10:06 PM
  #17  
Patches
Team Owner
Support Corvetteforum!
 
Patches's Avatar
 
Member Since: Sep 2001
Location: Lake Elsinore, CA
Posts: 23,283
Received 889 Likes on 587 Posts

Default

Great minds think alike.

I disassembled mine and had it powder coated. You do need to ensure no paint restricts continuity from the alternator casing to the bracket and engine block. It's critical to its correct operation.


The following 3 users liked this post by Patches:
ArmchairArchitect (01-19-2018), Tusc (06-19-2020), vette4fl (03-02-2021)

Get notified of new replies

To How I powder coated my C5 Alternator

Old 01-17-2018, 10:09 PM
  #18  
NebraskaTrevor
Instructor
Thread Starter
 
NebraskaTrevor's Avatar
 
Member Since: Jul 2013
Location: Lincoln Nebraska
Posts: 103
Received 39 Likes on 20 Posts
Default

Originally Posted by Patches
Great minds think alike.

I disassembled mine and had it powder coated. You do need to ensure no paint restricts continuity from the alternator casing to the bracket and engine block. It's critical to its correct operation.


Nice.! Was the throttle body hard to do? I assume it is a bit more involved considering the stepper motor drive.
Old 01-17-2018, 10:25 PM
  #19  
Patches
Team Owner
Support Corvetteforum!
 
Patches's Avatar
 
Member Since: Sep 2001
Location: Lake Elsinore, CA
Posts: 23,283
Received 889 Likes on 587 Posts

Default

Originally Posted by NebraskaTrevor
Nice.! Was the throttle body hard to do? I assume it is a bit more involved considering the stepper motor drive.
Not difficult - just removed the motor and sensor and had the PC'er mask properly. I pre-masked all the parts with tape to show the PC tech what needed to be protected. He used special high-temp tape in place of the tape I laid out.
The following users liked this post:
NebraskaTrevor (01-17-2018)
Old 01-18-2018, 02:43 PM
  #20  
NebraskaTrevor
Instructor
Thread Starter
 
NebraskaTrevor's Avatar
 
Member Since: Jul 2013
Location: Lincoln Nebraska
Posts: 103
Received 39 Likes on 20 Posts
Default bracket cover

I continued working on the bracket cover today. I want a way to cover the cast alternator bracket without removing the bracket which would require some daunting power steering pump work and would require a new pulley since the old one would need to be destroyed in the process. Although not as nice as a PC'd bracket would be this cover will at least satisfy my desire to eliminate as much under hood silver as I can. I started with a cereal box pattern, then when I was happy with the fit I scanned the flat pattern and drew it in Fusion 360 so that I could cut one out of .060" ABS on my CNC router. Once the flat pattern was cut out I used a steel template to ask as a bending guide to get my bends in the right place to arrive at the final shape. The cover is simply held on by pinching it in place using the upper alternator mounting bold and a machined Delrin space that is cut to the correct length to fit over the upper mounting bushing.


Drawn in Fusion 360


Cut/ready to bend


All folded up


installed


The following users liked this post:
Tusc (06-19-2020)


Quick Reply: How I powder coated my C5 Alternator


All times are GMT -4. The time now is 02:13 PM.