
A&A Vortech C5 Supercharger Build Thread by Toys4Life C5
 11-25-2018, 09:26 PM
#141
Race Director


Member Since: Dec 2010
Location: Atlanta, GA
Posts: 10,426
Received 1,261 Likes
on
1,056 Posts
2020 Corvette of the Year Finalist (performance mods)
C5 of Year Winner (performance mods) 2019

wideband is a must and I would rather have a fuel pressure gauge over a boost gauge... if you only have a wideband and fuel pressure drops it will go lean so you will know there is an issue but it could be a number of things causing the lean condition, if you have a fuel pressure gauge as well that will help you narrow the issue down and many of them also have a warning light so if it drops below a certain level you get a bright light in your face and know to let off... boost gauges are ok to have but if you have a boost leak or slipping belt it won't cost you the motor like running lean so they aren't as important in my opinion and you can easily log boost with hptuners via the map
 11-26-2018, 12:33 AM
#142
Drifting

Thread Starter
Member Since: Nov 2016
Location: East Metro (Twin Cities) Minnesota
Posts: 1,992
Received 1,248 Likes
on
546 Posts
St. Jude Donor '21
wideband is a must and I would rather have a fuel pressure gauge over a boost gauge... if you only have a wideband and fuel pressure drops it will go lean so you will know there is an issue but it could be a number of things causing the lean condition, if you have a fuel pressure gauge as well that will help you narrow the issue down and many of them also have a warning light so if it drops below a certain level you get a bright light in your face and know to let off... boost gauges are ok to have but if you have a boost leak or slipping belt it won't cost you the motor like running lean so they aren't as important in my opinion and you can easily log boost with hptuners via the map
11-26-2018, 12:39 AM
#143
Race Director
Member Since: Dec 2010
Location: Atlanta, GA
Posts: 10,426
Received 1,261 Likes
on
1,056 Posts
2020 Corvette of the Year Finalist (performance mods)
C5 of Year Winner (performance mods) 2019
you might be right about that, I installed a 2 bar sensor when the blower went on so I was never using the stock map sensor... a cobalt ss map will work, you just need to shave it down on one side and it plugs right in and uses the same connector and then switch your operating system in hptuners... it's still fairly easy though and a viable option if you don't have a boost gauge
11-26-2018, 12:02 PM
#144
Safety Car


Thanks as always guys..For now the fuel guage will have to wait...funds are not endless....the SC arrived today..will take a peak when I get home
11-26-2018, 02:51 PM
#145
Drifting
I opted to get 2 of the obd aeroforce gauges. They have analog inputs, so in addition to all the obd stuff, I can see wideband AFR and fuel pressure directly on the gauge too if I want. My wideband is a LC-2, so i actually don't have a dedicated gauge for it either, I can log via serial or display on the aeroforce gauge if i want. And you can set alarms based on whatever high / low conditions you want. Lots of different ways to skin the cat.
What kit options did you choose? I just placed my order about 30 minutes ago.
11-26-2018, 04:04 PM
#146
Safety Car
IMO I agree wideband is a must and boost/fuel pressure are nice but not something you need to see all the time. I got a fuel pressure sending unit but no gauge. I can datalog it when tuning to make sure everything is good and check up on it now and then if i want...but if AFR is fine then no reason to need it all the time... IMO. Same for boost.
I opted to get 2 of the obd aeroforce gauges. They have analog inputs, so in addition to all the obd stuff, I can see wideband AFR and fuel pressure directly on the gauge too if I want. My wideband is a LC-2, so i actually don't have a dedicated gauge for it either, I can log via serial or display on the aeroforce gauge if i want. And you can set alarms based on whatever high / low conditions you want. Lots of different ways to skin the cat.
What kit options did you choose? I just placed my order about 30 minutes ago.
11-26-2018, 04:15 PM
#147
Drifting
V3 Ti with the secondary drive, 3.6 pulley. A little more all-out but I'm up at 4300' so I got to combat the thin air. I lost about 70whp vs sea level.'
More or less same plan here, I already have the fuel pump in and gauges in. I've done a bunch of the little stuff, now it's time to finally get cracking on the big install. Need to find a shop that can install some aluminum bungs into the charge pipe tubing.
Doing the install at your own pace and not rushing is the way to go..actually makes it fun
Last edited by aaronc7; 11-26-2018 at 04:16 PM.
11-26-2018, 07:31 PM
#148
Safety Car
V3 Ti with the secondary drive, 3.6 pulley. A little more all-out but I'm up at 4300' so I got to combat the thin air. I lost about 70whp vs sea level.'
More or less same plan here, I already have the fuel pump in and gauges in. I've done a bunch of the little stuff, now it's time to finally get cracking on the big install. Need to find a shop that can install some aluminum bungs into the charge pipe tubing.
Doing the install at your own pace and not rushing is the way to go..actually makes it fun
More or less same plan here, I already have the fuel pump in and gauges in. I've done a bunch of the little stuff, now it's time to finally get cracking on the big install. Need to find a shop that can install some aluminum bungs into the charge pipe tubing.
Doing the install at your own pace and not rushing is the way to go..actually makes it fun
11-26-2018, 09:41 PM
#149
Drifting
11-26-2018, 09:48 PM
#150
Race Director
Member Since: Dec 2010
Location: Atlanta, GA
Posts: 10,426
Received 1,261 Likes
on
1,056 Posts
2020 Corvette of the Year Finalist (performance mods)
C5 of Year Winner (performance mods) 2019
did you go ahead and upgrade to an 8 or 10 rib as well?... might as well have since you have to get a balancer with the secondary drive anyway
11-27-2018, 10:32 AM
#151
Drifting
Yeah I did 8-rib secondary drive. I was thinking about donig the 10% OD balancer on 6 rib (no secondary drive), which would leave me the option to switch to secondary/8 rib down the road...but i decided I don't want to potentially have to mess with it again sooner rather than later. With the sale going on, it made it a pretty easy choice for me to just get the whole setup now and not have to worry about belt slippage.
Last edited by aaronc7; 11-27-2018 at 10:32 AM.
11-27-2018, 10:52 AM
#152
Safety Car
Yeah I did 8-rib secondary drive. I was thinking about donig the 10% OD balancer on 6 rib (no secondary drive), which would leave me the option to switch to secondary/8 rib down the road...but i decided I don't want to potentially have to mess with it again sooner rather than later. With the sale going on, it made it a pretty easy choice for me to just get the whole setup now and not have to worry about belt slippage.
12-11-2018, 08:41 AM
#153
Safety Car


Pics of guage pod....
Last edited by tabbruzz; 12-11-2018 at 08:44 AM.
12-11-2018, 09:49 AM
#154
Drifting
Thread Starter
Member Since: Nov 2016
Location: East Metro (Twin Cities) Minnesota
Posts: 1,992
Received 1,248 Likes
on
546 Posts
St. Jude Donor '21
Adding the build series videos back in one spot so first time viewers of this thread can find them easier.
In order - Parts 0 through 7 and the test drive.
In order - Parts 0 through 7 and the test drive.
Last edited by Toys4Life C5; 12-07-2019 at 01:50 PM.
01-08-2019, 12:07 PM
#155
Drifting
Thanks again for the video series. I ended up watching tidbits of the later parts a couple times during my install for some tips and tricks. I just have to work on my cold side pipe alignment, put the top cover on and trim one panel and it's done.
If you're going to compile them all in one post, why not just edit the original post and put them there?
If you're going to compile them all in one post, why not just edit the original post and put them there?
01-08-2019, 12:26 PM
#156
Drifting
Thread Starter
Member Since: Nov 2016
Location: East Metro (Twin Cities) Minnesota
Posts: 1,992
Received 1,248 Likes
on
546 Posts
St. Jude Donor '21
Thanks again for the video series. I ended up watching tidbits of the later parts a couple times during my install for some tips and tricks. I just have to work on my cold side pipe alignment, put the top cover on and trim one panel and it's done.
If you're going to compile them all in one post, why not just edit the original post and put them there?
If you're going to compile them all in one post, why not just edit the original post and put them there?
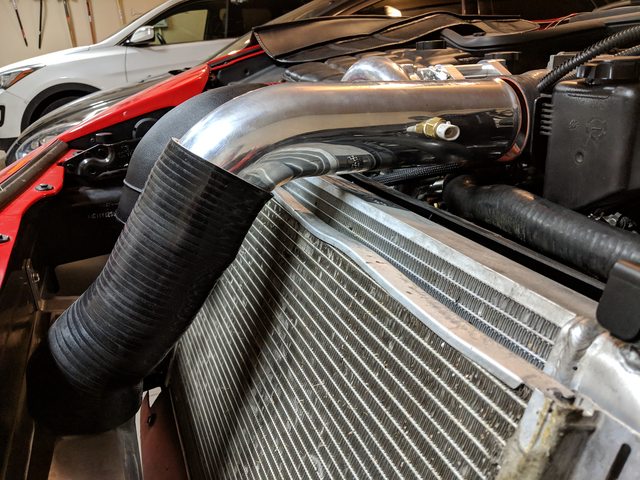
How did your main aluminum pipe from intercooler to MAF line up - mine works but I think I am going to have a custom cut/weld done to the pipe to get it to align straighter....
01-08-2019, 01:12 PM
#157
Drifting
Too funny, I was literally just watching that part of your video on that, wanted to see how yours looked and aligned. I am not running a MAF though, so I have the "MAF-less" pipe and the long straight section is longer. I feel like that long, straight section is not long enough on mine. If I connect the intercooler side of the pipe first and get it where it feels like it should be, the other end of the pipe will just barely reach but not go inside the TB coupler. If I install the TB side first and get it set, then I really have to tug on the intercooler side coupler to get it all to fit and then the bend in aluminum piece "bulges" quite high. I don't have the hood on at the moment, so I can't test fit really, but I don't think the hood will close as is.
I was working on this at the end of a long day of working though, so I'm going to give it a fresh look soon and see if I can't make it work... but I feel like in my case the easiest fix may be a longer coupler/reducer at the TB side, if I can find something that works.
Are you having similar issues or is it hitting the radiator/condensor or something?
edit: I'll also add that I am running a full-size Dewitts radiator, but the air intake does fit, so I don't think my radiator is causing issues.
Last edited by aaronc7; 01-08-2019 at 01:46 PM.
01-08-2019, 09:37 PM
#158
Drifting
Thread Starter
Member Since: Nov 2016
Location: East Metro (Twin Cities) Minnesota
Posts: 1,992
Received 1,248 Likes
on
546 Posts
St. Jude Donor '21
Too funny, I was literally just watching that part of your video on that, wanted to see how yours looked and aligned. I am not running a MAF though, so I have the "MAF-less" pipe and the long straight section is longer. I feel like that long, straight section is not long enough on mine. If I connect the intercooler side of the pipe first and get it where it feels like it should be, the other end of the pipe will just barely reach but not go inside the TB coupler. If I install the TB side first and get it set, then I really have to tug on the intercooler side coupler to get it all to fit and then the bend in aluminum piece "bulges" quite high. I don't have the hood on at the moment, so I can't test fit really, but I don't think the hood will close as is.
I was working on this at the end of a long day of working though, so I'm going to give it a fresh look soon and see if I can't make it work... but I feel like in my case the easiest fix may be a longer coupler/reducer at the TB side, if I can find something that works.
Are you having similar issues or is it hitting the radiator/condensor or something?
edit: I'll also add that I am running a full-size Dewitts radiator, but the air intake does fit, so I don't think my radiator is causing issues.
I was working on this at the end of a long day of working though, so I'm going to give it a fresh look soon and see if I can't make it work... but I feel like in my case the easiest fix may be a longer coupler/reducer at the TB side, if I can find something that works.
Are you having similar issues or is it hitting the radiator/condensor or something?
edit: I'll also add that I am running a full-size Dewitts radiator, but the air intake does fit, so I don't think my radiator is causing issues.
01-08-2019, 10:25 PM
#159
Safety Car
01-09-2019, 12:10 AM
#160
Drifting
This is the best compromise I can come to with mine... note it's not connected at the TB side. If I force the tube into the TB coupler, it will come off the IC outlet. If I pull the alum pipe out of the long silicone piece, the alum pipe will 'bulge' up significantly, surely coming in contact with hood.
Best solution I think in my case I think might be a 4" long coupler at the TB. I found some 4" and 4.7" couplers on ebay.
I agree the angle of alum piece seems a little off in my case, a little less sharp of angle would work better in my case I believe., it points too far "down".
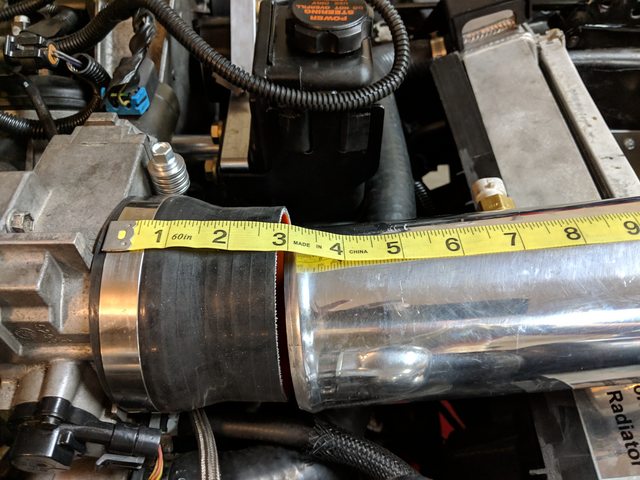
Best solution I think in my case I think might be a 4" long coupler at the TB. I found some 4" and 4.7" couplers on ebay.
I agree the angle of alum piece seems a little off in my case, a little less sharp of angle would work better in my case I believe., it points too far "down".
Last edited by aaronc7; 01-09-2019 at 12:12 AM.