
How to replace the passenger HVAC actuator
 11-29-2006, 04:36 PM
#1
Instructor

Thread Starter
This forum has helped me greatly in my few months of Corvette ownership so I'll try to give back to this great community:
If you're getting error codes B0367 and/or B0446 the passenger side actuator is either out of range or not responding at all to the HVAC Control Module. Below are the steps to access and replace the actuator.
Unlike the driver's side actuator, you cannot access the passenger side actuator from underneath the dashboard. (For the drivers side, visit this link for a great write up by JR_Vette: http://forums.corvetteforum.com/show....php?t=1465931)
You must remove the dashboard and glovebox to access the passenger side actuator. There is no need to remove the radio and HVAC Control Module as I did. I was originally hoping I could access the actuator through that area somehow, but quickly realized it was not possible. I found a detailed write up on the dashboard removal so I won't try to re-invent the wheel here, just follow the steps provided and you'll have the dash off in about 45 minutes. I realize this is an article for a HUD conversion, but the steps to remove the dashboard are very detailed and obviously apply here as well. http://joshker99.home.comcast.net/hudinstall2.htm
[TIP: Wrap the top of your steering wheel in blue painters tape or cover it with a towel to prevent scratching the leather.]
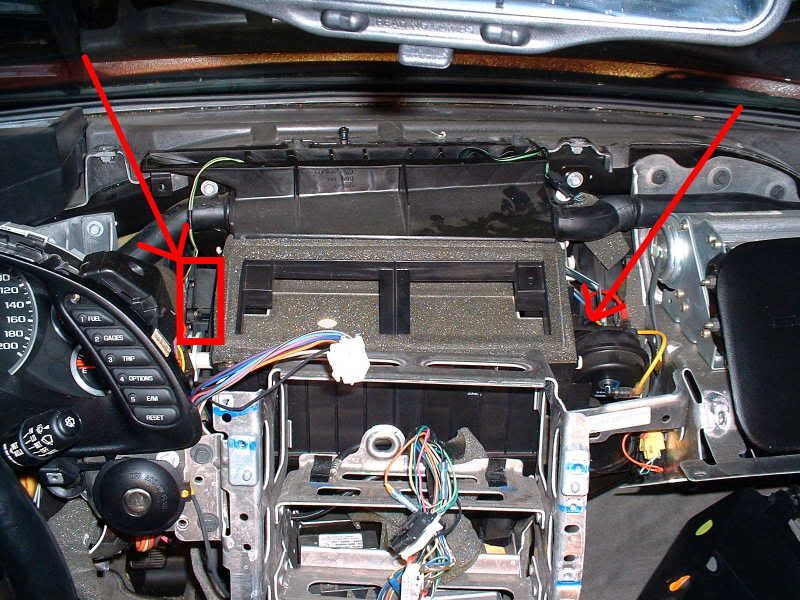
Once the dash is off, you can easily locate both the drivers side and passenger side actuators. The passenger side is a little hidden by the round motor on the right side of the picture, but its there and easily visible when you get in there.
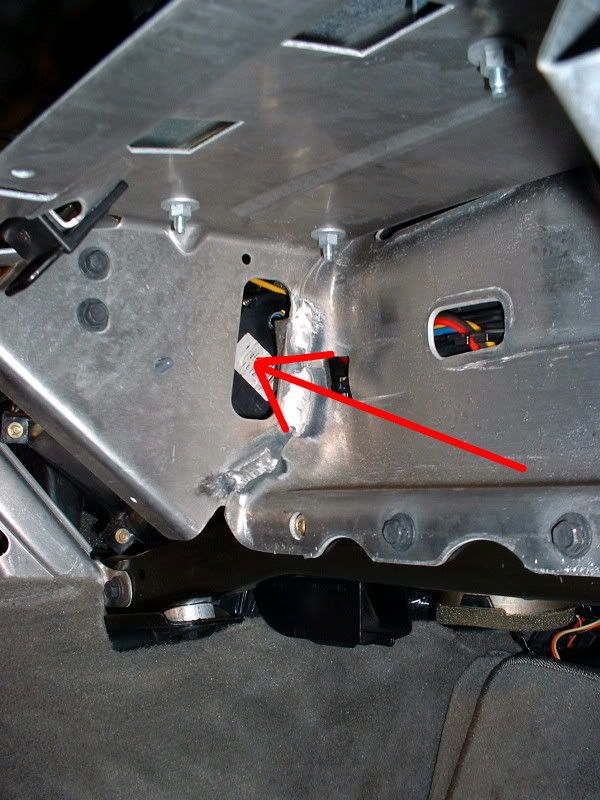
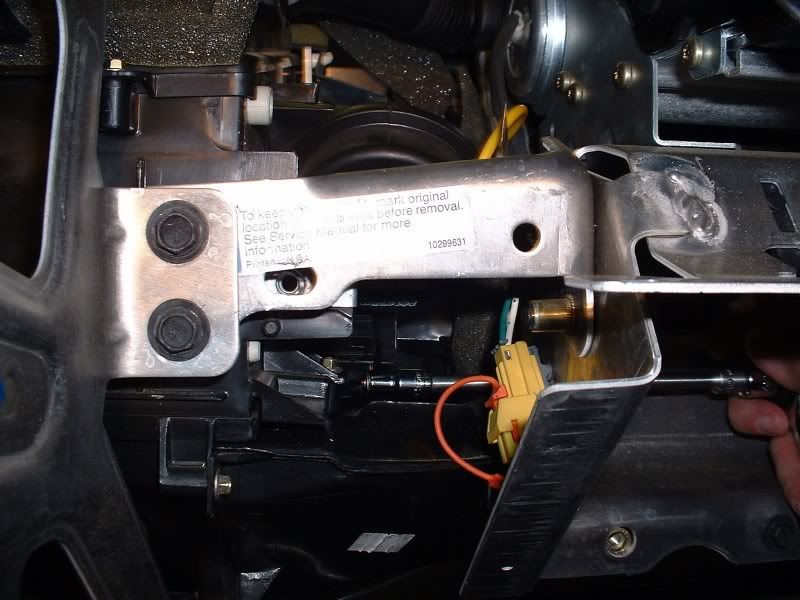
Using a 7mm socket, extension and wrench, you can remove the two bolts to the actuator through a cutout in the glovebox frame. That's the actuator with the bar code sticker on it. You can see the top bolt through the frame in this picture.
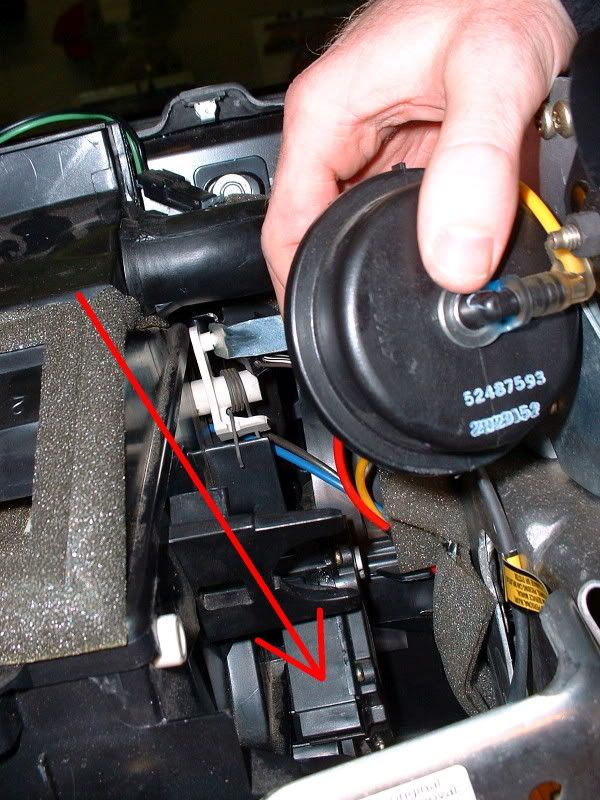
Now, rotate and twist the round motor off it's base (no screws or bolts, just twist and turn it a little and it will slide right off). Once off it's base, just move it out of the way and you can now pull the actuator out and disconnect the wiring harness.
Now just plug in your new actuator and reverse the process.
Approximate duration: 2-4 hours.
Good luck - hope this helps someone else!
If you have any questions feel free to send me a PM and I'll do what I can to help.
If you're getting error codes B0367 and/or B0446 the passenger side actuator is either out of range or not responding at all to the HVAC Control Module. Below are the steps to access and replace the actuator.
Unlike the driver's side actuator, you cannot access the passenger side actuator from underneath the dashboard. (For the drivers side, visit this link for a great write up by JR_Vette: http://forums.corvetteforum.com/show....php?t=1465931)
You must remove the dashboard and glovebox to access the passenger side actuator. There is no need to remove the radio and HVAC Control Module as I did. I was originally hoping I could access the actuator through that area somehow, but quickly realized it was not possible. I found a detailed write up on the dashboard removal so I won't try to re-invent the wheel here, just follow the steps provided and you'll have the dash off in about 45 minutes. I realize this is an article for a HUD conversion, but the steps to remove the dashboard are very detailed and obviously apply here as well. http://joshker99.home.comcast.net/hudinstall2.htm
[TIP: Wrap the top of your steering wheel in blue painters tape or cover it with a towel to prevent scratching the leather.]
Once the dash is off, you can easily locate both the drivers side and passenger side actuators. The passenger side is a little hidden by the round motor on the right side of the picture, but its there and easily visible when you get in there.
Using a 7mm socket, extension and wrench, you can remove the two bolts to the actuator through a cutout in the glovebox frame. That's the actuator with the bar code sticker on it. You can see the top bolt through the frame in this picture.
Now, rotate and twist the round motor off it's base (no screws or bolts, just twist and turn it a little and it will slide right off). Once off it's base, just move it out of the way and you can now pull the actuator out and disconnect the wiring harness.
Now just plug in your new actuator and reverse the process.
Approximate duration: 2-4 hours.
Good luck - hope this helps someone else!
If you have any questions feel free to send me a PM and I'll do what I can to help.
 11-29-2006, 06:28 PM
#2
Tech Contributor


Member Since: Dec 1999
Location: Anthony TX
Posts: 32,736
Received 2,180 Likes
on
1,583 Posts
CI 6,7,8,9,11 Vet
St. Jude Donor '08

FletcherT76
Great job!!! Nice post!!! 
Bill C
Great job!!! Nice post!!!
Bill C
11-30-2006, 08:40 PM
#3
Race Director


Great information!! Thank you for taking the time to document it! 


 04-13-2018, 07:22 AM
#6
Melting Slicks

 12-28-2018, 05:27 PM
#8
Melting Slicks
On this or other pages that have information of value to you, once you have the photos visible it's time to save the page as a web page, complete. Process varies with browsers, but once saved as a complete web page you have access with photos, even without internet access!
I know this post has aged more than a bit, but I came here stuck in the middle of the actuators (driver's done, passenger fighting). Think I found what I needed.
I know this post has aged more than a bit, but I came here stuck in the middle of the actuators (driver's done, passenger fighting). Think I found what I needed.