
How to replace the (p1416) air check valve??
 02-19-2018, 02:41 PM
#261
Melting Slicks


That code is for low pressure on passenger side, but is not the same as the code for the air check valve itself.
And, I think you meant Intake, not exhaust, Manifold, right?
Edit: Oops, my response is confusing, because you confused me by posting on a thread that pertains to a different code altogether. You might want to start a new thread, or search for your code. You'll get more accurate responses that way. ;-)
Last edited by MrLeadFoot; 02-19-2018 at 02:46 PM.
 08-11-2019, 09:58 AM
#262

Ok,,,,,I'm going to help put this check valve cleaning procedure in high gear and try to make it so anyone can under stand how to do it and where all the parts are:
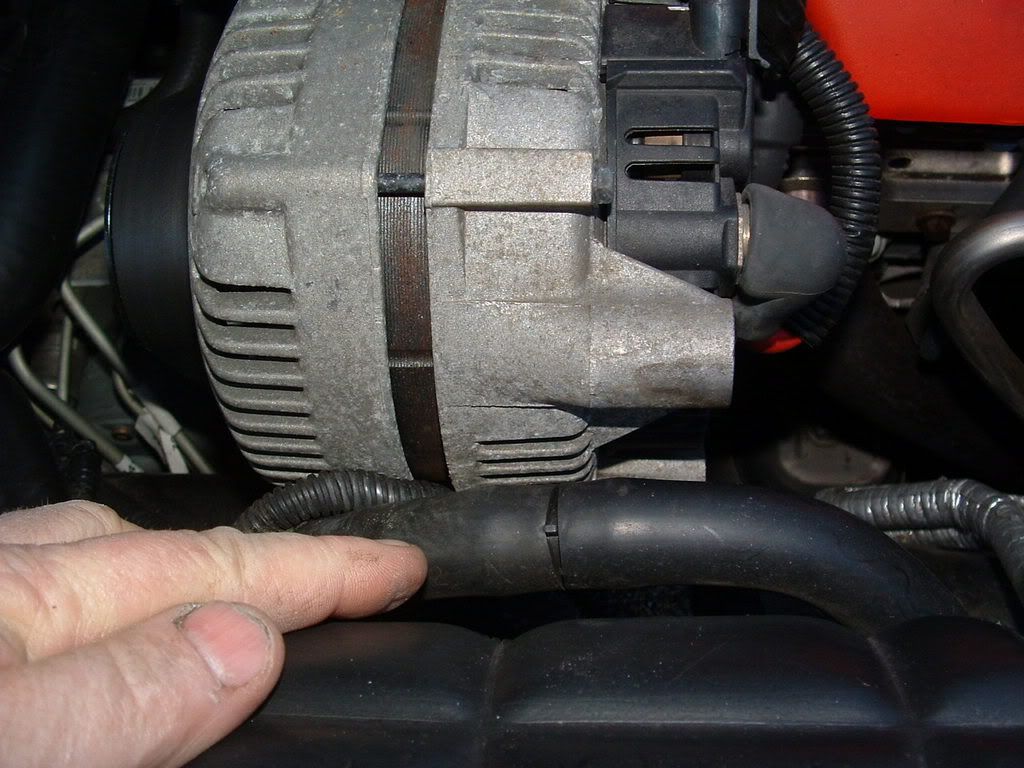
The AIR Pump is an electric motor driven pump and is below the drivers side headlight:

The output pipe off the pump is vacuum controlled:
Here is the suction side of the pump. It get clean air from the air box:

The output tube runs along the drivers side fender well. It has a connector in the center of the pipe that will allow you to disconnect the pump from the rest of the system:
Here is the rubber hose disconnected:
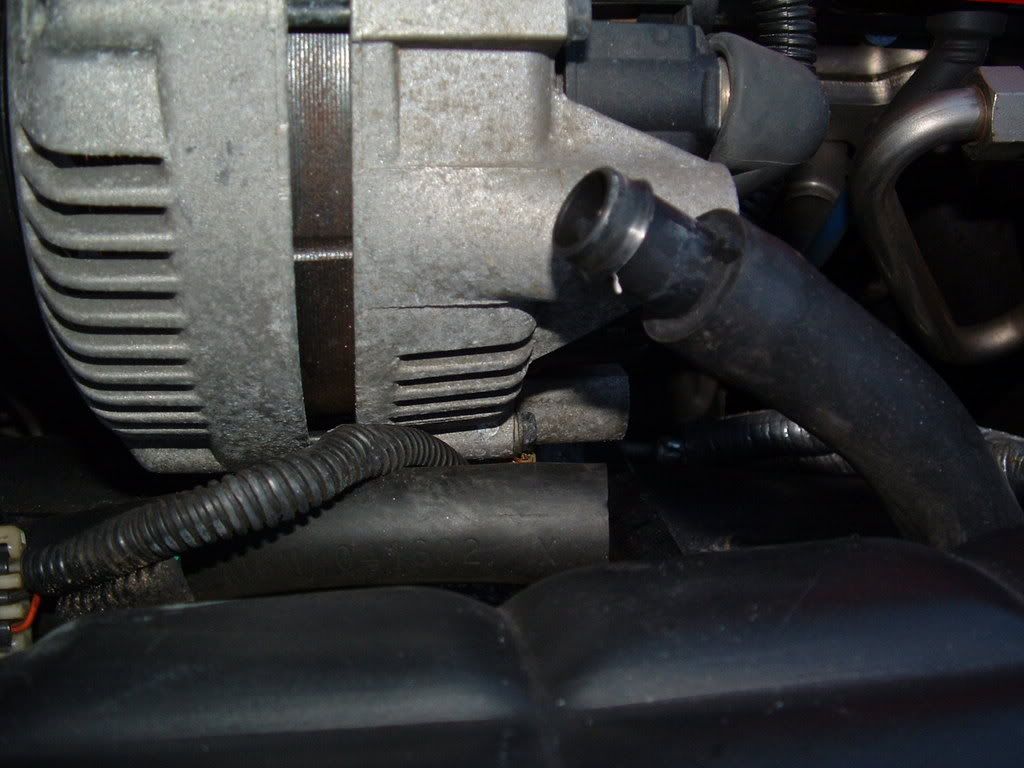
You can disconnect the hose here and conduct the cleaning from this location. Spray some carburetor cleaner in the rubber hose going to the "REAR" (the one pointing UP in the picture above). This will allow cleaner to reach BOTH check valves. Once you give the hose a GOOD shot of carb cleaner, use compressed air to force it through the system.
Once you have forced the cleaner thru, give the hose a good shot of WD-40 and force that through. The CHECK VALVES have a spring loaded disk that seats on a plastic seat. If it gets exhaust reside on the seat, moisture from the cold air will cause the seat to stick shut.
Cleaning it with carb cleaner and WD-40 should allow it to free up.
IF for some reason that the seat is stuck shut bad enough, you may need to remove the hose from the AIR side of the check valve and force chemicals in that individual valve.
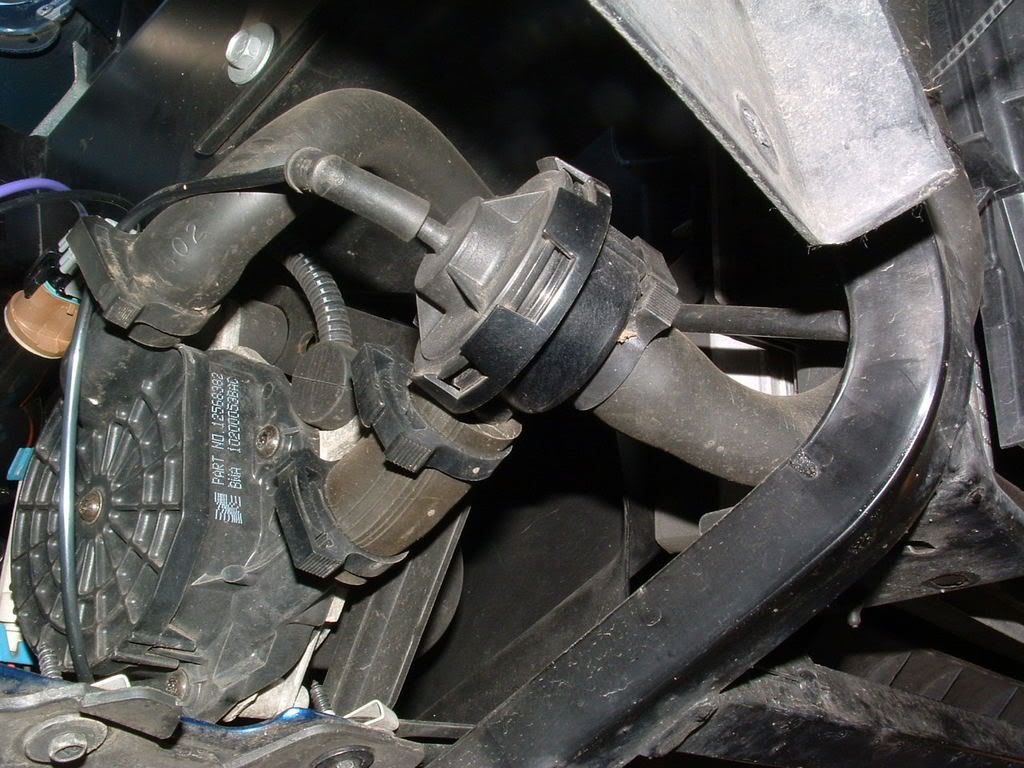
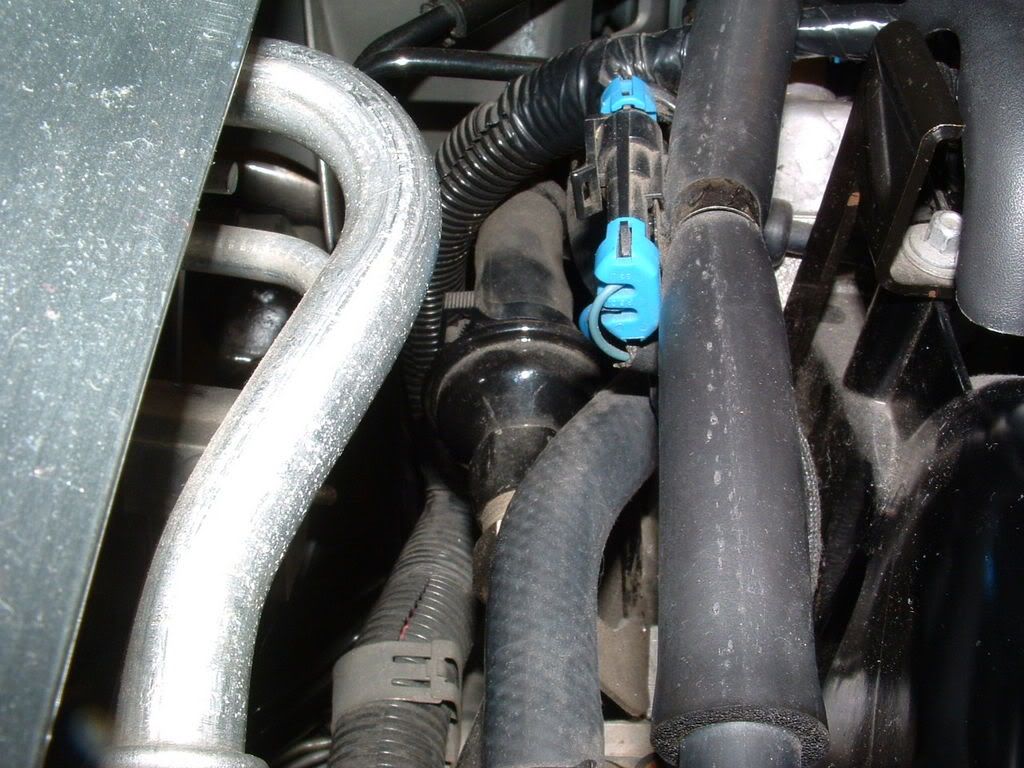
There are TWO check valves. One for the drivers side which is easily serviced and right out in the open:
The one for the passengers side is behind the engine!!!!

 Yep,,it's a royal BITCH to get to. It is possible to get a wrench back there and loosen the retaining bolt BUT,,, like I said,,,you will NOT enjoy the experience. I took some pictures of the passengers side valve at Bowling Green in the museum on the C5 chassis mock-up. You will NOT be able to see this on your car!
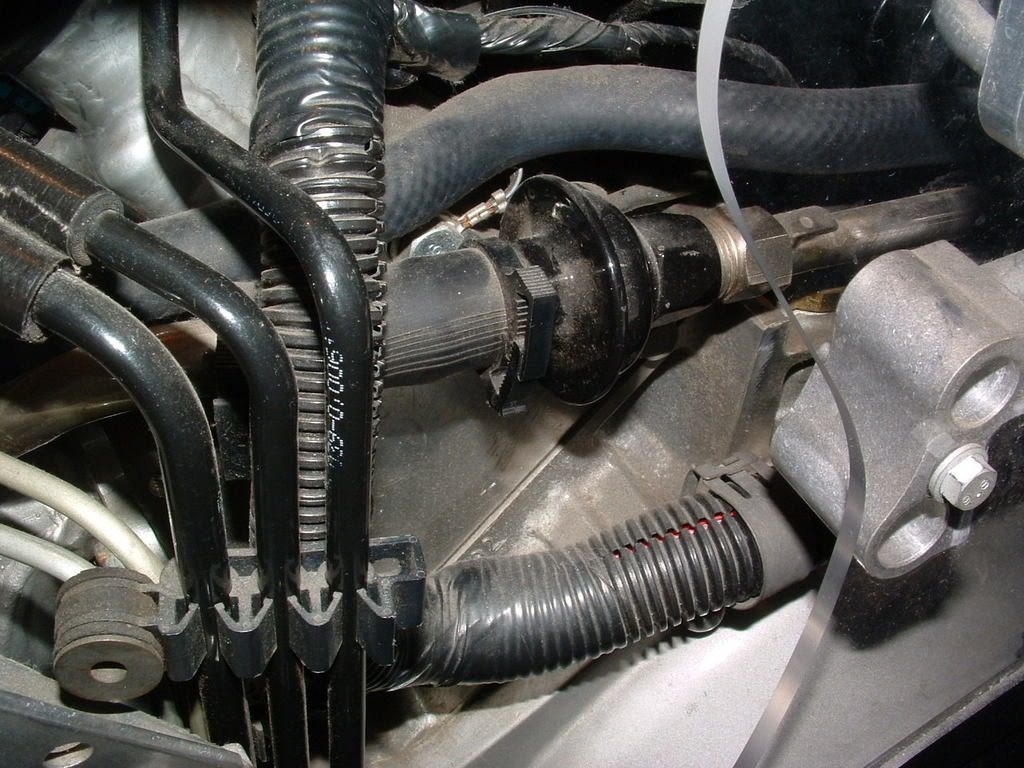

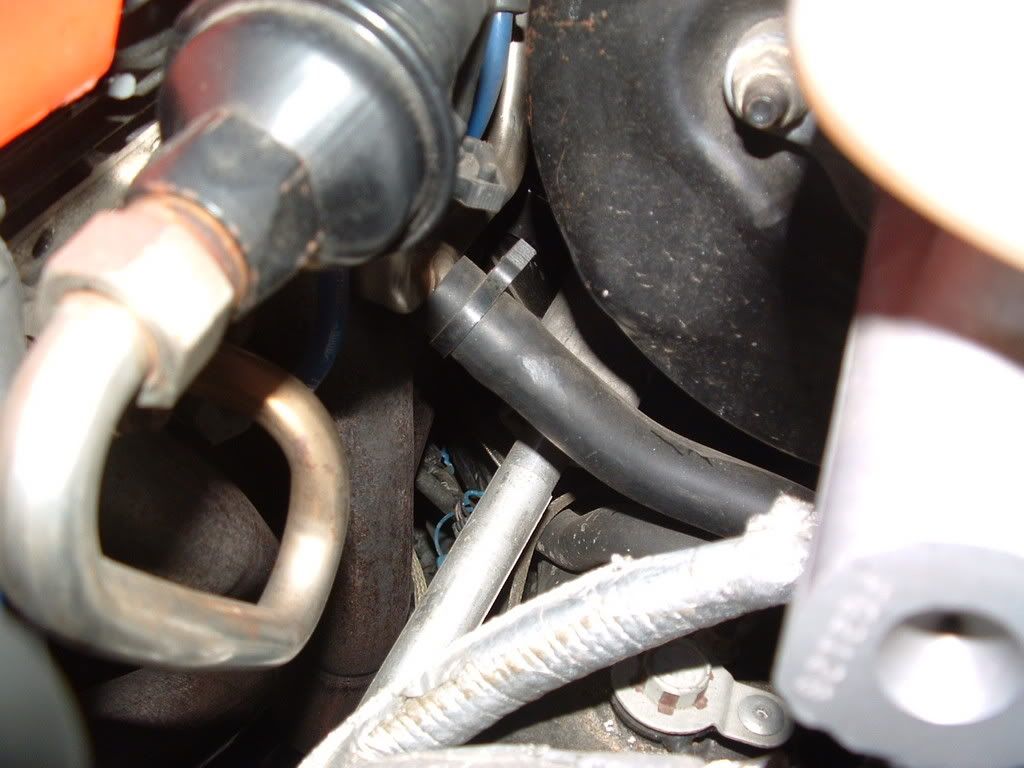
If you need to clean the passengers side valve, you can disconnect the pump air supply hose and the air supply hose from the Y connection at the rear of the engine. The next pics will show you where the Y connection is:
Here is where the AIR supply hose attach�s to the Y connection:
Look to the left of the power brake booster:

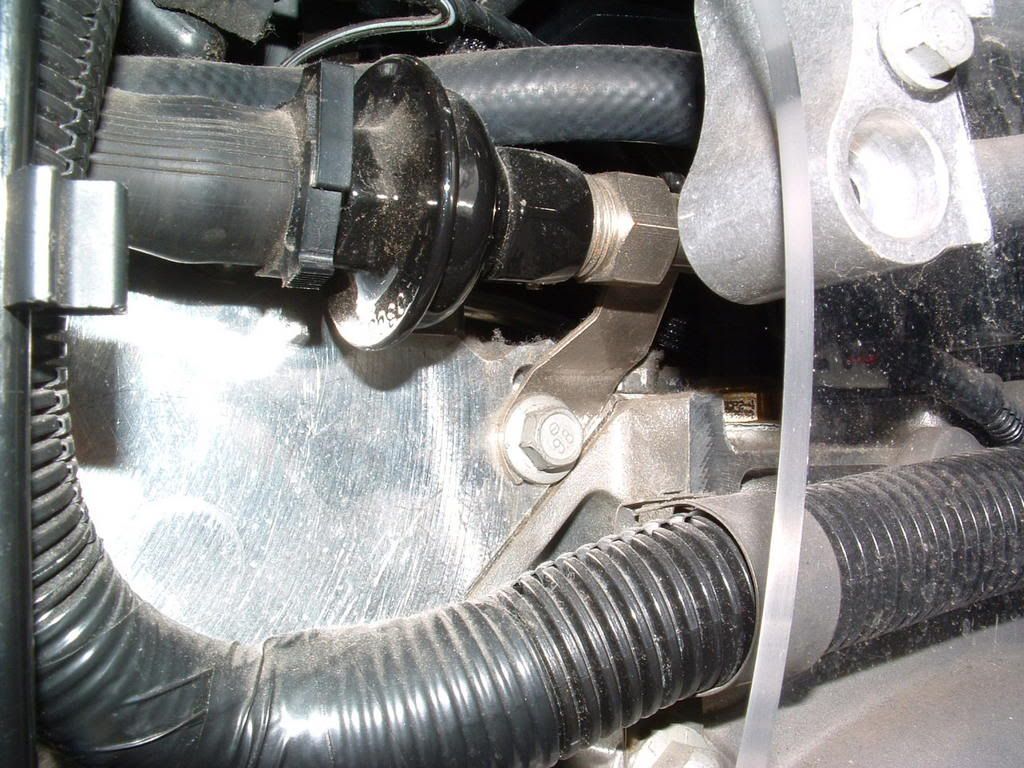
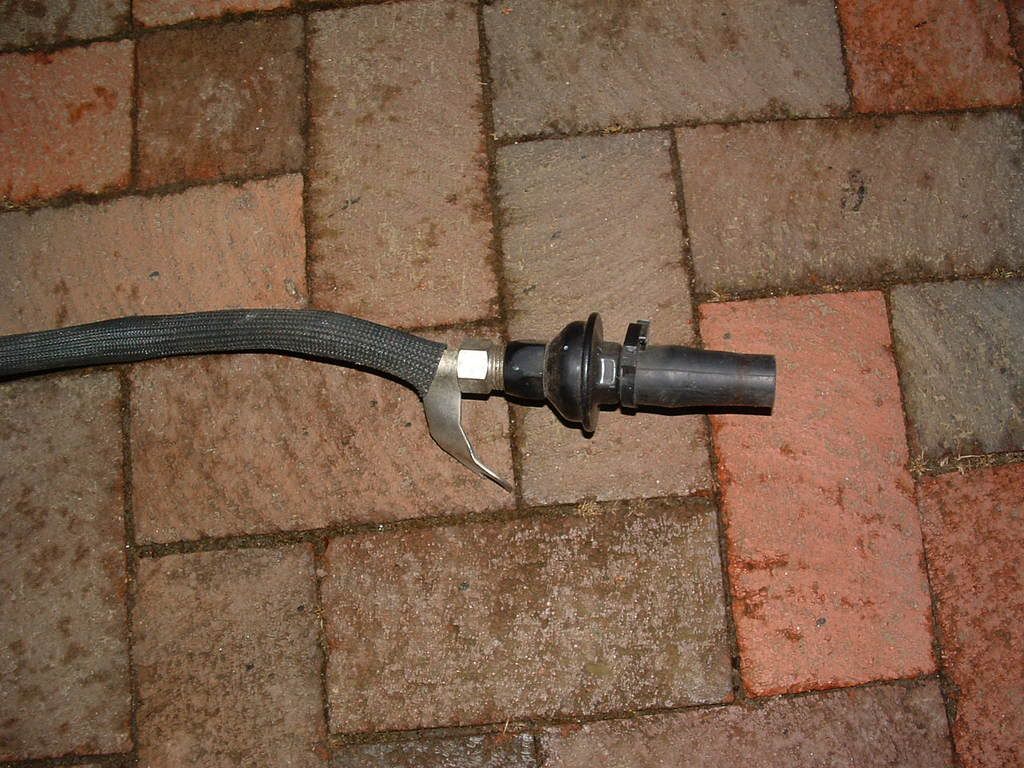
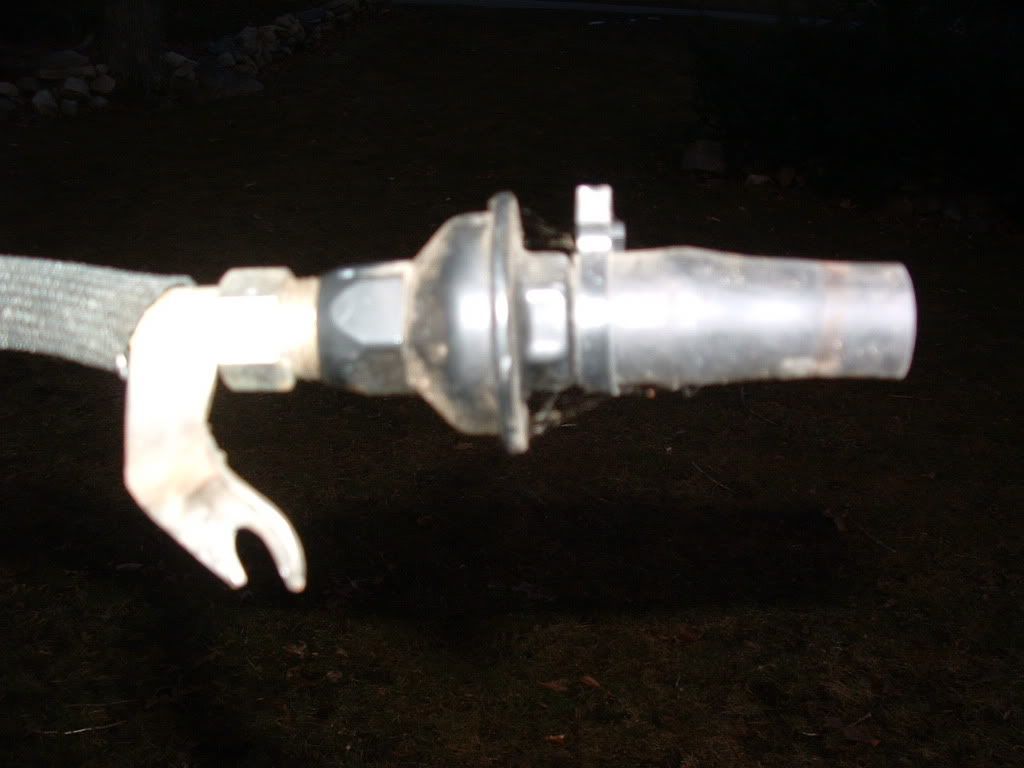
Here is the passenger side check valve, SS pipe and rubber hose fitting:

Hope this helps!
BC
The AIR Pump is an electric motor driven pump and is below the drivers side headlight:
The output pipe off the pump is vacuum controlled:
Here is the suction side of the pump. It get clean air from the air box:
The output tube runs along the drivers side fender well. It has a connector in the center of the pipe that will allow you to disconnect the pump from the rest of the system:
Here is the rubber hose disconnected:
You can disconnect the hose here and conduct the cleaning from this location. Spray some carburetor cleaner in the rubber hose going to the "REAR" (the one pointing UP in the picture above). This will allow cleaner to reach BOTH check valves. Once you give the hose a GOOD shot of carb cleaner, use compressed air to force it through the system.
Once you have forced the cleaner thru, give the hose a good shot of WD-40 and force that through. The CHECK VALVES have a spring loaded disk that seats on a plastic seat. If it gets exhaust reside on the seat, moisture from the cold air will cause the seat to stick shut.
Cleaning it with carb cleaner and WD-40 should allow it to free up.
IF for some reason that the seat is stuck shut bad enough, you may need to remove the hose from the AIR side of the check valve and force chemicals in that individual valve.
There are TWO check valves. One for the drivers side which is easily serviced and right out in the open:
The one for the passengers side is behind the engine!!!!
Yep,,it's a royal BITCH to get to. It is possible to get a wrench back there and loosen the retaining bolt BUT,,, like I said,,,you will NOT enjoy the experience. I took some pictures of the passengers side valve at Bowling Green in the museum on the C5 chassis mock-up. You will NOT be able to see this on your car!If you need to clean the passengers side valve, you can disconnect the pump air supply hose and the air supply hose from the Y connection at the rear of the engine. The next pics will show you where the Y connection is:
Here is where the AIR supply hose attach�s to the Y connection:
Look to the left of the power brake booster:
Here is the passenger side check valve, SS pipe and rubber hose fitting:
Hope this helps!
BC
08-11-2019, 11:11 AM
#263
Melting Slicks
That code is for low pressure on passenger side, but is not the same as the code for the air check valve itself.
And, I think you meant Intake, not exhaust, Manifold, right?
Edit: Oops, my response is confusing, because you confused me by posting on a thread that pertains to a different code altogether. You might want to start a new thread, or search for your code. You'll get more accurate responses that way. ;-)
And, I think you meant Intake, not exhaust, Manifold, right?
Edit: Oops, my response is confusing, because you confused me by posting on a thread that pertains to a different code altogether. You might want to start a new thread, or search for your code. You'll get more accurate responses that way. ;-)
Anyway.... Can someone confirm p0492 code is the passenger check valve? You are saying p0492 means low passenger vacuum pressure? So would that be the passenger check valve acting up or what else should I look for?
I tried spraying CRC MAF cleaner down the pipe to the passenger side check valve followed by compressed air and it didn't fix the check engine light..
Is CRC MAF cleaner too weak?
Last edited by mammoth713; 08-11-2019 at 11:12 AM.
08-11-2019, 12:01 PM
#264
Tech Contributor


Member Since: Dec 1999
Location: Anthony TX
Posts: 32,736
Received 2,180 Likes
on
1,583 Posts
CI 6,7,8,9,11 Vet
St. Jude Donor '08

Try carb cleaner Remember,, this is just a Band-Aid fix.. The real answer is to replace the valve.. Your rubber disk inside the check valve may just be too stiff to work correctly. The carb cleaner may soften it up but like I stated, its not a permanent fix.
Bill
Bill
08-11-2019, 03:34 PM
#265
Melting Slicks
When I posted I meant does the line from the check valve run down to meet up with the exhaust system next? I was just curious what is past the check valve system wise so when I spray the chemicals down the tube, that it won't ruin something downstream from it.
Anyway.... Can someone confirm p0492 code is the passenger check valve? You are saying p0492 means low passenger vacuum pressure? So would that be the passenger check valve acting up or what else should I look for?
I tried spraying CRC MAF cleaner down the pipe to the passenger side check valve followed by compressed air and it didn't fix the check engine light..
Is CRC MAF cleaner too weak?
I had the code, and sprayed PB Blaster in the hose. Code went away. Later I got the the code for the driver's side, so bought a replacement valve. Around the same time, my oil pressure sensor started leaking, soI decided to pull the manifold to replace it, thinking maybe I should use the check valve I bought for the driver's side to replace the passenger check valve, instead, since I would have the manifold off. Imagine my surprise, after removing the passenger side check valve and wiping it down, to find that it looked just fine. I figured it must just have gotten stuck and the PB Blaster freed it up. So, I didn't even replace it, and it's been fine ever since.
04-25-2020, 07:19 PM
#266

Sorry to bring this back from the dead, just wanted to share a quick tip for those looking to replace the valve.
As others have stated, even with the intake manifold off the check valve bracket bolt is a real PITA to reach. Luckly I had a sliding T handle 1/4� drive and a deep 13mm socket. I was able to get in there and loosen the bolt with that. I don�t see how I could have gotten a ratchet in there, or used a wrench. https://www.kctoolco.com/heyco-02503...ets-1-4-drive/
My valve was also seized to the hard line. I removed the hard line and tried heating the valve up with little success. I ended up whizzing it off with a cutting wheel.
Hope I never have to do this again!
04-25-2020, 09:40 PM
#267
Melting Slicks
I didn't know 13mm sockets were available in 1/4". Since you mentioned a deep socket, does that mean you can reach it from the top, so you don't even have to put a tool behind the motor? If so, couldn't you then just use anything like a small ratchet, or maybe a 1/4" breaker bar?
I can't remember what I used. I seem to recall dropping the bolt, and having to find it. If memory serves correctly, after removing and dropping the bolt, I discovered the stay/bracket that holds the hard line in place is split, so you don't have to even remove the bolt completely. You only need to loosen the bolt enough to slide the bracket rearward towards the firewall, and it slides off the bolt shaft. I hope that makes sense.
I can't remember what I used. I seem to recall dropping the bolt, and having to find it. If memory serves correctly, after removing and dropping the bolt, I discovered the stay/bracket that holds the hard line in place is split, so you don't have to even remove the bolt completely. You only need to loosen the bolt enough to slide the bracket rearward towards the firewall, and it slides off the bolt shaft. I hope that makes sense.
04-26-2020, 03:11 AM
#268
Melting Slicks
I had the issue ~2016 and did the spray in the tube + reset car computer. But the code showed up again late 2019.. the spraying in tube trick didn't work and I was sick of messing with it so hired a dealer to do it.
The dealer service was a whole fiasco I'm not going to bother going into, but I will say my car has been fine since.
The dealer service was a whole fiasco I'm not going to bother going into, but I will say my car has been fine since.
04-27-2020, 01:00 PM
#269

Sorry to bring this back from the dead, just wanted to share a quick tip for those looking to replace the valve.
As others have stated, even with the intake manifold off the check valve bracket bolt is a real PITA to reach. Luckly I had a sliding T handle 1/4� drive and a deep 13mm socket. I was able to get in there and loosen the bolt with that. I don�t see how I could have gotten a ratchet in there, or used a wrench. https://www.kctoolco.com/heyco-02503...ets-1-4-drive/
My valve was also seized to the hard line. I removed the hard line and tried heating the valve up with little success. I ended up whizzing it off with a cutting wheel.
Hope I never have to do this again!
As others have stated, even with the intake manifold off the check valve bracket bolt is a real PITA to reach. Luckly I had a sliding T handle 1/4� drive and a deep 13mm socket. I was able to get in there and loosen the bolt with that. I don�t see how I could have gotten a ratchet in there, or used a wrench. https://www.kctoolco.com/heyco-02503...ets-1-4-drive/
My valve was also seized to the hard line. I removed the hard line and tried heating the valve up with little success. I ended up whizzing it off with a cutting wheel.
Hope I never have to do this again!
04-27-2020, 01:14 PM
#270
Tech Contributor
Member Since: Dec 1999
Location: Anthony TX
Posts: 32,736
Received 2,180 Likes
on
1,583 Posts
CI 6,7,8,9,11 Vet
St. Jude Donor '08
For those of you that read this post an decide to try to spray the problem away,, It may work and then again it may not. After I dissected an old bad check valve, I found out that the valve part is actually a rubber disk that deflects when the A.I.R. pump builds up pressure. When the valve goes bad, the cause is that rubber disk get hard/brittle and can not deflect enough to allow enough air to pass through it. The PCM runs the A.I.R. test and expects to see a specific change in O2 sensor readings due to the fresh air being injected into the exhaust system. If that value doesn't change enough, it sets that DTC.
BC
BC
Last edited by Bill Curlee; 04-28-2020 at 11:59 AM.
04-27-2020, 03:58 PM
#271
For those of you that read this post an decide to try to spray the problem away,, It may work and then again it may not. After I dissected an old bad check valve, I found out that the valve part is actually a rubber disk that deflects when the A.I.R. pump builds up pressure. When the valve goes bad, the cause is that rubber disk get hard/brittle and can not deflect enough to allow enough air to pass through it. The PCM runs the A.I.R. test and expects to see a specific change in O2 sensor reading due to the fresh air being injected into the exhaust system. If that value doesn't change enough, it sets that DTC.
BC
BC
Obviously it's going to come down to the state's implementation and the particular inspector, but you can bet your *** that most states which require emissions inspections can bring up images what your under-hood should look like. And if anything looks missing or added or otherwise not stock, then you better have a good explanation.

Last edited by Bill Curlee; 04-28-2020 at 12:01 PM.
06-17-2020, 09:08 PM
#272
Big kudos to Bill C. for all the great info, especially the quality details!! I have an 04 Z06 with around 98k miles full of total smiles on it. I got the dreaded smog requirement letter but couldn't test due to the code. I applied carb/throttle body cleaner followed by compressed air (approx 40lbs psi) 3 times, about 20 mins apart. I finished with a good dose of WD-40, again followed by compressed air, and the code hasn't returned. I did this to keep the code away so I could pass smog (the dreaded CA testing) and did so with no trouble. The code hasn't returned yet but admittedly I've not quote driven 200 miles since the original treatment. Big thanks for all the quality content in this forum, a tremendous resource for us vette owners.
07-12-2021, 10:06 AM
#273

02 Z06, 50k mi. Read this thread 2 years ago (thanks Bill Curlee!!!). Tried the air and WD40 and the "safe" carb cleaner thing several times, to no avail. Replaced the unit with an orig. GM part and trouble gone, until now. The car gets driven about 3x/week but only about 3k mi. per year. No oil burning or any other problems. Now the failure is back, unfortunately, just months after having to remove the intake manifold AGAIN, this time for the oil pressure sensor.
I watched the youtube video about the "around the front" thing, but I can't flare a SS tube (too hard of metal) and there are none on Ebay for the adapt the driver's side idea. How about some "around the front" thing adaptation from another GM car or truck? Also, since the check valve is a rubber hose connection on one side, is there perhaps one that is rubber connections on both sides, thus eliminating the need for a screwed fitting?
Ideas?
Thanks.
Last edited by dbjeng; 07-12-2021 at 01:09 PM.
07-12-2021, 11:20 AM
#274
Intermediate

Member Since: May 2011
Posts: 30
Likes: 0
Received 0 Likes
on
0 Posts

02 Z06, 50k mi. Read this thread 2 years ago (thanks Bill Curlee!!!). Tried the air and WD40 and the "safe" carb cleaner thing several times, to no avail. Replaced the unit with an orig. GM part and trouble gone, until now. The car gets driven about 3x/week but only about 3k mi. per year. No oil burning or any other problems. Now the failure is back, unfortunately, just months after having to remove the intake manifold AGAIN, this time for the oil pressure sensor.
I watched the youtube video about the "around the front" thing, but I can't flare a SS tube (too hard of metal) and there are none on Ebay for the adapt the driver's side idea. How about some "around the front" thing adaptation from another GM car or truck? Also, since the check valve is a rubber hose connection on one side, is there perhaps one that is rubber connections on both sides, thus eliminating the need for a screwed fitting?
Ideas?
Thanks.
I watched the youtube video about the "around the front" thing, but I can't flare a SS tube (too hard of metal) and there are none on Ebay for the adapt the driver's side idea. How about some "around the front" thing adaptation from another GM car or truck? Also, since the check valve is a rubber hose connection on one side, is there perhaps one that is rubber connections on both sides, thus eliminating the need for a screwed fitting?
Ideas?
Thanks.
Another option I have seen done by racers and High Perf. guys is to bring the car to a tuner and have them just delete the air pump and codes from the logic.
Chevy did away with the air pump in 2003 cause it was no longer needed (and caused the very code you are fighting). A talk with local tuners say it cost around $100-$200 because they have to purchase a licence from GM to access your cars computer. This modification is burned into the chip and will not be lost when you loose power.
It also can be reversed if needed. Check with local shops about this proceedure.
07-29-2021, 02:09 PM
#275
Melting Slicks

02 Z06, 50k mi. Read this thread 2 years ago (thanks Bill Curlee!!!). Tried the air and WD40 and the "safe" carb cleaner thing several times, to no avail. Replaced the unit with an orig. GM part and trouble gone, until now. The car gets driven about 3x/week but only about 3k mi. per year. No oil burning or any other problems. Now the failure is back
EDIT: I tried cleaning both check valves by hand (I actually tackled relocation of the passenger check valve), and P1416 came back 180 miles later. Replaced the passenger side check valve again...
Last edited by MetalMan2; 09-15-2021 at 11:42 AM.
07-29-2021, 02:18 PM
#276
mike v


I did the cleaning first and lasted for a short time. I then replaced the both and cleaned the plumbing as well. Couple years later I installed headers and when they came there was no
holes for the check valves. I didn't want to drill and weld on the new headers so when I sent the ecm/bcm for the new tune I had it tuned out as well. Made no difference to start/warm up.
holes for the check valves. I didn't want to drill and weld on the new headers so when I sent the ecm/bcm for the new tune I had it tuned out as well. Made no difference to start/warm up.
09-12-2021, 08:40 PM
#277
Instructor
Tried your cleaning method and it worked well. Used multiple doses of CRC plastic safe MAF sensor cleaner followed a lot of air @25psi to dry things out and followed that with a shot of WD40 and more air. Thanks so much for your sharing your knowledge. Saved me a bunch of money.
 01-08-2023, 04:14 PM
#279
Melting Slicks
I think I used a 13mm swivel socket, and it was still tough. I actually dropped the socket when it slipped off and had to fishing for that in the midst of everything, to boot! If I recall correctly, I also went at it with a wrench, but had little success. Let me know what you find works best, so I remember for my next time.