
How to replace the (p1416) air check valve??
 02-17-2007, 10:16 AM
#1
Racer

Thread Starter


I have learned quite a great deal about this new beast I bought on this forum. I have yet to not learn what I needed to know just by asking so here I am again.
Last week I replaced 2 O2 sensors (after the cats) on my 03, and I got the infamous check engine light with the P1416 code on the DIC.
I have read a bunch of small articles on this problem with our babies but have'nt found any in depth articles on how to correctly go about replacing it as painlessly as possible. I am more than willing to fix it, but am hoping someone has step by step directions on this issue.
I really want to thank everybody in advance for all the great support you give for our Pride And Joy!!
Last week I replaced 2 O2 sensors (after the cats) on my 03, and I got the infamous check engine light
with the P1416 code on the DIC.I have read a bunch of small articles on this problem with our babies but have'nt found any in depth articles on how to correctly go about replacing it as painlessly as possible. I am more than willing to fix it, but am hoping someone has step by step directions on this issue.
I really want to thank everybody in advance for all the great support you give for our Pride And Joy!!

The following users liked this post:
Dahc (01-20-2017)
02-17-2007, 10:39 AM
#2
Tech Contributor


Member Since: Dec 1999
Location: Anthony TX
Posts: 32,736
Received 2,180 Likes
on
1,583 Posts
CI 6,7,8,9,11 Vet
St. Jude Donor '08

Storm
Why dont you just try to clean it instead of replacing it? The valve is very simple and usualy the seal just sticks shut or gets gunk on the seat and stucks open. If you disconnect the main air supply hose and you get exhaust out of the engine side of the hose, the valve is stuck open.
There is a "Y" that connects the main air supply hose to both check valves. It's located between the engine and the brake vacuum booster at the fire wall. You can either disconnect the hose for the specific defective valve or just spray carb cleaner in the main air hose and fog both valves. After the cleaning, I give it a good spray and doush of WD-40. This procedure works good for me and a bunch of guys on here.
Give it a try, hell,,its FREE! Cant beat that with a stick!
Let us know how you make out if you decide to clean it.
BC
Why dont you just try to clean it instead of replacing it? The valve is very simple and usualy the seal just sticks shut or gets gunk on the seat and stucks open. If you disconnect the main air supply hose and you get exhaust out of the engine side of the hose, the valve is stuck open.
There is a "Y" that connects the main air supply hose to both check valves. It's located between the engine and the brake vacuum booster at the fire wall. You can either disconnect the hose for the specific defective valve or just spray carb cleaner in the main air hose and fog both valves. After the cleaning, I give it a good spray and doush of WD-40. This procedure works good for me and a bunch of guys on here.
Give it a try, hell,,its FREE! Cant beat
that with a stick! Let us know how you make out if you decide to clean it.
BC
The following 2 users liked this post by Bill Curlee:
Frank Tringale (12-26-2019),
MilsteadGC (09-12-2021)
02-17-2007, 10:44 PM
#3
Racer
Thread Starter
Sounds great. I'm not real familar yet with the hose your talking about. I hope that its easy to get too. Please forgive my stupidity, but could you be a little more specific?
I heard you have to remove the intake to replace it, but if a cleaning is an option I just don't know what hose your talking about. Sorry.
I heard you have to remove the intake to replace it, but if a cleaning is an option I just don't know what hose your talking about. Sorry.
02-17-2007, 11:22 PM
#4
Tech Contributor
Member Since: Dec 1999
Location: Anthony TX
Posts: 32,736
Received 2,180 Likes
on
1,583 Posts
CI 6,7,8,9,11 Vet
St. Jude Donor '08
I try to take a picture of the hoses tomorrow. Then I will post them.
Bill
Bill
 02-18-2007, 12:50 AM
#6
Guest
Posts: n/a
Mine seemed to only trip the code when it was cold outside (less than 40) I pulled the hose off and sprayed a bunch of WD40 in it a couple different days and that really seemed to help. I haven't really driven it this winter at all, so I don't know how well it held up. Guess you could say it's in hibernation, even though we don't have that harsh of winters.
Oh yeah, After spraying the WD40, I used the air compressor to "sort of help" the WD40 get to where it needed to be. Put the nozzle in the hose and held a rag to keep air from escaping.
Oh yeah, After spraying the WD40, I used the air compressor to "sort of help" the WD40 get to where it needed to be. Put the nozzle in the hose and held a rag to keep air from escaping.
The following users liked this post:
sc400 (03-11-2017)
02-18-2007, 02:15 AM
#7
Advanced

Member Since: Jan 2007
Location: Costa Mesa CA
Posts: 74
Likes: 0
Received 0 Likes
on
0 Posts
I have the codes like most of the guys on this site and you are correct in stating that it is the voltage drop in the check valve. Others are also correct in stating that sometimes WD40 or similar lubricant will resolve the problem.
In my case, I was lazy, had Chevrolet do the valve replacement which then showed all 4 O2 sensors were good (California Car). 2 1/2 hour labor charge and $26.00 part. This was worth it to me as apparently unknown prior, the manifold was leaking and when re-installed a new gasket was required which resolved that problem as well.
My Vette required this service at 23K miles.


 02-19-2007, 06:56 PM
#10
Race Director


Member Since: Sep 2002
Location: Washington County, South UTAH
Posts: 13,983
Likes: 0
Received 21 Likes
on
15 Posts
I squirted throttle body clearer into the air hose, leading under the manifold. Then compressed air and reset code. Three 10 minute road tests and SES light has not yet come back on!
Hope it holds! Thank you guys very much!
Hope it holds! Thank you guys very much!
02-19-2007, 07:59 PM
#11
Race Director

Mine seems to pop that code about once every two or three months and mainly when it is very cold outside. I just reset it and it does not come back again. I am pretty sure you would need to remove the intake to get to it for replacement. I have heard some say you don't have to but I know I would.
02-19-2007, 10:06 PM
#12
Tech Contributor
Member Since: Dec 1999
Location: Anthony TX
Posts: 32,736
Received 2,180 Likes
on
1,583 Posts
CI 6,7,8,9,11 Vet
St. Jude Donor '08
Mine seems to pop that code about once every two or three months and mainly when it is very cold outside. I just reset it and it does not come back again. I am pretty sure you would need to remove the intake to get to it for replacement. I have heard some say you don't have to but I know I would.
BC
02-20-2007, 12:36 AM
#13

I just did that myself over the weekend on my 2004 A4 coupe. I was getting the 0492 error code and a check engine light. You can believe that I'm a happy man since the code didn't come back - and now I can get my inspection sticker without concern!
- Wisdom
- Wisdom
 02-21-2007, 01:00 AM
#16
- Wisdom
02-21-2007, 06:55 PM
#18
Tech Contributor
Member Since: Dec 1999
Location: Anthony TX
Posts: 32,736
Received 2,180 Likes
on
1,583 Posts
CI 6,7,8,9,11 Vet
St. Jude Donor '08
Ok,,,,,I'm going to help put this check valve cleaning procedure in high gear and try to make it so anyone can under stand how to do it and where all the parts are:
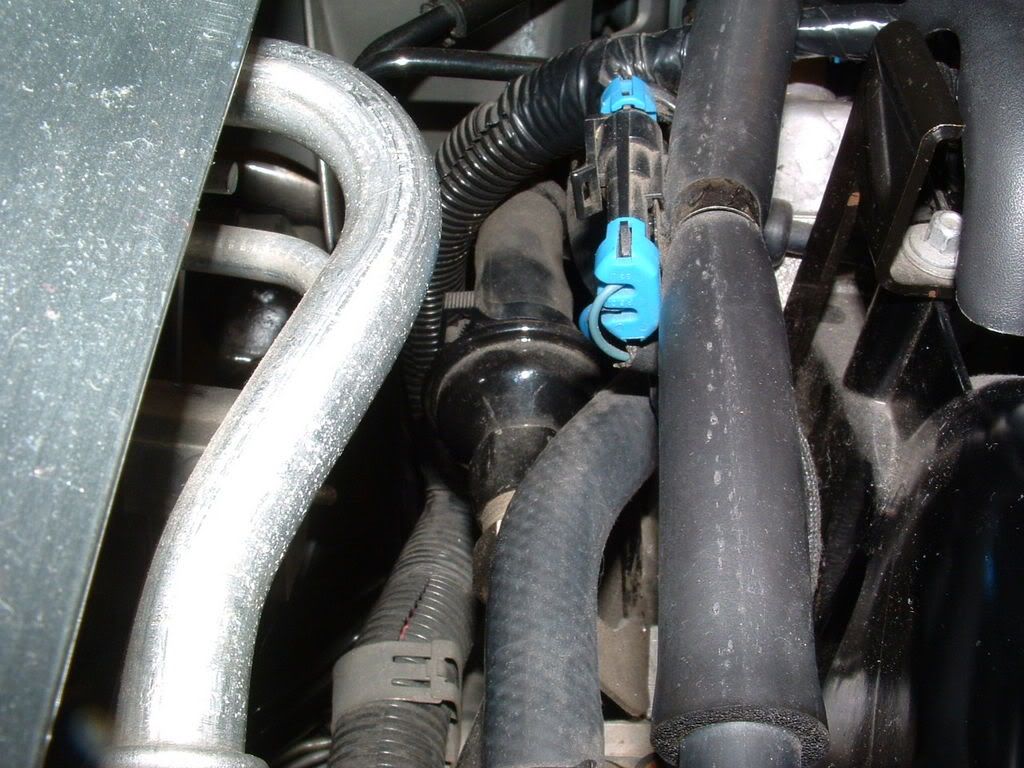
The AIR Pump is an electric motor driven pump and is below the drivers side headlight:

The output pipe off the pump is vacuum controlled:
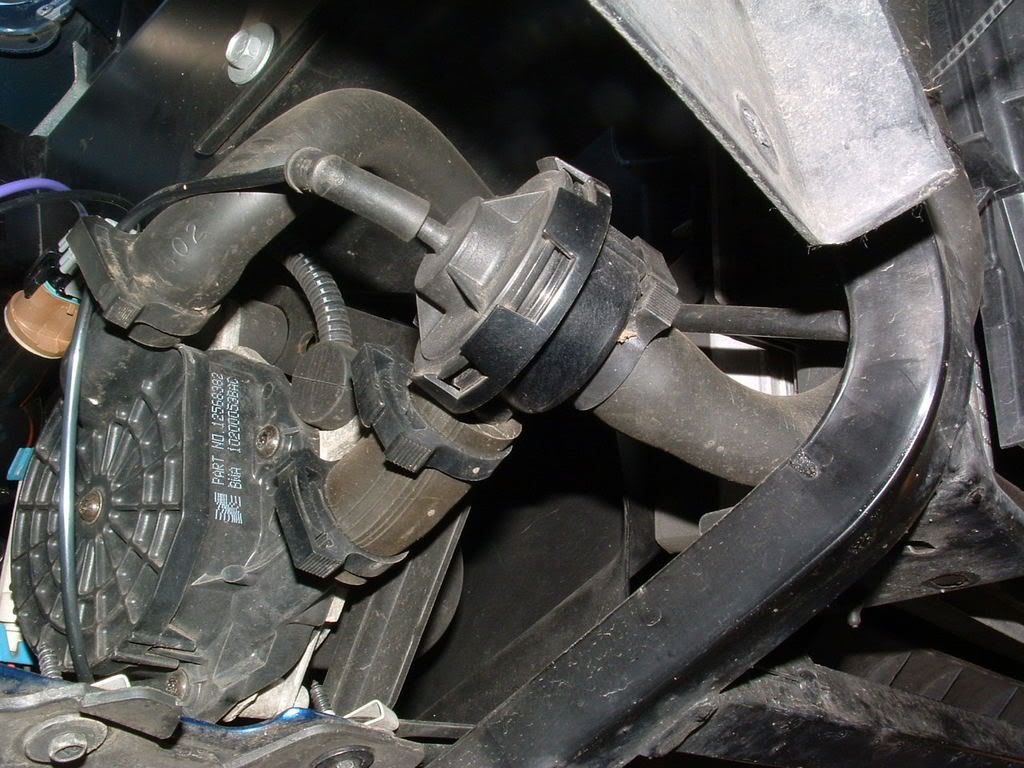
Here is the suction side of the pump. It get clean air from the air box:

The output tube runs along the drivers side fender well. It has a connector in the center of the pipe that will allow you to disconnect the pump from the rest of the system:
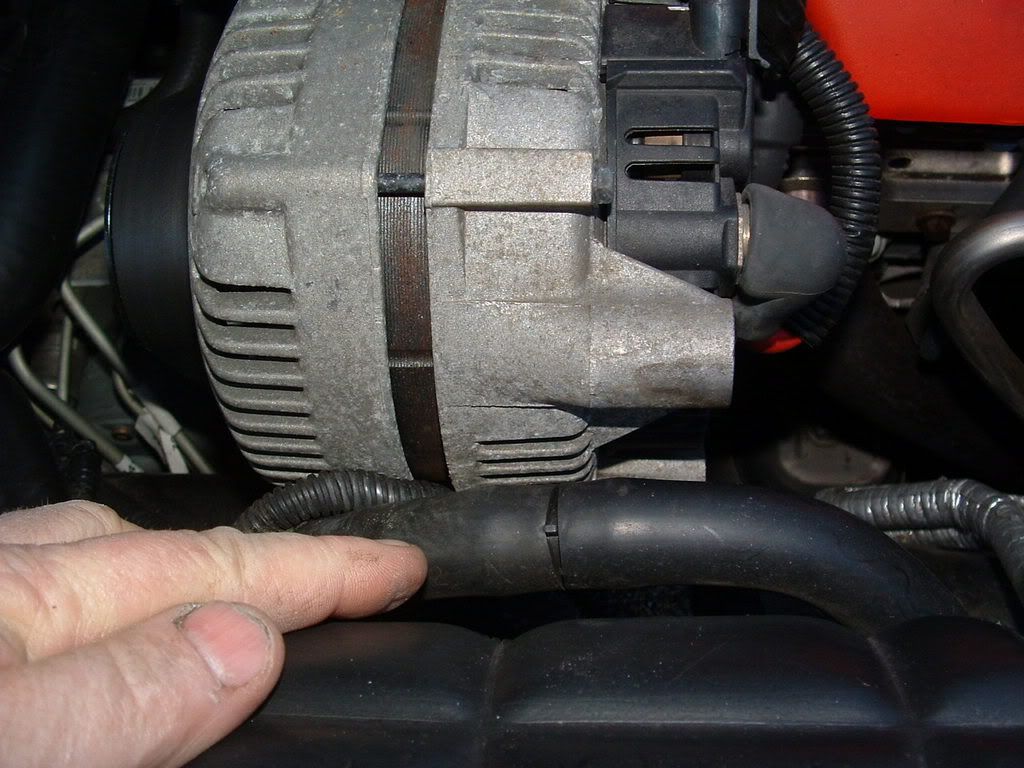
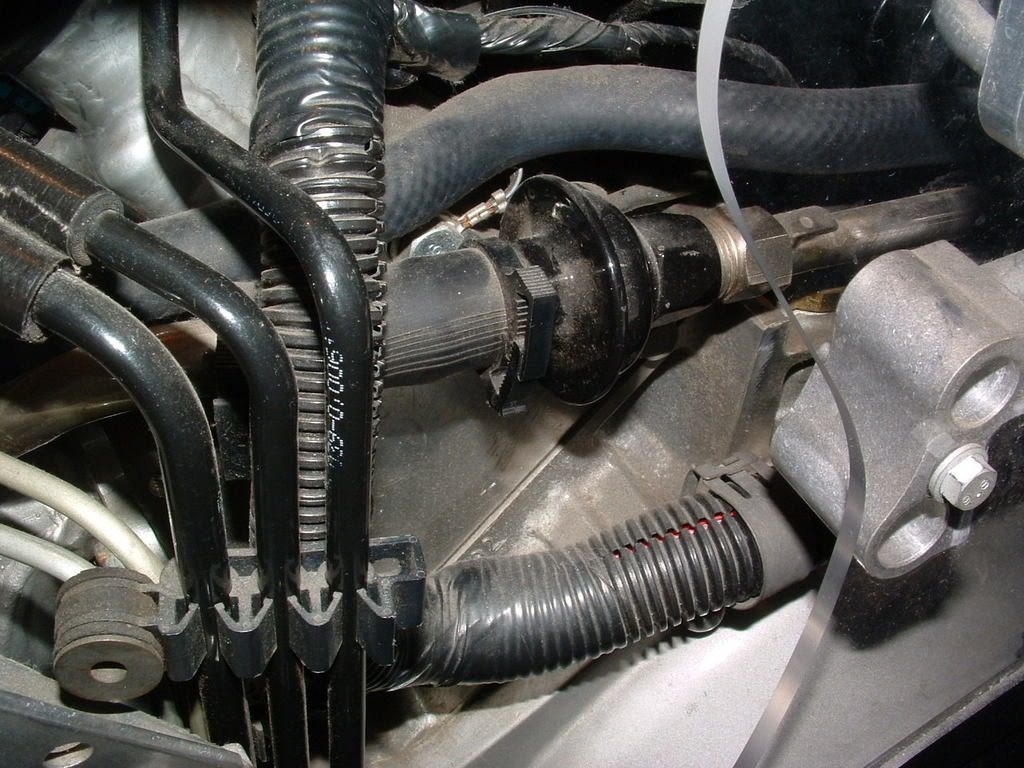
Here is the rubber hose disconnected:
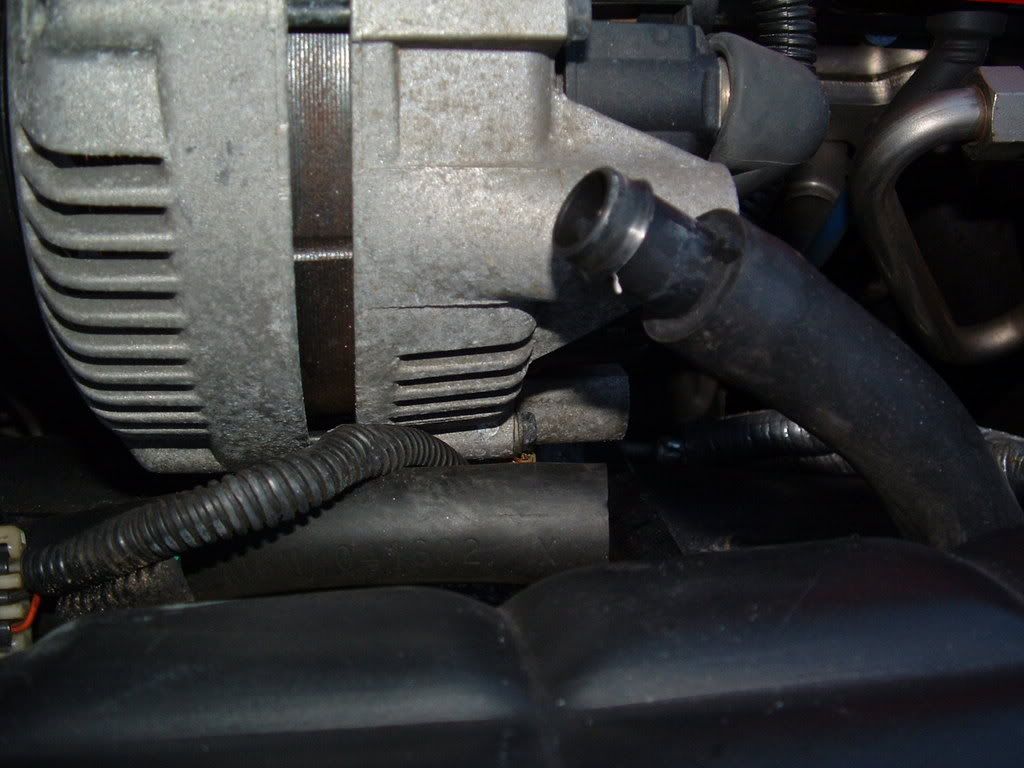
You can disconnect the hose here and conduct the cleaning from this location. Spray some carburetor cleaner in the rubber hose going to the "REAR" (the one pointing UP in the picture above). This will allow cleaner to reach BOTH check valves. Once you give the hose a GOOD shot of carb cleaner, use compressed air to force it through the system.
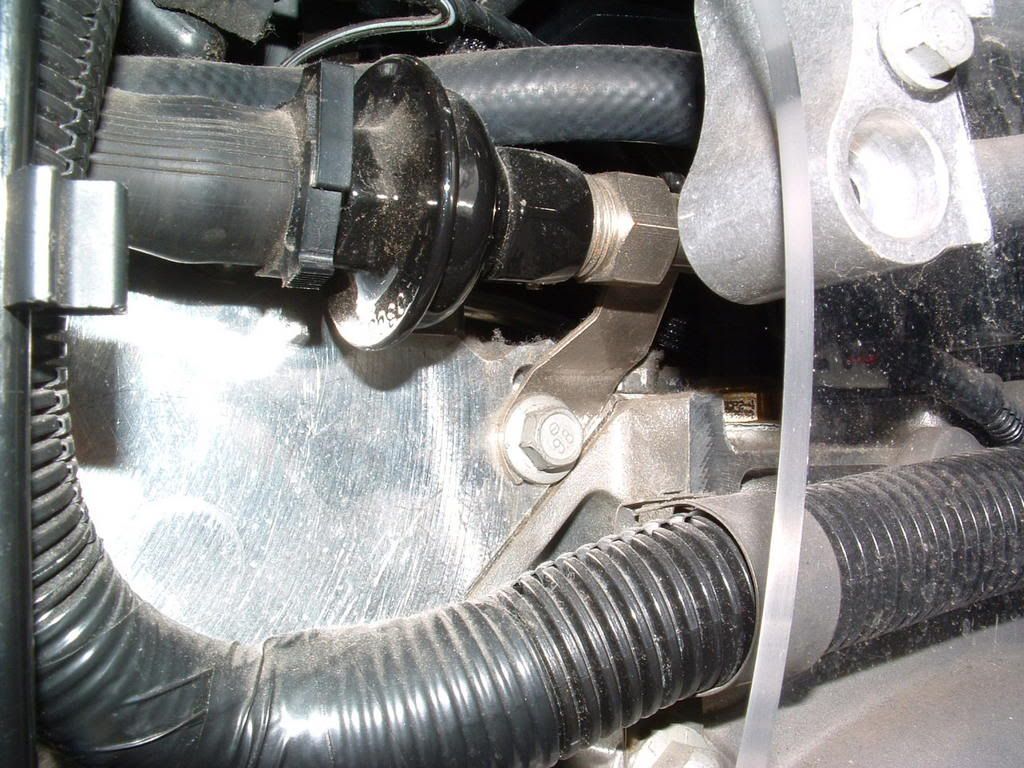
Once you have forced the cleaner thru, give the hose a good shot of WD-40 and force that through. The CHECK VALVES have a spring loaded disk that seats on a plastic seat. If it gets exhaust reside on the seat, moisture from the cold air will cause the seat to stick shut.
Cleaning it with carb cleaner and WD-40 should allow it to free up.
IF for some reason that the seat is stuck shut bad enough, you may need to remove the hose from the AIR side of the check valve and force chemicals in that individual valve.
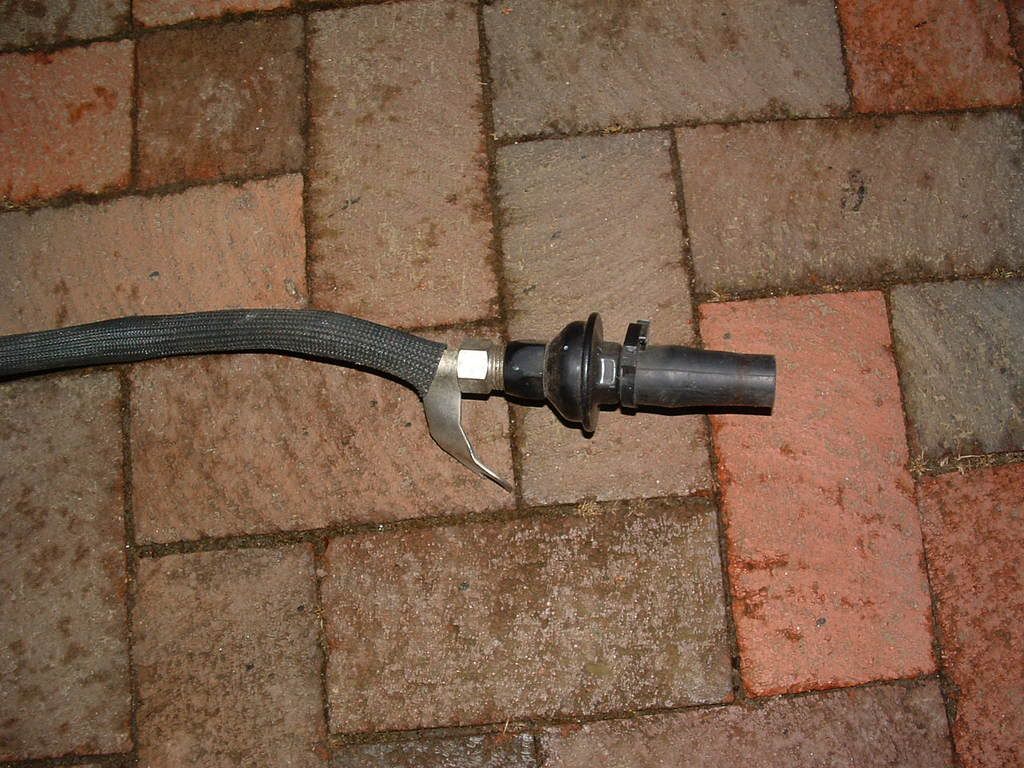
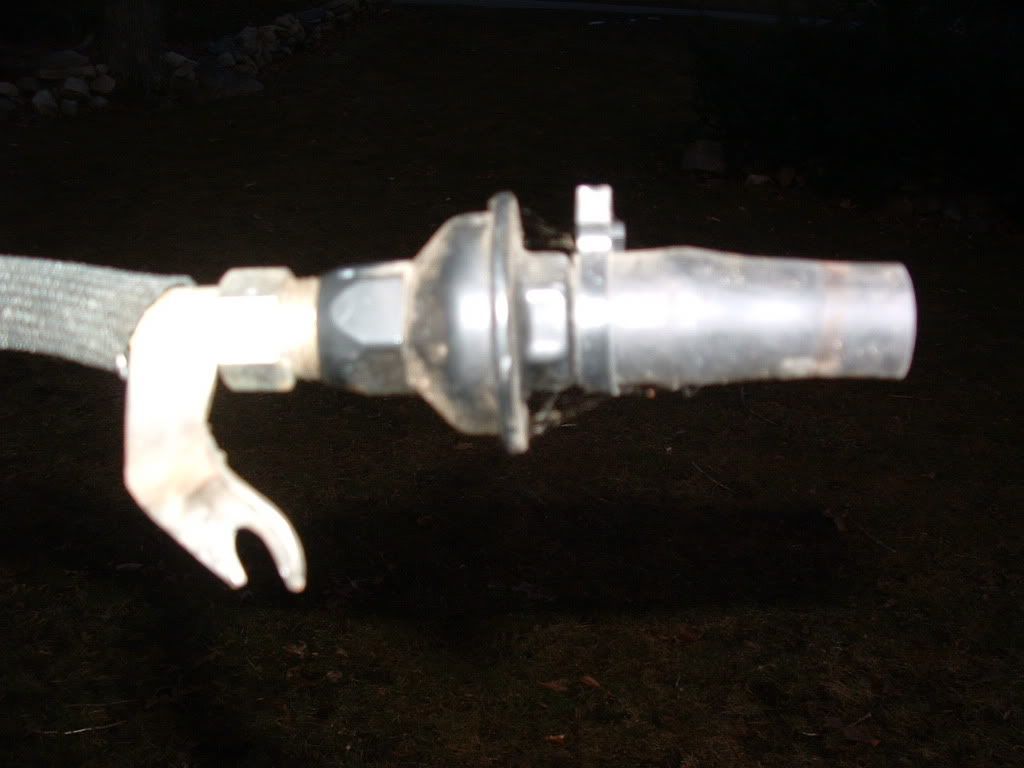
There are TWO check valves. One for the drivers side which is easily serviced and right out in the open:
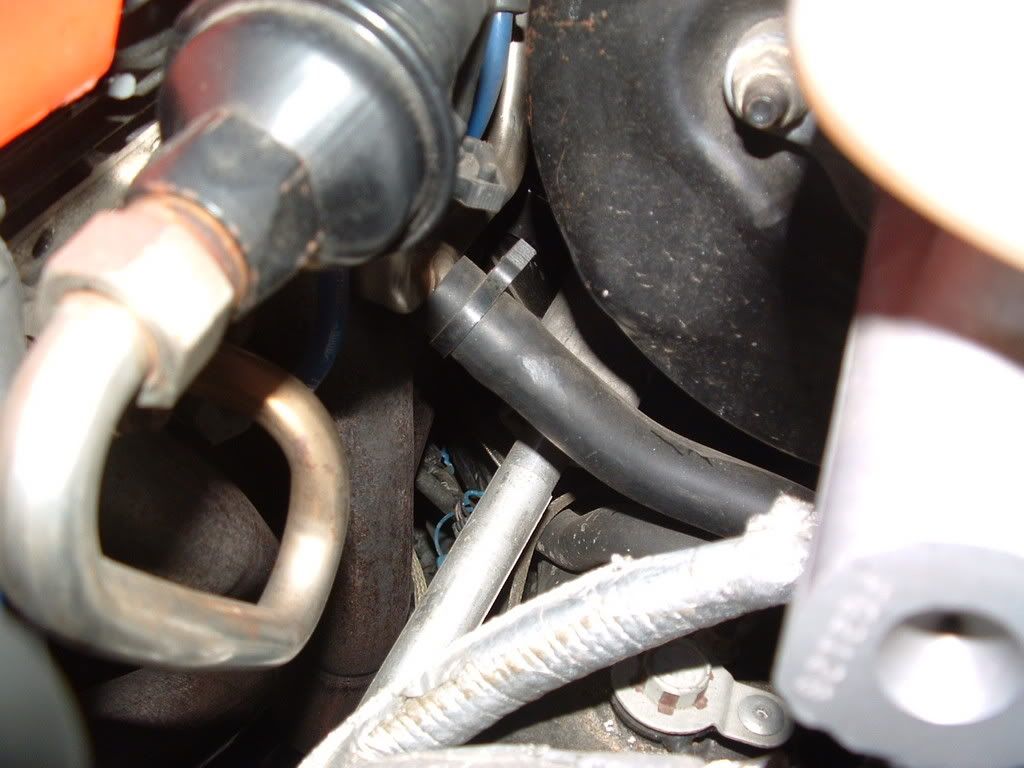
The one for the passengers side is behind the engine!!!!
 Yep,,it's a royal BITCH to get to. It is possible to get a wrench back there and loosen the retaining bolt BUT,,, like I said,,,you will NOT enjoy the experience. I took some pictures of the passengers side valve at Bowling Green in the museum on the C5 chassis mock-up. You will NOT be able to see this on your car!

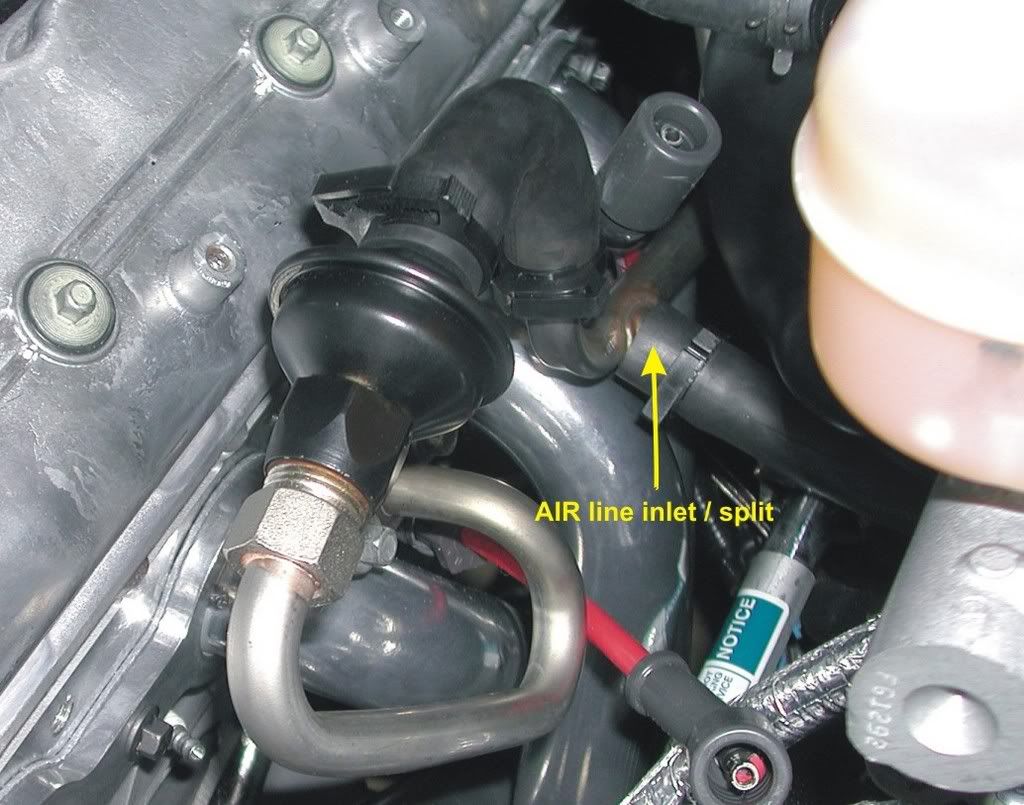
If you need to clean the passengers side valve, you can disconnect the pump air supply hose and the air supply hose from the Y connection at the rear of the engine. The next pics will show you where the Y connection is:
Here is where the AIR supply hose attachés to the Y connection:
Look to the left of the power brake booster:
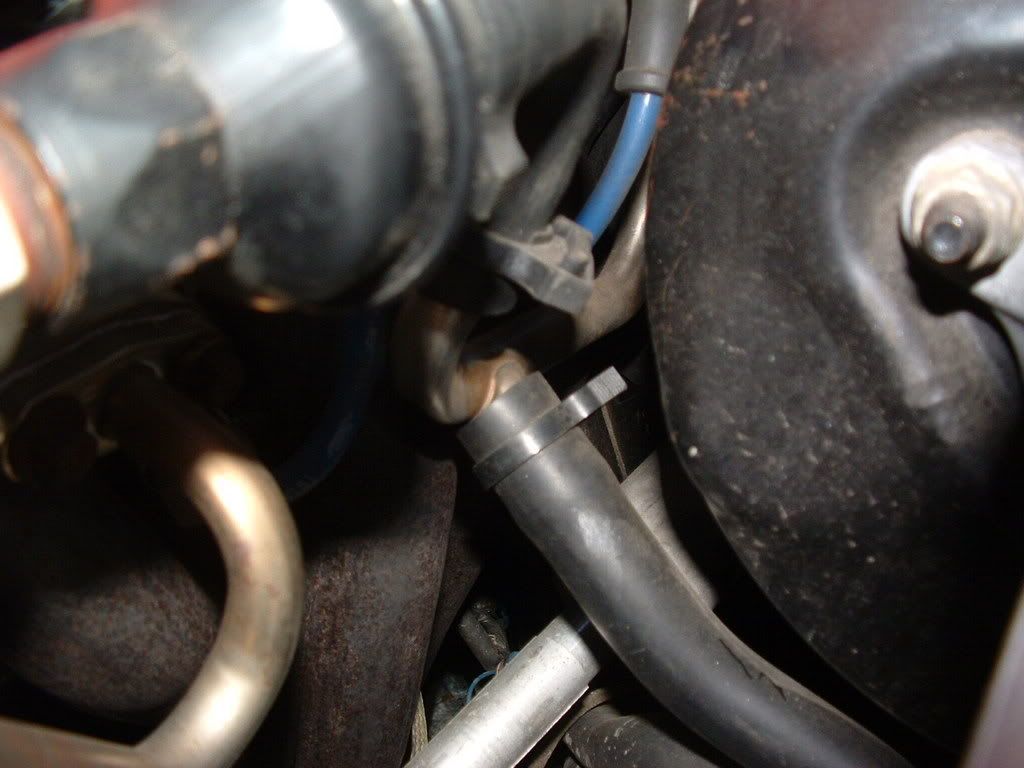

Here is the passenger side check valve, SS pipe and rubber hose fitting:

Hope this helps!
BC
The AIR Pump is an electric motor driven pump and is below the drivers side headlight:
The output pipe off the pump is vacuum controlled:
Here is the suction side of the pump. It get clean air from the air box:
The output tube runs along the drivers side fender well. It has a connector in the center of the pipe that will allow you to disconnect the pump from the rest of the system:
Here is the rubber hose disconnected:
You can disconnect the hose here and conduct the cleaning from this location. Spray some carburetor cleaner in the rubber hose going to the "REAR" (the one pointing UP in the picture above). This will allow cleaner to reach BOTH check valves. Once you give the hose a GOOD shot of carb cleaner, use compressed air to force it through the system.
Once you have forced the cleaner thru, give the hose a good shot of WD-40 and force that through. The CHECK VALVES have a spring loaded disk that seats on a plastic seat. If it gets exhaust reside on the seat, moisture from the cold air will cause the seat to stick shut.
Cleaning it with carb cleaner and WD-40 should allow it to free up.
IF for some reason that the seat is stuck shut bad enough, you may need to remove the hose from the AIR side of the check valve and force chemicals in that individual valve.
There are TWO check valves. One for the drivers side which is easily serviced and right out in the open:
The one for the passengers side is behind the engine!!!!
Yep,,it's a royal BITCH to get to. It is possible to get a wrench back there and loosen the retaining bolt BUT,,, like I said,,,you will NOT enjoy the experience. I took some pictures of the passengers side valve at Bowling Green in the museum on the C5 chassis mock-up. You will NOT be able to see this on your car! If you need to clean the passengers side valve, you can disconnect the pump air supply hose and the air supply hose from the Y connection at the rear of the engine. The next pics will show you where the Y connection is:
Here is where the AIR supply hose attachés to the Y connection:
Look to the left of the power brake booster:
Here is the passenger side check valve, SS pipe and rubber hose fitting:
Hope this helps!
BC
Last edited by Bill Curlee; 02-21-2007 at 07:01 PM.
The following 5 users liked this post by Bill Curlee:
link9a (04-08-2022),
MilsteadGC (09-08-2021),
rriddle (08-23-2016),
SpeedRacerMach (03-29-2019),
Whiteonrice (03-13-2018)