
Changing spark plugs a few tips.
 03-13-2007, 06:21 PM
#1
Melting Slicks

Thread Starter


Searched here and found several experiances changing spark plugs. Some said take off all the coils. NOT NECESSARY. I did the job including new red Performance Wires in about 4 hours on this first 70 degree day in Maryland. Used 41-985 Iridium gapped at .040 and GM Performance wires. Took my time. Did passanger side first (easiest except for last rear plug #8). Bought a 5/8 spark plug swivel socket at Autozone for about $3.50. This was needed ONLY for 2 rear plugs (#7 and #8). After removing beauty covers started with first passenger side plug (#2). Remove wire from coil by first twisting slightly left and right and then pulling it off. Came off relatively easy. Then twisted boot on the plug. After twisting it kept pulling by the boot with my fingers and it too came off easily. Now used a regular non-swivel 5/8 plug socket and a 3 inch 3/8 extension and tried to loosen it with the 3/8 socket wrench. These plugs have 70K miles on them and was concerned they wouldn't budge. Had PB Blaster ready if they wouldn't break loose. Went with a 1/2 inch socket wrench with a 3/8 reducer to get more leverage. Broke loose fine. loosened it about 5 turns and then removed wrench and slid a 3 or 4 inch piece of vacuum hose over the plug end. It was too tight to loosen with the hose. Reused the socket but switched back to the 3/8 inch wrench and went about 2 more turns. Reattached the vacuum hose and removed the plug slowly. It looked fine and was a little carbonized but still gapped at .060 and could go for a while yet. I DID use antisieze compound on about the first 4 threads of the new plug even though GM does not recommend this. I threaded the new plug with the vacuum hose on the top and screwed it in about 8 revolutions till it felt relatively tight.
Then used the 5/8 straight socket and the 3/8 socket wrench. Did not try to use a torque wrench (no room here) but tightened it snug and just a little more for good measure. Your arms are a great torque wrench for plugs if you have done this 50 or so times before. Continued with #4, #6 and #8. With #8 used the Swivel spark plug socket and the 1/2 wrench. In all cases removed and inserted the plug by hand using the hose attached to the plug so I could FEEL it coming out and make sure I didn't cross thread it with a socket wrench. If it does not FEEL right but binds immediately after you insert it you might be cross threading the plug.
Drivers side #1, #3, #5, and #7 done in a similar way. When I got to #7 (the last plug in back) first disconnected 2 rubber hoses. One from the brake booster and one from the air valve which is near plug #5. Then pushed both hoses and the air pipe UP and held them under the metal fuel line with a vise grip loosely around one of the hoses to keep them out of the way. Climbed over the fender and got my HUGE HAND in the space created by moving the hoses and pipe out of the way. Used a LONGER piece of vacuum hose on this plug. Tried it on the plug BEFORE loosening the plug so I was sure I could get the new plug back in. Used a combination of LONG 3/8 socket extensions and the 5/8 swivel plug wrench with the 1/2 socket wrench to get this sucker loose. loosened it about 6 or 7 turns before using a longer piece of vacuum hose. I actually had 3 lengths I used about 4", 6", and 7" or so inch for various plugs.
Finally used a straight 5/8 inch plug socket and a long extension to tighten the plug.
I then used an old plug and some Dielectric Grease to coat the inside of the plug boots as well as the coil boots. Reused the "tin cans" (antinoise supressors) which were on the old plug boots. Wiped them clean and they fit perfectly on the new boots. Started with #2 plug and put the boot on the PLUG first clicking it on tightly. Made sure the wire wasn't TWISTED and that the coil boot was aimed correctly DOWN and worked the coil boot on. It MUST CLICK ALL THE WAY ON. Went from #2 to #4, #6 and #8, then #1, #3, #5 and #7. #7 was the HARDEST to get tight on the plug and coil. MAKE SURE that the boots are ALL THE WAY ON or you will have trouble later. Don't forget to reconnected the rubber hoses. I also didn't like the metal hose hitting the #7 plug wire. I got a tiewrap and tied this hose to the brake line to give it some clearance. Don't need crossfire or grounded out spark on any plug.
Start with a cold engine (but not a frozen one) take your time... and take a break after about 4 plugs.
I took another break before attacking #7.
For what its worth the car now seems to take off like a rocket ship. Don't know if it is really faster or I am just expecting it to perform better. Still waiting to see if I cured the hesitation problem at slight to moderate throttle. Did the cleaning of the MAF sensor and throttle plate about 2 months ago but the hesitation reappeared. Will see if new plugs did the trick BIGHANK
Last edited by bighank; 03-14-2007 at 12:32 PM.

The following users liked this post:
Roundhouse (09-10-2016)
02-12-2014, 02:55 PM
#5
Burning Brakes


the metal boots just slide over the plug wires.. i used a small needle nose to pull on the boots when i pulled on the plug wires and poped off pretty easy.. I allways try to give the plug boots a good twist to make sure the brake the clip loose from the plug itself (incase its corroded on), seems to help them come off a little easier.. did mine in about 30 min inc wires.
Best tool i have are my small monkey hands to reach in to places to get the plug socket on.
Needle nose pliers (not required)
Plug Socket
Swivel 3/4"
4" extension 3/4"
3/4" ratchet
Gloves (to keep the skin on your nuckles)
spark plug thread grease
spark plug boot grease
Plugs
Wires
1/4" ratchet to remove AIR flanges (tuck out of the way)
02-12-2014, 02:58 PM
#6
Burning Brakes
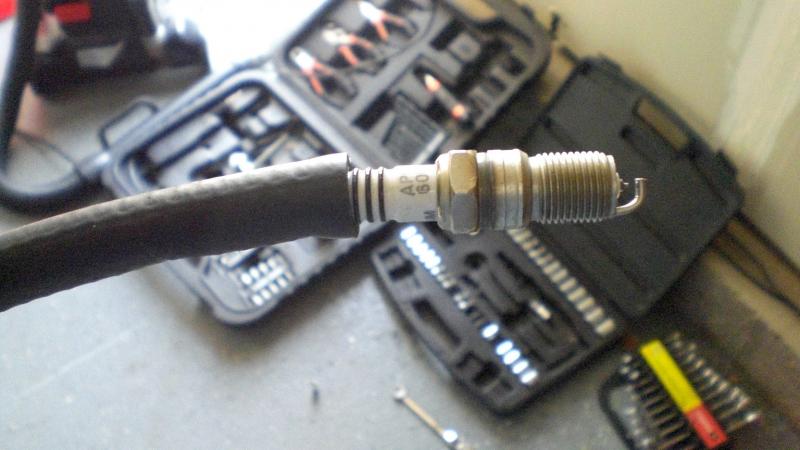
to hold the spark lug from falling when removing and installing.. twist the plug out after the socket loosens it with the hose... my small hands fit in there to do it with my figners... Spark plug sockets have a rubber fitting in them to hold the plug... this trick works tho if you dont have a spark plug socket:
02-12-2014, 03:14 PM
#7
Instructor


Thanks for the information, going to start tonight since we are expecting snow and rain for the next 12 hours. Busted my knuckles fixing the vacuum leak under the battery tray this past weekend. My HVAC system works fine now. Great information regarding your post....
02-12-2014, 04:33 PM
#9
 02-12-2014, 05:06 PM
#10
Burning Brakes
Plugs are Irridium so i dont recommend gapping them. TR5IX's should be set to .040. they recommend checking them here incase they where wrong out of the box but i say Eyeball it or use a gapper very lightly so you dont scrape the Irridium platting off.
I used OEM Delco Irridium but NGK are good as well.
Laser-welded iridium center electrode is resistant to heat, corrosion and electrical wear. The tapered ground electrode minimizes quenching. Provides outstanding acceleration, high fuel efficiency and durability.
Product Features:•0.6 mm iridium-tip center electrode provides durability and a high melting point
•Taper-cut ground electrode shape provides improved flame reproduction
Product Application(s):
2004 Chevrolet Corvette Z06 •Iridium IX Spark Plug; .040; 8 Req.
02-12-2014, 07:14 PM
#11
Advanced
Plugs are Irridium so i dont recommend gapping them. TR5IX's should be set to .040. they recommend checking them here incase they where wrong out of the box but i say Eyeball it or use a gapper very lightly so you dont scrape the Irridium platting off.
I used OEM Delco Irridium but NGK are good as well.
Laser-welded iridium center electrode is resistant to heat, corrosion and electrical wear. The tapered ground electrode minimizes quenching. Provides outstanding acceleration, high fuel efficiency and durability.
Product Features:�0.6 mm iridium-tip center electrode provides durability and a high melting point
�Taper-cut ground electrode shape provides improved flame reproduction
Product Application(s):
2004 Chevrolet Corvette Z06 �Iridium IX Spark Plug; .040; 8 Req.
If you don't have any vacuum hose laying around, one of the old plug wire boots works even better.
 02-12-2014, 10:37 PM
#12
Advanced

Member Since: Apr 2007
Location: OHIO
Posts: 78
Likes: 0
Received 0 Likes
on
0 Posts
Searched here and found several experiances changing spark plugs. Some said take off all the coils. NOT NECESSARY. I did the job including new red Performance Wires in about 4 hours on this first 70 degree day in Maryland. Used 41-985 Iridium gapped at .040 and GM Performance wires. Took my time. Did passanger side first (easiest except for last rear plug #8). Bought a 5/8 spark plug swivel socket at Autozone for about $3.50. This was needed ONLY for 2 rear plugs (#7 and #8). After removing beauty covers started with first passenger side plug (#2). Remove wire from coil by first twisting slightly left and right and then pulling it off. Came off relatively easy. Then twisted boot on the plug. After twisting it kept pulling by the boot with my fingers and it too came off easily. Now used a regular non-swivel 5/8 plug socket and a 3 inch 3/8 extension and tried to loosen it with the 3/8 socket wrench. These plugs have 70K miles on them and was concerned they wouldn't budge. Had PB Blaster ready if they wouldn't break loose. Went with a 1/2 inch socket wrench with a 3/8 reducer to get more leverage. Broke loose fine. loosened it about 5 turns and then removed wrench and slid a 3 or 4 inch piece of vacuum hose over the plug end. It was too tight to loosen with the hose. Reused the socket but switched back to the 3/8 inch wrench and went about 2 more turns. Reattached the vacuum hose and removed the plug slowly. It looked fine and was a little carbonized but still gapped at .060 and could go for a while yet. I DID use antisieze compound on about the first 4 threads of the new plug even though GM does not recommend this. I threaded the new plug with the vacuum hose on the top and screwed it in about 8 revolutions till it felt relatively tight.
Then used the 5/8 straight socket and the 3/8 socket wrench. Did not try to use a torque wrench (no room here) but tightened it snug and just a little more for good measure. Your arms are a great torque wrench for plugs if you have done this 50 or so times before. Continued with #4, #6 and #8. With #8 used the Swivel spark plug socket and the 1/2 wrench. In all cases removed and inserted the plug by hand using the hose attached to the plug so I could FEEL it coming out and make sure I didn't cross thread it with a socket wrench. If it does not FEEL right but binds immediately after you insert it you might be cross threading the plug.
Drivers side #1, #3, #5, and #7 done in a similar way. When I got to #7 (the last plug in back) first disconnected 2 rubber hoses. One from the brake booster and one from the air valve which is near plug #5. Then pushed both hoses and the air pipe UP and held them under the metal fuel line with a vise grip loosely around one of the hoses to keep them out of the way. Climbed over the fender and got my HUGE HAND in the space created by moving the hoses and pipe out of the way. Used a LONGER piece of vacuum hose on this plug. Tried it on the plug BEFORE loosening the plug so I was sure I could get the new plug back in. Used a combination of LONG 3/8 socket extensions and the 5/8 swivel plug wrench with the 1/2 socket wrench to get this sucker loose. loosened it about 6 or 7 turns before using a longer piece of vacuum hose. I actually had 3 lengths I used about 4", 6", and 7" or so inch for various plugs.
Finally used a straight 5/8 inch plug socket and a long extension to tighten the plug.
I then used an old plug and some Dielectric Grease to coat the inside of the plug boots as well as the coil boots. Reused the "tin cans" (antinoise supressors) which were on the old plug boots. Wiped them clean and they fit perfectly on the new boots. Started with #2 plug and put the boot on the PLUG first clicking it on tightly. Made sure the wire wasn't TWISTED and that the coil boot was aimed correctly DOWN and worked the coil boot on. It MUST CLICK ALL THE WAY ON. Went from #2 to #4, #6 and #8, then #1, #3, #5 and #7. #7 was the HARDEST to get tight on the plug and coil. MAKE SURE that the boots are ALL THE WAY ON or you will have trouble later. Don't forget to reconnected the rubber hoses. I also didn't like the metal hose hitting the #7 plug wire. I got a tiewrap and tied this hose to the brake line to give it some clearance. Don't need crossfire or grounded out spark on any plug.
Start with a cold engine (but not a frozen one) take your time... and take a break after about 4 plugs.
I took another break before attacking #7.
For what its worth the car now seems to take off like a rocket ship. Don't know if it is really faster or I am just expecting it to perform better. Still waiting to see if I cured the hesitation problem at slight to moderate throttle. Did the cleaning of the MAF sensor and throttle plate about 2 months ago but the hesitation reappeared. Will see if new plugs did the trick BIGHANK
Then used the 5/8 straight socket and the 3/8 socket wrench. Did not try to use a torque wrench (no room here) but tightened it snug and just a little more for good measure. Your arms are a great torque wrench for plugs if you have done this 50 or so times before. Continued with #4, #6 and #8. With #8 used the Swivel spark plug socket and the 1/2 wrench. In all cases removed and inserted the plug by hand using the hose attached to the plug so I could FEEL it coming out and make sure I didn't cross thread it with a socket wrench. If it does not FEEL right but binds immediately after you insert it you might be cross threading the plug.
Drivers side #1, #3, #5, and #7 done in a similar way. When I got to #7 (the last plug in back) first disconnected 2 rubber hoses. One from the brake booster and one from the air valve which is near plug #5. Then pushed both hoses and the air pipe UP and held them under the metal fuel line with a vise grip loosely around one of the hoses to keep them out of the way. Climbed over the fender and got my HUGE HAND in the space created by moving the hoses and pipe out of the way. Used a LONGER piece of vacuum hose on this plug. Tried it on the plug BEFORE loosening the plug so I was sure I could get the new plug back in. Used a combination of LONG 3/8 socket extensions and the 5/8 swivel plug wrench with the 1/2 socket wrench to get this sucker loose. loosened it about 6 or 7 turns before using a longer piece of vacuum hose. I actually had 3 lengths I used about 4", 6", and 7" or so inch for various plugs.
Finally used a straight 5/8 inch plug socket and a long extension to tighten the plug.
I then used an old plug and some Dielectric Grease to coat the inside of the plug boots as well as the coil boots. Reused the "tin cans" (antinoise supressors) which were on the old plug boots. Wiped them clean and they fit perfectly on the new boots. Started with #2 plug and put the boot on the PLUG first clicking it on tightly. Made sure the wire wasn't TWISTED and that the coil boot was aimed correctly DOWN and worked the coil boot on. It MUST CLICK ALL THE WAY ON. Went from #2 to #4, #6 and #8, then #1, #3, #5 and #7. #7 was the HARDEST to get tight on the plug and coil. MAKE SURE that the boots are ALL THE WAY ON or you will have trouble later. Don't forget to reconnected the rubber hoses. I also didn't like the metal hose hitting the #7 plug wire. I got a tiewrap and tied this hose to the brake line to give it some clearance. Don't need crossfire or grounded out spark on any plug.
Start with a cold engine (but not a frozen one) take your time... and take a break after about 4 plugs.
I took another break before attacking #7.
For what its worth the car now seems to take off like a rocket ship. Don't know if it is really faster or I am just expecting it to perform better. Still waiting to see if I cured the hesitation problem at slight to moderate throttle. Did the cleaning of the MAF sensor and throttle plate about 2 months ago but the hesitation reappeared. Will see if new plugs did the trick BIGHANK
02-13-2014, 04:53 PM
#13
Melting Slicks
Thread Starter
Was amazed to see my post from 2007 still having good current information. Incidentally the combination of new Iridium plugs and wires plus cleaning the MAF and TB did solve the slight hesitation I experienced at about half throttle and 50 MPH. Plugs still going strong at 90K and no acceleration problems. BIGHANK
BIGHANK
02-13-2014, 05:24 PM
#14
Team Owner

Was amazed to see my post from 2007 still having good current information. Incidentally the combination of new Iridium plugs and wires plus cleaning the MAF and TB did solve the slight hesitation I experienced at about half throttle and 50 MPH. Plugs still going strong at 90K and no acceleration problems.BIGHANK
BIGHANK
Stay warm my man, Mr Chill has your area in his cross-hairs.
 02-14-2014, 12:41 PM
#15
Instructor
Yes it has some great information. Sometimes I am a little skeptical of doing any work without consulting the forum because it may cause engine trouble and dic codes to pop up. I plan to install new Delco Iridium spark plugs and Granatelli solid core S.S. spark plug wires. Each of the wires has a metal ring that I have to slide as close to the coil end when I install them. It sounds like a good combination and the lengths looks about the same as what is there now.
02-14-2014, 02:47 PM
#16
Safety Car


I needed to gap two of my GM plugs. They were not coated, they have a small disk spot welded on the end. The material is very brittle, use care. I had a magnifying glass on hand to check my work with the unfamiliar material, but it was not needed. No surfaces were damaged with normal care.
I had never used anti seize on plugs before and was freaked out as the excess material burned away. I was concerned I had damaged something, although I suspected what was going on. This car has me gun shy, I know some mistakes can cause a cascade of new problems.
I had never used anti seize on plugs before and was freaked out as the excess material burned away. I was concerned I had damaged something, although I suspected what was going on. This car has me gun shy, I know some mistakes can cause a cascade of new problems.
02-14-2014, 04:47 PM
#18
Burning Brakes
02-15-2014, 02:08 PM
#19
Team Owner
