
water on the floor board
 10-19-2009, 09:52 PM
#1
Melting Slicks

Thread Starter
Member Since: Sep 2008
Location: Northern Virginia
Posts: 2,389
Likes: 0
Received 5 Likes
on
5 Posts
I have water (not just a few drips) on my floor board. Not puddled up but it is VERY damp and it keeps the windows fogged up pretty much all the time. I have no idea where the water is coming in at but it's on both sides of the car so I ruled out the AC drain plug.
Any advice would be great because I need to get this sorted out before it gets too bad... I'm super stressed about this because I feel like this is going to cost me a lot of $.
****.
Any advice would be great because I need to get this sorted out before it gets too bad... I'm super stressed about this because I feel like this is going to cost me a lot of $.
****.

The following users liked this post:
CorvetteBrent (11-07-2018)
10-19-2009, 10:07 PM
#2
Melting Slicks
Member Since: Oct 2007
Location: Kinston North Carolina
Posts: 2,382
Likes: 0
Received 9 Likes
on
9 Posts

Have you read this?
-------------------------------------------
http://forums.corvetteforum.com/c5-t...ak-checks.html
-------------------------------------------
http://forums.corvetteforum.com/c5-t...ak-checks.html
10-19-2009, 10:24 PM
#3
Melting Slicks
Thread Starter
Member Since: Sep 2008
Location: Northern Virginia
Posts: 2,389
Likes: 0
Received 5 Likes
on
5 Posts
Will clogged utters cause the drivers side to accumulate water?
If so, that doesn't explain why the passenger side is very damp.
If so, that doesn't explain why the passenger side is very damp.
Last edited by TheDingo; 10-19-2009 at 10:35 PM.
10-20-2009, 12:25 AM
#4
Tech Contributor


Member Since: Dec 1999
Location: Anthony TX
Posts: 32,736
Received 2,180 Likes
on
1,583 Posts
CI 6,7,8,9,11 Vet
St. Jude Donor '08

Brandon
There are drain udders on BOTH sides of the cowl. Your best bet is to remove the carpets on BOTH sides of the cabin. While there out, wet and dry clean them and allow them to completly dry. I stick mine in the furnace room.
Leak points:
BEHIND THE BATTERY:
WIPER UDDERS:
DOOR HINGES:
Once you remove the carpet, you will see this and be able to see where the water enters:
While there out, have some one run a garden hose over the car. START LOW and on one section. Run the water on that spot for a while to allow the water to soak into the leak and enter the cabin. Then work you way UP the car in sections. If it going to leak, you will see it and with the carpet out, its a LOT easier to find.
Bill C
The following users liked this post:
CorvetteBrent (11-07-2018)
10-20-2009, 12:40 AM
#5
Melting Slicks
Thread Starter
Member Since: Sep 2008
Location: Northern Virginia
Posts: 2,389
Likes: 0
Received 5 Likes
on
5 Posts
Thanks man.. is there a way to fill the places where the water is coming in??
It's one thing to find the leak, but another to fix it..
awesome write up by the way...
It's one thing to find the leak, but another to fix it..
awesome write up by the way...
10-21-2009, 07:30 AM
#7
Tech Contributor
Member Since: Dec 1999
Location: Anthony TX
Posts: 32,736
Received 2,180 Likes
on
1,583 Posts
CI 6,7,8,9,11 Vet
St. Jude Donor '08
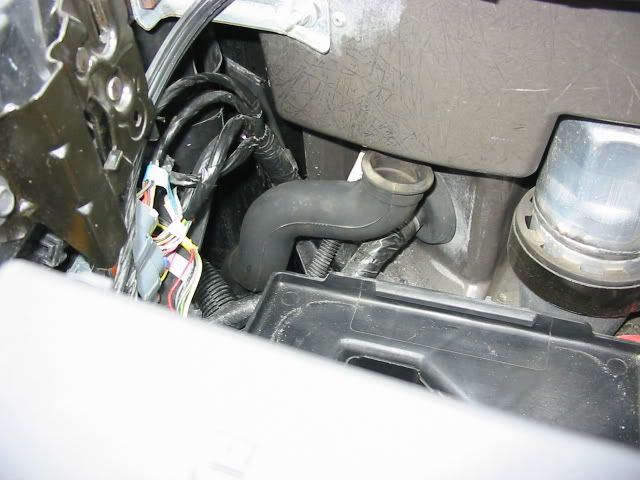
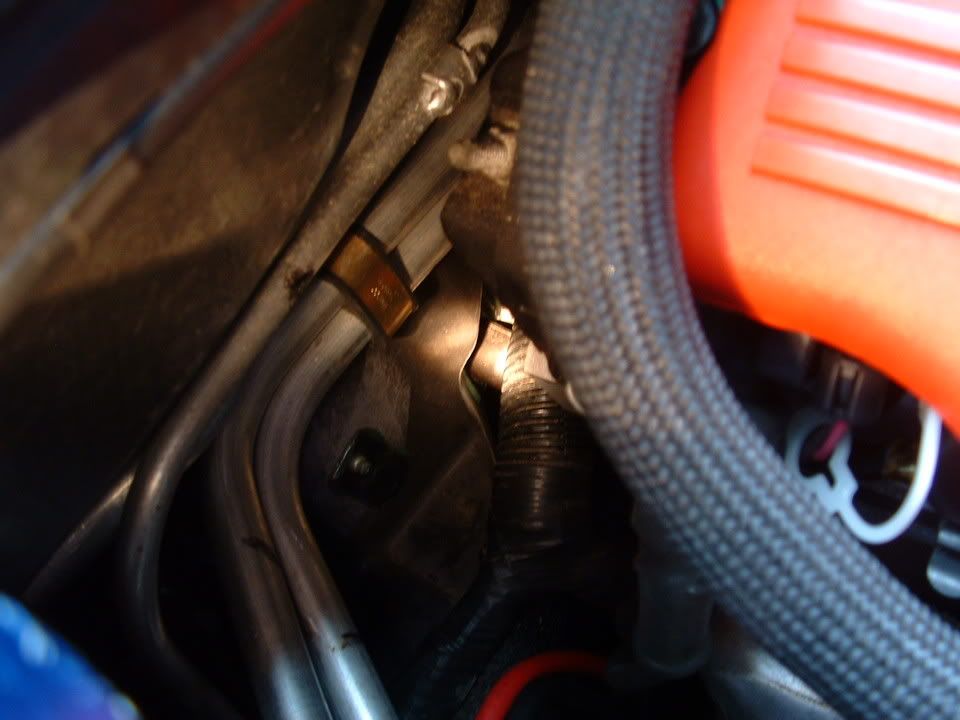
 If the windshiels COWL drains (on either side of the car) clog up,,,,,where do you think the water that drains off the winshield is going to go. When the water cant draim out of the cowl,,it goes into the opening for the HVAC air intake and into the cabin:
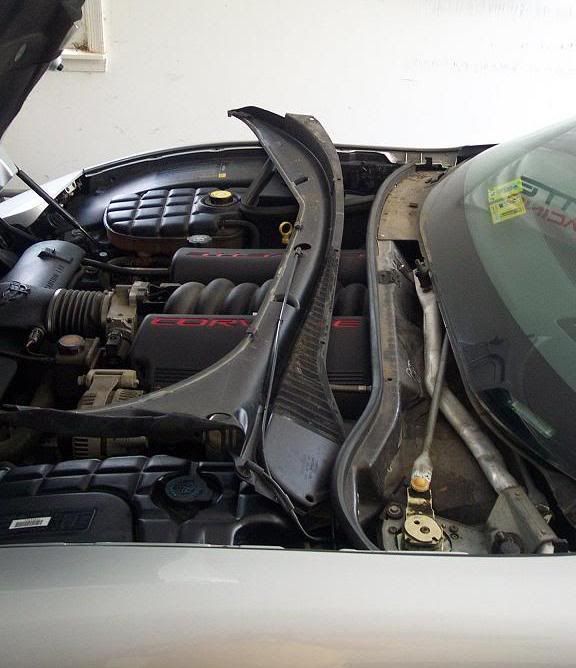
The water can fill the well on the drivers side and leak thru the wire way pass thru hole for the windshield wiper wiring. It will also rurin your wiper motor controller.
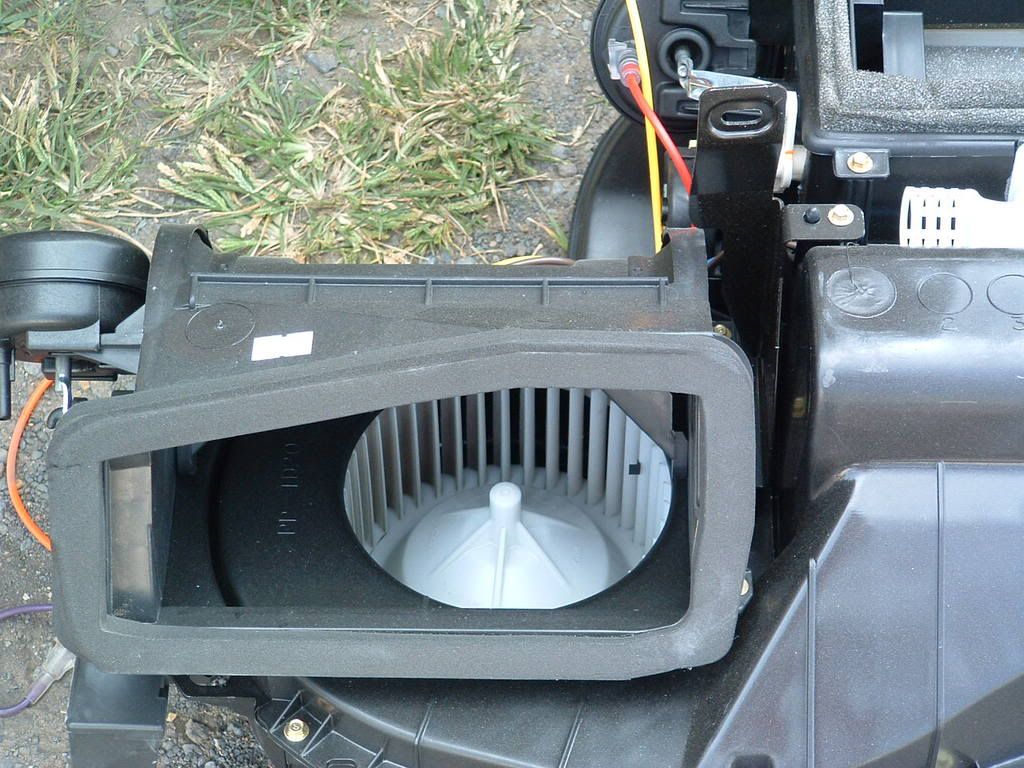
IF,,,the HVAC condensate drain cloggs, whe you run the AC or Defrost condensate will back up and flood into the passengers floor board and that will rurin the BCM.
BC
Unless you run water over the car and LOOK for the leak,,,your just guessing
The following users liked this post:
CorvetteBrent (11-07-2018)
10-21-2009, 06:45 PM
#9
Le Mans Master

I am just suggesting to check the simple things first.
The window seal with the targa top can sometimes not line up correctly and cause an issue. You would of course see water on your inner door as well if this was the source.
Thanks Bill for the detailed information as well.

The following users liked this post:
CorvetteBrent (11-07-2018)
10-21-2009, 07:06 PM
#10
Instructor


One more thing to check. Roll up your windows and close the doors. Then go the the back and slam down the rear hatch. On my 98, the air surge would unseat the top of the windows from the targa top seal.
So if it rained on the night after I went grocery shopping ( slam the hatch after pulling out the grocery bags ), the next day I would find traces of water in my car. Took me forever to figure where that water was coming from
So if it rained on the night after I went grocery shopping ( slam the hatch after pulling out the grocery bags ), the next day I would find traces of water in my car. Took me forever to figure where that water was coming from
The following 2 users liked this post by SPS:
CorvetteBrent (11-07-2018),
MyRedVette1 (12-07-2018)
10-21-2009, 08:29 PM
#12
Tech Contributor
Member Since: Dec 1999
Location: Anthony TX
Posts: 32,736
Received 2,180 Likes
on
1,583 Posts
CI 6,7,8,9,11 Vet
St. Jude Donor '08
OH CRAP! That means you have an entirely different issue and it fairly involved to fix it. I too have a Z. Been there!!
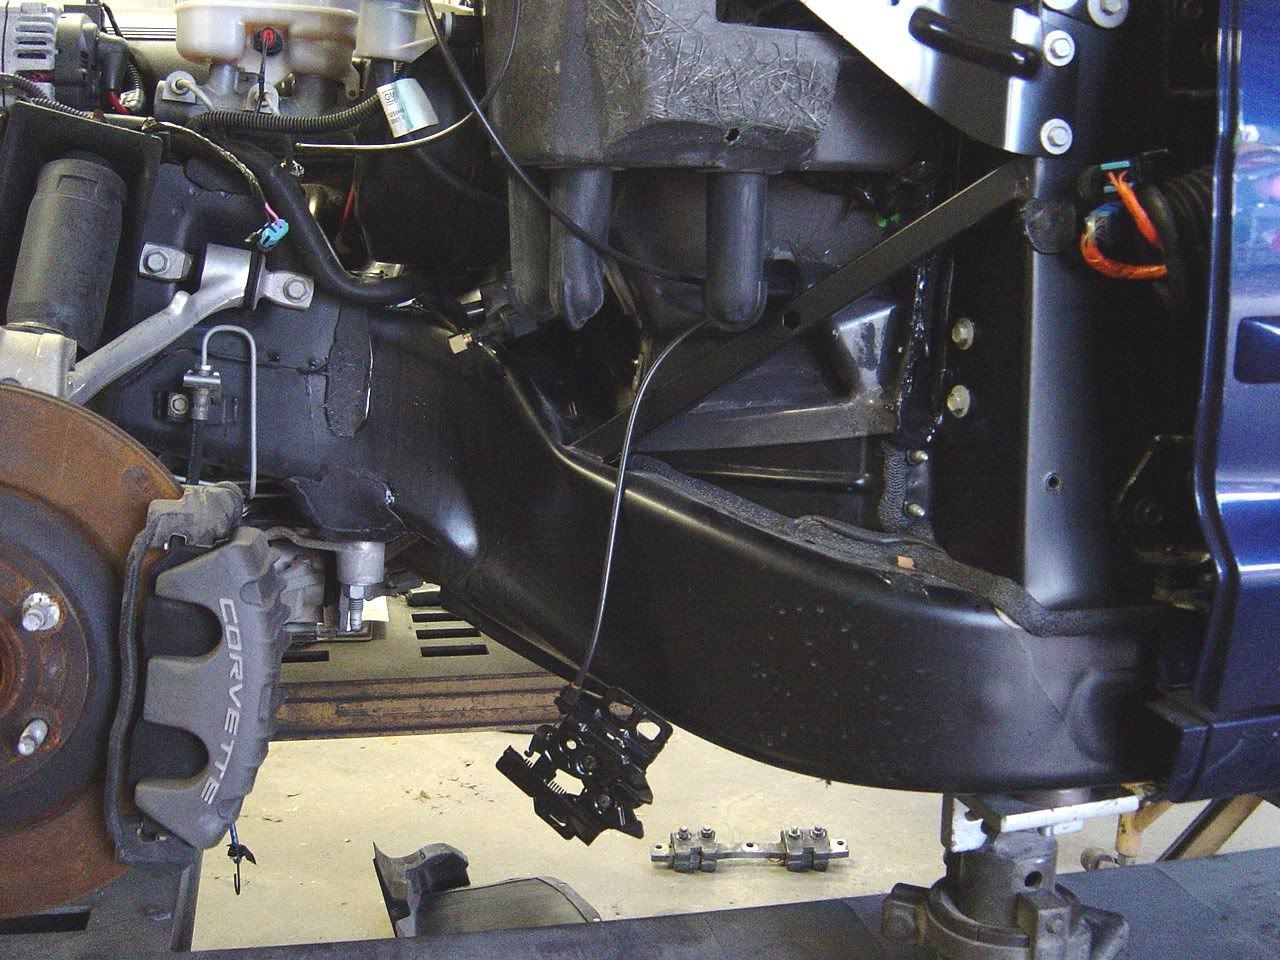
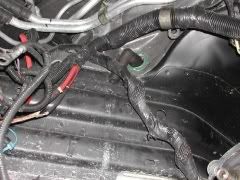
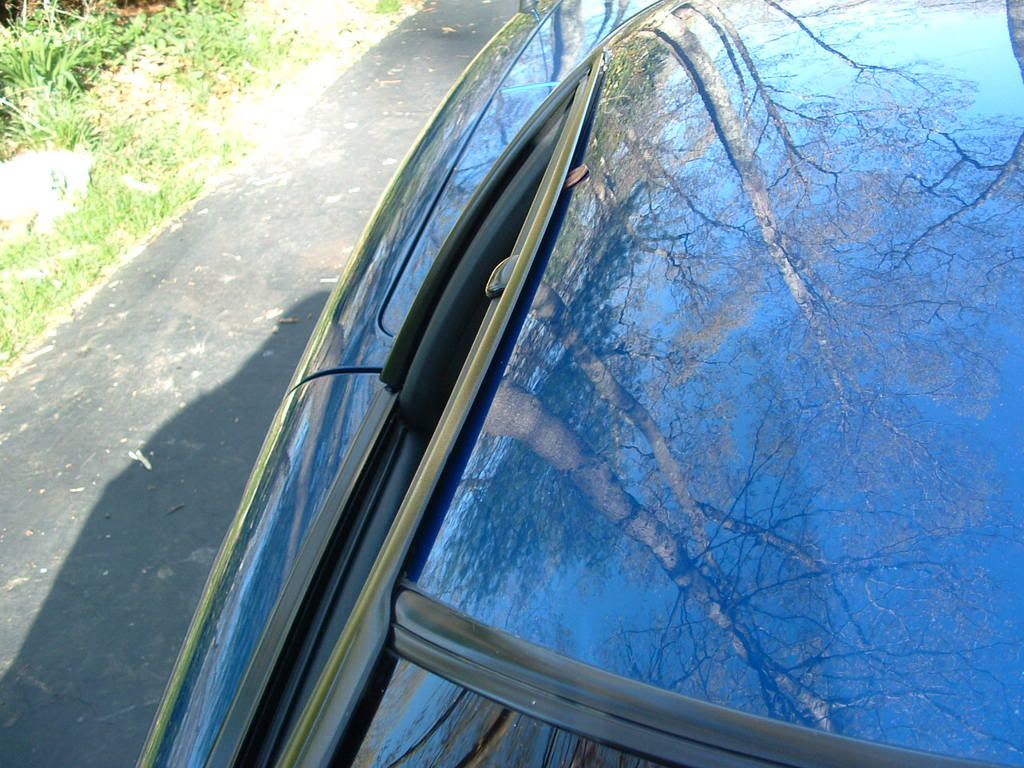
Look at this picture. You will see WATER. The water comes from the area where the roof, windshield and door sorrund roof channel meet.
You have to take the roof drip channel off and seal that joint!!!


The water runs down the windshield pillar and leaks in here:
The water ends up on the door sill and then it runs into the floor area. Instead of fixing mine, I ran a TALL bead of silicone RTV sealer allllllllll the way across the door sill. It acts as a dam. Then the water just runs OUT of the car on to the ground. Have NOT had a leak issue since.
Sorry I dont have a pic of the dam but, its easy to build and invisable when the door sill cover is reinstalled.
Heres where the dam goes:
Bill
Look at this picture. You will see WATER. The water comes from the area where the roof, windshield and door sorrund roof channel meet.
You have to take the roof drip channel off and seal that joint!!!
The water runs down the windshield pillar and leaks in here:
The water ends up on the door sill and then it runs into the floor area. Instead of fixing mine, I ran a TALL bead of silicone RTV sealer allllllllll the way across the door sill. It acts as a dam. Then the water just runs OUT of the car on to the ground. Have NOT had a leak issue since.
Sorry I dont have a pic of the dam but, its easy to build and invisable when the door sill cover is reinstalled.
Heres where the dam goes:
Bill
The following users liked this post:
ArmchairArchitect (11-06-2018)
10-22-2009, 01:14 AM
#13
Melting Slicks
Thread Starter
Member Since: Sep 2008
Location: Northern Virginia
Posts: 2,389
Likes: 0
Received 5 Likes
on
5 Posts
Thank God, that makes sense because there is always water inside the door jamb (where it hinges to the car) and on the kick panel then obviously on to the floor.
This makes a lot of sense. Bill.. I might need to give you a call or get a very detailed PM on how I should go about building the dam on the car.
Is it as simple as just making the dam in the hinges or do I need something to go in the gap where the water initially enters the car? Thanks for any information.
10-22-2009, 10:47 PM
#14
Le Mans Master
10-23-2009, 08:22 AM
#15
Tech Contributor
Member Since: Dec 1999
Location: Anthony TX
Posts: 32,736
Received 2,180 Likes
on
1,583 Posts
CI 6,7,8,9,11 Vet
St. Jude Donor '08
I will see if I can post some pictures of how I fixed mine.
BC
BC
11-14-2009, 05:46 PM
#17
Racer

I just had the same problem, I took off the A/C Evaporator case drain, Clean, took out the passenger side cowl drain, had a LITTLE debris in it, cleaned the 3 udders on the D/S the rear one was full of junk, and it still leaked, took the carpet, seat, armrest, door sill etc. out and found the leak. The Window weatherstripping wasn't in its groove, put ti back in correctly which all but eliminated the leak. The rest was leaking down by the drip rail you pictured Bill, So I took and laid a bead of rightstuff(great sealant) down the door sill and I'm waiting on it to dry before I reassemble.
I'll post up some pictures soon to get a visual of the Dam Bill was talking about, the Seat/carpets are EXTREMELY easy to take out so if anyone has any doubt, just do it..
EDIT: Watch the evaporator drain with the A/C on high before you bother pulling it off to clean/check it. It's a MAJOR PITA to get off,especially if you have big hands/arms like me.
Last edited by machone03; 11-14-2009 at 05:50 PM.
The following users liked this post:
CorvetteBrent (11-07-2018)
11-18-2009, 12:38 AM
#18
All credit is given to Bill Curlee for the following instructions and information.
He gave me these instructions when I had this same trouble.
Mine is now fixed and leak free.
Brandon,
Bill Curlee�s Post #13 shows the pictures of the locations that you need to address. Call these pictures #1, #2, and #3.
Bill talked me through the same trouble on my FRC. Mine had the same leaks as your Z06. The whole job does take some time but it is well worth it. Mine has not leaked a drop after this process.
You are going to need a caulking gun and about 4 tubes of 100% silicon for this job. I used GE Black 100% silicon.
1. Picture #1 - Remove the door gaskets and then the drip rails. Once the gaskets are removed the screws that hold the drip rails can be seen. Remove both drip rails. Leave them out for now. This will allow access to the seams on both sides the windshield where it meets the body.
2. Picture #1 - Next, I sharpened the handle end of a plastic tooth brush to use as a wedge (that won�t scratch the paint). Use this wedge to gently pry the windshield gasket up away from the roof of the car just enough to get the tip of the caulking gun into the slot between the windshield and the body. Fill it up all the way across the top of the windshield and then down both sides. Don�t worry about getting to much silicon in the gap. Too much is better than not enough. When the extra squeezes out, don�t worry, it will wipe off. Wipe it off right away before it gets dry.
3. Picture #1 - Next, reseal the drip rails and reinstall them. Again, don�t worry about using too much silicon. Just wipe off the extra. Then you can reinstall the door gaskets.
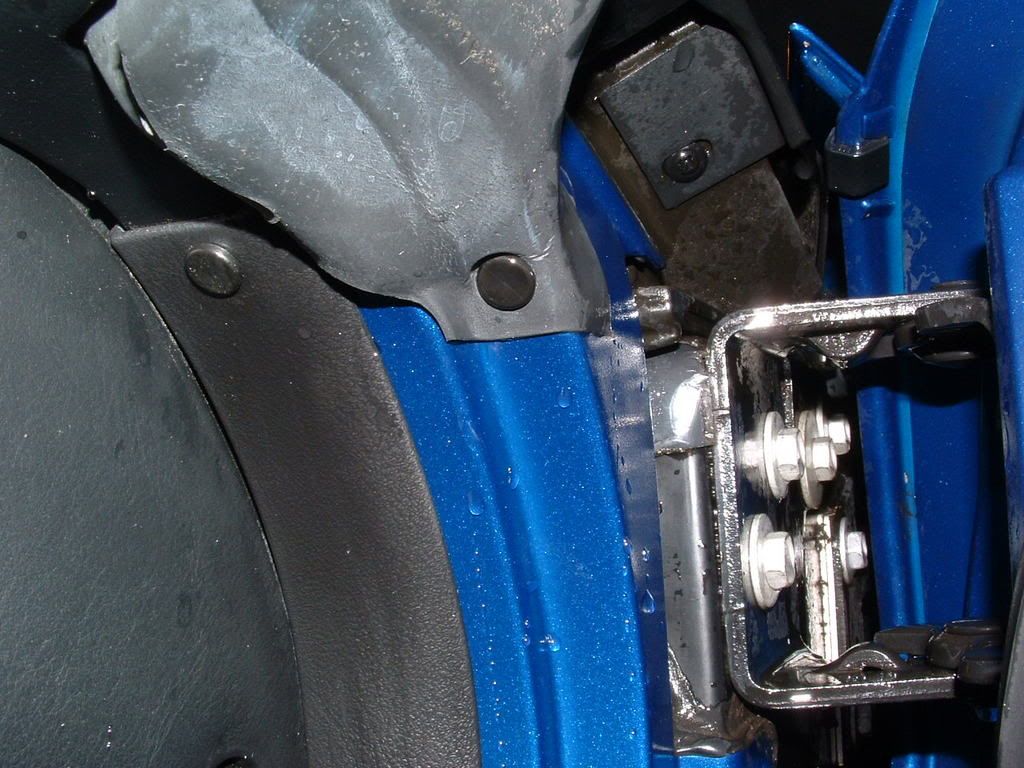
4. Picture #2 - Next, seal those door hinges up tight. Seal the top, bottom, and sides. I used blue painters tape to mask off what I did not want to get the silicon on. This gave a clean look when the job was finished and made cleanup easy. Seal them up totally. Never underestimate the fact that water can get into very small cracks.
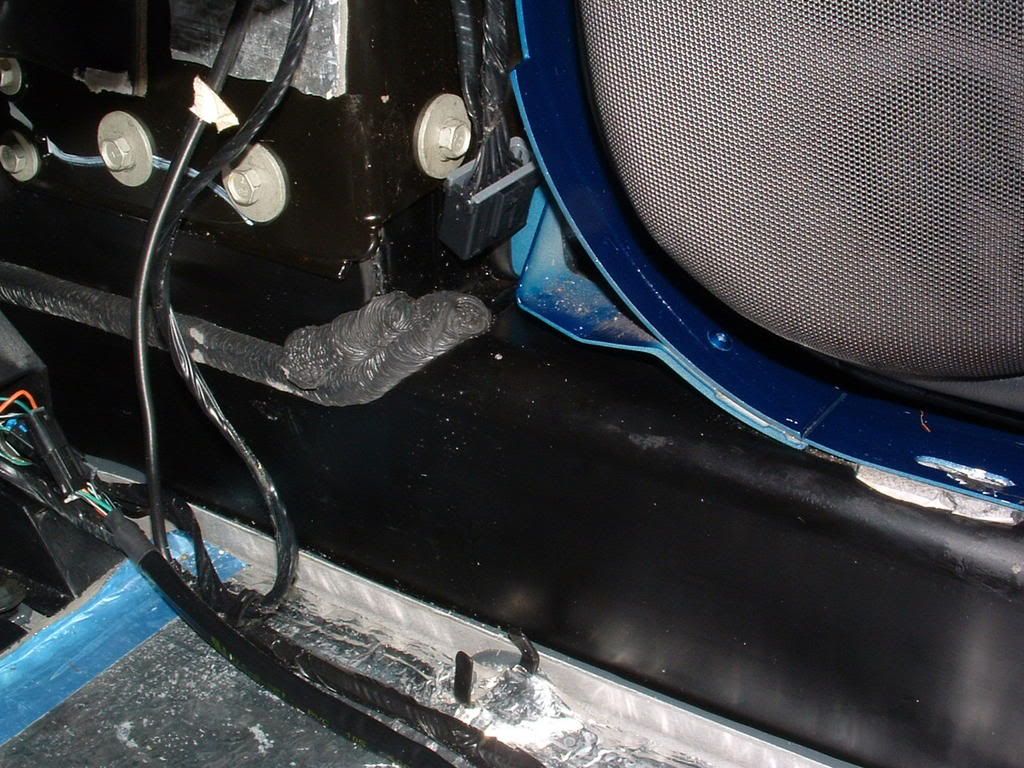
5. Picture#3 � Shows the door jam with the sill trim removed. You can see the ground plug up at the front of the door. Start caulking right under the plug where the black rail meets the blue body. Keep going towards the rear of the door caulking between the black and the blue body parts. Pump as much silicon between these two parts as you can get in there. Go all the way to the back of the door. Also, note the slots in the body panel. You will need to address this area before you put the sill trim back in place. Before installing the sill trim, you need to build a dam of silicon under it to prevent any water from running under it. First, use some grease on the bottom side of the sill trim (just a very thin coating). This will keep the silicon from sticking to the trim so that it can be removed later if need be. Build a wide and tall dam of silicon from the front to the back of the door. Also build a dam around the slots where the sill trim snaps down. Then snap the sill trim into place. You will need to do this quickly so that the silicon will form to the sill trim and become watertight.
6. There is no picture of the sill trim that the seat belt goes through but it will also need to be removed and the same dam built under it. Same process as above.
7. One last thing. Bill said this. Don�t let the carpet stay wet. Do yourself a favor and remove it. Clean it and dry it or it will mildew and stink.
Good Luck,
Brad
He gave me these instructions when I had this same trouble.
Mine is now fixed and leak free.
OH CRAP! That means you have an entirely different issue and it fairly involved to fix it. I too have a Z. Been there!!
Look at this picture. You will see WATER. The water comes from the area where the roof, windshield and door sorrund roof channel meet.
You have to take the roof drip channel off and seal that joint!!!
The water runs down the windshield pillar and leaks in here:
The water ends up on the door sill and then it runs into the floor area. Instead of fixing mine, I ran a TALL bead of silicone RTV sealer allllllllll the way across the door sill. It acts as a dam. Then the water just runs OUT of the car on to the ground. Have NOT had a leak issue since.
Sorry I dont have a pic of the dam but, its easy to build and invisable when the door sill cover is reinstalled.
Heres where the dam goes:
Bill
Bill Curlee�s Post #13 shows the pictures of the locations that you need to address. Call these pictures #1, #2, and #3.
Bill talked me through the same trouble on my FRC. Mine had the same leaks as your Z06. The whole job does take some time but it is well worth it. Mine has not leaked a drop after this process.
You are going to need a caulking gun and about 4 tubes of 100% silicon for this job. I used GE Black 100% silicon.
1. Picture #1 - Remove the door gaskets and then the drip rails. Once the gaskets are removed the screws that hold the drip rails can be seen. Remove both drip rails. Leave them out for now. This will allow access to the seams on both sides the windshield where it meets the body.
2. Picture #1 - Next, I sharpened the handle end of a plastic tooth brush to use as a wedge (that won�t scratch the paint). Use this wedge to gently pry the windshield gasket up away from the roof of the car just enough to get the tip of the caulking gun into the slot between the windshield and the body. Fill it up all the way across the top of the windshield and then down both sides. Don�t worry about getting to much silicon in the gap. Too much is better than not enough. When the extra squeezes out, don�t worry, it will wipe off. Wipe it off right away before it gets dry.
3. Picture #1 - Next, reseal the drip rails and reinstall them. Again, don�t worry about using too much silicon. Just wipe off the extra. Then you can reinstall the door gaskets.
4. Picture #2 - Next, seal those door hinges up tight. Seal the top, bottom, and sides. I used blue painters tape to mask off what I did not want to get the silicon on. This gave a clean look when the job was finished and made cleanup easy. Seal them up totally. Never underestimate the fact that water can get into very small cracks.
5. Picture#3 � Shows the door jam with the sill trim removed. You can see the ground plug up at the front of the door. Start caulking right under the plug where the black rail meets the blue body. Keep going towards the rear of the door caulking between the black and the blue body parts. Pump as much silicon between these two parts as you can get in there. Go all the way to the back of the door. Also, note the slots in the body panel. You will need to address this area before you put the sill trim back in place. Before installing the sill trim, you need to build a dam of silicon under it to prevent any water from running under it. First, use some grease on the bottom side of the sill trim (just a very thin coating). This will keep the silicon from sticking to the trim so that it can be removed later if need be. Build a wide and tall dam of silicon from the front to the back of the door. Also build a dam around the slots where the sill trim snaps down. Then snap the sill trim into place. You will need to do this quickly so that the silicon will form to the sill trim and become watertight.
6. There is no picture of the sill trim that the seat belt goes through but it will also need to be removed and the same dam built under it. Same process as above.
7. One last thing. Bill said this. Don�t let the carpet stay wet. Do yourself a favor and remove it. Clean it and dry it or it will mildew and stink.
Good Luck,
Brad
Last edited by Boulty1961; 11-19-2009 at 12:52 PM.
The following users liked this post:
CorvetteBrent (11-07-2018)
11-30-2012, 05:50 PM
#19
old thread I know, but I have the same problem, water on the floor in foot well near door opening and water ran down from the roof at the B pillar.
Boulty your description was great but I am having a hard time following, do you have any pictures of what you are talking about?
thanks guys! I really want to get this figured out as its a pain.
Boulty your description was great but I am having a hard time following, do you have any pictures of what you are talking about?
thanks guys! I really want to get this figured out as its a pain.
11-30-2012, 06:14 PM
#20
Tech Contributor
Member Since: Dec 1999
Location: Anthony TX
Posts: 32,736
Received 2,180 Likes
on
1,583 Posts
CI 6,7,8,9,11 Vet
St. Jude Donor '08
How did I know you have a ZO6?? Very common issue. The tri area where the windshield header, the top and the door drip molding meet is sealed with a putty. That putty dries out, cracks and BINGO,, you have the leak that your experiencing..
The ONLY way to properly fix it, is to remove the drip molding and resealing the area.
I will be doing this repair on the passengers side this winter. Yes,, LOTS of pictures will be taken.
Bill
Very common issue. The tri area where the windshield header, the top and the door drip molding meet is sealed with a putty. That putty dries out, cracks and BINGO,, you have the leak that your experiencing..The ONLY way to properly fix it, is to remove the drip molding and resealing the area.
I will be doing this repair on the passengers side this winter. Yes,, LOTS of pictures will be taken.
Bill
The following 2 users liked this post by Bill Curlee:
ArmchairArchitect (11-06-2018),
CorvetteBrent (11-07-2018)