
Cam/Header/CAI and other misc items install
 05-09-2010, 06:44 PM
#1
Instructor

Thread Starter
Member Since: Feb 2009
Location: Lockport IL
Posts: 177
Likes: 0
Received 0 Likes
on
0 Posts
Hey guys, I thought I post my project and show you guys my progress and parts that I'm putting on my car. This is probably the most I've spent on my car in one year, and after having it for almost 4 years now, I'm thinking its time to get some more HP out of this car. I've read vsocks thread on his cam/head installation and learned a lot from it. Hopefully you guys can chime in and give your thoughts throughout the whole process.
A little history on this car:
I bought this back in August of '06 with 10K miles and soon thereafter I installed BB Bullet exhaust system and a Kirban Short Throw shifter. And It pretty much stayed as it is until now. So now, it sas a tad bit over 50K and seeing every single kind of weather here in the Chicagoland area. So after the mods are complete, this will pretty much be my weekend warrior and take it out when its nice type of car.
Parts:
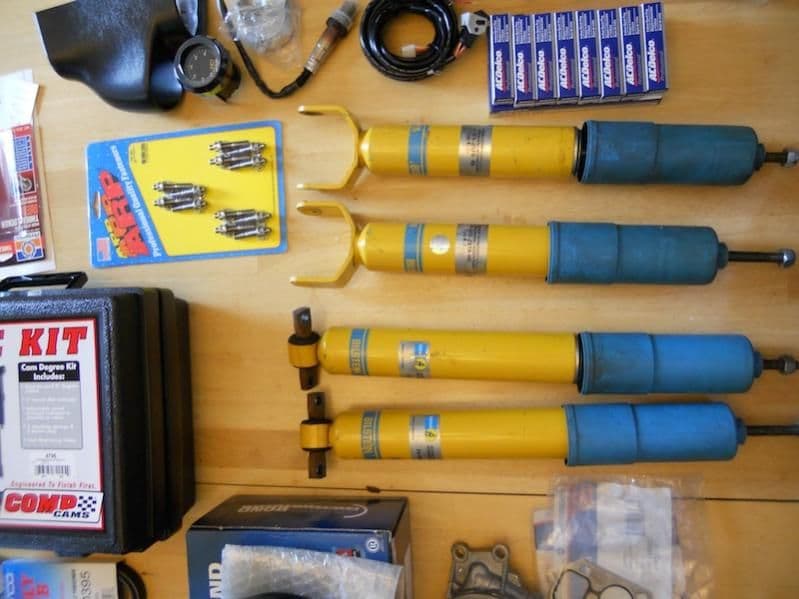
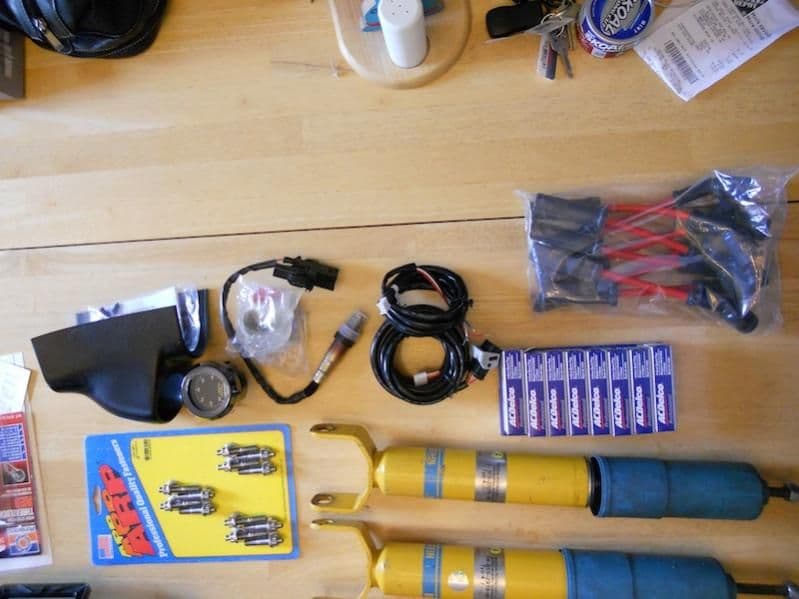
- England Green Whiplash II "Kitchen Sink" cam deal
- OBX LT Headers with Resonators
- ARP Header Bolts
- Used Bilstein Sport Shocks
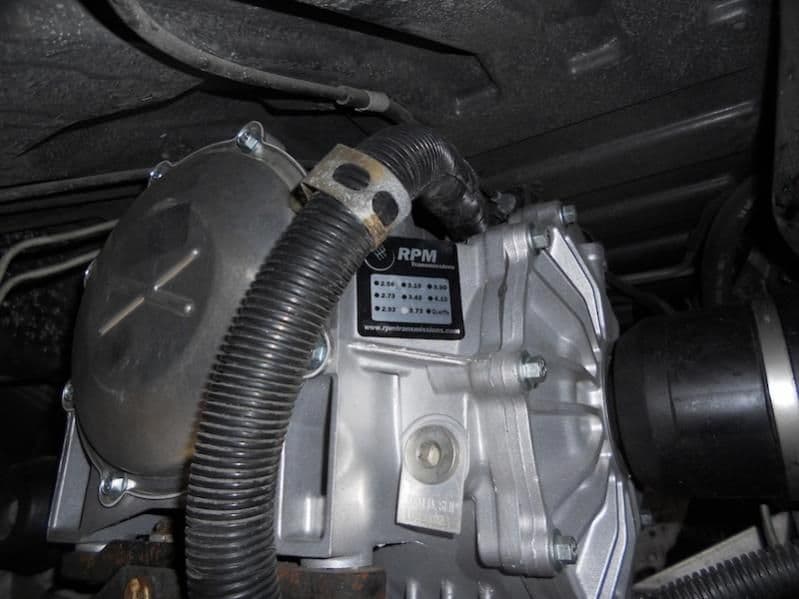
- RPM Stage II differential(already installed)
- C6Z51 front and rear sway bars
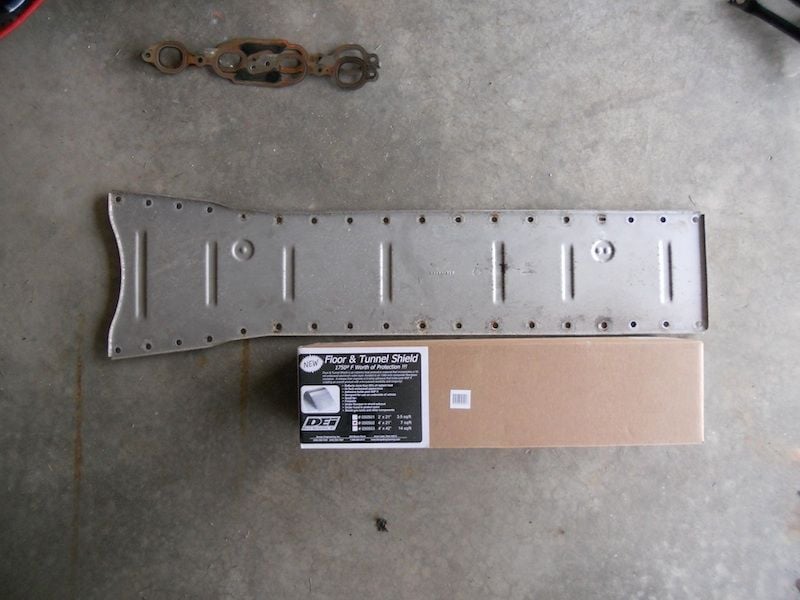
- DEI Heat Shield
- AEM UEGO AFR Sensor with Single Pillar
- Vararam Cold Air Intake
Install Posts: Updated 05/17/10
Harmonic Balancer Removal - Post #8
Valve Cover Removal and Cam Install - Post #9
Spring, Seats, Seal, etc... Install - Post #10
DEI Heat Shield Install - Post #27
Bilstein Shock Install - Post #28
Cam Start Up(Untuned) - Post #29
AEM UEGO Install - Post #41
I just ordered the C6Z51 rear sway bars from GMPartsHouse last week, so I should be getting those soon. Other than that I pretty much have everything else and already started the project last week Friday. NOTE: I cannot wait any longer for these headers, so I purchased a used set(OBX Headers from 02 Z06 Eric). I also got my C6Z51 sway bars in. So those are still pending for install...
 UPDATE:
- June 1st is my scheduled tune
- Made 416/360 to the stuff that touches the ground
Here are the pics of the parts:

A little history on this car:
I bought this back in August of '06 with 10K miles and soon thereafter I installed BB Bullet exhaust system and a Kirban Short Throw shifter. And It pretty much stayed as it is until now. So now, it sas a tad bit over 50K and seeing every single kind of weather here in the Chicagoland area. So after the mods are complete, this will pretty much be my weekend warrior and take it out when its nice type of car.
Parts:
- England Green Whiplash II "Kitchen Sink" cam deal
- OBX LT Headers with Resonators
- ARP Header Bolts
- Used Bilstein Sport Shocks
- RPM Stage II differential(already installed)
- C6Z51 front and rear sway bars
- DEI Heat Shield
- AEM UEGO AFR Sensor with Single Pillar
- Vararam Cold Air Intake
Install Posts: Updated 05/17/10
Harmonic Balancer Removal - Post #8
Valve Cover Removal and Cam Install - Post #9
Spring, Seats, Seal, etc... Install - Post #10
DEI Heat Shield Install - Post #27
Bilstein Shock Install - Post #28
Cam Start Up(Untuned) - Post #29
AEM UEGO Install - Post #41
I just ordered the C6Z51 rear sway bars from GMPartsHouse last week, so I should be getting those soon. Other than that I pretty much have everything else and already started the project last week Friday. NOTE: I cannot wait any longer for these headers, so I purchased a used set(OBX Headers from 02 Z06 Eric). I also got my C6Z51 sway bars in. So those are still pending for install...
UPDATE:- June 1st is my scheduled tune
- Made 416/360 to the stuff that touches the ground
Here are the pics of the parts:
Last edited by mstrnad; 06-16-2010 at 11:13 PM.
 05-09-2010, 06:54 PM
#2
Instructor
Thread Starter
Member Since: Feb 2009
Location: Lockport IL
Posts: 177
Likes: 0
Received 0 Likes
on
0 Posts
So, I've used ls1howto.com head/cam install as a guide to at least get me to the part where I can take out my cam. And after two days, I'm pretty much to the part were I'm getting ready to take the steering rack out. I just stopped and thought I would take pictures to show you guys my progress. So here we go.
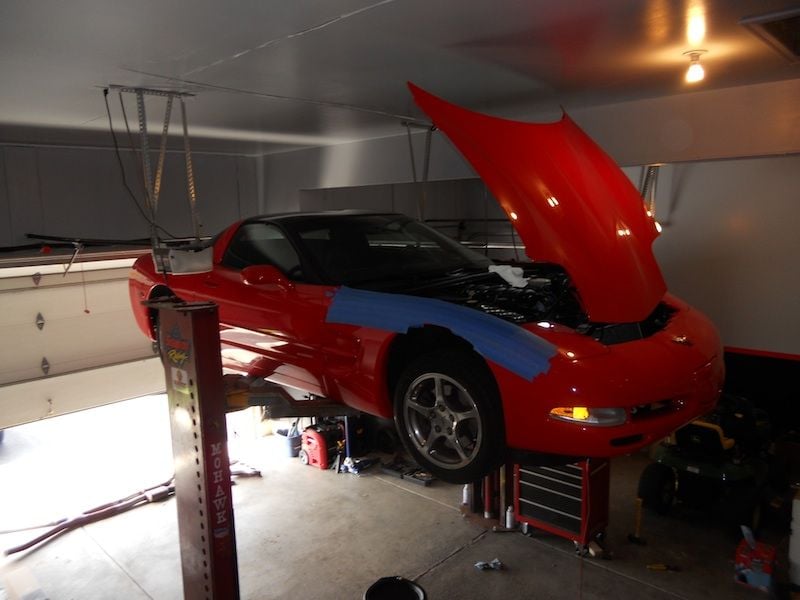
I have a lift in my garage, so this make things 100x easier:
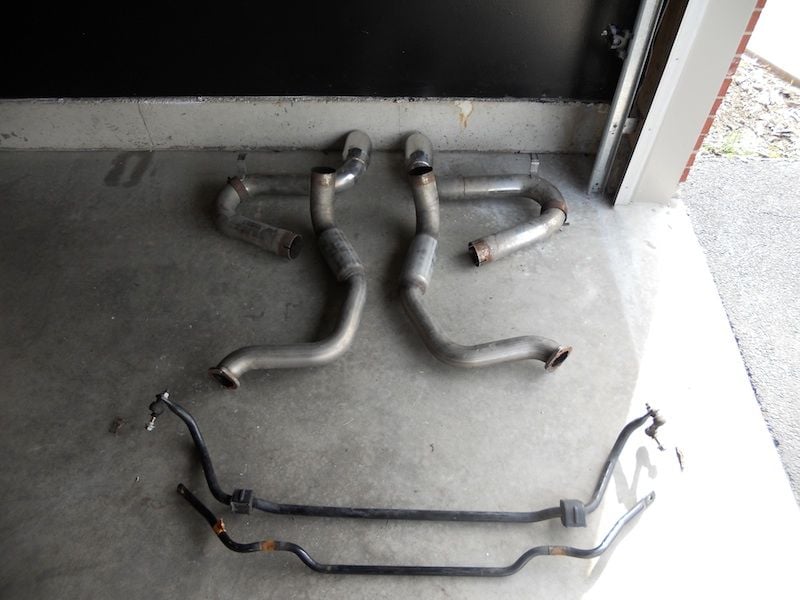
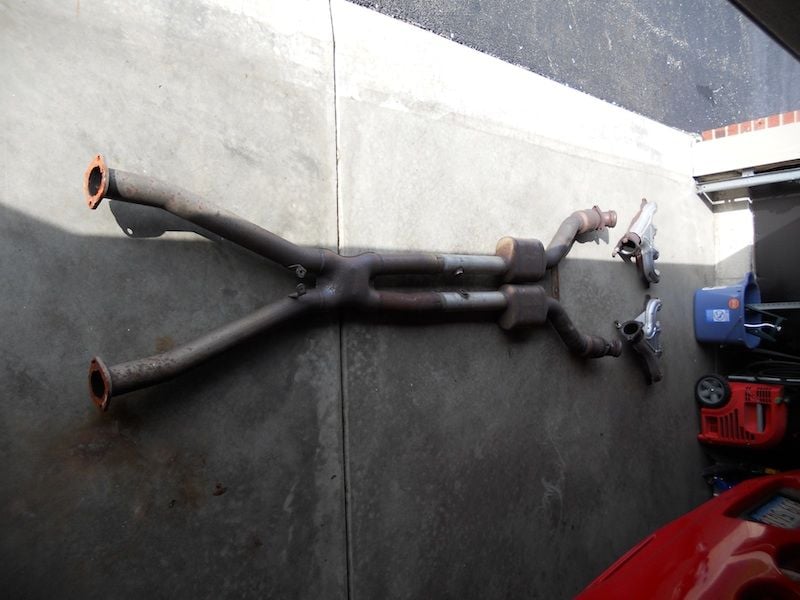
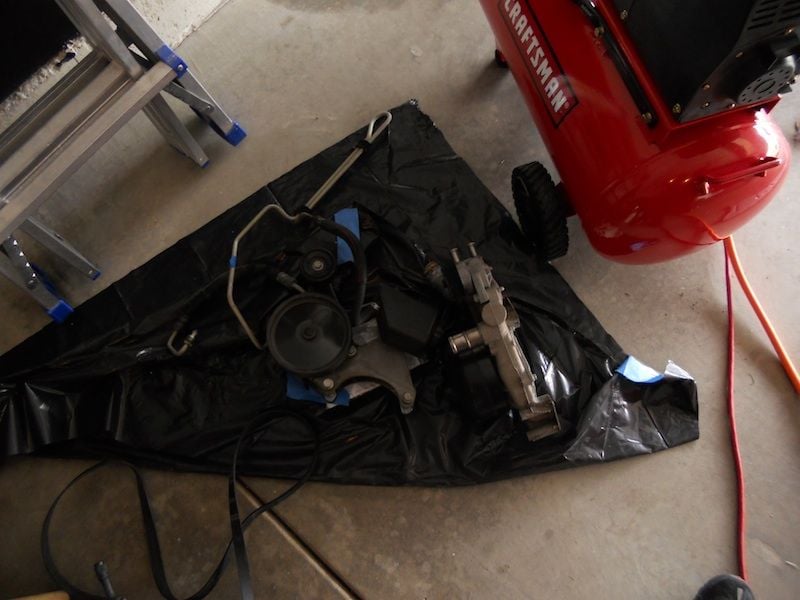
Got the whole exhaust system, heat shield, front and rear sway bars taken out:

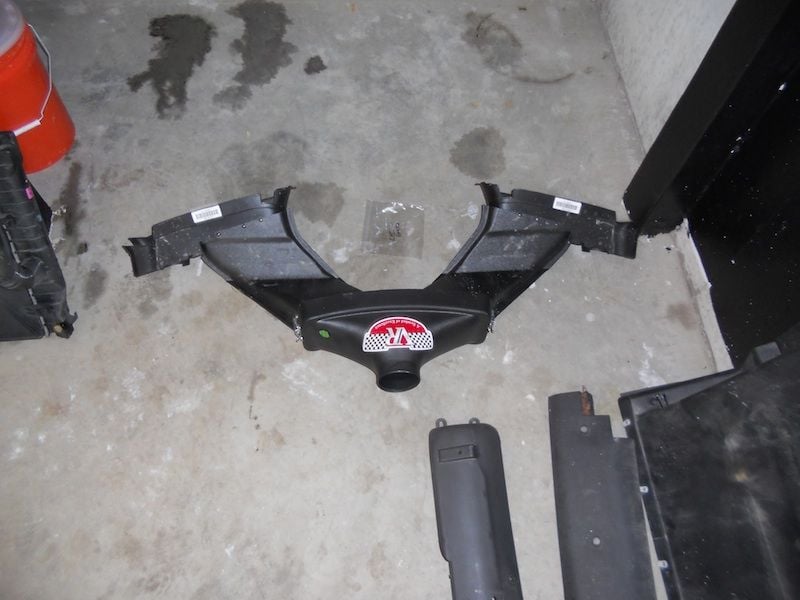
I had installed the CAI as soon as I got it. Originally this was only going to be a CAI/Header installation and I bit the bullet and purchased the England Green Cam package. So I had to take the CAI back out:
Radiator, Water Pump, and Power Steering system taken out:

I have a lift in my garage, so this make things 100x easier:
Got the whole exhaust system, heat shield, front and rear sway bars taken out:
I had installed the CAI as soon as I got it. Originally this was only going to be a CAI/Header installation and I bit the bullet and purchased the England Green Cam package. So I had to take the CAI back out:
Radiator, Water Pump, and Power Steering system taken out:
05-09-2010, 07:04 PM
#3
Instructor
Thread Starter
Member Since: Feb 2009
Location: Lockport IL
Posts: 177
Likes: 0
Received 0 Likes
on
0 Posts
I took my time throughout the process and drank a lot of beer. So it took me twice as long. I also used painters tape on every connection that I disconnected and labeled them. That way when I go back and put everything back together, I know all of the pieces with blue painters tape is what I have to connect.
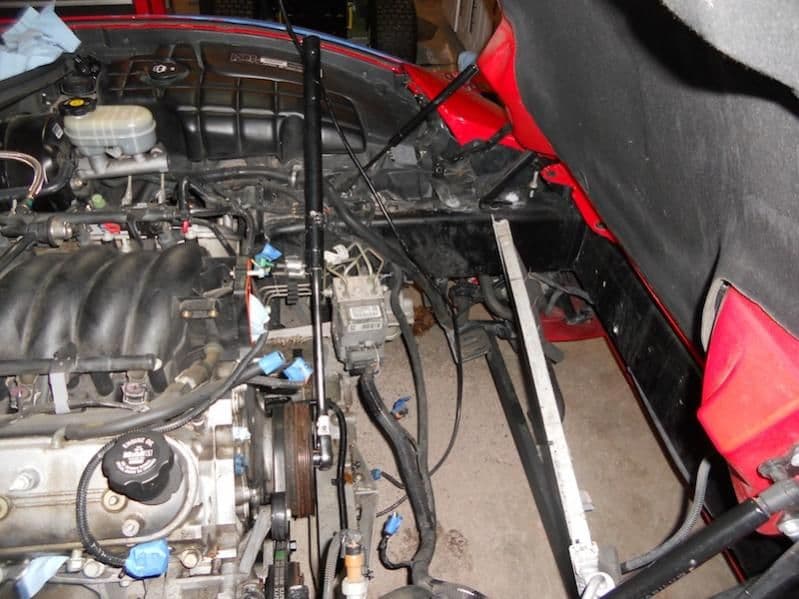
My engine bay isn't as clean as vsocks, so tonight I was going to take my time and start cleaning everything prior to taking the steering rack out. I've already disconnected the steering rack from the power steering unit and the steering stem. The two metal hoses that go from power steering unit to the steering rack was a PITA to get lose and out. So I practically spent 15 minutes and turning the flair wrench o'so every few degrees.
So hear are pics of the engine bay:

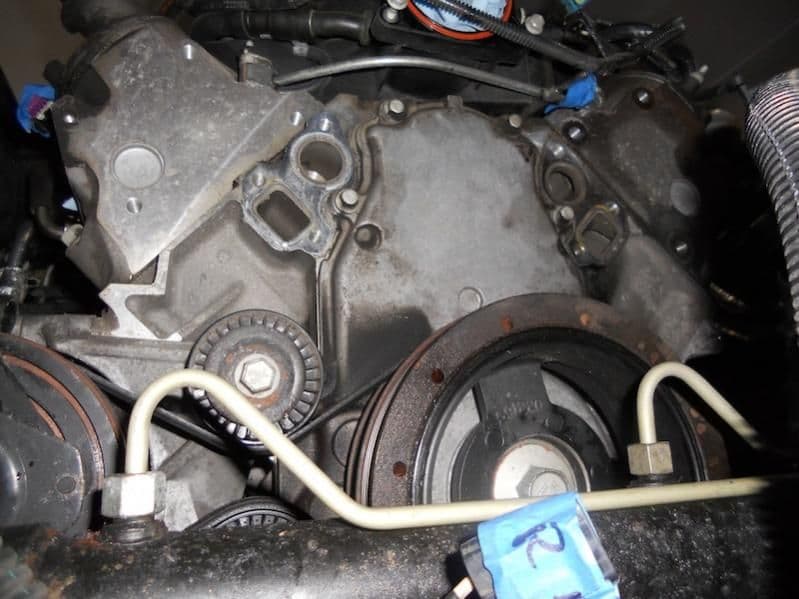
I can see the timing cover! GAWD everything is so dirty!
Steering Stem disconnected from the steering rack:

Another shot of the engine bay:

Shot of the front of the heads, intake manifold, and top of timing cover:

My engine bay isn't as clean as vsocks, so tonight I was going to take my time and start cleaning everything prior to taking the steering rack out. I've already disconnected the steering rack from the power steering unit and the steering stem. The two metal hoses that go from power steering unit to the steering rack was a PITA to get lose and out. So I practically spent 15 minutes and turning the flair wrench o'so every few degrees.
So hear are pics of the engine bay:
I can see the timing cover!
GAWD everything is so dirty!Steering Stem disconnected from the steering rack:
Another shot of the engine bay:
Shot of the front of the heads, intake manifold, and top of timing cover:
05-09-2010, 07:14 PM
#4
Instructor

Nice man, I live in Orland Park and I'm thinking about putting a cam in my 03Z soon as well. Car looks good, maybe I'll see you around at some local meets soon!


 05-11-2010, 05:25 PM
#7
Instructor
Thread Starter
Member Since: Feb 2009
Location: Lockport IL
Posts: 177
Likes: 0
Received 0 Likes
on
0 Posts
Nice man, I live in Orland Park and I'm thinking about putting a cam in my 03Z soon as well. Car looks good, maybe I'll see you around at some local meets soon!

Take your time and stay at it!
man it must be nice to have a lift in your garage it makes things so much easier lol
05-11-2010, 05:35 PM
#8
Instructor
Thread Starter
Member Since: Feb 2009
Location: Lockport IL
Posts: 177
Likes: 0
Received 0 Likes
on
0 Posts
Ok...I know this was going to be a PITA to take off, but with enough leverage and muscle power I got it broken within minutes.
This is what I used, its a 2 foot 1/2" tear drop drive with another 2 feet of pole. Put the car in 4th gear, put it on the ground and went at it:
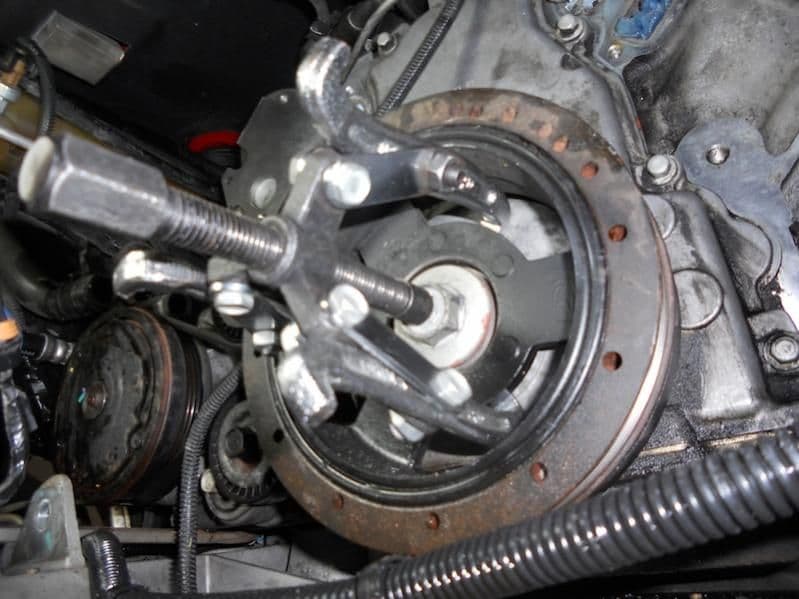
Now its taking the Harmonic Balancer out. I used the 3 arm pulley puller. I drilled a 5/16 hole in the middle of the bolt head to keep the pulley pin in place. In ls1howto.com, instead of unscrewing the bolt and then threading it in 4 turns, I just unscrewed it a couple of turns from the balancer. I wanted to use as much thread as possible when using the pulley puller. I had to unscrew about several times before I got the balancer out completely:
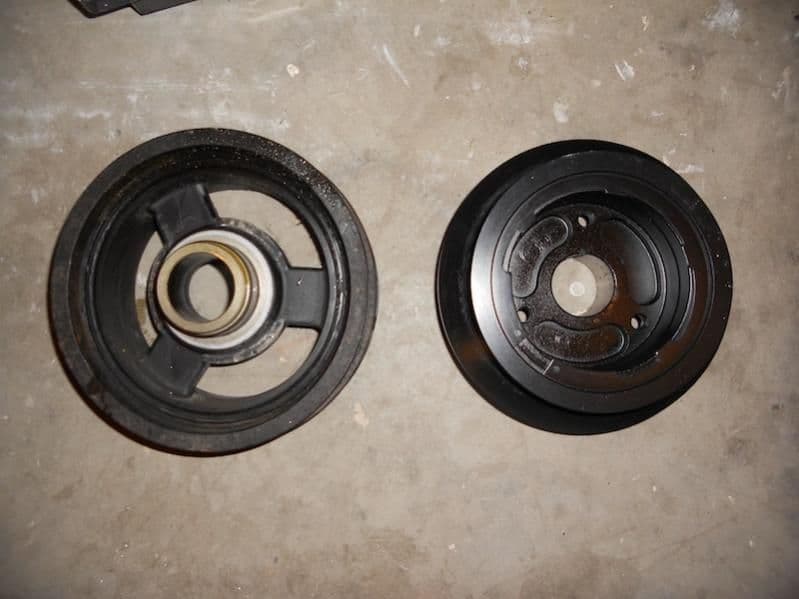
Stock - Left, PowerBond - Right:
This is what I used, its a 2 foot 1/2" tear drop drive with another 2 feet of pole. Put the car in 4th gear, put it on the ground and went at it:
Now its taking the Harmonic Balancer out. I used the 3 arm pulley puller. I drilled a 5/16 hole in the middle of the bolt head to keep the pulley pin in place. In ls1howto.com, instead of unscrewing the bolt and then threading it in 4 turns, I just unscrewed it a couple of turns from the balancer. I wanted to use as much thread as possible when using the pulley puller. I had to unscrew about several times before I got the balancer out completely:
Stock - Left, PowerBond - Right:
05-11-2010, 06:13 PM
#9
Instructor
Thread Starter
Member Since: Feb 2009
Location: Lockport IL
Posts: 177
Likes: 0
Received 0 Likes
on
0 Posts
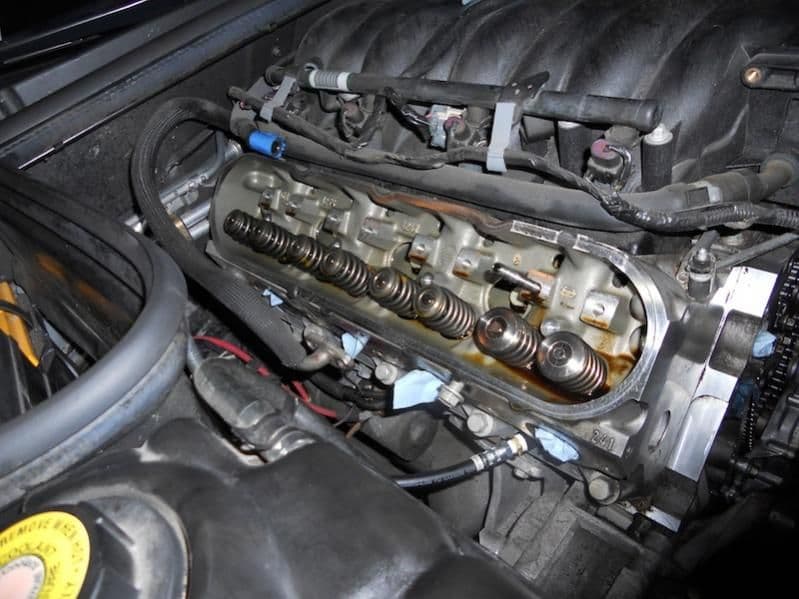
Now comes the fun part. This is the part I've been waiting for.
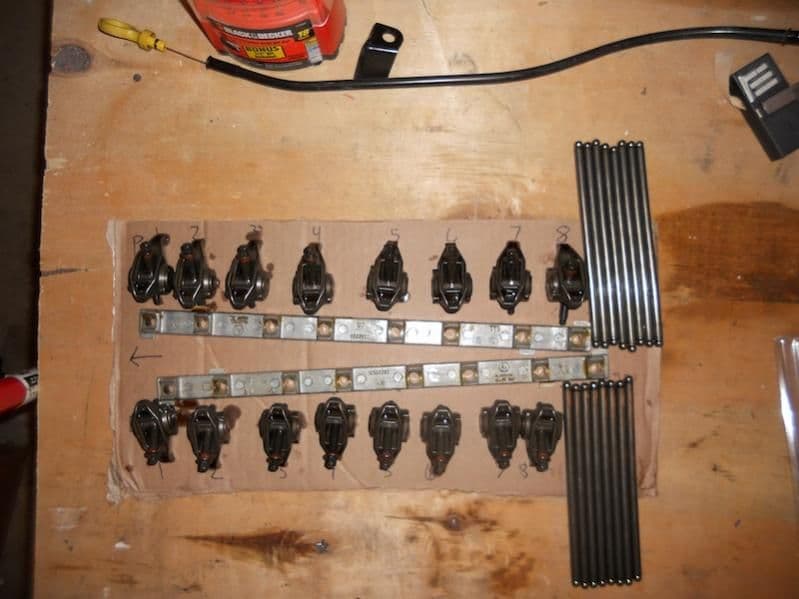
Before getting to the valve cover and removing the camshaft, I removed 16 rocker arms and rods out of the engine:
I removed the 10 bolts that keep the valve cover in place:

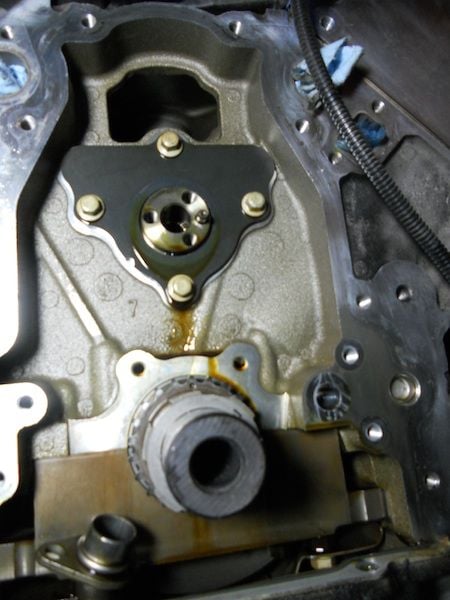
So this is what it revealed. The camshaft gear and oil pump. I took the 3 bolts connecting to the camshaft gear, 4 bolts for the oil pump, and 1 bolt that holds the oil snout to the oil pump off:

Took off the 4 bolts for the camshaft retainer:
I had bought two 36" 5/16" metal dowels from Lowes and cut it down to 22". Also grinded one of the 5/16" rods to a shape of a D for the passenger side. So I just took the water pump bolts, screwed them into the camshaft and put the dowels in and the camshaft extraction is ready to begin:
Sorry I didn't take any pictures of installing the new camshaft or oil pump. But they almost looked no different than the stock ones. The camshaft, as I said before, is a Whiplash II camshaft and the oil pump was an LS6 ported oil pump.
NOTE: I was careful about the o-ring that met at the oil snout and pump. I put the o-ring on the snout, and then push the snout(carefully) in the oil pump.Is there any way to validate that before buttoning everything back up?
This is the part I've been waiting for. Before getting to the valve cover and removing the camshaft, I removed 16 rocker arms and rods out of the engine:
I removed the 10 bolts that keep the valve cover in place:
So this is what it revealed. The camshaft gear and oil pump. I took the 3 bolts connecting to the camshaft gear, 4 bolts for the oil pump, and 1 bolt that holds the oil snout to the oil pump off:
Took off the 4 bolts for the camshaft retainer:
I had bought two 36" 5/16" metal dowels from Lowes and cut it down to 22". Also grinded one of the 5/16" rods to a shape of a D for the passenger side. So I just took the water pump bolts, screwed them into the camshaft and put the dowels in and the camshaft extraction is ready to begin:
Sorry I didn't take any pictures of installing the new camshaft or oil pump. But they almost looked no different than the stock ones. The camshaft, as I said before, is a Whiplash II camshaft and the oil pump was an LS6 ported oil pump.
NOTE: I was careful about the o-ring that met at the oil snout and pump. I put the o-ring on the snout, and then push the snout(carefully) in the oil pump.Is there any way to validate that before buttoning everything back up?
05-11-2010, 06:22 PM
#10
Instructor
Thread Starter
Member Since: Feb 2009
Location: Lockport IL
Posts: 177
Likes: 0
Received 0 Likes
on
0 Posts
So the tedious part. ls1howto said this will take anywhere between 2-6 hours, and well, this took my and my buddy 4 hours. We switched off every cylinder for a R&B (Relax and Beer) break.
In the parts picture (post #1)showed a valve spring compression tool that I had bought off of somebody on a different forum. This tool worked great. So essentially the method I used to remove the springs, seats, seals etc... was to utilize air compression in the cylinder. The kit cam with everything I needed, and the only pain part was trying to line up the unit with the spark plug hole and getting it screwed in. I swear that took half the time and a lot of cussing.
So here are the new springs compared to the stock: (They were much beefier and bigger than that stock)
With the new rods, springs, and stock rockers in place:
05-11-2010, 06:27 PM
#11
Instructor
Thread Starter
Member Since: Feb 2009
Location: Lockport IL
Posts: 177
Likes: 0
Received 0 Likes
on
0 Posts
So I called it a night after spending literally 12 hours on the car yesterday, between making many trips to the hardware store and then completely BS'ing on the phone.
The next items in place is to get the PowerBond Harmonic Balancer installed. I'm waiting for a HB installer tool from one of my buddies, but for now, I'm going to continue to get things cleaned up around the engine bay and prep parts for other installs.
Question: So essentially when I put on the HB. I'll be applying some oil around the snout and the HB when I install it to ease the fit and then use the tool to install the HB. Is there anything else I should be aware of?
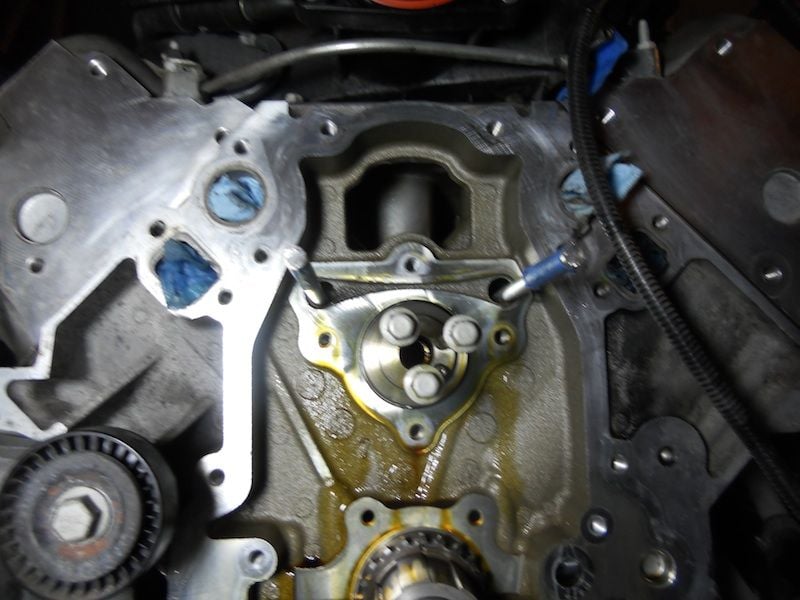
I've already installed a new seal on the timing cover.
The next items in place is to get the PowerBond Harmonic Balancer installed. I'm waiting for a HB installer tool from one of my buddies, but for now, I'm going to continue to get things cleaned up around the engine bay and prep parts for other installs.
Question: So essentially when I put on the HB. I'll be applying some oil around the snout and the HB when I install it to ease the fit and then use the tool to install the HB. Is there anything else I should be aware of?
I've already installed a new seal on the timing cover.
05-11-2010, 06:41 PM
#12
Instructor
Impact guns work great for the balancer bolt and fit in there nicely :-). Let me know when you get your car running again and we can meet up and go for a cruise. Good luck with everything and let me know if you have any questions, I'm a tech at a dealer so I work on cars all day every day!
05-12-2010, 09:18 AM
#13
AKA "The CLOWN"

Member Since: Feb 2010
Location: Chicago South Suburbs
Posts: 6,261
Likes: 0
Received 12 Likes
on
12 Posts

give me a buzz when you guys go for your cruise when your work is done, I just put a cam in my 01 yellow vert and now it's S/C ready. I live in Shererville IN. I'm about 30 mins from Orland Park. In fact I grew up in Tinley Park, only became a Hoosier when I got married
05-12-2010, 07:12 PM
#14
Instructor
Thread Starter
Member Since: Feb 2009
Location: Lockport IL
Posts: 177
Likes: 0
Received 0 Likes
on
0 Posts
Impact guns work great for the balancer bolt and fit in there nicely :-). Let me know when you get your car running again and we can meet up and go for a cruise. Good luck with everything and let me know if you have any questions, I'm a tech at a dealer so I work on cars all day every day!
I hope to have my car fired up tomorrow if I get the harmonic balancer install tool tonight. I've decided to put the original exhaust back on, just so I can start and test the car. I would rather find out if something is wrong earlier than later due to the massive backorder on the LG SuperPro LT exhaust, which, by the way is still on backorder. (Ordered it almost 2 months ago).

I've also put the heatshield and Bilstein sport shocks on. I'll post pics up later tonight.
 05-13-2010, 08:33 AM
#18
Instructor
Thread Starter
Member Since: Feb 2009
Location: Lockport IL
Posts: 177
Likes: 0
Received 0 Likes
on
0 Posts
Hey guys...Finished putting the car together and wanted to get some help.
1) It starts
2) Oil pressure goes up to/around 70-80PSI. Is this normal?
3) The car seems to sway violently at idle. Push it up to 2000rpm and its fine.
Any pointers on where to troubleshoot would be great...
Can this be timing related?
1) It starts
2) Oil pressure goes up to/around 70-80PSI. Is this normal?
3) The car seems to sway violently at idle. Push it up to 2000rpm and its fine.
Any pointers on where to troubleshoot would be great...
Can this be timing related?
05-13-2010, 09:47 AM
#19
Le Mans Master

Member Since: Dec 2005
Location: Where Woke Goes to Die
Posts: 8,194
Received 615 Likes
on
431 Posts

Your oil psi seems normal if its a hi volume ported type. I installed a stock LS6 oil pump and it cold starts 55 psi. What do you mean sways? Is the idle erratic or is the engine physically rocking? My engine shakes a decent amount from the cam. You need a tune more than likely it can be smoothed out a bit.
05-13-2010, 01:53 PM
#20
Instructor
Thread Starter
Member Since: Feb 2009
Location: Lockport IL
Posts: 177
Likes: 0
Received 0 Likes
on
0 Posts
Your oil psi seems normal if its a hi volume ported type. I installed a stock LS6 oil pump and it cold starts 55 psi. What do you mean sways? Is the idle erratic or is the engine physically rocking? My engine shakes a decent amount from the cam. You need a tune more than likely it can be smoothed out a bit.
I posted the video on Youtube:
Last edited by mstrnad; 05-13-2010 at 02:23 PM. Reason: Posting Video

