When you click on links to various merchants on this site and make a purchase, this can result in this site earning a commission. Affiliate programs and affiliations include, but are not limited to, the eBay Partner Network.
Got a new problem to go along with the service traction control and service abs. Everytime I drive in the rain the right front turn signal blows the bulb. Not a really big deal but at 5 bucks for 2 bulbs and rain every week in San Antonio it is piling up. Anyone know a fix for this. There is no moisture in the enclosure as far as I can tell. It is a 2001 Vert M6. Thanks in advance.
This is a common problem. The DRLs cause a heat build up and the light cluster melts. This allows water into the housing which causes the bulbs to blow. You need to pull the housing and either reseal it with silicon sealant or replace the unit with a new one
1. Raise and support the vehicle. Refer to Lifting and Jacking the Vehicle in General Information.
2. Remove the front fascia lower closeout panel.
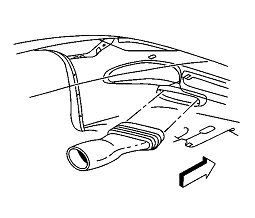
3. Release the brake caliper cooling duct from the front fascia, and position the duct aside.
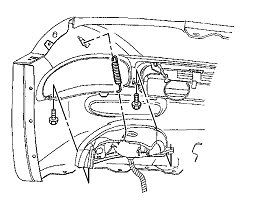
4. Remove the front turn signal lamp bracket retaining spring from the lamp bracket.
5. Remove the lamp bracket retaining spring from the front fascia.
6. Remove the front turn signal lamp bracket retaining screws.
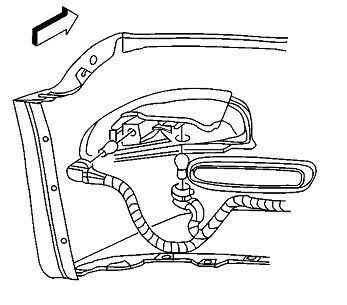
7. Disconnect the sockets from the lamp.
8. Remove the lamp, with the bracket, from the vehicle.
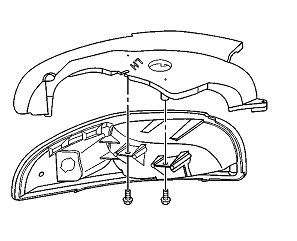
9. Remove the lamp to bracket retaining screws.
10. Remove the lamp from the bracket.
Installation Procedure
1. Install the front park/turn signal and sidemarker lamp into position on the front turn signal lamp bracket.
Notice
Use the correct fastener in the correct location. Replacement fasteners must be the correct part number for that application. Fasteners requiring replacement or fasteners requiring the use of thread locking compound or sealant are identified in the service procedure. Do not use paints, lubricants, or corrosion inhibitors on fasteners or fastener joint surfaces unless specified. These coatings affect fastener torque and joint clamping force and may damage the fastener. Use the correct tightening sequence and specifications when installing fasteners in order to avoid damage to parts and systems.
2. Install the front park/turn signal and sidemarker lamp to bracket retaining screws.
Tighten
Tighten the front park/turn signal and sidemarker lamp to bracket retaining screws to 2 N�m (18 lb in).
3. Install the sockets to the lamp.
4. Install the lamp, with the bracket, to the front fascia.
5. Align the lamp to the opening in the front fascia and hold the lamp firmly in place against the fascia, while installing the front turn signal lamp bracket retaining screws.
Tighten
Tighten the front turn signal lamp bracket retaining screws to 3 N�m (27 lb in).
6. Install the lamp bracket retaining spring to the front fascia.
7. Install the front turn signal lamp bracket retaining spring to the lamp bracket.
8. Position the brake caliper cooling duct to the front fascia and press the duct toward the fascia to secure.
9. Install the front fascia lower closeout panel. Refer to Close Out Panel - Front Bumper Fascia Lower in Bumpers.
I had the same problem. I just got the clear lenses, which look very cool by the way, and when I removed old lense, there was a hole burnt into the top of the housing.
LED's are not affected by rain so next time just swap them out for good led's.
Go ahead and get the switchbacks.
Go to google and type in "3157 switchback led" click the top link and that will take you to the best place to buy them. They are very expensiove and aare the good quality ones not the fleabay junk. I have had them in mine for 2 years with no problems and it is a daily driver. That is also the cheapest place (no vendor corvette tax) to get them and even there standard $5 shipping gets them to you in less than a week.
But check the socket, it may be burnt or corroded. I have found the $8 autozone sockets work great and come with a gasket.
Some dielectric grease will keep them from corroding in the future.
I had the same issue as you. For some reason, it was only the passenger side, and not the drivers side. I thought about sealing it with silicone, but if I thought if it got hot enough to melt the plastic housing, then how will silicone hold up to it?
Just for ****s and giggles, I cut a small piece of silver duct tape about 2"x2" square and covered hole in the housing. That was about 6 months ago, and many rain storms / carwashes later. So far so good. I'm surprised actually that the duct tape is holding up so well to the heat.
Similar problem to one described by Squidnut. I've replaced bulb 3 times, finally noticed the hole burned in top of housing. I wiped the housing off with Laquer Thinner then covered it with silver duct tape. Anxious to see if it works. If not, LED's are next. Thanx for the info on how to replace the housing.
I repaired mine with silicone and then I also pulled the running light fuse. The turn signals still work just fine and so do the parklights. It's the heat from those running lights being on all the time that get's the lens.
If you have small hands, you can remove the black cover surrounding the headlight when it is fully open, and reach through and put aluminun foil (doubled or trippled) on top of the cracked area. put clear silicone on top of the foil and be sure to seal around the edges. This repair has lasted me for five years now.
Autozone sells replacement bulb sockets for the DRL. They are manufactured by Dorman and are p/n 85882. For some reason they had ones made of all black plastic and ones made of a white plastic with a greenish tint (almost looked like the glow in the dark color of plastic) both had the same part number but the black ones wouldnt fit correctly because one of the twist tabs that mounts into the lens is too wide. The whitish-green ones fit perfectly so I bought two of those. They cost 8.99 each. I suppose the other ones would have worked if you file off about a 1/8 of an inch from the widest twist tab. The two narrow tabs seem to fit just fine. Or just buy the white/greenish ones if you can find them.
Last edited by Quicksilver98; 08-16-2011 at 12:32 AM.
Reason: missed a word

 06-09-2010, 10:57 PM


 I'm surprised actually that the duct tape is holding up so well to the heat.


