
How-To repair EBCM avoiding costly repairs through ABSfixer or Fleabay
 08-25-2017, 04:20 PM
#461


Guys,
I recently acquired an EBCM under the pretense that it went "bad" and was replaced. I have a 2000 coupe that I'm gathering parts for a retrofit to the later unit. I figured I would replace the solenoid and check the connections and give it a try. When I opened it up, this is what I found. Has anyone ever seen this before or have any idea why someone would do this? Thanks.
I recently acquired an EBCM under the pretense that it went "bad" and was replaced. I have a 2000 coupe that I'm gathering parts for a retrofit to the later unit. I figured I would replace the solenoid and check the connections and give it a try. When I opened it up, this is what I found. Has anyone ever seen this before or have any idea why someone would do this? Thanks.
 08-28-2017, 07:50 AM
#462
Tech Contributor


Member Since: Dec 1999
Location: Anthony TX
Posts: 32,736
Received 2,180 Likes
on
1,583 Posts
CI 6,7,8,9,11 Vet
St. Jude Donor '08

OH MY!!!! 

This is what it is SUPPOSE to look like:
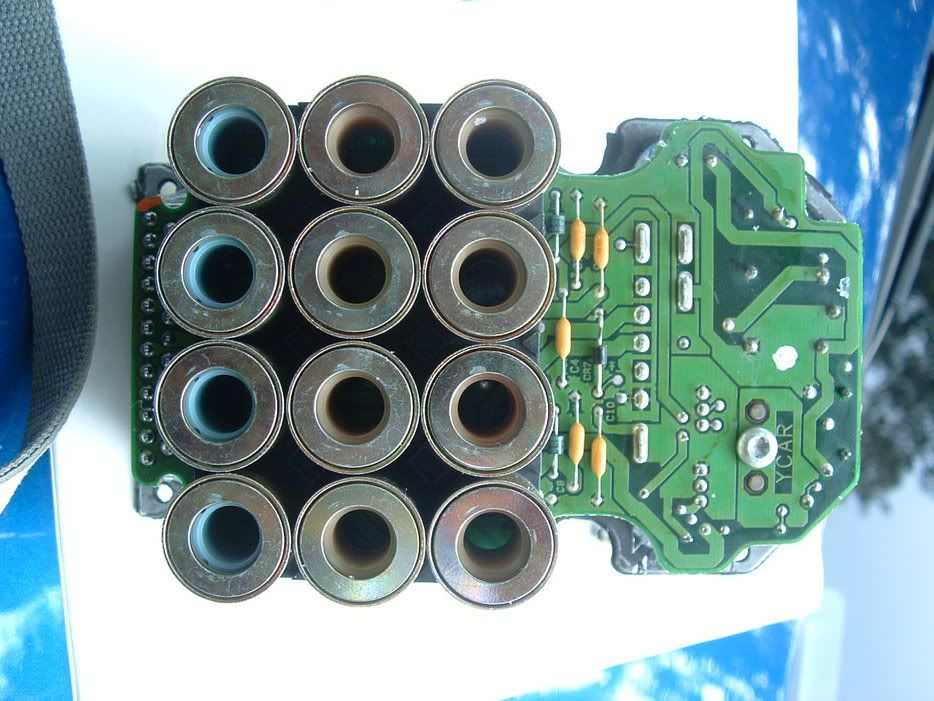
SOMEONE Butchered the one that you have. Looks like a THIRD GRADER Solder job.
If it works consider yourself very lucky. Do you know who did the repairs work on the module??
Bill
This is what it is SUPPOSE to look like:
SOMEONE Butchered the one that you have. Looks like a THIRD GRADER Solder job.
If it works consider yourself very lucky. Do you know who did the repairs work on the module??
Bill
08-28-2017, 09:33 AM
#463
2nd Gear


Member Since: Aug 2017
Posts: 2
Likes: 0
Received 0 Likes
on
0 Posts
For 2001 and later C5's
This is my first write up for CorvetteForum and without this Forum I would not have been able to repair my own EBCM. Bear with me as I may have forgotten something or may not have been too clear in my explanation.
Please feel free to ask any questions.
First, if you don�t already know how, you�ll want to Pull Your Codes
Next, I will direct you to the Electrical Info Thread where you should try to take care of any issues you could have in the ground points. (Thanks to Bill Curlee for the thread)
Once the grounds have been cleaned and taken care of we�ll move on to the removal of the EBCM. I'm aware that step 7 says to send it to ABSfixer. Disregard that step and we'll proceed to the disassembly of the EBCM.
Items required:
Soldering Iron
Solder
De-Solder braid or pump
1 Phillips Screw Driver
Exacto Knife
Tube of Silicone Sealent
Now in order to remove the case I followed these steps:
1. remove 4 x screws
2. remove silicon from that hole on the back lower corner of the EBCM.
3. use a 2BA (or similar) 'thread tap' to cut a thread in that hole
4. screw matching thread screw/bolt into hole, (it misses pcb inside) until it touches cover plate (screw/bolt needs to be 3" long max).
5. carry on winding the screw in until it starts pushing the cover plate away enough to break that gasket seal and allow space to insert those flat blade screwdrivers and work around the remainder. (Thank You JerseyC5)
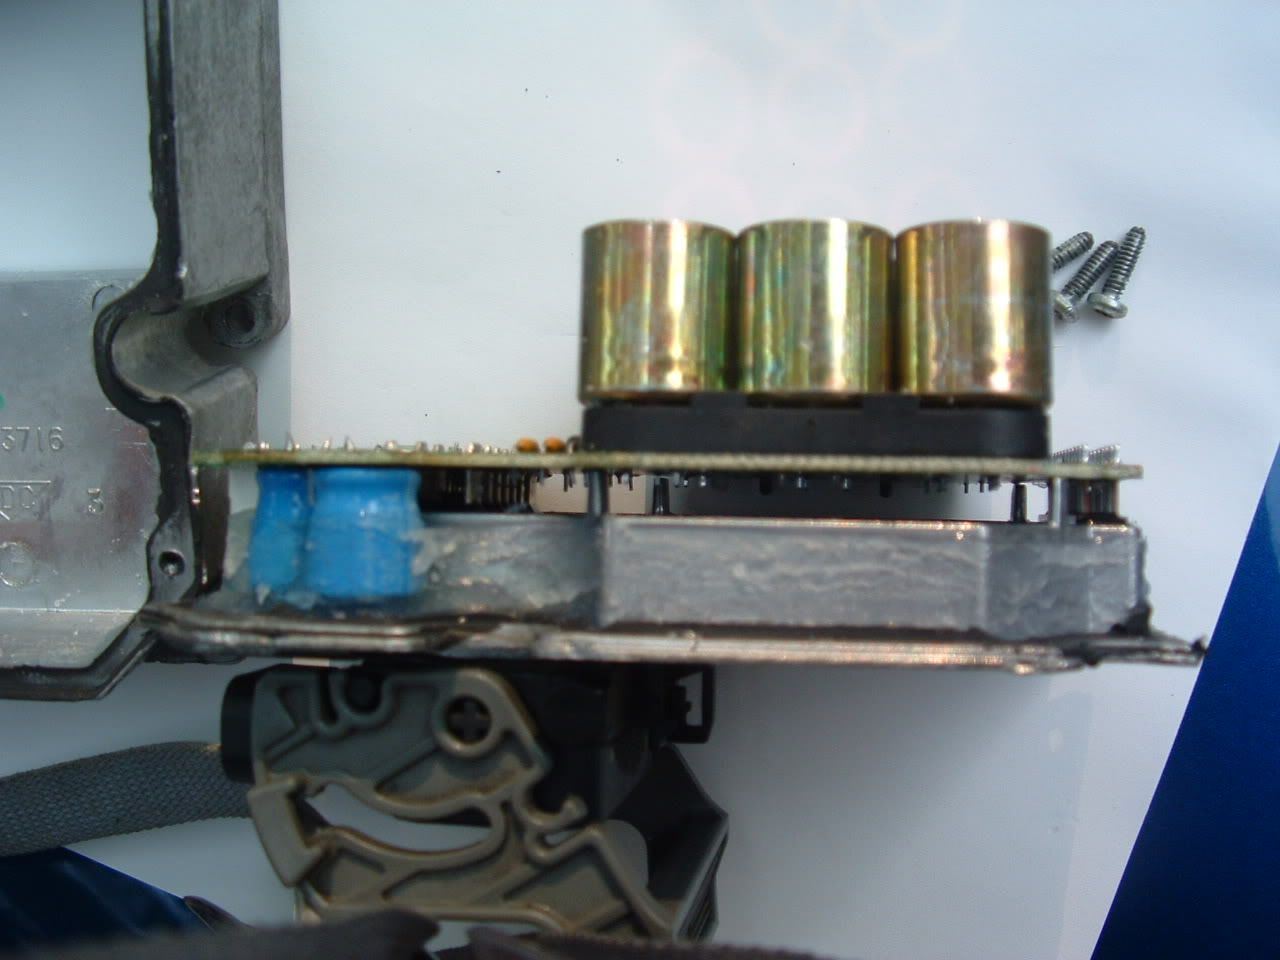
But if you�re like me you won�t have a tap to make a nice threaded hole. I was lucky and found a screw long enough and small enough to be threaded by hand. This is used to apply enough pressure so the back would separate. Refer to the image and said screw I used:
Attachment 48152659
Once the EBCM is taken apart it will look this (Once again Thank You Bill Curlee):
Attachment 48152660
Attachment 48152661
Attachment 48152662
Attachment 48152663
Attachment 48152664
You may need some good lighting and possibly a magnifying glass to inspect the solder points of 5posts.
Attachment 48152665
This most likely, as with so many others on the Forum causing the C1214 code. You need to get a soldering iron and some solder to re-solder any point that looks questionable. Once done you will want to test the EBCM, so put the box back together WITHOUT sealant and temp install the EBCM in your C5. Clear any codes before starting your car and you should be ok to start her up and check for any DIC messages.
If you have no messages then you've successfully repaired your own EBCM. Remove the EBCM apply some silicone and put the box back together completely. Install the EBCM using the steps here in reverse.
For replacing relay
If you suspect or may want to buy a new relay as a �just in case,� you�ll need to go here and place an order for a new relay (Thanks to forum member jrhott: The relay PB380-ND HAS BEEN SUPERCEDED BY PB1321-ND. Link is current with this info). You�ll also need to remove the silicone that�s surrounding the relay like so
Attachment 48152666
Attachment 48152667
Be very careful to not cut anything around the relay or the Circuit Board. Once the silicone is removed de-solder the points and cut a small amount off of each post in order to lower the relay and slide it out.
Take the new relay and just like the relay you removed, you may have to cut some material off each post to get it to fit. Install the relay, solder the points and refer to the instructions for install above.
Hopefully this makes enough sense for you guys to follow. Again if you have any questions feel free to ask.
Thanks to everyone who helped me and to the members who had previous info on this stupid C1214 code.
nvusgt
This is my first write up for CorvetteForum and without this Forum I would not have been able to repair my own EBCM. Bear with me as I may have forgotten something or may not have been too clear in my explanation.
Please feel free to ask any questions.
First, if you don�t already know how, you�ll want to Pull Your Codes
Next, I will direct you to the Electrical Info Thread where you should try to take care of any issues you could have in the ground points. (Thanks to Bill Curlee for the thread)
Once the grounds have been cleaned and taken care of we�ll move on to the removal of the EBCM. I'm aware that step 7 says to send it to ABSfixer. Disregard that step and we'll proceed to the disassembly of the EBCM.
Items required:
Soldering Iron
Solder
De-Solder braid or pump
1 Phillips Screw Driver
Exacto Knife
Tube of Silicone Sealent
Now in order to remove the case I followed these steps:
1. remove 4 x screws
2. remove silicon from that hole on the back lower corner of the EBCM.
3. use a 2BA (or similar) 'thread tap' to cut a thread in that hole
4. screw matching thread screw/bolt into hole, (it misses pcb inside) until it touches cover plate (screw/bolt needs to be 3" long max).
5. carry on winding the screw in until it starts pushing the cover plate away enough to break that gasket seal and allow space to insert those flat blade screwdrivers and work around the remainder. (Thank You JerseyC5)
But if you�re like me you won�t have a tap to make a nice threaded hole. I was lucky and found a screw long enough and small enough to be threaded by hand. This is used to apply enough pressure so the back would separate. Refer to the image and said screw I used:
Attachment 48152659
Once the EBCM is taken apart it will look this (Once again Thank You Bill Curlee):
Attachment 48152660
Attachment 48152661
Attachment 48152662
Attachment 48152663
Attachment 48152664
You may need some good lighting and possibly a magnifying glass to inspect the solder points of 5posts.
Attachment 48152665
This most likely, as with so many others on the Forum causing the C1214 code. You need to get a soldering iron and some solder to re-solder any point that looks questionable. Once done you will want to test the EBCM, so put the box back together WITHOUT sealant and temp install the EBCM in your C5. Clear any codes before starting your car and you should be ok to start her up and check for any DIC messages.
If you have no messages then you've successfully repaired your own EBCM. Remove the EBCM apply some silicone and put the box back together completely. Install the EBCM using the steps here in reverse.
For replacing relay
If you suspect or may want to buy a new relay as a �just in case,� you�ll need to go here and place an order for a new relay (Thanks to forum member jrhott: The relay PB380-ND HAS BEEN SUPERCEDED BY PB1321-ND. Link is current with this info). You�ll also need to remove the silicone that�s surrounding the relay like so
Attachment 48152666
Attachment 48152667
Be very careful to not cut anything around the relay or the Circuit Board. Once the silicone is removed de-solder the points and cut a small amount off of each post in order to lower the relay and slide it out.
Take the new relay and just like the relay you removed, you may have to cut some material off each post to get it to fit. Install the relay, solder the points and refer to the instructions for install above.
Hopefully this makes enough sense for you guys to follow. Again if you have any questions feel free to ask.
Thanks to everyone who helped me and to the members who had previous info on this stupid C1214 code.
nvusgt
Man oh Man! My son and I fixed his '01 over the weekend thanks to this post. The solder joints didn't actually look bad but I resoldered anyway and it did the trick. Helpful hint if not mentioned somewhere else. Take the radiator hose loose from the water pump outlet and move it over to the hood hinge (driver side obviously) and tuck it behind it. Very little coolant escapes. Completely remove the air duct from the throttle body to the other end where it connects to another piece of duct going to the filter. This provides much more room to operate.
08-28-2017, 09:44 AM
#464
2nd Gear
Member Since: Aug 2017
Posts: 2
Likes: 0
Received 0 Likes
on
0 Posts
Many thanks. My son and I accomplished this repair over the weekend on his '01. The solder joints on the relay didn't actually look bad but I touched them up and bingo, it fixed the problem.
I would add this. If this has been mentioned before I apologize. We removed the radiator hose from the water pump outlet and snaked it over to the hood hinge and tucked it behind it (er, drivers side obviously). Very little coolant escaped. We also completely removed the air duct from the throttle body and the other end. That involved loosening 2 hose clamps. This gave us much more room to operate. We were working around them but the stress level was rising quickly.
Thanks again.
08-28-2017, 01:13 PM
#465
Tech Contributor
Member Since: Oct 1999
Location: Charlotte, NC (formerly Endicott, NY)
Posts: 40,078
Received 8,915 Likes
on
5,326 Posts
Guys,
I recently acquired an EBCM under the pretense that it went "bad" and was replaced. I have a 2000 coupe that I'm gathering parts for a retrofit to the later unit. I figured I would replace the solenoid and check the connections and give it a try. When I opened it up, this is what I found. Has anyone ever seen this before or have any idea why someone would do this? Thanks.
I recently acquired an EBCM under the pretense that it went "bad" and was replaced. I have a 2000 coupe that I'm gathering parts for a retrofit to the later unit. I figured I would replace the solenoid and check the connections and give it a try. When I opened it up, this is what I found. Has anyone ever seen this before or have any idea why someone would do this? Thanks.
Be careful when selecting the silicone you use to cover the repair area. If it is the wrong type it will cause corrosion of the solder joints. See below:
Common RTV silicone made for automotive and general purpose use, the stuff that smells like vinegar, is corrosive to electronics, and its use is a death sentence to reliability. The use of acetic acid cure RTV silicone is forbidden in many government labs. (Acetic acid is the ingredient in vinegar that makes it smell like vinegar and taste sour; it is also used in photographic developer stop bath.
RTV silicone made for non-corrosive electronics applications uses an alcohol curing system rather than an acetic acid curing system. The alcohol cure products have a slightly sweet or ethereal odor as opposed to the distinctive vinegar odor of the common acetic acid cure products.
Bill
08-30-2017, 02:27 PM
#466

Many thanks for this post and the forum, I just used this to repair my ABS code 1214, worked great, my solder didn't look too good but did the job, no codes now. At first I was getting the code every 3rd time driving, lately every time I went out it came. 2001 6 speed vett.
09-01-2017, 03:59 PM
#467
Heel & Toe


That looks like there could have been a problem on the circuit board itself. Either somebody used to much heat and screwed up the contacts where the component mounts and had to bridge the gap with wires or there was a problem with the circuit lands on the board itself that required bridging the gap with wires. I suspect over heating was the real cause as the board looks a little worse for wear. However, as long as it works that is all that counts.
Be careful when selecting the silicone you use to cover the repair area. If it is the wrong type it will cause corrosion of the solder joints. See below:
Common RTV silicone made for automotive and general purpose use, the stuff that smells like vinegar, is corrosive to electronics, and its use is a death sentence to reliability. The use of acetic acid cure RTV silicone is forbidden in many government labs. (Acetic acid is the ingredient in vinegar that makes it smell like vinegar and taste sour; it is also used in photographic developer stop bath.
RTV silicone made for non-corrosive electronics applications uses an alcohol curing system rather than an acetic acid curing system. The alcohol cure products have a slightly sweet or ethereal odor as opposed to the distinctive vinegar odor of the common acetic acid cure products.
Bill
Thanks for the responses. I don't know who did it (or why). The seller said that it was working when he bought the car and then it failed. He had it replaced and I picked this one up hoping that I'd be able to replace the relay and re-solder the connections and use it to swap my 2000 to the later style. I still might try replacing the relay and cleaning up the "3rd grader" solders and seeing if it works. Worst case I'm out a $2 relay. I'll post back when I get around to trying it.
09-07-2017, 10:29 PM
#469
Team Owner

Do a search and many of us have posted write-ups on this - your best bet is to try to find a used one for the 1997-2000 -
Non-Active Handling are interchangeable -
And Active Handling are Interchangeable -
But you cannot use either of the two on one another (Ex AH will not work on Non-AH and Visa-Versa)
I did a write-up on all the Non-AH modules part numbers that will interchange on the 1997-2000 -
Thanks,Matt
09-08-2017, 03:24 PM
#470
Drifting

Thread Starter
As madmatt9471 already stated, this fix is only for '01-04 C5's, so unfortunately you'll either have to find a new one altogether, or live with the code popping up. Well there's a third option but it's kind of overboard...you can do a full EBCM swap from 01-04 C5's. I think I may have seen one person do it and it was challenging to say the least.
 10-11-2017, 07:40 AM
#472
Burning Brakes

When you guys reassemble your units do you just use silicone to seal it or do you use the black Permatex goop in the caulking tube on the perimeter of the casing as well?
RH
RH
Last edited by shootnstarz; 10-11-2017 at 07:41 AM.
10-11-2017, 07:46 AM
#473
Burning Brakes
the Lizzard
The following users liked this post:
shootnstarz (10-12-2017)
10-11-2017, 09:42 AM
#474
Advanced
I use black RTV SP 040 .. I buy this stuff by the case as it is the best stuff I found for all sorts of repairs allowing for future service if needed.
Sprayon SP 040 - RTV Silicone Sealants
Sprayon SP 040 - RTV Silicone Sealants
Last edited by motorwiz; 10-11-2017 at 09:44 AM. Reason: link to item used
The following 2 users liked this post by motorwiz:
ArmchairArchitect (10-13-2017),
shootnstarz (10-12-2017)
10-13-2017, 07:26 AM
#475
Burning Brakes
I received my new relays yesterday along with this email. I ordered a spare but if you think you might need one in the future you may want to order a couple now:
"Thank you for your recent purchase from Digi-Key Electronics.
This email is to inform you that your recent order included a part number that is currently obsolete. The product is in stock and is being shipped or is scheduled to ship to you. We wanted to make you aware of this obsolescence so you are able to react accordingly to account for this.
We have included the obsolete part below with additional information regarding the part and your order. The link provided will show if there are available substitutes".
Don't know if there will be an upgraded replacement to take it's place.
RH
Last edited by shootnstarz; 10-13-2017 at 07:28 AM.
10-13-2017, 10:58 AM
#476
Instructor

Member Since: Jul 2004
Location: Upper Marlboro Maryland
Posts: 113
Likes: 0
Received 0 Likes
on
0 Posts

I received my new relays yesterday along with this email. I ordered a spare but if you think you might need one in the future you may want to order a couple now:
"Thank you for your recent purchase from Digi-Key Electronics.
This email is to inform you that your recent order included a part number that is currently obsolete. The product is in stock and is being shipped or is scheduled to ship to you. We wanted to make you aware of this obsolescence so you are able to react accordingly to account for this.
We have included the obsolete part below with additional information regarding the part and your order. The link provided will show if there are available substitutes".
Don't know if there will be an upgraded replacement to take it's place.
RH
"Thank you for your recent purchase from Digi-Key Electronics.
This email is to inform you that your recent order included a part number that is currently obsolete. The product is in stock and is being shipped or is scheduled to ship to you. We wanted to make you aware of this obsolescence so you are able to react accordingly to account for this.
We have included the obsolete part below with additional information regarding the part and your order. The link provided will show if there are available substitutes".
Don't know if there will be an upgraded replacement to take it's place.
RH
 saving this thread. Heaven forbid I need this info.
10-29-2017, 05:32 PM
saving this thread. Heaven forbid I need this info.
10-29-2017, 05:32 PM
#479
 10-29-2017, 07:42 PM
#480
Burning Brakes
 Also, use a stainless steel screw next effort...a bit stronger.
