
Need a GOOD alternative to Headlight insulators/tab stops/bumpers
 01-02-2012, 02:32 PM
#1
Instructor

Thread Starter
Member Since: Apr 2011
Location: Roanoke VA
Posts: 102
Likes: 0
Received 0 Likes
on
0 Posts
Guys, I need some help. I've got an '02 vert and I've read just about every post on here about headlight problems. I've replaced two headlight gears and have done a lot of troubleshooting on these headlights. The chronic problem I'm having is that my DS Headlight doesn't come up when I turn the lights on. I know WHY: the down stop/insulator is worn and the headlight is going down too far and overtightening the manual turn ****. 1 quarter-turn and the **** loosens and the light comes up on the next try. It works until the next time it goes down and over-tightens. What I don't know is HOW to fix the problem!
Part #16524060 (the insulator) is known to be discontinued. I've tried flipping over my worn insulators and it failed within days! Here are the other things I've tried in place of them:
-Rubber Gas Line Hose - too soft, got torn to pieces
-Hard Rubber Bushings - longer-term fix, but still gets eaten up over time and is too bulky and gets in the way of the actuator arm.
Anybody having as much trouble as me because I can not get a good fix to this issue?! I'm thinking of trying to pad the actuator arm that comes down so hard on that tab stop next. Maybe this would be the best option?? Any insight is much appreciated!
Last edited by ryrob; 01-17-2012 at 07:29 PM.
 01-02-2012, 03:39 PM
#2
Drifting

Member Since: Jul 2002
Location: Corpus Christi Tx.
Posts: 1,329
Likes: 0
Received 8 Likes
on
6 Posts

You can order from Ecklers
http://www.ecklerscorvette.com/corve...1997-2004.html
Corvette Headlight Stop Bumper, 1997-2004
http://www.ecklerscorvette.com/corve...1997-2004.html
Corvette Headlight Stop Bumper, 1997-2004
- Reproduction Of Original
01-02-2012, 10:23 PM
#3
Instructor
Thread Starter
Member Since: Apr 2011
Location: Roanoke VA
Posts: 102
Likes: 0
Received 0 Likes
on
0 Posts
You can order from Ecklers
http://www.ecklerscorvette.com/corve...1997-2004.html
Corvette Headlight Stop Bumper, 1997-2004
http://www.ecklerscorvette.com/corve...1997-2004.html
Corvette Headlight Stop Bumper, 1997-2004
- Reproduction Of Original
Yeah, I've got 8 of these on order; should arrive on Wednesday. However, Rodney Dickman has told me that these are too brittle and did not work well. We'll see.
Any other ideas out there to (almost) permanently solve this problem?
01-04-2012, 06:10 PM
#4
Instructor
Thread Starter
Member Since: Apr 2011
Location: Roanoke VA
Posts: 102
Likes: 0
Received 0 Likes
on
0 Posts
Got the stops from Ecklers today. When I pulled out the original that I had flipped over last week, I was shocked to see that in 7 days that acuator arm had put a big-time dent in this insulator. 7 days! I don't know how these things lasted all this time in the first place.
Anyway, when I tried to put Eckler's reproduction stop on the down stop tab, it wouldn't even fit all the way on the tab. I had to drill it out a little bit so it would fit on. I've got one of Eckler's stops on a down tab and one on an up tab, so we'll see how they do. Not holding my breath...
Are my actuator arms just brutal or what?!?
 01-04-2012, 08:06 PM
#6
Instructor
Thread Starter
Member Since: Apr 2011
Location: Roanoke VA
Posts: 102
Likes: 0
Received 0 Likes
on
0 Posts
Thanks Peter, yeah I did the TSB fix on that driver's side when I replaced the gear in the motor. The arm lines up to the tab great. It just must come down with such force that it eats these things up. I'm thinking of padding the arm next so it will dampen the force.
Am I the only one having such a chronic problem with this issue?
 01-04-2012, 10:36 PM
#7
Race Director

Member Since: Apr 2007
Location: South Western Ontario
Posts: 11,061
Received 845 Likes
on
721 Posts

The headlight controller sets the force. It's possible your controller is simply bad and not stopping until it applies too much current to the motors which means too much torque.
Peter
Peter
01-05-2012, 12:45 PM
#8
Tech Contributor
Good point Peter. Since the problem is isolated to the drivers side, perhaps it's time to measure the current draw on the drivers motor, using the passenger side as a comparison.
01-05-2012, 12:51 PM
#9
Tech Contributor


Member Since: Dec 1999
Location: Anthony TX
Posts: 32,736
Received 2,180 Likes
on
1,583 Posts
CI 6,7,8,9,11 Vet
St. Jude Donor '08

 100% ACCURATE! I also recommend changing out the headlight control module. Not only is too much torque messing up your stops,, its going to cause motor/gear failure and excessive wear on the head light assy movement points. You can put an amp meter in series with the head light motor power wire and see how much current its drawing compared to another C5 that isnt tearing up the stops. I do not know what the "IDEAL" designed current cut off is but its not very much. Listen to your head light into the stops sound compared to another C5. See if it sounds like it hammering home too hard thats an issue.
 The HLCM is the ONLY thing that has an effect on that function.
What is your C5 SLEEP Current draw at the main 12 VDC battery?? When the BCM is in the SLEEP mode, part of the 20ma current draw is the BCM, and that module keping the headlight motors torqued shut my keeping that module powered up.
Bill
01-06-2012, 10:10 PM
#10
Instructor
Thread Starter
Member Since: Apr 2011
Location: Roanoke VA
Posts: 102
Likes: 0
Received 0 Likes
on
0 Posts
100% ACCURATE! I also recommend changing out the headlight control module. Not only is too much torque messing up your stops,, its going to cause motor/gear failure and excessive wear on the head light assy movement points. You can put an amp meter in series with the head light motor power wire and see how much current its drawing compared to another C5 that isnt tearing up the stops. I do not know what the "IDEAL" designed current cut off is but its not very much. Listen to your head light into the stops sound compared to another C5. See if it sounds like it hammering home too hard thats an issue. The HLCM is the ONLY thing that has an effect on that function.
What is your C5 SLEEP Current draw at the main 12 VDC battery?? When the BCM is in the SLEEP mode, part of the 20ma current draw is the BCM, and that module keping the headlight motors torqued shut my keeping that module powered up.
Bill
Thanks so much for the input guys! It's a good lesson for me - find the actual Cause of the problem before spending so much time on the Effect.
I've got a new HL control module on order, so I will post again when I get it installed. Fingers crossed!
01-13-2012, 02:09 PM
#11
Instructor
Thread Starter
Member Since: Apr 2011
Location: Roanoke VA
Posts: 102
Likes: 0
Received 0 Likes
on
0 Posts
The new HLCM has arrived. The repair procedure for replacing this part is telling me to go in from under the car. Is this completely necessary? I'd rather get to it from the headlight assembly if possible. Thoughts?
Ryan
Ryan
01-13-2012, 03:13 PM
#12
Team Owner

This is the manner in which I replace burned out DRL/turn signal bulbs.
HTH
01-16-2012, 04:25 PM
#13
Instructor
Thread Starter
Member Since: Apr 2011
Location: Roanoke VA
Posts: 102
Likes: 0
Received 0 Likes
on
0 Posts
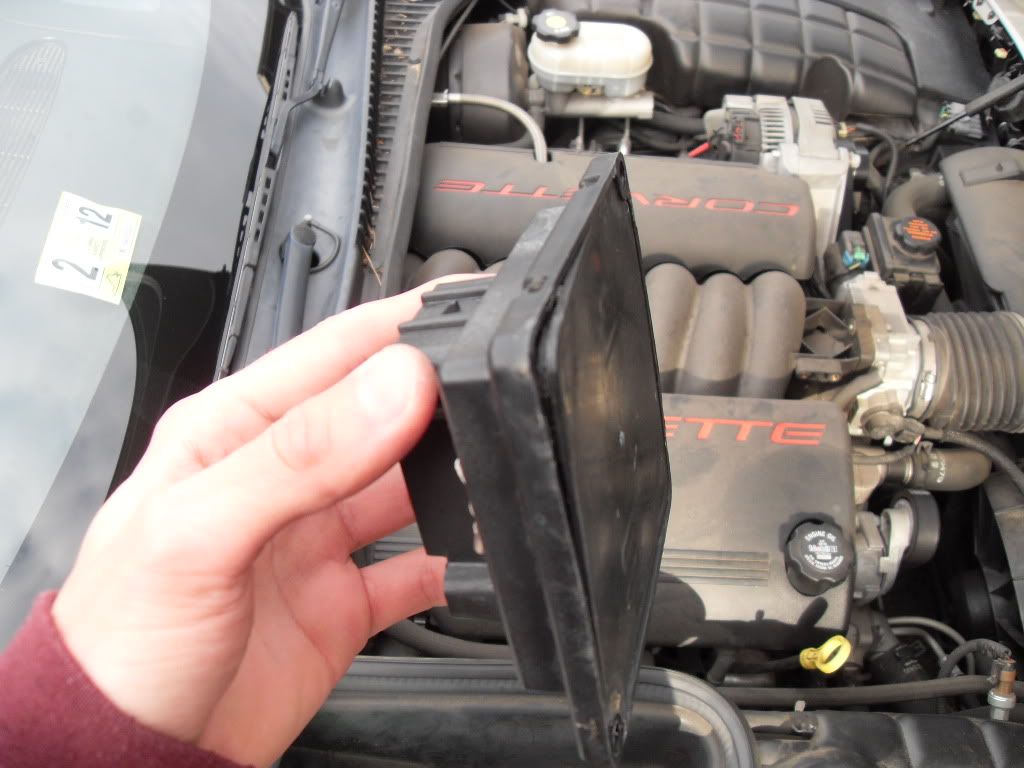
For safety, unplug the power connector to motor assembly immediately behind headlight, manually raise your headlight to the up position, remove your RH headlight close-out panel (black), then (measure height first) remove the RH hood-stop with the rubber pad on top. You should then have enough room to reach down inside, unplug the module and remove it's mounting fasteners.
This is the manner in which I replace burned out DRL/turn signal bulbs.
HTH
This is the manner in which I replace burned out DRL/turn signal bulbs.
HTH
 ) Oh well I sucked it up and got it done. Really an easy job - didn't even have to take the hood-stop out. The hardest part was loosening and tightening the top right nut on the control module.
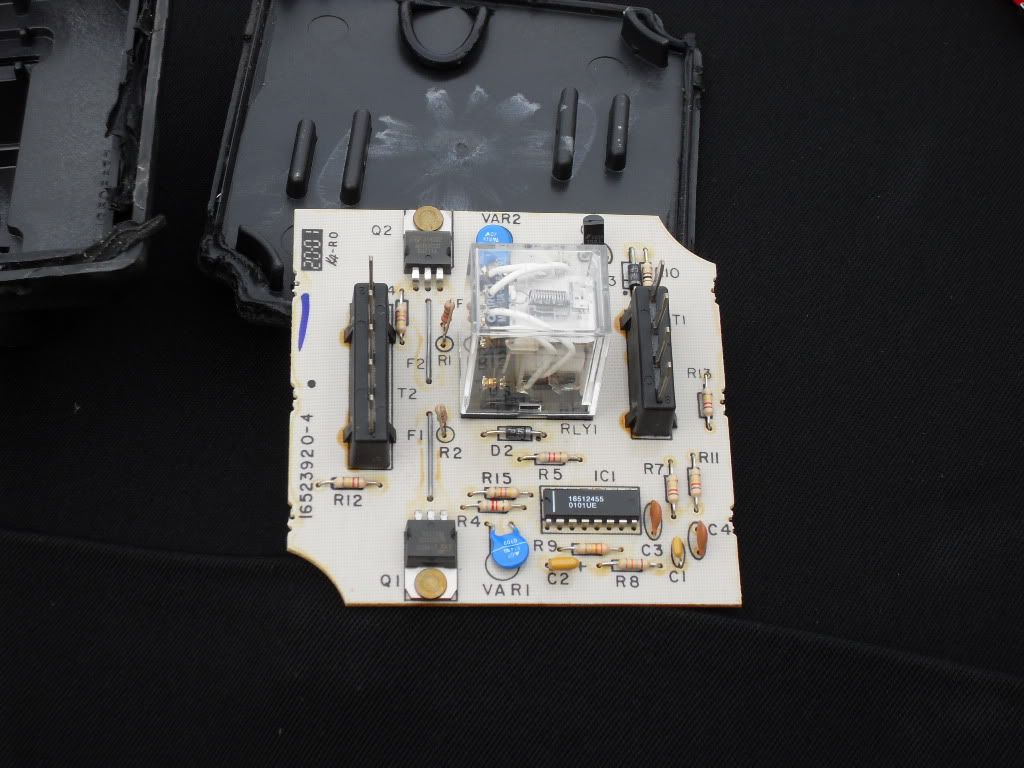
Now, I inspected the old control module and the only suspicious-looking thing was the one of the corners of the back cover had come loose. The inside looked OK, no obvious damage to the circuit board...
Never was able to test the current that the old module was sending out to the HL motors however. Well, the new one is in and I have turned over the insulators to a fresh side. The only thing to do now is wait and see if this new HLCM is the answer that I've been looking for!
Last edited by ryrob; 01-16-2012 at 04:28 PM.
 01-16-2012, 04:38 PM
#15
Instructor
Thread Starter
Member Since: Apr 2011
Location: Roanoke VA
Posts: 102
Likes: 0
Received 0 Likes
on
0 Posts
These are pics of the old headlight control module that we think is bad...

Last edited by ryrob; 01-16-2012 at 04:41 PM.
01-17-2012, 06:18 PM
#16
Race Director
Member Since: Apr 2007
Location: South Western Ontario
Posts: 11,061
Received 845 Likes
on
721 Posts
It does look OK but that still doesn't mean it's working correctly. Here's hoping the new one works for you.
I read about some cars stripping gears within 20k or 30k miles and others running 100k+ miles before gear failure. So, there must be a range of motor currents and switching times on these modules and the ones prone to failure drive the motors too hard.
Peter
I read about some cars stripping gears within 20k or 30k miles and others running 100k+ miles before gear failure. So, there must be a range of motor currents and switching times on these modules and the ones prone to failure drive the motors too hard.
Peter
01-17-2012, 08:24 PM
#17
Instructor
Thread Starter
Member Since: Apr 2011
Location: Roanoke VA
Posts: 102
Likes: 0
Received 0 Likes
on
0 Posts
It does look OK but that still doesn't mean it's working correctly. Here's hoping the new one works for you.
I read about some cars stripping gears within 20k or 30k miles and others running 100k+ miles before gear failure. So, there must be a range of motor currents and switching times on these modules and the ones prone to failure drive the motors too hard.
Peter
I read about some cars stripping gears within 20k or 30k miles and others running 100k+ miles before gear failure. So, there must be a range of motor currents and switching times on these modules and the ones prone to failure drive the motors too hard.
Peter
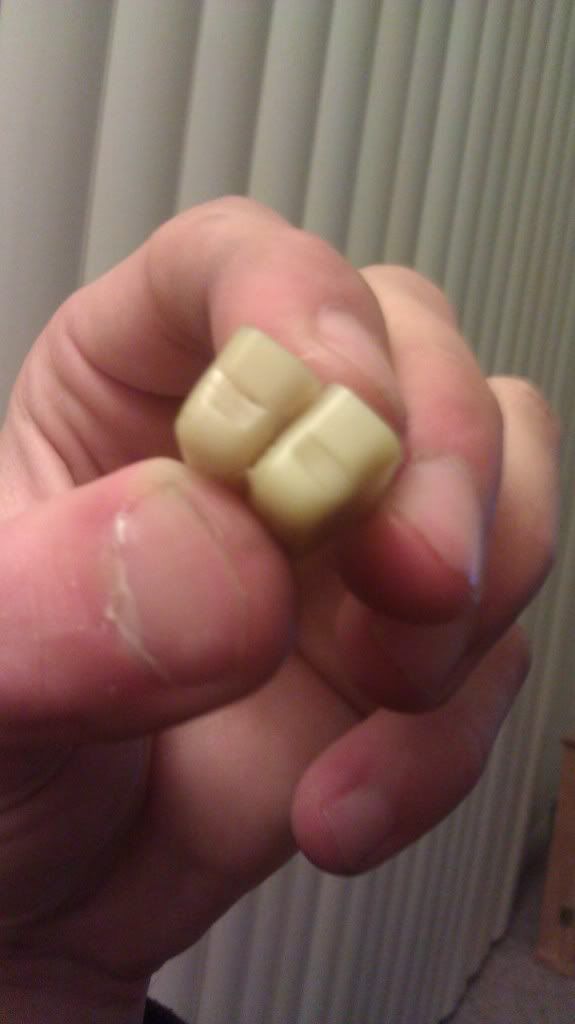
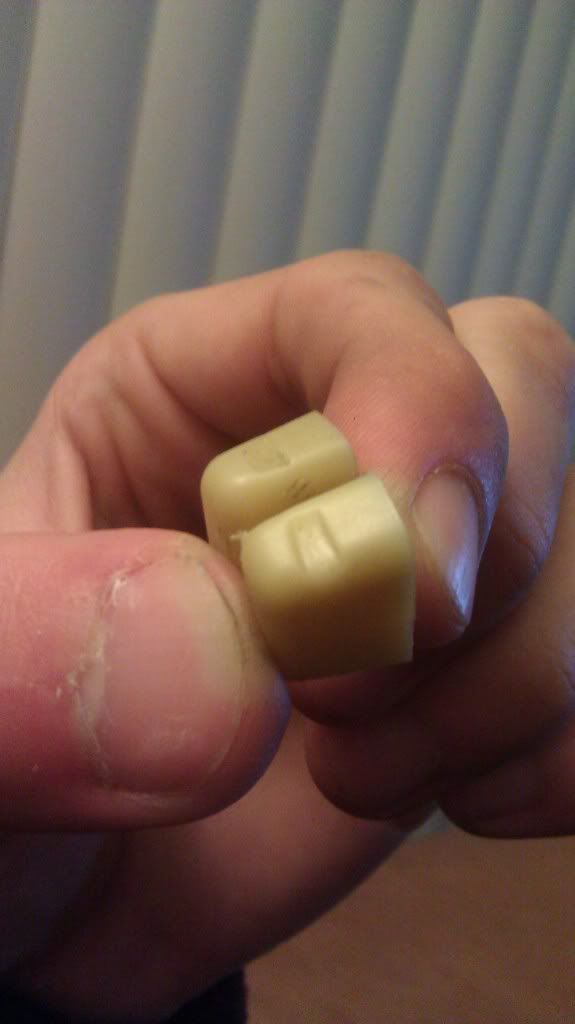
So in just one day this is the indentation done by the arms. The interesting thing is that the indentation is about the same on both tabs; HOWEVER the passenger side always comes up. It's the DS only that gets stuck. The same amount of indentation in the tabs is what puzzles me.
What's the next step if the DS headlight continues to get stuck? Could it be that the motor is just bad and needs to be replaced. The big key is that the manual **** is just being overtightened on the DS, I just don't know why.
02-04-2012, 09:16 AM
#18
Instructor
Thread Starter
Member Since: Apr 2011
Location: Roanoke VA
Posts: 102
Likes: 0
Received 0 Likes
on
0 Posts
Headlights have been popping up fine for the last two weeks, no problems. I was ready to declare that the Headlamp Control Module was the solution to the problem. However, last night something strange happened:
I went to turn the lights on, flipped the headlight switch and NOTHING happened. Hmm. Turned it back off and flipped it on again and the Driver's Side headlight only came up. Those of you that have read the whole thread know that this is the exact OPPOSITE of the original issue (only PS came up before). I had to get out of the car, turn the manual **** a quarter turn and everything worked after that.
Now I'm a little confused. What could this be if now the DS comes up and the PS doesn't?? Brand new HLCM had been working fine...
02-04-2012, 12:32 PM
#19
Instructor
Member Since: Sep 2011
Posts: 109
Likes: 0
Received 0 Likes
on
0 Posts
The chronic problem I'm having is that my DS Headlight doesn't come up when I turn the lights on. I know WHY: the down stop/insulator is worn and the headlight is going down too far and overtightening the manual turn ****. 1 quarter-turn and the **** loosens and the light comes up on the next try. It works until the next time it goes down and over-tightens. What I don't know is HOW to fix the problem!
Part #16524060 (the insulator) is known to be discontinued. I've tried flipping over my worn insulators and it failed within days! Here are the other things I've tried in place of them:
-Rubber Gas Line Hose - too soft, got torn to pieces
-Hard Rubber Bushings - longer-term fix, but still gets eaten up over time and is too bulky and gets in the way of the actuator arm.
Anybody having as much trouble as me because I can not get a good fix to this issue?! I'm thinking of trying to pad the actuator arm that comes down so hard on that tab stop next. Maybe this would be the best option?? Any insight is much appreciated!
I replaced the gear with the bronze one with the rubber insert and the only change I got was a major increase in gear noise.
Thanks for the updates.
Last edited by red-in-la; 02-04-2012 at 03:56 PM.