
Problems with front turn signals burning out. Moisture?
 04-01-2012, 11:50 AM
#1
Intermediate

Thread Starter

Member Since: Jun 2011
Posts: 35
Likes: 0
Received 0 Likes
on
0 Posts
Hey guys, I've literally changed my front turn signal bulbs 5 times now. I think it keeps on burning out b/c water is getting in. Is there something I can do to prevent this from happening? It's a pain in the *** to change these bulbs. Also people are getting pissed b/c they dont thnik im using my signals.
Thanks!
Thanks!
 04-01-2012, 12:13 PM
#3
Team Owner


mine keep exploding  I need to replace the sockets..as far as replacing the light housings themselves see the DIY sticky in C5 tech...
I need to replace the sockets..as far as replacing the light housings themselves see the DIY sticky in C5 tech...
04-01-2012, 12:20 PM
#4
Racer

Member Since: Mar 2008
Location: Grandview Texas
Posts: 316
Likes: 0
Received 0 Likes
on
0 Posts

This is a common issue. Usually caused by a small hole in the lens allowing water in. These cars are so close to the ground that ANY spec of debris thrown by another vehicle makes a Bee Line straight to your car's nose. I pulled the fuse to my DRLs(allowing blinkers to still be operative), b/c A. I hate them. And, B. if there is ANY possible spot for water to get in there, it will happen while washing your car. If your car is still running, and those lights are on "POP"! Time to scar up the forearm again changing bulbs.
04-01-2012, 01:10 PM
#5
Melting Slicks


my original ones had holes burnt in the top of the housings. i bought some clear corners and switchback led's. now i have no issues because the led's don't give off much heat at all.
04-01-2012, 01:33 PM
#6
Team Owner
 The ONLY long term solution, even if you do not buy the clear aftermarket corners. Period.
 Either buy new stock (or aftermarket) housings and load them with LED bulbs or repair the old ones and buy LED bulbs. Either way, DO NOT just keep loading incandescent bulbs back into the housing.
04-01-2012, 05:40 PM
#7
Tech Contributor
Member Since: Oct 1999
Location: Charlotte, NC (formerly Endicott, NY)
Posts: 40,078
Received 8,919 Likes
on
5,328 Posts

Or you can repair the old ones by using a thin sheet of metal sealed to the top of the housing. Just clean up the burned out area and then attach the thin plate to the top of the housing with some roof sealant or other similarly tough sealant and reinstall. Don't use RTV (silicone) since it corrodes metal. The bulb will not burn the patch and you can use stock bulbs.
Bill
Bill
04-02-2012, 02:44 AM
#8
Tech Contributor
Member Since: Dec 2003
Location: Horncastle Lincolnshire, England
Posts: 19,384
Likes: 0
Received 79 Likes
on
61 Posts
2023 C5 of the Year Finalist - Unmodified
I posted this a while ago which might help.
Melted turn signal housings are common and its a design problem on all C5s. The turn signal bulbs are dual filament and act as park, turn and DRLs. The heat of the DRLs being on constantly burns the housing. I had to inhibit the DRLs here in England as ambers are not legal here. I never have T/S bulb failures and my lenses are still sound. The most common symptom is that the bulbs fail regularly because water gets into the bulb holder.
You can inhibit the DRLs by pulling the A2 fuse but if you want to keep the DRLs, LEDs are the way to go. LED bulbs produce less heat and are less likely to damage the housing. If you fit LEDs you’ll need a ballast mod to prevent “hyperflashing” as the system doesn’t recognize the LED bulb and thinks it’s failed. (JWMotoring sell a harness which will fix that issue).
Pull the housing – I’ve attached a procedure below – and inspect it. Others prefer to go in through the headlight housing but its harder to see the fixtures. You’ll probably find a hole on top. If it’s not too bad seal it with silicon sealant and reinstall the housing. That should fix the problem for now and the silicon may be enough to stop it getting worse.
Document ID# 655625
2002 Chevrolet Corvette
________________________________________
Park/Turn Signal/Side Marker Lamp Replacement
Removal Procedure
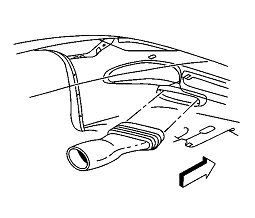
1. Raise and support the vehicle. Refer to Lifting and Jacking the Vehicle in General Information.
2. Remove the front fascia lower closeout panel.

3. Release the brake caliper cooling duct from the front fascia, and position the duct aside.
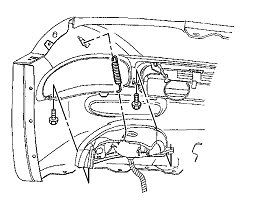
4. Remove the front turn signal lamp bracket retaining spring from the lamp bracket.
5. Remove the lamp bracket retaining spring from the front fascia.
6. Remove the front turn signal lamp bracket retaining screws.
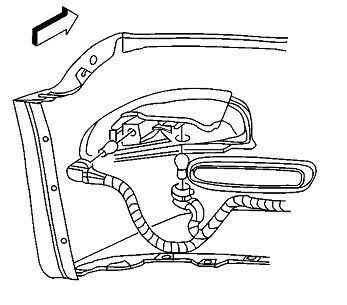
7. Disconnect the sockets from the lamp.
8. Remove the lamp, with the bracket, from the vehicle.
9. Remove the lamp to bracket retaining screws.
10. Remove the lamp from the bracket.
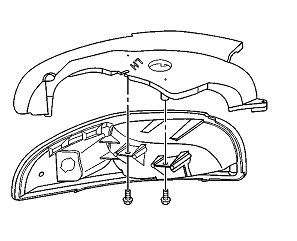
Installation Procedure
1. Install the front park/turn signal and sidemarker lamp into position on the front turn signal lamp bracket.
Notice
Use the correct fastener in the correct location. Replacement fasteners must be the correct part number for that application. Fasteners requiring replacement or fasteners requiring the use of thread locking compound or sealant are identified in the service procedure. Do not use paints, lubricants, or corrosion inhibitors on fasteners or fastener joint surfaces unless specified. These coatings affect fastener torque and joint clamping force and may damage the fastener. Use the correct tightening sequence and specifications when installing fasteners in order to avoid damage to parts and systems.
2. Install the front park/turn signal and sidemarker lamp to bracket retaining screws.
Tighten
Tighten the front park/turn signal and sidemarker lamp to bracket retaining screws to 2 N•m (18 lb in).
3. Install the sockets to the lamp.
4. Install the lamp, with the bracket, to the front fascia.
5. Align the lamp to the opening in the front fascia and hold the lamp firmly in place against the fascia, while installing the front turn signal lamp bracket retaining screws.
Tighten
Tighten the front turn signal lamp bracket retaining screws to 3 N•m (27 lb in).
6. Install the lamp bracket retaining spring to the front fascia.
7. Install the front turn signal lamp bracket retaining spring to the lamp bracket.
8. Position the brake caliper cooling duct to the front fascia and press the duct toward the fascia to secure.
9. Install the front fascia lower closeout panel. Refer to Close Out Panel - Front Bumper Fascia Lower in Bumpers.
04-02-2012, 07:58 AM
#9
Team Owner
Or you can repair the old ones by using a thin sheet of metal sealed to the top of the housing. Just clean up the burned out area and then attach the thin plate to the top of the housing with some roof sealant or other similarly tough sealant and reinstall. Don't use RTV (silicone) since it corrodes metal. The bulb will not burn the patch and you can use stock bulbs.
Bill
Bill
Even though I'm an advocate of LEDs (for several reasons), I agree Bill. For those so inclined, and for whom their housings are not toasted beyond any cost-effective repair, this could be a very viable option. 
I think a 2" (minimum) hole, using a hole-saw, cut directly above where the bulb is positioned and the use of JB Weld for sealing would be a good approach. Additionally, I would try to make a slight "dome" shape in the metal as much as possible to gain as much additional clearance as possible over the bulb. Only problem there though may be the fact that the bracket (shark cage) also sits directly above the housing and doesn't leave much room for clearance unless you also cut a relief hole in it as well.
As far as material, even something thin like a patch made from a soda can might work well since it's easily formed by hand and trimmed by scissors if necessary.
04-02-2012, 08:08 AM
#10
Team Owner
I posted this a while ago which might help.
Melted turn signal housings are common and its a design problem on all C5s. The turn signal bulbs are dual filament and act as park, turn and DRLs. The heat of the DRLs being on constantly burns the housing. I had to inhibit the DRLs here in England as ambers are not legal here. I never have T/S bulb failures and my lenses are still sound. The most common symptom is that the bulbs fail regularly because water gets into the bulb holder.
The constant high heat from the bulb coupled with a poor design (bulb too close to the housing) leads to failure after failure.Though posted before, a repost of the removal procedure from the FSM is a good idea from time to time. Thanks Dave.
 04-16-2012, 12:42 PM
#12

My left turn signal had water in it after I drove in a hard rain. After reading these posts about it I decided to see what I could do to seal it. The bulb never blew but I figured it was just a matter of the water not hitting it and it would happen sooner or later. Got it all apart and no hole? Filled it with water and could get a slow drip out of the seam where the lens goes on. I guess I will just seal the seam with something and put it back together.
04-17-2012, 08:12 AM
#13
Racer

I got my skinny armed buddy to reach down there and smear Permatex on top of them. Haven't blowen one in a couple years.
I still have pieces of an old one in my right housing though.
I still have pieces of an old one in my right housing though.
04-18-2012, 10:23 PM
#14
Drifting

FYI Here are some pics from my old DRLs...driver side, top and bottom...12 years of dealing with the same issue....should've changed them out along time ago!
BTW the last pic is looking up where the bulb would twist in (as if you were sitting on the floor looking up)...see that hole/crack at the very top? Thats where the heat melted through...
Good luck.


BTW the last pic is looking up where the bulb would twist in (as if you were sitting on the floor looking up)...see that hole/crack at the very top? Thats where the heat melted through...
Good luck.
Last edited by env00; 04-18-2012 at 10:27 PM.