

 03-06-2015, 05:49 PM
Last edit by: IB Advertising
See related guides and technical advice from our community experts:
Browse all: General How-Tos
- C6 Corvette: How to Add AUX to NAV
Step by step instructions for do-it-yourselfers..
Browse all: General How-Tos

$9 DIY Aux input for Ipod for C6's with XM
11-13-2011, 12:09 AM
#141
Emerging Vendor
Guys,
Here's the wiring for the C2 harness:

But in a C6 Corvette, it's a lot easier to access the audio wiring at the XM receiver than at the radio, because you've got to pull the center console to get to the radio.
Remember that tapping into the audio wires requires a working XM receiver, otherwise you won't have an XM band to use as an auxiliary input. So if you have an XM receiver, it's easier to tap into its wiring. In a coupe, the XM receiver is above the left rear wheel well where you can access it without even the need for a screwdriver. And in a convertible, the XM receiver is right behind the waterfall, which is easy to remove.
Either location you can access the left, right, and audio common wires. On my auxiliary input website:
http://www.kawal.net/auxinput.htm
you'll notice a number of different alternative approaches to adding an aux input. The first one taps in at the XM receiver and simply substitutes the music player audio for XM audio for those who don't subscribe to XM. The second alternative uses the make/break jack previously described to allow you to continue to use XM audio if you don't connect to the jack. And the third alternative is the same as the second, except you are connecting at the back of the radio instead of at the XM receiver.
Since I offer harnesses to accomplish any of these three alternatives, I'll offer the comment that less than 10% of owners choose the third alternative - connecting at the radio - because of the ease of connecting at the XM receiver. Those who do choose the third alternative are usually pulling the center console out for some other reason, or perhaps just like the idea of a shorter route to the audio jack. The third alternative is certainly neat, if you don't mind the extra work.
The other reason for connecting at the back of the radio - if you have a Nav radio - is to add not only the auxiliary input but also the "nav mod" switch, which allows you to enter destinations while your Vette is moving. This alternative is covered in Alternative 4 on the "Nav Mod" page:
http://www.kawal.net/navigation.htm
The "nav mod" forces you to pull the radio because that's the only practical location to intercept the speed sensor wire.
I hope this helps a bit - either location is fine for adding an auxiliary input.
Ray
Here's the wiring for the C2 harness:
But in a C6 Corvette, it's a lot easier to access the audio wiring at the XM receiver than at the radio, because you've got to pull the center console to get to the radio.
Remember that tapping into the audio wires requires a working XM receiver, otherwise you won't have an XM band to use as an auxiliary input. So if you have an XM receiver, it's easier to tap into its wiring. In a coupe, the XM receiver is above the left rear wheel well where you can access it without even the need for a screwdriver. And in a convertible, the XM receiver is right behind the waterfall, which is easy to remove.
Either location you can access the left, right, and audio common wires. On my auxiliary input website:
http://www.kawal.net/auxinput.htm
you'll notice a number of different alternative approaches to adding an aux input. The first one taps in at the XM receiver and simply substitutes the music player audio for XM audio for those who don't subscribe to XM. The second alternative uses the make/break jack previously described to allow you to continue to use XM audio if you don't connect to the jack. And the third alternative is the same as the second, except you are connecting at the back of the radio instead of at the XM receiver.
Since I offer harnesses to accomplish any of these three alternatives, I'll offer the comment that less than 10% of owners choose the third alternative - connecting at the radio - because of the ease of connecting at the XM receiver. Those who do choose the third alternative are usually pulling the center console out for some other reason, or perhaps just like the idea of a shorter route to the audio jack. The third alternative is certainly neat, if you don't mind the extra work.
The other reason for connecting at the back of the radio - if you have a Nav radio - is to add not only the auxiliary input but also the "nav mod" switch, which allows you to enter destinations while your Vette is moving. This alternative is covered in Alternative 4 on the "Nav Mod" page:
http://www.kawal.net/navigation.htm
The "nav mod" forces you to pull the radio because that's the only practical location to intercept the speed sensor wire.
I hope this helps a bit - either location is fine for adding an auxiliary input.
Ray
Last edited by kawal; 11-14-2011 at 04:00 PM.


 11-22-2011, 10:20 PM
#146
Advanced


Member Since: Aug 2011
Location: Gilbert AZ
Posts: 93
Likes: 0
Received 0 Likes
on
0 Posts
For an easier and cleaner solution...
I ordered a NAV-3 harness from Ray and plugged it into the back of my factory Nav unit. Works great! Now I can plug my iPhone into my new aux-in and input new destinations while I'm driving. I mean my passenger can. I think people are afraid of taking the head unit out if they have never done it before. It's actually not that bad. I can have mine out in about 5 minutes now that I know how to do it.

Rays NAV-3 harness $75
 12-19-2011, 08:45 PM
#147
Emerging Vendor
Here is the wiring for the XM receiver:
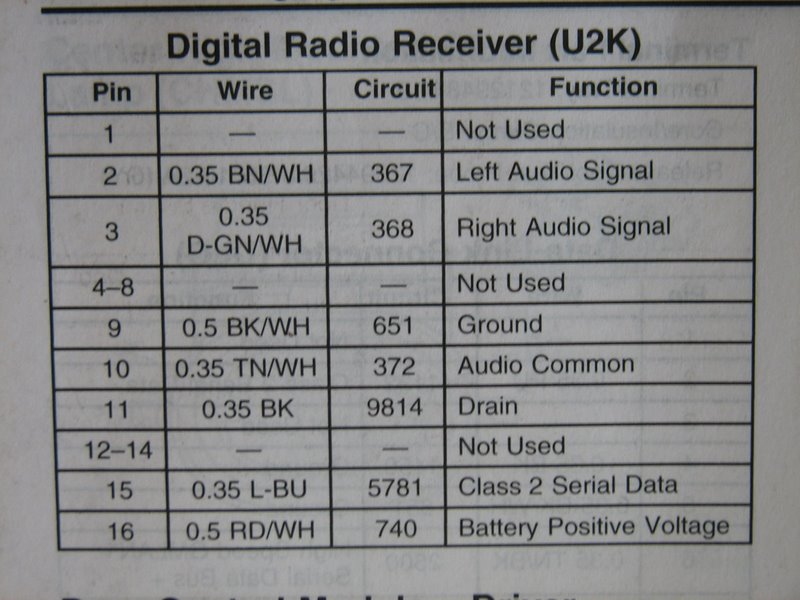
As you can see, the same audio left, right, and common wires are available here on Pins 2,3, and 10, and easier to get to than having to pull the center console and radio.
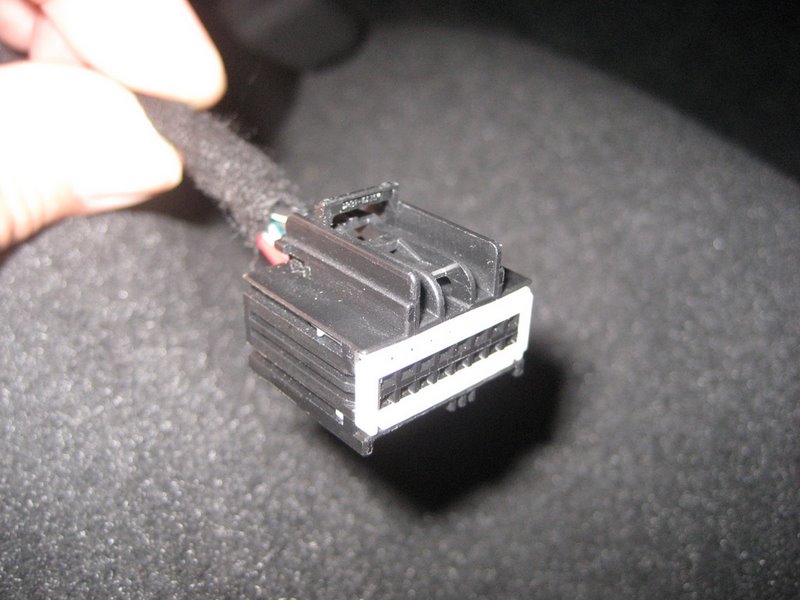
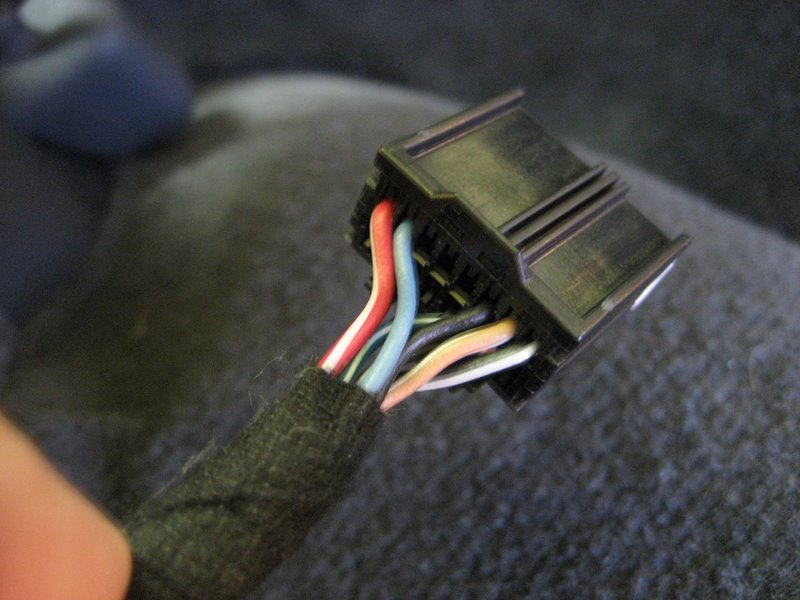
Here's the XM connector:
But be careful if you start cutting into the wiring, because it's tough returning it to factory condition. Also remember the red/white wire is always hot (unless you disconnect the battery).
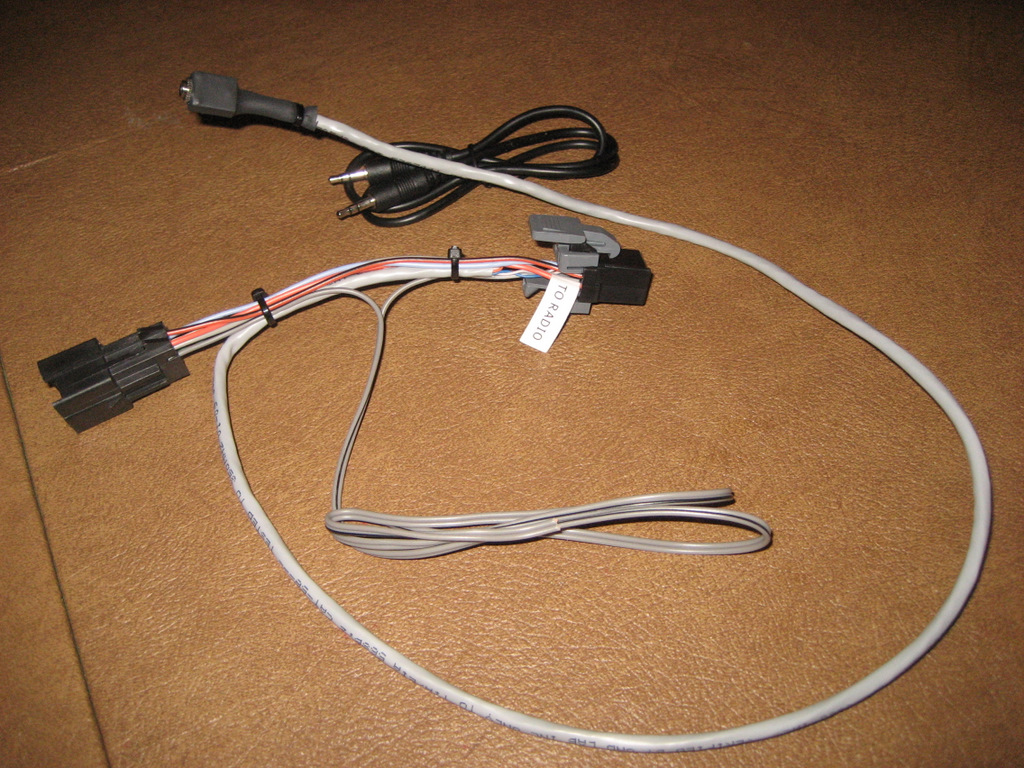
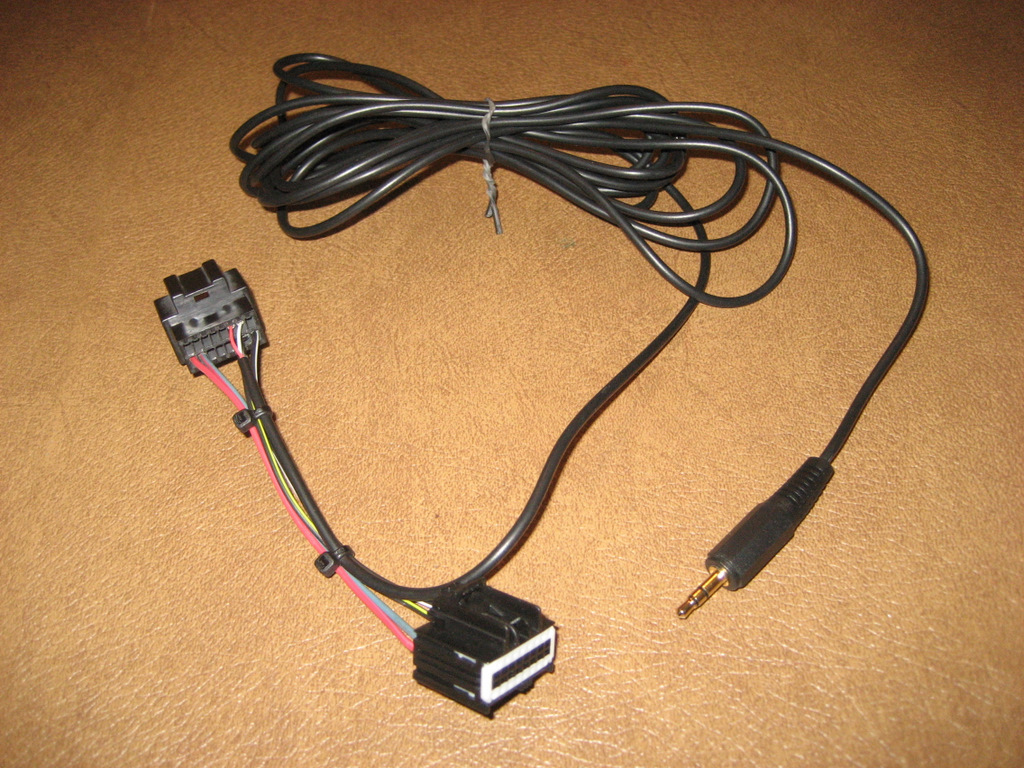
You can splice into these wires, but a cleaner approach is with my AUX-1 harness for $25 bucks:
You can save a few bucks by splicing, but you'll need to decide whether it's worth the trouble.
Here is a website with some other alternatives:
http://www.kawal.net/auxinput.htm
including how to do it yourself. I'm not posting this to sell my stuff, but I get a lot of emails from unfortunate Vette owners who have messed up their factory wiring and wonder how to fix it. If you have the right terminals (Yazaki or Delphi) and a crimp tool, you can pretty much return it to factory condition, but it's a lot of work, time, trouble, and expense. A plug and play solution is reversible and a lot cleaner.
Ray
As you can see, the same audio left, right, and common wires are available here on Pins 2,3, and 10, and easier to get to than having to pull the center console and radio.
Here's the XM connector:
But be careful if you start cutting into the wiring, because it's tough returning it to factory condition. Also remember the red/white wire is always hot (unless you disconnect the battery).
You can splice into these wires, but a cleaner approach is with my AUX-1 harness for $25 bucks:
You can save a few bucks by splicing, but you'll need to decide whether it's worth the trouble.
Here is a website with some other alternatives:
http://www.kawal.net/auxinput.htm
including how to do it yourself. I'm not posting this to sell my stuff, but I get a lot of emails from unfortunate Vette owners who have messed up their factory wiring and wonder how to fix it. If you have the right terminals (Yazaki or Delphi) and a crimp tool, you can pretty much return it to factory condition, but it's a lot of work, time, trouble, and expense. A plug and play solution is reversible and a lot cleaner.
Ray
Last edited by kawal; 12-20-2011 at 12:59 PM.
12-13-2012, 11:18 AM
#148
5th Gear

Member Since: Feb 2007
Posts: 5
Likes: 0
Received 0 Likes
on
0 Posts
Had to check my wires so I thought I would ask if any one knows of adapters I can use to use the factory 2008 xm antenna from the xm module? I am using the $9 diy aux input for my portable xm; I am using the portable xm antenna on the dash; but was hoping someone knows of the adapter so I can use the c6 xm antenna.
Confusing post I know; thanks
Confusing post I know; thanks
12-19-2012, 02:14 PM
#149
Melting Slicks

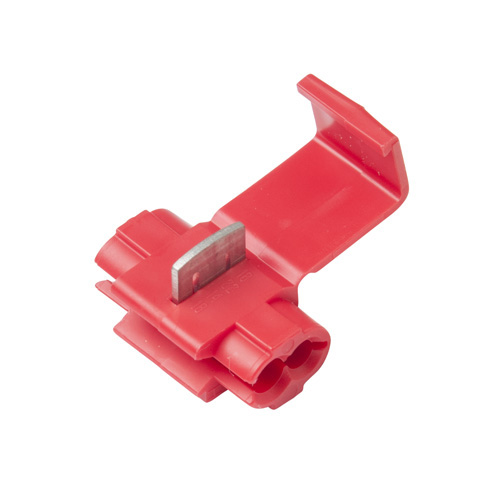
I happen to have a 9' male/male aux port. I would think this is the exact same as the male/female one right? Just have to cut off one side and splice into the XM wires.
Can I use these to splice into the xm wires so it will be a clean install and wont have to cut anything?
Can I use these to splice into the xm wires so it will be a clean install and wont have to cut anything?
Last edited by crAzy; 12-19-2012 at 02:30 PM.
12-19-2012, 08:32 PM
#150
Race Director


I happen to have a 9' male/male aux port. I would think this is the exact same as the male/female one right? Just have to cut off one side and splice into the XM wires.
Can I use these to splice into the xm wires so it will be a clean install and wont have to cut anything?
Can I use these to splice into the xm wires so it will be a clean install and wont have to cut anything?
No
You are not splicing into a simple single insulated piece of electrical wire.
You are connecting to a shielded audio cable, like the RCA cables in your stereo.
There is a shield/ground wrapped around the center conductor. Shields are usually either braided, twisted or foil and are used as the (-) or ground while the center conductor is the (+) or hot/signal.
 12-19-2012, 09:13 PM
#151
Melting Slicks
No
You are not splicing into a simple single insulated piece of electrical wire.
You are connecting to a shielded audio cable, like the RCA cables in your stereo.
There is a shield/ground wrapped around the center conductor. Shields are usually either braided, twisted or foil and are used as the (-) or ground while the center conductor is the (+) or hot/signal.
04-27-2013, 02:23 AM
#152
2nd Gear

Member Since: Apr 2013
Posts: 2
Likes: 0
Received 0 Likes
on
0 Posts
Sorry to comment on an old thread, but I'm a newbie here. This was extremely valuable information. I just pulled the pins out of the harness, wove the wire around the pins with about 2" of wire to maintain good contact and then used heat shrink to keep each wire in place. The quick harness would have been great, I just got impatient.
09-02-2013, 02:41 PM
#153
5th Gear

Member Since: May 2013
Posts: 5
Likes: 0
Received 0 Likes
on
0 Posts
Sorry to comment on an old thread, but I'm a newbie here. This was extremely valuable information. I just pulled the pins out of the harness, wove the wire around the pins with about 2" of wire to maintain good contact and then used heat shrink to keep each wire in place. The quick harness would have been great, I just got impatient.
To my surprise, the XM is still working, all I needed to do was unplug the Phone and it will go back to XM. I also got a "Humming" sound but it was resolved by doing two things: 1) selecting XM station "0" 2) having the phone connected to charger outlet/cigarette lighter.
This is a great, easy, and cheap DIY mod. Thank you Thank you Thank you.
11-06-2013, 12:12 PM
#154
Emerging Vendor
Over the weekend, I received another email from a C6 owner that again messed up his radio by cutting into the wrong wire. This now makes five owners that I know of who have destroyed their radio or Bose amplifier by not knowing exactly what they are doing. These are very expensive to repair or replace, so that is why I am NOT an advocate for cutting or splicing into the factory wiring harnesses. Not only are these procedures rather ugly and irreversible, if not done correctly they can be expensive mistakes.
This might sound like I'm just trying to sell my harnesses, but I sympathize with do-it-yourselfers - I've been one all my life. But with these computer controlled cars, you must be careful and absolutely sure what you are doing. The wires are small and close together and therefore easy to make a mistake.
Here again is the wiring at the XM receiver:
If you're going to cut, be sure to cut ONLY wires at Pin locations 2, 3, and 10. And DON'T short them together!
Here's one of my simple plug in harnesses:
There are no mistakes possible with one of these. Just plug it in and start listening. And you can always remove it if you want to.
Here's a link to other harness options:
http://www.kawal.net/vettemods.htm
Good luck on your projects.
Ray
Last edited by kawal; 11-06-2013 at 12:14 PM.
11-06-2013, 01:54 PM
#155
Hey Kawal,
I read your review on the Kinivo BTC450 and ordered one last week. However I REALLY hate wires and since my 2011 has aux built into the stock radio. I would have one wire from the mic to the 12 volts in the console and then back to the radio which is UGLY. Here is what I had in mind
Since I will be taking the seats out for new leather covers might as well run wires from the XM to the console and from the MIC to the XM for mi Kinivo BTC450. However How would you power the unit from the XM (I don,t use XM). I doubt that the BTC450 will take standard 12v ? I was hoping to use a "add a fuse" and use the seat heater swicthed 12 volts but again not sure that will work. You where talking about a potential solution to power the unit. Any update or suggestions would be great since the streaming capabilities of the Kinivo would avoid migrating to a more expensive double din Unit.
Thanks
11-06-2013, 08:35 PM
#156
Emerging Vendor
Hey Kawal,
I read your review on the Kinivo BTC450 and ordered one last week. However I REALLY hate wires and since my 2011 has aux built into the stock radio. I would have one wire from the mic to the 12 volts in the console and then back to the radio which is UGLY. Here is what I had in mind
Since I will be taking the seats out for new leather covers might as well run wires from the XM to the console and from the MIC to the XM for mi Kinivo BTC450. However How would you power the unit from the XM (I don,t use XM). I doubt that the BTC450 will take standard 12v ? I was hoping to use a "add a fuse" and use the seat heater swicthed 12 volts but again not sure that will work. You where talking about a potential solution to power the unit. Any update or suggestions would be great since the streaming capabilities of the Kinivo would avoid migrating to a more expensive double din Unit.
Thanks
I read your review on the Kinivo BTC450 and ordered one last week. However I REALLY hate wires and since my 2011 has aux built into the stock radio. I would have one wire from the mic to the 12 volts in the console and then back to the radio which is UGLY. Here is what I had in mind
Since I will be taking the seats out for new leather covers might as well run wires from the XM to the console and from the MIC to the XM for mi Kinivo BTC450. However How would you power the unit from the XM (I don,t use XM). I doubt that the BTC450 will take standard 12v ? I was hoping to use a "add a fuse" and use the seat heater swicthed 12 volts but again not sure that will work. You where talking about a potential solution to power the unit. Any update or suggestions would be great since the streaming capabilities of the Kinivo would avoid migrating to a more expensive double din Unit.
Thanks
http://www.kawal.net/vettemods.htm
You also didn't say whether or not you have a coupe or convertible. If you have a convertible, your XM receiver is right behind the waterfall between the seats. In that case you would want the shorter AUX-1 VRT harness, which is only about 4' long.
Next, in either case, the BTC450 has a male plug to connect to an auxiliary input. My AUX-1 harnesses have a male plug, so if you are planning to use it with the BTC450, you can order my AUX-1F harness with the female jack. The shorter 4' version is the AUX-1F VRT.
You can keep the Kinivo wiring inside your console if you wish, and use the power connector to plug in the Kinivo power plug - it will also charge your smartphone with its USB charging port. The only hitch is that you must unplug the Kinivo if you're going to leave your car for a few days. The BTC450 only takes about 7 mA of current on standby, so your battery should last a good while before you need to worry about it not starting.
There is a way to connect to a power circuit that turns off with the ignition, but it's a bit complicated to go into here - the easiest and neatest way is to tie into the HVAC module wiring below the radio. But you can email me at ray@kawal.net if you want to discuss the details.
My wife and I just returned from a two week 4000 mile road trip and we used the Kinivo for audio streaming and handsfree calling quite a bit. I had it plugged into the power connector inside the console and it wasn't much of a hassle to unplug it at night.
I do have a circuit that will shut it down when the XM receiver shuts down, but I don't have it ready for sale. Unfortunately I rather doubt I will find it profitable to build the circuit for sale to other Vette owners because of the quantities I would need to build to keep the price reasonable. I'll later be posting the results of my testing on my website, but for now most owners will have to just unplug the BTC450 like I did on the road trip.
Ray
12-10-2013, 08:04 PM
#157
Instructor
Member Since: May 2007
Location: Wetumpka
Posts: 202
Likes: 0
Received 0 Likes
on
0 Posts

I purchased the AUX-2 input from Ray and it works great. I wanted to share my installation and setup using the Kinivo BTC450. I was hesitant to remove my center console so I decided to see if there was a different solution but still have the plug under the center console lid. This is what I did...
Pull up on the E-Brake boot. It is held on with 2 clips and will pop off if pulled straight up. This view is from the passenger seat looking at the center console. There is a small space in the middle that you can drill into from the outside into the console cubby. I used a 1/4 drill bit but found that the plastic is too thick to engage the nut once the input is pushed through. So I went with a slightly larger drill bit which allowed more of the plugs main body to poke through. So it wouldn't pull through, I placed a zip tie on the backside of the plugs main body. Then when I pushed it into the hole, I placed a washer over the threads and then tightened the nut. Just FYI...I used a smaller bit to start the initial exploratory hole just so I could get an idea of where it would come out in the console.
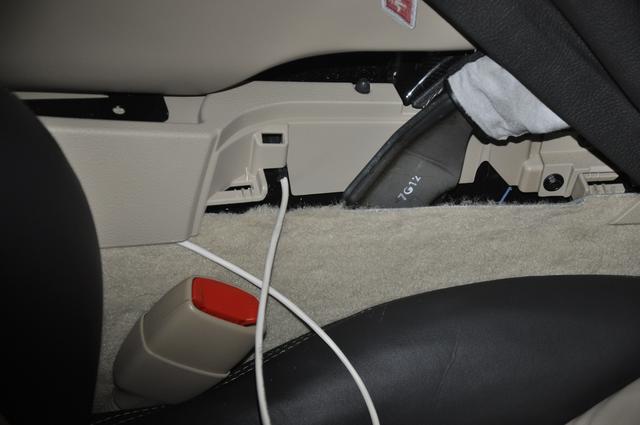
Closeup of the area to drill into the console. The extra cable just gets tucked under the side of the console.
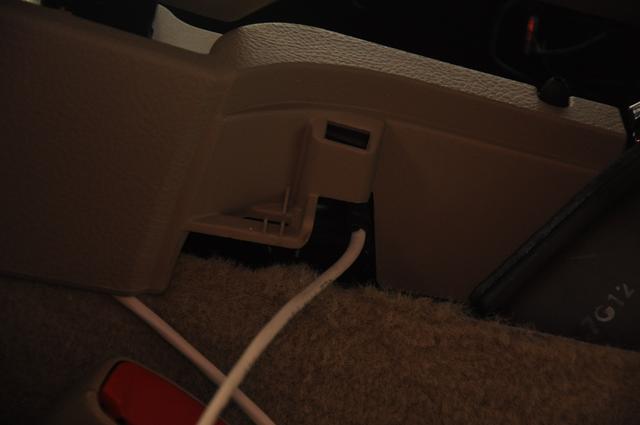
As you can see it is now on the side of the inner console area and securely fastened. I did flatten the bottom of the washer so it would sit flush.

Finished look.
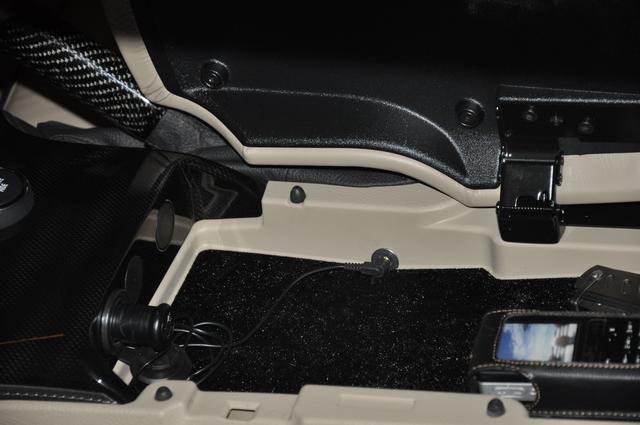
Finally I ran the bluetooth speaker/controller along side of the drivers side of the console and used the double sided tape to secure it next to the start button.

Total time...about 30 minutes and I didn't have to dismantle anything.
Al
Pull up on the E-Brake boot. It is held on with 2 clips and will pop off if pulled straight up. This view is from the passenger seat looking at the center console. There is a small space in the middle that you can drill into from the outside into the console cubby. I used a 1/4 drill bit but found that the plastic is too thick to engage the nut once the input is pushed through. So I went with a slightly larger drill bit which allowed more of the plugs main body to poke through. So it wouldn't pull through, I placed a zip tie on the backside of the plugs main body. Then when I pushed it into the hole, I placed a washer over the threads and then tightened the nut. Just FYI...I used a smaller bit to start the initial exploratory hole just so I could get an idea of where it would come out in the console.
Closeup of the area to drill into the console. The extra cable just gets tucked under the side of the console.
As you can see it is now on the side of the inner console area and securely fastened. I did flatten the bottom of the washer so it would sit flush.
Finished look.
Finally I ran the bluetooth speaker/controller along side of the drivers side of the console and used the double sided tape to secure it next to the start button.
Total time...about 30 minutes and I didn't have to dismantle anything.
Al
Last edited by arp35; 12-10-2013 at 08:06 PM.
12-18-2013, 12:59 PM
#158
Emerging Vendor
I purchased the AUX-2 input from Ray and it works great. I wanted to share my installation and setup using the Kinivo BTC450. I was hesitant to remove my center console so I decided to see if there was a different solution but still have the plug under the center console lid. This is what I did...
Pull up on the E-Brake boot. It is held on with 2 clips and will pop off if pulled straight up. This view is from the passenger seat looking at the center console. There is a small space in the middle that you can drill into from the outside into the console cubby. I used a 1/4 drill bit but found that the plastic is too thick to engage the nut once the input is pushed through. So I went with a slightly larger drill bit which allowed more of the plugs main body to poke through. So it wouldn't pull through, I placed a zip tie on the backside of the plugs main body. Then when I pushed it into the hole, I placed a washer over the threads and then tightened the nut. Just FYI...I used a smaller bit to start the initial exploratory hole just so I could get an idea of where it would come out in the console.
Closeup of the area to drill into the console. The extra cable just gets tucked under the side of the console.
As you can see it is now on the side of the inner console area and securely fastened. I did flatten the bottom of the washer so it would sit flush.
Finished look.
Finally I ran the bluetooth speaker/controller along side of the drivers side of the console and used the double sided tape to secure it next to the start button.
Total time...about 30 minutes and I didn't have to dismantle anything.
Al
Ray
 04-13-2014, 02:08 AM
#160
Emerging Vendor
Without XM, there are no external inputs to the radio, and therefore, the sound system. You could possibly try one of the older GM external 6 CD changers, but they are hard to find too.
If someone knows a way to add an auxiliary input without XM, I'd like to know as well.
The Version 2 PAL will work, because there is software in the PAL that will create an XM band on the radio, thereby "tricking" the radio into thinking the PAL is an XM receiver. But Version 2 PALs are still unavailable.
Ray
