
Clean Escort Radar Mount w/pics
 04-09-2008, 12:33 AM
#21
Melting Slicks


 04-09-2008, 04:35 AM
#23

Glad it's working for you! 
I tried something similar. After unsuccessful attempts at getting those suction cups to stay stuck, I tried the visor mount that was included with my V1 purchase. However it put the RD down too low for any concealment.
I then used that same visor mount bracket and bent it similar to the way you bent your ruler, and stuck it up under the windshield frame as you did, also wrapping part of it with black electrical tape.
But there are a number of rough roads here at the beach and the bracket vibrated against the windshield too much and drove me crazy. Also, the bracket slid sideways (and thus the RD slid sideways) so my hand was constantly reaching up to correct it.
I eventually just ordered the Vettemods Visor Bracket, but I wish it was higher and more forward as I tried to do with my DIY.
 04-09-2008, 07:58 AM
#25
nice but I think mounting it by the shaded portion of the window will degrade radar performance as well as laser. I know the laser part is probably worth less by the time you get the warning your toast. I have the voz tech mount on my car but I mounted it on the passenger side so I could use my sun visor.
04-09-2008, 10:08 AM
#27
Team Owner

Good solution nice job.
04-09-2008, 12:28 PM
#28
Team Owner
Thread Starter
Last edited by cclive; 04-09-2008 at 12:41 PM.
04-09-2008, 12:40 PM
#29
Team Owner
Thread Starter
nice but I think mounting it by the shaded portion of the window will degrade radar performance as well as laser. I know the laser part is probably worth less by the time you get the warning your toast. I have the voz tech mount on my car but I mounted it on the passenger side so I could use my sun visor.
I also tend to agree with your laser comment, It seems to me that laser doesn't scatter like radar does, and the scatter is what saves the people who have detectors. The posts here show my point exactly; that is that you need a good understanding of the physics of radar and also of the psychology of the person using it in order to use any detector effectively. And fair to point out also that no detector will save you every time. But I have at least one event per month or so where someone goes flying past me on the highway when my detector is ALREADY warning me of a trap ahead; a clear indication of the value of my X50. And each event like this makes the detector worth the price of admission!
 04-09-2008, 12:58 PM
#30
Melting Slicks
This one is certainly where I got my inspiration from, as I mentioned it by name at the beginning of the post....but I didn't like the way it was outside of the trim (mine is hidden under the trim) and it doesn't tuck the detector up and out of sight like mine does, and the visor can't be folded under and actually be useful with the Voztech as it can with mine. So... other than those three things, yes, just like this....
04-09-2008, 01:18 PM
#31
Team Owner
Thread Starter
04-09-2008, 03:13 PM
#32
Team Owner
Thread Starter
Here is a pic of the actual bracket, I took it out of the car for the picture.
The second pic is a tracing of the actual contour of the bracket...for easy bending. Since Flickr resizes photos, I can't make it actual size, but the original full size image is 1265 x 541 pixels, so it can be resized to that number and it will be the right size. I also put the overall length of the piece in there at 6 1/16 inches, so if you are bending, make sure that is correct. The notch at the end by the hole is there to allow the point on the visor clip to go through. And the ruler must be ground off to make it slightly narrower to match the width of the slot that it goes into on the detector.
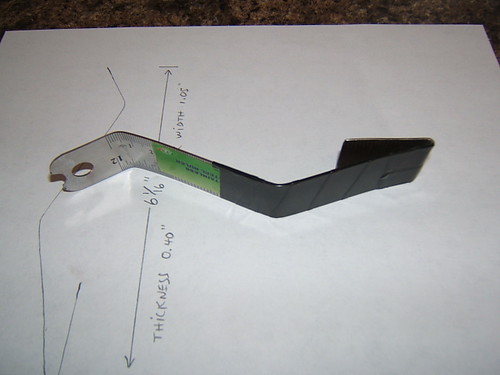
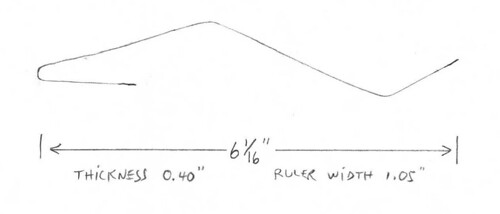
CORRECTION: Thickness is .040" not 0.40...Thanks Glennhl.! A little more thickness shouldn't be a problem though.
The second pic is a tracing of the actual contour of the bracket...for easy bending. Since Flickr resizes photos, I can't make it actual size, but the original full size image is 1265 x 541 pixels, so it can be resized to that number and it will be the right size. I also put the overall length of the piece in there at 6 1/16 inches, so if you are bending, make sure that is correct. The notch at the end by the hole is there to allow the point on the visor clip to go through. And the ruler must be ground off to make it slightly narrower to match the width of the slot that it goes into on the detector.
CORRECTION: Thickness is .040" not 0.40...Thanks Glennhl.! A little more thickness shouldn't be a problem though.
Last edited by cclive; 02-03-2010 at 02:10 PM.
The following users liked this post:
808 MAOLI (04-05-2024)
04-10-2008, 12:35 AM
#33
Former Sponsor
Member Since: Jun 2006
Posts: 347
Likes: 0
Received 0 Likes
on
0 Posts
St. Jude Donor '06
Cclive,
Looks like a good DIY solution, with exceptional inspiration I will state that our brackets have a few specific design elements that set it apart from the others out there. The placement of the detector is designed to clear the tint line and allow for function and a good level of concealment. Our brackets are milled from aluminum, then precision bent by machine and powder coated. Felt is applied to avoid damage to the windshield header and all hardware is provided in black to match. Also we designed all of our brackets to work with Escort, Beltronics and Valentine detectors.
Although alot of folks don't have the time, I think its great when someone has the ingenuity and skill to come up with a creative solution like yours, it makes your car that much more unique.
Take it easy,
Rick
Voztech
Looks like a good DIY solution, with exceptional inspiration
I will state that our brackets have a few specific design elements that set it apart from the others out there. The placement of the detector is designed to clear the tint line and allow for function and a good level of concealment. Our brackets are milled from aluminum, then precision bent by machine and powder coated. Felt is applied to avoid damage to the windshield header and all hardware is provided in black to match. Also we designed all of our brackets to work with Escort, Beltronics and Valentine detectors. Although alot of folks don't have the time, I think its great when someone has the ingenuity and skill to come up with a creative solution like yours, it makes your car that much more unique.
Take it easy,
Rick
Voztech
04-10-2008, 11:51 AM
#35
Burning Brakes

Member Since: Oct 2006
Location: New Braunfels Republic of Texas
Posts: 962
Likes: 0
Received 0 Likes
on
0 Posts

Cclive,
Looks like a good DIY solution, with exceptional inspiration I will state that our brackets have a few specific design elements that set it apart from the others out there. The placement of the detector is designed to clear the tint line and allow for function and a good level of concealment. Our brackets are milled from aluminum, then precision bent by machine and powder coated. Felt is applied to avoid damage to the windshield header and all hardware is provided in black to match. Also we designed all of our brackets to work with Escort, Beltronics and Valentine detectors.
Although alot of folks don't have the time, I think its great when someone has the ingenuity and skill to come up with a creative solution like yours, it makes your car that much more unique.
Take it easy,
Rick
Voztech
Looks like a good DIY solution, with exceptional inspiration
I will state that our brackets have a few specific design elements that set it apart from the others out there. The placement of the detector is designed to clear the tint line and allow for function and a good level of concealment. Our brackets are milled from aluminum, then precision bent by machine and powder coated. Felt is applied to avoid damage to the windshield header and all hardware is provided in black to match. Also we designed all of our brackets to work with Escort, Beltronics and Valentine detectors. Although alot of folks don't have the time, I think its great when someone has the ingenuity and skill to come up with a creative solution like yours, it makes your car that much more unique.
Take it easy,
Rick
Voztech
Rick, I just got one of yours for my new CRM and was excited based on quality and no suction cups, but will not be using it because it prevents to complete travel of the passenger visor. If I had know that before, I would not have purchased it. You need to modify or add a second style that moves the unit back further so the visor can have all or almost all of its travel. In my case I just waisted my money and guess I will try to recoup it by selling it on ebay.
Mickey
04-10-2008, 12:17 PM
#36
Former Sponsor
Member Since: Jun 2006
Posts: 347
Likes: 0
Received 0 Likes
on
0 Posts
St. Jude Donor '06
Mickey,
I understand. Assuming its not damaged theres no need to sell it, just send your bracket back to us with an explanation and we will issue a refund. I will PM the address is.
Rick
I understand. Assuming its not damaged theres no need to sell it, just send your bracket back to us with an explanation and we will issue a refund. I will PM the address is.
Rick
Rick, I just got one of yours for my new CRM and was excited based on quality and no suction cups, but will not be using it because it prevents to complete travel of the passenger visor. If I had know that before, I would not have purchased it. You need to modify or add a second style that moves the unit back further so the visor can have all or almost all of its travel. In my case I just waisted my money and guess I will try to recoup it by selling it on ebay.
Mickey
Mickey
04-10-2008, 12:25 PM
#37
Team Owner
Thread Starter


 04-12-2008, 02:26 PM
#40
Melting Slicks
Rick, I just got one of yours for my new CRM and was excited based on quality and no suction cups, but will not be using it because it prevents to complete travel of the passenger visor. If I had know that before, I would not have purchased it. You need to modify or add a second style that moves the unit back further so the visor can have all or almost all of its travel. In my case I just waisted my money and guess I will try to recoup it by selling it on ebay.
Mickey
Mickey
Last edited by rothchilds; 04-12-2008 at 02:28 PM.