
Clean Escort Radar Mount w/pics
 01-25-2010, 02:11 PM
#61
Melting Slicks


as for the rearview mount, i think the main concern with the one that is out there is that it is attached to the rearview mirror by adhesive...additionally, the clip that goes into the radar does not "snap" into place, it's just an extended metal piece that fits snug....
i still have no clue which one to get and the ruler idea seems to be the best option...
anyone have any other mounts similar to the one in this thread or any other options?...getting tired of having the cigarette lighter hang down the middle of the console...looks crappy...


 03-17-2010, 05:08 PM
#64
Drifting


Member Since: Feb 2010
Location: Bonsall CA
Posts: 1,266
Likes: 0
Received 0 Likes
on
0 Posts
Some pics of last weekend's project, getting my 8500 X50 mounted clean and out of sight....all for less than $4. Probably a more important mod for a convertible than a coupe...

This is the mount installed. The exposed part is wrapped in black electrical tape in a spiral.
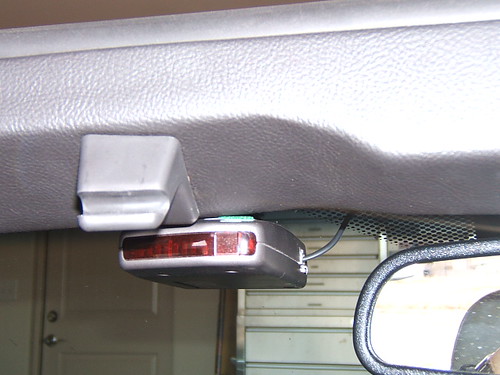

As you can see, it is tucked up nice and tight under the windshield frame. Tied in to the power from the mirror as shown on the Bugman's site. http://www.bugmanweb.com/c6/c6index.html
I saw the two mounts on his site and had a problem with both. The Great Lakes leaves the detector hanging down in plain view under the mirror. I dont like people driving behind me to see the detector in plain sight. Then the Voztech mount looked good and I thought that the mounting on the visor screw made alot of sense. But the Voztech is on the OUTSIDE of the windshield frame trim, and I figured it would look better if it was underneath the trim. I took off both visor clips that are near the mirror, and the trim flexes plenty to fit a bracket in underneath it, following the contour of the frame itself. I thought Stainless would be a nice material and found a stainless ruler at Walmart for $1.97. It was only slightly wider than the slot in the 8500, and the same thickness as the original suction cup bracket. I carefully bent it to fit the frame and then ground off about a 32nd on each side of the part that goes into the 8500...perfect.
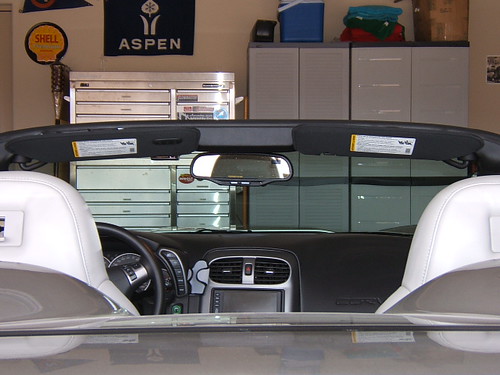
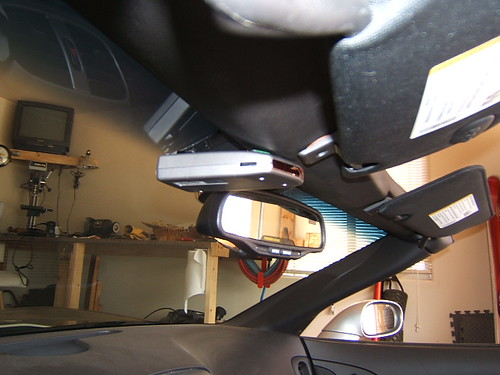
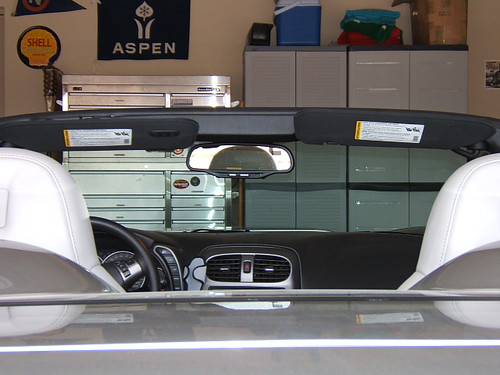
This is the view from the rear of the car and the 8500 is just barely visible. But if I unsnap the visor and just put it under the clip...it looks like this from behind...
And the visor is still very solid there.
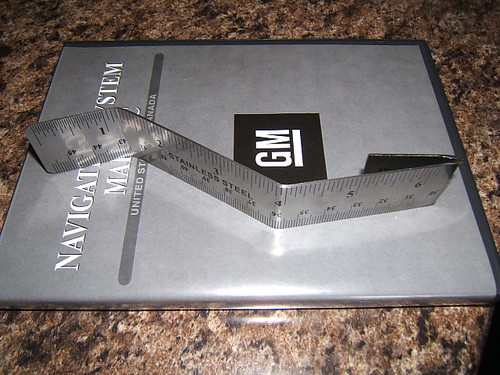
The reason it was $4 is because one ruler at $1.97 was a tester and got weak when I bent it too far...pic below. I heated the second one up with a torch until just glowing and the second ruler bent just fine. This pic is not completely bent to shape but shows the general look of the part. The last thing was to get the windshield trim back up where it was before, but the thickness of the ruler makes the trim sit that much farther from the frame, so the visor clip must have about a 16th ground off the end to make it shorter, and then it pulls the trim up nice and snug to the frame. The whole thing can go on either of the two visor clips but I like the driver's side myself...also the power jack on the 8500 is on the right so it faces the mirror this way...power cord is shorter.
There's quite a bit of space up and under the windshield frame, and this puts the 8500 right there. The visor is fully functional and can be folded all the way around 180 degrees. It completely hides the 8500 when folded this way. I've never done a post like this so let me know if I forgot some part of the explanation...
This is the mount installed. The exposed part is wrapped in black electrical tape in a spiral.
As you can see, it is tucked up nice and tight under the windshield frame. Tied in to the power from the mirror as shown on the Bugman's site. http://www.bugmanweb.com/c6/c6index.html
I saw the two mounts on his site and had a problem with both. The Great Lakes leaves the detector hanging down in plain view under the mirror. I dont like people driving behind me to see the detector in plain sight. Then the Voztech mount looked good and I thought that the mounting on the visor screw made alot of sense. But the Voztech is on the OUTSIDE of the windshield frame trim, and I figured it would look better if it was underneath the trim. I took off both visor clips that are near the mirror, and the trim flexes plenty to fit a bracket in underneath it, following the contour of the frame itself. I thought Stainless would be a nice material and found a stainless ruler at Walmart for $1.97. It was only slightly wider than the slot in the 8500, and the same thickness as the original suction cup bracket. I carefully bent it to fit the frame and then ground off about a 32nd on each side of the part that goes into the 8500...perfect.
This is the view from the rear of the car and the 8500 is just barely visible. But if I unsnap the visor and just put it under the clip...it looks like this from behind...
And the visor is still very solid there.
The reason it was $4 is because one ruler at $1.97 was a tester and got weak when I bent it too far...pic below. I heated the second one up with a torch until just glowing and the second ruler bent just fine. This pic is not completely bent to shape but shows the general look of the part. The last thing was to get the windshield trim back up where it was before, but the thickness of the ruler makes the trim sit that much farther from the frame, so the visor clip must have about a 16th ground off the end to make it shorter, and then it pulls the trim up nice and snug to the frame. The whole thing can go on either of the two visor clips but I like the driver's side myself...also the power jack on the 8500 is on the right so it faces the mirror this way...power cord is shorter.
There's quite a bit of space up and under the windshield frame, and this puts the 8500 right there. The visor is fully functional and can be folded all the way around 180 degrees. It completely hides the 8500 when folded this way. I've never done a post like this so let me know if I forgot some part of the explanation...
 08-23-2010, 07:28 PM
#65
Cruising


Member Since: Jul 2010
Posts: 11
Likes: 0
Received 0 Likes
on
0 Posts
This is a great DIY! I could not find the stainless rulers at wally world, but I did find them in aluminum. I bought a couple and bent them according to the template above. My first version had way too much vibration, so I ended up "doubling up" on the the thickness by JB welding two rulers together. The end result was rock solid.
Also constructed a mirror connected power cord from an old phone cord. Worked great. Man, I love this place!
Also constructed a mirror connected power cord from an old phone cord. Worked great. Man, I love this place!
08-23-2010, 11:18 PM
#66
Melting Slicks

I got the 9500i, the only problem with this type of mount is the rear radar antenna is on the top of the detector and being that high the visor blocks the rear reception. 
So mine is mounted about the same location as the rear view mirror (left side). I bought the hardwire kit that has the alert led in it with mute button, I mounted that on the top of the HUD buttons on the left side.
So mine is mounted about the same location as the rear view mirror (left side). I bought the hardwire kit that has the alert led in it with mute button, I mounted that on the top of the HUD buttons on the left side.

 10-10-2010, 10:28 PM
#68
Burning Brakes

I got the 9500i, the only problem with this type of mount is the rear radar antenna is on the top of the detector and being that high the visor blocks the rear reception.
So mine is mounted about the same location as the rear view mirror (left side). I bought the hardwire kit that has the alert led in it with mute button, I mounted that on the top of the HUD buttons on the left side.
So mine is mounted about the same location as the rear view mirror (left side). I bought the hardwire kit that has the alert led in it with mute button, I mounted that on the top of the HUD buttons on the left side.
10-10-2010, 11:57 PM
#69
Safety Car


gotcha...didnt see where he did that...i thought he was comparing the visor mount to the mount he created?...main "functionality" differences between the two that I can see is one sits further back and higher than the other...also with his, the visor can go all the way back...
as for the rearview mount, i think the main concern with the one that is out there is that it is attached to the rearview mirror by adhesive...additionally, the clip that goes into the radar does not "snap" into place, it's just an extended metal piece that fits snug....
i still have no clue which one to get and the ruler idea seems to be the best option...
anyone have any other mounts similar to the one in this thread or any other options?...getting tired of having the cigarette lighter hang down the middle of the console...looks crappy...
10-11-2010, 12:21 AM
#70

 10-11-2010, 09:56 PM
#72
Burning Brakes
Well done. Mine looks exactly the same as yours, but I painted mine with some rustoleum spray paint (black hardened) before I mounted it. Looks very nice. I also made my own power cable spliced into the rear view mirror.
I will suggest one thing. I did start with a ruler, but an old piece of sheet metal that I had left over from another project was much easier to work with and its stiffer. You can buy a small piece for next to nothing at home depot. If you're experimenting try both.
Also, my Z51 with a somewhat stiffer ride makes the detector shake a bit. My 2011 winter project will add a short piece to metal to connect the part that bends near the windsheild with the straight part that slides into the detector (Ill weld it).
Good luck with it! Here's mine:
 01-15-2011, 07:39 PM
#74
Burning Brakes

Wanted to say thanks for the write-up. I built mine yesterday and it turned out perfect. I too printed the resized pic showing the dimensions and shaped my bracket according to that. I also painted mine with some por15 I had left over from a roll cage install, and dremmeled a slot so it would actually lock on to the radar detector. I originally wanted the blendmount, but this saved me $130 and I like it even better.
I didn't want to pay $30 for the directwire smart cord, so I cut the cig lighter plug off with a dremel. I replaced the coil cord with a long straight phone cord and ran it out the back with the power wire which I had to lengthen. Then just cut a small piece of decal material to cover the hole in the front where the coil cord was. Then I mounted it in the ashtray like the pic above. Another $30 saved!
Now if I could just build my own dashtronix kit for the hud!
Last edited by Xtremespeed; 01-15-2011 at 07:52 PM.
 06-28-2014, 09:56 PM
#76
Emerging Vendor
I used these instructions to build my Escort detector mount and it still works great after a few years. It sure beats the suction cups that keep falling off.
Thanks for the neat project.
Ray
Thanks for the neat project.
Ray