
Replacing air filter is easy -- and few pointers with pics...
 11-08-2009, 02:46 PM
#1
Le Mans Master

Thread Starter
Member Since: Apr 2006
Location: The Beautiful Inland Empire WA.
Posts: 5,933
Likes: 0
Received 11 Likes
on
7 Posts
I bought the new blue Attack Air Filter from TKO (which is unbelievably well made by the way) and decided to install it this morning.
I thought that I might offer a few pointers for those thinking about doing this with some details that might make it easier -- whether you are installing a new stock filter or a custom one like this -- there is really no reason to pay a mechanic to do this and you have the satisfaction of doing it yourself and knowing everything is nice and tight again.
No, I don't know the technical names for some of these, so maybe someone who might consider those important can weigh in here....but here goes anyway:
First, use a TORX 15 (same as the one for the tailights) to remove the two screws that attach this to the driver's side of the intake:
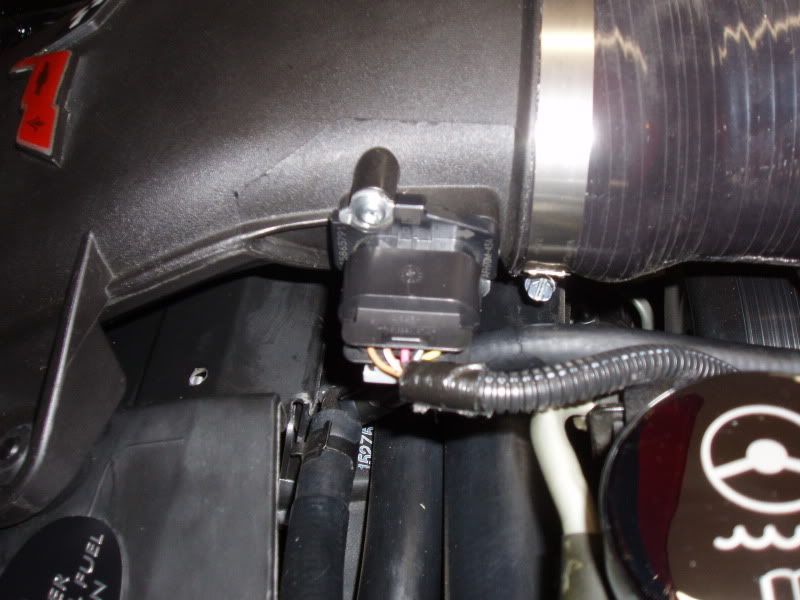
What is inside is about 3 inches long -- pull it straight out and carefully let it sit nearby on the engine.
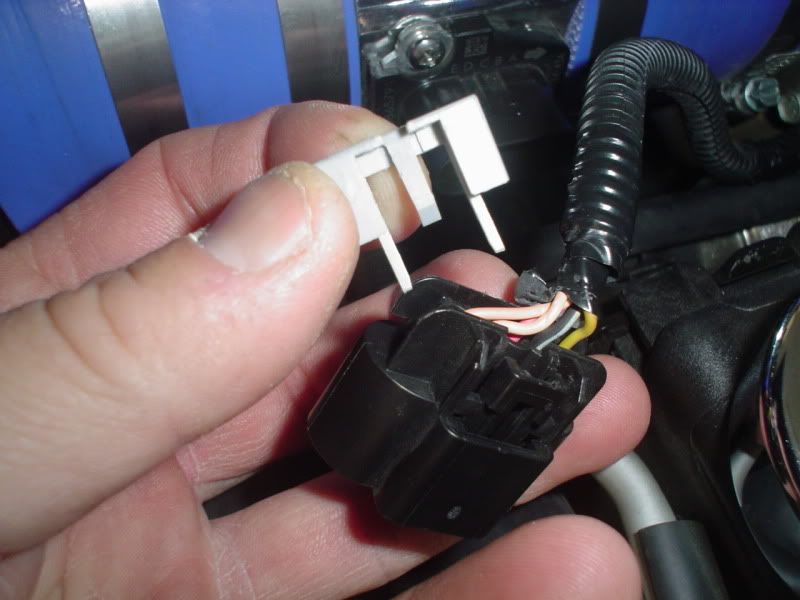
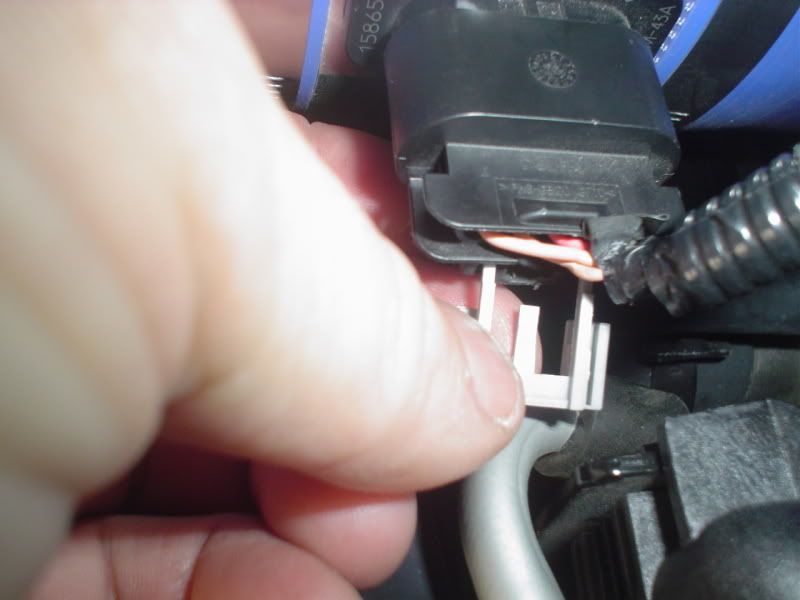
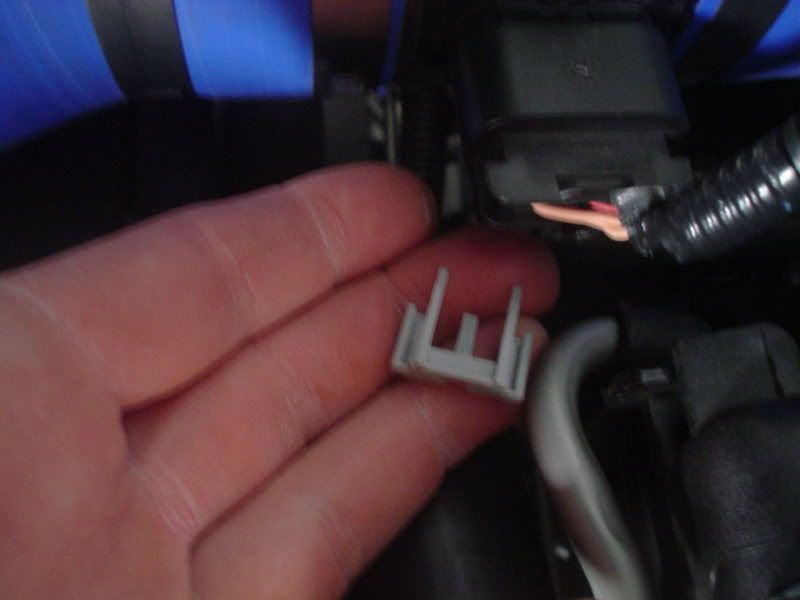
The screws are about 3/4 of an inch in length and when you get near the end, take them out the rest of the way by hand and you won't drop them. There is a clip that is underneath this (the Mass Air Sensor) that is posted below as to how to remove the clip and wiring without unscrewing it. If you DO choose to unscrew it, be very, very careful with what you take out and set aside..............Its EXPENSIVE!
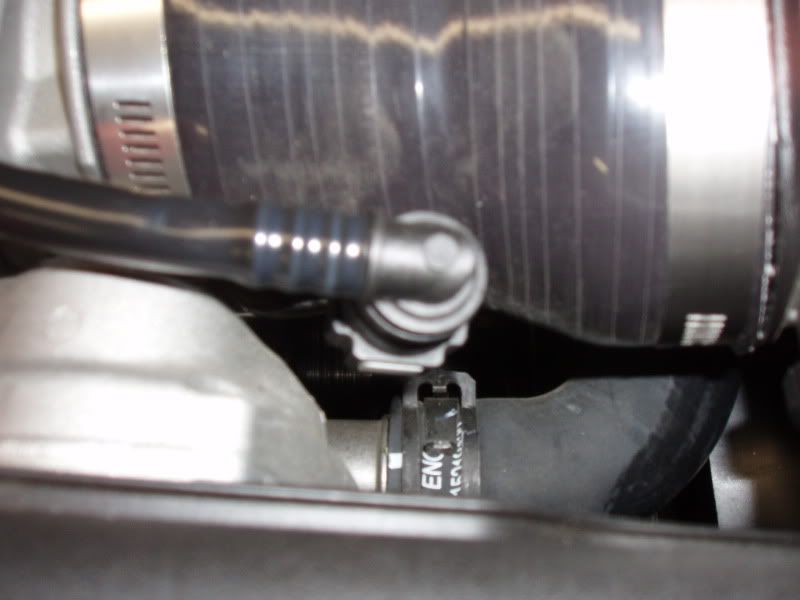
Second -- take the hose clamp or other fastener off of one end of the flexible connector from your intake to the manifold. Mine are simple hose clamps that came with the smooth connector that I have.
Third -- this pulls straight out of the hole that is in the passenger side of the intake. Set it aside in the engine compartment:
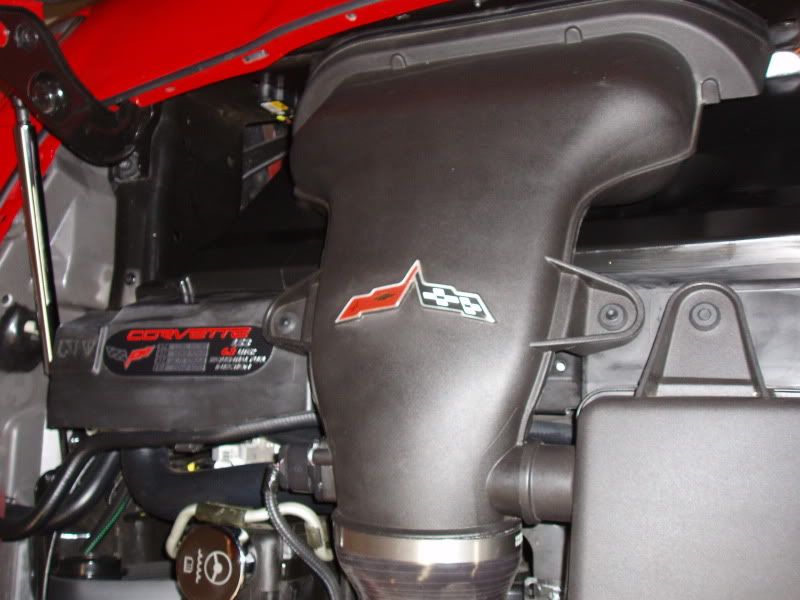
There are some rubber grommets that hold the intake to the top of the radiator cover. Just pull up on the intake and it will come right off of these and into your hands --- it is now off of the car!.
The grommets are soft and give up their grip pretty easily. One may come off of the intake and stay on the radiator (one of mine did) so pay attention to where they are left after lifting it off:
Look in the bottom of the housing and you will see six black screws on the perimeter of the filter housing. Use a TORX 25 to remove these. They will come out halfway, then you need to pull them toward you to get the second set of threads to start and to come completly out. The screws may stay in the bracket and the bracket come off with the screws halfway out --- but I took mine completely out. The attachment bracket pulls right out once all of the screws are removed:
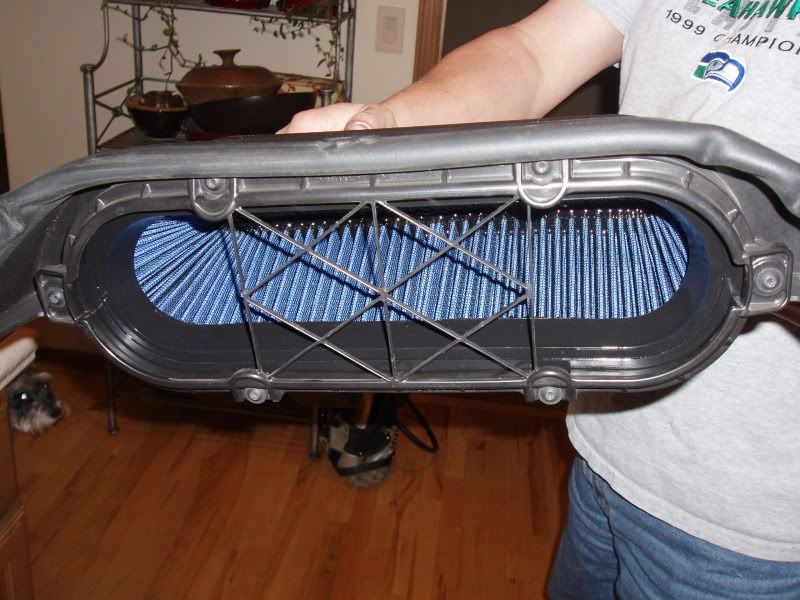
The stock air filter has two little rubber tabs on both ends to pull it out.
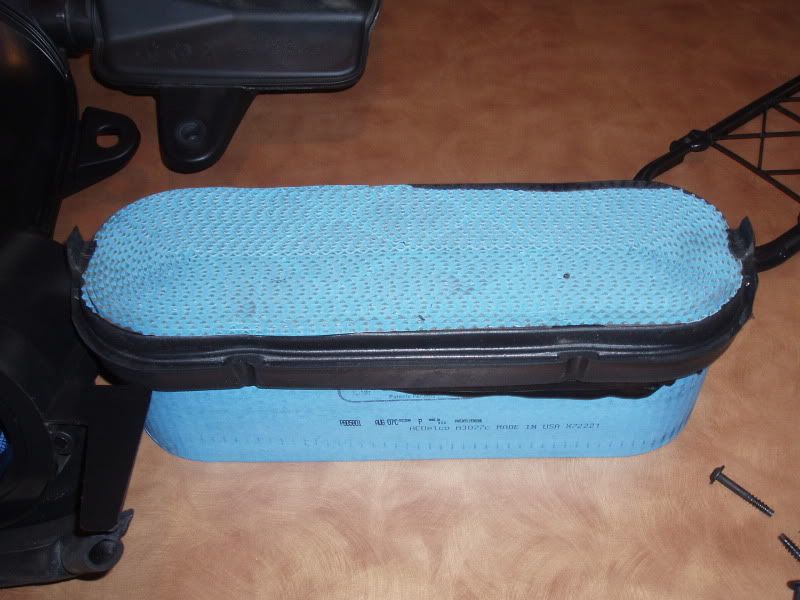
The old filter just lifts right out. Place your new filter in place and replace the bracket and screws (everything may not fit flush until you use the screws to push the new filter down into place by retightening the screws and bracket).
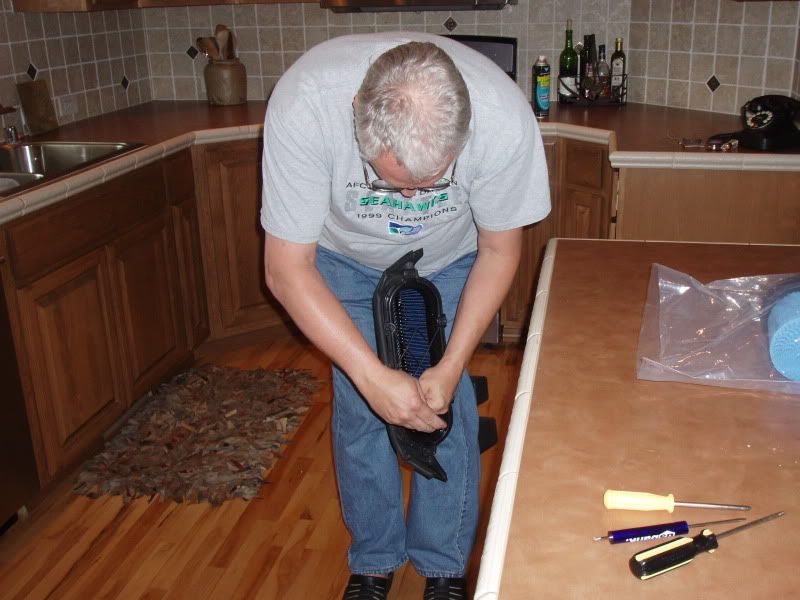
Go around the perimiter of the bracket and tighten the screws gradually so the filter is pushed down into place evenly around the perimeter. It is easier if you hold it between your legs while you do this, as it does not move around as much as if you had it on a surface in front of you, and you'll be much less likely to slip with the TORX and punch a hole in your new $100.00 filter!!:
Take the filter out to your car, reattach it by reversing the above steps and you are done..........It really is very easy to do yourself and sorry if this post got a little long ----- but I for one would have been glad to have this before I started!!
I thought that I might offer a few pointers for those thinking about doing this with some details that might make it easier -- whether you are installing a new stock filter or a custom one like this -- there is really no reason to pay a mechanic to do this and you have the satisfaction of doing it yourself and knowing everything is nice and tight again.
No, I don't know the technical names for some of these, so maybe someone who might consider those important can weigh in here....but here goes anyway:
First, use a TORX 15 (same as the one for the tailights) to remove the two screws that attach this to the driver's side of the intake:
What is inside is about 3 inches long -- pull it straight out and carefully let it sit nearby on the engine.
The screws are about 3/4 of an inch in length and when you get near the end, take them out the rest of the way by hand and you won't drop them. There is a clip that is underneath this (the Mass Air Sensor) that is posted below as to how to remove the clip and wiring without unscrewing it. If you DO choose to unscrew it, be very, very careful with what you take out and set aside..............Its EXPENSIVE!
Second -- take the hose clamp or other fastener off of one end of the flexible connector from your intake to the manifold. Mine are simple hose clamps that came with the smooth connector that I have.
Third -- this pulls straight out of the hole that is in the passenger side of the intake. Set it aside in the engine compartment:
There are some rubber grommets that hold the intake to the top of the radiator cover. Just pull up on the intake and it will come right off of these and into your hands --- it is now off of the car!.
The grommets are soft and give up their grip pretty easily. One may come off of the intake and stay on the radiator (one of mine did) so pay attention to where they are left after lifting it off:
Look in the bottom of the housing and you will see six black screws on the perimeter of the filter housing. Use a TORX 25 to remove these. They will come out halfway, then you need to pull them toward you to get the second set of threads to start and to come completly out. The screws may stay in the bracket and the bracket come off with the screws halfway out --- but I took mine completely out. The attachment bracket pulls right out once all of the screws are removed:
The stock air filter has two little rubber tabs on both ends to pull it out.
The old filter just lifts right out. Place your new filter in place and replace the bracket and screws (everything may not fit flush until you use the screws to push the new filter down into place by retightening the screws and bracket).
Go around the perimiter of the bracket and tighten the screws gradually so the filter is pushed down into place evenly around the perimeter. It is easier if you hold it between your legs while you do this, as it does not move around as much as if you had it on a surface in front of you, and you'll be much less likely to slip with the TORX and punch a hole in your new $100.00 filter!!:
Take the filter out to your car, reattach it by reversing the above steps and you are done..........It really is very easy to do yourself and sorry if this post got a little long ----- but I for one would have been glad to have this before I started!!
Last edited by C6NRED; 11-08-2009 at 05:00 PM.

The following 5 users liked this post by C6NRED:
ClashBandicoot (04-28-2016),
Hans D (03-30-2016),
mbsnmisc (01-20-2017),
TKO Performance (03-31-2016),
wwlandry (11-11-2015)


 11-08-2009, 04:14 PM
#5
Safety Car

looks good but why did you take the mass air flow sensor off? (the sensor with the 2 torx screws)? you can just unplug it. I wouldnt mess with it unless you are very carefull. It has a highly sensitive peice that is easy to damage and then you will have all kinds of issues. The MAF sensor unclips pretty easy just take your time great write up for someone that might be hesitant to do it. A little help can go along way
great write up for someone that might be hesitant to do it. A little help can go along way
Last edited by HANNY; 11-08-2009 at 04:21 PM.
11-08-2009, 04:22 PM
#6
Le Mans Master
Thread Starter
Member Since: Apr 2006
Location: The Beautiful Inland Empire WA.
Posts: 5,933
Likes: 0
Received 11 Likes
on
7 Posts
looks good but why did you take the mass air flow sensor off? (the sensor with the 2 torx screws)? you can just unplug it. I wouldnt mess with it unless you are very carefull. It has a highly sensitive peice that is easy to damage and then you will have all kinds of issues. The MAF sensor unclips pretty easy just take your time great write up for someone that might be hesitant to do it
great write up for someone that might be hesitant to do it If you can post how it unclips, that might be very valuable to someone trying this. I was thinking that for me, jerking it around in taking the intake off would (or might) have been harder on it than CAREFULLY and slowly removing it and setting it aside.....thanks for the additional advice, i appreciate it!!!
11-08-2009, 04:36 PM
#7
Safety Car
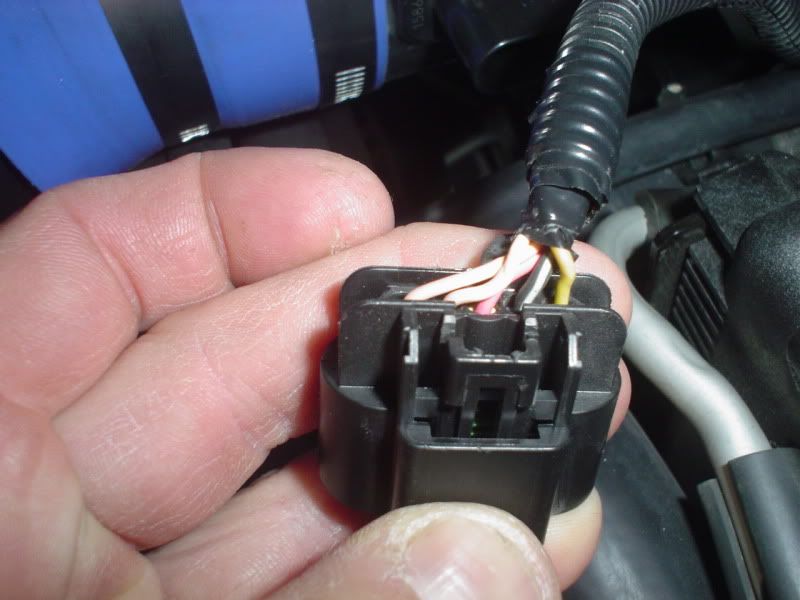
there is a grey safety piece that comes all the way off the connector. then just push down on the black connector to release it. All that is "underneath" the connector as you are looking at it on the car so kinda hard to do unless you do it last while removing.
If it were me i wouldnt mess with it and just take the entire air filter housing off but leave the maf hooked up, set the housing on top of the engine leaving it hooked up. Alot of things can be dicked around while doing it "except" the MAF sensor. Its very touchy reading temp and airflow so just be carefull with it. I have an extra air filter housing so if anyone breaks something feel free to PM me. Good luck, paul
If it were me i wouldnt mess with it and just take the entire air filter housing off but leave the maf hooked up, set the housing on top of the engine leaving it hooked up. Alot of things can be dicked around while doing it "except" the MAF sensor. Its very touchy reading temp and airflow so just be carefull with it. I have an extra air filter housing so if anyone breaks something feel free to PM me. Good luck, paul
 11-08-2009, 04:43 PM
#9
Le Mans Master
Thread Starter
Member Since: Apr 2006
Location: The Beautiful Inland Empire WA.
Posts: 5,933
Likes: 0
Received 11 Likes
on
7 Posts
there is a grey safety piece that comes all the way off the connector. then just push down on the black connector to release it. All that is "underneath" the connector as you are looking at it on the car so kinda hard to do unless you do it last while removing.
If it were me i wouldnt mess with it and just take the entire air filter housing off but leave the maf hooked up, set the housing on top of the engine leaving it hooked up. Alot of things can be dicked around while doing it "except" the MAF sensor. Its very touchy reading temp and airflow so just be carefull with it. I have an extra air filter housing so if anyone breaks something feel free to PM me. Good luck, paul
If it were me i wouldnt mess with it and just take the entire air filter housing off but leave the maf hooked up, set the housing on top of the engine leaving it hooked up. Alot of things can be dicked around while doing it "except" the MAF sensor. Its very touchy reading temp and airflow so just be carefull with it. I have an extra air filter housing so if anyone breaks something feel free to PM me. Good luck, paul
The following users liked this post:
Hans D (03-30-2016)
11-08-2009, 06:33 PM
#11
Le Mans Master

Actually, there is no need to disconnect the MAF sensor or even remove it from the air cleaner. The wire that attaches to it has a clip that holds that wire to a small metal brace. Just pull up on that clip. This will give you the slack you'll need to proceed. Next, loosen the front hose clamp and lightly pop the air cleaner assembly off the rubber grommets and just swing the system around so you have access to the torx screws holding the filter in.
Last edited by AirBusPilot; 11-08-2009 at 08:53 PM.
11-08-2009, 08:49 PM
#12
Pro


Member Since: Sep 2006
Location: Orange County, Southern California
Posts: 644
Received 105 Likes
on
73 Posts

Thank you! I've been wanting to do this.... now I have the impetus and the means to do it correctly. Thank you for taking the time and effort to post such helpful instructions!
11-08-2009, 11:38 PM
#13
Le Mans Master
Thread Starter
Member Since: Apr 2006
Location: The Beautiful Inland Empire WA.
Posts: 5,933
Likes: 0
Received 11 Likes
on
7 Posts
Actually, there is no need to disconnect the MAF sensor or even remove it from the air cleaner. The wire that attaches to it has a clip that holds that wire to a small metal brace. Just pull up on that clip. This will give you the slack you'll need to proceed. Next, loosen the front hose clamp and lightly pop the air cleaner assembly off the rubber grommets and just swing the system around so you have access to the torx screws holding the filter in.
The following users liked this post:
wwlandry (11-11-2015)
11-09-2009, 09:44 AM
#14
Le Mans Master
All great info, but my question is did anyone who has installed the TKO filter see any improvement or have any issues. I understand the '08 MAF sensor is very sensitive.
11-09-2009, 11:23 AM
#15
Le Mans Master
I am sure it can be done that way as well, but I really preferred to have mine out of the car to work on it with those perimeter screws......but thanks for another viewpoint on this easy install!! I would not want to be bending over the fender for all that time.............but your choice if that is comfortable for you.......
Originally Posted by sxeC6
All great info, but my question is did anyone who has installed the TKO filter see any improvement or have any issues. I understand the '08 MAF sensor is very sensitive.


 11-09-2009, 07:22 PM
#19
Race Director


Member Since: Sep 2004
Location: BOOMER SOONER Big 12 Champions 2000, 2002, 2004, 2006 - 2008, 2010, 2012, 2015 - 2020.....
Posts: 14,857
Received 914 Likes
on
527 Posts
thank you guys for this thread. Im considering getting one of these filters and would like very much to know what you all think. Christmas is right around the corner 
11-10-2009, 12:40 AM
#20
Le Mans Master
Thread Starter
Member Since: Apr 2006
Location: The Beautiful Inland Empire WA.
Posts: 5,933
Likes: 0
Received 11 Likes
on
7 Posts
I've had many K and N filters in past cars, and the quality of this filter beats everything that I've ever seen or felt. The price is right and the quality is beyond what you'd think it would buy. VERY well made and fits so tight you just know it is NOT going to leak.....and its the last filter you'll ever need as it is cleanable --- just pop it back in again and you are good to go!