
C6 trailer hitch w/pics & construction details
 08-13-2011, 10:01 PM
#1
Race Director

Thread Starter
Member Since: Sep 2007
Location: Peoria/Phoenix AZ
Posts: 16,555
Received 2,061 Likes
on
1,505 Posts
C6 of Year Finalist (performance mods) 2019

After posting pics on a couple other threads, several members PM'd asking for more details. Rather than answer individually, I chose to post for all to see.
Since my background is engineering and manufacturing, when the need for special non-commercially available items arise, I make my own.
I sold my metal fabrication business a couple years ago, but retained the right of access for personal projects. For those who will need to have someone else do the labor, expect to pay for about 2 hours for the fabrication part and another hour for initial installation not including the wiring. Of course, any portion of it you can do yourself will save paying someone else.
Once it's installed the first time, it can be easily removed and/or reinstalled in 5 minutes without even raising the car.
Material costs were somewhere around $20 including the ball.
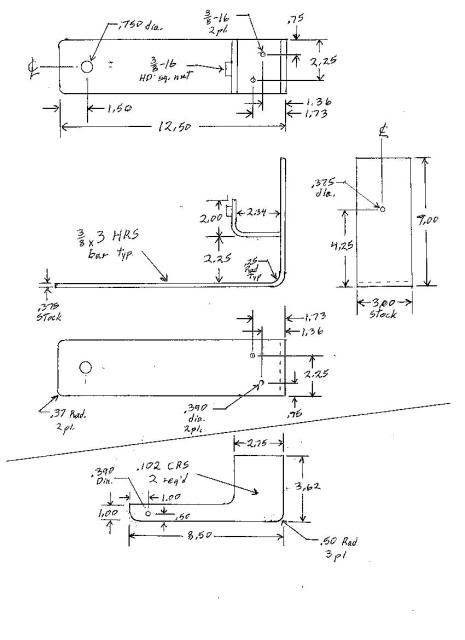
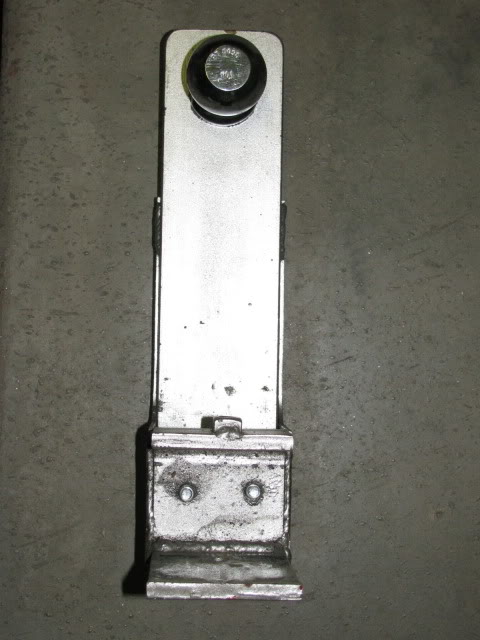
The procedure is as important as the construction. Dimensional tolerance is only important in the one area that fits around the rear frame member.
Measure the frame carefully on your car because it's a welded assembly there is no assurance they will be identical. Mine measured 2.336 where my drawing shows 2.34. Form the 2" dimension on that piece and let the other side run long, so it can be cut off after forming to match your car's frame. I cut mine to about 2.5 and then milled it to the 2.34 to assure the dimension was accurate and parallel. Pay particular attention that this is an inside dimension that should be only a few thousands larger than your frame. Use an equally thick spacer when welding to assure the surfaces remain parallel, so the welding doesn't force you to do subsequent bending. (don't ask how I know)
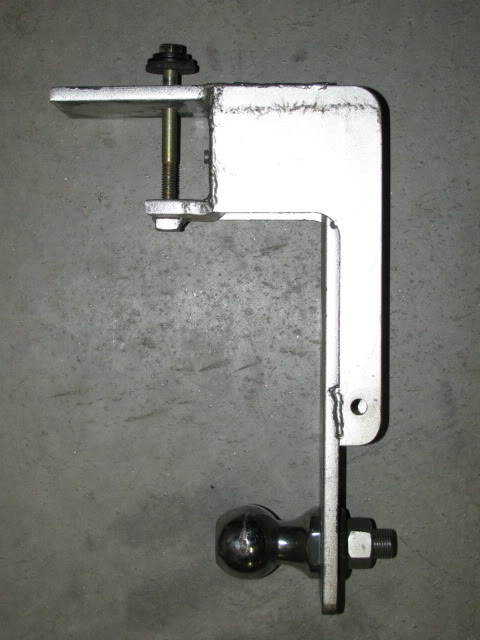
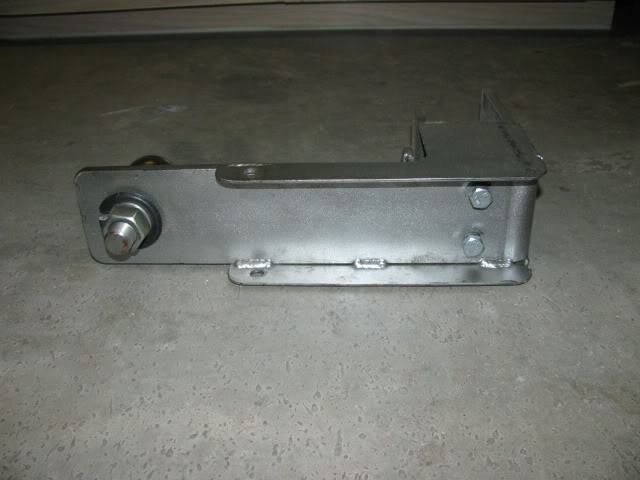
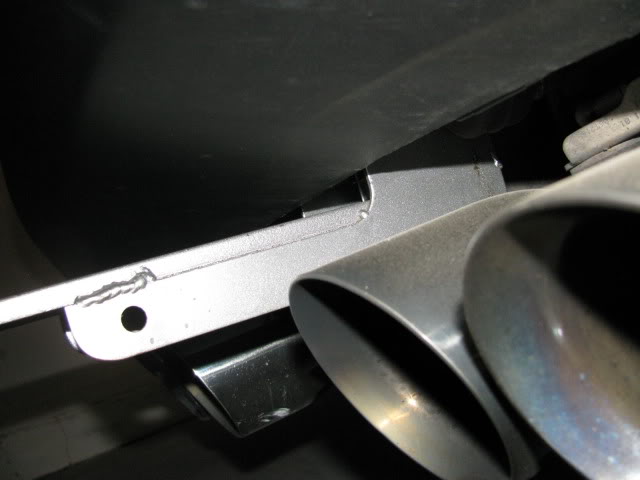
I put in all the holes after forming so I could control the dimensions a little better, just because I'm a little **** that way. Be sure to drill and tap the 3/8-16 holes before welding. At this point, tackweld everything including the two side plates (the .390 holes in the plates are for the safety chain hook, but your size may be different than mine), then weld it as desired. You may see where I welded on the pics.
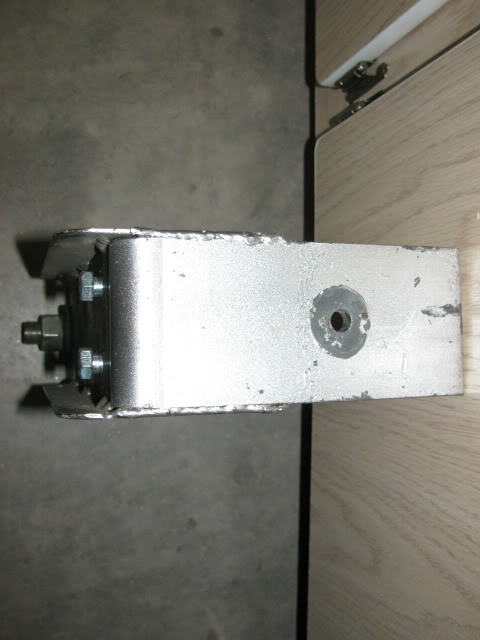
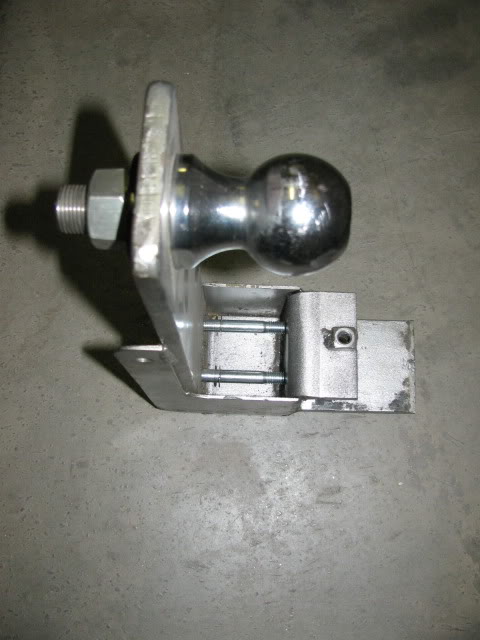
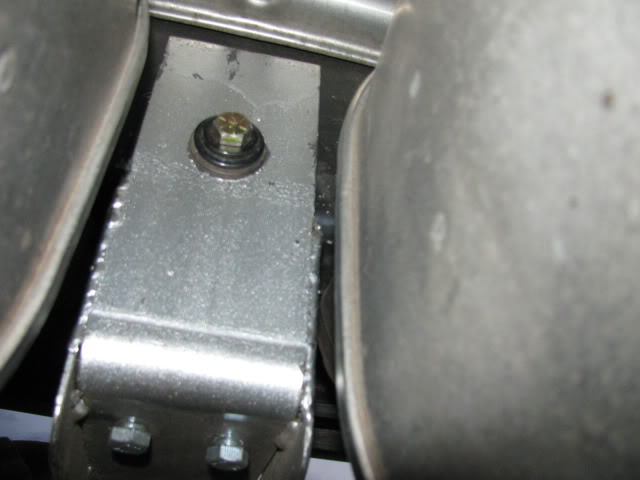
As you may note on the drawing, the .375 hole is only through the 7" surface initially. After welding, slip the hitch over the center of the frame as far up as possible and clamp it in place. Then drill through both thicknesses of the frame and the second part of the hitch, using the .375 hole as the pilot. I removed both mufflers to do that part, which accounts for most of the installation time. Now open up the last hole you just drilled in the hitch to .406. Put a 3/8-16x3.5 grade 8 bolt in from the 7" side and a 3/8-16 HD Square nut as shown. Center the bolt in the .406 hole, tighten slightly to avoid movement, then weld the nut in place.
Take two 3/8-16x3 grade 3 bolts and cut a C-clip groove about 1" from the head. I forgot to do this on the lathe earlier, but was able to accomplish it by chucking the bolt in my home drillpress and using a hacksaw blade against the bolt. After painting the hitch your favorite color, thread the two bolts just slightly into the tapped holes and install the C-clips. Taper the end of the grade 8 bolt and use a HD (thick) flat washer when installing the hitch. Once you tighten the main bolt, then equally tighten the bottom bolts until they are snug against the car frame. The two bottom bolts provide tension and will keep the hitch from moving (rotating) on the main bolt. When you remove the hitch from the car, loosen the bottom bolts first to relieve the tension before loosening/removing the main bolt.
I can't make any guarantees how well this will work for you, as I have no control of the materials or workmanship. I'm merely informing you of the methods, materials, dimensions, and procedure of the one I built for my own use.
The final item to consider is the wiring. Remove the right inboard taillight. Slip the wiring pigtail through the opening next to the license plate lamp and reach through the taillight opening to pull it through. Splice into the taillight wiring and secure with tie wraps, while allowing the connector to hang down to the hitch. When you don't have a trailer hooked up, merely push the wiring up and slip the connector behind the license plate, so it doesn't flop around.
It's a nice project that you can do yourself, with assistance, or farm out completely depending on your level of expertise and available equipment.
If you have any questions, please post them here so everyone can learn the answers. If I don't respond in a couple of days, send me a PM to get me off my a$$.
Enjoy!
Since my background is engineering and manufacturing, when the need for special non-commercially available items arise, I make my own.
I sold my metal fabrication business a couple years ago, but retained the right of access for personal projects. For those who will need to have someone else do the labor, expect to pay for about 2 hours for the fabrication part and another hour for initial installation not including the wiring. Of course, any portion of it you can do yourself will save paying someone else.
Once it's installed the first time, it can be easily removed and/or reinstalled in 5 minutes without even raising the car.
Material costs were somewhere around $20 including the ball.
The procedure is as important as the construction. Dimensional tolerance is only important in the one area that fits around the rear frame member.
Measure the frame carefully on your car because it's a welded assembly there is no assurance they will be identical. Mine measured 2.336 where my drawing shows 2.34. Form the 2" dimension on that piece and let the other side run long, so it can be cut off after forming to match your car's frame. I cut mine to about 2.5 and then milled it to the 2.34 to assure the dimension was accurate and parallel. Pay particular attention that this is an inside dimension that should be only a few thousands larger than your frame. Use an equally thick spacer when welding to assure the surfaces remain parallel, so the welding doesn't force you to do subsequent bending. (don't ask how I know)
I put in all the holes after forming so I could control the dimensions a little better, just because I'm a little **** that way. Be sure to drill and tap the 3/8-16 holes before welding. At this point, tackweld everything including the two side plates (the .390 holes in the plates are for the safety chain hook, but your size may be different than mine), then weld it as desired. You may see where I welded on the pics.
As you may note on the drawing, the .375 hole is only through the 7" surface initially. After welding, slip the hitch over the center of the frame as far up as possible and clamp it in place. Then drill through both thicknesses of the frame and the second part of the hitch, using the .375 hole as the pilot. I removed both mufflers to do that part, which accounts for most of the installation time. Now open up the last hole you just drilled in the hitch to .406. Put a 3/8-16x3.5 grade 8 bolt in from the 7" side and a 3/8-16 HD Square nut as shown. Center the bolt in the .406 hole, tighten slightly to avoid movement, then weld the nut in place.
Take two 3/8-16x3 grade 3 bolts and cut a C-clip groove about 1" from the head. I forgot to do this on the lathe earlier, but was able to accomplish it by chucking the bolt in my home drillpress and using a hacksaw blade against the bolt. After painting the hitch your favorite color, thread the two bolts just slightly into the tapped holes and install the C-clips. Taper the end of the grade 8 bolt and use a HD (thick) flat washer when installing the hitch. Once you tighten the main bolt, then equally tighten the bottom bolts until they are snug against the car frame. The two bottom bolts provide tension and will keep the hitch from moving (rotating) on the main bolt. When you remove the hitch from the car, loosen the bottom bolts first to relieve the tension before loosening/removing the main bolt.
I can't make any guarantees how well this will work for you, as I have no control of the materials or workmanship. I'm merely informing you of the methods, materials, dimensions, and procedure of the one I built for my own use.
The final item to consider is the wiring. Remove the right inboard taillight. Slip the wiring pigtail through the opening next to the license plate lamp and reach through the taillight opening to pull it through. Splice into the taillight wiring and secure with tie wraps, while allowing the connector to hang down to the hitch. When you don't have a trailer hooked up, merely push the wiring up and slip the connector behind the license plate, so it doesn't flop around.
It's a nice project that you can do yourself, with assistance, or farm out completely depending on your level of expertise and available equipment.
If you have any questions, please post them here so everyone can learn the answers. If I don't respond in a couple of days, send me a PM to get me off my a$$.
Enjoy!

The following users liked this post:
shipahoy (10-20-2020)
 08-14-2011, 10:35 AM
#5
Tech Contributor

Tom that is an awesome solution.
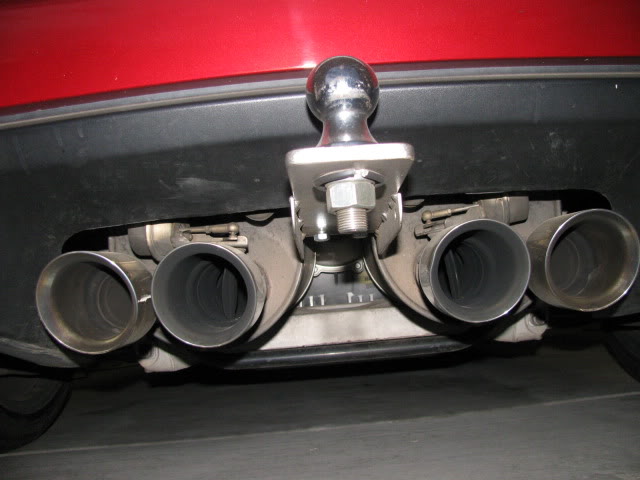
I've got the standard De'Laan hitch you can buy from many vendors. IT IS NOT COMPATIBLE WITH THE NPP or Z06 EXHAUST. The cross bars go right where the vacuum cans are.
Your solution retains the wonderful NPP/Z06 exhaust. Hat's off!
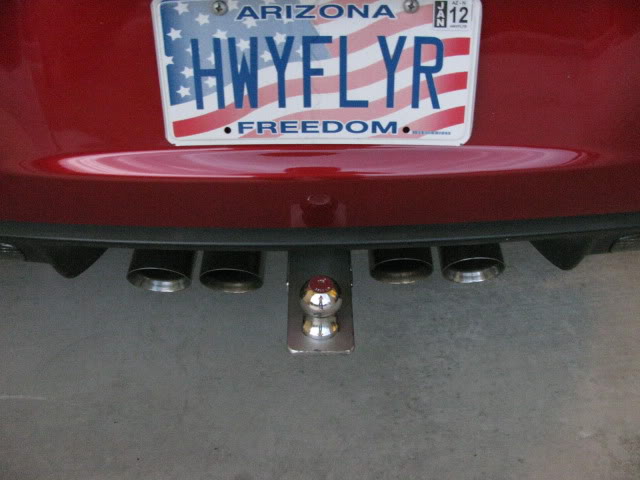
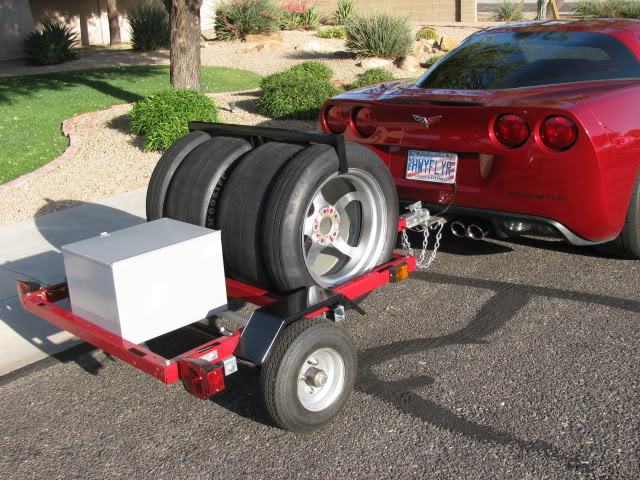
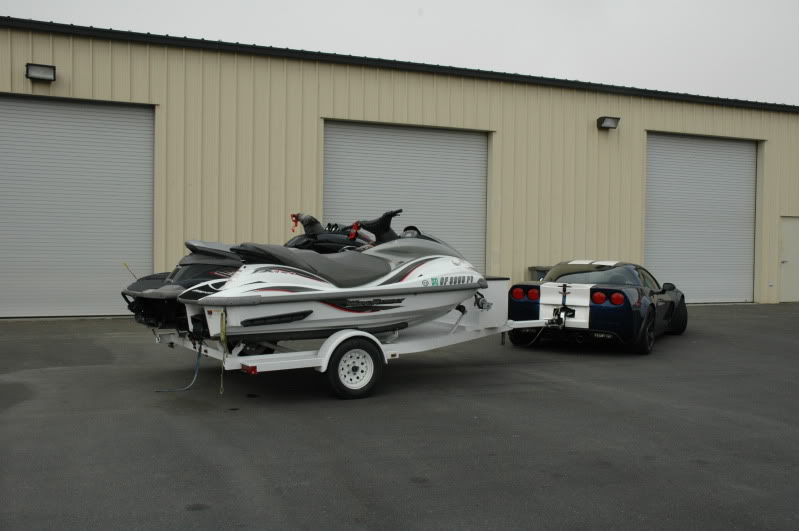
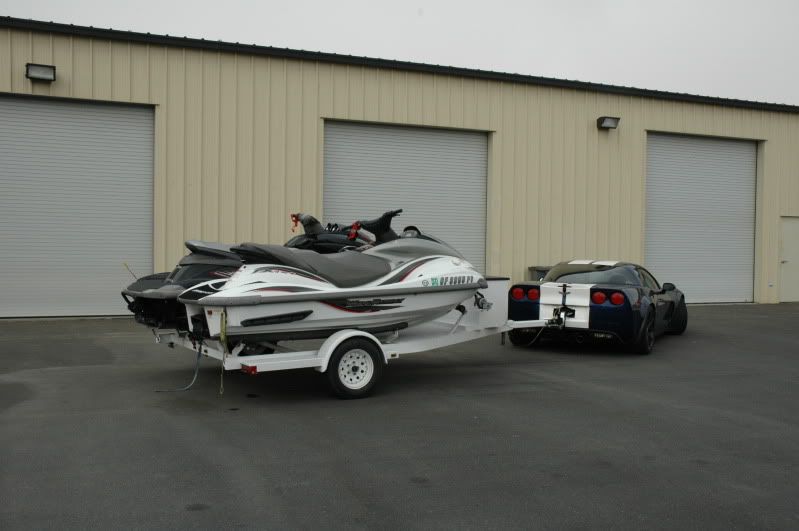
Oh, and I love to post this picture. For some reason, people get their panties in a wad about a Corvette pulling a trailer. Of course the only thing they need to tote is Zaino and a polishing rag. I personally think hitches should come standard so we can tow our racing tires to the track!
I've got the standard De'Laan hitch you can buy from many vendors. IT IS NOT COMPATIBLE WITH THE NPP or Z06 EXHAUST. The cross bars go right where the vacuum cans are.
Your solution retains the wonderful NPP/Z06 exhaust. Hat's off!
Oh, and I love to post this picture. For some reason, people get their panties in a wad about a Corvette pulling a trailer. Of course the only thing they need to tote is Zaino and a polishing rag. I personally think hitches should come standard so we can tow our racing tires to the track!
08-14-2011, 10:48 AM
#6
CF Senior Member


Member Since: Feb 2006
Location: Tucson Arizona
Posts: 23,313
Likes: 0
Received 19 Likes
on
18 Posts
Nice work and thanks for sharing the instructions. 
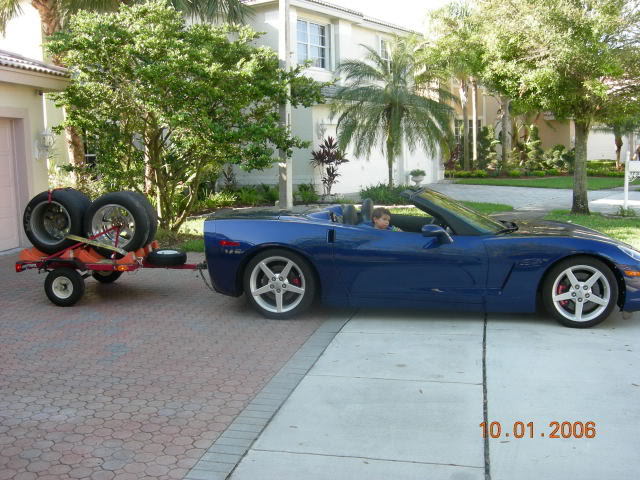
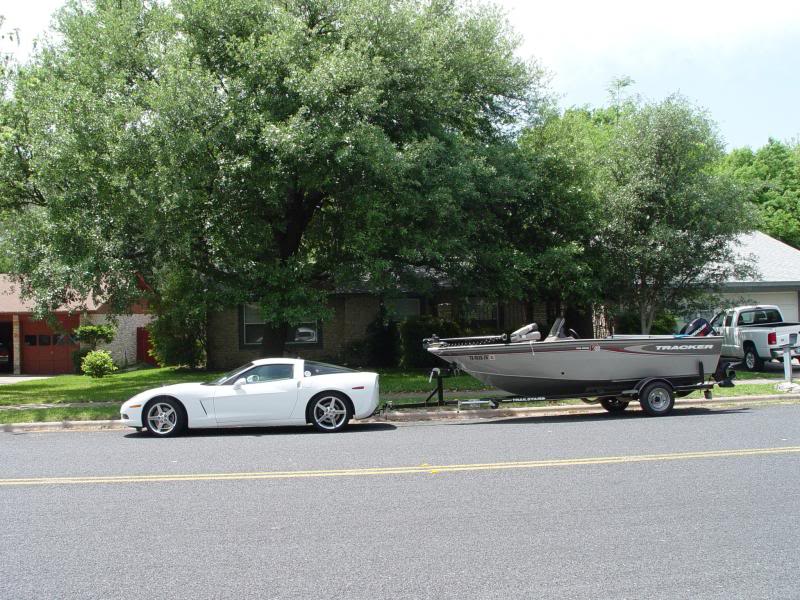
My friend used to tow a small trailer (with his track tires and tools) before he bought a huge, enclosed auto trailer. He never had any problems towing a light load with his C6. I wouldn't tow with my C6 but it can be done. Thanks again, your efforts are appreciated.
My friend used to tow a small trailer (with his track tires and tools) before he bought a huge, enclosed auto trailer. He never had any problems towing a light load with his C6. I wouldn't tow with my C6 but it can be done. Thanks again, your efforts are appreciated.
08-14-2011, 12:09 PM
#7
Instructor

Looks a little light duty for my taste but i suppose it would be fine for a 500 lb trailer as shown. Is there any way to get another bolt through the frame higher up? I would also recommend using some type of hardened plate between the "tension" bolts and the frame. Over time the bolts will push into the soft steel of the frame. Just my $.02 from another engineer.
08-14-2011, 06:55 PM
#8
Race Director
Thread Starter
Member Since: Sep 2007
Location: Peoria/Phoenix AZ
Posts: 16,555
Received 2,061 Likes
on
1,505 Posts
C6 of Year Finalist (performance mods) 2019
I'd easily be comfortable towing the 900# trailer capacity, however currently the gross weight is about 300# and tongue weight is ~25-35# depending on the tools I put in the box.
08-14-2011, 07:17 PM
#9
Team Owner

Outstanding! Great solution for getting tires and tools to the track. I have several friends that tow a similar setup. Well done on the design and fab of the hitch.
Paul
Paul
08-14-2011, 08:04 PM
#10
Race Director
Thread Starter
Member Since: Sep 2007
Location: Peoria/Phoenix AZ
Posts: 16,555
Received 2,061 Likes
on
1,505 Posts
C6 of Year Finalist (performance mods) 2019
Looks a little light duty for my taste but i suppose it would be fine for a 500 lb trailer as shown. Is there any way to get another bolt through the frame higher up? I would also recommend using some type of hardened plate between the "tension" bolts and the frame. Over time the bolts will push into the soft steel of the frame. Just my $.02 from another engineer.
There's not much room to get two bolts through the frame crossmember below the bumper. The one bolt is already at the high limit to create as much tension over the frictional surfaces as possible. Two bolts side by side could add to that, but created less working room for wrenches. I wanted simplicity.
BTW, the crossmember is constructed of two formed channels made of different tensile strength steel sheets and welded together to form a box. If you look closely between the frame and muffler (installed pic) on the right side you can see the weld. Neither of these channels are the same softer mild steel used on the rest of the frame, to pass the crash test requirements I suspect. In order to use an additional hardened plate, it would have been necessary to grind away the weld and lower the hitch farther to get the plate in that space. From the scratch test I did for hardness, the frame is harder than the grade 3 bolts.
While I recognize this is not perfect, it is certainly a workable solution for Vettes with NPP/Z06 mufflers who wish to tow their tires to the track with the same car they intend to race.
05-23-2012, 12:52 AM
#11
Advanced

Member Since: Oct 2004
Location: Lincoln California
Posts: 82
Likes: 0
Received 0 Likes
on
0 Posts

In the 1970's, a "retired" Porsche owner designed a fast speed small trailer with motorcycle wheels/tires and sway bars to carry the much needed space for his woman to ensure her acceptance of long trips. This was in Orland Ca. and soon to be marketed as Bushtec trailers. BMW motorcycles quickly gravitated to this new age fast/stable trailer with 300#+capacity and steady as a rock at 130mph. As all good things, he sold to a larger firm who put smaller trailer wheels on it but it remains the pinnical of fast, stable small trailers for sport cars and motorcycles of today--perfect for my 10' GS to carry 4+ suit cases, etc. This is the perfect hitch for it and Bushtec makes designs/color matching that of the the discerning Vette owner. Try www.bushtec.com I put a bike rack on the top of mine and rode 3000+ miles in Canada without issue.

 06-21-2012, 11:25 PM
#15
Race Director
Thread Starter
Member Since: Sep 2007
Location: Peoria/Phoenix AZ
Posts: 16,555
Received 2,061 Likes
on
1,505 Posts
C6 of Year Finalist (performance mods) 2019


 09-08-2012, 02:11 PM
#19


Nicely done and documented. Nice to see someone can actually draw multiple views and dimension properly.
For your purpose (~300#) it looks fabulous. I'd think 900# would be pushing it as there needs to be some safety factor for when something goes wrong (say loosing a tire/bearing, etc.). Maybe 500#?
For your purpose (~300#) it looks fabulous. I'd think 900# would be pushing it as there needs to be some safety factor for when something goes wrong (say loosing a tire/bearing, etc.). Maybe 500#?
09-08-2012, 02:16 PM
#20
Instructor

I meant to ask, what is the wall thickness of the box? I thought you might know from drilling through it. Trying to determine the increased stress on the box due to this hole.