
Full Width GM C6 Racing Spoiler Install
 10-01-2011, 02:29 PM
#1
Burning Brakes

Thread Starter

I finally bit the bullet and installed the GM spoiler on my 08. It is a straight forward mod that takes about 2hrs to complete. Follow the directions from here http://www.southerncarparts.com/info...hp?pages_id=37 (Thank you JLB768 for the link). 
The only thing I noticed was that you will need a 3/8 wrench to tighten the outer nuts onto the studs.I did not use any double sided tape during the install but may go back at a latter date and add some if needed.


The only thing I noticed was that you will need a 3/8 wrench to tighten the outer nuts onto the studs.I did not use any double sided tape during the install but may go back at a latter date and add some if needed.

 [/IMG]
 [/IMG]
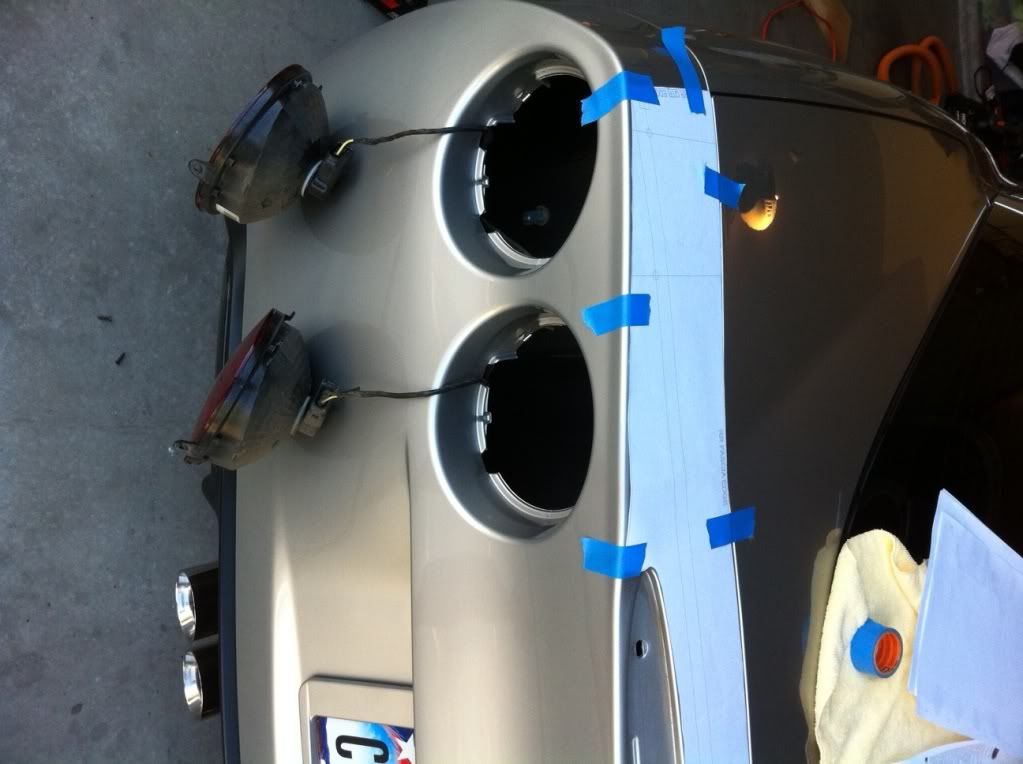 [/IMG]
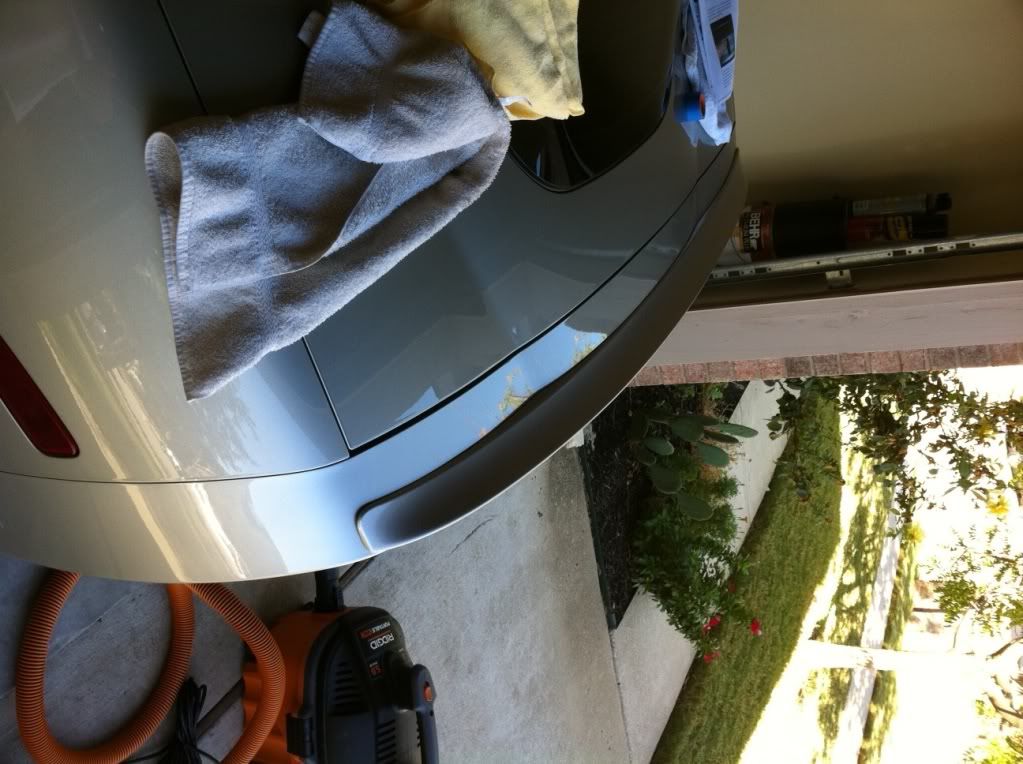 [/IMG]
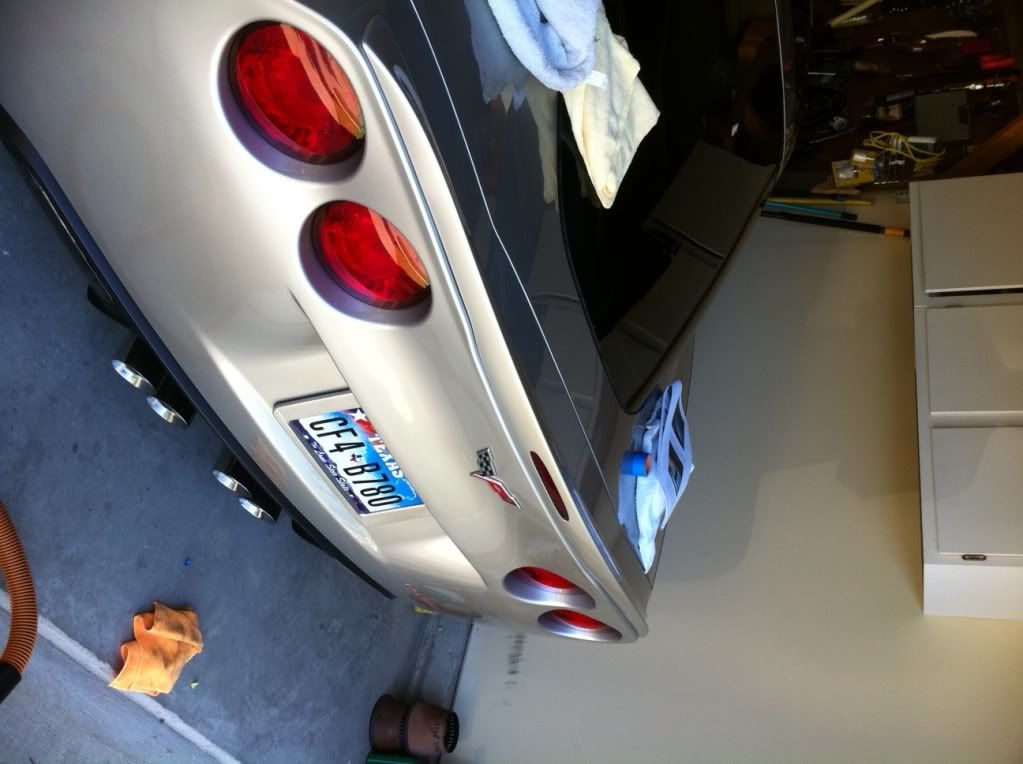 [/IMG]

 10-02-2011, 06:44 PM
#7
Pro


I just did mine today. I had looked through all the various install tips scattered around the forum, and summed them up in a set of instructions. After doing the install, added a couple more notes. Thought I'd share. And all the other folks on here who share what they learn, you are the best!
1. The spoiler comes in a sock in a box. I decided to wash and Zaino it BEFORE installing, as it was easier to get to all the various nooks and crannies with it off the car. Once prepped, the color (Atomic Orange) really matched well. Nothing like factory paint!
2. Use Torx T15 screwdriver to remove taillights. Leave them hanging, they are not in the way (either wrap in towels, or hang towels out the holes, so they don�t scratch the paint when bumped; or just unplug them). And it can be REALLY dusty in those taillight holes, you might want to wipe them out with a damp towel before starting, to keep from getting everything else dirty.
3. Access existing spoiler mounting studs through taillight opening. Use a 10MM deep socket to remove 4 nuts from studs.
4. Gently work the spoiler off. I found I had to tap one of the studs up and loose, the holes they sit in can be pretty snug. Flip the spoiler over, and remove four mounting studs and CHMSL from existing spoiler. Vise grip at base of stud can be used to remove stud. You can also use an electric drill to remove them. Just tighten the drill on the Torx portion at the tip of the stud to remove. Very easy, and installed two of the old studs on the new spoiler the same way.
5. There is a problem at this point that isn�t in the instructions. The center-most two studs that hold in the CHMSL install in a more recessed manner then on the stock or Z06 spoiler and can�t be used as is. You need to use the two short black screws supplied with the spoiler to hold the CHMSL. Not listed in the instructions. Then add the two remaining studs from the old spoiler to the new one. That means the new spoiler will be held down by SIX total studs (two old ones, four new ones), not eight.
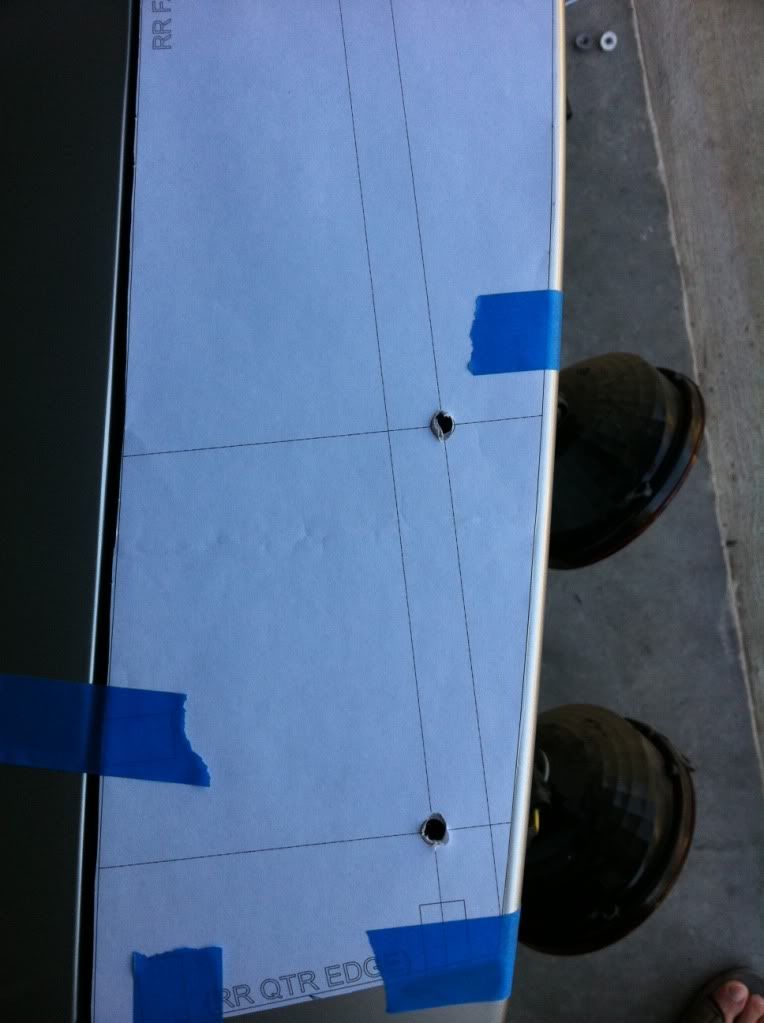
6. Cut out the supplied template and tape to the body as per the instructions. Use blue painters tape to tape down your template. Won't leave any sticky residue on your paint.
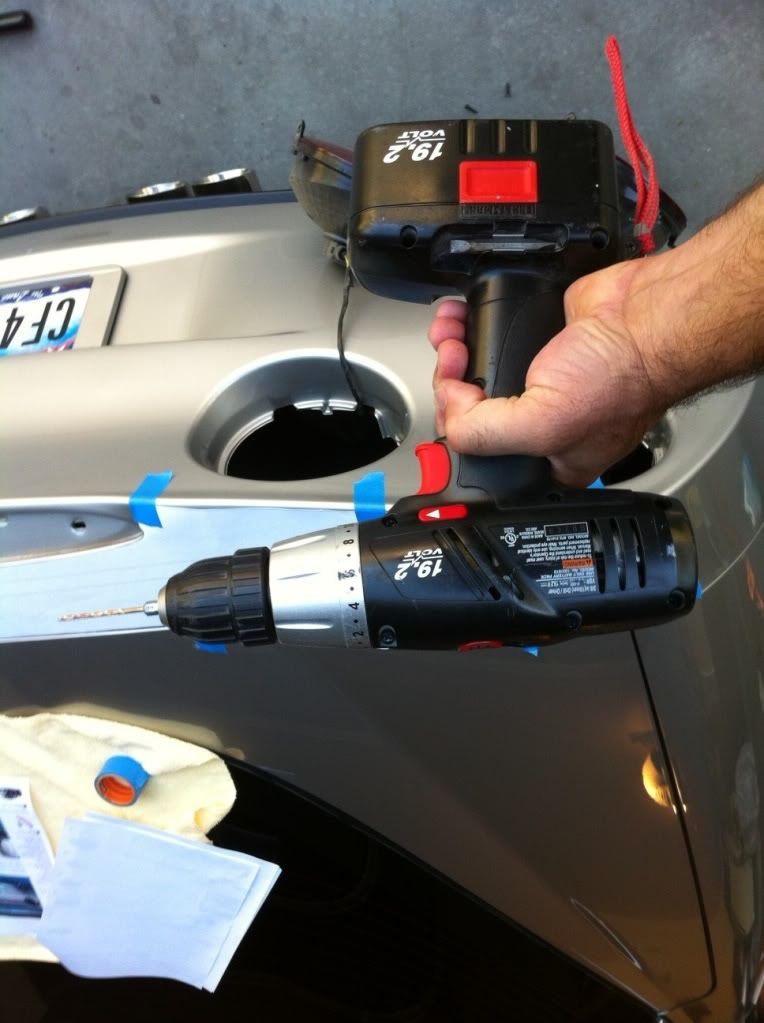
7. Template is dead spot on (if centered and taped correctly). You will have to drill 4 holes. Use a Phillips head screwdriver to gently center punch the four holes that must be drilled Fear not just drill a pilot hole where indicated then go with the 1/4 drill. You can use slow speed and NO pressure as your fiberglass is very easy to drill through.
8. I ended up not using the template (as SOMEONE had thrown it out with the box and the instructions a couple weeks earlier). So instead, I set the spoiler one (with a second person holding the other end), got it where we wanted it, and marked the location with tape. Eyeballed it several times at both ends, as well as measuring several times. I then used some modeling clay set in the stud locations (with the studs NOT in the spoiler), and very carefully got it just right, then pressed it down. The clay made nice little wet circles on the paint. I then measured everything several times to make sure it was centered correctly, then drilled the holes and installed. Certainly more nerve-wracking, but it came out great.
9. The center opening on the body for the CHMSL connector MUST be enlarged. CAUTION! Instructions say to cut in the existing center electrical cord access channel (for center rear light). What they really meant to say was to cut the bottom lip out of the existing channel. Do NOT, repeat DO NOT make a cut anywhere forward of the existing spoiler depression and save yourself a $300 repair bill. There is a short lip that is hanging from the vertical wall on the front side of the depression. You need only cut maybe an 1/8" off of it to have "nothing" but the vertical wall coming down from the deck into the depression. That�s it. A very small rectangle of the lower lip is removed. One person used a box cutter (utility knife) with a fresh razor blade and carved it out in less than a minute. I used a Dremel and it also took just a minute or two.
10. The kit comes with 4 studs that clip onto the bottom of the new spoiler at the head. Press them into their spoiler connections with a pair of pliers. Once everything is together, you�ll have a total of six studs on the new spoiler.
11. Hook the electrical connection to the spoiler as you insert the spoiler. Test fit it once and make sure it all looks good after it is tightened down. Also a damn good time to make sure the brake light is working. If all is good, take it back off so you can pull the mask off the VHB tape, and then final install the spoiler on the car.
12. The install is the reverse of the removal. The four innermost studs are relatively easy to get to. Note that the new nuts are different sized from the old nuts, at least in what came with my spoiler, so you might want to check size before starting them. I also found it was easier to pull all the taillights, so that I could get two hands in there, as the outermost studs sits directly over the taillight housing, very snug area. Might be helpful to use a swivel head 1/4" drive ratchet with 10MM socket to tighten those two new outermost nuts. I ended up with a short 10mm box wrench and two hands, that worked easily enough.
13. Be very careful not to drop the anchor nuts when taking off or putting on (add 15 minutes per retrieval).
14. Be very careful not to slide out and drop a tail light screw retaining clip when taking off or putting on the anchor nuts (add 15 minutes per retrieval).
15. Measure twice, drill once! Doing it without a template, and adding the wash and Zaino time, I ended up taking maybe two very patient and slow hours. Half-hour to an hour sounds a lot more reasonable. Definitely easier with two folks, as the spoiler does not just sit loose on the tail cleanly, it has a little soft non-useful curving to it, you have to push it down to see where it will sit once bolted down.
Hope the photo attaches.
 [/IMG]
1. The spoiler comes in a sock in a box. I decided to wash and Zaino it BEFORE installing, as it was easier to get to all the various nooks and crannies with it off the car. Once prepped, the color (Atomic Orange) really matched well. Nothing like factory paint!
2. Use Torx T15 screwdriver to remove taillights. Leave them hanging, they are not in the way (either wrap in towels, or hang towels out the holes, so they don�t scratch the paint when bumped; or just unplug them). And it can be REALLY dusty in those taillight holes, you might want to wipe them out with a damp towel before starting, to keep from getting everything else dirty.
3. Access existing spoiler mounting studs through taillight opening. Use a 10MM deep socket to remove 4 nuts from studs.
4. Gently work the spoiler off. I found I had to tap one of the studs up and loose, the holes they sit in can be pretty snug. Flip the spoiler over, and remove four mounting studs and CHMSL from existing spoiler. Vise grip at base of stud can be used to remove stud. You can also use an electric drill to remove them. Just tighten the drill on the Torx portion at the tip of the stud to remove. Very easy, and installed two of the old studs on the new spoiler the same way.
5. There is a problem at this point that isn�t in the instructions. The center-most two studs that hold in the CHMSL install in a more recessed manner then on the stock or Z06 spoiler and can�t be used as is. You need to use the two short black screws supplied with the spoiler to hold the CHMSL. Not listed in the instructions. Then add the two remaining studs from the old spoiler to the new one. That means the new spoiler will be held down by SIX total studs (two old ones, four new ones), not eight.
6. Cut out the supplied template and tape to the body as per the instructions. Use blue painters tape to tape down your template. Won't leave any sticky residue on your paint.
7. Template is dead spot on (if centered and taped correctly). You will have to drill 4 holes. Use a Phillips head screwdriver to gently center punch the four holes that must be drilled Fear not just drill a pilot hole where indicated then go with the 1/4 drill. You can use slow speed and NO pressure as your fiberglass is very easy to drill through.
8. I ended up not using the template (as SOMEONE
had thrown it out with the box and the instructions a couple weeks earlier). So instead, I set the spoiler one (with a second person holding the other end), got it where we wanted it, and marked the location with tape. Eyeballed it several times at both ends, as well as measuring several times. I then used some modeling clay set in the stud locations (with the studs NOT in the spoiler), and very carefully got it just right, then pressed it down. The clay made nice little wet circles on the paint. I then measured everything several times to make sure it was centered correctly, then drilled the holes and installed. Certainly more nerve-wracking, but it came out great.9. The center opening on the body for the CHMSL connector MUST be enlarged. CAUTION! Instructions say to cut in the existing center electrical cord access channel (for center rear light). What they really meant to say was to cut the bottom lip out of the existing channel. Do NOT, repeat DO NOT make a cut anywhere forward of the existing spoiler depression and save yourself a $300 repair bill. There is a short lip that is hanging from the vertical wall on the front side of the depression. You need only cut maybe an 1/8" off of it to have "nothing" but the vertical wall coming down from the deck into the depression. That�s it. A very small rectangle of the lower lip is removed. One person used a box cutter (utility knife) with a fresh razor blade and carved it out in less than a minute. I used a Dremel and it also took just a minute or two.
10. The kit comes with 4 studs that clip onto the bottom of the new spoiler at the head. Press them into their spoiler connections with a pair of pliers. Once everything is together, you�ll have a total of six studs on the new spoiler.
11. Hook the electrical connection to the spoiler as you insert the spoiler. Test fit it once and make sure it all looks good after it is tightened down. Also a damn good time to make sure the brake light is working. If all is good, take it back off so you can pull the mask off the VHB tape, and then final install the spoiler on the car.
12. The install is the reverse of the removal. The four innermost studs are relatively easy to get to. Note that the new nuts are different sized from the old nuts, at least in what came with my spoiler, so you might want to check size before starting them. I also found it was easier to pull all the taillights, so that I could get two hands in there, as the outermost studs sits directly over the taillight housing, very snug area. Might be helpful to use a swivel head 1/4" drive ratchet with 10MM socket to tighten those two new outermost nuts. I ended up with a short 10mm box wrench and two hands, that worked easily enough.
13. Be very careful not to drop the anchor nuts when taking off or putting on (add 15 minutes per retrieval).
14. Be very careful not to slide out and drop a tail light screw retaining clip when taking off or putting on the anchor nuts (add 15 minutes per retrieval).
15. Measure twice, drill once! Doing it without a template, and adding the wash and Zaino time, I ended up taking maybe two very patient and slow hours. Half-hour to an hour sounds a lot more reasonable. Definitely easier with two folks, as the spoiler does not just sit loose on the tail cleanly, it has a little soft non-useful curving to it, you have to push it down to see where it will sit once bolted down.
Hope the photo attaches.
[/IMG]


 One of my first mods
10-02-2011, 06:48 PM
One of my first mods
10-02-2011, 06:48 PM
#9
Team Owner

Looks good.
10-02-2011, 08:03 PM
#10
Burning Brakes

How does the brake light fit on most of these, the one I have looks to be a little bowed and not fitting properly around the brake light hole with it installed.
10-02-2011, 09:01 PM
#11
Burning Brakes
Thread Starter
My brake light fit very well. It has a slight bow that is not noticeable to those not in the know. I may end up going back and putting in some thin double sided tape to tighten it up.
10-02-2011, 09:03 PM
#12
Burning Brakes
Thread Starter
Nice job! I can not imagine drilling without the template. You are much braver than I!
I just did mine today. I had looked through all the various install tips scattered around the forum, and summed them up in a set of instructions. After doing the install, added a couple more notes. Thought I'd share. And all the other folks on here who share what they learn, you are the best!
1. The spoiler comes in a sock in a box. I decided to wash and Zaino it BEFORE installing, as it was easier to get to all the various nooks and crannies with it off the car. Once prepped, the color (Atomic Orange) really matched well. Nothing like factory paint!
2. Use Torx T15 screwdriver to remove taillights. Leave them hanging, they are not in the way (either wrap in towels, or hang towels out the holes, so they don�t scratch the paint when bumped; or just unplug them). And it can be REALLY dusty in those taillight holes, you might want to wipe them out with a damp towel before starting, to keep from getting everything else dirty.
3. Access existing spoiler mounting studs through taillight opening. Use a 10MM deep socket to remove 4 nuts from studs.
4. Gently work the spoiler off. I found I had to tap one of the studs up and loose, the holes they sit in can be pretty snug. Flip the spoiler over, and remove four mounting studs and CHMSL from existing spoiler. Vise grip at base of stud can be used to remove stud. You can also use an electric drill to remove them. Just tighten the drill on the Torx portion at the tip of the stud to remove. Very easy, and installed two of the old studs on the new spoiler the same way.
5. There is a problem at this point that isn�t in the instructions. The center-most two studs that hold in the CHMSL install in a more recessed manner then on the stock or Z06 spoiler and can�t be used as is. You need to use the two short black screws supplied with the spoiler to hold the CHMSL. Not listed in the instructions. Then add the two remaining studs from the old spoiler to the new one. That means the new spoiler will be held down by SIX total studs (two old ones, four new ones), not eight.
6. Cut out the supplied template and tape to the body as per the instructions. Use blue painters tape to tape down your template. Won't leave any sticky residue on your paint.
7. Template is dead spot on (if centered and taped correctly). You will have to drill 4 holes. Use a Phillips head screwdriver to gently center punch the four holes that must be drilled Fear not just drill a pilot hole where indicated then go with the 1/4 drill. You can use slow speed and NO pressure as your fiberglass is very easy to drill through.
8. I ended up not using the template (as SOMEONEhad thrown it out with the box and the instructions a couple weeks earlier). So instead, I set the spoiler one (with a second person holding the other end), got it where we wanted it, and marked the location with tape. Eyeballed it several times at both ends, as well as measuring several times. I then used some modeling clay set in the stud locations (with the studs NOT in the spoiler), and very carefully got it just right, then pressed it down. The clay made nice little wet circles on the paint. I then measured everything several times to make sure it was centered correctly, then drilled the holes and installed. Certainly more nerve-wracking, but it came out great.
9. The center opening on the body for the CHMSL connector MUST be enlarged. CAUTION! Instructions say to cut in the existing center electrical cord access channel (for center rear light). What they really meant to say was to cut the bottom lip out of the existing channel. Do NOT, repeat DO NOT make a cut anywhere forward of the existing spoiler depression and save yourself a $300 repair bill. There is a short lip that is hanging from the vertical wall on the front side of the depression. You need only cut maybe an 1/8" off of it to have "nothing" but the vertical wall coming down from the deck into the depression. That�s it. A very small rectangle of the lower lip is removed. One person used a box cutter (utility knife) with a fresh razor blade and carved it out in less than a minute. I used a Dremel and it also took just a minute or two.
10. The kit comes with 4 studs that clip onto the bottom of the new spoiler at the head. Press them into their spoiler connections with a pair of pliers. Once everything is together, you�ll have a total of six studs on the new spoiler.
11. Hook the electrical connection to the spoiler as you insert the spoiler. Test fit it once and make sure it all looks good after it is tightened down. Also a damn good time to make sure the brake light is working. If all is good, take it back off so you can pull the mask off the VHB tape, and then final install the spoiler on the car.
12. The install is the reverse of the removal. The four innermost studs are relatively easy to get to. Note that the new nuts are different sized from the old nuts, at least in what came with my spoiler, so you might want to check size before starting them. I also found it was easier to pull all the taillights, so that I could get two hands in there, as the outermost studs sits directly over the taillight housing, very snug area. Might be helpful to use a swivel head 1/4" drive ratchet with 10MM socket to tighten those two new outermost nuts. I ended up with a short 10mm box wrench and two hands, that worked easily enough.
13. Be very careful not to drop the anchor nuts when taking off or putting on (add 15 minutes per retrieval).
14. Be very careful not to slide out and drop a tail light screw retaining clip when taking off or putting on the anchor nuts (add 15 minutes per retrieval).
15. Measure twice, drill once! Doing it without a template, and adding the wash and Zaino time, I ended up taking maybe two very patient and slow hours. Half-hour to an hour sounds a lot more reasonable. Definitely easier with two folks, as the spoiler does not just sit loose on the tail cleanly, it has a little soft non-useful curving to it, you have to push it down to see where it will sit once bolted down.
Hope the photo attaches.
[/IMG]
1. The spoiler comes in a sock in a box. I decided to wash and Zaino it BEFORE installing, as it was easier to get to all the various nooks and crannies with it off the car. Once prepped, the color (Atomic Orange) really matched well. Nothing like factory paint!
2. Use Torx T15 screwdriver to remove taillights. Leave them hanging, they are not in the way (either wrap in towels, or hang towels out the holes, so they don�t scratch the paint when bumped; or just unplug them). And it can be REALLY dusty in those taillight holes, you might want to wipe them out with a damp towel before starting, to keep from getting everything else dirty.
3. Access existing spoiler mounting studs through taillight opening. Use a 10MM deep socket to remove 4 nuts from studs.
4. Gently work the spoiler off. I found I had to tap one of the studs up and loose, the holes they sit in can be pretty snug. Flip the spoiler over, and remove four mounting studs and CHMSL from existing spoiler. Vise grip at base of stud can be used to remove stud. You can also use an electric drill to remove them. Just tighten the drill on the Torx portion at the tip of the stud to remove. Very easy, and installed two of the old studs on the new spoiler the same way.
5. There is a problem at this point that isn�t in the instructions. The center-most two studs that hold in the CHMSL install in a more recessed manner then on the stock or Z06 spoiler and can�t be used as is. You need to use the two short black screws supplied with the spoiler to hold the CHMSL. Not listed in the instructions. Then add the two remaining studs from the old spoiler to the new one. That means the new spoiler will be held down by SIX total studs (two old ones, four new ones), not eight.
6. Cut out the supplied template and tape to the body as per the instructions. Use blue painters tape to tape down your template. Won't leave any sticky residue on your paint.
7. Template is dead spot on (if centered and taped correctly). You will have to drill 4 holes. Use a Phillips head screwdriver to gently center punch the four holes that must be drilled Fear not just drill a pilot hole where indicated then go with the 1/4 drill. You can use slow speed and NO pressure as your fiberglass is very easy to drill through.
8. I ended up not using the template (as SOMEONE
had thrown it out with the box and the instructions a couple weeks earlier). So instead, I set the spoiler one (with a second person holding the other end), got it where we wanted it, and marked the location with tape. Eyeballed it several times at both ends, as well as measuring several times. I then used some modeling clay set in the stud locations (with the studs NOT in the spoiler), and very carefully got it just right, then pressed it down. The clay made nice little wet circles on the paint. I then measured everything several times to make sure it was centered correctly, then drilled the holes and installed. Certainly more nerve-wracking, but it came out great.9. The center opening on the body for the CHMSL connector MUST be enlarged. CAUTION! Instructions say to cut in the existing center electrical cord access channel (for center rear light). What they really meant to say was to cut the bottom lip out of the existing channel. Do NOT, repeat DO NOT make a cut anywhere forward of the existing spoiler depression and save yourself a $300 repair bill. There is a short lip that is hanging from the vertical wall on the front side of the depression. You need only cut maybe an 1/8" off of it to have "nothing" but the vertical wall coming down from the deck into the depression. That�s it. A very small rectangle of the lower lip is removed. One person used a box cutter (utility knife) with a fresh razor blade and carved it out in less than a minute. I used a Dremel and it also took just a minute or two.
10. The kit comes with 4 studs that clip onto the bottom of the new spoiler at the head. Press them into their spoiler connections with a pair of pliers. Once everything is together, you�ll have a total of six studs on the new spoiler.
11. Hook the electrical connection to the spoiler as you insert the spoiler. Test fit it once and make sure it all looks good after it is tightened down. Also a damn good time to make sure the brake light is working. If all is good, take it back off so you can pull the mask off the VHB tape, and then final install the spoiler on the car.
12. The install is the reverse of the removal. The four innermost studs are relatively easy to get to. Note that the new nuts are different sized from the old nuts, at least in what came with my spoiler, so you might want to check size before starting them. I also found it was easier to pull all the taillights, so that I could get two hands in there, as the outermost studs sits directly over the taillight housing, very snug area. Might be helpful to use a swivel head 1/4" drive ratchet with 10MM socket to tighten those two new outermost nuts. I ended up with a short 10mm box wrench and two hands, that worked easily enough.
13. Be very careful not to drop the anchor nuts when taking off or putting on (add 15 minutes per retrieval).
14. Be very careful not to slide out and drop a tail light screw retaining clip when taking off or putting on the anchor nuts (add 15 minutes per retrieval).
15. Measure twice, drill once! Doing it without a template, and adding the wash and Zaino time, I ended up taking maybe two very patient and slow hours. Half-hour to an hour sounds a lot more reasonable. Definitely easier with two folks, as the spoiler does not just sit loose on the tail cleanly, it has a little soft non-useful curving to it, you have to push it down to see where it will sit once bolted down.
Hope the photo attaches.
[/IMG]
10-02-2011, 10:03 PM
#13
Safety Car

I will be installing mine this week but i am only bolting it down with the 4 stock bolts and some double sided tape. I can't see how it wouldn't hold up. A few members have done this with no issues. Just need the right 3m tape.
10-02-2011, 10:11 PM
#15
Burning Brakes


 10-03-2011, 02:00 AM
#19
Drifting


