
DIY Grill and Cove Screens-Details and how to Pics
 02-05-2012, 01:55 PM
#1
Melting Slicks


Thread Starter
I recently did the DIY mod for cove and front grill screens. For anyone with average skills you too can do this and I hope the pictures and info below help you if you decide to make them yourself.

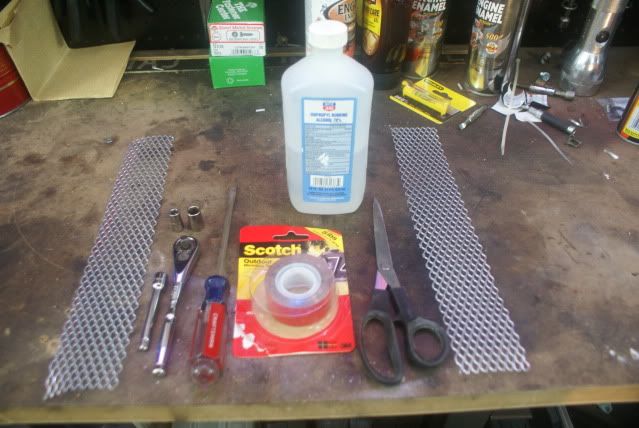
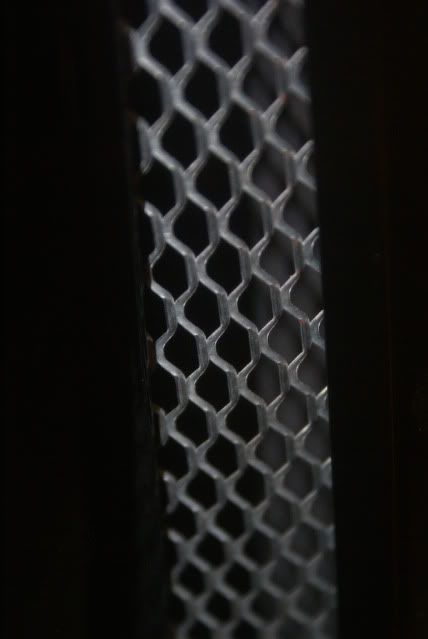
I purchased aluminum gutter screen from my local Home Improvement Store (Lowes) and used duck bill metal sheers to cut them, but you could do the same with a good pair of wire pliers.
Front Grill Screens-Estimated time 45 mins (or less)
What is needed:
•One (1) piece 36X6 Gutter Guard cut to two (2) each 18X5 inch pieces
•Metal Sheers or Wire Cutters
•Zip Ties
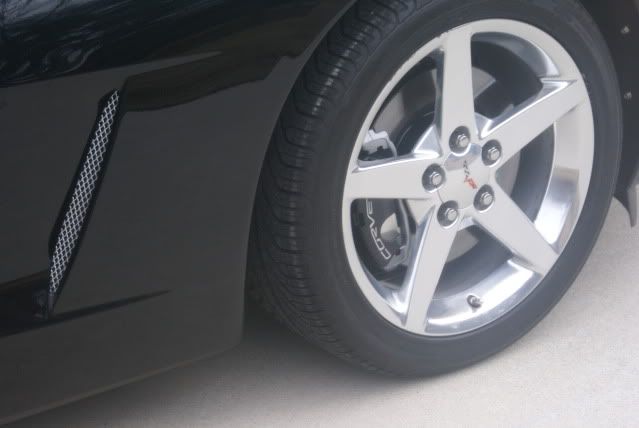
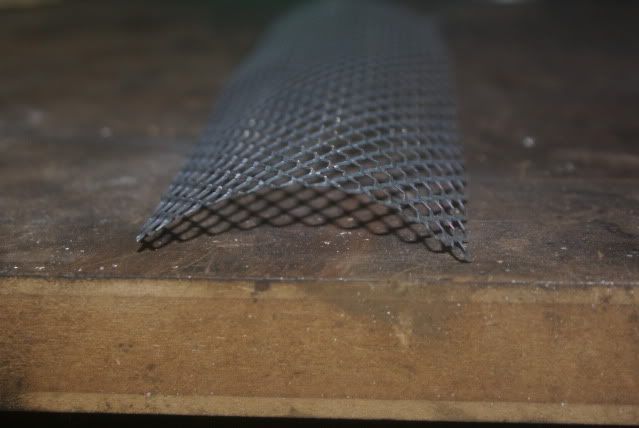
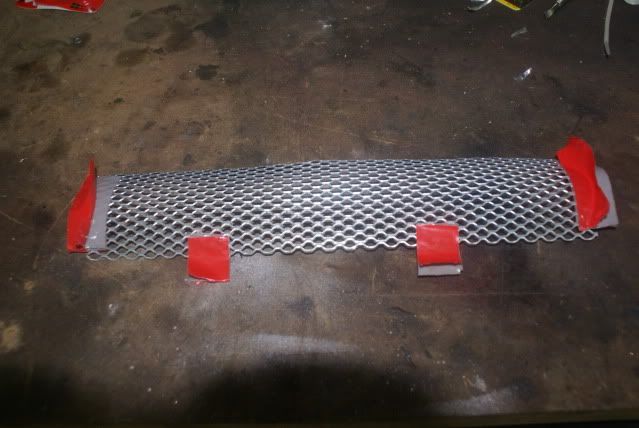
1. The metal mesh comes in an 36 in X 6 in section and you need to cut into two (2) 18X5 in pieces.
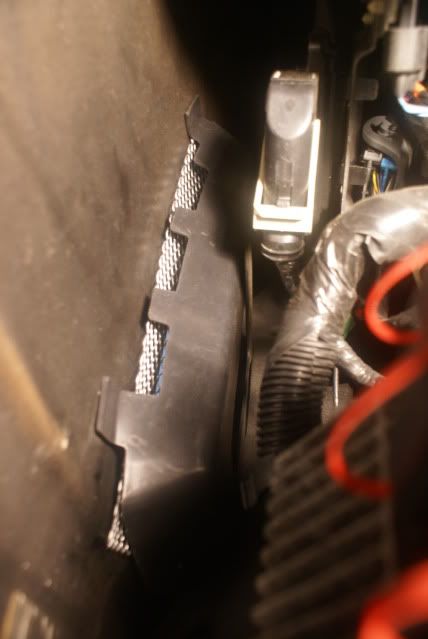
2. Place each piece from underneath the car behind the existing grill. They will slide right in place.
3. Use zip ties to secure them in place. Make sure the diamond pattern is running the same way on both half’s

Cove Screens-Estimated time 45 mins per side (90 mins total)
What is needed
•One (1) piece 36X6 Gutter Guard cut to two (2) each 13X3 inch pieces
•Metal Sheers or Wire Cutters
•Scissors
•Medium size flat tip screwdriver
•7mm and 10mm sockets
•3M outdoor mounting tape or equivalent
•Rubbing Alcohol
•Drop light/Flash light
Remove front tire (Recommend you use jacking puck, jack stand and chocks)
Step 1-Remove inner fender panel
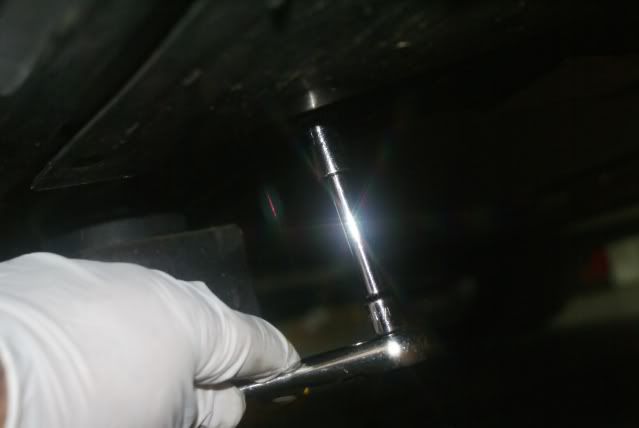
a. Remove lift the center pins from the mounting plugs from inner fender panel. Use a flat tip screwdriver to lift them out. Remove the mounting plugs

b. Use the 7mm to remove the two self tapping screws that are underneath the rocker panel that secure the to the fender
c. Use the 10mm to remove the two bolts on the bottom side of the inner Fender Panel
Step 2-Test Fit
a. Cut a 13X3 piece of mesh

b. Put a slight arch in it
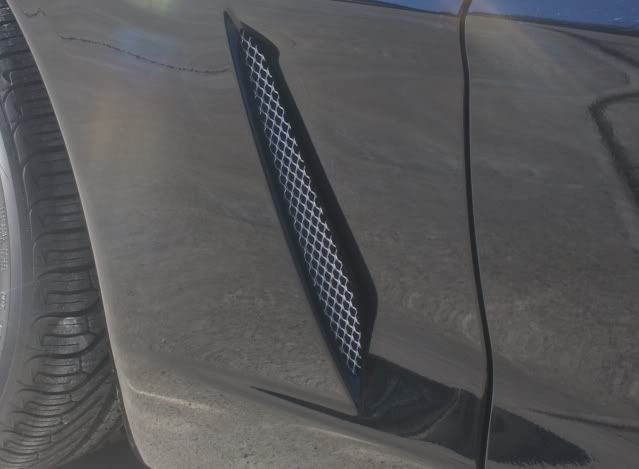
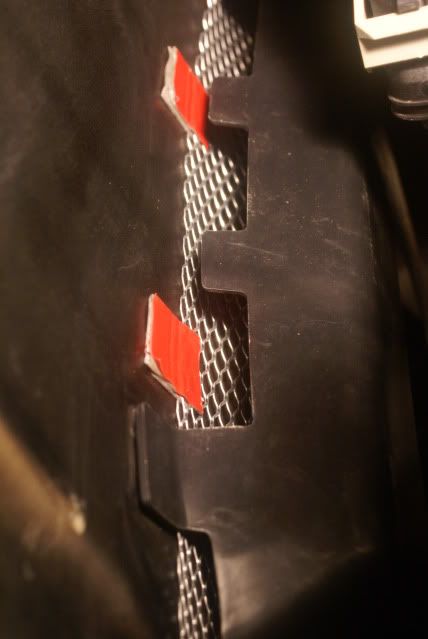
c. Test fit inside the fender (CAUTION-I kept one hand over the outside cove opening to keep the screen from coming out while placing it. The shape edges on the mesh can/will scratch your paint). Figure out if you want the diamond point on the pattern of the screen facing in or out (I chose in)
d. Snake the screen in from the top of the inner cove support, using the outside hand to help keep the screen inside the fender while the other pushes it in place. Once in place, you can reach through the inner cove support and push the mesh into place and refine the arch in the screen as need so it will lay flesh at the cove opening.
e. Once you see how the screen will go in, remove by pushing it up through the top of the inner cove support, watching to make sure it does not come outside and scratch paint.
Step 3-Mounting Screen
a. Clean inside of the fender with Rubbing Alcohol and clean rag where mounting tape will be secured. Although I think this 3M mounting tape will stick to anything, it’s always best to remove dust and dirt for improved adhesion
b. Sandwich the screen between pieces of 3M mounting tape with � on the screen and the other off. You will place across the top, bottom and the side edge that will face the front (Hint, keep in mind which way you want the pattern to run with the diamond point before mounting side edge tape)
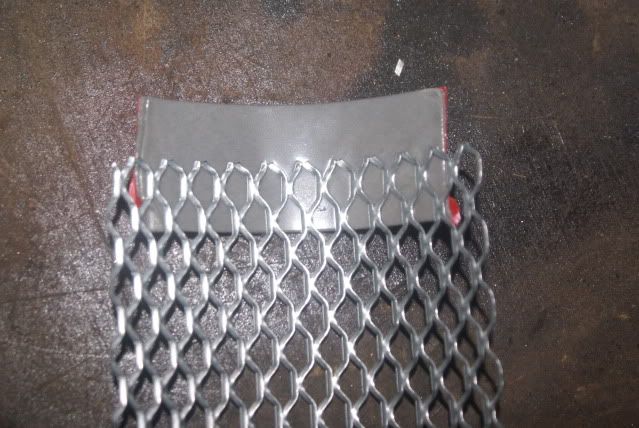
c. Each piece of side edge tape should be 4 inches from the respective top and bottom edge or else they may get caught on the inner cove support, keeping you from properly seating the screen.
d. You can completely remove the backing from the one side of each of the 4 pieces of tape that will bond to the inner fender or loosen the backing and put back in place and remove once the screen is in place (I have done it both ways). The tape is bendable so when snaking the screen in place for mounting you can bend them over if needed.
e. Using your hand through the inner cove support bracket you can make final adjustments as need. Once screen is in place, press the 3M tape on the 4 locations.
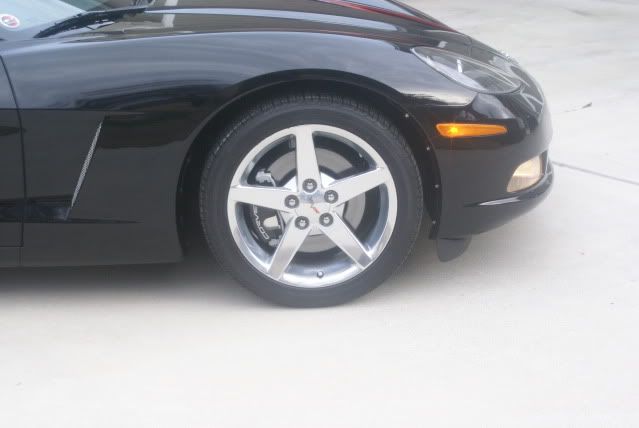
f. Step back and look at your cove and admire you're handy work….replace the Inner Fender panel, and Tire. Remove Jack stands and Chocks
Hope this helps!
John
I purchased aluminum gutter screen from my local Home Improvement Store (Lowes) and used duck bill metal sheers to cut them, but you could do the same with a good pair of wire pliers.
Front Grill Screens-Estimated time 45 mins (or less)
What is needed:
•One (1) piece 36X6 Gutter Guard cut to two (2) each 18X5 inch pieces
•Metal Sheers or Wire Cutters
•Zip Ties
1. The metal mesh comes in an 36 in X 6 in section and you need to cut into two (2) 18X5 in pieces.
2. Place each piece from underneath the car behind the existing grill. They will slide right in place.
3. Use zip ties to secure them in place. Make sure the diamond pattern is running the same way on both half’s
Cove Screens-Estimated time 45 mins per side (90 mins total)
What is needed
•One (1) piece 36X6 Gutter Guard cut to two (2) each 13X3 inch pieces
•Metal Sheers or Wire Cutters
•Scissors
•Medium size flat tip screwdriver
•7mm and 10mm sockets
•3M outdoor mounting tape or equivalent
•Rubbing Alcohol
•Drop light/Flash light
Remove front tire (Recommend you use jacking puck, jack stand and chocks)
Step 1-Remove inner fender panel
a. Remove lift the center pins from the mounting plugs from inner fender panel. Use a flat tip screwdriver to lift them out. Remove the mounting plugs
b. Use the 7mm to remove the two self tapping screws that are underneath the rocker panel that secure the to the fender
c. Use the 10mm to remove the two bolts on the bottom side of the inner Fender Panel
Step 2-Test Fit
a. Cut a 13X3 piece of mesh
b. Put a slight arch in it
c. Test fit inside the fender (CAUTION-I kept one hand over the outside cove opening to keep the screen from coming out while placing it. The shape edges on the mesh can/will scratch your paint). Figure out if you want the diamond point on the pattern of the screen facing in or out (I chose in)
d. Snake the screen in from the top of the inner cove support, using the outside hand to help keep the screen inside the fender while the other pushes it in place. Once in place, you can reach through the inner cove support and push the mesh into place and refine the arch in the screen as need so it will lay flesh at the cove opening.
e. Once you see how the screen will go in, remove by pushing it up through the top of the inner cove support, watching to make sure it does not come outside and scratch paint.
Step 3-Mounting Screen
a. Clean inside of the fender with Rubbing Alcohol and clean rag where mounting tape will be secured. Although I think this 3M mounting tape will stick to anything, it’s always best to remove dust and dirt for improved adhesion
b. Sandwich the screen between pieces of 3M mounting tape with � on the screen and the other off. You will place across the top, bottom and the side edge that will face the front (Hint, keep in mind which way you want the pattern to run with the diamond point before mounting side edge tape)
c. Each piece of side edge tape should be 4 inches from the respective top and bottom edge or else they may get caught on the inner cove support, keeping you from properly seating the screen.
d. You can completely remove the backing from the one side of each of the 4 pieces of tape that will bond to the inner fender or loosen the backing and put back in place and remove once the screen is in place (I have done it both ways). The tape is bendable so when snaking the screen in place for mounting you can bend them over if needed.
e. Using your hand through the inner cove support bracket you can make final adjustments as need. Once screen is in place, press the 3M tape on the 4 locations.
f. Step back and look at your cove and admire you're handy work….replace the Inner Fender panel, and Tire. Remove Jack stands and Chocks
Hope this helps!
John
Last edited by JKbride; 01-27-2015 at 08:42 PM.

The following 2 users liked this post by JKbride:
Old Ben (11-13-2015),
Richard A. Snitzer (10-12-2015)
 02-05-2012, 02:41 PM
#3
Safety Car

Member Since: Nov 2007
Location: Tarpon Springs FL
Posts: 4,446
Received 308 Likes
on
198 Posts
FL Events Coordinator

Great Pictorial....I did the same thing 3 yrs ago with my Black Vert. Only difference is I painted the screen gloss black. I use a metal primer followed with 3 coats if Gloss Black Rustoleum....
 02-06-2012, 10:43 PM
#6
Melting Slicks

John,
Nicely done. Will help many who follow!
Mike
Nicely done. Will help many who follow!
Mike
02-07-2012, 01:56 AM
#7
Race Director

Nice, inexpensive DIY approach. 
Many have found it necessary to add some form of adhesive (Epoxy/RTV/Silicone/Gorilla Glue/etc.) to the 3M Tape for the side cove screens.
Here's a Thread describing various attempts at getting this done right.
http://forums.corvetteforum.com/c6-c...e-screens.html
It includes this pic of one method of holding the screen in place while the glue sets up.


 Now tie wrapping rags is very clever!
02-07-2012, 08:58 AM
Now tie wrapping rags is very clever!
02-07-2012, 08:58 AM
#10
Melting Slicks
Thread Starter
Time will tell

 03-25-2012, 11:54 AM
#12


 03-25-2012, 02:09 PM
#16
Melting Slicks

Member Since: Sep 2009
Location: Mooresville North Carolina
Posts: 2,558
Received 195 Likes
on
105 Posts
St. Jude Donor '10-'11-'12-'13-'14-'15-'16-'17-'18
Nice, inexpensive DIY approach.
Many have found it necessary to add some form of adhesive (Epoxy/RTV/Silicone/Gorilla Glue/etc.) to the 3M Tape for the side cove screens.
Here's a Thread describing various attempts at getting this done right.
http://forums.corvetteforum.com/c6-c...e-screens.html
It includes this pic of one method of holding the screen in place while the glue sets up.


 03-25-2012, 09:06 PM
#18
The Consigliere


Member Since: May 2006
Location: 2023 Z06 & 2010 ZR1
Posts: 22,243
Received 5,421 Likes
on
2,268 Posts

Very cool work.
Thanks for sharing.
Thanks for sharing.


