
C6Z06 Windshield replacement (PIC Heavy)
 02-06-2012, 11:36 AM
#1
Le Mans Master


Thread Starter
As some of you know I took some typical Alabama road FOD to the windshield and had a large crack that was working its way into my field of view (Link). Called around and got replacement estimates from $875 to $1200. I have NAV & HUD so the windshield is a little pricey. I ended up going with Safelite for the replacement and all I had to pay was my $250 Comp deductible through State farm.

When the guy showed up at my house on Wednesday last week for the install we immediately found some minor scratches on the new glass during the pre-install inspection. So we had to order another.

We rescheduled for today and I decided to take the car to their shop this time and have the replacement performed there.

First step was to remove all the trim from around the sides, corners, and cowl area of the windshield. I was surprised there are no clips holding this windshield in place. It's pretty much just adhesive holding it in.


Removing the cowl cover.
Once all the trim was removed they used a series of special blades of various lengths to cut through the factory calk/adhesive.


My eyes got a little big when he bought out this bad boy! This device cuts through the last of the factory adhesive they can't get with their special blades.


Now that all the trim is removed & the adhesive bond has been severed the old windshield is lifted off.

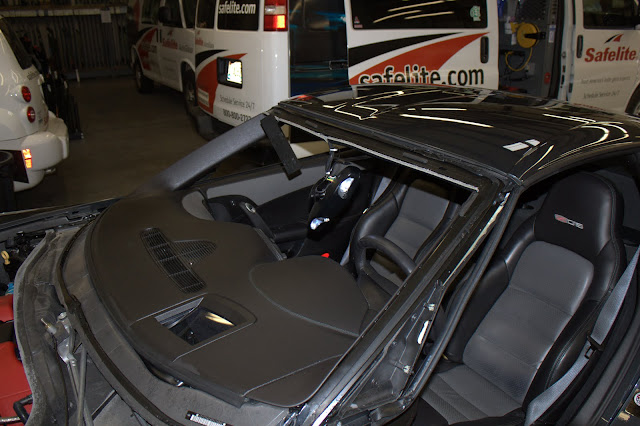
Windshield gone. (Was a good time to clean the HUD too!)
Removing factory sealant/adhesive. This stuff is think and very tough stuff!

Once the factory sealant was removed an activator was applied all the way around the frame. Without this crucial step the new adhesive will not stick properly.

These are tubes of windshield adhesive being heated to 200 degrees.

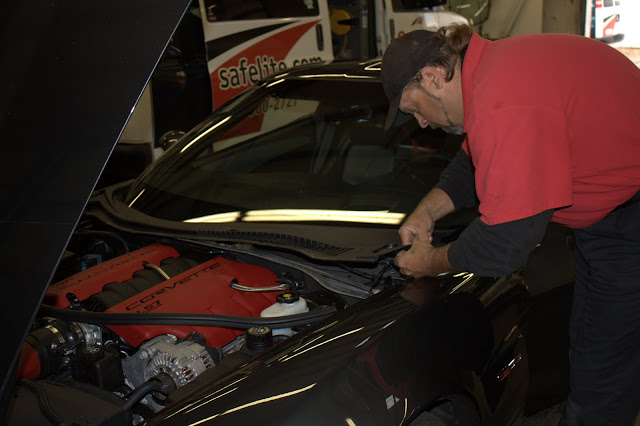
Here they are applying the adhesive with a powered calking gun! Never seen one of those before.


New windshield is dropped into place and taped at the top to keep it from sliding. 15-20 minutes for the initial cure before the car can be driven.


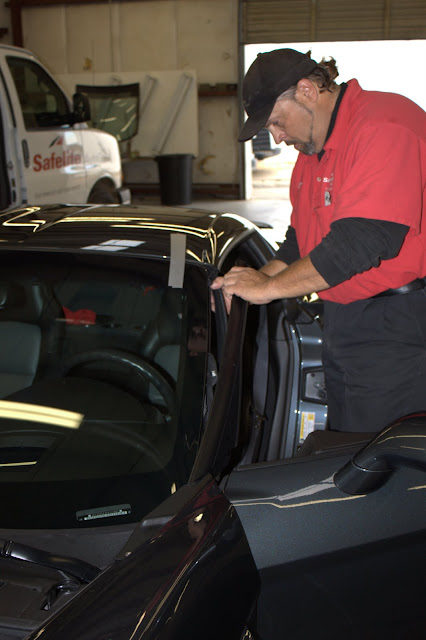
Now all that's left is the re-install of the trim and slipping the rear view mirror and GPS module back onto the inside of the windshield.


Little clean up and she's done! Total install time start to finish... 59 minutes.

U.M.
* Addendum *
Stock windshield has locating pins but replacement windshield does not. Guy stated this saves time at the factory, but the pins are not necessary for installation.

Replacement windshield is marked with "HUD" just like the OEM one. (This marking is hidden under the cowl cover so you don't see it after install. Safelite claims this windshield is sourced from the same place GM gets theirs from.

* Side note *
The mounting assembly for the windshield wiper motor is really BEEFY! I was surprised to see how massive this mount is.


When the guy showed up at my house on Wednesday last week for the install we immediately found some minor scratches on the new glass during the pre-install inspection. So we had to order another.
We rescheduled for today and I decided to take the car to their shop this time and have the replacement performed there.
First step was to remove all the trim from around the sides, corners, and cowl area of the windshield. I was surprised there are no clips holding this windshield in place. It's pretty much just adhesive holding it in.
Removing the cowl cover.
Once all the trim was removed they used a series of special blades of various lengths to cut through the factory calk/adhesive.
My eyes got a little big when he bought out this bad boy!
This device cuts through the last of the factory adhesive they can't get with their special blades. Now that all the trim is removed & the adhesive bond has been severed the old windshield is lifted off.
Windshield gone. (Was a good time to clean the HUD too!)
Removing factory sealant/adhesive. This stuff is think and very tough stuff!
Once the factory sealant was removed an activator was applied all the way around the frame. Without this crucial step the new adhesive will not stick properly.
These are tubes of windshield adhesive being heated to 200 degrees.
Here they are applying the adhesive with a powered calking gun! Never seen one of those before.
New windshield is dropped into place and taped at the top to keep it from sliding. 15-20 minutes for the initial cure before the car can be driven.
Now all that's left is the re-install of the trim and slipping the rear view mirror and GPS module back onto the inside of the windshield.
Little clean up and she's done! Total install time start to finish... 59 minutes.
U.M.
* Addendum *
Stock windshield has locating pins but replacement windshield does not. Guy stated this saves time at the factory, but the pins are not necessary for installation.
Replacement windshield is marked with "HUD" just like the OEM one. (This marking is hidden under the cowl cover so you don't see it after install. Safelite claims this windshield is sourced from the same place GM gets theirs from.
* Side note *
The mounting assembly for the windshield wiper motor is really BEEFY! I was surprised to see how massive this mount is.


 02-06-2012, 12:21 PM
#4
Burning Brakes

I had Safelite do the the replacement shield on my 06Z. The tech was rock solid and did a very nice job and I couldnt be happier. Just make sure they hook you up with experienced tech who has done vettes before.
02-06-2012, 12:27 PM
#5
Le Mans Master
Thread Starter
The guy who did the install above had done a handful of C6's prior to mine. However none were Z06's or ZR1's. How do I know this? This first thing he asked me to do once we pulled the car into the bay was to remove the roof! He claimed it makes replacing the windshield easier. I had to inform him we would need to remove some interior trim and the headliner first. He game me that chicken-on-my-head look until I explained the roof was not designed to be taken on and off. LOL!
U.M.
U.M.
02-06-2012, 12:35 PM
#6
Instructor

Kind of surprised I don't see any fender protectors, particularly when he brought out the Milwaukee Bazooka! Plus, he's leaning right up against the painted surfaces of the door with his belt.
02-06-2012, 12:36 PM
#7

im getting my windshield replaced next week as well. my car is a 08 1lt and i have no hud. The glass place asked if i had gps and i said i dont know.
what is this GPS option? is this the ONstar system? what is that black rectangular piece that sits above the rear view mirror?
my windshield guy then asked for my VIN number so he could order the glass from gm. Will the VIN # be able to tell exactly what glass i need?
what is this GPS option? is this the ONstar system? what is that black rectangular piece that sits above the rear view mirror?
my windshield guy then asked for my VIN number so he could order the glass from gm. Will the VIN # be able to tell exactly what glass i need?
02-06-2012, 02:11 PM
#8
Le Mans Master
Thread Starter
I even DRIVE IT IN THE RAIN FOR GODS SAKE!!! 

U.M.


 02-06-2012, 06:48 PM
#12
Le Mans Master
Thread Starter
U.M.
02-06-2012, 08:42 PM
#13
Team Owner

Member Since: Jun 2005
Location: Northern, VA
Posts: 46,104
Received 2,481 Likes
on
1,944 Posts
St. Jude Donor '15
"In honor of jpee"

I didn't know that Nav cars had a different windshield. Does it have something specifically on the windshield? I thought that black box is the Onstar unit; I didn't think it had Nav stuff in it, too.
Learn something new. Thanks for the detailed info and pics. That guy really knows how to be careful especially with the "jackhammer!"
Learn something new. Thanks for the detailed info and pics. That guy really knows how to be careful especially with the "jackhammer!"
02-06-2012, 08:49 PM
#14
Melting Slicks

Glad you were happy and thanks for sharing. I had a lousy experience with Safelite with my truck. The guys who own the franchise near me are a bunch of ham handed fools.
BTW: I also would have demanded they cover the fenders, the dash and the HUD recess. I'm a bit retentive with my Vette, but still, they should respect it properly.
BTW: I also would have demanded they cover the fenders, the dash and the HUD recess. I'm a bit retentive with my Vette, but still, they should respect it properly.
 02-07-2012, 12:31 AM
#16
Melting Slicks

Good job Uncle......They did mine also......and to AO....yes indeed there are two different windshields.....one for the non nav/gps and one with....
 02-07-2012, 01:33 AM
#18
Le Mans Master
Thread Starter
U.M.
02-07-2012, 11:34 PM
#19
Melting Slicks