
Tilt/shock sensor install using factory alarm
 08-05-2012, 07:47 PM
#1

Parts needed for tilt sensor
507 M Directed Electronics digital tilt sensor ($25 at Amazon.com)
2 common 12 volt automotive type relays
2 2 amp fuses and fuse holders
Additional parts needed for shock sensor option
DEI Stinger Doubleguard sensor 504D ($11 at Amazon.com)
1 SPST switch
Other items needed
Wire, solder, heat shrink, and some patients
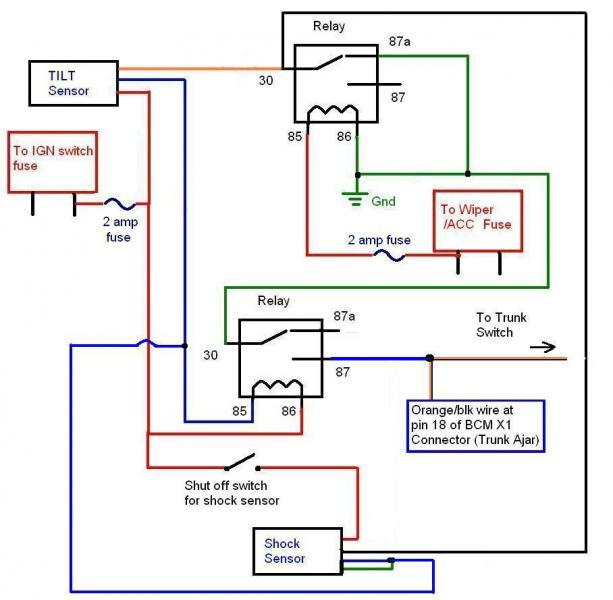
See diagrams below for how to connect it.
Notes:
The reason for doing this is I don't want to have to carry two key fobs, one for the car and one for an alarm. I just wanted to add a tilt and shock sensor to the existing alarm, like GM should have put on the car at the factory. The hope is that this would at least be enough to let me know if someone is trying to jack up my car and steal the wheels. In addition to this, I'd highly suggest investing in a set of wheel locks.
The trunk ajar switch wire is used as the trigger for the factory alarm. It is orange with a black stripe and goes to pin 18 of the X1 body control connector under the dash. Just be careful though because convertibles have another orange/black wire for the power top that also goes to this connector. I used a posi-tap connector to connect to the wire. If you want to make sure you have the correct wire, check voltage on it. With the trunk closed it should be at battery voltage (12v) and with it open, it should go to nearly 0 volts. If you see the voltage change when you open the trunk, then you have the correct wire.
One relay in the diagram is used to remove ground to the sensors whenever the car is running (via the wiper/acc fuse output). This is needed to shut both sensors off when you have the car running. The instructions in the tilt sensor also tell you that it self calibrates to whatever the angle the vehicle is parked at the time the ground wire is connected, so you'll want it to do this every time you shut off the car. This is the purpose of the first relay.
The second relay is used to apply a ground to the Trunk Ajar wire and trigger the alarm when either sensor trips. I used a relay because the sensors themselves would not always trip the factory alarm if their output was too fast. The relay simply slows it down enough to give the BCM time to see the ground and trip the alarm.
I would highly advise putting 2 amp fuses on both power leads you tap into from the ignition fuse and wiper fuse so that if you have a short you don't cause other problems. And since I fused my circuits, it allowed me to connect them both to the hot side of each fuse at the fuse box, so I wouldn't blow out my wiper or ignition fuse if something shorted out, but would instead just blow my small 2 amp fuse.
I mounted my tilt sensor and relays to the floor of the space under the passengar footwell next to the BCM with double sided foam sticky tape. I tried jacking the car at all four locations, and after about 3-4 inches of movement, the sensor trips. Rocking the car usually won't trip it. You have to actually change the angle of the car for a couple seconds before it trips. It responds very well and appears to be very reliable.
Tilt sensor only wire diagram

The Stinger Doubleguard shock sensor is a little tough to get set properly. If set too sensitive, it will trip when you go to open the door, and you'll get a single horn honk before the BCM shuts off the alarm. This is because the BCM shuts off the factory via the data buss when the door open circuit is triggered, but the Stinger shock sensor reacts faster, so it triggers the alarm first from the vibration of the door opening. The solution is to adjust the position and sensitivity of the shock sensor so that opening the door doesn't trigger it. This may take some trial and error in both location and sensitivity adjustment. There aren't much provided in the way of instructions with this sensor, but I did find some notes in some other the DEI Alarm installations that instruct you NOT to hard mount the shock sensor to metal parts of the frame or steering column, but instead to use velcro or double sided foam tape and affix it to something like a plastic air duct under the dash. I mounted mine with sticky tape under the glove box area stuck to a plastic duct and it seems to work well there. I also installed a switch so I could turn the shock sensor on and off in the event I don't want it on, or it causes too many false alarms.
Tilt and Shock sensor wire diagram
507 M Directed Electronics digital tilt sensor ($25 at Amazon.com)
2 common 12 volt automotive type relays
2 2 amp fuses and fuse holders
Additional parts needed for shock sensor option
DEI Stinger Doubleguard sensor 504D ($11 at Amazon.com)
1 SPST switch
Other items needed
Wire, solder, heat shrink, and some patients
See diagrams below for how to connect it.
Notes:
The reason for doing this is I don't want to have to carry two key fobs, one for the car and one for an alarm. I just wanted to add a tilt and shock sensor to the existing alarm, like GM should have put on the car at the factory. The hope is that this would at least be enough to let me know if someone is trying to jack up my car and steal the wheels. In addition to this, I'd highly suggest investing in a set of wheel locks.
The trunk ajar switch wire is used as the trigger for the factory alarm. It is orange with a black stripe and goes to pin 18 of the X1 body control connector under the dash. Just be careful though because convertibles have another orange/black wire for the power top that also goes to this connector. I used a posi-tap connector to connect to the wire. If you want to make sure you have the correct wire, check voltage on it. With the trunk closed it should be at battery voltage (12v) and with it open, it should go to nearly 0 volts. If you see the voltage change when you open the trunk, then you have the correct wire.
One relay in the diagram is used to remove ground to the sensors whenever the car is running (via the wiper/acc fuse output). This is needed to shut both sensors off when you have the car running. The instructions in the tilt sensor also tell you that it self calibrates to whatever the angle the vehicle is parked at the time the ground wire is connected, so you'll want it to do this every time you shut off the car. This is the purpose of the first relay.
The second relay is used to apply a ground to the Trunk Ajar wire and trigger the alarm when either sensor trips. I used a relay because the sensors themselves would not always trip the factory alarm if their output was too fast. The relay simply slows it down enough to give the BCM time to see the ground and trip the alarm.
I would highly advise putting 2 amp fuses on both power leads you tap into from the ignition fuse and wiper fuse so that if you have a short you don't cause other problems. And since I fused my circuits, it allowed me to connect them both to the hot side of each fuse at the fuse box, so I wouldn't blow out my wiper or ignition fuse if something shorted out, but would instead just blow my small 2 amp fuse.
I mounted my tilt sensor and relays to the floor of the space under the passengar footwell next to the BCM with double sided foam sticky tape. I tried jacking the car at all four locations, and after about 3-4 inches of movement, the sensor trips. Rocking the car usually won't trip it. You have to actually change the angle of the car for a couple seconds before it trips. It responds very well and appears to be very reliable.
Tilt sensor only wire diagram
The Stinger Doubleguard shock sensor is a little tough to get set properly. If set too sensitive, it will trip when you go to open the door, and you'll get a single horn honk before the BCM shuts off the alarm. This is because the BCM shuts off the factory via the data buss when the door open circuit is triggered, but the Stinger shock sensor reacts faster, so it triggers the alarm first from the vibration of the door opening. The solution is to adjust the position and sensitivity of the shock sensor so that opening the door doesn't trigger it. This may take some trial and error in both location and sensitivity adjustment. There aren't much provided in the way of instructions with this sensor, but I did find some notes in some other the DEI Alarm installations that instruct you NOT to hard mount the shock sensor to metal parts of the frame or steering column, but instead to use velcro or double sided foam tape and affix it to something like a plastic air duct under the dash. I mounted mine with sticky tape under the glove box area stuck to a plastic duct and it seems to work well there. I also installed a switch so I could turn the shock sensor on and off in the event I don't want it on, or it causes too many false alarms.
Tilt and Shock sensor wire diagram
Last edited by RainMan12; 08-09-2012 at 01:39 PM.
 08-06-2012, 08:04 AM
#2
FYI, I have also found a $28 Dual Zone Motion Sensor (model 508d) made by the same company that I suspect could be wired up in the same manner, but I haven't bought one yet to play with it. If it works, this would be a nice option for convertible owners since it would sense motion and set off the alarm if someone reaches in the car.
Directed Install essentials Dual Zone Motion Sensor 508d
An effective vehicle intrusion sensor, this dual zone radar sensor detects moving high density objects using RF field disturbance technology. Ideal for convertibles or any application where zone-intrusion protection is desired. Protect your vehicle with an invisible sensing field which detects moving high-density objects (including people) near your car using Radio Frequency (RF) field disturbance technology. Ideal for convertibles, or any application where zone-intrusion protection is desired. Violation of the outer field can provoke siren chirps (or a WarnAway message from an optional voice module) while intrusion into the inner zone will trigger the systems siren.
Customer feedback notes:
This is a must for any alarm system. Just the shock sensor alone won't give much protection. This way if someone is too nosy around your car it will do a few warning beeps and if they stay there the full alarm will go off.
But it has to be adjusted correctly!
Two things to remember when adjusting:
1. It takes 20-30 seconds to fully arm and expand the radar circle. So don't just arm and step right up to the car, wait until it's fully armed and then test the sensitivity.
2. After the warning has been triggered a few times, most DEI alarm systems lower the sensitivity to prevent false alarms. This makes adjusting nearly impossible. To "reset" the sensitivity, just turn the ignition on and off after every time you adjust the sensor.
Just keep those two things in mind because they're not mentioned in the manual. Other than that just follow the manual and you'll be good.
Last edited by RainMan12; 08-06-2012 at 08:11 AM.
08-06-2012, 08:27 AM
#3
Here is another interesting device that will send your phone a text message if your car alarm is tripped. This might be a good alternative to having to carry a second key fob pager for the alarm, since most folks already carry a phone anyway.
http://www.text2car.com/
http://www.text2car.com/

 01-17-2013, 08:35 AM
#7
Got some more questions about this today, so wanted to add some notes.
The top relay in the diagram is used to power on and off the sensors, by applying and removing the ground to them. It is wired so that when power is removed from the Wiper/ACC fuse, it de-energizes and applies ground and turns on the sensors. This is needed because you don't want the sensors turned on while the car is running, or else it will trigger an OPEN TRUNK indicator on the DIC. So anytime the vehicle is turned on, or in the accessory mode, the relay energizes and removes ground from the tilt and motion sensors, thus shutting them off. Then when you turn off the car, the sensors both automatically turn on. I used negative logic on the relay to minimize current draw from the battery when the car is shut off. Thus, the relay is in the de-energized state when the car is shut off, and isn't drawing additional current from the battery.
The second relay was simply used to apply a more solid ground to the trunk wire to trigger the system. I found when I didn't use the second relay, it would not reliably trigger the alarm properly. I think the relay adds just enough of a delay that it helps, and it may also be providing a better ground path than the sensor itself did. The system is tripped when it senses a GROUND on the org/blk (trunk) wire going to the BCM.
The X1 connector is at the top of the BCM module under the passenger floorboard area.
The sensitivity of the impact sensor is greatly affected by how and where it is attached to the vehicle. You'll have to experiment with where you want to put it and then adjust the sensitivity on it. I'd advise pulling out the HORN relay from the electrical box under the hood while you perform testing so you don't drive your neighbors (and dogs) crazy.
Last edited by RainMan12; 01-17-2013 at 08:40 AM.
03-10-2014, 06:52 AM
#8
Racer


Are the C5's different from C6 regarding this? I used a diode (stripe towards 508D) to isolate it, and one relay in the NC (normally closed) configuration by connecting to GRND/Positive/ACC plugged wires in the passenger foot well to power it only when the car is OFF.
BUT, my tap into the Blue #9 BCM wire (suggested by many posts) didn't seem to work, so I probed some of the connectors inside the waterfall and found the wire that actually comes off of the momentary ajar switch. I tapped into that wire directly in the waterfall (just inches from the 508D) and the new alarm sensor works like a charm.
This "tonneau ajar" wire in the waterfall has some slack and is much easier to tap into than the BCM wire, so I think everyone should consider tapping it instead of messing with wires near the BCM.

The Prox alarm works great (at factory Trigger sensitivity so far) and doesn't interfere with the operation of the Tonneau release, so I can't think of any reason to mess with the BCM wire instead, but I'm open to suggestions or comments if someone can tell me why tapping the often-referenced wire at the BCM is preferable!

Last edited by mike_engr; 03-10-2014 at 09:02 AM.
03-10-2014, 09:19 AM
#9
Le Mans Master


This weekend I installed the proximity sensor DEI 508D you mentioned in my 2001 C5 Convertible.
Are the C5's different from C6 regarding this? I used a diode (stripe towards 508D) to isolate it, and one relay in the NC (normally closed) configuration by connecting to GRND/Positive/ACC plugged wires in the passenger foot well to power it only when the car is OFF.
BUT, my tap into the Blue #9 BCM wire (suggested by many posts) didn't seem to work, so I probed some of the connectors inside the waterfall and found the wire that actually comes off of the momentary ajar switch. I tapped into that wire directly in the waterfall (just inches from the 508D) and the new alarm sensor works like a charm.
This "tonneau ajar" wire in the waterfall has some slack and is much easier to tap into than the BCM wire, so I think everyone should consider tapping it instead of messing with wires near the BCM.
The Prox alarm works great (at factory Trigger sensitivity so far) and doesn't interfere with the operation of the Tonneau release, so I can't think of any reason to mess with the BCM wire instead, but I'm open to suggestions or comments if someone can tell me why tapping the often-referenced wire at the BCM is preferable!
Mike, sounds like you mounted this prox sensor inside the waterfall which seems optimal. Is there good 12V+ ignition sources & ground in there or did you tap off the fuse block?
03-10-2014, 12:49 PM
#10
Racer
Yes, I mounted the 508D onto the U-shaped metal channel inside the waterfall using doublesided tape and a ZIP strip on a diagonal thru some existing holes.
With factory sensitivity settings the alarm goes off when I reach in from the sides or above, though I may increase the sensitivity a little as long as it doesn't start triggering false alarms!
For electrical I ran the DEI RED/BLACK wiring all the way to the C5 ACC/12V/GRND plug above the passenger foot well. I soldered and zip-tied the relay above the foot well too.
Very happy with the outcome, and really wished I'd probed the waterfall wires first before toying with BCM trigger wires!
02-01-2017, 06:12 PM
#11

So i am getting parts for this as well. So far i was able to wire the shock sensor to trip a relay which would then trip the trunk or a door. I ordered a 508D zone sensor and i'll test that too. Anyone have any idea if the trigger wire is Ground or 12v from the 508D?
Yes i know this is an old post but there's very few available and its better than starting a new one.
Yes i know this is an old post but there's very few available and its better than starting a new one.
 02-01-2017, 08:54 PM
#13
Where did you tap in for the trunk alarm? Not sure what the BCM X1 connector means.
Also I see that the OP routed the sensor with a shut off switch. I plan on using 1 relay and power off all the sensors after the 12v acc is live.
One question. What is this "waterfall" people are referring to?
Also I see that the OP routed the sensor with a shut off switch. I plan on using 1 relay and power off all the sensors after the 12v acc is live.
One question. What is this "waterfall" people are referring to?
Last edited by Triple88a; 02-01-2017 at 09:20 PM.

 02-03-2017, 01:28 AM
#15
Drifting

Where did you tap in for the trunk alarm? Not sure what the BCM X1 connector means.
Also I see that the OP routed the sensor with a shut off switch. I plan on using 1 relay and power off all the sensors after the 12v acc is live.
One question. What is this "waterfall" people are referring to?
Also I see that the OP routed the sensor with a shut off switch. I plan on using 1 relay and power off all the sensors after the 12v acc is live.
One question. What is this "waterfall" people are referring to?
The following users liked this post:
Triple88a (02-03-2017)