

 02-20-2015, 01:39 PM
Last edit by: IB Advertising
See related guides and technical advice from our community experts:
Browse all: Engine and Powertrain
- How to Replace Battery
Step by step instructions for do-it-yourselfers.
Browse all: Engine and Powertrain

Key Fob Battery Replacement DIY
10-22-2012, 10:35 AM
#1
Melting Slicks


Thread Starter

For those of us who have pulled engines or transmissions you might think a Key Fob battery replacment is no biggie...in fact it is not, but if done wrong or you break your Fob you could be in a real jam.
The below takes the mystery out of changing the battery and anyone can do it. Hope this DIY thread helps
Edit: The Fob below is for a 2005-2007. I would suspect the process would be similar for others (2008-2013), but in truth I don't know that for sure. Please use care when opening the two halves. The seal is tight and if you use too much force or don't open evenly from side to side you may break the case. Tnxs to 68/70Vette for his warning on this issue for the newer Fobs.
The Steps:
First you need to purchase the batteries. You can get them at most places, and I picked mine up at a local chain auto parts store. There are two to a pack, and enough to do two Fobs.

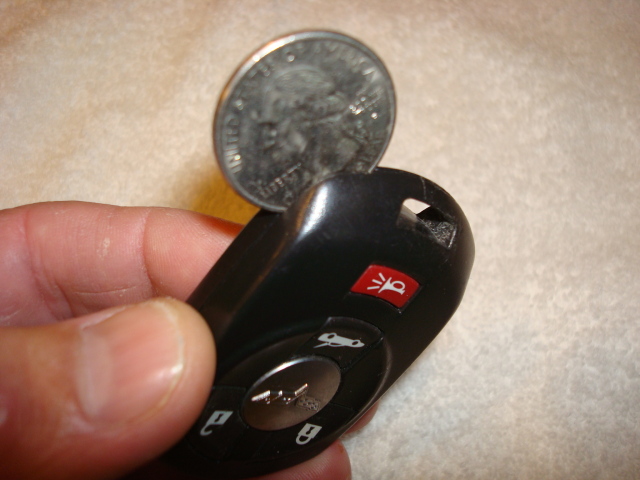
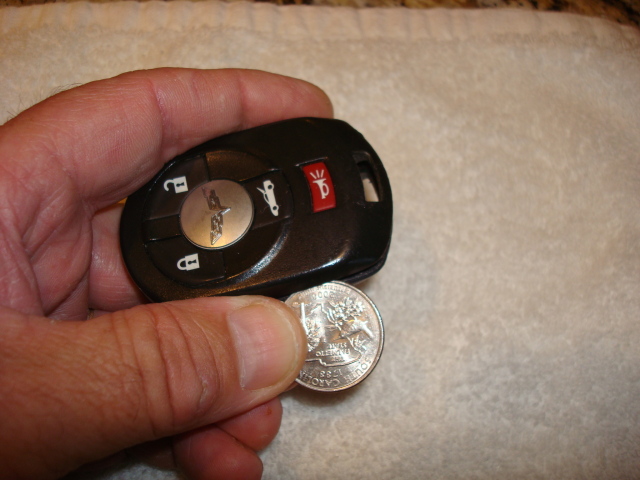
Next remove your key ring from the Fob. You need to do this so you can open it.

Locate the slot on the front side of the Fob and use a quarter to pry it open. If you use a smaller mil coin or screw driver you will have too much play in the slot and could mar your Fob.
Once you crack it open, use your coin to work it open evenly from one side to the other till the halves are seperated. The Fob has a water tight seal which requires you to open it evenly or risk damage.
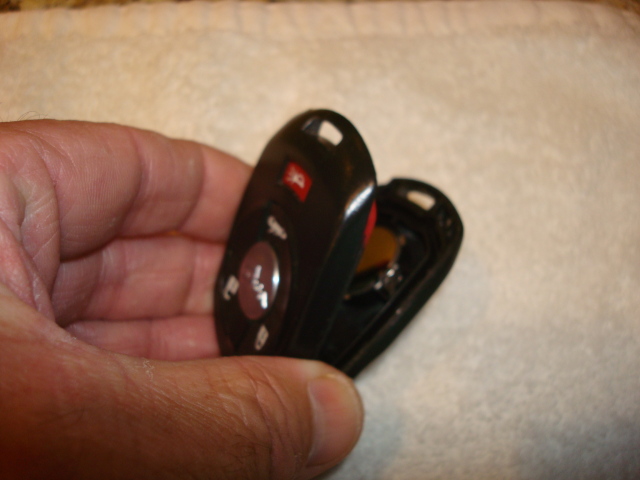
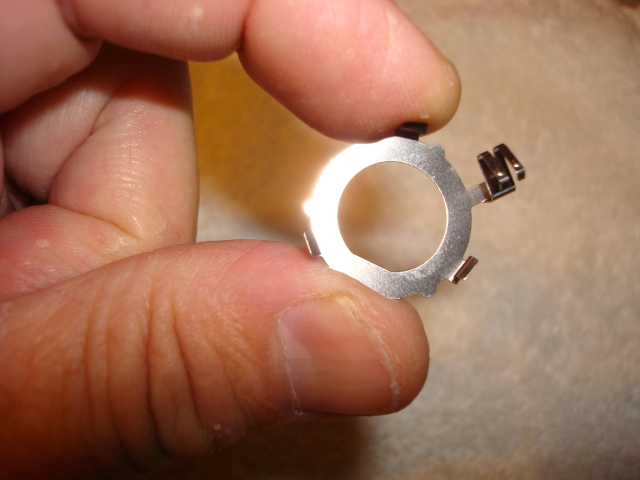
Here is a close up of the water seal. I have washed mine before and the seal held, so you don't want to damage it.
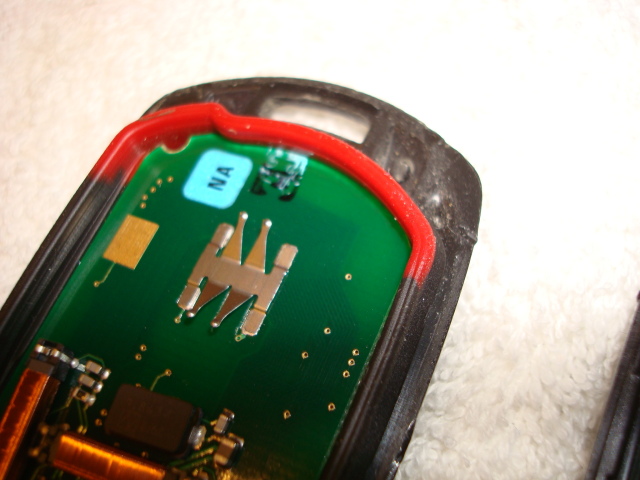
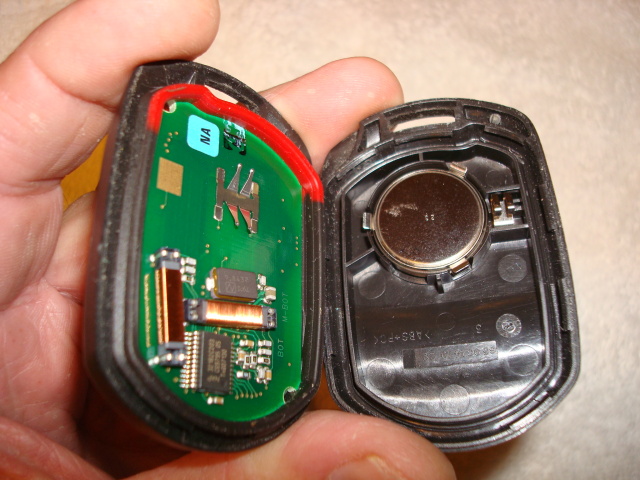
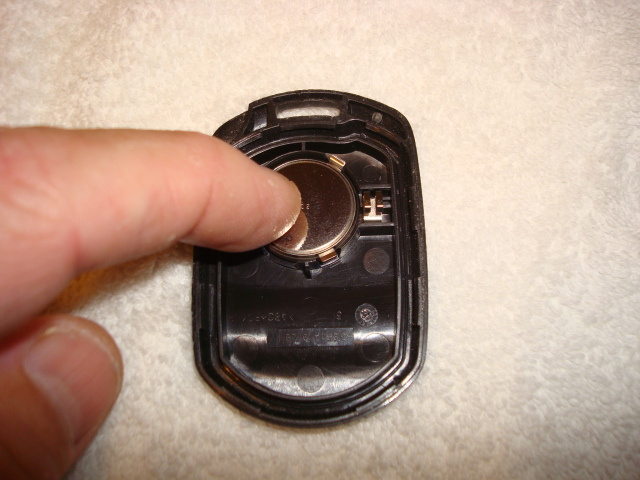
Once you have it open this is what you will see. On one half you have the electronics and on the other the battery.
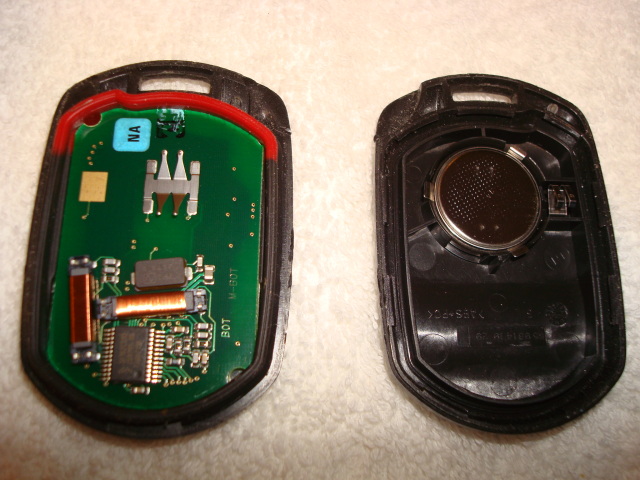
You can remove the battery by carefully placing a screw driver under it and lifting. There are 3 clips which hold it in place, and once you pry it loose from one clip, the battery will lift out.

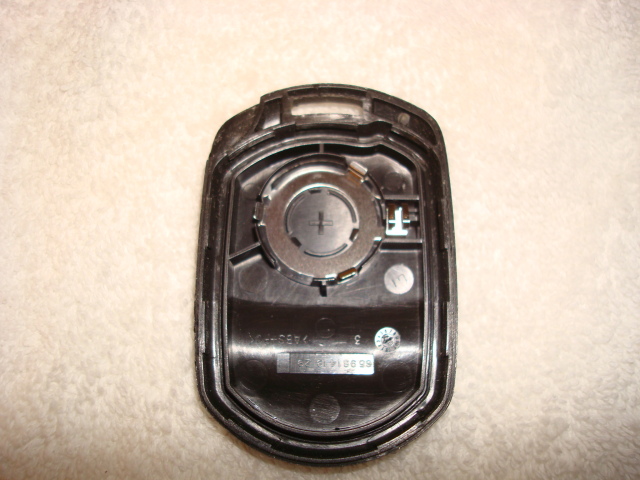
If for some reason when you lift the battery out, you might lift the whole clip assy out too...no biggie if it does. In fact, once I had my battery out I took the clip assy out and gently pushed a little on the clips to tighten them up. Just note (you can use these pics if necessary) how it goes back into the FOB.
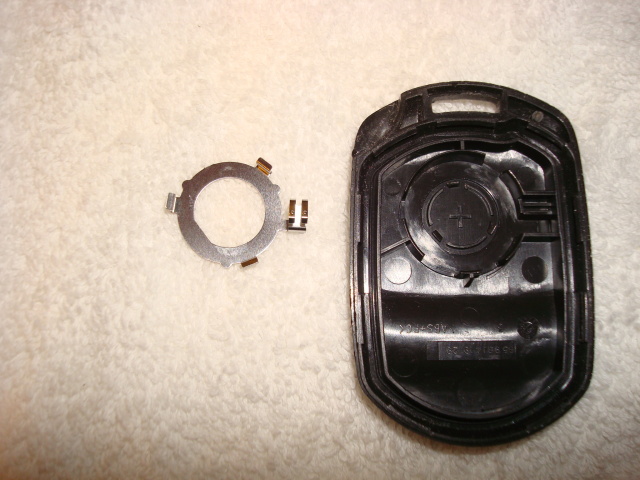
Take your new battery with the positive side down (it will be marked with a + symbol) and press it into place. You do this by placing the battery under two clips and working it under the third.
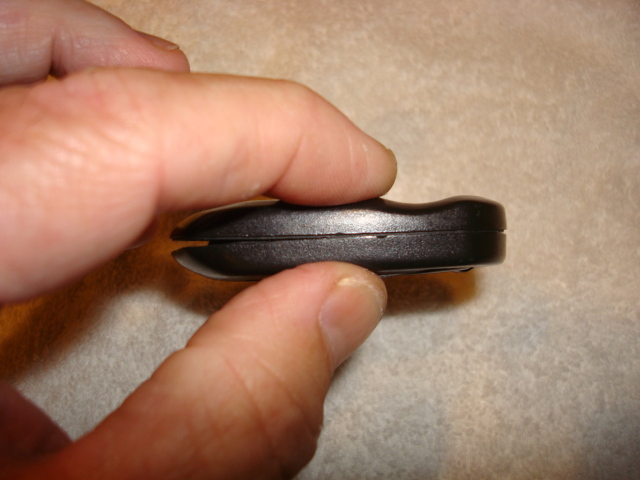
To put it back together, place the halves together starting at the top of the FOB (oppisite the key ring slot). There are two small dog ears that fit into slots.
Working from the top end, use your thumb and forefinger to press the sides together, working evenly from side to side. The seal requires you to press firmily for the Fob halves to go together. NOTE: I have read where some use a Que-Tip and small amount of Vaseline on the seal for ease of putting it back together...in my case it was not needed.
Once you have it sealed, inspect the seams and make sure you do not have not gaps.
Now do a functions check, Lock, Unlock, Trunk and Alarm. Put the Fob in your pocket and see that your doors open and the car starts.
If not, mke sure its sealed tightly...if not, the battery clips will not make contact with the electronics. Other probems could be the battery is installed upside down or it's not making good contact with the retaining clips.
Word of advice, change the battery in only one key Fob at a time. You want to make sure you have at least one working Fobe at all times.
I hope fellow CF members find this useful and that it takes the mystery out of changing your battery
The below takes the mystery out of changing the battery and anyone can do it. Hope this DIY thread helps
Edit: The Fob below is for a 2005-2007. I would suspect the process would be similar for others (2008-2013), but in truth I don't know that for sure. Please use care when opening the two halves. The seal is tight and if you use too much force or don't open evenly from side to side you may break the case. Tnxs to 68/70Vette for his warning on this issue for the newer Fobs.
The Steps:
First you need to purchase the batteries. You can get them at most places, and I picked mine up at a local chain auto parts store. There are two to a pack, and enough to do two Fobs.

Next remove your key ring from the Fob. You need to do this so you can open it.

Locate the slot on the front side of the Fob and use a quarter to pry it open. If you use a smaller mil coin or screw driver you will have too much play in the slot and could mar your Fob.

Once you crack it open, use your coin to work it open evenly from one side to the other till the halves are seperated. The Fob has a water tight seal which requires you to open it evenly or risk damage.


Here is a close up of the water seal. I have washed mine before and the seal held, so you don't want to damage it.

Once you have it open this is what you will see. On one half you have the electronics and on the other the battery.

You can remove the battery by carefully placing a screw driver under it and lifting. There are 3 clips which hold it in place, and once you pry it loose from one clip, the battery will lift out.


If for some reason when you lift the battery out, you might lift the whole clip assy out too...no biggie if it does. In fact, once I had my battery out I took the clip assy out and gently pushed a little on the clips to tighten them up. Just note (you can use these pics if necessary) how it goes back into the FOB.


Take your new battery with the positive side down (it will be marked with a + symbol) and press it into place. You do this by placing the battery under two clips and working it under the third.

To put it back together, place the halves together starting at the top of the FOB (oppisite the key ring slot). There are two small dog ears that fit into slots.
Working from the top end, use your thumb and forefinger to press the sides together, working evenly from side to side. The seal requires you to press firmily for the Fob halves to go together. NOTE: I have read where some use a Que-Tip and small amount of Vaseline on the seal for ease of putting it back together...in my case it was not needed.
Once you have it sealed, inspect the seams and make sure you do not have not gaps.

Now do a functions check, Lock, Unlock, Trunk and Alarm. Put the Fob in your pocket and see that your doors open and the car starts.
If not, mke sure its sealed tightly...if not, the battery clips will not make contact with the electronics. Other probems could be the battery is installed upside down or it's not making good contact with the retaining clips.
Word of advice, change the battery in only one key Fob at a time. You want to make sure you have at least one working Fobe at all times.
I hope fellow CF members find this useful and that it takes the mystery out of changing your battery
Last edited by JKbride; 03-31-2014 at 08:02 PM.

The following 9 users liked this post by JKbride:
Borinquen (05-01-2016),
Diamonddave60 (07-23-2022),
Doppler1992 (02-13-2016),
Greencove (05-01-2016),
Landru (11-11-2016),
and 4 others liked this post.
10-22-2012, 11:44 AM
#2
Racer

I've changed my key fob several times and the only thing that I would add to your excellent how to is that I use a tooth pick or something made of wood to pry out the battery. Sometimes metal against metal (such as a screwdriver) can short out or damage the fob brain. But that just my .002.
10-22-2012, 11:54 AM
#3
Team Owner

1. Getting into the fob is a little different if you have an 08-013 fob.
2. Don't buy a battery with the rough surface on one side like the Ray-O-Vac batteries. Some Wal-Marts, that's all they carry in that battery size.
2. Don't buy a battery with the rough surface on one side like the Ray-O-Vac batteries. Some Wal-Marts, that's all they carry in that battery size.
10-22-2012, 12:08 PM
#4
What year is that FOB from? My '09 looks very different and with the key inserted into it. You still use a quarter to separate the halves after removing the key though.
10-22-2012, 01:40 PM
#5
Melting Slicks
Thread Starter
I've changed my key fob several times and the only thing that I would add to your excellent how to is that I use a tooth pick or something made of wood to pry out the battery. Sometimes metal against metal (such as a screwdriver) can short out or damage the fob brain. But that just my .002.

As for the screwdriver vs tooth pic, in this case it is not an issue because the electronics are located in the other half of the Fob and there is nothing to short out on the battery side
The Key Fob is for a 2005. Not sure how long this Fob was used for before it was changed with a model year.
10-22-2012, 02:55 PM
#6
Team Owner
So the fob shown in the pics above is for model years 2005 through 2007. The newer fob is for model years 2008 through 2013.
10-22-2012, 05:51 PM
#7
Le Mans Master

 The original battery that came in my FOBs were Panasonic and they also had a rough surface on the negative side. One failed in the first year yet when I measured the voltage the battery was almost new. I have to assume this was also caused by the rough surface. The other Panasonic is still doing fine over 5 years later. The Energizer replacement for the first is smooth on the negative side and is still working.
 10-23-2012, 12:49 AM
#10
I too had to do this recently. I used a butter knife to pry open the fob, and a pair of pliers to gently pop it back together. It took a bit more force than I could muster with just my fingers.
10-23-2012, 10:25 PM
#11
Team Owner

Member Since: Jul 2004
Location: Redondo Beach, California
Posts: 39,553
Received 547 Likes
on
375 Posts

With my 08 fob, I followed the "quarter" advice. THANKS for this helpful hint. I cracked the fob case. I'll be soon sending off $104 to buy another fob. What about some bullet proof advice for opening the fob???
10-24-2012, 09:13 AM
#12
Melting Slicks
Thread Starter
Maybe if you have some pics or some advice on your model of Fob so others can learn what went wrong and can avoid.
10-24-2012, 11:46 AM
#13
VETERAN


JKbride,
Having been in the military for 34 years, I can see that you were trained well. Outstanding "spoon fed" instructions. The best kind of instructions leaving absolutely no questions on how to execute the job.
Do yo need a new job. I work in the Pentagon.
Cheers,
Fuze

Having been in the military for 34 years, I can see that you were trained well. Outstanding "spoon fed" instructions. The best kind of instructions leaving absolutely no questions on how to execute the job.
Do yo need a new job. I work in the Pentagon.
Cheers,
Fuze
10-24-2012, 01:09 PM
#14
Melting Slicks
Thread Starter
JKbride,
Having been in the military for 34 years, I can see that you were trained well. Outstanding "spoon fed" instructions. The best kind of instructions leaving absolutely no questions on how to execute the job.
Do yo need a new job. I work in the Pentagon.
Cheers,
Fuze
Having been in the military for 34 years, I can see that you were trained well. Outstanding "spoon fed" instructions. The best kind of instructions leaving absolutely no questions on how to execute the job.
Do yo need a new job. I work in the Pentagon.
Cheers,
Fuze
Im good on the job right now, but you never know what will happen these days

Back at ya...thanks for your service
 10-24-2012, 06:01 PM
#15
Le Mans Master
I'll buy you a new Corvette fob if you'l buy me a VW "Smart key".
10-24-2012, 06:46 PM
#16
Melting Slicks
Thread Starter
No solution here, but it might make you feel slightly more fortunate to learn that a replacement "smart key" (the entire fob slides into the ignition slot) for my 2006 VW Passat runs $250, plus programming (which the dealer must do) which runs about $50.
I'll buy you a new Corvette fob if you'l buy me a VW "Smart key".
I'll buy you a new Corvette fob if you'l buy me a VW "Smart key".
LIl 1.9 TDI...44 mpg around town..whoohoo!
10-24-2012, 08:18 PM
#17
Le Mans Master

I took both fobs for my 2008 to the local Chevy dealer parts dept. They replaced the batteries in both fobs (they did the work) for a total of $9.61. It took them less than 5 minutes to do both. The last thing I wanted to do is mess something up, which would have cost me a whole lot more.
10-24-2012, 11:17 PM
#18
Instructor

I replaced the batteries in both fobs for my '08 Vette this summer. In one of the fobs, the printed circuit board was loose, in the other is was attached to one half of the fob. I put everything back together and both fobs worked. Any suggestions on how to attache the loose board to the case?
10-25-2012, 08:03 AM
#19
Melting Slicks
Thread Starter
I replaced the batteries in both fobs for my '08 Vette this summer. In one of the fobs, the printed circuit board was loose, in the other is was attached to one half of the fob. I put everything back together and both fobs worked. Any suggestions on how to attache the loose board to the case?
10-25-2012, 12:07 PM
#20
Team Owner
In both types of fob, the circuit board is designed to be separate from the case...it can even fall out in the hand sometimes. There is no need to attach it to either half.