

 02-20-2015, 01:14 PM
Last edit by: IB Advertising
See related guides and technical advice from our community experts:
Browse all: Engine and Powertrain
- How to Change Your Oil and Oil Filter
Step by step instructions for do-it-yourselfers.
Browse all: Engine and Powertrain

LS3 Dry Sump Oil Change How to With Pics
11-10-2012, 05:43 PM
#1
Drifting

Thread Starter

So, I searched the forum and FAQ, and I could not find an LS3 dry sump oil change thread with pictures. So here is mine. This is certainly not the only way, and maybe not even the best way, but it's how I did it.
I'll start by saying this is my first time changing the oil on my 2012 Grand Sport. I wanted to change before putting it away for the winter, and it has 1456 miles on the clock. I read all of the info I could find, but I got lazy and didn't go buy jacking pucks, and I don't have ramps, so I wanted a way to do it without them, and without damaging anything.
I started to do the change a week ago and just thought backing up onto a couple 2x10's would be high enough, but it wasn't. I could slide under the car up to my chest, but that was it. For all of you wet sump folks, this would have been high enough becasue you only have to access one drain plug and the filter on the side of the pan. The dry sump has an additional drain plug right at the front of the pan in the center of the car, so I needed to get higher. So here is how it went today:
I started by taking a spin around the block to get the oil up to temp. I like doing my oil changes with warm oil as it flows better, and anything that is in the oil gets mixed up and suspended in the oil where it can drain out, instead of sitting at the bottom of the pan.
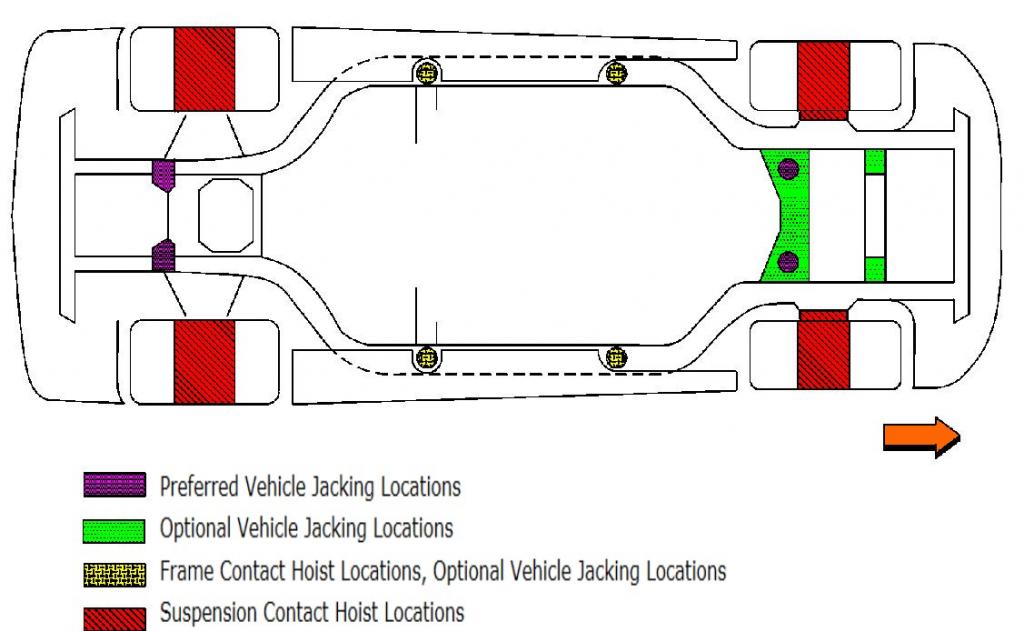
I'l start by showing the proper C6 lifting points. I will be using the Purple locations in the front. A note on lift points from the service manual when using the purple or green lift points "make sure the jack lift pad spans at least 2 suspension crossmember ribs"
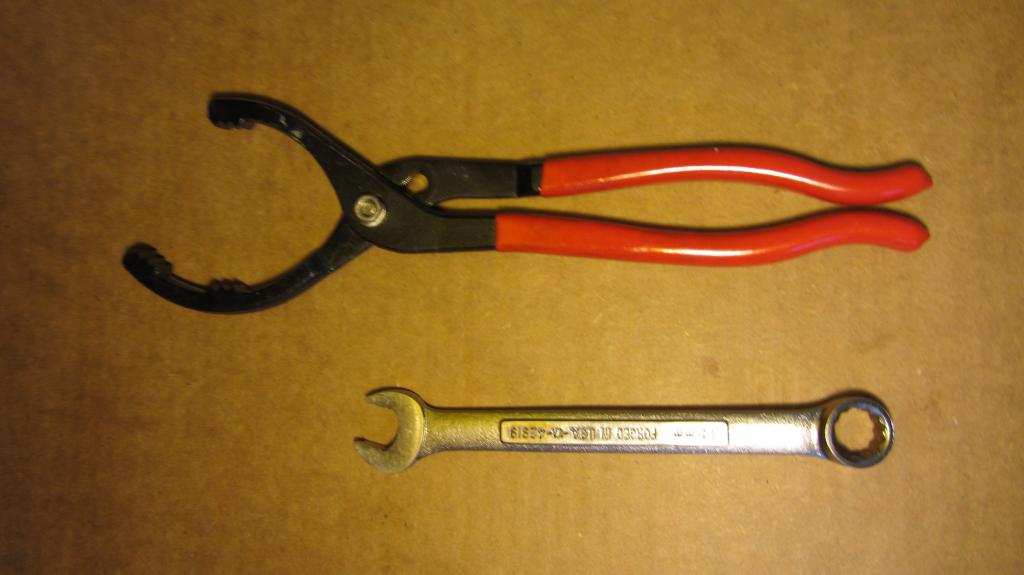
Next the tools I will be using: 15mm wrench and an oil filter wrench:
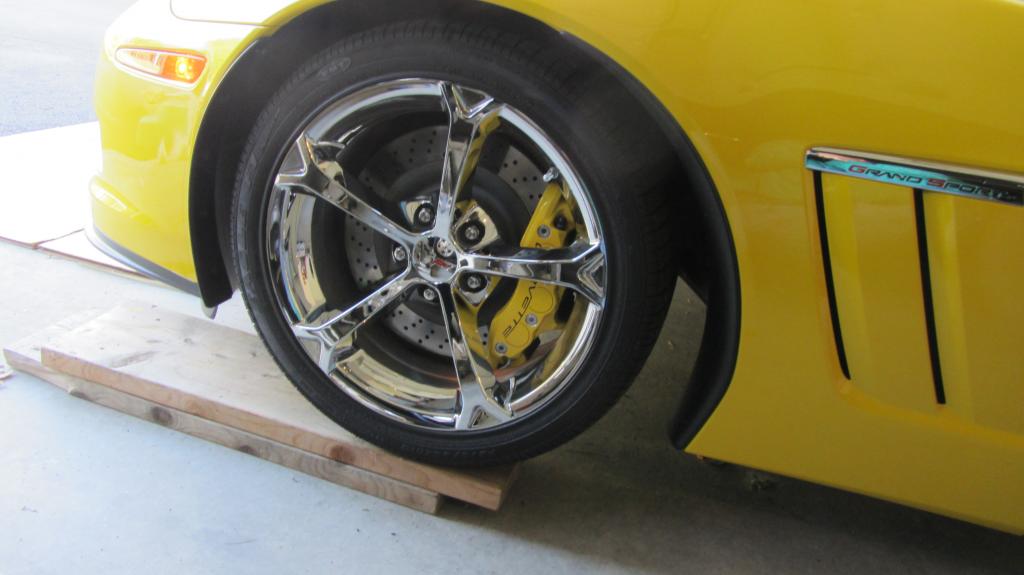
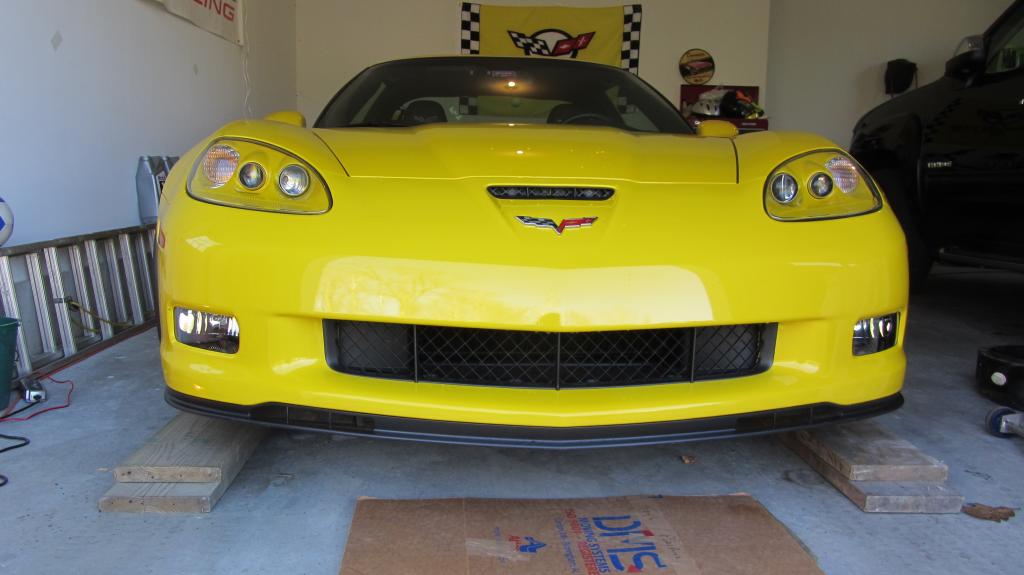
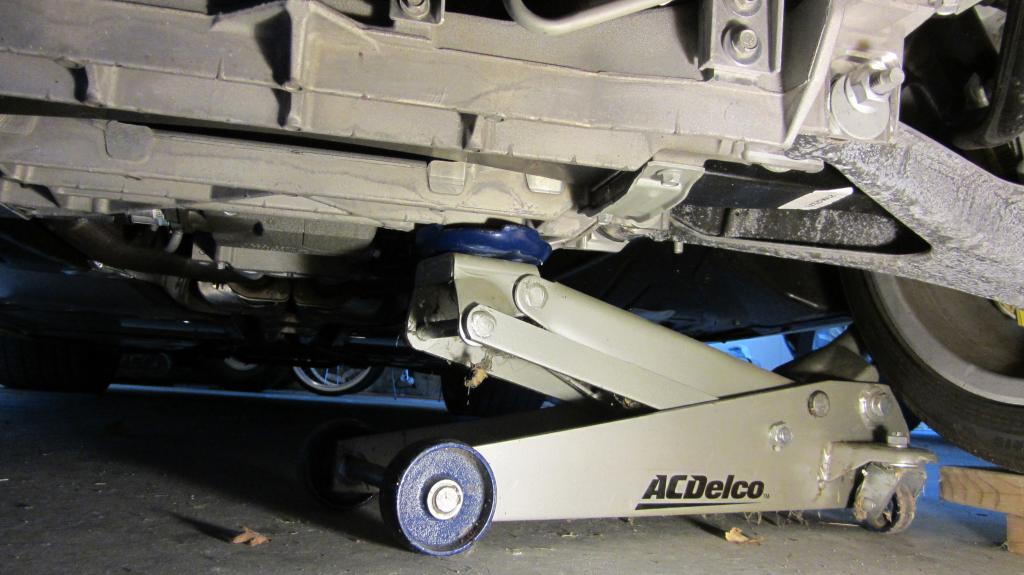
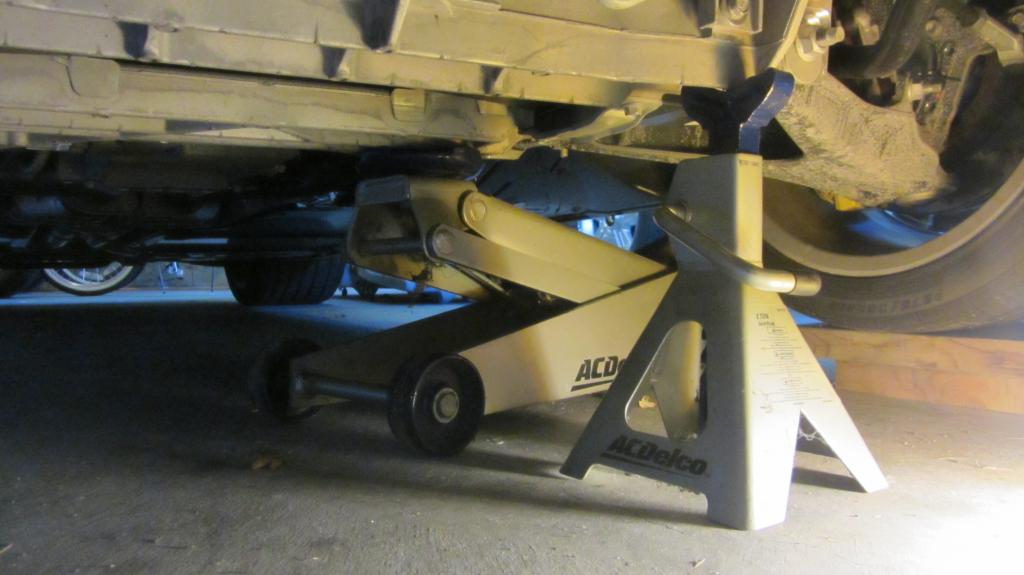
I started by backing up onto the stacked 2x10's from last week. This gave me enough clearance for the jack to get to the front crossmember jacking points:
From the Front:
Next I slid the jack under behind the front tire:
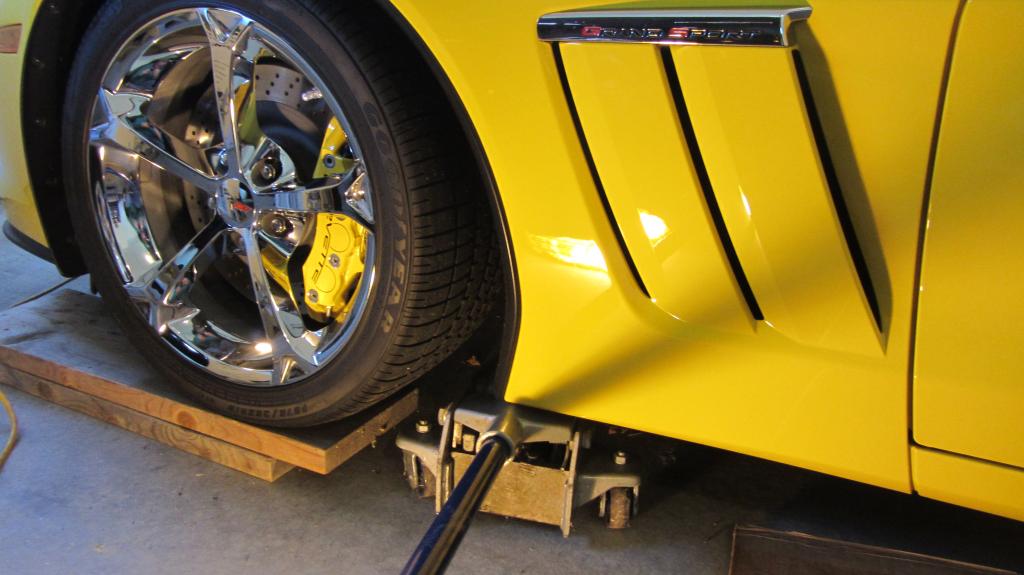
Here is where I got a little lucky. It just so happened the handle on the jack fit right between the front tire and the fender, allowing for a full pump on the jack:
Here is where I am lifting from:
and a view front the front of the car. Also make note, my jack has a wide lifting pad. There is a warning in the service manaual about lifting from this point, and the green points, that says "make sure the jack lift pad spans at least 2 suspension crossmember ribs"
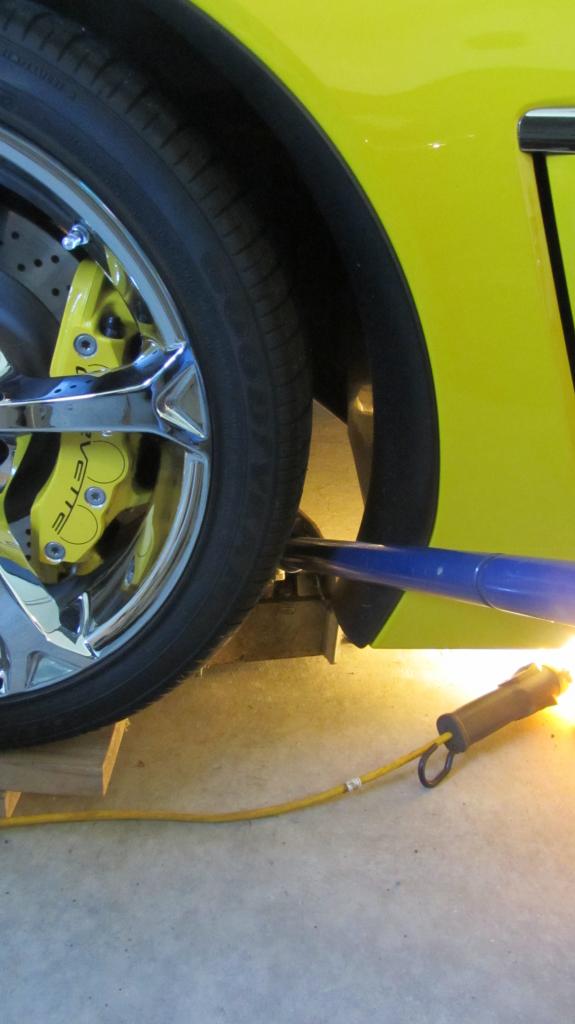
Jack stand under the front green alternate lift point for safety:
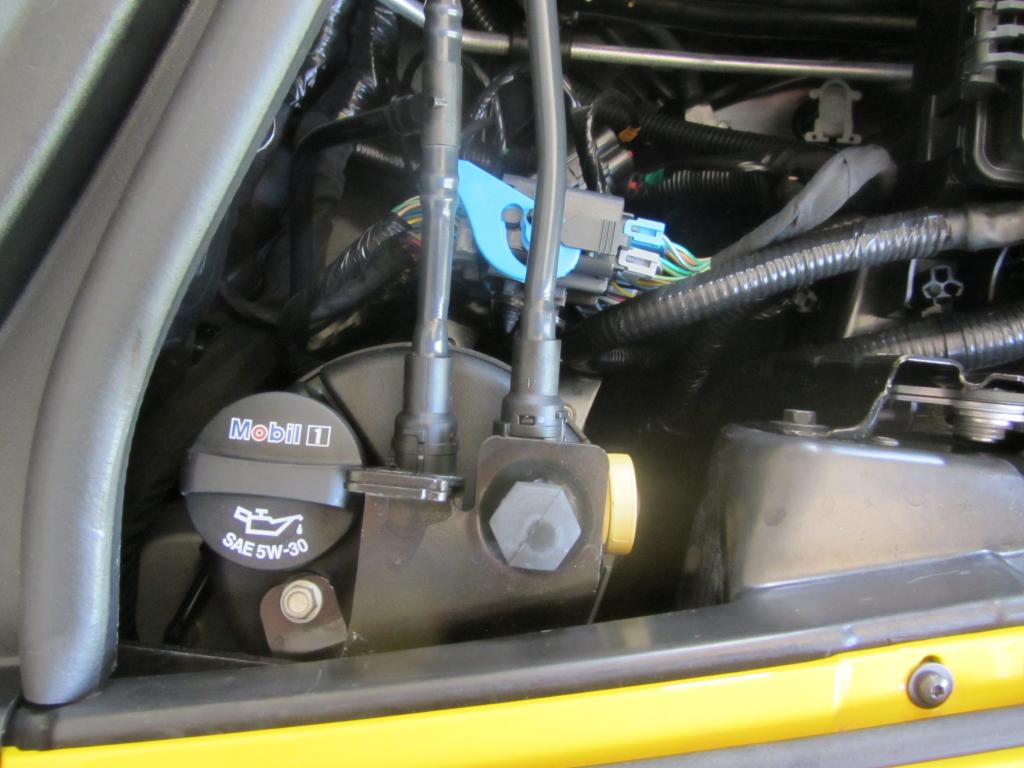
Now that you are up, pop the hood and locate the dry sump tank on the passenger side rear of the engine bay. Take off the cap and pull the dipstick loose. Just like the plumbing in your house, air behind liquid makes everything flow better. This is normally a sealed system, so pulling the cap will make for less gurgling and splashing when you pull the drain plugs.
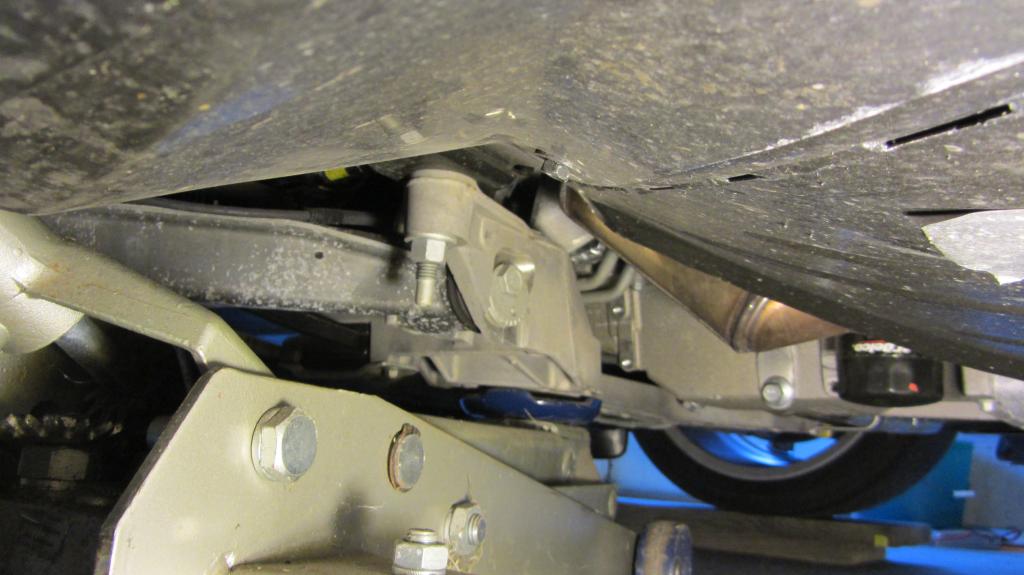
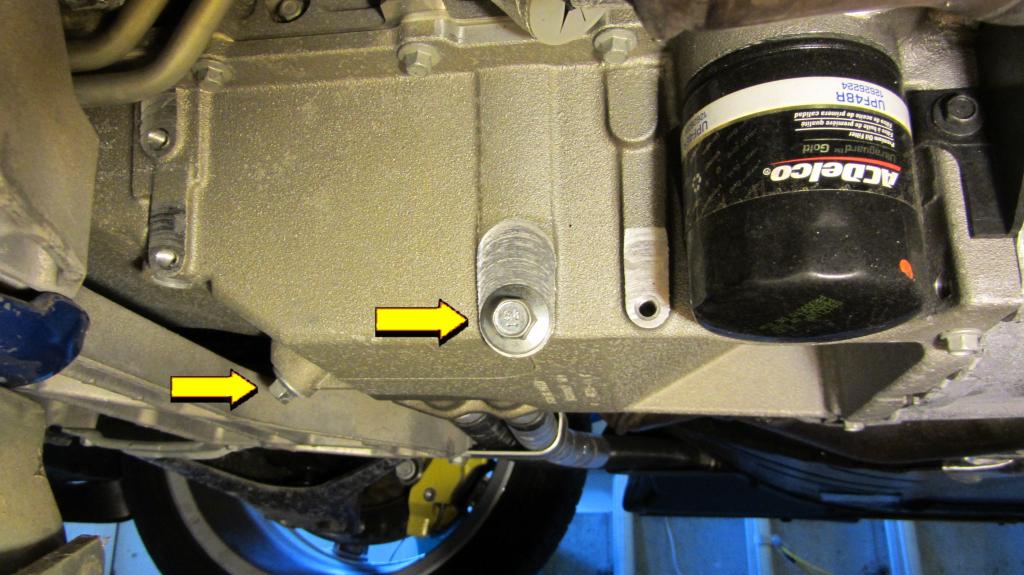
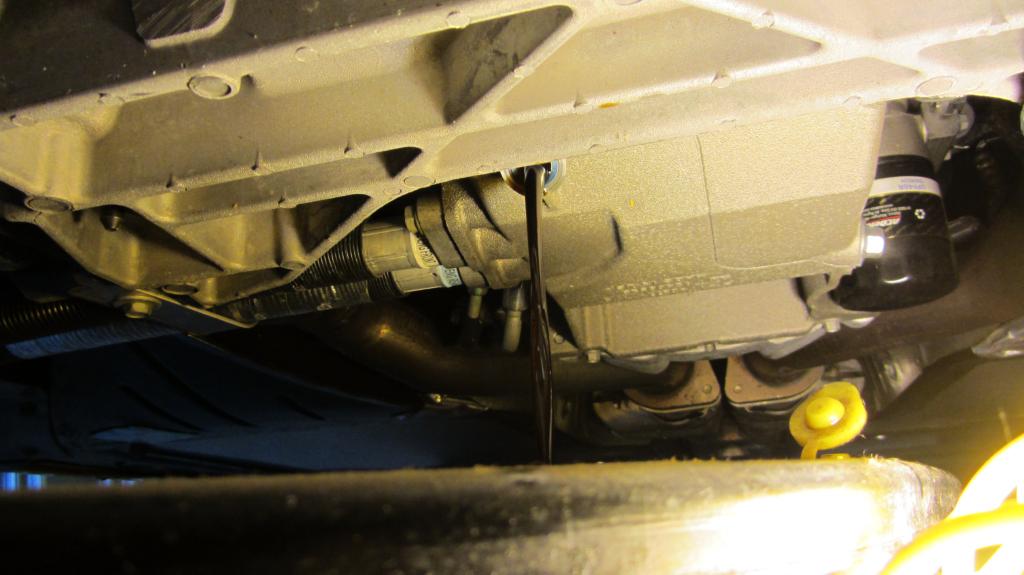
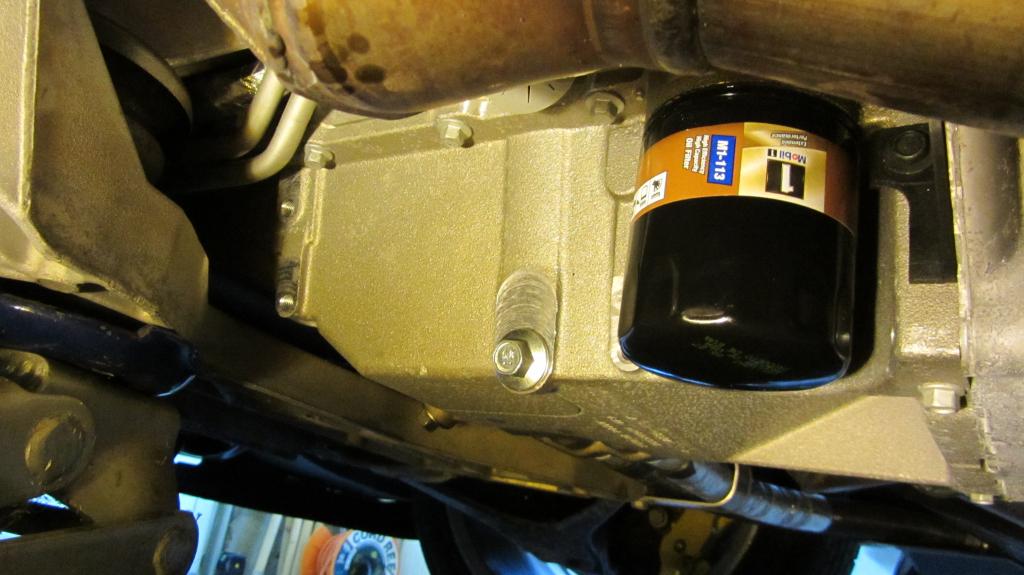
OK, now we go under, and from this view you can see the two drain plugs (side and front), as well as what the factory oil filter looks like. The dry sump uses a special high pressure black AC Delco filter instead of the normal blue ones:
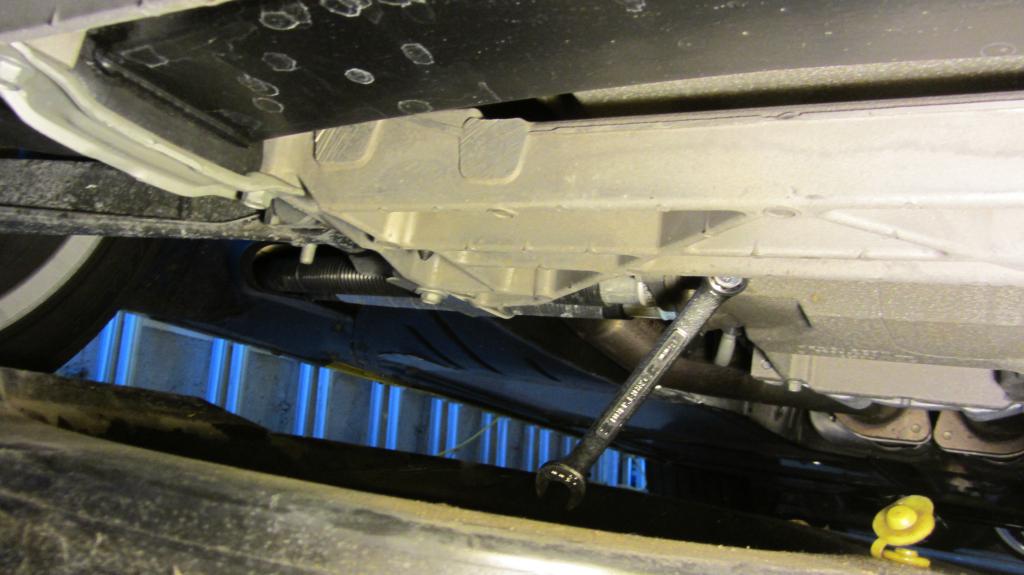
Here is where my strategy caused a little issue. Because of where the jack was, I could not get my drain pan under both drain plugs at once. So I went around to the front of the car and started with that one first:
Front plug draining:
....and still draining, wow that's a lot of oil!
I reinstalled the front drain plug and moved back around to the side:
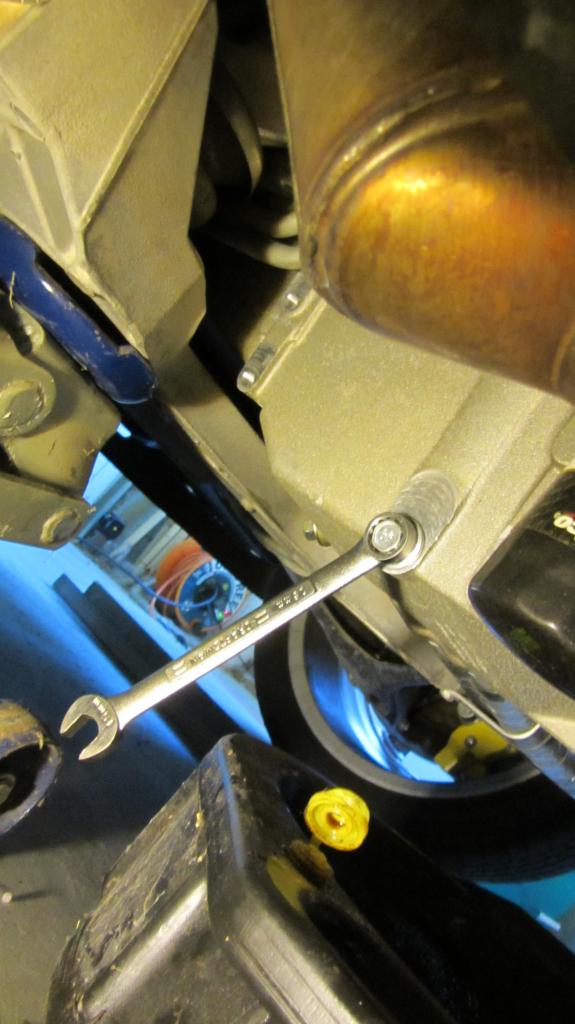
Much less oil here:
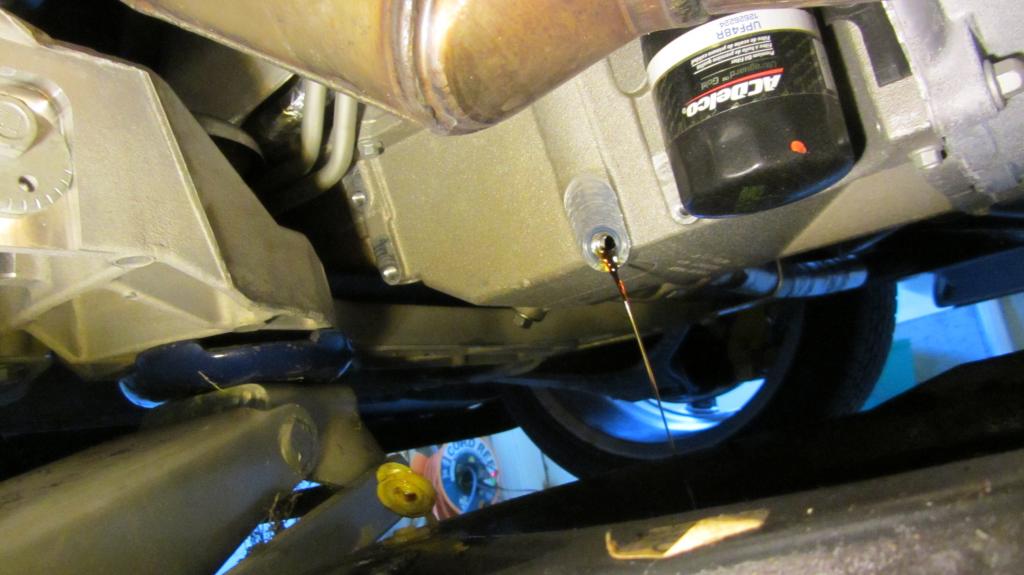
I then removed the oil filter. You will absolutely need a wrench, as the oil pan wraps so far around the filter there is no way to get a grip with your hand. I just loosened it a little and let it drain for a while before removing it completely:
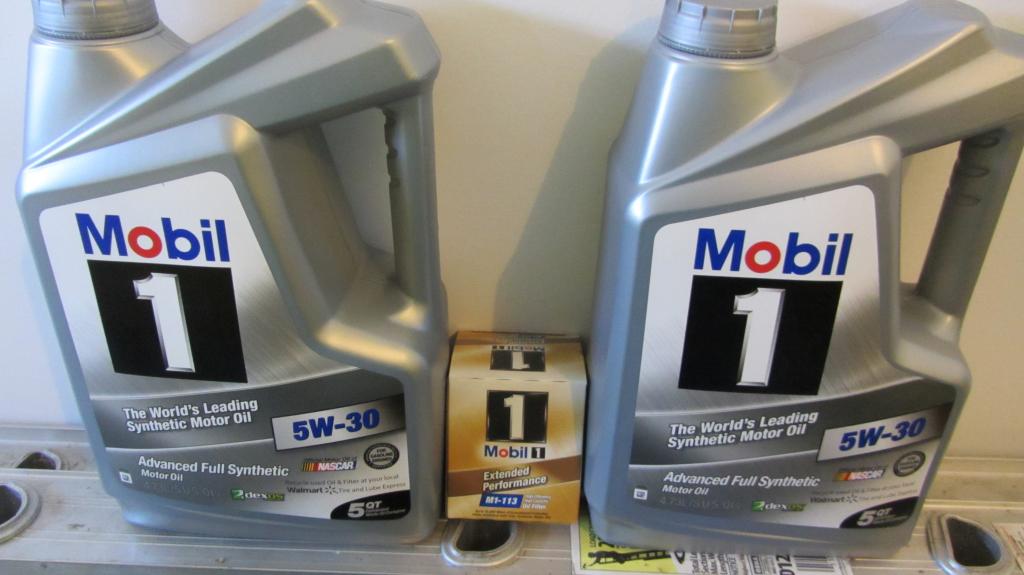
Now for the new stuff. I did a lot of research on filters and in my opinion this one seemed to be the best. In fact, there is no special high pressure dry sump applicaion for the Mobil 1 filter, becasue it is already made better to start with, with the thicker case that can stand the higher dry sump pressure:
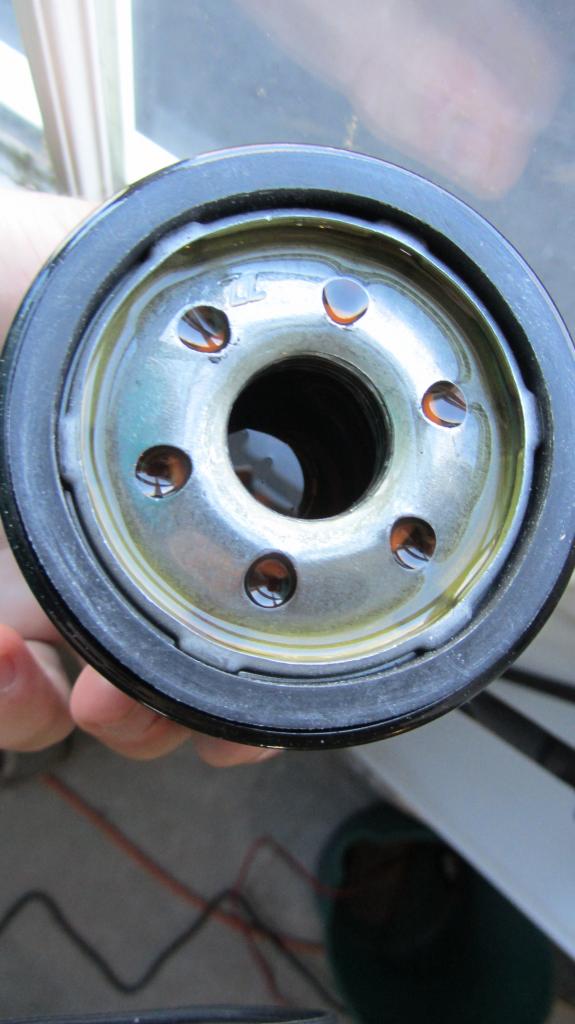
I always prefill my filters. No use letting the LS3 run without oil pressure, even for a couple seconds:
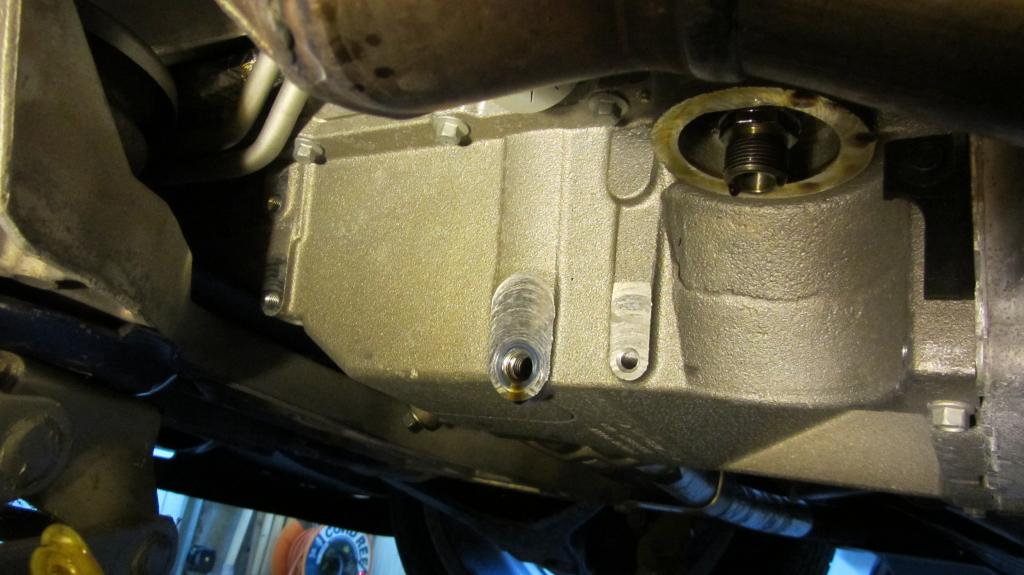
New filter installed and drain plug back in:
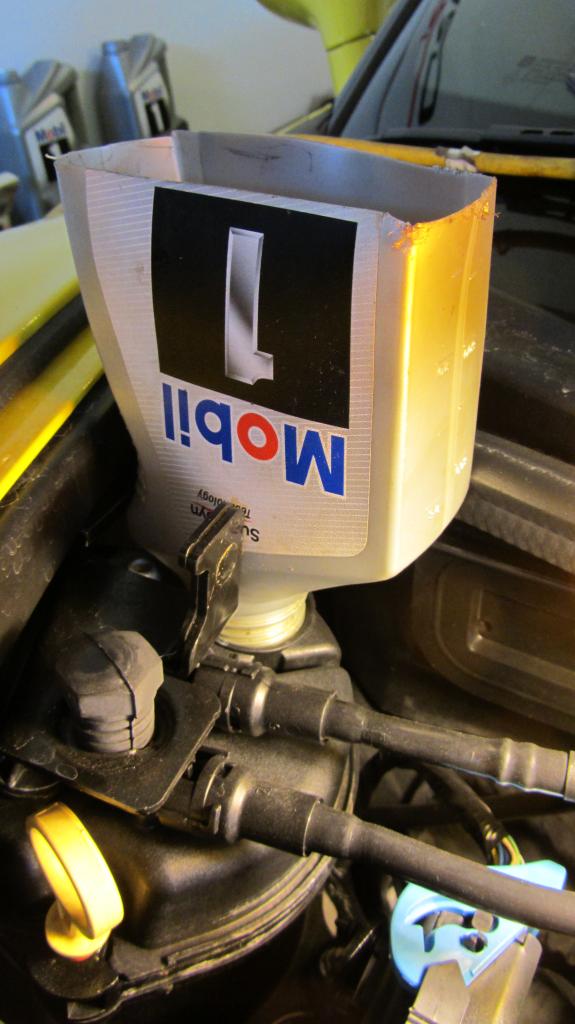
Here is my little trick for adding oil to the dry sump tank. Old Mobil 1 bottle fits perfectly in the dry sump opening, and no worry about a spill trying to pour from the 5 quart jugs:
Filled it up, check for leaks and put everything away. On a side note, with all of the threads about burning oil smell after oil changes, I poured my 5 quart jugs in slowly. I would tend to agree with the theories that too fast a fill gets oil into the PCV system causing the smell (although I have no idea). Right after the change, I put the car to bed for the winter, so I can't report of if I have a smell or not. It didn't smell as I backed it into it's final position.
Since the oil only had 1500 miles on it, I also changed the oil in my tractor and used the oil that just came out of the Vette. Now that's a way to recycle!
I'll start by saying this is my first time changing the oil on my 2012 Grand Sport. I wanted to change before putting it away for the winter, and it has 1456 miles on the clock. I read all of the info I could find, but I got lazy and didn't go buy jacking pucks, and I don't have ramps, so I wanted a way to do it without them, and without damaging anything.
I started to do the change a week ago and just thought backing up onto a couple 2x10's would be high enough, but it wasn't. I could slide under the car up to my chest, but that was it. For all of you wet sump folks, this would have been high enough becasue you only have to access one drain plug and the filter on the side of the pan. The dry sump has an additional drain plug right at the front of the pan in the center of the car, so I needed to get higher. So here is how it went today:
I started by taking a spin around the block to get the oil up to temp. I like doing my oil changes with warm oil as it flows better, and anything that is in the oil gets mixed up and suspended in the oil where it can drain out, instead of sitting at the bottom of the pan.
I'l start by showing the proper C6 lifting points. I will be using the Purple locations in the front. A note on lift points from the service manual when using the purple or green lift points "make sure the jack lift pad spans at least 2 suspension crossmember ribs"
Next the tools I will be using: 15mm wrench and an oil filter wrench:
I started by backing up onto the stacked 2x10's from last week. This gave me enough clearance for the jack to get to the front crossmember jacking points:
From the Front:
Next I slid the jack under behind the front tire:
Here is where I got a little lucky. It just so happened the handle on the jack fit right between the front tire and the fender, allowing for a full pump on the jack:
Here is where I am lifting from:
and a view front the front of the car. Also make note, my jack has a wide lifting pad. There is a warning in the service manaual about lifting from this point, and the green points, that says "make sure the jack lift pad spans at least 2 suspension crossmember ribs"
Jack stand under the front green alternate lift point for safety:
Now that you are up, pop the hood and locate the dry sump tank on the passenger side rear of the engine bay. Take off the cap and pull the dipstick loose. Just like the plumbing in your house, air behind liquid makes everything flow better. This is normally a sealed system, so pulling the cap will make for less gurgling and splashing when you pull the drain plugs.
OK, now we go under, and from this view you can see the two drain plugs (side and front), as well as what the factory oil filter looks like. The dry sump uses a special high pressure black AC Delco filter instead of the normal blue ones:
Here is where my strategy caused a little issue. Because of where the jack was, I could not get my drain pan under both drain plugs at once. So I went around to the front of the car and started with that one first:
Front plug draining:
....and still draining, wow that's a lot of oil!
I reinstalled the front drain plug and moved back around to the side:
Much less oil here:
I then removed the oil filter. You will absolutely need a wrench, as the oil pan wraps so far around the filter there is no way to get a grip with your hand. I just loosened it a little and let it drain for a while before removing it completely:
Now for the new stuff. I did a lot of research on filters and in my opinion this one seemed to be the best. In fact, there is no special high pressure dry sump applicaion for the Mobil 1 filter, becasue it is already made better to start with, with the thicker case that can stand the higher dry sump pressure:
I always prefill my filters. No use letting the LS3 run without oil pressure, even for a couple seconds:
New filter installed and drain plug back in:
Here is my little trick for adding oil to the dry sump tank. Old Mobil 1 bottle fits perfectly in the dry sump opening, and no worry about a spill trying to pour from the 5 quart jugs:
Filled it up, check for leaks and put everything away. On a side note, with all of the threads about burning oil smell after oil changes, I poured my 5 quart jugs in slowly. I would tend to agree with the theories that too fast a fill gets oil into the PCV system causing the smell (although I have no idea). Right after the change, I put the car to bed for the winter, so I can't report of if I have a smell or not. It didn't smell as I backed it into it's final position.
Since the oil only had 1500 miles on it, I also changed the oil in my tractor and used the oil that just came out of the Vette. Now that's a way to recycle!
Last edited by GM'er; 11-11-2012 at 07:22 AM. Reason: Added additional information, and the service manual warning on jacking.

The following 5 users liked this post by GM'er:
Ajaste (10-18-2018),
Big Top Gt (10-16-2023),
LoganExplosion (11-27-2017),
ONEBADZ (03-31-2017),
tomtoro (10-23-2017)
11-10-2012, 05:54 PM
#2
Melting Slicks


Great writeup I often wondered how it was done with the dry dump. Thanks 
 11-10-2012, 08:29 PM
#4
Safety Car

Nice writeup thanks!
11-10-2012, 08:35 PM
#5
Drifting
Thread Starter

 11-10-2012, 08:41 PM
#7
Tech Contributor
 11-10-2012, 08:43 PM
#8
Drifting
Thread Starter
10 quarts. I know it's supposed to take 10.5, but I know there is no way you get every drop out. When I dumped my drain pan back into the Mobil 1 jugs everything that came out fit back into those bottles, so I didn't drain out 10.5. Dipstick also shows full after the change.
The following 2 users liked this post by GM'er:
rdwalljr (07-19-2021),
Viet_Vette47 (06-06-2016)
11-10-2012, 08:49 PM
#9
Pro

Member Since: Mar 2012
Location: Buena Park CA
Posts: 606
Likes: 0
Received 0 Likes
on
0 Posts
Good write-up. Anybody should be able to do it with your instructions if they have the right tools.
I have never filled my new oil filter before installing. I will have to try that.
I have never filled my new oil filter before installing. I will have to try that.
11-10-2012, 09:29 PM
#10
Cruising


Member Since: Mar 2012
Location: Louisiana
Posts: 12
Likes: 0
Received 0 Likes
on
0 Posts
Very nice write up. I am getting ready to change my 2012 GS dry sump. Have a little over 1600 miles. Had decided to go with the same oil and filter as you chose. Never filled the oil filter though on my other cars but will do so from now on!
Question: are they magnetic drain plugs? If so any gunk stuck on them?
Thanks,
Glenn
Question: are they magnetic drain plugs? If so any gunk stuck on them?
Thanks,
Glenn
 11-10-2012, 09:33 PM
#12
Tech Contributor
Quick question....Do the drain plugs use a crush washer or have a rubber seal around them? Seems like most (but not all) aluminum pans use a drain plug with aluminum or copper crush washers that have to be replaced each time but you made no mention of that....hence the question  I'm getting ready to do the oil change on my '13 GS.
I'm getting ready to do the oil change on my '13 GS.
11-10-2012, 09:43 PM
#13
Drifting
Thread Starter
Quick question....Do the drain plugs use a crush washer or have a rubber seal around them? Seems like most (but not all) aluminum pans use a drain plug with aluminum or copper crush washers that have to be replaced each time but you made no mention of that....hence the question I'm getting ready to do the oil change on my '13 GS.
I'm getting ready to do the oil change on my '13 GS.
11-10-2012, 09:51 PM
#14
Drifting
Thread Starter
Very nice write up. I am getting ready to change my 2012 GS dry sump. Have a little over 1600 miles. Had decided to go with the same oil and filter as you chose. Never filled the oil filter though on my other cars but will do so from now on!
Question: are they magnetic drain plugs? If so any gunk stuck on them?
Thanks,
Glenn
Question: are they magnetic drain plugs? If so any gunk stuck on them?
Thanks,
Glenn
11-10-2012, 09:54 PM
#15
Drifting
Thread Starter
11-10-2012, 10:29 PM
#16
Burning Brakes


Member Since: Sep 2012
Posts: 974
Likes: 0
Received 0 Likes
on
0 Posts
Thanks for the write up. I had the advantage to watch from under the car, my local GM vette tech at the dealer , change the oil on my GS for the first time. The only thing he said/did that was different than your write up was there is a special filter that is needed for the Ddrysump cars because of the higher oil pressure. It was some special delco filter he had to go get from parts.
And the second thing was he dropped both plugs at the same time. It seemed to drain pretty fast at that point. I also asked him about the magnetic plugs and he said they were not. So no big deal, but thats what my tech(30yr vette tech) said and did. He said we was the only tech at the dealer that was allowed to work on any of the vettes including oil changes. So great write up man. And my tech did add the 10.5 into mine and it was full too, but he did not fill up the filter.
And the second thing was he dropped both plugs at the same time. It seemed to drain pretty fast at that point. I also asked him about the magnetic plugs and he said they were not. So no big deal, but thats what my tech(30yr vette tech) said and did. He said we was the only tech at the dealer that was allowed to work on any of the vettes including oil changes. So great write up man. And my tech did add the 10.5 into mine and it was full too, but he did not fill up the filter.
11-11-2012, 12:07 AM
#17
Nice write up. I went with the race ramps and still get 10 quarts of the old oil out. One thing to mention is to pour the oil in slowly. To fast and it over flows and you have a mess to clean up and oil dripping from your car for a day or so.
11-11-2012, 06:52 AM
#19
Drifting
Thread Starter
Thanks for the write up. I had the advantage to watch from under the car, my local GM vette tech at the dealer , change the oil on my GS for the first time. The only thing he said/did that was different than your write up was there is a special filter that is needed for the Ddrysump cars because of the higher oil pressure. It was some special delco filter he had to go get from parts.
And the second thing was he dropped both plugs at the same time. It seemed to drain pretty fast at that point. I also asked him about the magnetic plugs and he said they were not. So no big deal, but thats what my tech(30yr vette tech) said and did. He said we was the only tech at the dealer that was allowed to work on any of the vettes including oil changes. So great write up man. And my tech did add the 10.5 into mine and it was full too, but he did not fill up the filter.
And the second thing was he dropped both plugs at the same time. It seemed to drain pretty fast at that point. I also asked him about the magnetic plugs and he said they were not. So no big deal, but thats what my tech(30yr vette tech) said and did. He said we was the only tech at the dealer that was allowed to work on any of the vettes including oil changes. So great write up man. And my tech did add the 10.5 into mine and it was full too, but he did not fill up the filter.
Last edited by GM'er; 11-11-2012 at 07:24 AM.

The following users liked this post:
Viet_Vette47 (06-06-2016)