When you click on links to various merchants on this site and make a purchase, this can result in this site earning a commission. Affiliate programs and affiliations include, but are not limited to, the eBay Partner Network.
Hello everyone wanted to get an opinion on an issue I’m having (one of many that I’ve posted here). First of all this forum has been a great help and wanted to thank you all. Well here’s my problem.
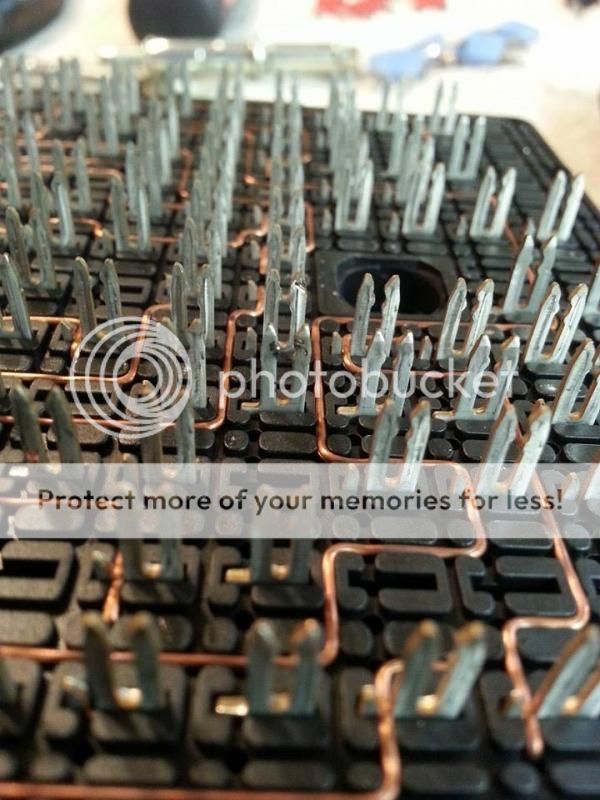
Lately my car hasn’t been starting. It would crank but would not start. Checked and there was no fuel pressure. So I opened up the fuel box and looks like one of the pins is burned. I think this one connects to the fuel pump relay. Do I have to replace this wire ? If so is there a part number for it ?
Lower block Connector pin just needs to be corrected (bent back in shape).
Look at the the block that does not have a connect, and see the spring loaded retainer plastic piece.
So what you need to do is use a sewing pin (slightly larger size one or dental pick, presses the tab on it away from the connector,so you can pull the connector out the bottom of block (mark the channel that the connector has to go back up into). Now straighten the U bend on the clip on the connector back outwards with a pin from the sides, so it will make better contact with the fuse block spade when its snapped back in place to lock back on the plastic retainer.
Note, may be able to just use a sewing pin with the connector is place to correct is center U bend piece, without having to pull the connector from the block.
Back at the starter relay on top of the upper fuse block, remove it, and flood the slots for the relay spades into the U connectors with electrical spray cleaner.
Hence blunt of the problem is back up at the upper fuse block U connector for the relay spade connector, with its contact points either burnt, or the U spread open, which causes the excess heat, and the lower block connector take the brunt of that heat isntead. Also, a relay itself that is starting to go out, will cause the same problem as well.
In most cases, just spray cleaning the upper block U connector for the relay spade resolves, the problem, while in worst causes where not only is the U connector contact surfaces burnt, the U bent open, and even bad contact of the trace wire to the side of the U connector for the relay spade, that you have to pull the upper block apart to correct such instead.
Note, when you go to put the relay back in, swap it for the same type relay in the fuse box (postion swaps of the two), but one that is not being used much like the washer pump.
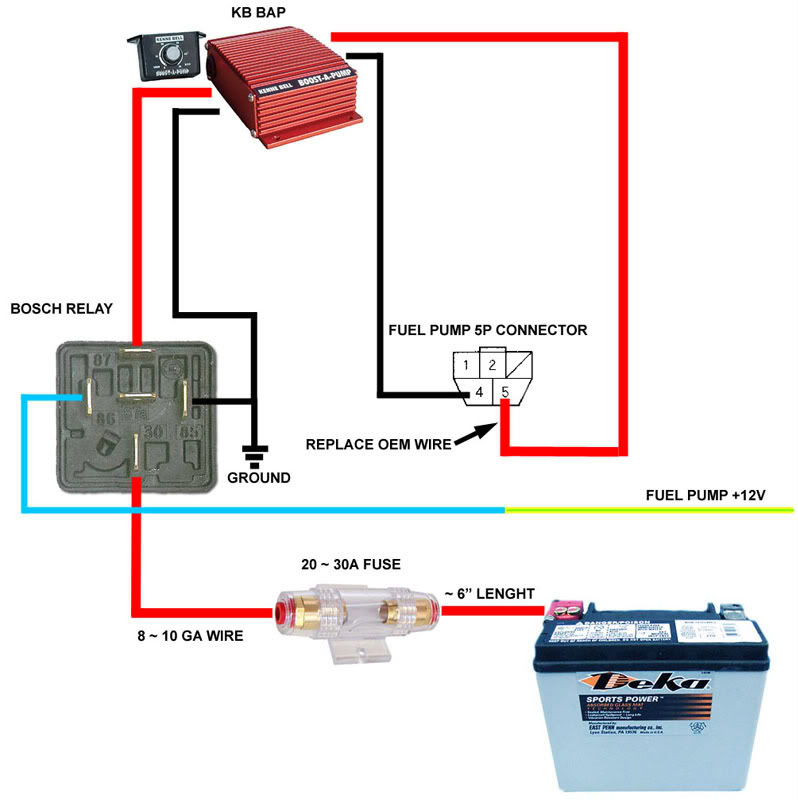
The last one, if there is a BAP that was installed in the car, and the OEM wire is being used to drive the BAP (not just its relay controlling the power that is being pulling from the engine bay fuse box connector), that needs to be corrected.
Hence green/yellow wire is the OEM 12V back to the oem fuel pump, and with a BAP install, the oem 12V wire is only used power up the relay, since it too small of gauge to power up the BAP directly isntead. Same goes for if there is a secondary fuel pump added to the car, and then the fuel pumps are wired with large gauge wire, with the oem power wire only controlling the control relay itself (relay uses less than 1 amp of power, so it not taxing the hell out of the OEM relay and it circuit sides to burn them up).
Also, before you go to put the upper fuse box back in place, use dielectric grease on the lower spades of the upper fuse box, and the connectors of the lower fuse block connectors. The dielectric (slicone) grease not only works to prevent the metal parts from corroding, but works as a light thermal heat transfer paste to help soak up some of the heat of the connectors as well. Truth is, will pull the fuse and relays one at a time, to use the dielectric grease on the fuse pins and relay pins, to transfer to the block U connectors for the same reason as well.
Lower block Connector pin just needs to be corrected (bent back in shape).
Look at the the block that does not have a connect, and see the spring loaded retainer plastic piece.
So what you need to do is use a sewing pin (slightly larger size one or dental pick, presses the tab on it away from the connector,so you can pull the connector out the bottom of block (mark the channel that the connector has to go back up into). Now straighten the U bend on the clip on the connector back outwards with a pin from the sides, so it will make better contact with the fuse block spade when its snapped back in place to lock back on the plastic retainer.
Note, may be able to just use a sewing pin with the connector is place to correct is center U bend piece, without having to pull the connector from the block.
Back at the starter relay on top of the upper fuse block, remove it, and flood the slots for the relay spades into the U connectors with electrical spray cleaner.
Hence blunt of the problem is back up at the upper fuse block U connector for the relay spade connector, with its contact points either burnt, or the U spread open, which causes the excess heat, and the lower block connector take the brunt of that heat isntead. Also, a relay itself that is starting to go out, will cause the same problem as well.
In most cases, just spray cleaning the upper block U connector for the relay spade resolves, the problem, while in worst causes where not only is the U connector contact surfaces burnt, the U bent open, and even bad contact of the trace wire to the side of the U connector for the relay spade, that you have to pull the upper block apart to correct such instead.
Note, when you go to put the relay back in, swap it for the same type relay in the fuse box (postion swaps of the two), but one that is not being used much like the washer pump.
The last one, if there is a BAP that was installed in the car, and the OEM wire is being used to drive the BAP (not just its relay controlling the power that is being pulling from the engine bay fuse box connector), that needs to be corrected.
Hence green/yellow wire is the OEM 12V back to the oem fuel pump, and with a BAP install, the oem 12V wire is only used power up the relay, since it too small of gauge to power up the BAP directly isntead. Same goes for if there is a secondary fuel pump added to the car, and then the fuel pumps are wired with large gauge wire, with the oem power wire only controlling the control relay itself (relay uses less than 1 amp of power, so it not taxing the hell out of the OEM relay and it circuit sides to burn them up).
Also, before you go to put the upper fuse box back in place, use dielectric grease on the lower spades of the upper fuse box, and the connectors of the lower fuse block connectors. The dielectric (slicone) grease not only works to prevent the metal parts from corroding, but works as a light thermal heat transfer paste to help soak up some of the heat of the connectors as well. Truth is, will pull the fuse and relays one at a time, to use the dielectric grease on the fuse pins and relay pins, to transfer to the block U connectors for the same reason as well.
thanks for the reply Dano! I was just about to attempt cleaning and bending the pin back in shape when I saw that the clip that holds the pin on the lower block in place is broke. Do you think this would affect the contact made with the upper block ? If so what would be a possible solution ? I got this car used about a year ago maybe the previous owner opened up the fuse box to try and fix this issue before and broke the clip
Mouser has the crimp on connectors on the cheap that you can buy in the small packs. As stated, push the plastic retainer tab away from the connector with pick tool/larger sewing pin, and the connector can be pulled out the bottom of the block.
If you just have to have the connector now, then hit up autozone or another car parts shop, and should be able to find a few of the needed connectors that may cost more instead. Hence if you can not find just the crimp on connectors by themselves, look the replacement harness with connectors that has the needed connects in it.
Thanks Dano. Im going to call autozone today. I will update once I figure this out.
Yea, I had same problem a couple of times. Take fuse box apart and clean burnt/corroded pin for fuel pump relay- then with dental pick bend connector pin back so it will contact top of fuse box connector when you put it back together. I even decided to carry the socket and other tools in case it ever dies on me when driving!
Thanks guys. It ended up being a lose ground at the left rear wheel well causing a short to the fuel pump relay. Tightened that up and soldered a new wire for the fuel pump relay. Cars starts every time now.
I know this is an older thread. However, I'm sure more people have had to deal with this issue. By chance, for those have repaired the connector at the fuse box, do any of you have the part number for the mouser replacement pins?
Here's information on the connector including some part numbers. It's a Metri-Pack unsealed 280 series. So you will need to get female terminals for a Metri-Pack unsealed 280 connector. Mouser and other electrical supply houses will have lots of them and the crimp tool to attach them if you don't already have one. Make sure you have the correct terminal and crimp die sizes for the fuel pump 12v supply wire - it's larger than the other wires attached to the X2 connector. You can remove the old terminal from the connector with the regular Metri-Pack release tool.

 02-06-2021, 07:13 PM


 I will update once I figure this out.


