When you click on links to various merchants on this site and make a purchase, this can result in this site earning a commission. Affiliate programs and affiliations include, but are not limited to, the eBay Partner Network.
Installed my RadioFlyer Innovations DRL LED Switchbacks
The one thing I did not ever like on my C6 was the Amber DLR lights
I thought it really dated the car compared to all the new cars that are coming out with LED running lights
I looked on EBAY but all I could find were switchbacks that only turned white when the headlights were on, otherwise they were just fancy LED Amber DRL
Then I checked out RadioFlyer Innovations Switchback Harness and Cree LED Switchback bulbs . RadioFlyer is a Forum Vendor
This was exactly what I was looking for , a White DRL that turns amber only when you turn the turn signal is on or the 4 way flashers are switched .
So my buddy Tom and I purchased the kit and bulbs , they arrived on our doorsteps two days later ( Fast Shipping ! )
The Harness is OEM quality using OEM connectors and the Cree LED bulb is a bright white and gives the front of the car a new look .
Very easy installation , maybe 10 minutes a side including removing the tire. Tom used his lift , I did mine on the ground using a jack and jack stand for safety .
To install the Harness
1- remove the 6 pushpins that hold the front part of the inner fender
2- remove 10 MM bolt down by the front air dam towards the center
3- Remove pin that connects the side air dam to the center air dam.
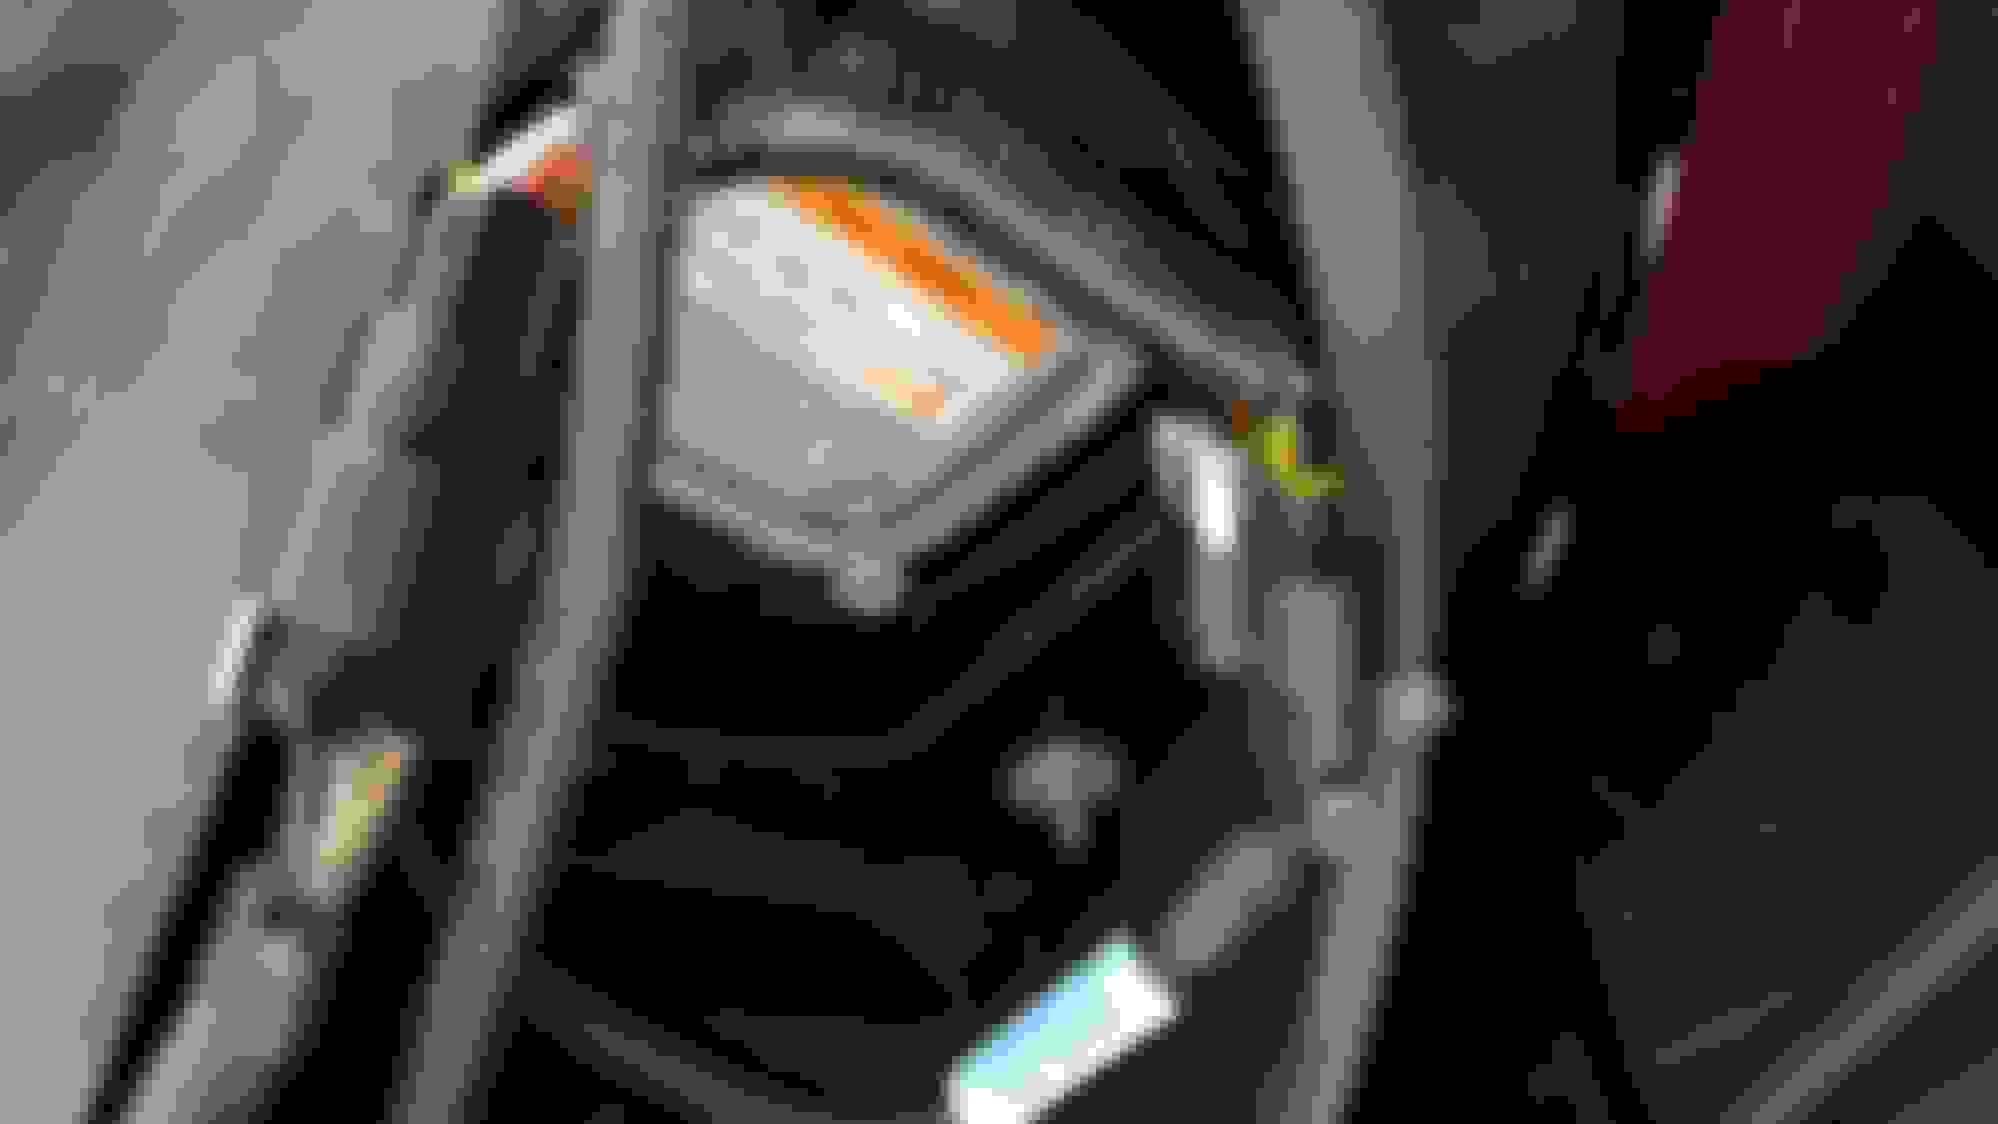
4- Remove the front inner wheel well and brake cooling duct as a unit and you will have access to the headlamp wiring harness shown in the picture below.
5- Split the OEM harness and insert the new Radioflyer harness between the OEM body harness and the headlamp harness
To Install the bulbs
1- Just remove the 6 push pins that hold the rubber flap that is located just above the inner fender you just removed ,
2- This will give you access to the rear of the headlight
3- Remove the AMBER DRL by twisting the socket and replace with the new Cree Bulb
4- Before putting it all back together , test that you have the bulb in the right direction , a bulb installed in the wrong direction will result in the Amber LEDs staying lit instead of the White
Reverse the above steps to re assemble
Here is a picture of the DRL lights and headlights on
And one with the Left Turn signal on , notice the color change
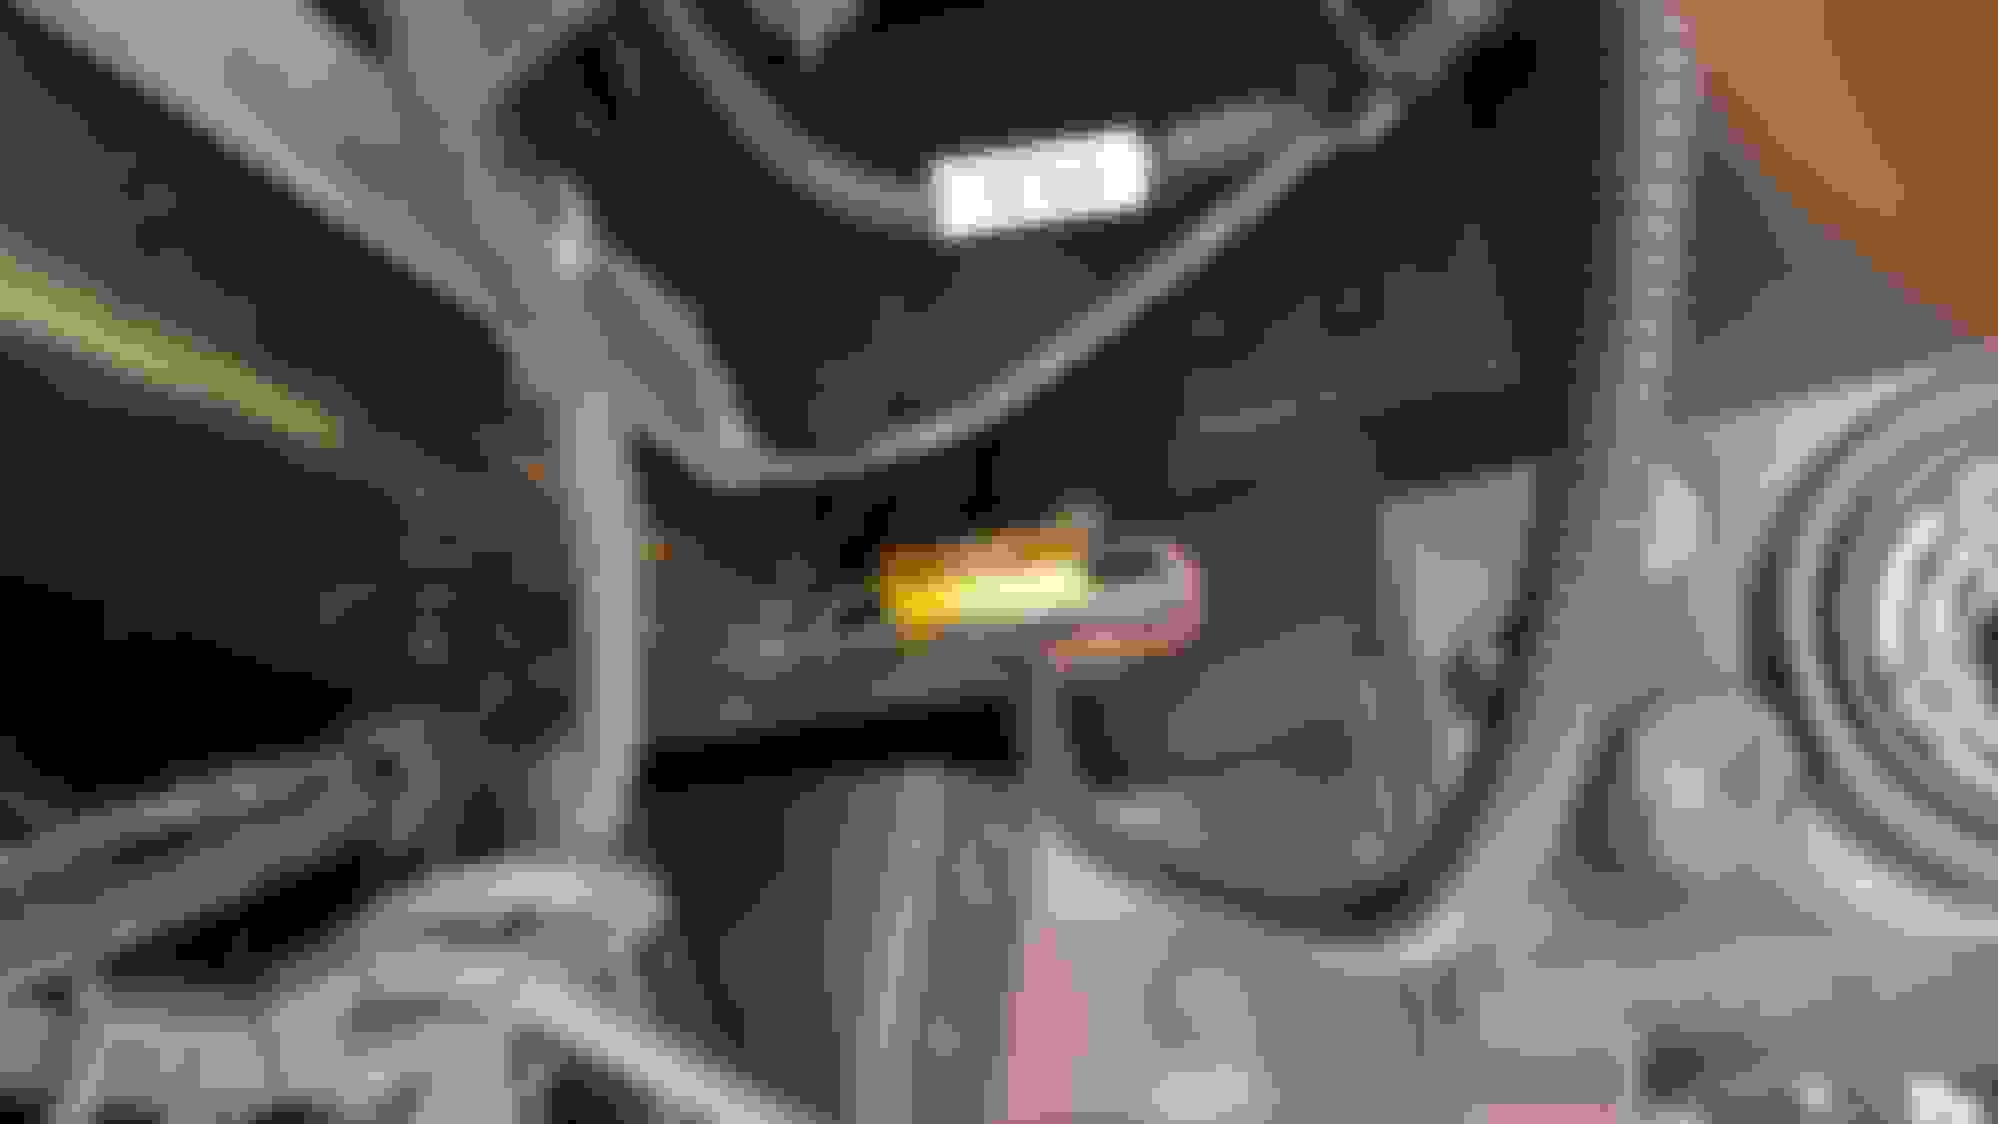
A picture of the harness , you just unplug the OEM headlight harness and plug in the supplied harness between the two OEM harness connectors , you can see how well this harness is made
And then you mount the resistor that is wired into the harness to used to prevent HYPERFLASH right to the metal sub-frame of the car with the included hardware
Awesome kit that I highly recommend to anyone who was like me and hates the Amber DRL bulbs ....
Plus Radio Flyer responds very fast to any email that you send him , god only knows how many emails I sent him as I had more than a few questions before I purchased the kit lol
Dave
( PS I am in no way affiliated with Radioflyer Innovations lol)
I literally just installed these in my car too. It's a great mod.
The only flaw I can find is RadioFlyer had no instructions for accessing the area to install this.
By trial and error, I realized that I had to get under the car and remove the inner wheel liner, front airdam and brake duct intake. From underneath with all the plastic out of the way, installation was a snap.
I wish this thread was up last night. Nice writeup Dcasole.
Just put these into my 2005. First off, with the current bulbs and harness, the bulbs are NOT necessarily in correctly if they are white when you turn on the lights.
You need to put the bulb in, turn on the hazards, and see if it's yellow. If not, try reversing it. Don't be a dummy like me and put everything back and then discover that you have no yellow.
Second off, I'm having issues that are worrisome. After reversing the bulbs, I could get them working, then install them back into the socket and they would either stop working all together,
or go back to all white. I'm not sure if the sockets are old, the bulbs are flaky, or what. I've contacted RadioFlyer, but so far no response. Wish me luck.
Last edited by SilverTiger; 08-17-2016 at 05:27 PM.
Just put these into my 2005. First off, with the current bulbs and harness, the bulbs are NOT necessarily in correctly if they are white when you turn on the lights.
You need to put the bulb in, turn on the hazards, and see if it's yellow. If not, try reversing it. Don't be a dummy like me and put everything back and then discover that you have no yellow.
Second off, I'm having issues that are worrisome. After reversing the bulbs, I could get them working, then install them back into the socket and they would either stop working all together,
or go back to all white. I'm not sure if the sockets are old, the bulbs are flaky, or what. I've contacted RadioFlyer, but so far no response. Wish me luck.
Yep , you have to check any LED bulb to make sure that they are in correctly as they can go in either way
I also checked for proper operation before I put it all back together.
I would check the harness connections again and also the bulbs as you really have to press hard to get them to clip into the socket correctly
I would also check the wires on the bottom of the bulbs to make sure they are making a good contact since you had them in backwards and had to pull them out , it's easy for those wires to move on the black plastic and not make proper contact
I have installed 2 sets if these with no problems at all except for putting the bulb in backwards once so I am confident it is something simple
Radio will contact you , he has always returned my emails and PM's
Dave
Hey, thanks a ton for the response.
They're working now, but I lack confidence due to all the glitches.
I don't think it's the harness connections; I was pretty careful there.
Yeah, I checked the wires on the LEDs; looked OK to me and I'm reasonably certain that I had them pushed in all the way. Going to try it for a while and see what happens, I guess.
Welcome !
you will be fine , mine have been in for a while , its only a wire harness with a capacitor in it so there is not to much to go wrong , same goes for the bulb , the Cree bulb that Radio sells is one of the best and brightest out there , again its just a bulb so there is not to much that can go wrong
and you have to love the look !!!! they look so awesome !
Dave
Agree! I found that the little contact wires on my bulbs were a bit "off" compared to the sockets. A little bending here and there got them working. I got the following from Radio Flyer, which I think would be a good
way to install them (slightly edited):
Check the function with LED bulbs installed BEFORE installing harnesses (running on factory wiring) You should see:
Parking lights: White
DRL - Amber
Turn signal/Hazard Amber
If you have this correct, then install the harnesses. If not, remove and re-install the bulbs so the contacts are reversed to correct polarity.
I would add that you should try jiggling the bulbs a bit before reinstalling to make sure you have good contact.
If not, fiddle with the contact wires.
Also, the bulb sockets in my 05 are VERY HARD to remove! Had to use pliers. Counterclockwise to remove.
Hope this stuff may help someone else out!
Silver you are wrong ....
Parking lights = white
DRL = white , that's why you bought the harness as it's the only solution that provides a DRL in white
Turnsignals = Amber ......
Parking lights = white
DRL = white , that's why you bought the harness as it's the only solution that provides a DRL in white
Turnsignals = Amber ......
Dave
Read it again Dave. They work that way BEFORE you install the new harnesses. This came directly (more or less) from Radio.
Got mine this afternoon and put them on after dinner. Took a shower (93 and VERY humid!) and was driving before sunset.
Must be one of the easiest mod's I've done. The 'only' hard part was mounting the resistor. What a pain...but it's done.
Dave, do yours flash a LOT faster than the OEM bulbs? My install technique was to do the bulbs first to validate bulb orientation, then harness install. I really couldn't tell the difference between the LED bulb working withOUT the harness and with the mod'ed harness.
I do have EagleEye tail lights with the huge resistor packs, but I didn't have hyper flash prior to installation. Just wondering how fast everyone else's are working.
TIA,
Bob...
Originally Posted by Dcasole
Silver you are wrong ....
Parking lights = white
DRL = white , that's why you bought the harness as it's the only solution that provides a DRL in white
Turnsignals = Amber ......

 07-17-2016, 04:11 PM


 Nice writeup Dcasole.


