
[Z06] **Z06 Muffler Mod with pics**
 03-27-2010, 10:24 PM
#21

So if I'm looking at the above pics correctly, GM effectively took a 3 inch pipe and crimped it down to what looks like 2.5 inch pipe or less going into the muffler ?? !! 

Who makes a good after market system for the Z06 ? I was looking at SLP Loud Mouth's and Corsa Extreme's but it seems neither are made for our cars.
Who makes a good after market system for the Z06 ? I was looking at SLP Loud Mouth's and Corsa Extreme's but it seems neither are made for our cars.
B&B Z06 Fusions .....
http://www.bbexhaust.com/car/corvette/z06/

 04-09-2010, 10:59 PM
#23
A good friend helped me with my Muffler-Mod this morning.
All I can say about the end result: WOWOWOWOWOWOW!!!!!!
Total cost ($40):
1) $20 spent at the Auto-Parts store for some 3" pipe, WD-40, and Header paint.
2) $20 to treat my friend to a burger, fries and a coke!
My friend, Brad wouldn't accept any type of payment other than lunch, so I gave him a brand new Z06 ball cap.
I still have the stock H-pipe, cats and exhaust manifolds.... but this mod really improved the sound! Of course it would sound even better with headers, high-flow cats, and X-pipe.... that will happen in a few months.
At least now, I can HEAR my exhaust better!
Best bang for the buck Mod to a Z06!

Oh... I forgot to mention, my buddy and I jacked the rear up and put ramps under the rear tires..... I did NOT mess with dropping the cradle.
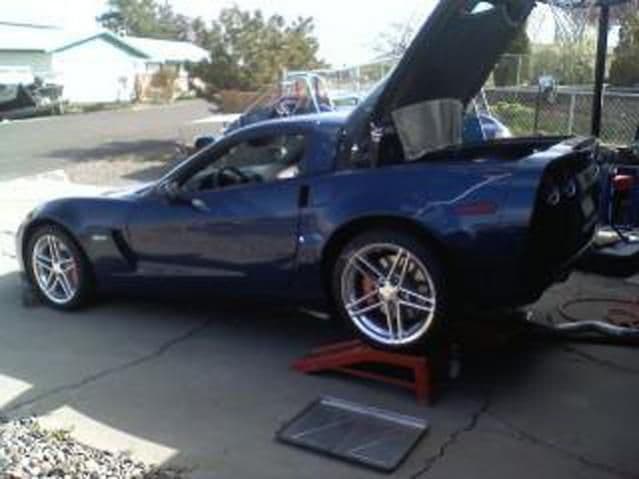
We did remove the heat-shield that is right above the mufflers (see metal shield/tray by left-rear wheel) ...it made the removal of the right muffler a lot easier (per say).
The right muffler bank WAS a BITCH to wiggle out of the car ...BUT... we managed to get it out with lots of careful finessing. It went back in with slightly less cussing than when it came out... but it still wasn't very easy. The left muffler bank came out and went back in the car SUPER EASY!
All I can say about the end result: WOWOWOWOWOWOW!!!!!!
Total cost ($40):
1) $20 spent at the Auto-Parts store for some 3" pipe, WD-40, and Header paint.
2) $20 to treat my friend to a burger, fries and a coke!
My friend, Brad wouldn't accept any type of payment other than lunch, so I gave him a brand new Z06 ball cap.
I still have the stock H-pipe, cats and exhaust manifolds.... but this mod really improved the sound! Of course it would sound even better with headers, high-flow cats, and X-pipe.... that will happen in a few months.
At least now, I can HEAR my exhaust better!
Best bang for the buck Mod to a Z06!
Oh... I forgot to mention, my buddy and I jacked the rear up and put ramps under the rear tires..... I did NOT mess with dropping the cradle.
We did remove the heat-shield that is right above the mufflers (see metal shield/tray by left-rear wheel) ...it made the removal of the right muffler a lot easier (per say).
The right muffler bank WAS a BITCH to wiggle out of the car ...BUT... we managed to get it out with lots of careful finessing. It went back in with slightly less cussing than when it came out... but it still wasn't very easy. The left muffler bank came out and went back in the car SUPER EASY!
Last edited by Dbl6gun; 04-10-2010 at 12:51 AM.
04-10-2010, 05:39 PM
#24
Safety Car


i never scraped the right heat shield, instead the edge of the pipe scratched the fiberglass just above the axle. the right muffler was a bear. right after i got a CEL that said to check my gas cap. I checked the plumbing and wires thinking i knocked something loose when i yanked the right muffler out but all was well. maybe the extra vibration running some turndowns out the back of the X pipe vibrated the gas cap loose  If you want it louder out the back, stick with the H pipe, if you want a smoother exhaust flow with pops and gurgles on decel use an X pipe.
If you want it louder out the back, stick with the H pipe, if you want a smoother exhaust flow with pops and gurgles on decel use an X pipe.

 04-11-2010, 11:26 AM
#26
Drifting

 04-11-2010, 11:30 AM
#27
Drifting
I wanted to see the way the pipes route from the out side thru the muffler to the out side. I need to understand the flow in my small brain. And also understand the flow when the valve is closed and open.
ErnieO
ErnieO


 04-11-2010, 05:35 PM
#30
Le Mans Master

 04-11-2010, 06:31 PM
#31
04-11-2010, 09:46 PM
#33

There are a few threads on this so I'll post my experience in the most recent. Maybe it'll help some other DIY'ers.
Did this today, the paint is drying and will put them back on tomorrow. There are plenty of write ups and pics so I'll just add a few things I think might be helpful.
I taped some rags over the tips to protect them before starting anything.
Drivers side, as stated, comes out easily. On mine it was hanging up on one of the trans lines, just flexed the line out of the way, the pipe popped up above it, and it slid right out.
I then removed the big rectangular heat shield as mentioned. Other than having to be careful of the electrical harness and connectors on that side, the passenger slid out easily, almost as easily as the drivers side. The heat shield makes a big difference. May want to disconnect those electrical harnesses and get them out of the way as much as possible but I was careful and it just rubbed them a bit, not hard. I was up to full height on my jack with a 2x6 under the crossmember, so somewhere around 28", set it down on stands and the floor wasn't an issue, so this was actually easier than removing my C5 Z06 mufflers (which required full height plus 3 2x6s and some bad words). I did put 2x10s under the front wheels, I'm not sure if the front fascia would have touched or not but wanted to be safe. I think at full height on the back it would have rubbed the floor.
2.5" Easy Seal clamps were perfect. Pep boys has them around here for $11, but I got 4 off ebay and saved $10 or so. You'll see that where they butt together (when you line the two up on the pipe), it will leave a small gap and a couple holes exposed (unless you center it on the small strip with no holes, but that is kind of hard). Offsetting them (not lining up the bolts) helps some, but I cut a notch out of one of them, basically removed the bit of vertical flexible stainless that sticks out beyond the clasp and bolts, and left the other alone. This allows the two to overlap by about 1/8" and covers everything nicely. Torqued the easy seals to the max 70 ft-lbs (go back and forth a few times as they stretch as you tighten), and you can see they mold nice and tight to what is underneath. Tack welded each nut to hold them in place permanently. Didn't tack the seal itself to the pipe as they are very thin and stainless, figured if anything I'd just melt and weaken them by doing that, they are under a ton of stretching pressure. But it ain't moving, that's for sure.
If you have the opportunity to leave them overnight, do so and retorque in the morning (before tack welding of course), as I could see them stretching a bit, but I doubt it would be enough to loosen, 70 ft-lbs is a lot. I didn't do this but the thought crossed my mind.
For welding, I started with my welders settings for 16 gauge and while it was do-able, it was burning through a bit, so I stepped down to 18 gauge, which wasn't getting good penetration. 1/2 way between (for both heat and wire speed) was perfect. I used .025 wire and C25 (argon blend) but I'm sure C02 would work fine too. I just like the C25 for less spatter and smoother bead. This did throw me for a loop as I've never had to weld to pieces together that had a gap in between (due to using a cutoff tool, wish I had a plasma). On the first one, I perfected my "weave" technique and while it wasn't as pretty as I'd like, worked OK. After grinding I did have a few holes to patch. But on the second one, the piece I had removed had warped a bit, so after tacking it in, I used a hammer to straighten it out. But I noticed, that by just slightly bending both the removed piece and the area around it, it compresses it back together and isn't noticible at all. This made the gap much tighter and could just weld in a straight line. Just ever so slightly increasing the bend of the muffler can (including the piece you remove) makes things a whole lot easier. Just remember of course when doing your first tacks you need to strike the arc on the muffler side of the gap and not the piece you removed since there is no circuit there. Just strike it and push the bead up to the removed piece.
I tacked every 2-3" and used "push" and "step" techniques, was actually pretty easy, was expecting a lot more issues with burn through and warping. "Push" is the proper technique for MIG but a few spots where my tack was pretty tall and getting in the way, I did "pull" and honestly that seemed easier, but you don't get as much shielding gas coverage that way, so I stuck with push for the rest. Perhaps setting the gas up to 40 to 45 cfh and pulling would be ok, but I'm no welding expert so didn't mess with it, push wasn't too bad.
If it matters, the side of both mufflers with no writing on it has visible access to the section of pipe with no perforations if you want to line your clamps up there. But from what I recall, one clamp can't be lined up as there is another pipe in the way, do doesn't really matter. You can also feel and slightly see this hole-less section if you open the other side of the can as well so don't sweat it. As I mentioned, with the notch cut out and offsetting of the clamps, I think they got nearly full coverage anyway so didn't bother worrying about getting the clamps centered any special way. I opened the inside of both cans (stamped on one side and non-stamped on the other) so that the cuts would be facing each other and less visible, though I doubt you'd ever see it from the side anyway.
After grinding down the welds, and a quick coat of 1200 degree black, you can barely tell anything has been done, unless you look real close.
Can't wait to get them on tomorrow. I did fire it up with just cats on (how can you resist) and its surprisingly quiet (relatively speaking, its obviously quite loud), those cats must be really restrictive.
04-12-2010, 04:49 PM
#34
Got it back together before work this morning. Man the slip fits on that H pipe are a pain (I hate slip fits). Make sure you have a 3" pipe spreader, I "loaned" mine out about a year ago and was too lazy to get another one this morning. Managed to get it on by propping it up with wood, twisting one side on, then wiggling the other side in.
I thought it was odd how some posts said it was a huge difference, and others not that much. I see what people are saying now. When I first fired it up in the garage with my truck parked behind it, I was like "WOW", but then on the open road, the audible difference is pretty subtle and only from idle to maybe 3000 RPMs. But standing behind it (or with something behind it, going under an overpass, etc), it is quite a bit louder. I think the design of these cars is such that the exhaust sound goes straight back out. I like the sound a lot better than my Borla Stingers that were on my C5 Z06, but it is definitely quieter in the cabin (though I'd say probably louder behind the car). So I'm happy and a tad disappointed at the same time :-) Maybe headers and cats or race pipes are in my near future. I'm sick of having to use my horn, much easier to just rev at people who are in your way
For $40 in parts and a day worth of time, well worth it. It gave me an excuse to buy a nice new MIG setup for myself, which I wanted anyway, and even after that, still cheaper than any aftermarket exhaust I've seen. I'm assuming the results with an aftermarket system would be similar, but hard to say. Opening up more flow while retaining the stock valve flap function (which I have disabled, but its there if I want it) for $40, or even $250-$300 if you have someone do it can't be beat. The only cheaper way would be to just remove your H pipe
I briefly considered opening up the whole can and doing something more drastic, like doing 3" pipe all the way through, but I didn't figure the small extra gain would be worth the significant extra effort. It is silly how the pipe is 3" all the way to the muffler then goes down to 2.5", but it is still better than 2.5" all the way. Similar to air hoses I'm assuming pressure build up reduces the effective throughput, which is why you need a 3/8" hose for a big impact wrench but a 1/4" fitting on the end is fine. Who knows.
Maybe a pair of O2 sims and a "cleaning out" of the cats is in order :-).
 04-12-2010, 06:52 PM
#36
Safety Car
be careful if you drive your front wheels up on some wood and then raise the back higher, the car will come off the wood and try to roll down the driveway... ask me how i know
04-13-2010, 12:24 AM
#37
Drifting

I moved from Atlanta 2 years ago to go to Seattle, now I am in Memphis and own a Z, MTI told me that if I drove up to ATL they would be happy to do it for me. So I guess the answer is yes.
04-13-2010, 09:09 AM
#38

The blocks/mini ramps I use I left enough space to get chocks in front of and in back of the tires.
My funny wood block incident is from my 2003 when I tried to get all 4 tires up on blocks at once, the rear two went flying about 50' down the driveway
04-13-2010, 06:03 PM
#39
Thanks guys!
04-13-2010, 06:43 PM
#40
Drifting
I think a lot of people think it should be a very cheap mod at a shop, but you need a mig welder a air cutter and the skills to do this so I don't think it's a 50 dollar thing, probably more like 250.00-350
Last edited by VRedZ06; 04-15-2010 at 10:32 PM.