
[Z06] Alternator-Power Steering Pump Bracket Removal
 03-22-2015, 03:05 PM
#1
Melting Slicks

Thread Starter

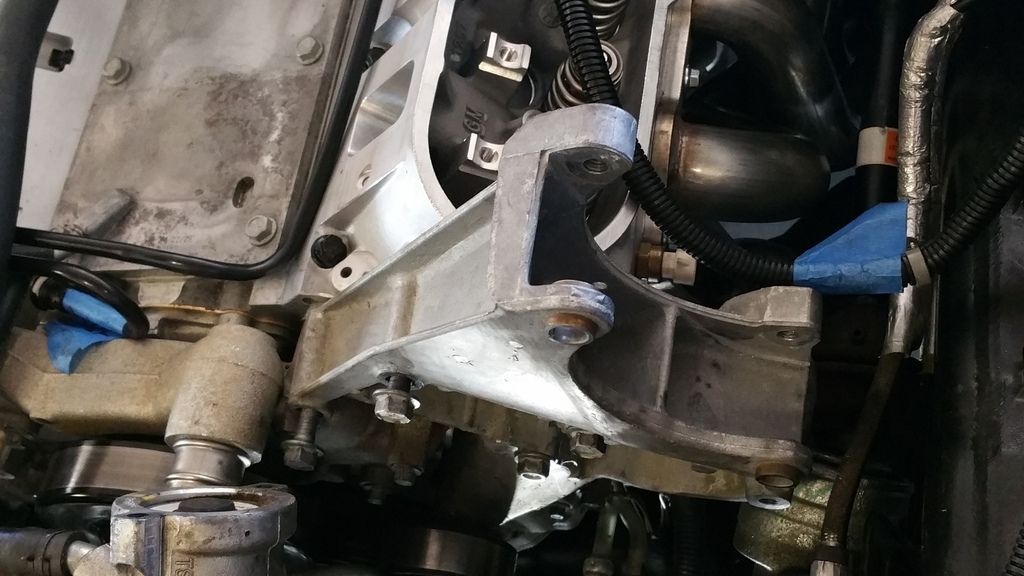
One of the most irritating parts to remove on these cars is the large alternator-power steering bracket. This is for an LS7, but should also work on an LS2 or LS3. This bracket needs to be removed to install a cam or timing chain and even makes motor mount access easier. Pictured below is the alternator-power steering bracket installed, but with the alternator removed. To remove the alternator, disconnect the battery, then the two wires to the alternator. There are two long 15mm head bolts that go through the alternator and thread into the back of the bracket. Easy!
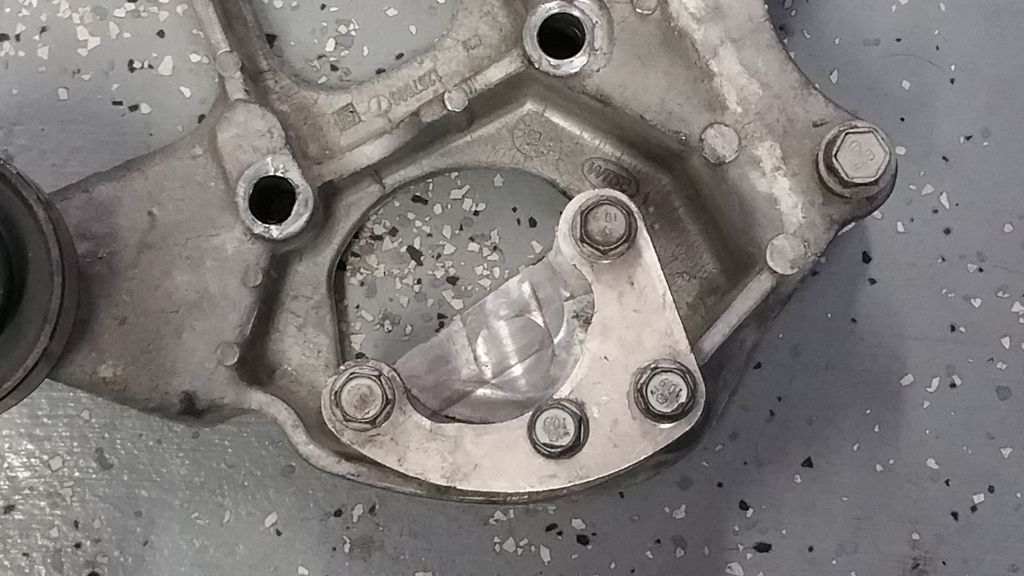
Below is a picture of the large alternator-power steering bracket removed so you can see the big picture. There are four 15mm head bolts holding the alternator-power steering bracket onto the cylinder head. These four bolts almost form a square: top left (nearest the throttle body), top right (this one is a little lower in the square pattern), and bottom left and bottom right. There are also four 13mm head bolts holding the power steering pump on, but only 3 go into the bracket and the 4th goes into the pump itself.
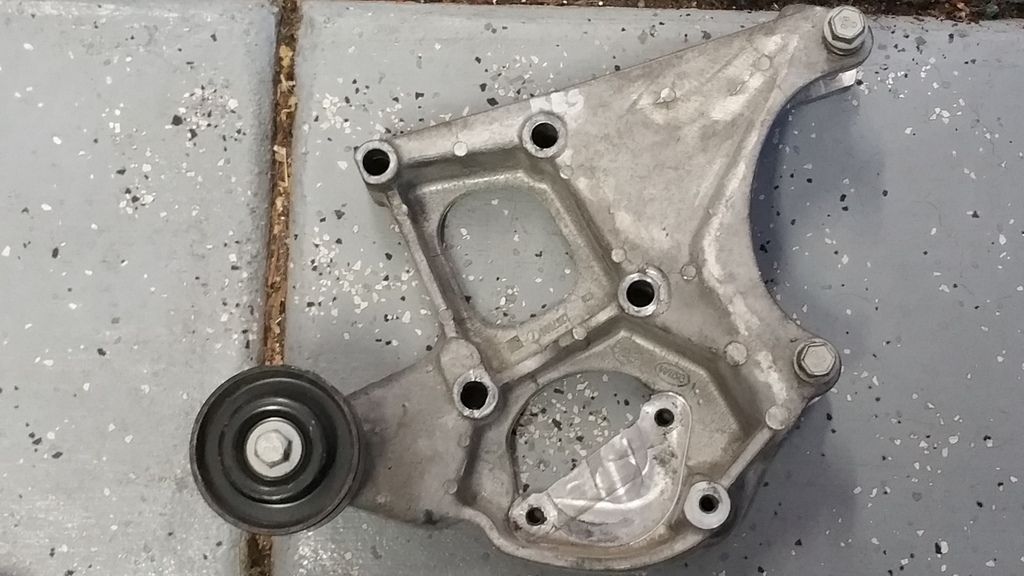
There is also a power steering pump sub-bracket that goes in front of the pump but behind the PS pulley. You can see the 4 bolt holes in it.They are roughly 12 o’clock (long bolt), 3 o’clock (short bolt), 4 o’clock (short bolt), and 7 o’clock (long bolt) on the pump.
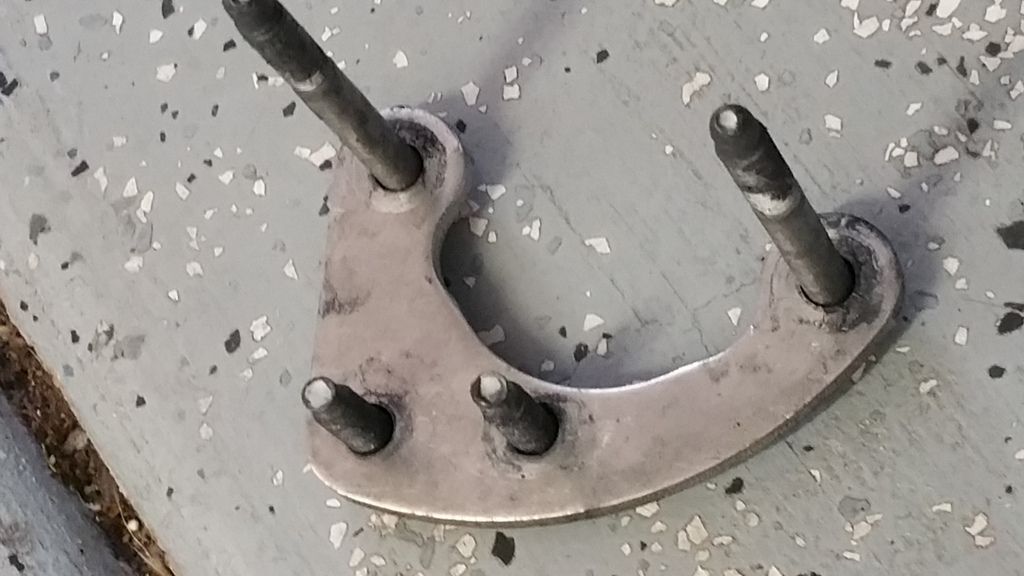
Now the fun part. The power steering also has a reservoir that mounts to the top two 15mm bracket bolts. This makes it difficult to access the top right 15mm alternator-power steering bracket bolt. One of the clever folks on this forum suggested using a Dremel to cut a small notch in the bracket to make install-uninstall easier (see pic). The first bolt to remove is the 15mm head top left bolt (closest to the throttle body). Use a 6” socket extension for easy access. Then the difficult top right bolt.It is masked by the reservoir, so use a ratcheting end wrench or just an open end wrench and work it off.
Now we start working on the power steering pump. I remove the two ABS 15mm mounting bracket bolts down underneath on the cross member to give me a little more room. The 4 PS bolts are masked by the power steering pulley. It is easier to use a very short 1” socket extension and work through the pulley than to remove the pulley. Start by removing the 12 o’clock 13 mm bolt, then work your way around. The 4 o’clock bolt goes into the pump itself (instead of through the bracket) and you only need to loosen this bolt. Mark these bolts as to position because they are different lengths. Once the pump is free you can move it and the reservoir out of the way towards the passenger side of the car.
Now you can tackle the two remaining 15mm alternator-power steering bracket bolts. Mark these with a piece of masking tape to note their location as one is shorter than the other.I usually leave the idler pulley attached, but some folks remove it for more clearance. Now you can lift the alternator-power steering bracket up out of the way.
Installation is the reverse, but make sure you get the right length bolt back into each position. If you removed all four PS bracket bolts, spend some time getting the sub-bracket back on correctly. It will go on backwards, but then only three of the 13mm bolts will line up. If you notch the top right reservoir bracket, installation will be much easier. You can install the top right 15mm bolt and just leave it a few turns loose. Then you slide on the reservoir bracket through the notch and install the top left bolt.
Hope this helps!

Below is a picture of the large alternator-power steering bracket removed so you can see the big picture. There are four 15mm head bolts holding the alternator-power steering bracket onto the cylinder head. These four bolts almost form a square: top left (nearest the throttle body), top right (this one is a little lower in the square pattern), and bottom left and bottom right. There are also four 13mm head bolts holding the power steering pump on, but only 3 go into the bracket and the 4th goes into the pump itself.

There is also a power steering pump sub-bracket that goes in front of the pump but behind the PS pulley. You can see the 4 bolt holes in it.They are roughly 12 o’clock (long bolt), 3 o’clock (short bolt), 4 o’clock (short bolt), and 7 o’clock (long bolt) on the pump.

Now the fun part. The power steering also has a reservoir that mounts to the top two 15mm bracket bolts. This makes it difficult to access the top right 15mm alternator-power steering bracket bolt. One of the clever folks on this forum suggested using a Dremel to cut a small notch in the bracket to make install-uninstall easier (see pic). The first bolt to remove is the 15mm head top left bolt (closest to the throttle body). Use a 6” socket extension for easy access. Then the difficult top right bolt.It is masked by the reservoir, so use a ratcheting end wrench or just an open end wrench and work it off.

Now we start working on the power steering pump. I remove the two ABS 15mm mounting bracket bolts down underneath on the cross member to give me a little more room. The 4 PS bolts are masked by the power steering pulley. It is easier to use a very short 1” socket extension and work through the pulley than to remove the pulley. Start by removing the 12 o’clock 13 mm bolt, then work your way around. The 4 o’clock bolt goes into the pump itself (instead of through the bracket) and you only need to loosen this bolt. Mark these bolts as to position because they are different lengths. Once the pump is free you can move it and the reservoir out of the way towards the passenger side of the car.

Now you can tackle the two remaining 15mm alternator-power steering bracket bolts. Mark these with a piece of masking tape to note their location as one is shorter than the other.I usually leave the idler pulley attached, but some folks remove it for more clearance. Now you can lift the alternator-power steering bracket up out of the way.
Installation is the reverse, but make sure you get the right length bolt back into each position. If you removed all four PS bracket bolts, spend some time getting the sub-bracket back on correctly. It will go on backwards, but then only three of the 13mm bolts will line up. If you notch the top right reservoir bracket, installation will be much easier. You can install the top right 15mm bolt and just leave it a few turns loose. Then you slide on the reservoir bracket through the notch and install the top left bolt.
Hope this helps!
Last edited by Vito.A; 03-24-2015 at 09:49 PM.
 03-23-2015, 01:10 AM
#2


I just took the whole thing pump and all off with the head. It will go back the same way....Onice the head was on the bench, I just pulled the pully and took it off.......easy...
One of the most irritating parts to remove on these cars is the large alternator-power steering bracket. This is for an LS7, but should also work on an LS2 or LS3. This bracket needs to be removed to install a cam or timing chain and even makes motor mount access easier. Pictured below is the alternator-power steering bracket installed, but with the alternator removed. To remove the alternator, disconnect the battery, then the two wires to the alternator. There are two long 15mm head bolts that go through the alternator and thread into the back of the bracket. Easy!
Below is a picture of the large alternator-power steering bracket removed so you can see the big picture. There are four 15mm head bolts holding the alternator-power steering bracket onto the cylinder head. These four bolts almost form a square: top left (nearest the throttle body), top right (this one is a little lower in the square pattern), and bottom left and bottom right. There are also four 13mm head bolts holding the power steering pump on, but only 3 go into the bracket and the 4th goes into the pump itself.
There is also a power steering pump sub-bracket that goes in front of the pump but behind the PS pulley. You can see the 4 bolt holes in it.They are roughly 12 o�clock (long bolt), 3 o�clock (short bolt), 4 o�clock (short bolt), and 7 o�clock (long bolt) on the pump.
Now the fun part. The power steering also has a reservoir that mounts to the top two 15mm bracket bolts. This makes it difficult to access the top right 15mm alternator-power steering bracket bolt. One of the clever folks on this forum suggested using a Dremel to cut a small notch in the bracket to make install-uninstall easier (see pic). The first bolt to remove is the 15mm head top left bolt (closest to the throttle body). Use a 6� socket extension for easy access. Then the difficult top right bolt.It is masked by the reservoir, so use a ratcheting end wrench or just an open end wrench and work it off.
Now we start working on the power steering pump. I remove the two ABS 15mm mounting bracket bolts down underneath on the cross member to give me a little more room. The 4 PS bolts are masked by the power steering pulley. It is easier to use a very short 1� socket extension and work through the pulley than to remove the pulley. Start by removing the 12 o�clock 13 mm bolt, then work your way around. The 3 o�clock bolt goes into the pump itself (instead of through the bracket) and you only need to loosen this bolt. Mark these bolts as to position because they are different lengths. Once the pump is free you can move it and the reservoir out of the way towards the passenger side of the car.
Now you can tackle the two remaining 15mm alternator-power steering bracket bolts. Mark these with a piece of masking tape to note their location as one is shorter than the other.I usually leave the idler pulley attached, but some folks remove it for more clearance. Now you can lift the alternator-power steering bracket up out of the way.
Installation is the reverse, but make sure you get the right length bolt back into each position. If you removed all four PS bracket bolts, spend some time getting the sub-bracket back on correctly. It will go on backwards, but then only three of the 13mm bolts will line up. If you notch the top right reservoir bracket, installation will be much easier. You can install the top right 15mm bolt and just leave it a few turns loose. Then you slide on the reservoir bracket through the notch and install the top left bolt.
Hope this helps!

 04-15-2015, 11:20 AM
#4
Melting Slicks
I didn't find it difficult at all. The trick is to use your extension and slip it through the pump pulley. It will lineup exactly and allow removal of all of the bolts very easily.
When I did my cam swap I removed everything. Then I thoroughly cleaned all of the parts before reassembly.
So easy a Caveman (like me) can do it.
When I did my cam swap I removed everything. Then I thoroughly cleaned all of the parts before reassembly.
So easy a Caveman (like me) can do it.