
Nitrous Express LS 90mm plate kit install on C6 Z06
 03-01-2015, 04:34 PM
#1
Racer

Thread Starter

Well I recently finished installing my NX kit on my car so I thought I would do a full right up on it. During my install I searched all over for threads for a full install thread and I haven’t found one myself.
First off I would like to thank Mike A., Kyle B., and Aaron G. at Nitrous Express for all the help they were during this install and how knowledgeable they were for when I had not only my “how” questions but also my “why” questions.
Just a warning this will be long and pic heavy.
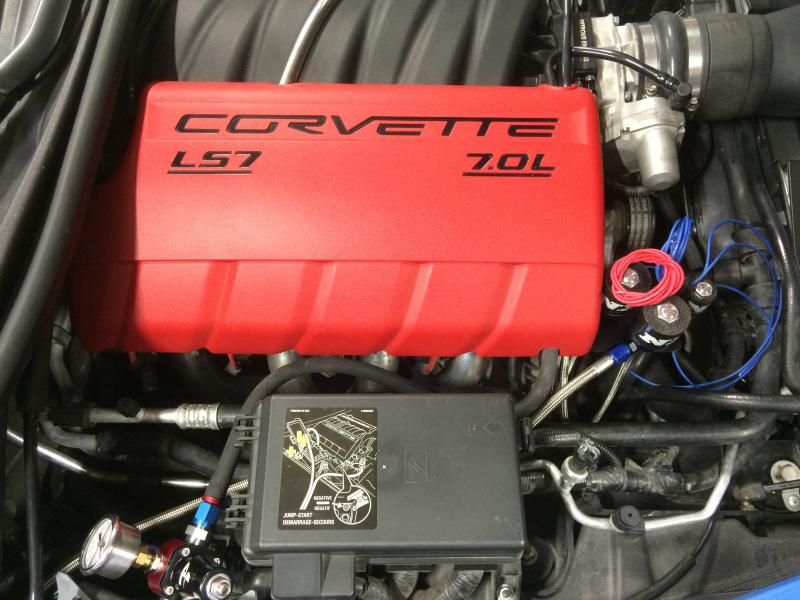
Current mods to the car include:
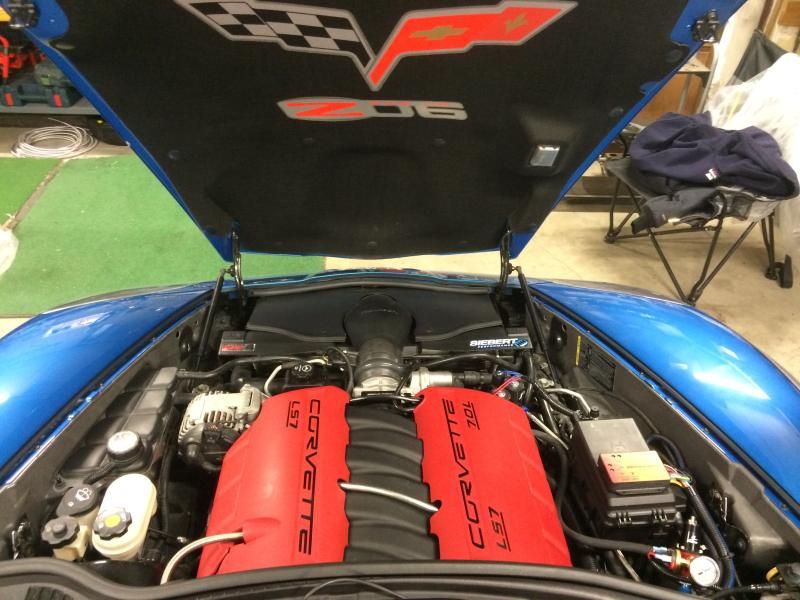
Ragin Racin Stage 4 package with the stalker cam, ARH long tubes with high flow cats, Lightly ported heads, intake and TB, and Halltech CAI. Sodium filled exhaust valves replaced with solid stainless steel and the valve guides have all been replaced with C.H.E. bronze valve guides. This combo put down 542rwhp and 503rwtq.
I apologize in advance for spelling and grammatical errors. This post got long fast!
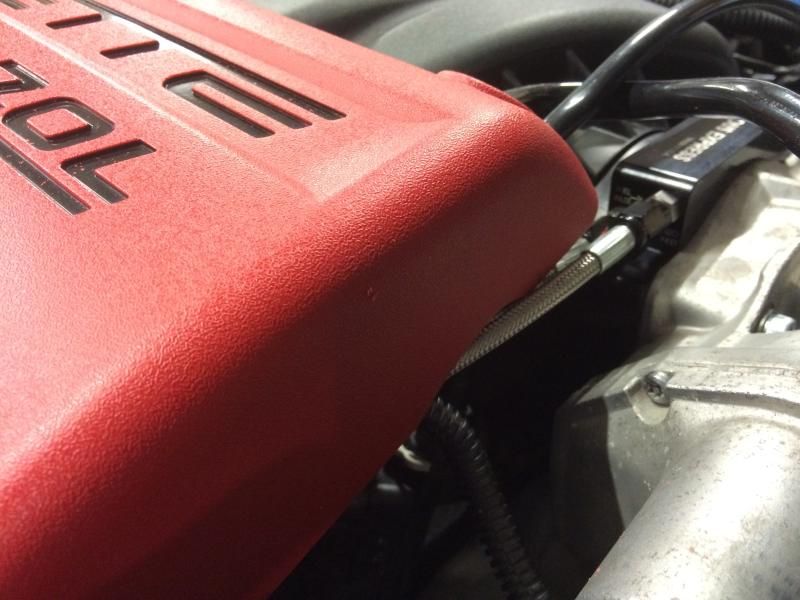
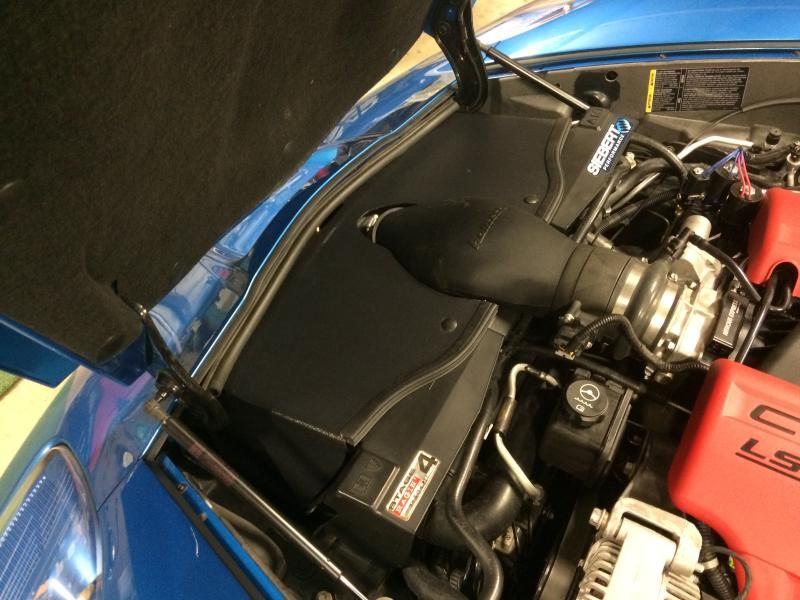
The first step was relocating the EVAP purge solenoid pictured below circled in red. The reason I needed to move it is because there’s a bracket that holds it that bolts to the passenger side head and that’s where I am going to bolt my solenoid bracket. This is what vents the fuel tank so instead of just venting to the atmosphere it sends it through the intake to burn off so you don’t smell the fumes. I’ve read that some guys just delete it and cap it off all together but some say that it can smell like gas over time especially if stored in a small space like a garage and eventually your car will start to smell like gas.
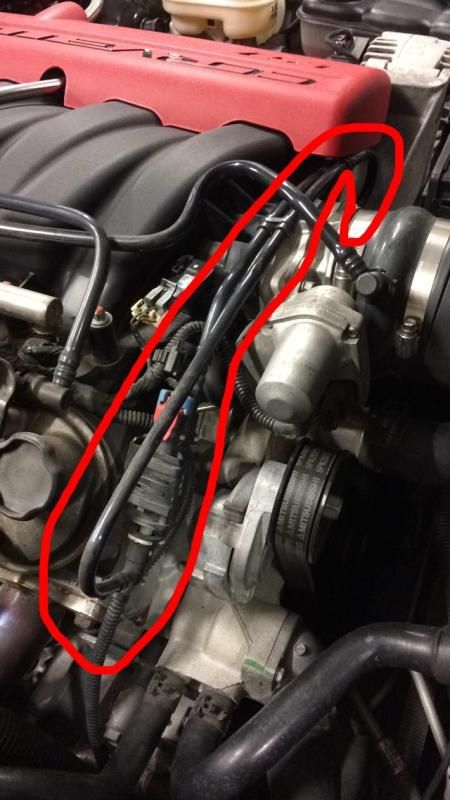
What I did was unhooked all of the lines and relocated the one that hooks to the bottom side of the solenoid to the space underneath the throttle body. The line that connects to the top I left running over the top of the TB. I cut the factory line and heated and bent it into the shape I needed to allow me to move the solenoid off the head, closer to the empty space just behind the TB and idler pulley down in the valley. I reconnected it and plugged it back in. I did not cut or modify the factory wiring plug in anyway.
Here you can see the completed relocation and how its stuffed down in that valley.
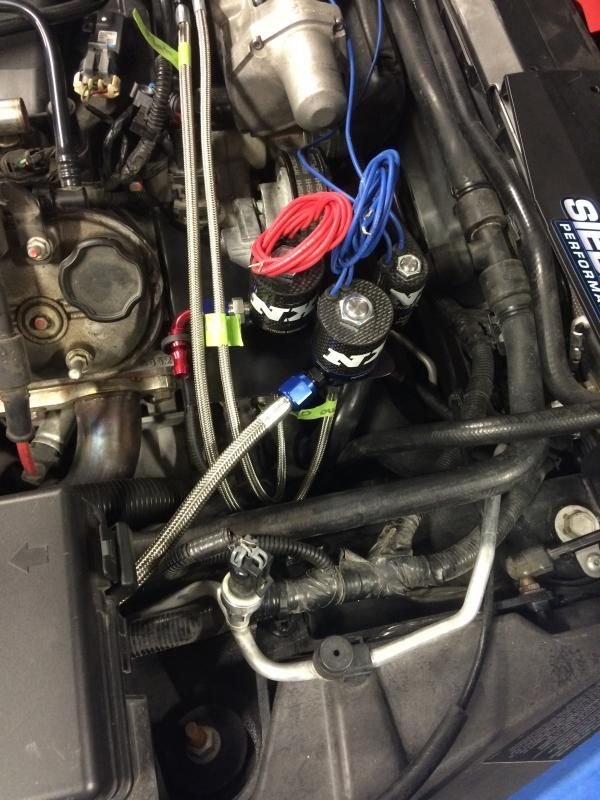
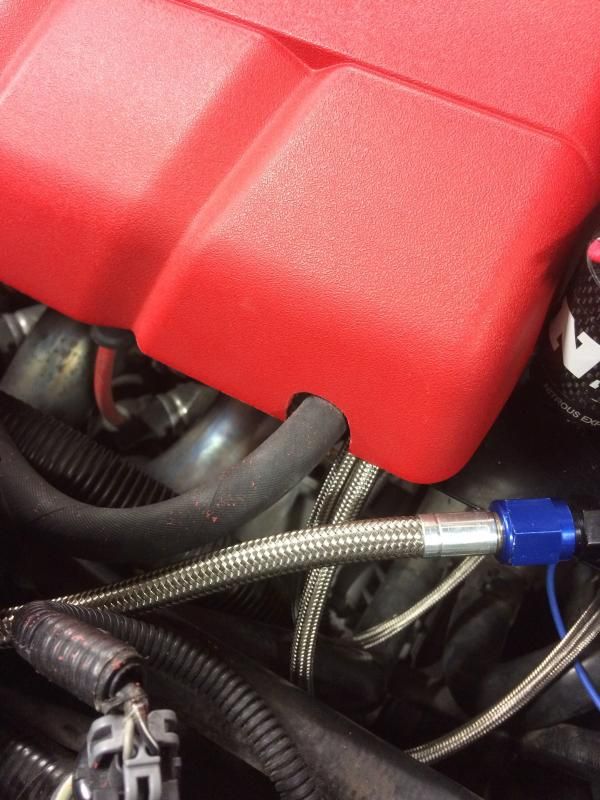
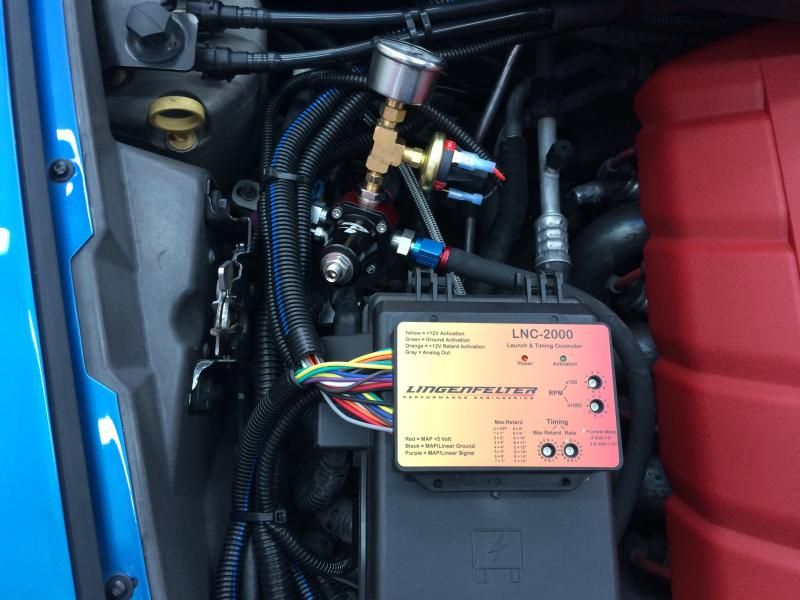
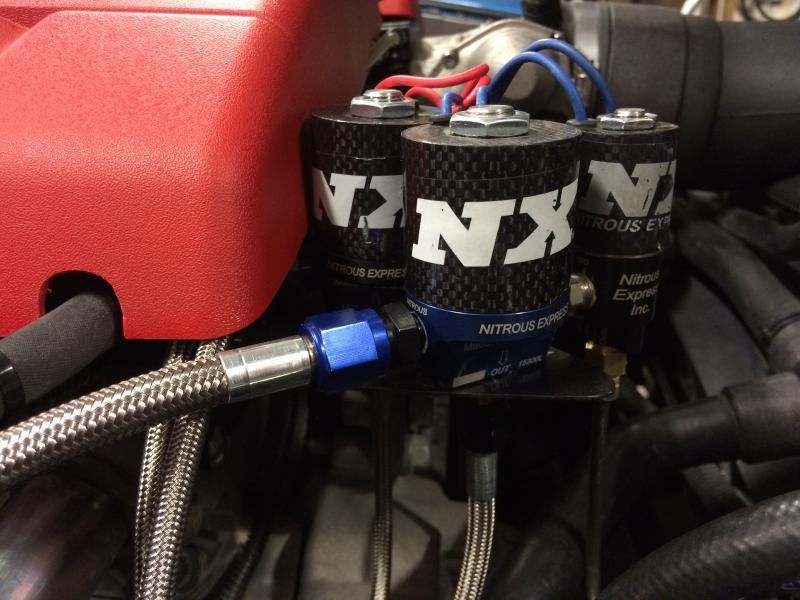
The next job was trying to find the place to mount the nitrous solenoids. Now I originally purchased the bracket that mounts to the passenger side head, but I wanted to keep my fuel rail covers to help hide lines and wiring. That bracket placed the fuel solenoid right under the FRC and made it harder to route the lines both to the solenoids and to the plate from the solenoids. So what I did was actually make my own bracket that still bolted to the head in the same spot but was longer to bring the solenoids out past the FRC and further away from the head so it would clear. However it was necessary to trim the FRC a little to allow the line from the fuel regulator in to the solenoid and also trimmed a little where the lines run from the solenoids to the plate.
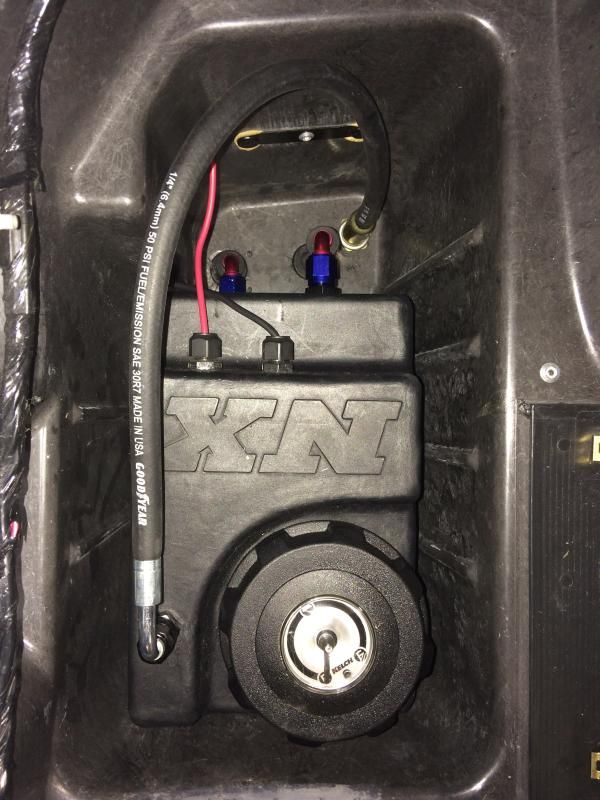
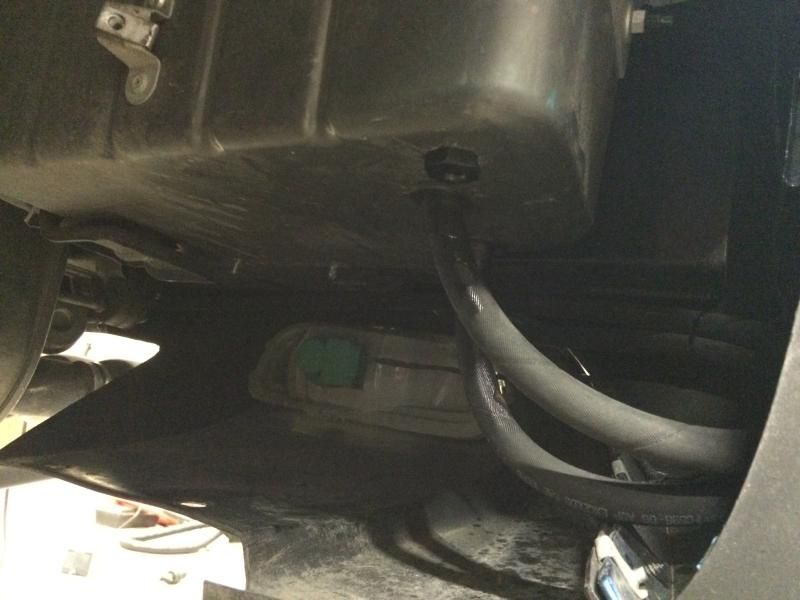
After I mounted the solenoids in their respective spot I looked for a good place to mount my S.A.F.E. Tank (Stand Alone Fuel Enrichment) system and fuel pressure regulator. Now since my car is a Z06 and has the dry sump oil system there was no place to mount it under the hood anywhere. So I had to mount in the hatch area somewhere. The Z06 already has the battery mounted in the rear passenger side compartment of the hatch area. That left me with the options of either just mounting it to the floor in the hatch, or mounting it in the other rear compartment on the driver side of the rear hatch. I chose this option for a number of reasons. One is I could still hide the tank from view and have it be covered up with the factory compartment lid. Other reasons were because it would be easier to route my fuel lines and the breather line from the tank to the outside of the car so I wouldn’t have to smell any fuel. It was easy to remove the rear inner fender wells and route my lines and drill the bottom floor out. The holes I drilled were slightly larger than the diameter of the lines to allow for rubber grommets to help seal off the holes and then I went ahead and silicone around them to ensure placement and a water tight seal.
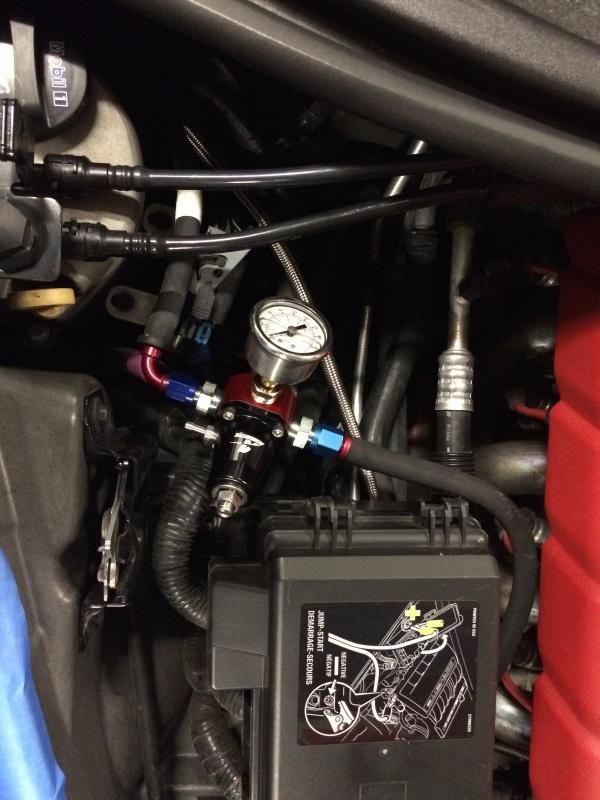
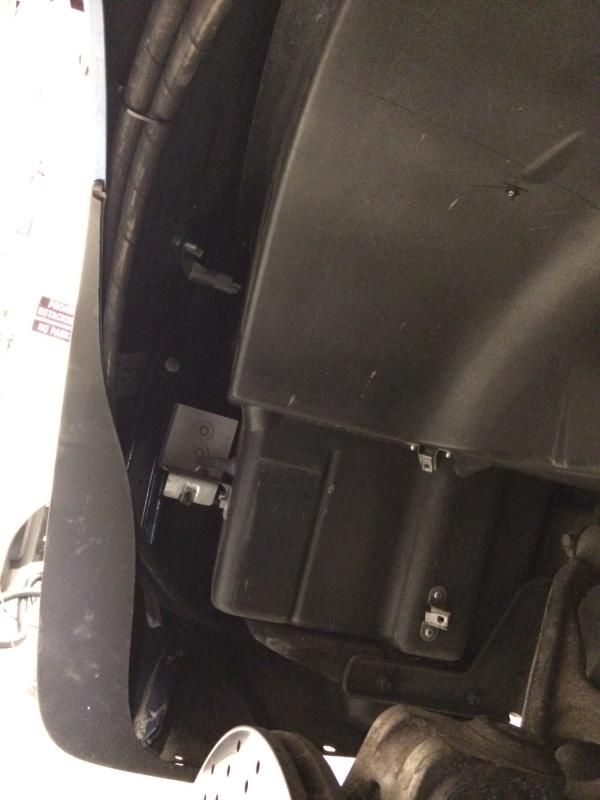
Since the fuel pressure regulator had to be as close to the solenoids as possible, I thought the best place to mount it was behind the fuse box utilizing a mounting bolt off of the box. The factory Areomotive bracket had a 45 degree bend in it and that made the regulator fit perfectly between the fuse box and the dry sump system with the gauge attached to the regulator with plenty of hood clearance. This location also made it handy for the fuel lines to be routed down into the passenger side rocker to route them back to the SAFE tank in the rear of the car.
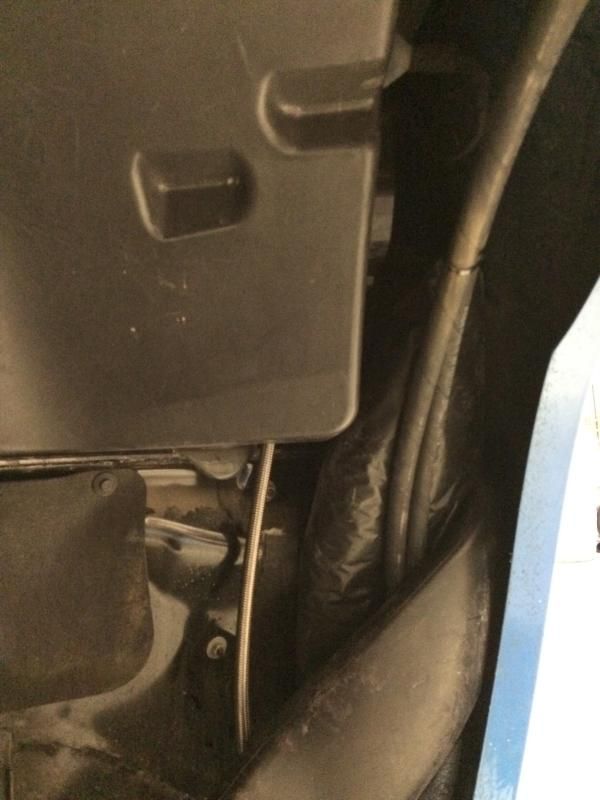

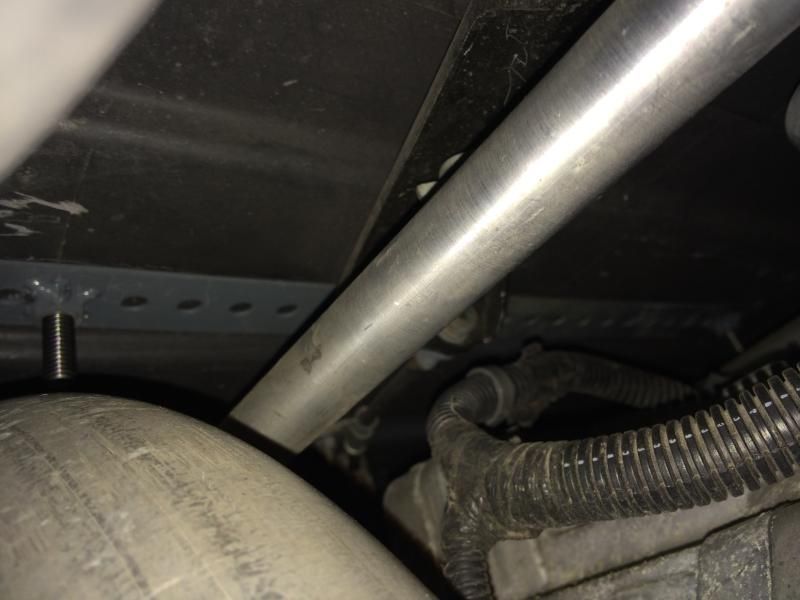
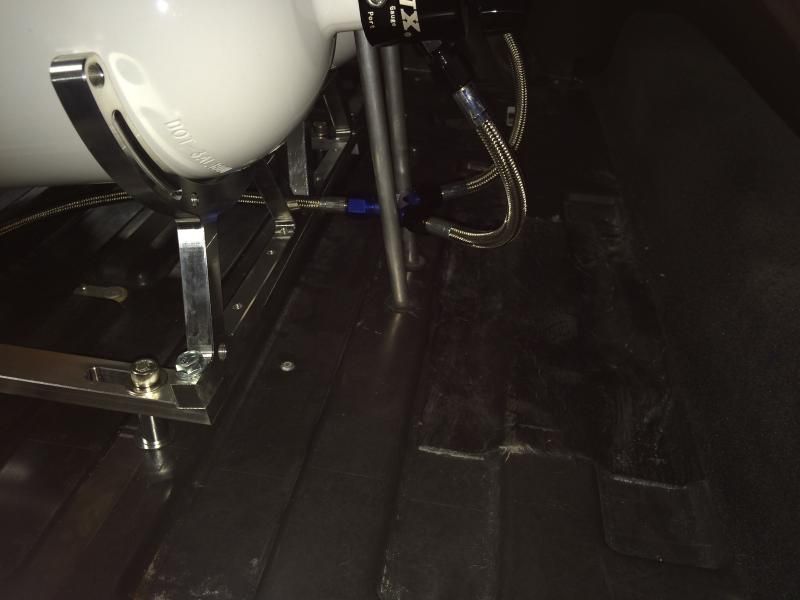
Now since I wanted to mount my bottles in the rear hatch area I ran the nitrous line with the fuel lines down along the passenger side rocker panel. I thought it would be best to keep the lines outside of the car and there was plenty of room inside the rocker for all the lines. (nitrous, fuel inlet to the regulator and return to the SAFE tank) The rocker was also completely enclosed protecting the lines from rocks and debris. The lines continue up and over the rear inner fender liner. This is where the nitrous line stops and routes inside the rear hatch area. Here again I had to drill a hole and use a rubber grommet and more silicone. From there I was able to route it up and into the rear hatch area.

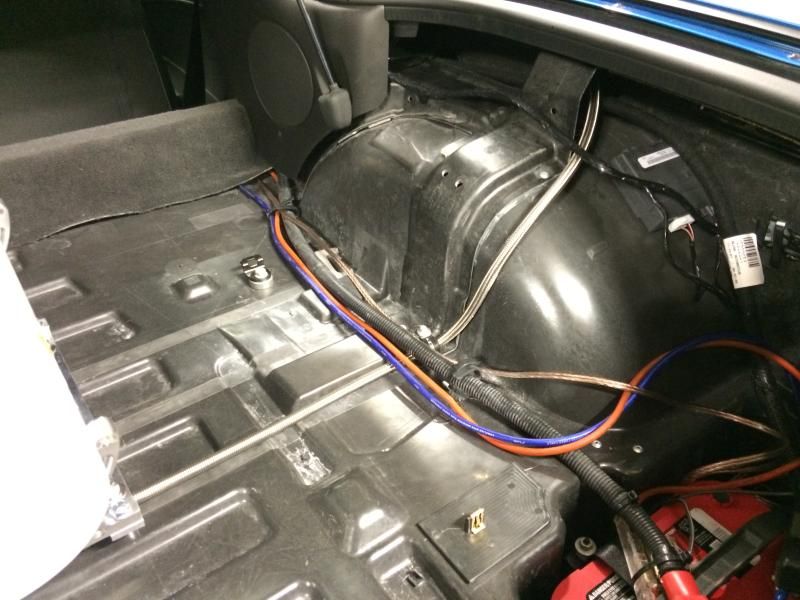
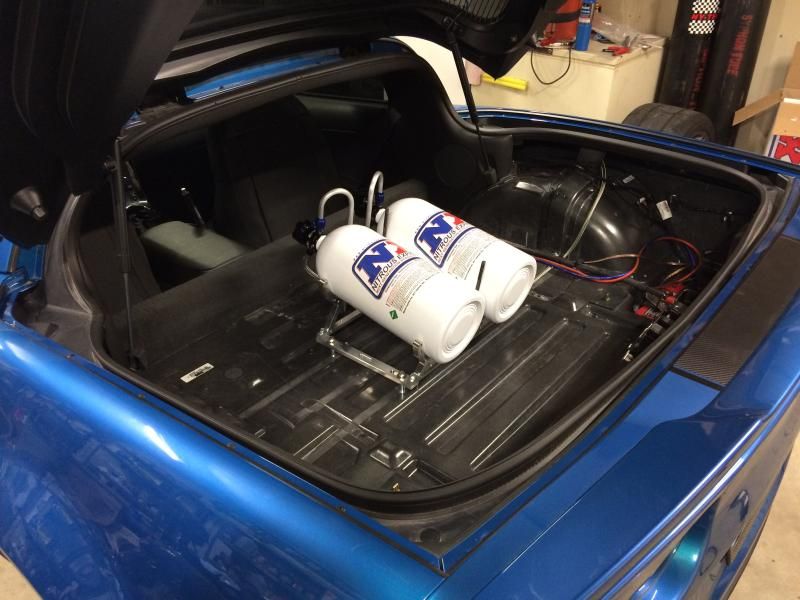
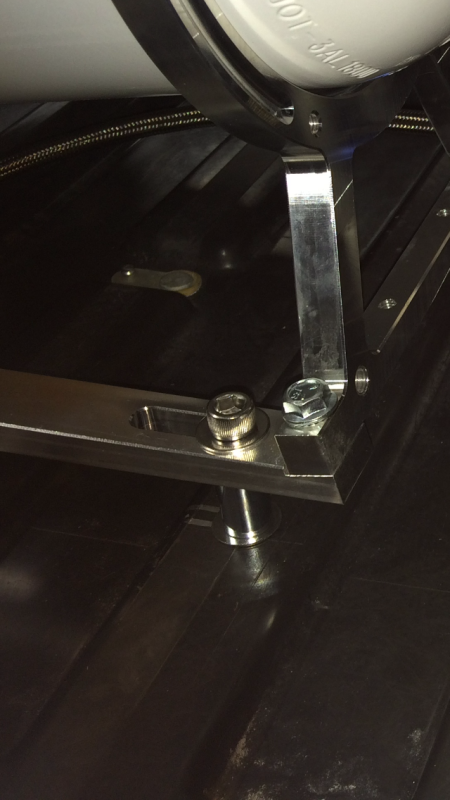
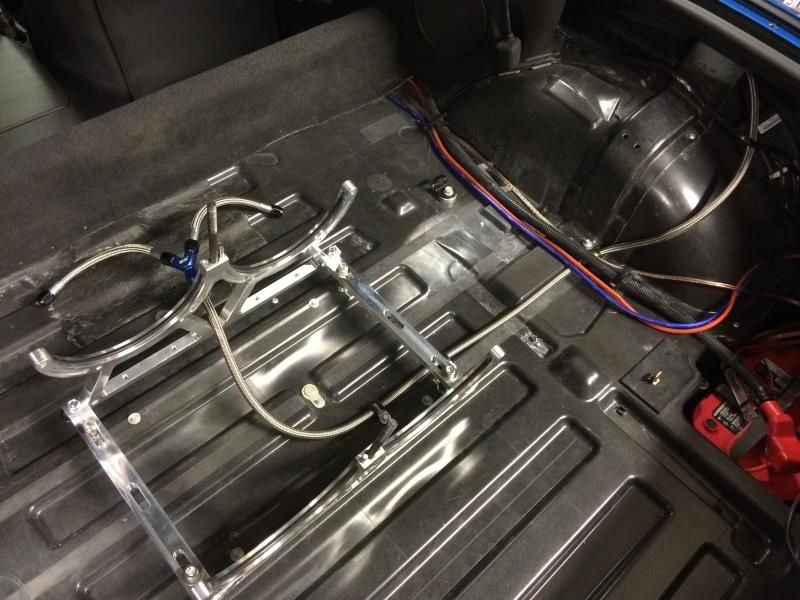
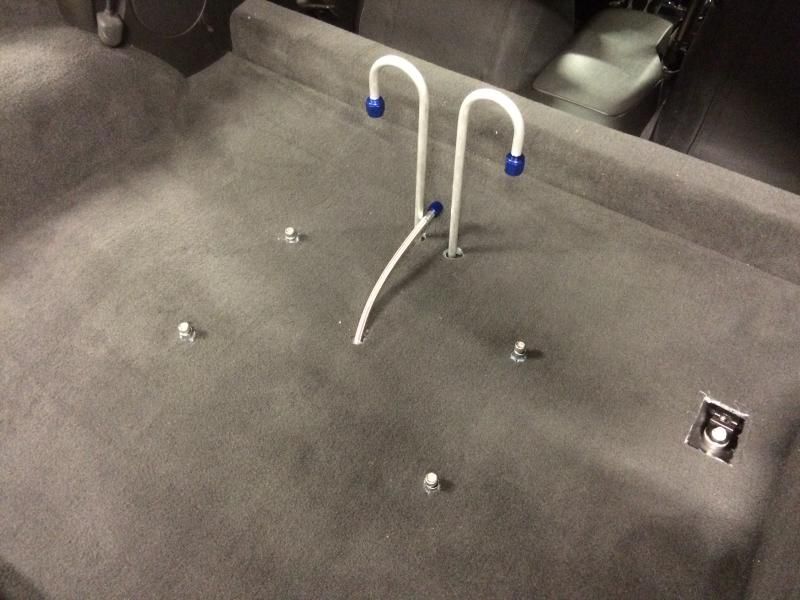
Next was mounting my dual bottle bracket inside the car. I wanted the install to look clean and not have the carpet all hacked up. I put the bracket about in the center where I wanted it and then I got under the car to make sure where the mounting bolts would be coming through the floor, they wouldn’t be coming in contact with anything else underneath. There are lines and cables mounted to the floor so be very aware of where you are drilling! I found it very helpful to have a friend help me so there were eyes on top and below the car to pinpoint exactly where you should be drilling. We started with drilling small holes first to make sure they were where we wanted them. I thought it would be a good idea to somehow make it so there were nuts permanently fastened under the car so when test fitting installing and removing the bracket during test fitting I wouldn’t have to worry about the nuts falling off under the car because let’s face it, it’s not a very easily accessible place to get to. So what we came up with was taking some flat strap and welding a nut to them the same distance needed for the bracket. Once we had that done then we bolted them in using the bottle bracket bolts to hold them in position while we took some self-tapping screws and screwed the flat strap to the floor to hold it in position. This allowed us to remove the bolts holding the bottle bracket as many times as need without losing position of the nuts on the bottom. I figured it was best to use all stainless hardware so it wouldn’t rust. I used 2 inch spacers to hold the bracket off the floor enough that it wouldn’t squish the carpet down when the bolts were tightened to the floor. This was helpful when trimming the carpet. We installed the brackets and bottles to see where we needed holes in floor for the blow down tubes coming off the bottles.
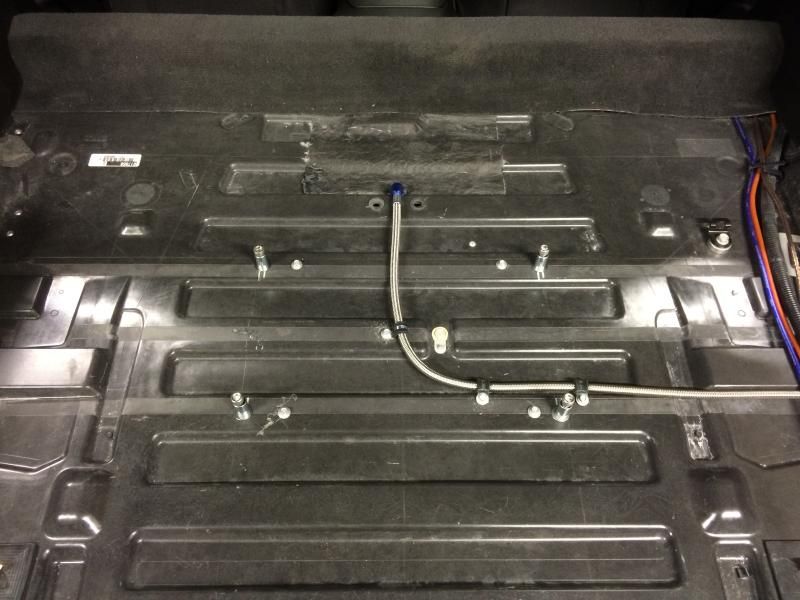
The flat straps will go on the underside of the floor:

Trimming the carpet was fairly easy. Reinstalling the bolts and made it helpful for locating where the holes needed to be. I used a pick coming up from the bottom of the car to find the holes for the blow down tubes. Carefully using new razor blades we made slits to poke the bolts through and then trimmed the carpet around the bolts and spacers. I made a slit in the middle to round the nitrous line and wires for the bottle heaters. We then pulled the carpet out of the car to fine trim the rest of the holes and then we used a propane torch to heat a socket the same diameter as the holes to heat the carpet to sort of melt it so it wouldn’t fray where we made holes.


Once everything was mounted and all the lines were run the only thing left before starting the wiring was to run the purge lines. I decided to use brake line and route the purge out the front scoop in the bumper. It took a little modification but not too bad. Mainly just drilling holes from inside the engine bay to route the lines to the scoop. I have the GM accessory mesh grille which actually helped with holding the lines in place.
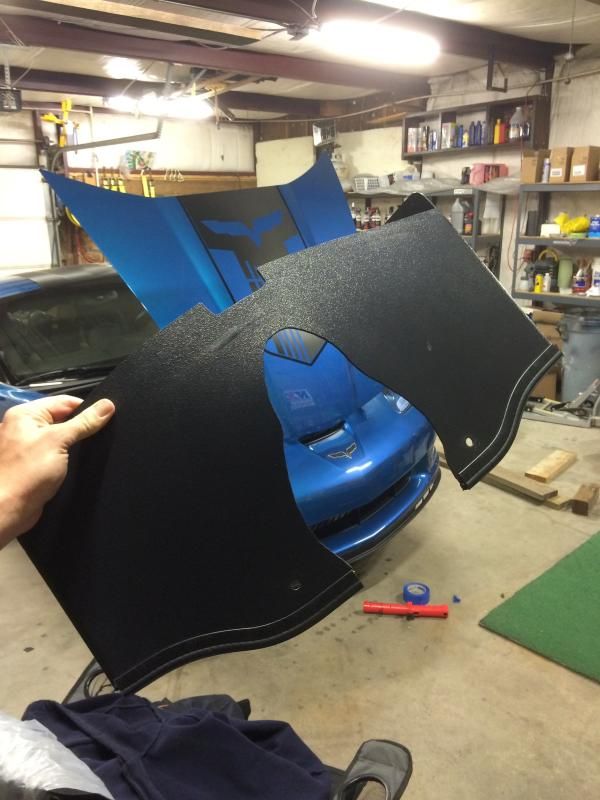
Last was trimming the plastic cover that covered the Halltech cold air intake. The extra inch the NX plate system added moved everything forward. It was necessary to trim the cover to allow everything to fit right and still utilize it for its original purpose of keeping hot engine bay air out and only taking in cool outside air. I just used an air die grinder and trimmed and test fitted as needed until it fit.

Next I installed my wideband. I used the PLX wideband and it was very user friendly and easy to install. I already had a spare bung on my ARH X-pipe so I sued that so I didn’t have to weld in a new bung. I screwed in the new sensor and routed the wire up and away from the heat, up into the engine bay and inside the car via the door wiring. I mounted my box on the side of the floor board where it is easily accessible and out of side.
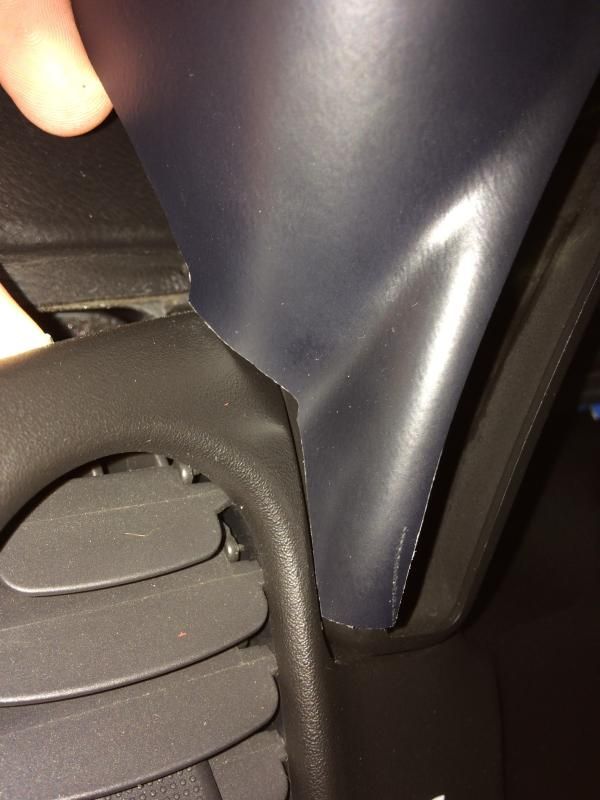
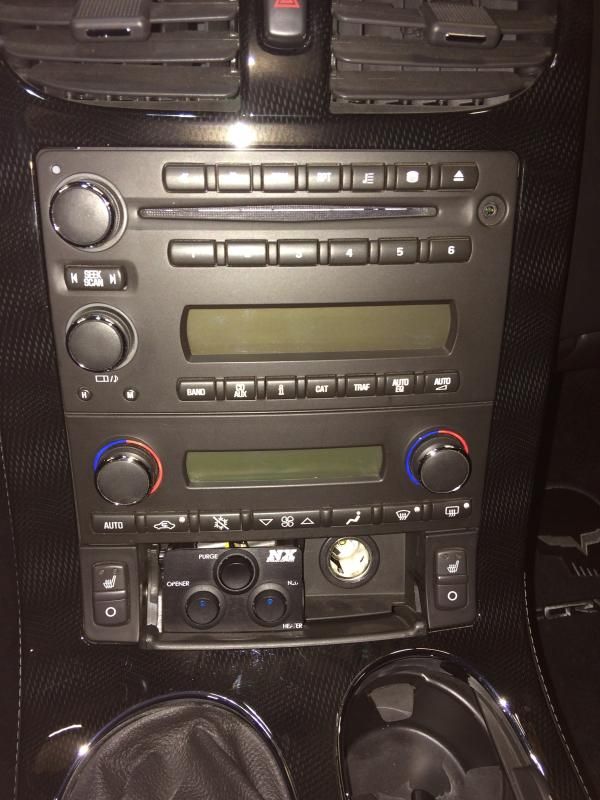
Since the bottles are mounted right behind me, I decided to utilize the gauges on the bottles instead of ordering pressure gauges saving me a couple hundred dollars. I ordered the SLP single gauge pod to mound the wideband in. I have to say I expected a lot better fitment from SLP. I had to trim the gauge pod in several places to try and get it to fit and some placed I didn’t trim were carved too much and even then it still doesn’t fit right. I also expected the color to match closer to the factory plastics which as you can see, does not. So overall I have to say I’m disappointed in this gauge pod and maybe I should’ve gone with the A-pillar gauge pod.
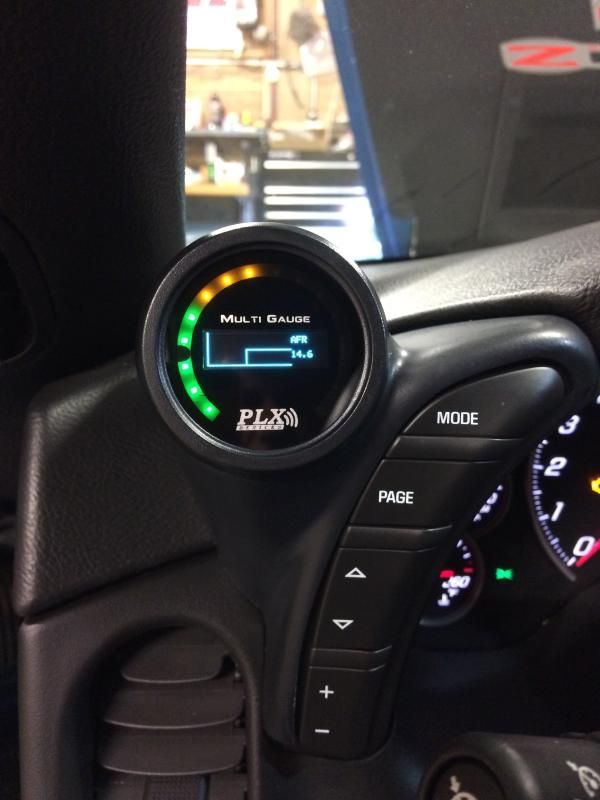
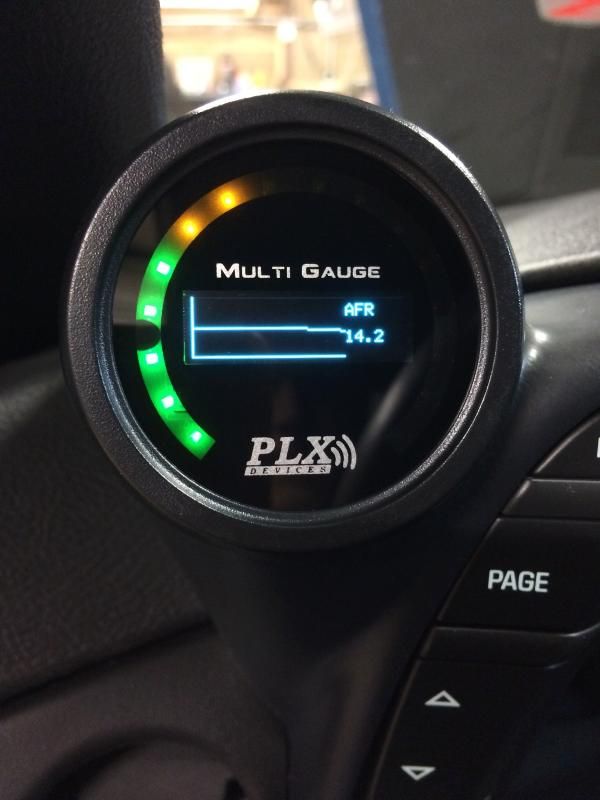
Overall the PLX gauge works flawlessly and is very easy to read and is a plug and play installation with no special calibrating or programming required. I’m very happy with the PLX wideband.
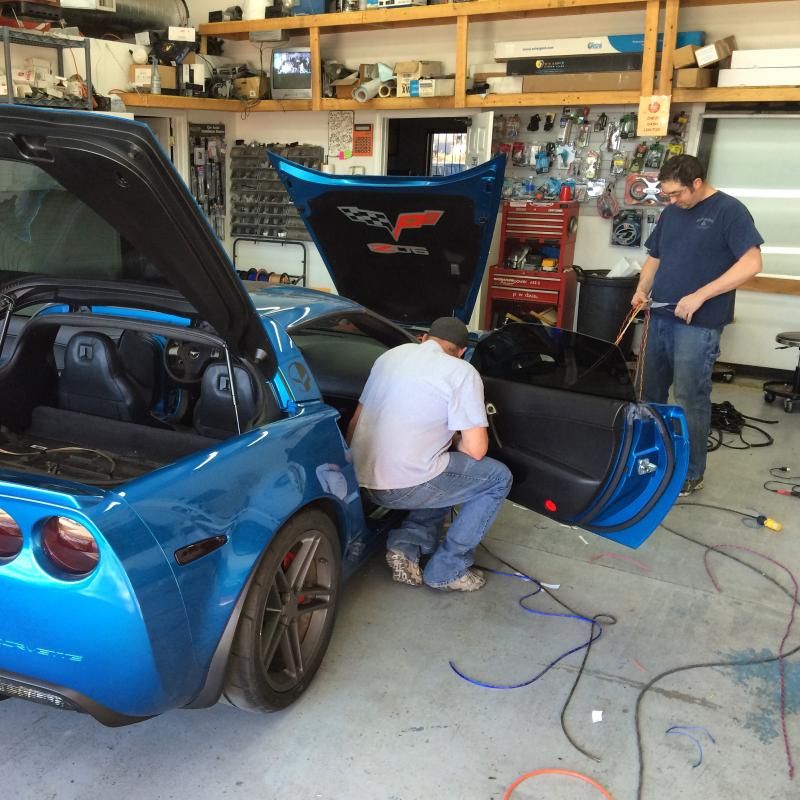
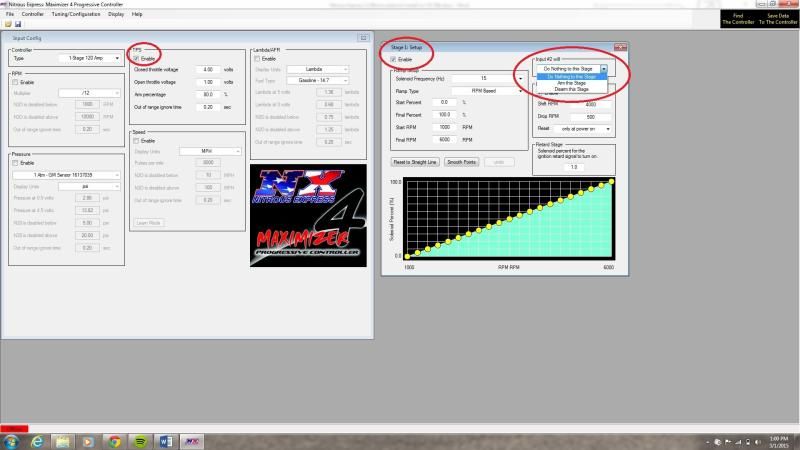
When I came to the wiring I decided I wasn’t comfortable tackling that on my own so I decided to let my friends who own and operate a local stereo shop do the job. They have done nitrous kit installs on their own cars before and they are very familiar with the car system wiring. This included wiring of the bottle heaters, SAFE tank system, switch panel, Lingenfelter timing retard box, and the NX MAX for controller. They put the bottle heaters on quick disconnects. Since the SAFE tank is activated and runs as soon as the system is armed, and the MAX 4 isn’t active until you arm the system, we put the SAFE system on a quick disconnect also, so you can make changes to the MAX 4 without the SAFE tank pump running the whole time. The MAX 4 is very easy to operate although it should be noted that if you are wanting to test the system like we did, you have open the “Stage 1” window and check the “Enable” Box. Then over on the “Input #2 will” side there’s a drop down menu and you must put it in “Do nothing to this stage”. After this was changed, everything worked like clockwork. I set the system to come on at WOT and all others disabled. So with the engine off and the accessory on and the system armed, gave it WOT and it worked. We had the nitrous line unhooked from the plate and one person had a firm grasp on it so it didn’t flop around. Also we disconnected the SAFE tank power so it wouldn’t spray fuel.

Now all that’s left is for this weather to clear up so I can go get the car tuned! I will post those results here when it is done.
If you made it all the way to the end then I thank you for taking the time to read this and hopefully this will help out anyone else thinking of doing a nitrous kit install. If you have any questions reply or PM me. Be sure the call the guys at Nitrous Express when you want a kit for yourself!
More posts to come...
First off I would like to thank Mike A., Kyle B., and Aaron G. at Nitrous Express for all the help they were during this install and how knowledgeable they were for when I had not only my “how” questions but also my “why” questions.
Just a warning this will be long and pic heavy.
Current mods to the car include:
Ragin Racin Stage 4 package with the stalker cam, ARH long tubes with high flow cats, Lightly ported heads, intake and TB, and Halltech CAI. Sodium filled exhaust valves replaced with solid stainless steel and the valve guides have all been replaced with C.H.E. bronze valve guides. This combo put down 542rwhp and 503rwtq.
I apologize in advance for spelling and grammatical errors. This post got long fast!


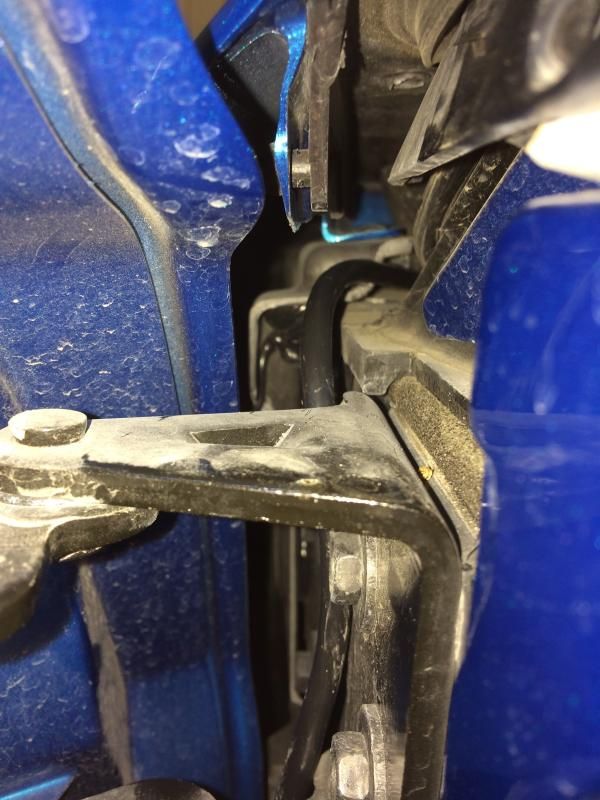
The first step was relocating the EVAP purge solenoid pictured below circled in red. The reason I needed to move it is because there’s a bracket that holds it that bolts to the passenger side head and that’s where I am going to bolt my solenoid bracket. This is what vents the fuel tank so instead of just venting to the atmosphere it sends it through the intake to burn off so you don’t smell the fumes. I’ve read that some guys just delete it and cap it off all together but some say that it can smell like gas over time especially if stored in a small space like a garage and eventually your car will start to smell like gas.

What I did was unhooked all of the lines and relocated the one that hooks to the bottom side of the solenoid to the space underneath the throttle body. The line that connects to the top I left running over the top of the TB. I cut the factory line and heated and bent it into the shape I needed to allow me to move the solenoid off the head, closer to the empty space just behind the TB and idler pulley down in the valley. I reconnected it and plugged it back in. I did not cut or modify the factory wiring plug in anyway.
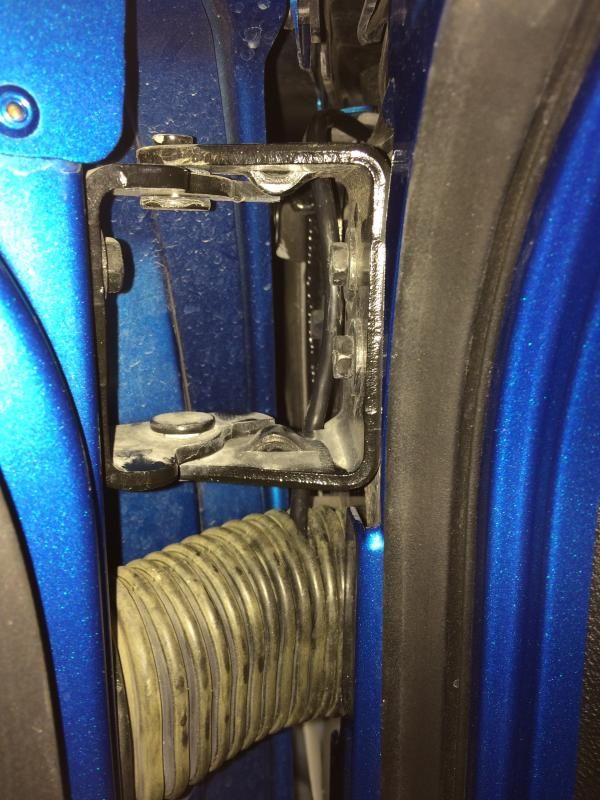
Here you can see the completed relocation and how its stuffed down in that valley.

The next job was trying to find the place to mount the nitrous solenoids. Now I originally purchased the bracket that mounts to the passenger side head, but I wanted to keep my fuel rail covers to help hide lines and wiring. That bracket placed the fuel solenoid right under the FRC and made it harder to route the lines both to the solenoids and to the plate from the solenoids. So what I did was actually make my own bracket that still bolted to the head in the same spot but was longer to bring the solenoids out past the FRC and further away from the head so it would clear. However it was necessary to trim the FRC a little to allow the line from the fuel regulator in to the solenoid and also trimmed a little where the lines run from the solenoids to the plate.


After I mounted the solenoids in their respective spot I looked for a good place to mount my S.A.F.E. Tank (Stand Alone Fuel Enrichment) system and fuel pressure regulator. Now since my car is a Z06 and has the dry sump oil system there was no place to mount it under the hood anywhere. So I had to mount in the hatch area somewhere. The Z06 already has the battery mounted in the rear passenger side compartment of the hatch area. That left me with the options of either just mounting it to the floor in the hatch, or mounting it in the other rear compartment on the driver side of the rear hatch. I chose this option for a number of reasons. One is I could still hide the tank from view and have it be covered up with the factory compartment lid. Other reasons were because it would be easier to route my fuel lines and the breather line from the tank to the outside of the car so I wouldn’t have to smell any fuel. It was easy to remove the rear inner fender wells and route my lines and drill the bottom floor out. The holes I drilled were slightly larger than the diameter of the lines to allow for rubber grommets to help seal off the holes and then I went ahead and silicone around them to ensure placement and a water tight seal.
Since the fuel pressure regulator had to be as close to the solenoids as possible, I thought the best place to mount it was behind the fuse box utilizing a mounting bolt off of the box. The factory Areomotive bracket had a 45 degree bend in it and that made the regulator fit perfectly between the fuse box and the dry sump system with the gauge attached to the regulator with plenty of hood clearance. This location also made it handy for the fuel lines to be routed down into the passenger side rocker to route them back to the SAFE tank in the rear of the car.


Now since I wanted to mount my bottles in the rear hatch area I ran the nitrous line with the fuel lines down along the passenger side rocker panel. I thought it would be best to keep the lines outside of the car and there was plenty of room inside the rocker for all the lines. (nitrous, fuel inlet to the regulator and return to the SAFE tank) The rocker was also completely enclosed protecting the lines from rocks and debris. The lines continue up and over the rear inner fender liner. This is where the nitrous line stops and routes inside the rear hatch area. Here again I had to drill a hole and use a rubber grommet and more silicone. From there I was able to route it up and into the rear hatch area.


Next was mounting my dual bottle bracket inside the car. I wanted the install to look clean and not have the carpet all hacked up. I put the bracket about in the center where I wanted it and then I got under the car to make sure where the mounting bolts would be coming through the floor, they wouldn’t be coming in contact with anything else underneath. There are lines and cables mounted to the floor so be very aware of where you are drilling! I found it very helpful to have a friend help me so there were eyes on top and below the car to pinpoint exactly where you should be drilling. We started with drilling small holes first to make sure they were where we wanted them. I thought it would be a good idea to somehow make it so there were nuts permanently fastened under the car so when test fitting installing and removing the bracket during test fitting I wouldn’t have to worry about the nuts falling off under the car because let’s face it, it’s not a very easily accessible place to get to. So what we came up with was taking some flat strap and welding a nut to them the same distance needed for the bracket. Once we had that done then we bolted them in using the bottle bracket bolts to hold them in position while we took some self-tapping screws and screwed the flat strap to the floor to hold it in position. This allowed us to remove the bolts holding the bottle bracket as many times as need without losing position of the nuts on the bottom. I figured it was best to use all stainless hardware so it wouldn’t rust. I used 2 inch spacers to hold the bracket off the floor enough that it wouldn’t squish the carpet down when the bolts were tightened to the floor. This was helpful when trimming the carpet. We installed the brackets and bottles to see where we needed holes in floor for the blow down tubes coming off the bottles.
The flat straps will go on the underside of the floor:


Trimming the carpet was fairly easy. Reinstalling the bolts and made it helpful for locating where the holes needed to be. I used a pick coming up from the bottom of the car to find the holes for the blow down tubes. Carefully using new razor blades we made slits to poke the bolts through and then trimmed the carpet around the bolts and spacers. I made a slit in the middle to round the nitrous line and wires for the bottle heaters. We then pulled the carpet out of the car to fine trim the rest of the holes and then we used a propane torch to heat a socket the same diameter as the holes to heat the carpet to sort of melt it so it wouldn’t fray where we made holes.


Once everything was mounted and all the lines were run the only thing left before starting the wiring was to run the purge lines. I decided to use brake line and route the purge out the front scoop in the bumper. It took a little modification but not too bad. Mainly just drilling holes from inside the engine bay to route the lines to the scoop. I have the GM accessory mesh grille which actually helped with holding the lines in place.
Last was trimming the plastic cover that covered the Halltech cold air intake. The extra inch the NX plate system added moved everything forward. It was necessary to trim the cover to allow everything to fit right and still utilize it for its original purpose of keeping hot engine bay air out and only taking in cool outside air. I just used an air die grinder and trimmed and test fitted as needed until it fit.


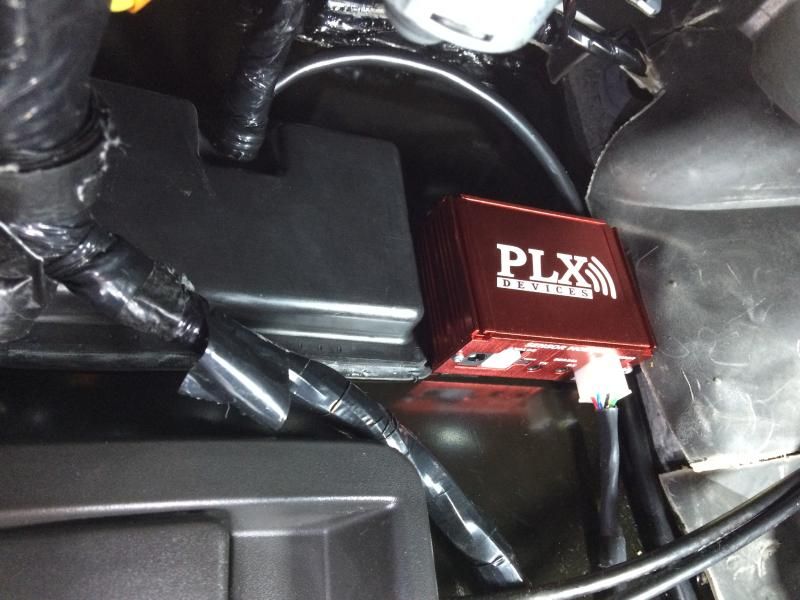
Next I installed my wideband. I used the PLX wideband and it was very user friendly and easy to install. I already had a spare bung on my ARH X-pipe so I sued that so I didn’t have to weld in a new bung. I screwed in the new sensor and routed the wire up and away from the heat, up into the engine bay and inside the car via the door wiring. I mounted my box on the side of the floor board where it is easily accessible and out of side.


Since the bottles are mounted right behind me, I decided to utilize the gauges on the bottles instead of ordering pressure gauges saving me a couple hundred dollars. I ordered the SLP single gauge pod to mound the wideband in. I have to say I expected a lot better fitment from SLP. I had to trim the gauge pod in several places to try and get it to fit and some placed I didn’t trim were carved too much and even then it still doesn’t fit right. I also expected the color to match closer to the factory plastics which as you can see, does not. So overall I have to say I’m disappointed in this gauge pod and maybe I should’ve gone with the A-pillar gauge pod.


Overall the PLX gauge works flawlessly and is very easy to read and is a plug and play installation with no special calibrating or programming required. I’m very happy with the PLX wideband.
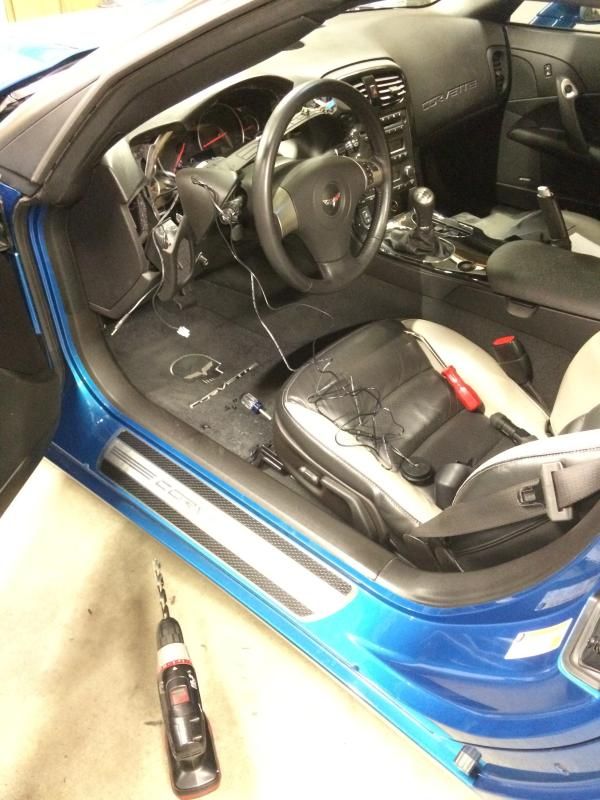
When I came to the wiring I decided I wasn’t comfortable tackling that on my own so I decided to let my friends who own and operate a local stereo shop do the job. They have done nitrous kit installs on their own cars before and they are very familiar with the car system wiring. This included wiring of the bottle heaters, SAFE tank system, switch panel, Lingenfelter timing retard box, and the NX MAX for controller. They put the bottle heaters on quick disconnects. Since the SAFE tank is activated and runs as soon as the system is armed, and the MAX 4 isn’t active until you arm the system, we put the SAFE system on a quick disconnect also, so you can make changes to the MAX 4 without the SAFE tank pump running the whole time. The MAX 4 is very easy to operate although it should be noted that if you are wanting to test the system like we did, you have open the “Stage 1” window and check the “Enable” Box. Then over on the “Input #2 will” side there’s a drop down menu and you must put it in “Do nothing to this stage”. After this was changed, everything worked like clockwork. I set the system to come on at WOT and all others disabled. So with the engine off and the accessory on and the system armed, gave it WOT and it worked. We had the nitrous line unhooked from the plate and one person had a firm grasp on it so it didn’t flop around. Also we disconnected the SAFE tank power so it wouldn’t spray fuel.


Now all that’s left is for this weather to clear up so I can go get the car tuned! I will post those results here when it is done.
If you made it all the way to the end then I thank you for taking the time to read this and hopefully this will help out anyone else thinking of doing a nitrous kit install. If you have any questions reply or PM me. Be sure the call the guys at Nitrous Express when you want a kit for yourself!
More posts to come...
Last edited by JCox23; 03-01-2015 at 07:27 PM.


 03-01-2015, 06:57 PM
#4
Racer
Thread Starter
Thanks guys! I wanted to only do it once and do it right so no shortcuts were taken.
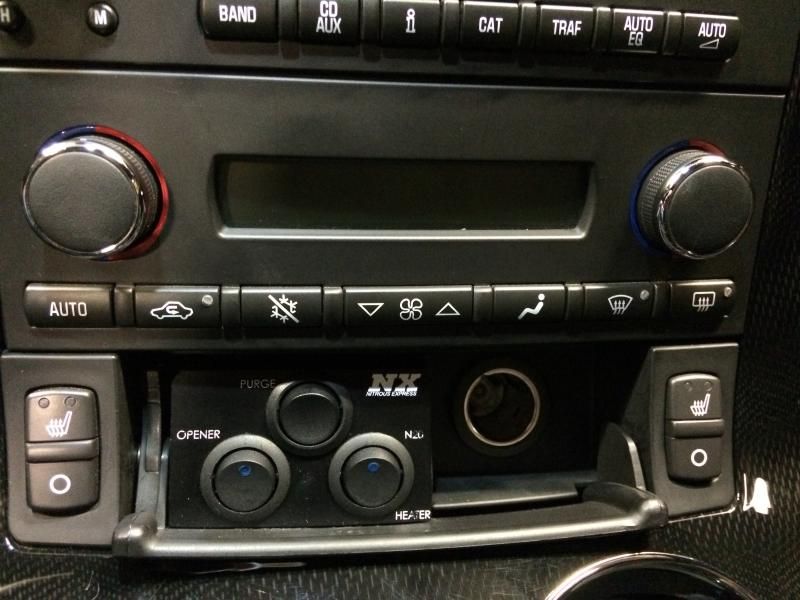
I aded a few more pics of the Wideband and the switch plate in the ash tray.
I aded a few more pics of the Wideband and the switch plate in the ash tray.


 03-17-2015, 09:42 AM
#9

Nice build man bet that thing pulls hard on the juice. I'm going through an almost exact build right now and i have one question for you (sorry if you mentioned it)
How were you able to get the Throttle Body plug back in the TB after the plate was installed? After i put the plate on the plug is almost sitting on the pulley. Looking for a smaller idler pulley now. I've added a pic to show what i'm talking about..
Full page photo.pdf
How were you able to get the Throttle Body plug back in the TB after the plate was installed? After i put the plate on the plug is almost sitting on the pulley. Looking for a smaller idler pulley now. I've added a pic to show what i'm talking about..
Full page photo.pdf
03-17-2015, 09:53 PM
#10
Le Mans Master


Nice build man bet that thing pulls hard on the juice. I'm going through an almost exact build right now and i have one question for you (sorry if you mentioned it)
How were you able to get the Throttle Body plug back in the TB after the plate was installed? After i put the plate on the plug is almost sitting on the pulley. Looking for a smaller idler pulley now. I've added a pic to show what i'm talking about..
Attachment 47871700
How were you able to get the Throttle Body plug back in the TB after the plate was installed? After i put the plate on the plug is almost sitting on the pulley. Looking for a smaller idler pulley now. I've added a pic to show what i'm talking about..
Attachment 47871700
03-17-2015, 11:10 PM
#11
I do not have a fast it is the stock ls3 intake but as I understand since I have the dry sump (grand sport) they pulleys are aligned different causing the low clearance with the pulley. my shop over nighted the pulley, not sure what belt will be needed. Just trying to get ready for 2k.
03-18-2015, 11:36 AM
#12
Racer
Thread Starter
I'm not sure on that. I didn't have any clearance issues with my stock LS7 TB and intake.
Good luck at 2K! I'm here at HP Motorsports having a last minute clutch installed on the car. I'm hoping it at east drys out for tomorrow!
Good luck at 2K! I'm here at HP Motorsports having a last minute clutch installed on the car. I'm hoping it at east drys out for tomorrow!