
Switching Camps - TTIX --> UPP - The Search for Big Power
 02-25-2016, 04:36 PM
#1
Le Mans Master

Thread Starter
I've had my TTIX kit for several years now and it had served me well with a few caveats:
1. It's limited to the 62/65 turbo size, which has been proven to make big (~1200 RWHP) power with the Precision turbos, but I had Turbonetics 62's which didn't seem to perform as well only making 980 @ 24#. Plenty for some but I wanted more so I added a 150 shot and cracked 1100 but became leery of spraying it after a few mishaps. Also I just think the 62's, even the Precisions, are out of their sweet spot being pushed that hard.
2. It's a pain to work on. Working on the turbos usually requires dropping the cradle and things like head swaps or motor swaps which are labor intensive become exponentially more so with the TTIX kit installed. It's a tight fit!
3. Heat. My old LQ iron block and now my LSX iron block don't reject heat nearly as well as an aluminum block and with the turbos tucked up right next to the block. I struggled to maintain reasonable coolant temps in traffic in the Houston summers.
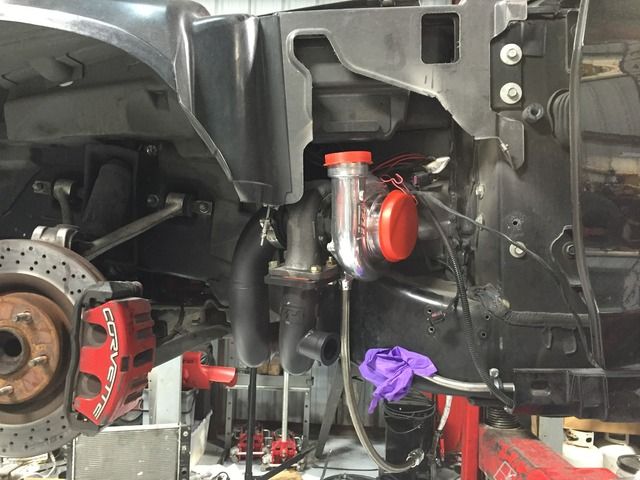
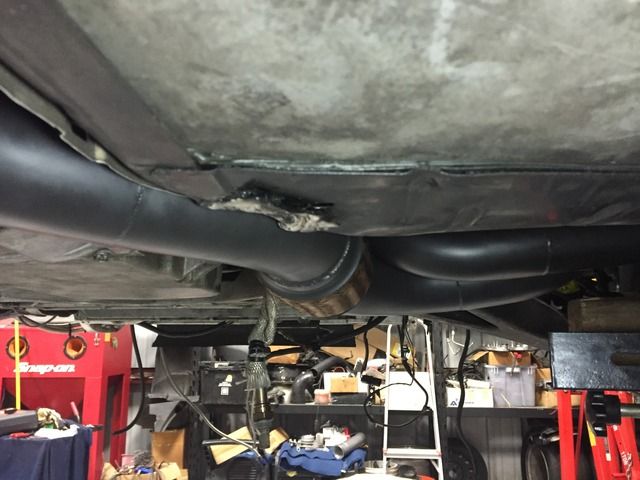
So when the turbos started smoking after a hard pull and needed to come out to be refreshed, I made the decision to pull the whole kit out and go a different direction. I've had a hard on for the UPP fender kit since it came out, mainly because its very similar to my buddy Hector (Z06er)'s old custom kit which was epic back in it's heyday making well over a grand at the wheels back when not that many people were doing that. While the UPP kit was still limited to the 62's, two CF members have recently cracked 1200 RWHP at, or just over 20#. When I talked to CK he mentioned that the ball bearing 72's were under testing and I could get them when the next batch came out. This sealed the deal. I also elected to get a dual T3/T4 flange where the turbo mounts so I had the option to upgrade to a T4 frame later.
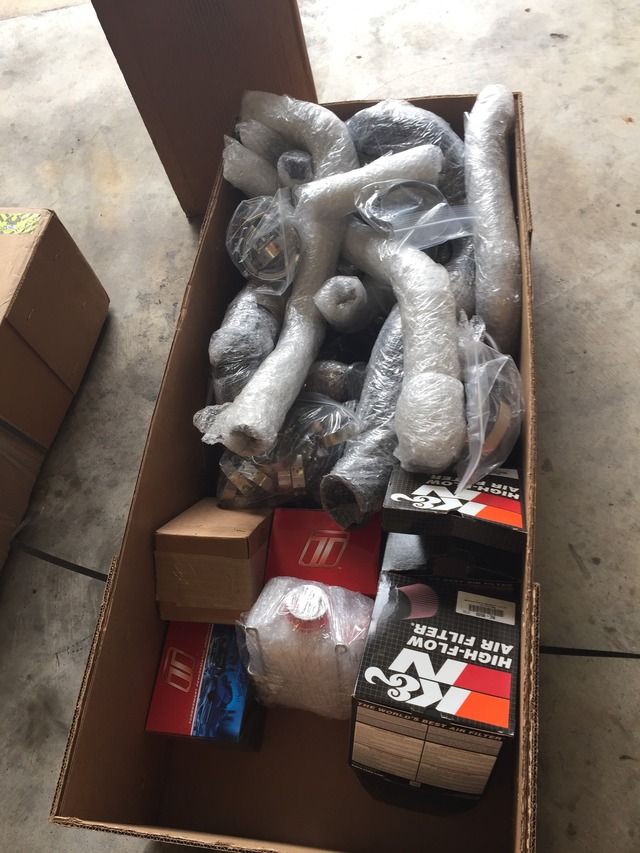
Everything arrived nicely packed:
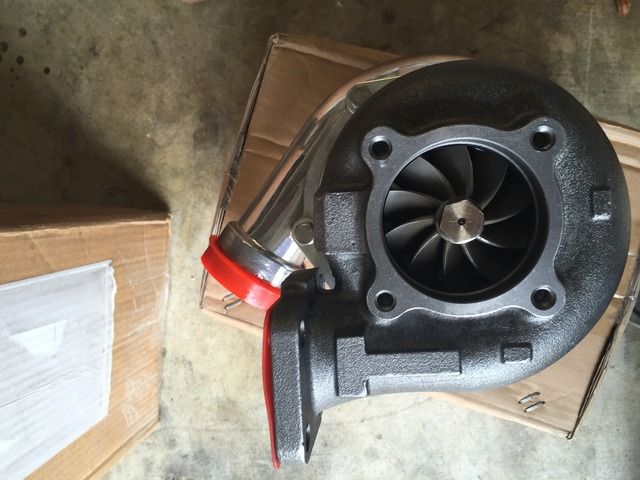
First thing I noticed was the new turbos aren't a 5 bolt turbine housing made for an internal wastegate that won't be used anymore.
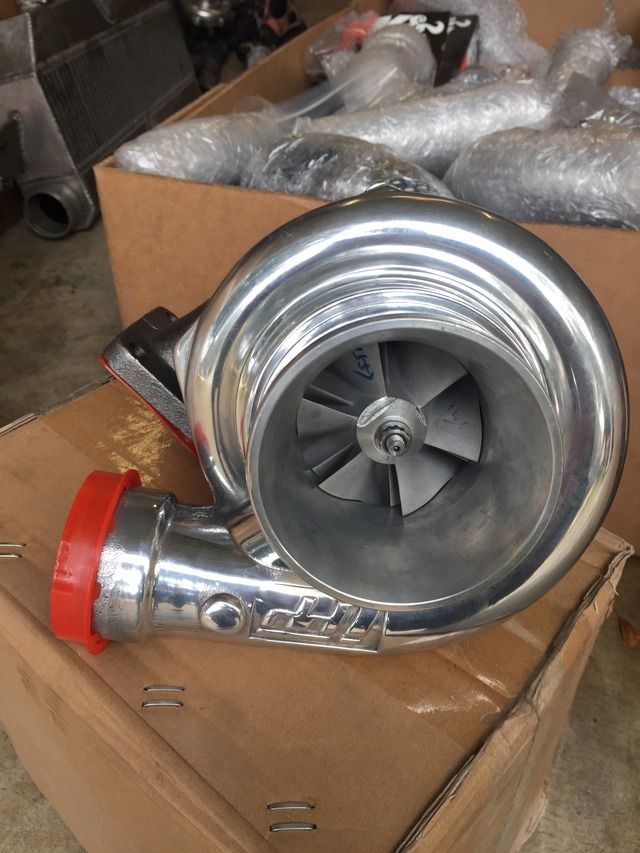
Nice big compressor side.
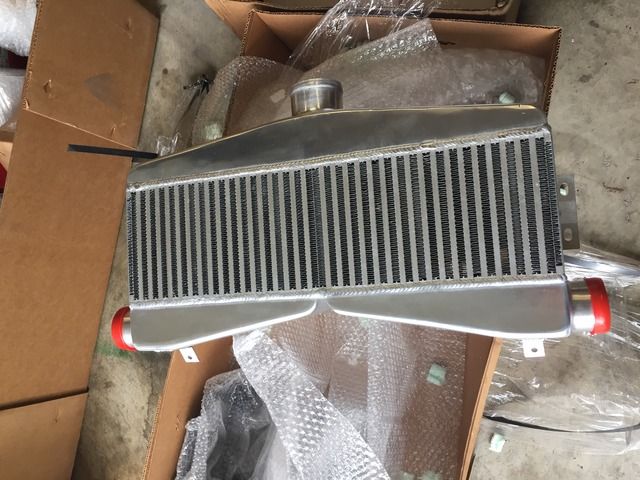
Sheet metal (aluminum) Intercooler:
There are no written instructions, just the installation video, so I watched that a few times to familiarize myself with the install. It's quite detailed and helped a lot but the kit has been revised since the video which is now a few years old. So there were differences in how things fit and what needed to be done. EG: both braces from the firewall to the frame need to be cut out now rather than just the drivers side, the post the battery box mounts to needs to be cut off and lastly the kit is now supposed to utilize existing holes to mount the turbos rather than drilling your own.
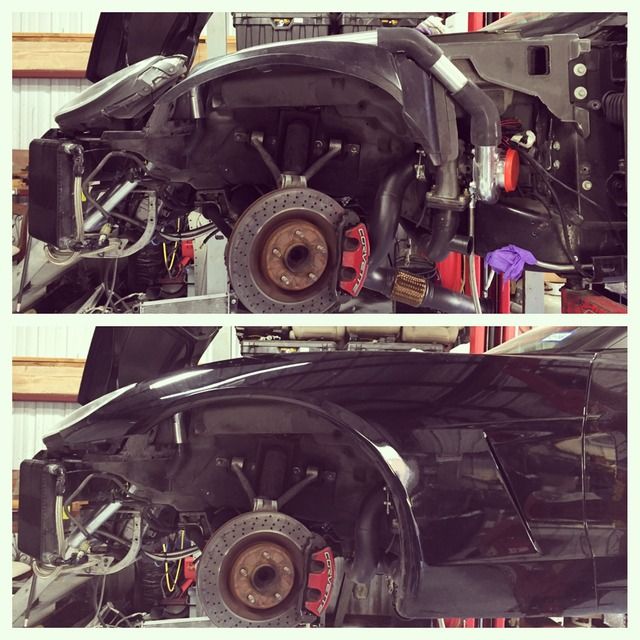
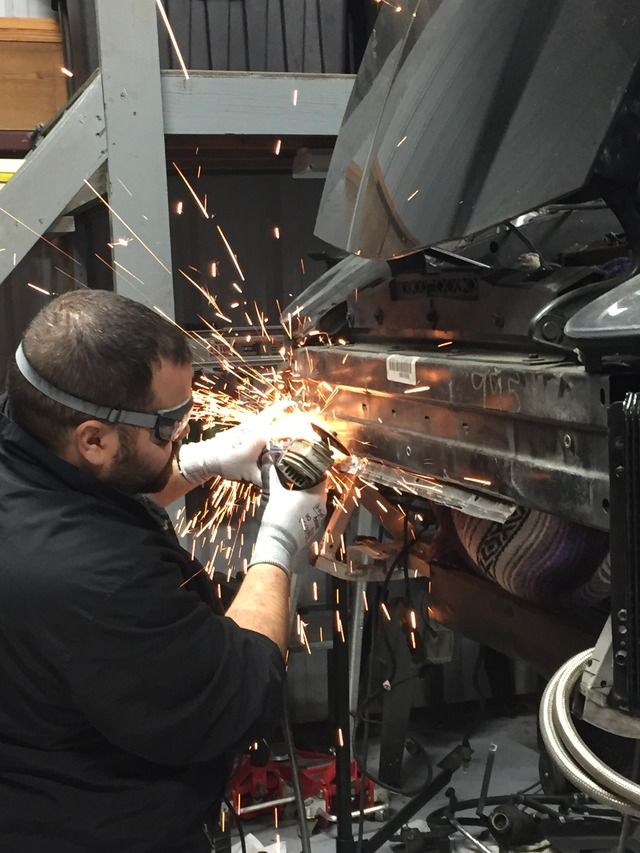
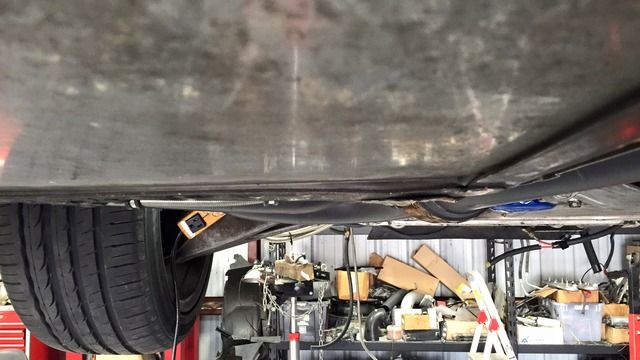
Started at it after removing the TTIX kit. Yanked the bumper and fenders, started cutting the fiberglass fenderwell to make room for the drivers turbo, probably could have taken more time to do this and cut less, it's hard to tell exactly where to cut as you can't put it in place to see where it'll end up to see where to cut. Also it's a two man deal because you're test fitting with the up pipe and downpipe bolted loosely to the turbo and having to connect the up pipe to the manifold and move the assembly around. It's arduous, much like trying to squeeze the TTIX manifold and turbo assembly in place. :P We tried for some time to get to the stock hole but were off by quite a bit. This could be due to the fact that I had to use 5/16" spacers between the head and the stock exhaust manifold to keep the manifolds from hitting the bosses on my six bolt heads. Anyhow we got it where it looked good and decided to drill our own hole. Cool right?
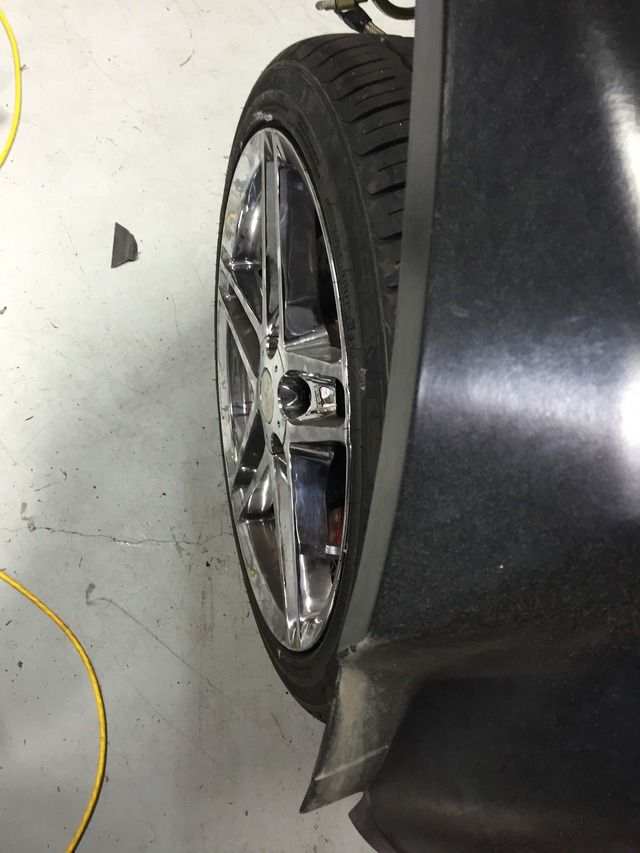
Well no, the downpipe was sticking WAY into the wheel well. Didn't see that until I put the tire on and couldn't turn the wheel more than ~20 degrees.
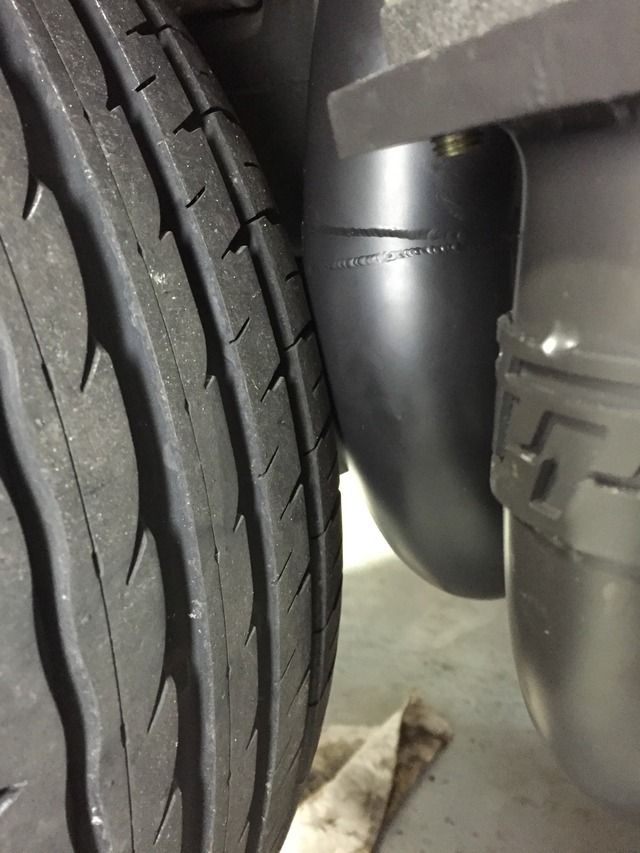
I called CK and sent him some pics and vids and he walked me through some tips and said to just keep messing with it until the downpipe is tucked up against the frame and the exit of the downpipe is facing straight back. This looked impossible, but after much fiddling it just worked. ended up hitting the stock hole, downpipe cleared (barely) and was level with the bottom of the cradle and exit was where it needed to be. I can't even tell you what we changed in order for it to work. You have to be patient because you look at it and you're like, "It can't go any other way than this"! But small tweaks lead to big changes. And again I don't think the spacers were helping things.
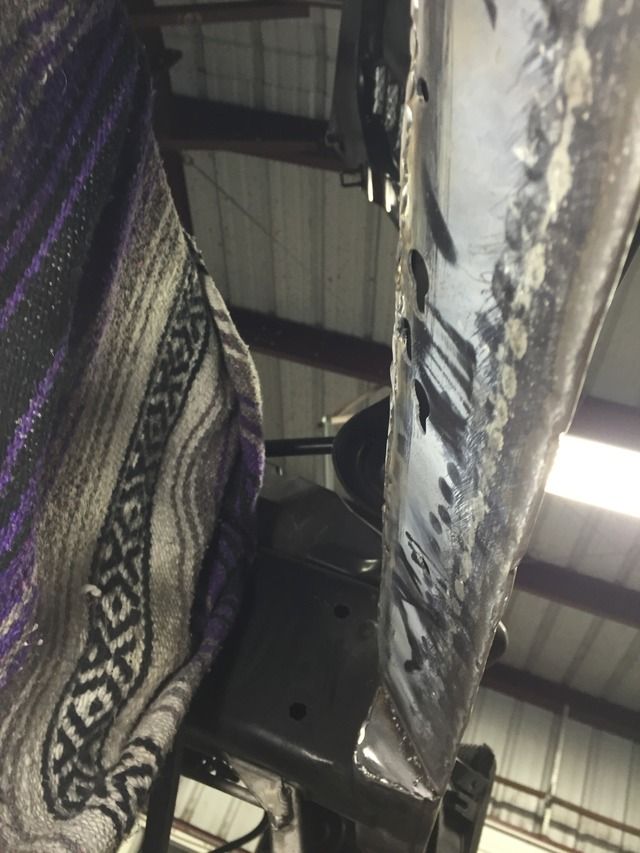
On to the passenger side and it was pretty much more of the same. You put it up there and are like WTF? Keep messing with it and get it ~good although we couldn't come close to the stock hole. you can see the battery stand off cut off here as well as the extra flange holes for a T4 frame if desired later:

The downpipe cleared the tire easy on this side but the problem I ran into was there didn't seem to be a way to get it as high as the other side. It hung down below the cradle a good ways.
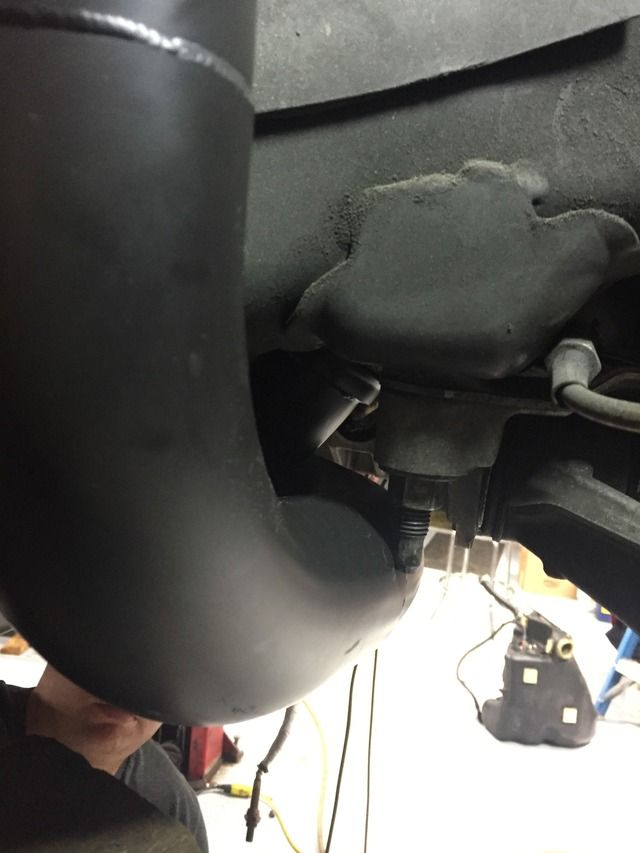
Could not see a way to fix this because the downpipe was up against the up pipe and the up pipe location is dictated by the manifold connection. But like before we just kept messing with it and got it a little better, but honestly we ended up denting the downpipe (which was a pain because the tubing is THICK) to let it slip by the up pipe to come up higher although it's still lower than the other side. I probably should have spend more time playing with it to get it higher but I got impatient.
After that it goes a lot easier once you get over cutting into your fenderwells. This part is actually pretty fun placing the pipes and clearancing and re-fitting and clearancing more. It went pretty easy.

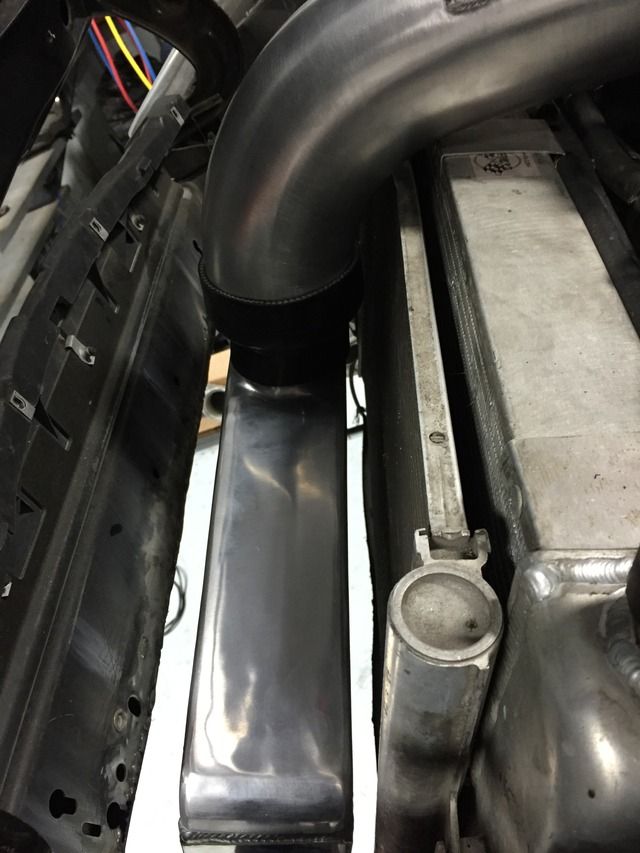
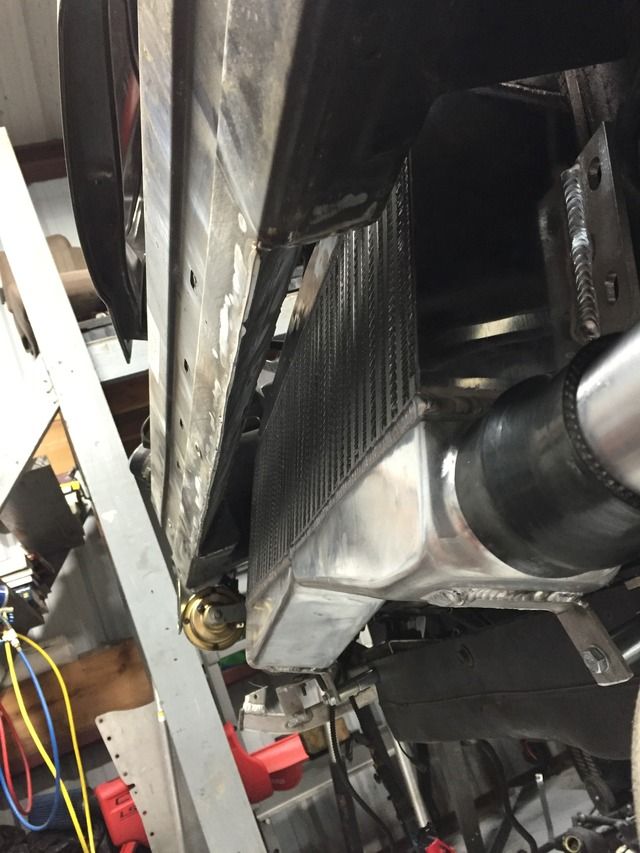
I had originally used the cradle spacers to move the radiator forward for the 4" IC-TB pipe to fit but after having done that and mounting the intercooler the pipe had gobs of room above my Dewitts so I decided to reverse that. This required some mods to how thee intercooler mounts to the cradle to keep it in the same place it would have been but gave me a nice air gap between the IC and condenser which I liked. What I didn't like was the top ~1/3 of the intercooler was above the frame crosstube similar to how my TTIX intercooler was. so I decided to do the Pat G mod to the frame cross tube to give air to the whole intercooler.
The placement of the PCM would work but I though it better to keep it farther away from the turbo/downpipe. With the passenger turbo in place I could see a better spot for it.
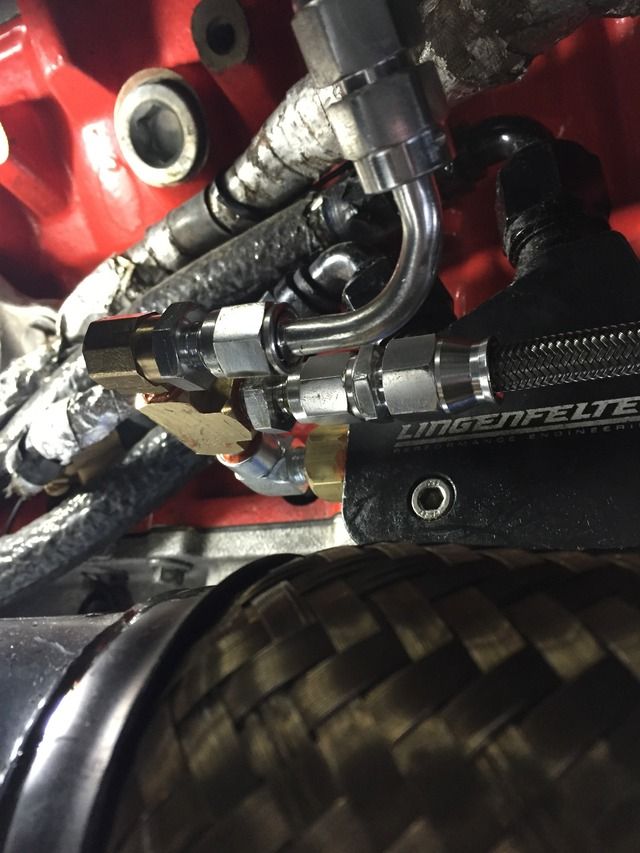
I had a custom triple AEM 320 fuel system already but the hard line I had run needed to be modified. You can see how it was originally ran in an earlier pic above with the purple glove on it.
Speaking of fuel I decided to go from FIC 1k's to FIC 2k's to support E85. My meth had to go since there was no more WW reservoir and I didn't feel like running a tank in the rear cubby all the way to the front and I was relying so much on meth for fuel/octane on my old setup that I was worried about distribution so I scrapped it.
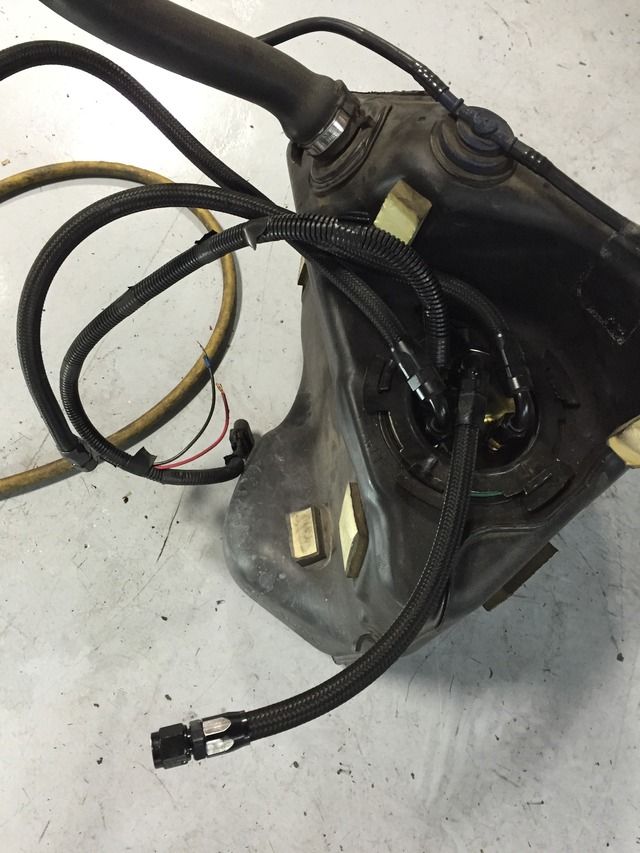
The corn necessitated replacing my fuel hoses with PTFE ones which thus necessitated dropping the tank. Yay.
I had to change the oil feeds a little as I had an LPE oil cooler block.
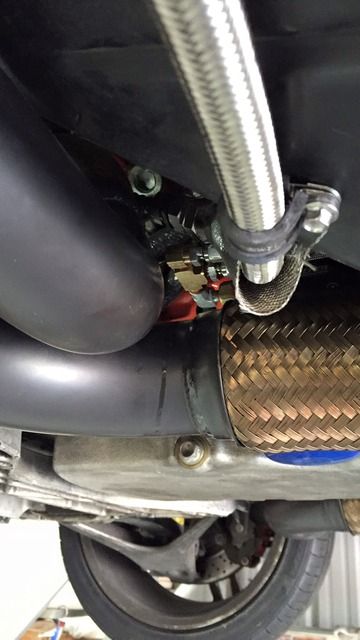
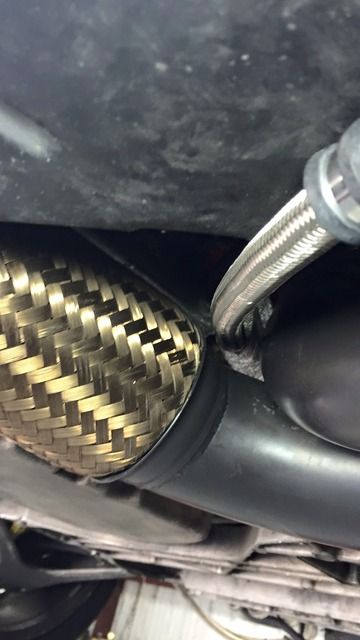
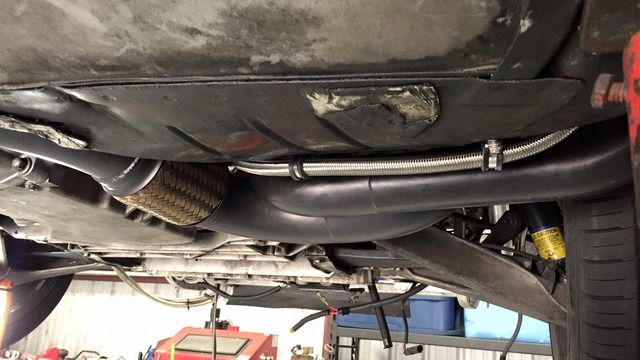
On the subject of oil I just couldn't bring myself to run the oil return lines under the car becoming the lowest point on the car. I'm sure it would have worked but I re-did the returns to go up over the downpipes along side the block under the motor mounts on both sides to the Exapump. The top most point of the lines is just a little higher than it would have been and I'm confident the Exapump will not have trouble pulling the oil up it.
I don't have pics of the center section ATM but it wasn't hard at all to modify it to mate to the downpipes with the V bands.
I added Dave Steck's flex fuel kit so the stock E40 can adjust for the ethanol content and it worked great. And my Aeroforce Interceptor should show the percent ethanol. (Pics pending) It's going to be fun tuning with the additional tables. I've just started tuning.
Initial impressions (having put ~5 miles on it) are:
Firstly, it sounds like a totally different car. The exhaust note is very different, hard to explain. It sounds more F1'y than muscle'y. Wasn't expecting that.
The car feels a bit more "racey", I guess because the turbos/exhaust is bolted to the frame. There's not a marked NVM increase, but it feels/sounds more racecar'y.
I'll have more empirical data after I line out the non-boost part of the tune and start to tune boost but it seems way more responsive than the TTIX. Boost comes on notably quicker.
More to come as it happens. Barring any unforeseen issues the car should be on kill for 2k. The goal is to make a solid 1200 RWHP at <=20# which is conservative given that Derrick and Josh have already made >1200 at ~21# on the 62's.
1. It's limited to the 62/65 turbo size, which has been proven to make big (~1200 RWHP) power with the Precision turbos, but I had Turbonetics 62's which didn't seem to perform as well only making 980 @ 24#. Plenty for some but I wanted more so I added a 150 shot and cracked 1100 but became leery of spraying it after a few mishaps. Also I just think the 62's, even the Precisions, are out of their sweet spot being pushed that hard.
2. It's a pain to work on. Working on the turbos usually requires dropping the cradle and things like head swaps or motor swaps which are labor intensive become exponentially more so with the TTIX kit installed. It's a tight fit!
3. Heat. My old LQ iron block and now my LSX iron block don't reject heat nearly as well as an aluminum block and with the turbos tucked up right next to the block. I struggled to maintain reasonable coolant temps in traffic in the Houston summers.
So when the turbos started smoking after a hard pull and needed to come out to be refreshed, I made the decision to pull the whole kit out and go a different direction. I've had a hard on for the UPP fender kit since it came out, mainly because its very similar to my buddy Hector (Z06er)'s old custom kit which was epic back in it's heyday making well over a grand at the wheels back when not that many people were doing that. While the UPP kit was still limited to the 62's, two CF members have recently cracked 1200 RWHP at, or just over 20#. When I talked to CK he mentioned that the ball bearing 72's were under testing and I could get them when the next batch came out. This sealed the deal. I also elected to get a dual T3/T4 flange where the turbo mounts so I had the option to upgrade to a T4 frame later.
Everything arrived nicely packed:
First thing I noticed was the new turbos aren't a 5 bolt turbine housing made for an internal wastegate that won't be used anymore.
Nice big compressor side.
Sheet metal (aluminum) Intercooler:
There are no written instructions, just the installation video, so I watched that a few times to familiarize myself with the install. It's quite detailed and helped a lot but the kit has been revised since the video which is now a few years old. So there were differences in how things fit and what needed to be done. EG: both braces from the firewall to the frame need to be cut out now rather than just the drivers side, the post the battery box mounts to needs to be cut off and lastly the kit is now supposed to utilize existing holes to mount the turbos rather than drilling your own.
Started at it after removing the TTIX kit. Yanked the bumper and fenders, started cutting the fiberglass fenderwell to make room for the drivers turbo, probably could have taken more time to do this and cut less, it's hard to tell exactly where to cut as you can't put it in place to see where it'll end up to see where to cut. Also it's a two man deal because you're test fitting with the up pipe and downpipe bolted loosely to the turbo and having to connect the up pipe to the manifold and move the assembly around. It's arduous, much like trying to squeeze the TTIX manifold and turbo assembly in place. :P We tried for some time to get to the stock hole but were off by quite a bit. This could be due to the fact that I had to use 5/16" spacers between the head and the stock exhaust manifold to keep the manifolds from hitting the bosses on my six bolt heads. Anyhow we got it where it looked good and decided to drill our own hole. Cool right?
Well no, the downpipe was sticking WAY into the wheel well. Didn't see that until I put the tire on and couldn't turn the wheel more than ~20 degrees.
I called CK and sent him some pics and vids and he walked me through some tips and said to just keep messing with it until the downpipe is tucked up against the frame and the exit of the downpipe is facing straight back. This looked impossible, but after much fiddling it just worked. ended up hitting the stock hole, downpipe cleared (barely) and was level with the bottom of the cradle and exit was where it needed to be. I can't even tell you what we changed in order for it to work. You have to be patient because you look at it and you're like, "It can't go any other way than this"! But small tweaks lead to big changes. And again I don't think the spacers were helping things.
On to the passenger side and it was pretty much more of the same. You put it up there and are like WTF? Keep messing with it and get it ~good although we couldn't come close to the stock hole. you can see the battery stand off cut off here as well as the extra flange holes for a T4 frame if desired later:
The downpipe cleared the tire easy on this side but the problem I ran into was there didn't seem to be a way to get it as high as the other side. It hung down below the cradle a good ways.
Could not see a way to fix this because the downpipe was up against the up pipe and the up pipe location is dictated by the manifold connection. But like before we just kept messing with it and got it a little better, but honestly we ended up denting the downpipe (which was a pain because the tubing is THICK) to let it slip by the up pipe to come up higher although it's still lower than the other side. I probably should have spend more time playing with it to get it higher but I got impatient.
After that it goes a lot easier once you get over cutting into your fenderwells. This part is actually pretty fun placing the pipes and clearancing and re-fitting and clearancing more. It went pretty easy.
I had originally used the cradle spacers to move the radiator forward for the 4" IC-TB pipe to fit but after having done that and mounting the intercooler the pipe had gobs of room above my Dewitts so I decided to reverse that. This required some mods to how thee intercooler mounts to the cradle to keep it in the same place it would have been but gave me a nice air gap between the IC and condenser which I liked. What I didn't like was the top ~1/3 of the intercooler was above the frame crosstube similar to how my TTIX intercooler was. so I decided to do the Pat G mod to the frame cross tube to give air to the whole intercooler.
The placement of the PCM would work but I though it better to keep it farther away from the turbo/downpipe. With the passenger turbo in place I could see a better spot for it.
I had a custom triple AEM 320 fuel system already but the hard line I had run needed to be modified. You can see how it was originally ran in an earlier pic above with the purple glove on it.
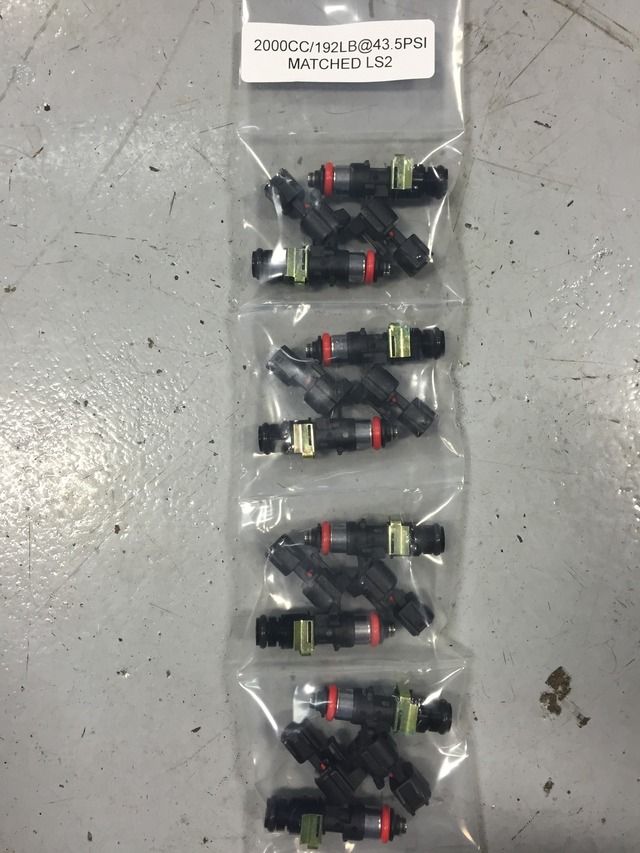
Speaking of fuel I decided to go from FIC 1k's to FIC 2k's to support E85. My meth had to go since there was no more WW reservoir and I didn't feel like running a tank in the rear cubby all the way to the front and I was relying so much on meth for fuel/octane on my old setup that I was worried about distribution so I scrapped it.
The corn necessitated replacing my fuel hoses with PTFE ones which thus necessitated dropping the tank. Yay.
I had to change the oil feeds a little as I had an LPE oil cooler block.
On the subject of oil I just couldn't bring myself to run the oil return lines under the car becoming the lowest point on the car. I'm sure it would have worked but I re-did the returns to go up over the downpipes along side the block under the motor mounts on both sides to the Exapump. The top most point of the lines is just a little higher than it would have been and I'm confident the Exapump will not have trouble pulling the oil up it.
I don't have pics of the center section ATM but it wasn't hard at all to modify it to mate to the downpipes with the V bands.
I added Dave Steck's flex fuel kit so the stock E40 can adjust for the ethanol content and it worked great. And my Aeroforce Interceptor should show the percent ethanol. (Pics pending) It's going to be fun tuning with the additional tables. I've just started tuning.
Initial impressions (having put ~5 miles on it) are:
Firstly, it sounds like a totally different car. The exhaust note is very different, hard to explain. It sounds more F1'y than muscle'y. Wasn't expecting that.
The car feels a bit more "racey", I guess because the turbos/exhaust is bolted to the frame. There's not a marked NVM increase, but it feels/sounds more racecar'y.
I'll have more empirical data after I line out the non-boost part of the tune and start to tune boost but it seems way more responsive than the TTIX. Boost comes on notably quicker.
More to come as it happens. Barring any unforeseen issues the car should be on kill for 2k. The goal is to make a solid 1200 RWHP at <=20# which is conservative given that Derrick and Josh have already made >1200 at ~21# on the 62's.
Last edited by 5 Liter Eater; 02-26-2016 at 12:13 PM.


 02-25-2016, 07:14 PM
#5
Melting Slicks


Great work. Do you have minions working for you now? Are the up-pipes and down pipes both 3"? I can't believe how well everything tucks.
Looking forward to the final results and videos of you dragging some peeps.
Looking forward to the final results and videos of you dragging some peeps.

 02-25-2016, 09:56 PM
#8
Le Mans Master
Nice build Bill! Looks like a PITA to install but seems to tuck well and have much less restriction on the exhaust side.
Sub'd for your progress for sure..
BTW are the FIC2k injectors all stainless internals? Are they intended for E85 or just "E85 compatible"? Apparently there is a difference in how long they last without corroding.
I'm bouncing on the E85 fence myself. Lots of pros and cons with it.
Sub'd for your progress for sure..
BTW are the FIC2k injectors all stainless internals? Are they intended for E85 or just "E85 compatible"? Apparently there is a difference in how long they last without corroding.
I'm bouncing on the E85 fence myself. Lots of pros and cons with it.
02-25-2016, 10:58 PM
#9
Safety Car

That's awesome man. Looking forward to seeing what it makes. E85 is so great. Glad I made the switch.
02-25-2016, 11:27 PM
#10
Race Director

Member Since: May 2004
Location: Raleigh, NC
Posts: 16,664
Received 1,194 Likes
on
1,053 Posts
St. Jude Donor '15

Nice! Sub'd
02-26-2016, 12:58 AM
#11
Drifting

Man Bill your garage looks SOooo different than I remember! LOL! Man I was scheptical at first, but it came out real nice man. I think the little differences you made sealed the deal for me about me liking it or not. And I'm excited for you to get it tuned up and taking me for a ride! I'm upset that I'm missing yet another 2K in my own ride, but somewhat happy we were able to get yours together. Congrats on a successful swap man nice job! It's going to be a totally different car than it was at just under a grand to the wheels!
Last edited by inspector12; 02-26-2016 at 12:59 AM.
 02-26-2016, 10:15 AM
#16
Le Mans Master
Thread Starter
Alan, when I talked to Jon he said they were good to go for E85. But it's possible they may fair as well as, say, ID2000's do on corn. Neither are stainless.
Jeff, doing this work on the lift at WPC has officially ruined me. I raised up the ride height in my garage and it felt wrong to be crawling around on the floor.
Chuntington, a top mount, any top mount, violates two of my reasons for making the switch in the first place; heat and ease of work.
Jeff, doing this work on the lift at WPC has officially ruined me. I raised up the ride height in my garage and it felt wrong to be crawling around on the floor.
Chuntington, a top mount, any top mount, violates two of my reasons for making the switch in the first place; heat and ease of work.
02-26-2016, 10:24 AM
#17
Le Mans Master
Thread Starter
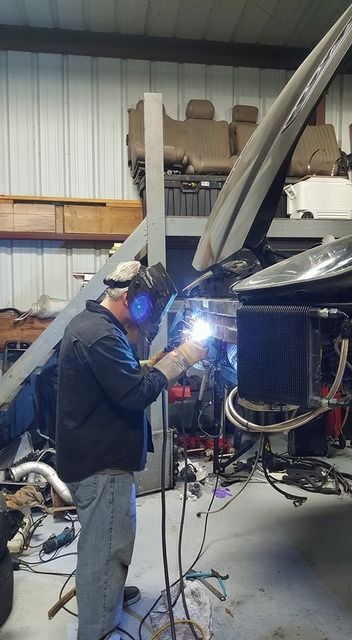
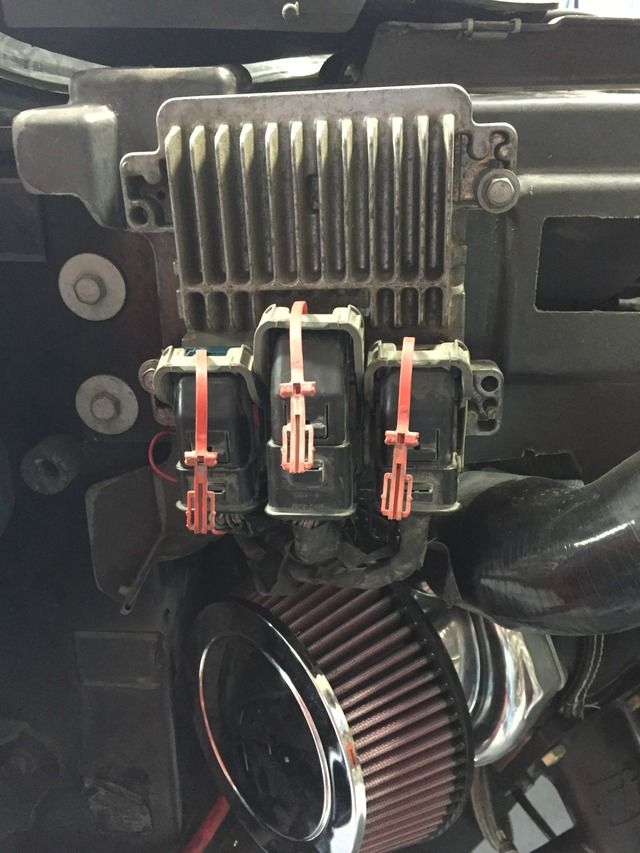
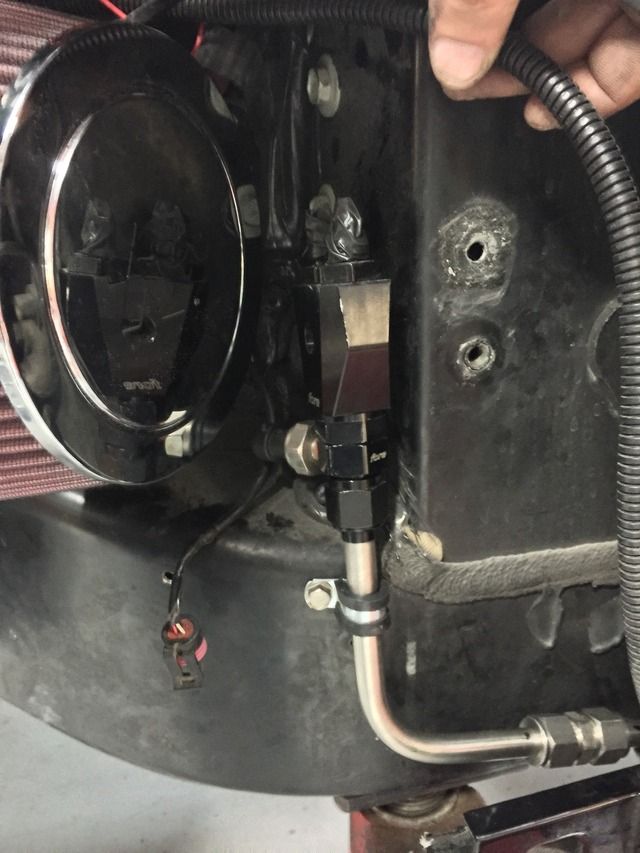
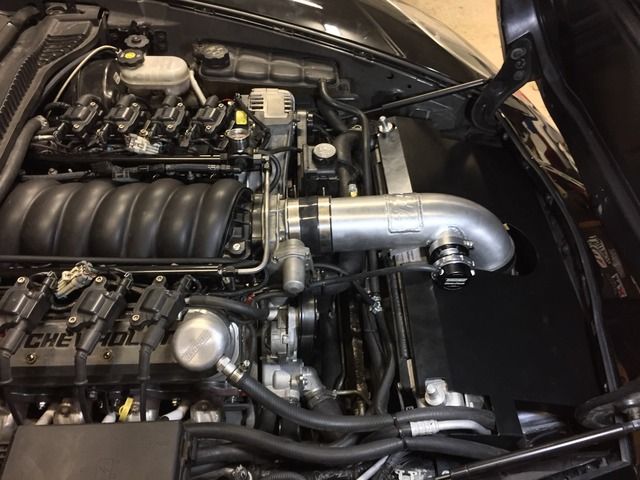
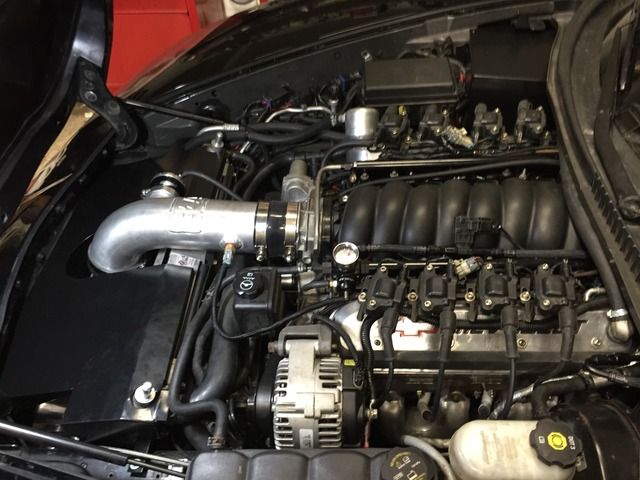
Engine bay pics. Radiator shroud still fit nicely although the radiator is in a different place. Vanity cover nicely hides the mess of wires where the battery used to be. Ethanol sensor on the return line just behind the regulator on top of the manifold. Crankcase breathing is temporary, will be welding bungs on the valve covers.
Last edited by 5 Liter Eater; 02-26-2016 at 10:26 AM.


 02-26-2016, 11:26 AM
#20
Race Director
Member Since: May 2004
Location: Raleigh, NC
Posts: 16,664
Received 1,194 Likes
on
1,053 Posts
St. Jude Donor '15
I really like the hard fuel lines you're using
The following users liked this post:
5 Liter Eater (02-26-2016)