
"More" on shifter box bushings - MN6 - A perfect solution!
 05-18-2010, 11:24 AM
#21
Drifting

Thread Starter
Member Since: Sep 2007
Location: Hurst (Fort Worth area) Texas
Posts: 1,283
Likes: 0
Received 6 Likes
on
5 Posts
St. Jude Donor '09

OK... Thanks! These photos show clearly that Dale did have the bushings lined up correctly. The fact remains that the use of the B&M bushings (real B&M or replicated) do, indeed, raise the shifter box up from the tunnel mounting surfaces. This is important and a fundamental design flaw.
The bottom of the shifter box has a "V" protrusion that rests in a corresponding "V"-shaped rubber piece. The mechanical design relies on the three points of attachment of the shifter box: the two top screws (through whatever bushings) plus the "V" on the bottom.
Use of the B&M bushing design guarantees that there will be no contact at all with the bottom "V", leaving the two top screws to both position and support the shifter box... obvoiusly weaker - and potentially sloppier - than the as-designed three-point mounting.
Dang, Dale... despite your excellent efforts, I'm thinking that the B&M design (what there is of it) has led you down the primrose path to a compromised "fix." While it may not rattle, I suggest that it is not properly supported.
<<< sigh >>>
R
 b
b
Last edited by RFP; 05-18-2010 at 01:49 PM.
 05-18-2010, 11:33 AM
#22
Drifting
Thread Starter
Member Since: Sep 2007
Location: Hurst (Fort Worth area) Texas
Posts: 1,283
Likes: 0
Received 6 Likes
on
5 Posts
St. Jude Donor '09
By the way, the installation instructions for the B&M shifter are not quite accurate (click here and scroll down to the pdf link: http://bmracing.com/PRODUCTS/Chevrol...97-05-Corvette ).
Photos 25 and 26 clearly show the installation of the B&M spacer (it's really a reach to call this metal piece a 'bushing.') on the shift box. Then photos 27 and 28 - where they describe putting the whole thing back together - show factory rubber bushings in the shifter box. Hmmmmm
Stuff like this simply confuses the whole issue.
05-18-2010, 11:41 AM
#23
Safety Car


Member Since: Jun 1999
Location: Austin, Singapore, Kuala Lumpur, Houston, Dallas, Hong Kong, Elgin, etc.. Texas
Posts: 3,570
Likes: 0
Received 3 Likes
on
2 Posts

OK... Thanks! These photos show clearly that Dale did have the bushings lined up correctly. The fact remains that the use of the B&M bushings (real B&M or replicated) do, indeed, raise the shifter box up from the tunnel mounting surfaces. This is important and a fundamental design flaw.
The bottom of the shifter box has a "V" protrusion that rests in a corresponding "V"-shaped rubber piece. The mechanical design relies on the three points of attachment of the shifter box: the two top screws (through whatever bushings) plus the "V" on the bottom.
Use of the B&M bushing design guarantees that there will be no contact at all with the bottom "V", leaving the two top screws to both position and support the shifter box... obvoiusly weaker - and potentially sloppier - than the as-designed three-point mounting.
Dang, Dale... despite your excellent efforts, I'm thinking that the B&M design (what there is of it) has led you down the primrose path to a compromised "fix." While it may not rattle, I suggest that it is not properly supported.
<<< sigh >>>
R
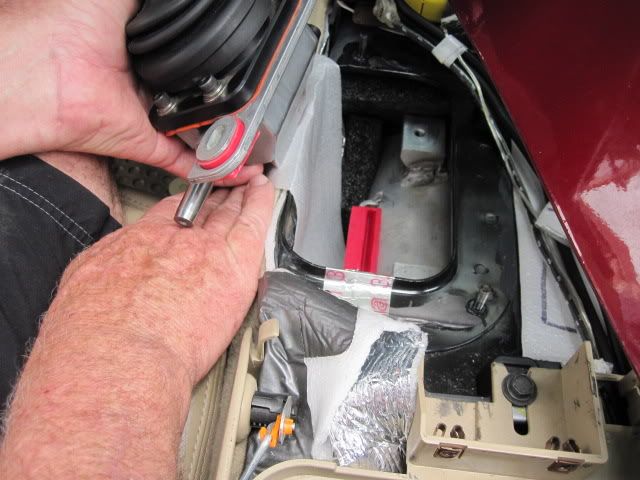
bThe bottom "V" mount is something I looked at carefully and have recommending simply adding a bead of RTV on that when reinstalling the shifter box to dampen any vibration that may be transmitted thru that. In my last photo, you will see some red high temp RTV on the "V" mount.
There is a hard piece of plastic there which provides little if any vibration damping.
Last edited by Mez; 05-18-2010 at 11:46 AM.
05-18-2010, 11:45 AM
#24
Safety Car
Member Since: Jun 1999
Location: Austin, Singapore, Kuala Lumpur, Houston, Dallas, Hong Kong, Elgin, etc.. Texas
Posts: 3,570
Likes: 0
Received 3 Likes
on
2 Posts
By the way, the installation instructions for the B&M shifter are not quite accurate (click here and scroll down to the pdf link: http://bmracing.com/PRODUCTS/Chevrol...97-05-Corvette ).
Photos 25 and 26 clearly show the installation of the B&M spacer (it's really a reach to call this metal piece a 'bushing.') on the shift box. Then photos 27 and 28 - where they describe putting the whole thing back together - show factory rubber bushings in the shifter box. Hmmmmm
Stuff like this simply confuses the whole issue.
Photos 25 and 26 clearly show the installation of the B&M spacer (it's really a reach to call this metal piece a 'bushing.') on the shift box. Then photos 27 and 28 - where they describe putting the whole thing back together - show factory rubber bushings in the shifter box. Hmmmmm
Stuff like this simply confuses the whole issue.
STEP 23. Remove bolts securing shifter base to vehicle.
TOOLS: Ratchet, Extension & T-40
NOTE: THIS STEP IS NOT NECESSARY ON C-5 Z06
MODEL VEHICLES AS IT IS ALREADY SOLID
MOUNTED. ALSO NOTE THAT THIS STEP IS
OPTIONAL AND WILL TRANSMIT MORE
NOISE AND VIBRATION THAN RUBBER
BUSHINGS.
05-18-2010, 11:46 AM
#25
Le Mans Master

I could see the height difference being a problem with the B&M metal "bushing" but it seems to me that Dale's urethane ones should deform until the positive stop of the internal metal spacer is reached.
05-18-2010, 11:50 AM
#26
Safety Car
Member Since: Jun 1999
Location: Austin, Singapore, Kuala Lumpur, Houston, Dallas, Hong Kong, Elgin, etc.. Texas
Posts: 3,570
Likes: 0
Received 3 Likes
on
2 Posts
But look at the top. There is no rubber between standoff and the top of the shifter box, so it does sit higher.
05-18-2010, 12:23 PM
#27
Drifting
Thread Starter
Member Since: Sep 2007
Location: Hurst (Fort Worth area) Texas
Posts: 1,283
Likes: 0
Received 6 Likes
on
5 Posts
St. Jude Donor '09
 05-18-2010, 01:48 PM
#28
Drifting
Thread Starter
Member Since: Sep 2007
Location: Hurst (Fort Worth area) Texas
Posts: 1,283
Likes: 0
Received 6 Likes
on
5 Posts
St. Jude Donor '09
Yes, it is confusing. But here is what step 23 says:
STEP 23. Remove bolts securing shifter base to vehicle.
TOOLS: Ratchet, Extension & T-40
NOTE: THIS STEP IS NOT NECESSARY ON C-5 Z06
MODEL VEHICLES AS IT IS ALREADY SOLID
MOUNTED. ALSO NOTE THAT THIS STEP IS
OPTIONAL AND WILL TRANSMIT MORE
NOISE AND VIBRATION THAN RUBBER
BUSHINGS.
STEP 23. Remove bolts securing shifter base to vehicle.
TOOLS: Ratchet, Extension & T-40
NOTE: THIS STEP IS NOT NECESSARY ON C-5 Z06
MODEL VEHICLES AS IT IS ALREADY SOLID
MOUNTED. ALSO NOTE THAT THIS STEP IS
OPTIONAL AND WILL TRANSMIT MORE
NOISE AND VIBRATION THAN RUBBER
BUSHINGS.
Correct me if I'm wrong, but I fail to see that STEP 23 has any bearing on the point I was making.
My point is that in first two photos, they show their own metal spacer installed (no rubber stuff), and the next two photos clearly show rubber parts still in there during the reassembly process.
Were it a ZO6 installation, there would be no rubber parts in their at all... before or after.
05-18-2010, 01:57 PM
#29
Safety Car
Member Since: Jun 1999
Location: Austin, Singapore, Kuala Lumpur, Houston, Dallas, Hong Kong, Elgin, etc.. Texas
Posts: 3,570
Likes: 0
Received 3 Likes
on
2 Posts
Correct me if I'm wrong, but I fail to see that STEP 23 has any bearing on the point I was making.
My point is that in first two photos, they show their own metal spacer installed (no rubber stuff), and the next two photos clearly show rubber parts still in there during the reassembly process.
Were it a ZO6 installation, there would be no rubber parts in their at all... before or after.
05-18-2010, 02:28 PM
#30
Drifting

Ok, here is a disclaimer by me:
The next information I am about to provide is in no way an endorsement or even a defense of my urethane bushings. This is just information on how I put MY car together and some thoughts on why I did it this way. My intentions are not to spam the board for business or puff out my chest and claim I am a great engineer. Ultimately I am hoping that my info is helping people by giving them data points they can add to the data points offered by other individuals on the forum from which they can act upon to increase the enjoyment of their Corvette.(end disclaimer)
So here goes.
Question....does my bushing mount the box at the same height as the stock rubber?
Answer....I doubt it, but the difference is S M A L L. Here is why. The inner metal sleeve of the stock bushing does not just sit on top of the rubber bushing, it compresses the rubber and bites down into it quite far, thus displacing a good amount of rubber. I can tell this by examining my stock bushings. So I think my shifter now sits maybe 1/16 of an inch higher, but I'm not going to disassemble my car to find out.
Question....if the stock box is sitting higher won't it keep the bottom blade from nesting into the torque tube slot?
Answer....sounds to me like it would not nest fully into the slot.
Question....will the car spin off the road in a ball of death inducing hell fire if the box's bottom blade is not fulling engaged into the torque tube slot?
Answer.....not so far.
Question....what is that blade/slot mount for anyway?
Answer.....well, I doubt it is load bearing as that appears to be taken care of with the top side mounting holes. My guess is this is a simple key/keyway used to protect against lateral forces. This keeps you from pulling the stick sideways so hard that you break the cast aluminum mounting flanges on the top side. I'm no structural engineer so perhaps I am wrong, but since the blade is shorter than the slot, allowing for front/rear adjustment, I can only assume it only gives lateral (left/right) support.
Question.....what happens if the blade is not fully engaged in the slot? Won't it buzz like crazy, break loose, or harm the car some way?
Answer.....I would assume it would make your box susceptible to vibration and buzzing as the partially engaged blade rattles against the sides of the slot. This is NOT happening to my car, so my assumption does not seem to hold true in practice. Who knows, maybe this non isolated blade/slot is where the buzzing comes from in the first place and perhaps my taller bushing raises the blade out of the slot enough to prevent this. Its like a blind pig picking up an acorn....a lucky result. Perhaps I am overlooking something and the blade IS fully engaged. The frustrating thing is that I had the torque tube OUT OF THE CAR when I did the installation so I could have inspected that pretty easily.
Question.....how soft/hard are the urethane bushings?
Answer......they are very hard to deflect by hand and quite easy to deflect with mechanical assist. I chose this material hoping it would hold the box securely and still absorb some vibration.
Question....chicken or the egg?
Answer.....chicken.
Final thoughts....
I am very happy with the outcome of my bushings simply based on results. Perhaps there is a surprise waiting for me down the road. I think the other solutions offered in this thread are fantastic, terrific, and wonderful. I embarked on the urethane bushing solution because I thought it would be fun and maybe offer a way to make some money on the side while helping solve a problem. Before I made my first post about the bushings I decided NOT to sell them. Why? Because there are two other people on the board wanting to sell solutions for this application and simply put, I don't want the competition. When vendors (or non vendors as the case may be) start competing for a new product market the result is often not pretty. One vendor attacks the other vendor's product, people get defensive, blah, blah, blah, and it just gets ugly. So I'm out. I don't want any part of that. I think the market for this part is way too small to justify the effort and can't make enough money to make becoming a forum vendor worthwhile.
Good luck to everybody!
-Dale
Last edited by mitchydkid; 05-18-2010 at 02:33 PM.
05-18-2010, 02:38 PM
#31
Drifting
Thread Starter
Member Since: Sep 2007
Location: Hurst (Fort Worth area) Texas
Posts: 1,283
Likes: 0
Received 6 Likes
on
5 Posts
St. Jude Donor '09
Ok, here is a disclaimer by me:
The next information I am about to provide is in no way an endorsement or even a defense of my urethane bushings. This is just information on how I put MY car together and some thoughts on why I did it this way.
Good luck to everybody!
-Dale
The next information I am about to provide is in no way an endorsement or even a defense of my urethane bushings. This is just information on how I put MY car together and some thoughts on why I did it this way.
Good luck to everybody!
-Dale
Great post, Dale... I really admire the way you deal with things with grace and hood humor!

All the best... and keep on pinging here from time to time, you have added to the discussion greatly.
Oh, by the way, I'm neither making nor selling anything... I didn't retire to "work!"!
 Like you I certainly don't want to offend any that are interested in this "bushing thing"... I am just an OCD kind of guy who obsesses over stuff like this!
R
b
05-18-2010, 03:26 PM
#32
Pro


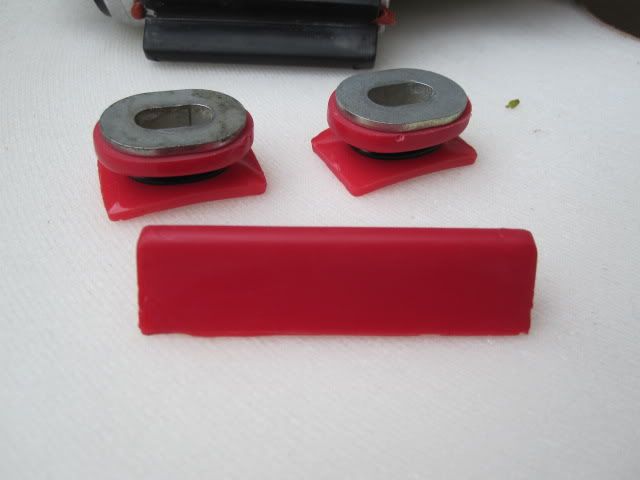
I'm the guy that built Rob's bushings. I wasn't planning on going into a lot of detail on the bushings I've developed until everything is finalized and fully tested. But, I'll go ahead and add some details to Rob's descriptions and address some questions being discussed here and some issues. It just won't be all in one reply.
I provided the dimensions for the oem rubber bushings in Tom's (Mez) prior thread because I had been working on this issue for a while. I do not want to interfere with his clearing inventory of the rubber bushings. He was gracious enough to find and offer to forum members a replacement. I have therefore stayed out of that thread and will add all future comments here or in my own threads. Having installed all generations of MGW shifters, shortening stock C6 shifters, Z06 shift boxes, and working with the B&M shifter and metal bushings has taught me a lot about what works and what does not. Some think this is a simple problem with an easy solution. I've found that it is not. And, different owners have widely varying wants and needs from what happens when they grab the shifter and expect it to work in particular fashion. Some solutions are a compromise one or more of three key areas. 1) durability or the lack of it with rubber bushings 2) shifter feel or notchyness (is that a word?) and 3) vibration whether audible or not. That's why MGW has gone through three generations of shifter designs. That's also why GM has changed the Z06 shift box after years of complaints with the solid box.
I'll be discussing some of the things I've learned in one hundred plus hours of effort, hundreds of dollars in materials and countless trys at getting this right. I won't "trade licks" with others here...It's not my style. The forum is a fountain of information and I've learned way too much here to argue with anyone. I've conveyed much of this information to Rob but he doesn't have to spend all his time on my project even though he has been super helpful and contributed mightily to my project. And, yes he is OCD like me!
As a teaser I'll post these pics for the moment and will have a website up shortly with lots of pictures and answers to questions about shifters and shift boxes. Search "corvettecustom" in a few days for lots more.....
And, thanks to everyone for their patience while I worked on this!
Curt Miller in Texas
And, thanks to everyone for their patience while I worked on this!
Curt Miller in Texas
05-18-2010, 06:19 PM
#33
Safety Car
Member Since: Jun 1999
Location: Austin, Singapore, Kuala Lumpur, Houston, Dallas, Hong Kong, Elgin, etc.. Texas
Posts: 3,570
Likes: 0
Received 3 Likes
on
2 Posts
Curt,
I agree...this is not as simple as it looks.
I must admit your bushings look extraordinary. They must have taken a lot of effort to develop.
However, I took a different direction. My goal was as follows:
I believe I have met those objectives.
As with almost everything in this hobby, we have a choice in the products we buy. That's what is great about this country and this forum.
I agree...this is not as simple as it looks.
I must admit your bushings look extraordinary. They must have taken a lot of effort to develop.
However, I took a different direction. My goal was as follows:
- Identify the root cause for the failures of the OEM shifter bushings.
- Design a simple fix for the root cause because simply replacing the bushings without understanding the root cause will set you up for failure again.
- Find a high quality, low cost replacement bushing that is readily available on the open market.
I believe I have met those objectives.
As with almost everything in this hobby, we have a choice in the products we buy. That's what is great about this country and this forum.
Last edited by Mez; 05-18-2010 at 07:05 PM.
05-18-2010, 08:21 PM
#34
Pro
Curt,
I agree...this is not as simple as it looks.
I must admit your bushings look extraordinary. They must have taken a lot of effort to develop.
However, I took a different direction. My goal was as follows:
I agree...this is not as simple as it looks.
I must admit your bushings look extraordinary. They must have taken a lot of effort to develop.
However, I took a different direction. My goal was as follows:
- Identify the root cause for the failures of the OEM shifter bushings.
- Design a simple fix for the root cause because simply replacing the bushings without understanding the root cause will set you up for failure again.
- Find a high quality, low cost replacement bushing that is readily available on the open market.
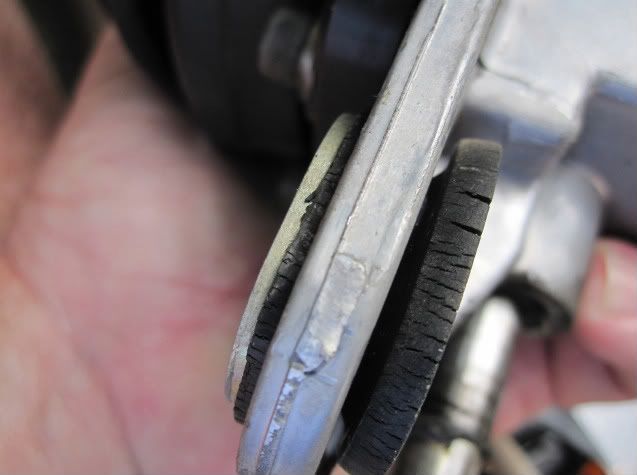
The first item on my list of objectives was durabiltiy. How durable does this bushing from my own car with 20K miles look to you? The casting was smooth. Rubber under constant stress does not work for me.
Few would question the durability of urethane bushings over rubber (maybe even GM) merely the cost. GM made their choice. So have I.
But that is not the only cause of failure in my opinion. We can get to some the other reasons as we progress with a solution. For now, rubber is on the list of failures for me and is not part of the solution. It's merely a replacement not a "fix" in your words. These are your words:
"simply replacing the bushings without understanding the root cause will set you up for failure again."
Thanks for your efforts but we look at this differently.
 Curt Miller.......more to folllow...............
Last edited by MontereyRedC6; 05-18-2010 at 08:55 PM. Reason: Diction errors..................yes I have OCD!
05-18-2010, 08:51 PM
#35
Pro
Ok, here is a disclaimer by me:
The next information I am about to provide is in no way an endorsement or even a defense of my urethane bushings. This is just information on how I put MY car together and some thoughts on why I did it this way. My intentions are not to spam the board for business or puff out my chest and claim I am a great engineer. Ultimately I am hoping that my info is helping people by giving them data points they can add to the data points offered by other individuals on the forum from which they can act upon to increase the enjoyment of their Corvette.(end disclaimer)
So here goes.
Question....does my bushing mount the box at the same height as the stock rubber?
Answer....I doubt it, but the difference is S M A L L. Here is why. The inner metal sleeve of the stock bushing does not just sit on top of the rubber bushing, it compresses the rubber and bites down into it quite far, thus displacing a good amount of rubber. I can tell this by examining my stock bushings. So I think my shifter now sits maybe 1/16 of an inch higher, but I'm not going to disassemble my car to find out.
Question....if the stock box is sitting higher won't it keep the bottom blade from nesting into the torque tube slot?
Answer....sounds to me like it would not nest fully into the slot.
Question....will the car spin off the road in a ball of death inducing hell fire if the box's bottom blade is not fulling engaged into the torque tube slot?
Answer.....not so far.
Question....what is that blade/slot mount for anyway?
Answer.....well, I doubt it is load bearing as that appears to be taken care of with the top side mounting holes. My guess is this is a simple key/keyway used to protect against lateral forces. This keeps you from pulling the stick sideways so hard that you break the cast aluminum mounting flanges on the top side. I'm no structural engineer so perhaps I am wrong, but since the blade is shorter than the slot, allowing for front/rear adjustment, I can only assume it only gives lateral (left/right) support.
Question.....what happens if the blade is not fully engaged in the slot? Won't it buzz like crazy, break loose, or harm the car some way?
Answer.....I would assume it would make your box susceptible to vibration and buzzing as the partially engaged blade rattles against the sides of the slot. This is NOT happening to my car, so my assumption does not seem to hold true in practice. Who knows, maybe this non isolated blade/slot is where the buzzing comes from in the first place and perhaps my taller bushing raises the blade out of the slot enough to prevent this. Its like a blind pig picking up an acorn....a lucky result. Perhaps I am overlooking something and the blade IS fully engaged. The frustrating thing is that I had the torque tube OUT OF THE CAR when I did the installation so I could have inspected that pretty easily.
Question.....how soft/hard are the urethane bushings?
Answer......they are very hard to deflect by hand and quite easy to deflect with mechanical assist. I chose this material hoping it would hold the box securely and still absorb some vibration.
Question....chicken or the egg?
Answer.....chicken.
Final thoughts....
I am very happy with the outcome of my bushings simply based on results. Perhaps there is a surprise waiting for me down the road. I think the other solutions offered in this thread are fantastic, terrific, and wonderful. I embarked on the urethane bushing solution because I thought it would be fun and maybe offer a way to make some money on the side while helping solve a problem. Before I made my first post about the bushings I decided NOT to sell them. Why? Because there are two other people on the board wanting to sell solutions for this application and simply put, I don't want the competition. When vendors (or non vendors as the case may be) start competing for a new product market the result is often not pretty. One vendor attacks the other vendor's product, people get defensive, blah, blah, blah, and it just gets ugly. So I'm out. I don't want any part of that. I think the market for this part is way too small to justify the effort and can't make enough money to make becoming a forum vendor worthwhile.
Good luck to everybody!
-Dale
Earlier, you had asked me about the B&M bushings in a PM. I told you that I felt that B&M had put their bushings in the wrong position, relying only on the two corners of the stock (non-early Z06 shift box) for support. With the shift box elevated by the solid bushings the bottom mount would never be able to add support and would likely not even touch. Your urethane bushings must now take all that strain and you have metal to metal in support of the top of the shift box flange. To your credit you have some of the solution and a great sense of humor.....chicken or egg....I'm going with omelets!
Also, as a reward for your honest attempt to contribute a solution to this problem, please PM me for a special offer and we'll see if you like what I've worked on.
Thanks again for my laugh of the day!!!!!!!
Curt
 05-18-2010, 09:50 PM
#37
Safety Car
Member Since: Jun 1999
Location: Austin, Singapore, Kuala Lumpur, Houston, Dallas, Hong Kong, Elgin, etc.. Texas
Posts: 3,570
Likes: 0
Received 3 Likes
on
2 Posts
Curt,
Before I go any further, I am impressed by your solution and giving people a choice.
However.....rubber is a major component in everybody's cars today. From tires, to hoses, belts, weather stripping, seals, and so forth. So the fact the OEM shifter bushing are rubber is not a reason for them to fail like this.
I have personally pulled a number of failed bushings or seen photos on this forum and none have looked like this. All have been torn apart with pieces missing including the photo of one on this thread and the thread I started a few months ago. If anyone else has seen a bushing look like this, please let me know because this is a whole different problem.
Do you think it could be heat related as 07MontRedcp has suggested? I say this because in the photo you posted earlier, I noticed what appears to be white foam sheet insulation and foil sticking out around the edges of the carpet. If it is...and this is just a thought here so don't get upset.... and the insulation was there while the OEM rubber bushings were in service, that could increase the temperature of the shifter box above the 225F specs of the material commonly used in this application (Styrene Butadiene Rubber or SBR for short). If this is the case, then you are correct, SBR are not right for you.
Last edited by Mez; 05-18-2010 at 09:54 PM.

 05-18-2010, 11:40 PM
#40
Pro
Curt,
Before I go any further, I am impressed by your solution and giving people a choice.
However.....rubber is a major component in everybody's cars today. From tires, to hoses, belts, weather stripping, seals, and so forth. So the fact the OEM shifter bushing are rubber is not a reason for them to fail like this.
I have personally pulled a number of failed bushings or seen photos on this forum and none have looked like this. All have been torn apart with pieces missing including the photo of one on this thread and the thread I started a few months ago. If anyone else has seen a bushing look like this, please let me know because this is a whole different problem.
Do you think it could be heat related as 07MontRedcp has suggested? I say this because in the photo you posted earlier, I noticed what appears to be white foam sheet insulation and foil sticking out around the edges of the carpet. If it is...and this is just a thought here so don't get upset.... and the insulation was there while the OEM rubber bushings were in service, that could increase the temperature of the shifter box above the 225F specs of the material commonly used in this application (Styrene Butadiene Rubber or SBR for short). If this is the case, then you are correct, SBR are not right for you.
Before I go any further, I am impressed by your solution and giving people a choice.
However.....rubber is a major component in everybody's cars today. From tires, to hoses, belts, weather stripping, seals, and so forth. So the fact the OEM shifter bushing are rubber is not a reason for them to fail like this.
I have personally pulled a number of failed bushings or seen photos on this forum and none have looked like this. All have been torn apart with pieces missing including the photo of one on this thread and the thread I started a few months ago. If anyone else has seen a bushing look like this, please let me know because this is a whole different problem.
Do you think it could be heat related as 07MontRedcp has suggested? I say this because in the photo you posted earlier, I noticed what appears to be white foam sheet insulation and foil sticking out around the edges of the carpet. If it is...and this is just a thought here so don't get upset.... and the insulation was there while the OEM rubber bushings were in service, that could increase the temperature of the shifter box above the 225F specs of the material commonly used in this application (Styrene Butadiene Rubber or SBR for short). If this is the case, then you are correct, SBR are not right for you.
You say none you've seen look like this? Look closely at Dale's photos here. The cracks are there as well. His car is likely newer than my '05 but I've seen this and shearing as early as two - three years ago in my '05. I noticed these problems in my quest for improvement when I bought my first generation MGW shifter. I didn't have a solution to take more stress then but I do now. And, they don't use it in chewing gum.
So, heat is always a factor but not in my case since the issue began before my more recent insulation. Many factors effect thermoset rubbers and thermoplastic elastomers. Cold, heat, excessive shear or compression, elongation at break and Die C Tear Strength to name a few. I don't have a comparison table handy but perhaps someone will come up with one. Tom, maybe you have one? The table I do have shows common SBR up to 212 F. Maybe all our tunnels are all too hot. Let's work on that problem next!
Tom, are these rubber replacements Buna-S or something else. Did you specify the material or was that all that was available?
I like rubber for the right applications. It has great value and works great if not overworked. I just wish my SBR tires would last longer!