

 03-02-2015, 08:07 PM
Last edit by: IB Advertising
See related guides and technical advice from our community experts:
Browse all: Engine and Powertrain
- How to Replace Your Timing Chain
Step by step instructions for do-it-yourselfers.
Browse all: Engine and Powertrain

[Beware: LS3 timing chain tensioner] aka: DIY Oil Pan removal guide
07-28-2012, 12:53 PM
#1
Le Mans Master

Thread Starter
Member Since: May 2011
Location: Tampa FL (formerly Justinjor)
Posts: 5,022
Likes: 0
Received 14 Likes
on
9 Posts
Tech Contributor
St. Jude Donor '11-'12-'13-'14

Hi CF brethren,
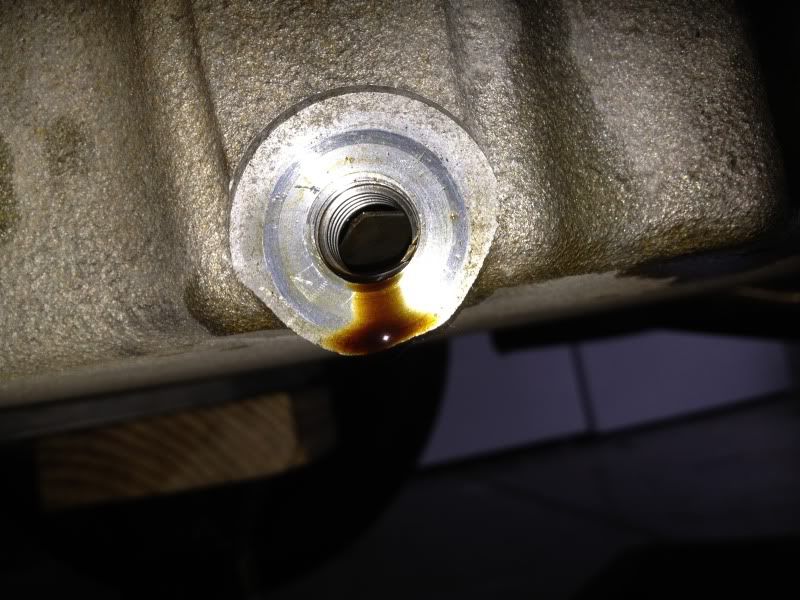
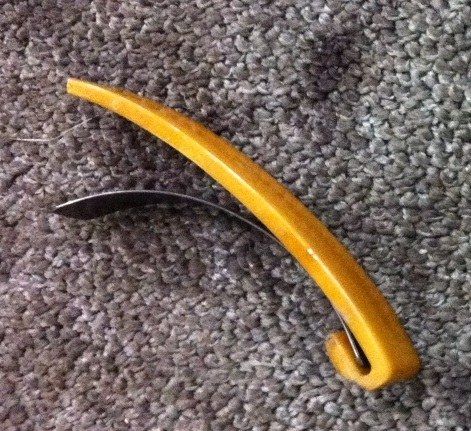
Upon a routine oil chance I discovered a mysterious metal piece in my oil pan that was too large to fit through the oil drain hole. Before discovering this piece the car ran fine, had no issues, no smoke, and was(still is) a regular attendee at the dragstrip.
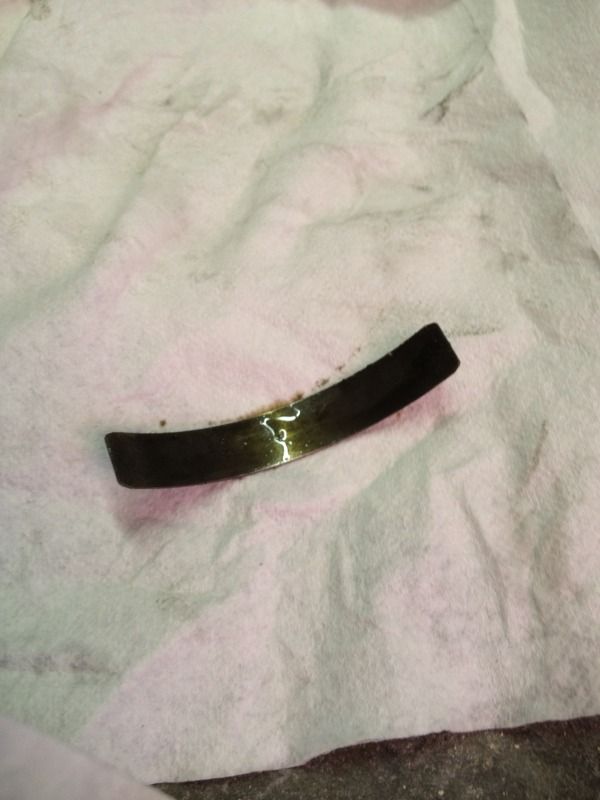
I polled the audience and thanks to glenB, it was determined that the most likely piece was the spring from the tensioner and the oil pan would need to be pulled to remove the broken part.
I did this on a 2 post lift but it could be done on jack stands if you had a smaller floor stand.
Here is my original thread about the mysterious object
http://forums.corvetteforum.com/c6-t...s-enclosed.htm
1) Raise vehicle
2) Remove front wheels
2.5) Drain motor oil
3) Disconnect shocks at LOWER mounting point (2x 13mm nuts/bolts)
4) Unbolt upper A-arms and be sure to keep a note of what shims are in place(if applicable) (4x 15mm bolts)
5) Disconnect brake line mounting point and wire harness from each side of the cradle (2x 10mm shorty bolts)
5.5) Remove front leaf spring so you have access to the crank pulley. (4x 15mm bolts)
6) We used this style jack under the crank pulley to support the motor
http://www.harborfreight.com/media/c...mage_11255.jpg
7) Unbolt lower motor mount bolts
8) Support motor with above jack
9) Loosen cradle bolts(4) to the very bottom of their threads. If you need more clearance, remove the rear bolts to allow cradle to flex. Keep the front bolts with at least a few threads so you don't have to line everything back up.
10) Once cradle is lowered, you can slowly raise the motor approximately 1.5 inches.
11) With the cradle lowered and the engine raised, you have about 2.5" of total clearance which is plenty to get the job done. There was plenty of room to remove all the oil pan bolts and unbolt the oil cooler lines and other small brackets
12) Carefully remove oil pan. The pickup tube runs the length of the motor but is not obtrusive at all.
13) Reverse the steps and you're done.
13a) Cradle bolts are 81 ft lbs
13) Bigger oil pan bolts call for 18ft lbs, the 2 smaller ones in the rear(the longer ones) call for 106 inch lbs(~9ft lbs)
14) Important: There are 2 bolts from the bellhousing that are secured into the oil pan. With the weight of the motor on the crank pulley, there will be very slight separation and you'll need to wait until the very end to secure these bolts as you don't want to misalign the oil pan and risk it leaking. Torque on these bolts is 37 ft lbs.
Make sure you clean off the gasket so it has a nice surface to seal against. The gasket is riveted onto the oil pan which I thought was odd so I just gently lifted up and cleaned all the residual oil so everything sealed up nice and tight.
Here are some pictures
The mysterious piece
Looking up at the tensioner from below. The only thing left is nub and it just spins around, there's nothing left
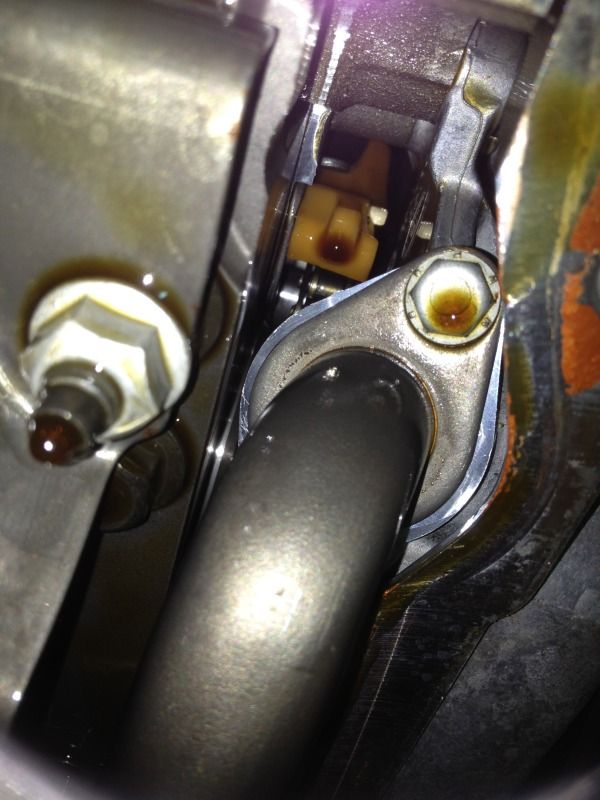

/Broken tensioner
Success!
Upon a routine oil chance I discovered a mysterious metal piece in my oil pan that was too large to fit through the oil drain hole. Before discovering this piece the car ran fine, had no issues, no smoke, and was(still is) a regular attendee at the dragstrip.
I polled the audience and thanks to glenB, it was determined that the most likely piece was the spring from the tensioner and the oil pan would need to be pulled to remove the broken part.
I did this on a 2 post lift but it could be done on jack stands if you had a smaller floor stand.
Here is my original thread about the mysterious object
http://forums.corvetteforum.com/c6-t...s-enclosed.htm
1) Raise vehicle
2) Remove front wheels
2.5) Drain motor oil
3) Disconnect shocks at LOWER mounting point (2x 13mm nuts/bolts)
4) Unbolt upper A-arms and be sure to keep a note of what shims are in place(if applicable) (4x 15mm bolts)
5) Disconnect brake line mounting point and wire harness from each side of the cradle (2x 10mm shorty bolts)
5.5) Remove front leaf spring so you have access to the crank pulley. (4x 15mm bolts)
6) We used this style jack under the crank pulley to support the motor
http://www.harborfreight.com/media/c...mage_11255.jpg
7) Unbolt lower motor mount bolts
8) Support motor with above jack
9) Loosen cradle bolts(4) to the very bottom of their threads. If you need more clearance, remove the rear bolts to allow cradle to flex. Keep the front bolts with at least a few threads so you don't have to line everything back up.
10) Once cradle is lowered, you can slowly raise the motor approximately 1.5 inches.
11) With the cradle lowered and the engine raised, you have about 2.5" of total clearance which is plenty to get the job done. There was plenty of room to remove all the oil pan bolts and unbolt the oil cooler lines and other small brackets
12) Carefully remove oil pan. The pickup tube runs the length of the motor but is not obtrusive at all.
13) Reverse the steps and you're done.
13a) Cradle bolts are 81 ft lbs
13) Bigger oil pan bolts call for 18ft lbs, the 2 smaller ones in the rear(the longer ones) call for 106 inch lbs(~9ft lbs)
14) Important: There are 2 bolts from the bellhousing that are secured into the oil pan. With the weight of the motor on the crank pulley, there will be very slight separation and you'll need to wait until the very end to secure these bolts as you don't want to misalign the oil pan and risk it leaking. Torque on these bolts is 37 ft lbs.
Make sure you clean off the gasket so it has a nice surface to seal against. The gasket is riveted onto the oil pan which I thought was odd so I just gently lifted up and cleaned all the residual oil so everything sealed up nice and tight.
Here are some pictures
The mysterious piece
Looking up at the tensioner from below. The only thing left is nub and it just spins around, there's nothing left
/Broken tensioner
Success!
Last edited by JUIC3D; 07-28-2012 at 01:20 PM.


 100% Sticky, sticky, sticky...
 07-28-2012, 01:31 PM
#4
Team Owner

Member Since: Jun 2005
Location: Northern, VA
Posts: 46,104
Received 2,481 Likes
on
1,944 Posts
St. Jude Donor '15
"In honor of jpee"

I agree, this should be a sticky. Good post! 

07-28-2012, 07:20 PM
#5
Safety Car


Awesome post..sticky for sure...so glad you were able to figure it out and get to it before any further damage occurred.
Thanks for sharing.
Thanks for sharing.
07-28-2012, 07:25 PM
#6
Tech Contributor
Justin probably worth noting that per GlenB, the tensioner was used with the loose factory chain with asymmetrical gear teeth starting in 08...I hadn't heard that before but it makes sense.
I'm going to guess your super tight c5r chain you put in the car when you installed the cam couldn't use the tensioner and in fact broke it.
Wouldn't want the ls3 folks to think the sky is falling.
I'm going to guess your super tight c5r chain you put in the car when you installed the cam couldn't use the tensioner and in fact broke it.
Wouldn't want the ls3 folks to think the sky is falling.
07-28-2012, 07:40 PM
#7
Track Junky
Good point Joe. I know that cloyes makes a timing chain set that is highly regarded in the racing world. It has an extra tooth to take up any and all slack in the chain from what I heard. That's what Schwanke recommended to me when they quoted me a true road Race engine. I wonder if anybody out there has experience with that setup.
Justin, I think I will be using this post as soon as I feel like getting back into the motor for an Avaid oil pan baffle. Thanks again for the thread!
Justin, I think I will be using this post as soon as I feel like getting back into the motor for an Avaid oil pan baffle. Thanks again for the thread!
Last edited by taken19; 07-28-2012 at 07:42 PM.
07-28-2012, 11:03 PM
#8
Safety Car
Good point Joe. I know that cloyes makes a timing chain set that is highly regarded in the racing world. It has an extra tooth to take up any and all slack in the chain from what I heard. That's what Schwanke recommended to me when they quoted me a true road Race engine. I wonder if anybody out there has experience with that setup.
Justin, I think I will be using this post as soon as I feel like getting back into the motor for an Avaid oil pan baffle. Thanks again for the thread!
Justin, I think I will be using this post as soon as I feel like getting back into the motor for an Avaid oil pan baffle. Thanks again for the thread!
Anyway, when talking to the Cloyes people at the PRI they told me the setup is as tight as the Gen 2 motors. I'll be finding out soon since I'll be doing a cam and will be using their setup. I just have to get off my lazy a$$ and just do it, maybe Thanksgiving weekend sounds like a plan.
07-28-2012, 11:21 PM
#9
Track Junky
Not sure about an extra tooth, not an engineer but I would think that would throw off the sync between the crank and cam since they use the same chain as the C5R, but I could be wrong.
Anyway, when talking to the Cloyes people at the PRI they told me the setup is as tight as the Gen 2 motors. I'll be finding out soon since I'll be doing a cam and will be using their setup. I just have to get off my lazy a$$ and just do it, maybe Thanksgiving weekend sounds like a plan.
Anyway, when talking to the Cloyes people at the PRI they told me the setup is as tight as the Gen 2 motors. I'll be finding out soon since I'll be doing a cam and will be using their setup. I just have to get off my lazy a$$ and just do it, maybe Thanksgiving weekend sounds like a plan.
Do their setup before I swap cams in my car so I can live vicariously through you for a cople months, lol!
07-28-2012, 11:46 PM
#10
Le Mans Master
Thread Starter
Member Since: May 2011
Location: Tampa FL (formerly Justinjor)
Posts: 5,022
Likes: 0
Received 14 Likes
on
9 Posts
Tech Contributor
St. Jude Donor '11-'12-'13-'14
FWIW, I ran the car tonight and made 5 passes with 4 of them being on the bottle with no issues. Car ran strong and performed flawlessly with essentially no tensioner. I'll pull it apart next week to get the dampener in place. I drove home with the a/c on and the stereo blasting.  I love my car
I love my car
07-29-2012, 12:19 AM
#12
Le Mans Master
Thread Starter
Member Since: May 2011
Location: Tampa FL (formerly Justinjor)
Posts: 5,022
Likes: 0
Received 14 Likes
on
9 Posts
Tech Contributor
St. Jude Donor '11-'12-'13-'14
Here's a fun clip from tonight.
Me versus my buddies lightly modded ZR1. Pulley, long tubes, tune...
I was on motor, no nitrous on this pass.
Me versus my buddies lightly modded ZR1. Pulley, long tubes, tune...
I was on motor, no nitrous on this pass.


 07-29-2012, 06:37 AM
#17
Team Owner


 lol
07-29-2012, 10:27 AM
lol
07-29-2012, 10:27 AM
#19
Le Mans Master
Thread Starter
Member Since: May 2011
Location: Tampa FL (formerly Justinjor)
Posts: 5,022
Likes: 0
Received 14 Likes
on
9 Posts
Tech Contributor
St. Jude Donor '11-'12-'13-'14
Thanks. I don't want to muddy up this DIY sticky thread but thanks for the compliments.
07-29-2012, 12:43 PM
#20
Instructor


That was the same thing that happen on my 07 ls2 when I took it to the dealer for oil pan gasket seep, when they drop the oil pan they found the metal piece of the tensioner, they replaced it under the powertrain warranty and send the parts to GM, they caught it 4 months before the warranty was up, my warranty ended 17th of July 12.