
New Headlight Lens (Thanks RLSebring)
 02-21-2013, 11:26 PM
#1
Safety Car

Thread Starter
Member Since: Feb 2008
Location: TEXOMA
Posts: 3,712
Likes: 0
Received 3 Likes
on
3 Posts
St. Jude Donor '08-'09

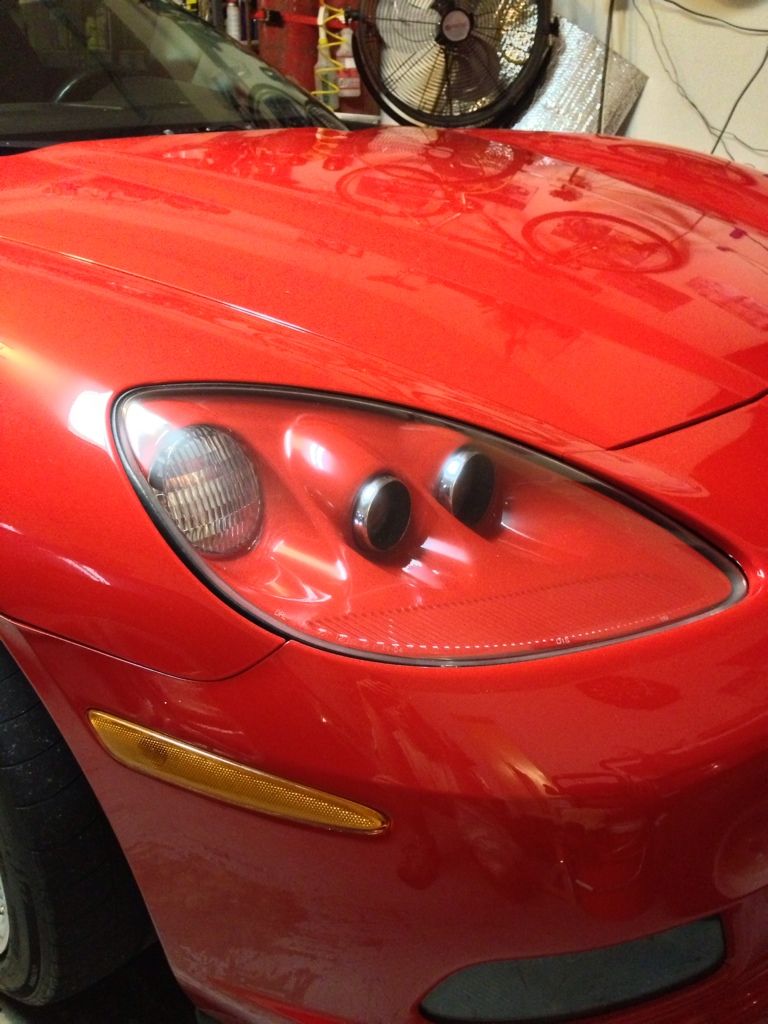
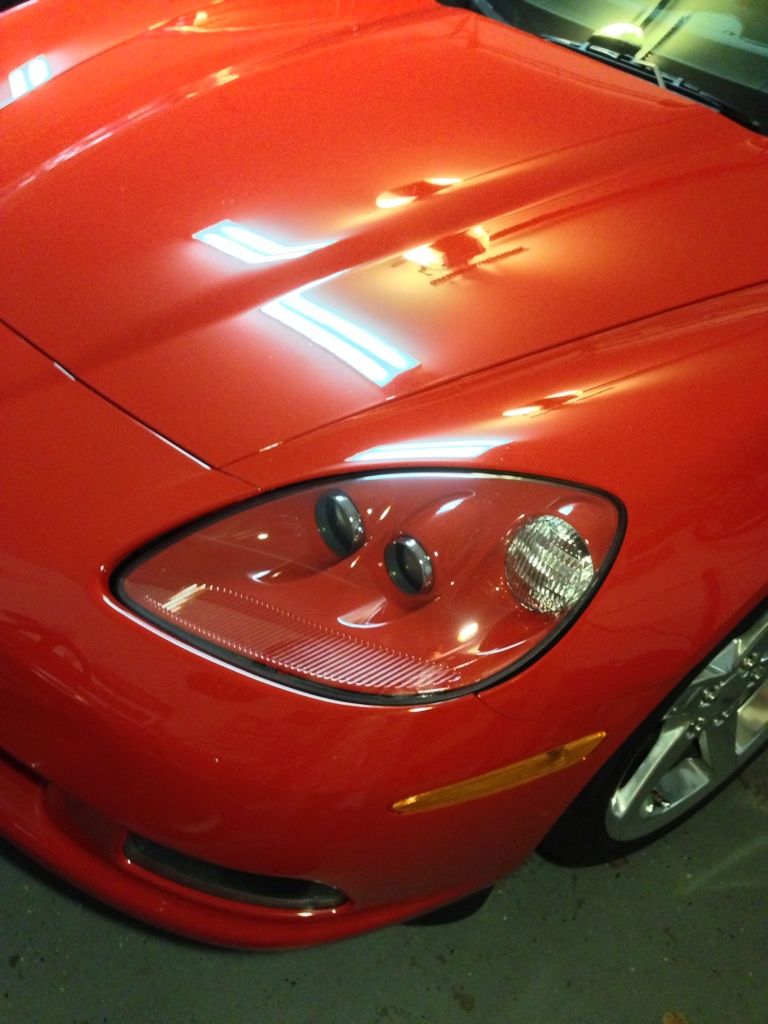
Drivers lens was crazed so finally ordered a new one from RLSebring. It came very fast and undamaged.
I followed his directions carefully. It is a pain in the butt, but I was able to finish in about 4 hours.
-My gasket was very delicate but i managed to save it, just gently wiped it down with a strong paper towel to remove loose dirt. I pretty much destroyed the push nuts. found some at lowes, but with a little tap of a hammer i was able to reuse the old one.
Some confusing parts:
-when I went to pick out the adhesive, it doesn't mention a specific one. and me just walking into lowes found myself staring at 6 different tubes that all seemed the same to me. ended up with PL Premium advanced, it was the most expensive one so i figured i couldn't go wrong (4.68).
-I was unsure on how much adhesive to actually put in the channel, so I just filled it up flush and seemed to work out really well and didn't ooze out very much.
-After installing the new lens with adhesive, i think you should reinstall the three nuts/screws that hold the bezel to the lamp housing, I only clamped the lens tightly on and i guess i got lucky that it was all lined up and tight.
-I had no idea how to align the housing in the car, the best i could figure out is to reinstall the fender and just leave teh front fender liner out, adjust the gaps then tighten it down, there is alot of slop in the mounting bolts. after that it was all down hill.
besides just those things, one tip i like was to tape the whole lens up so the clamps couldn't scratch the it as well as when re-installing the housing in the car.
the other light got some polishing with my drill and then the porter cable. pics of both lights, one is brand new, the other is 7 years old with 44,000 miles.

-Carl
I followed his directions carefully. It is a pain in the butt, but I was able to finish in about 4 hours.
-My gasket was very delicate but i managed to save it, just gently wiped it down with a strong paper towel to remove loose dirt. I pretty much destroyed the push nuts. found some at lowes, but with a little tap of a hammer i was able to reuse the old one.
Some confusing parts:
-when I went to pick out the adhesive, it doesn't mention a specific one. and me just walking into lowes found myself staring at 6 different tubes that all seemed the same to me. ended up with PL Premium advanced, it was the most expensive one so i figured i couldn't go wrong (4.68).
-I was unsure on how much adhesive to actually put in the channel, so I just filled it up flush and seemed to work out really well and didn't ooze out very much.
-After installing the new lens with adhesive, i think you should reinstall the three nuts/screws that hold the bezel to the lamp housing, I only clamped the lens tightly on and i guess i got lucky that it was all lined up and tight.
-I had no idea how to align the housing in the car, the best i could figure out is to reinstall the fender and just leave teh front fender liner out, adjust the gaps then tighten it down, there is alot of slop in the mounting bolts. after that it was all down hill.
besides just those things, one tip i like was to tape the whole lens up so the clamps couldn't scratch the it as well as when re-installing the housing in the car.
the other light got some polishing with my drill and then the porter cable. pics of both lights, one is brand new, the other is 7 years old with 44,000 miles.
-Carl
 02-21-2013, 11:37 PM
#2
Supporting Vendor

Member Since: Sep 2007
Location: Pensacola Florida GO GATORS!!! www.rlsebring.com www.c6c7vette.com
Posts: 11,216
Received 174 Likes
on
92 Posts
St. Jude Donor '17

Nice write up Carl. You did it right. I'll have to go through the directions and add a few things.
Thanks
Thanks