
2013 G/S ceramic brake pad install.
 03-10-2014, 09:00 AM
#1
Melting Slicks

Thread Starter
Finally got around to install my ceramic brake pads this weekend. Was easier than expected. The car has only 1200 miles so I'm sure thats why it came out so easy. The paddlets I used were the Auto Zone Duralast Gold #DG1419A (rear), and #DG1419 (front). Payed around $90.00 for both after taxes.
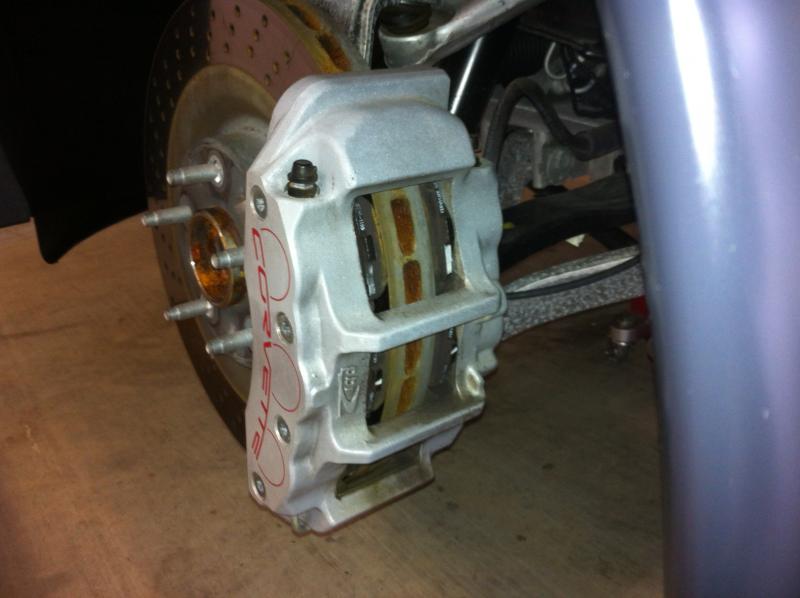
You can see the back of the calipers are open, for easy removal.
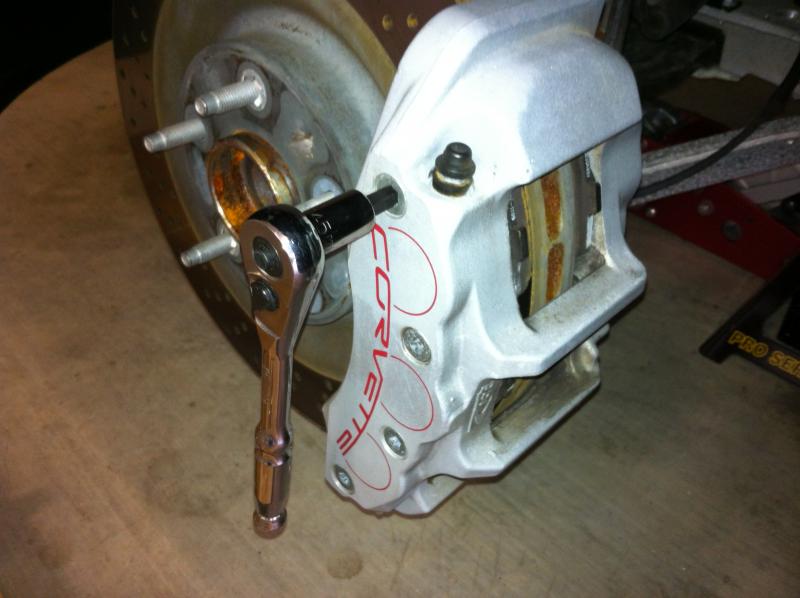
Istarted at the top, removed four pins (two in front and two in back) using a T45 Torx wrench with a 3/8" drive.
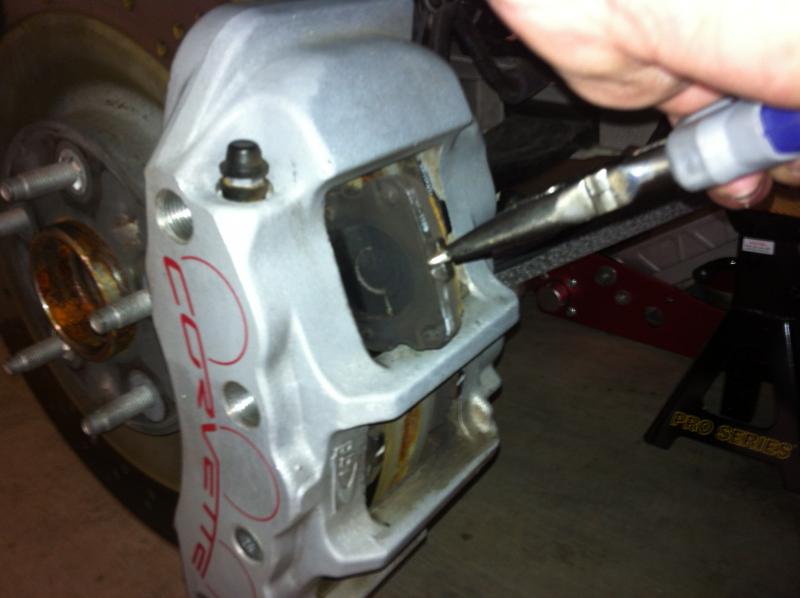
then you can wiggle the pads out using some needle nose pliers, grabbing the tabs. Working your way down, the last (bottom) pins can stay in, you should be able to remove and install over it.
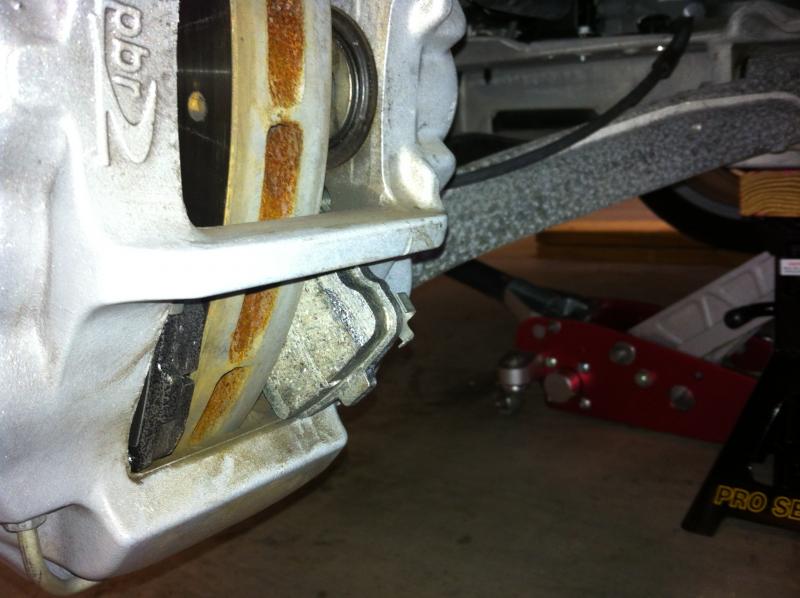
The bottom pad is the wear sensor pad, the metal tab faces up.
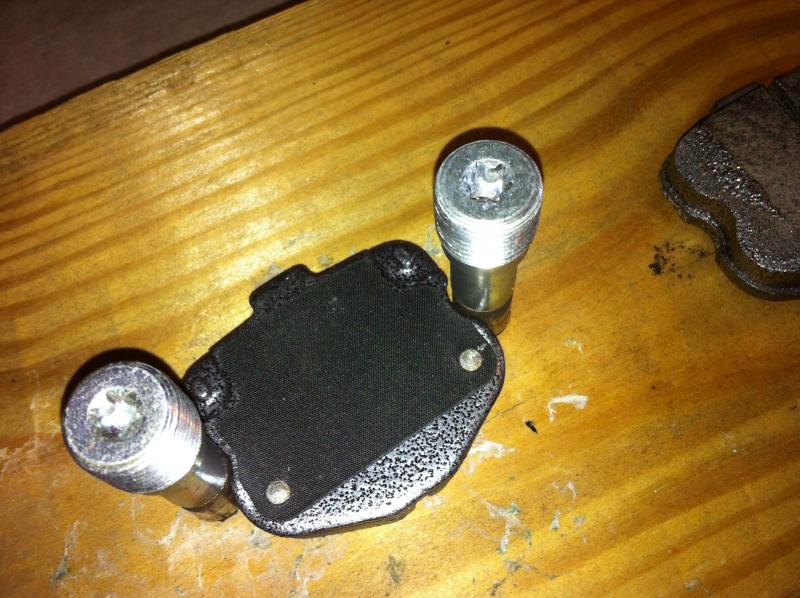
This shows how the pins hold the pads in location. When you reinstall the pins, screw them in by hand, they should screw in freely. you may have to wiggle the pad while as you screw them in. Also I used a pair of pliers with rubber handles to push the caliper piston back enough so the new pads would fit, mine did not need to move much, with only 1200 miles on the clock, but for those that have much more I would recomend cleaning the calipers around the piston to ensure no brake particles don't damage or scratch your pistons.
You can see the back of the calipers are open, for easy removal.
Istarted at the top, removed four pins (two in front and two in back) using a T45 Torx wrench with a 3/8" drive.
then you can wiggle the pads out using some needle nose pliers, grabbing the tabs. Working your way down, the last (bottom) pins can stay in, you should be able to remove and install over it.
The bottom pad is the wear sensor pad, the metal tab faces up.
This shows how the pins hold the pads in location. When you reinstall the pins, screw them in by hand, they should screw in freely. you may have to wiggle the pad while as you screw them in. Also I used a pair of pliers with rubber handles to push the caliper piston back enough so the new pads would fit, mine did not need to move much, with only 1200 miles on the clock, but for those that have much more I would recomend cleaning the calipers around the piston to ensure no brake particles don't damage or scratch your pistons.
Last edited by Eric ray; 01-07-2015 at 05:30 PM.


 03-11-2014, 04:57 PM
#4
Melting Slicks

Member Since: Jul 2010
Location: Tacoma, Wa/Surprise, Az
Posts: 2,849
Received 193 Likes
on
166 Posts

Typically the ceramics produce less brake dust than OEM's. I used Hawk, a bit more expensive. Ceramics are not for track use. I also removed the calipers/rotors and sanded the rotors to help bed the new pads. You might not have to do that if you stay within the same manufacture's pad where the pad materials may be similar enough obviating the need for re-bedding
03-11-2014, 09:00 PM
#5
Tech Contributor
Member Since: Oct 1999
Location: Charlotte, NC (formerly Endicott, NY)
Posts: 40,089
Received 8,928 Likes
on
5,333 Posts

Attachment 47774246
This shows how the pins hold the pads in location. When you reinstall the pins, screw them in by hand, they should screw in freely. you may have to wiggle the pad while as you screw them in. Also I used a pair of pliers with rubber handles to push the caliper piston back enough so the new pads would fit, mine did not need to move much, with only 1200 miles on the clock, but for those that have much more I would recomend cleaning the calipers around the piston to ensure no brake particles don't damage or scratch your pistons.
This shows how the pins hold the pads in location. When you reinstall the pins, screw them in by hand, they should screw in freely. you may have to wiggle the pad while as you screw them in. Also I used a pair of pliers with rubber handles to push the caliper piston back enough so the new pads would fit, mine did not need to move much, with only 1200 miles on the clock, but for those that have much more I would recomend cleaning the calipers around the piston to ensure no brake particles don't damage or scratch your pistons.
Bill
03-12-2014, 10:44 AM
#7
Melting Slicks
Thread Starter
Driving to Kerrville Tx. tomarrow, to ride the twisted sisters, I'll put them to the test and let everyone know how the brakes handled, and any dusting issues.


 03-13-2014, 12:30 PM
#9
Pro


Have used the Auto Zone dura last on both my previous C-5 and current Grand Sport, you can't believe the reduction in dust. Also no need to clean the wheels after every use to prevent the metal dust from rusting and marring the wheel.
01-07-2015, 03:42 PM
#10
Instructor


Finally got around to install my ceramic brake pads this weekend. Was easier than expected. The car has only 1200 miles so I'm sure thats why it came out so easy. The paddlets I used were the Auto Zone Duralast Gold #DG1419A (rear), and #DG1419 (front). Payed around $90.00 for both after taxes.
Attachment 47774240
You can see the back of the calipers are open, for easy removal.
Attachment 47774243
Istarted at the top, removed four pins (two in front and two in back) using a T45 Torx wrench with a 3/8" drive.
Attachment 47774244
then you can wiggle the pads out using some needle nose pliers, grabbing the tabs. Working your way down, the last (bottom) pins can stay in, you should be able to remove and install over it.
Attachment 47774245
The bottom pad is the wear sensor pad, the metal tab faces up.
Attachment 47774246
This shows how the pins hold the pads in location. When you reinstall the pins, screw them in by hand, they should screw in freely. you may have to wiggle the pad while as you screw them in. Also I used a pair of pliers with rubber handles to push the caliper piston back enough so the new pads would fit, mine did not need to move much, with only 1200 miles on the clock, but for those that have much more I would recomend cleaning the calipers around the piston to ensure no brake particles don't damage or scratch your pistons.
Attachment 47774247
Its a good thing I decided to do this this weekend, look what I found.Going to San Antonio this weekend.
any way you can repost the pictures? They are not working for me. Going to do a full brake pad job next week. Thanks
Also i would assume it would be the exact same steps in my 2011 GS right?