
C6 Heated Seat Conversion WITH Factory Switches (Complex YES, but Possible!)
 04-18-2014, 12:11 AM
#1
3rd Gear

Thread Starter

Member Since: Mar 2013
Location: Wake Forest North Carolina
Posts: 3
Likes: 0
Received 0 Likes
on
0 Posts
First, a little background on the car followed by my HEATED SEAT WRITE-UP LOCATED DIRECTLY AFTER THE SECOND PICTURE:
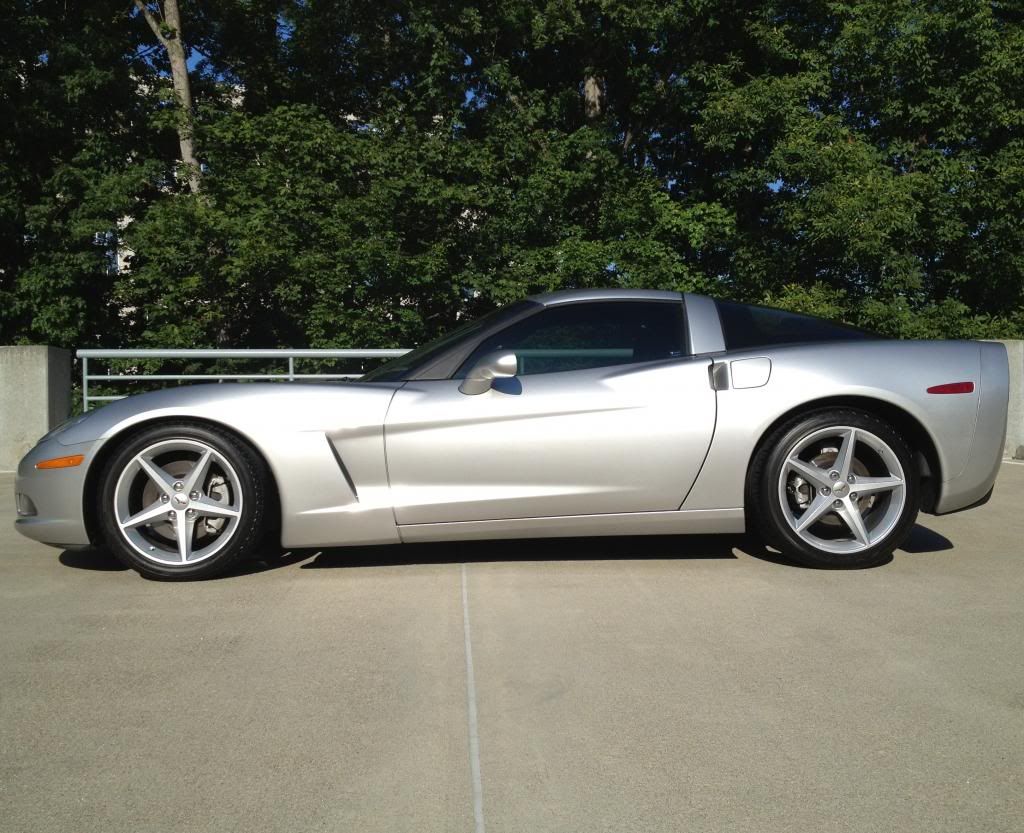
I bought my 2007 Corvette Base 6-Speed Coupe in March, 2013 with a few blemishes here and there: scratches, scuffs, improper front bumper alignment from a previously repaired minor fender bender, a little wear on the seats, etc.
So in July, 2013, I removed every panel, gasket, badge and piece of trim, had everything re-sprayed factory Machine Silver, cleared, buffed then reassembled with all new gaskets, badges and trim, where applicable (Basically anything with a flaw visible from a few feet away was replaced).
I installed LLumar ATR-40 window film on all side and rear windows, and SunTek HP-70 on the entire windshield. I typically recommend LLumar AIR-80 for the front windshield since it is virtually clear and still offers 43% Total Solar Energy Rejection but had some HP-70 in stock to give it a slightly “darker” appearance (though still fairly clear as roughly 70% of light is allowed through the windshield).
I installed LEDs in every applicable exterior and interior location, then installed new Slotted Brake Rotors and new Brake Pads, painted the Brake Calipers Silver and installed brand new 2011 C6 wheels and Michelin Pilot Sport ZP tires.
Exterior Now:
Since the exterior looks GREAT now, last month I started some interior upgrades to include the following:
- Kenwood DNX890HD Double-DIN Navigation/Multimedia System
- SIRIUSXM SXV200V1 Satellite Radio Tuner Module (I installed the SiriusXM Antenna during the body work last year)
- JL Audio XD500/3 3-Channel Amplifier mounted in place of the factory-installed amplifier in front of the passenger floorboard
- JL Audio C2-650CSi 6.5” Component Speakers (Front)
- JL Audio TR525-CXi 5.25" Coaxial Rear Speakers (Rear)
- JL Audio C6 Corvette Stealthbox
- Dynamat XTreme and DynaPad Noise Deadening Throughout
- OEM Heads-Up Display Kit
- MGW Short Shift Kit
- New Black/Gray Leather Seat Covers
What the car looked like in getting ready for all of this:
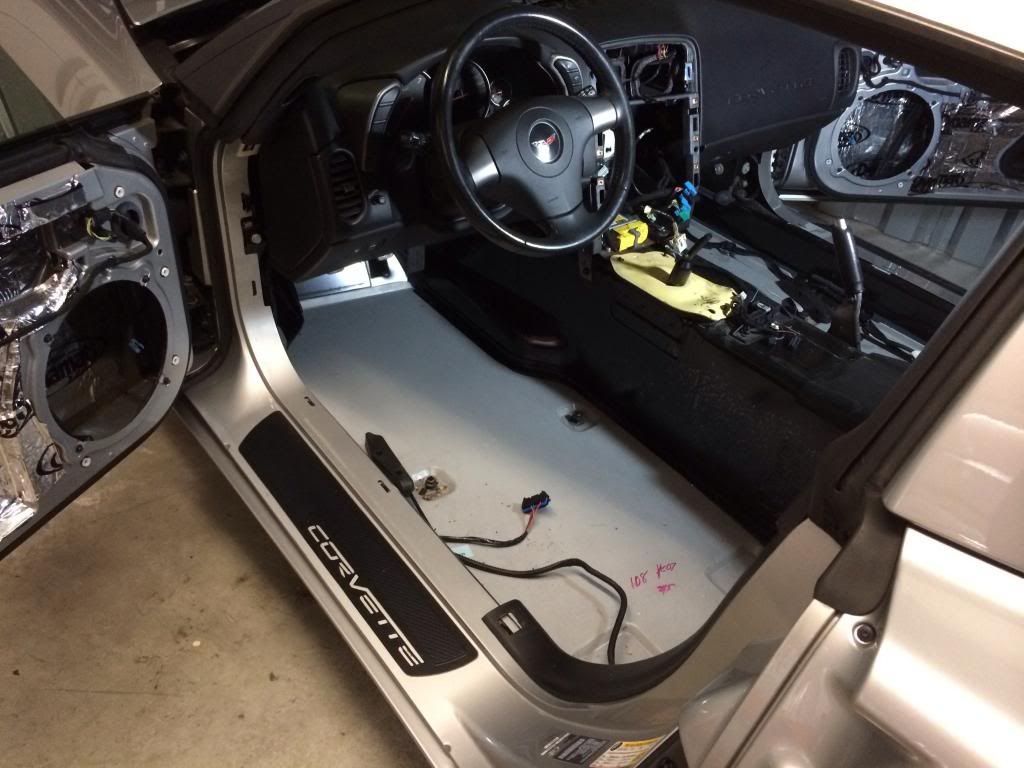
While I was at it, I decided to upgrade to Heated Seats since I would have the seats out for the noise deadening and re-upholstering, and I can’t stand not having every useful option available!
I know the question has been posed many, many times about adding aftermarket heated seats and utilizing factory switches, and the answer is always “It is possible, but extremely complicated”.
“Challenge…ACCEPTED!!”
First, I had to figure out exactly how Aftermarket Heated Seat Kits work. I have installed several of these and there are some variations, but here I will explain the most common Aftermarket Heated Seat Kit available online at eBay and elsewhere:
- Switched Power and Ground are sourced for input to the switch, which in this example is a Two-Way “High/Low/Off” switch.
- A relay is installed underneath the seat.
- A heating pad is installed within the bottom and back of the seat.
See my wiring diagram for this type of Aftermarket Heated Seat Kit BELOW:
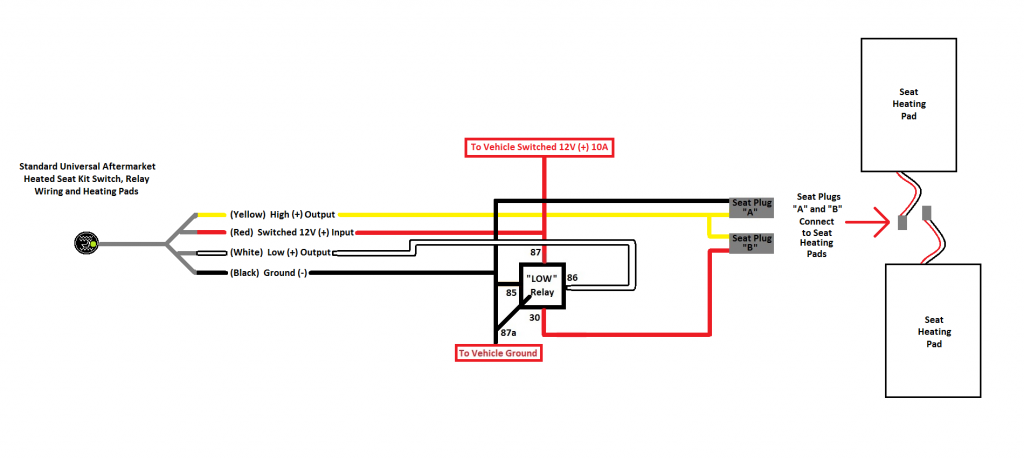
Look at my diagram above and think of each Seat Heating Pad as a very large Resistor for the following explanation of how exactly this type of Aftermarket Seat Heater Kit works:
- In the “Off ” position, no voltage is present at any point past the switch.
- In the “High” position, 12V (+) is directed to the Yellow wires. Since the Black wire at Seat Heating Pad Plug “A” is at Ground and the Red wire of Seat Heating Pad Plug “B” is resting at Ground via Pin 30 of the Relay (through Ground at 87a), the two Yellow Wires being energized to 12V (+) provides power in PARALLEL to each seat: 12V (+) AND Ground are available at BOTH Plugs “A” and “B”, therefore creating the maximum heat possible for each seat.
- In the “Low” position, 12V (+) is directed to the White wire, thereby energizing the Relay, changing the Red wire at Seat Heating Pad Plug “B” to 12V (+). Since the Yellow wires are linked together at all times and this circuit goes to an open state from any other circuit while the switch is in the “Low” position, and the Black Wire at Seat Heating Pad Plug “A” is always at Ground, power is provided in SERIES to both seats: 12V (+) is available at the Red Wire at Plug “B”, the current streams from one Seat Heating Pad to the next via the linked Yellow Wires, and the Black Ground Wire at Plug “A” completes the circuit, providing low heat for both Seat Heating Pads.
Next, I had to understand exactly what goes into and out of the factory switch. There is no point even attempting to understand the role of the seat control modules and other related components of a C6 equipped with Heated Seats from the factory, as there would be no way to replicate it’s processes without buying hundreds OR thousands of dollars in components and harnesses from a dealer, along with who knows what else!
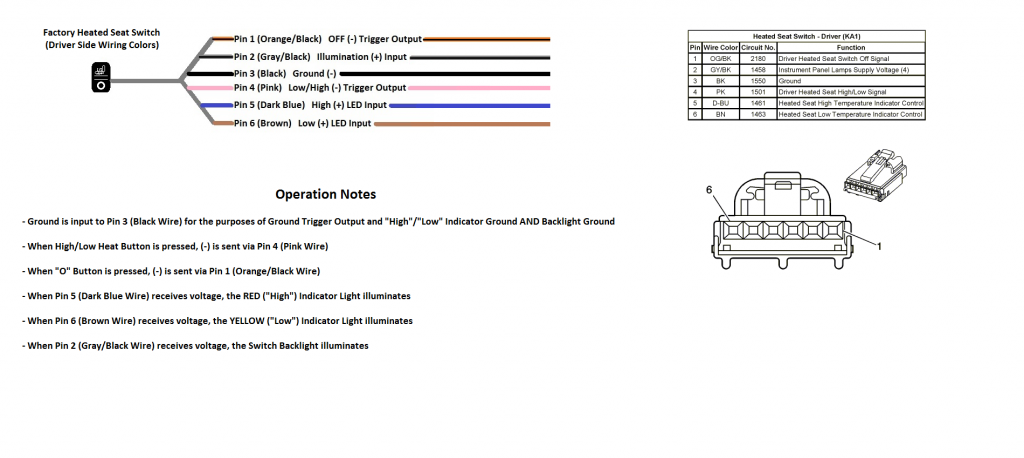
So my main objective was to obtain a pin-out of the factory Heated Seat Switch connector, test it and adapt it.
See my diagram which includes the GM diagram and explanation of each pin’s role BELOW:
Then, I arrived at the hardest part. How to adapt the inputs and outputs of the factory switch to an Aftermarket Heated Seat Kit. From my experience with Latching Relay Modules, Programmable Trigger Modules and Relays, I knew it COULD be done. It was just a matter of setting aside the time to figure it out.
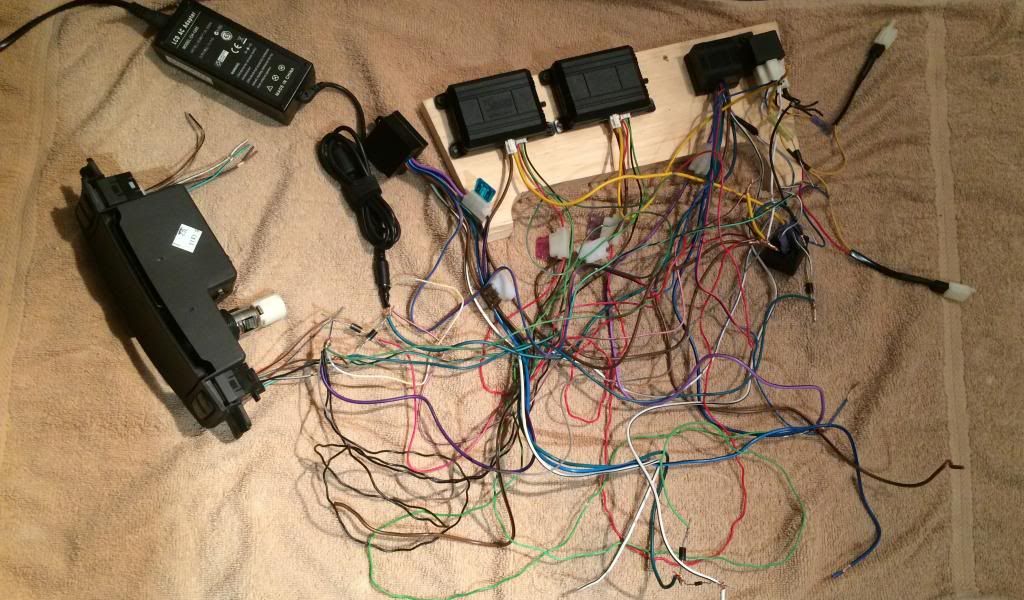
I proceeded to design, build, test, design, build, test, design, build, test and FINALLY created a working prototype.
Here is a picture of one of my tests in progress for an early design:
After roughly 3 weeks of effort in my “free” time between appointments and everything else (probably 40+ hours of designing, building and testing), I eventually created a few configurations that worked, most of the time. I had issues with devices resting at what they shouldn’t be due to relay current backfeed, timing of pulses, and overall just trying to produce consistent results from a finished product that I knew would work every single time.
My most consistent and predictable operation was achieved with the following items:
- ONE Factory C6 Heated Seat Switch/Ashtray Center Console Panel
- TWO Universal Aftermarket Heated Seat Kits (ONLY the TWO Seat Heating Pads are required from each kit, so four Seat Heating Pads purchased without the switches and relays would work too!)
- TWO PAC TR-7 Programmable Trigger Modules
- Four DEI 611T Latching Relay Modules (I could also have used a PAC TR-7 Programmable Trigger Module in place of each 611T, but the 611T is extremely reliable from my experience and having three PAC TR-7 modules for each seat would have introduced far too many variables in the testing and troubleshooting phases.)
- TWO DEI 451-M Relay Packs (These are simply mini relays assembled in pairs, typically used for many aftermarket Keyless Entry/Alarm door lock integrations and easily used for any purpose standard Bosch-style relays could be used for)
- FOUR Bosch-style 5-pin Relays
- TWO spare DEI 6-Pin Connectors I had laying around for the C6 Heated Seat Switches (You could probably source the factory connectors somewhere, but I found that some spare wiring connectors from old Viper Alarm/Remote Start systems and many other vehicle electronic accessories had the exact type of metal pins and plastic surround that fit the factory connector pins perfectly)
- 22 Diodes
- 4 470-ohm Resistors
- Lots of Wiring, Shrink Wrap, Electrical Tape, Zip Ties and Miscellaneous Hardware for mounting assembling everything
I have drawn a diagram of the completed, working assembly BELOW:
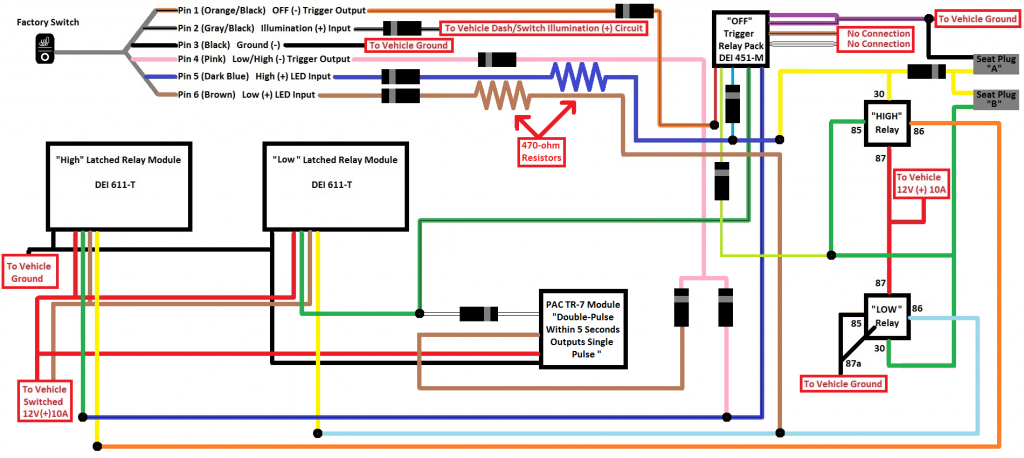
- Note that wires are color-coded in the most sensible way possible: The wire colors of the C6 Factory Heated Seat Switch correspond to the Driver Side, but pins are labeled and are identical for the Passenger Side. The wire colors of the DEI 611T Latching Relay Modules, DEI 451-M Relay Packs, and PAC TR-7 Programmable Trigger Modules ARE ACCURATE to each module’s respective wire colors, but Relay and Seat Heating Pad Plug wiring colors will vary, so these items are labeled accordingly.
- In my diagram, if two wires are EXACTLY THE SAME COLOR and cross or form a perpendicular joint, they ARE connected. If two wires are NOT EXACTLY THE SAME COLOR and cross, they ARE NOT connected UNLESS there is a BLACK CIRCLE which represents a connection between those two or more wires.
- I used A LOT of Diodes in this system. The reason is that as mentioned above, I experienced some current backfeed and some other unexplainable phenomena during testing of all of the design variations, so diode-isolating just about every circuit possible was the best way I found to make everything work perfectly, every time.
- DEI 611T Latching Relay Module Dip Switch Settings (Same for ALL FOUR 611T Latching Relay Modules):
o Dip Switches 1, 2 and 3 OFF (UP)
o Dip Switch 4 ON (Down)
- PAC TR-7 Programmable Trigger Interface:
o Option 14 – “Pulses to Pulse Output”
o After 14 is selected, select Number of Pulses to TWO
o After programming, TWO consecutive (-) Pulses within 5 seconds to the Brown Wire will result in ONE (-) Pulse from the White Wire
As of right now, I am awaiting my seat covers and so have not completely reassembled the car. However, I have performed 25-30+ tests with the above systems in the car and this design WORKS PERFECTLY. Operation is not exactly like it would be from the factory, but its close enough!
- With the car running or in the ON position, you can press the “High/Low” Button ONCE and the Seat Heater will turn on High. The RED “High” Indicator LED on the switch will illuminate.
- Press the “High/Low” Button a SECOND TIME within 5 seconds of the first press and the Seat Heater will turn on Low. The YELLOW “Low” Indicator LED on the switch will illuminate.
- Press the “O” Button in EITHER “High” or “Low” mode and the Seat Heater will turn OFF
- Anytime the Parking Lights/Headlights are turned ON and the dash lights illuminate, the Factory Seat Heater Switch Backlights illuminate.
- THE ONLY DRAWBACK to this system is that when you have a Seat Heater in the “Low” position, you cannot press the “High/Low” Button again to set the Seat Heater to “High”—you must turn Off with “O” then press “High/Low” Button. A small price to pay!
I have provided some pictures of the installed components BELOW:
Driver Side: Limited room underneath seat so I made a plate from ABS plastic that spanned left to right below the front of the seat foam (about 1.5-2.0" below the front edge of the support springs)
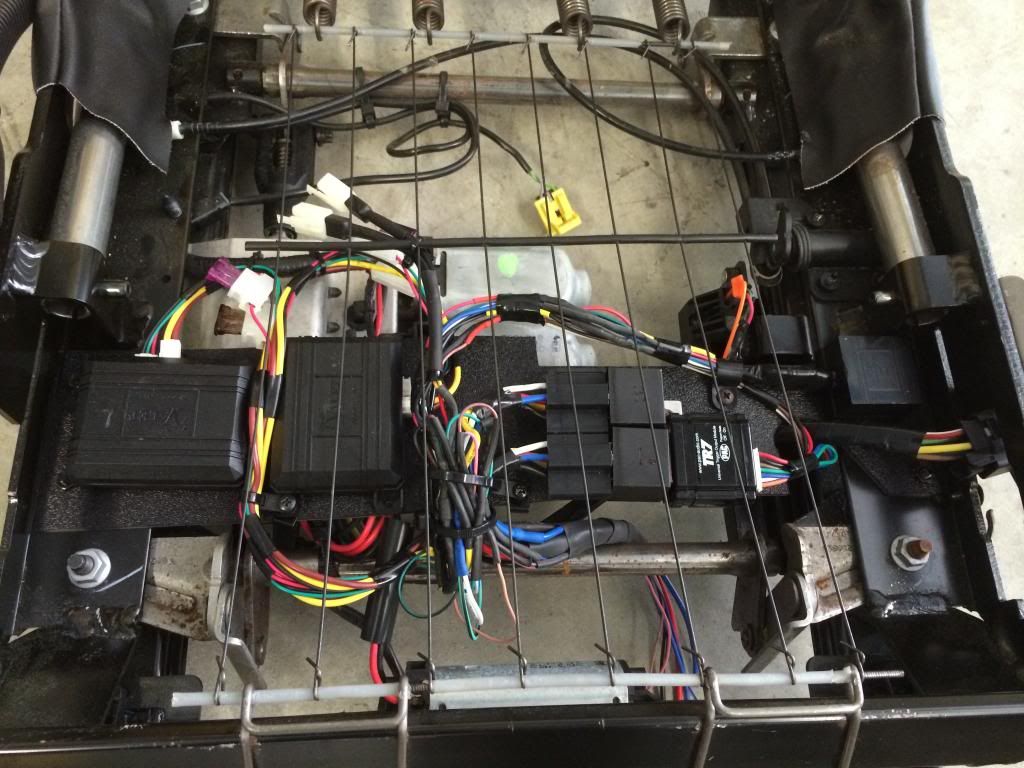
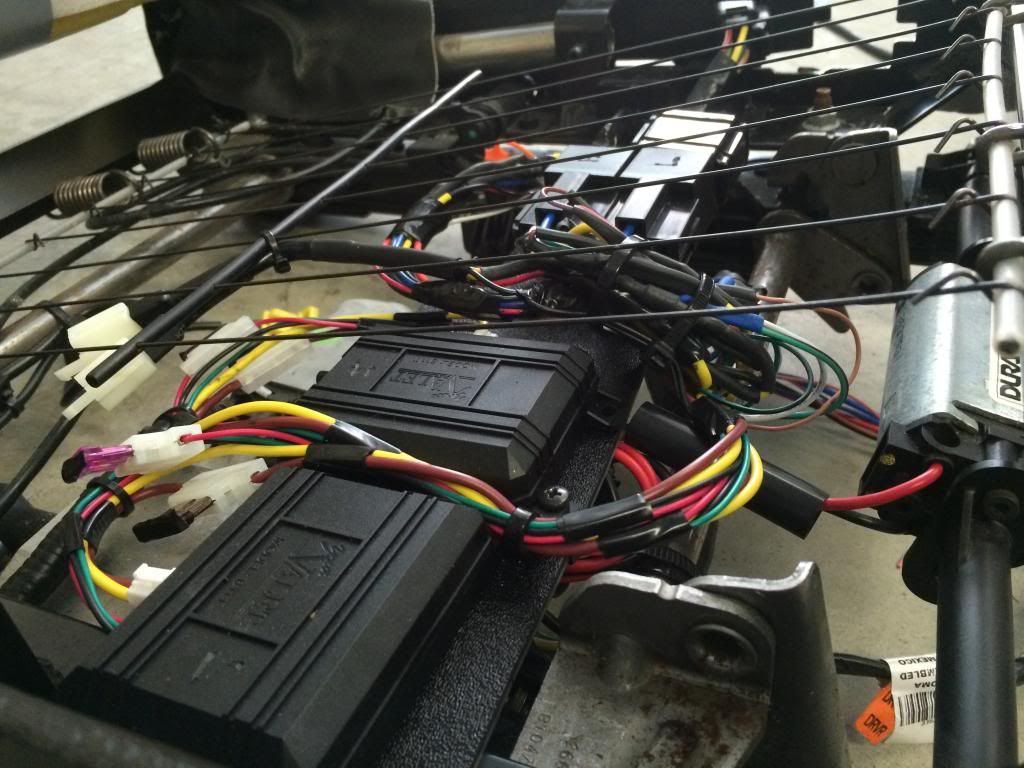
Passenger Side: Manual Seat so there was sufficient room for mounting the components under the seat so as not to affect the movement of te seat or related components

The purpose of this post is to be informative, and to share what I have learned and created. If you wish to attempt this and have technical questions, I will do my best to assist but my troubleshooting ability will be limited due to the complex nature of these components and countless variables.
If someone has any suggestions for others or wishes to add to my post with their findings, feel free!
I bought my 2007 Corvette Base 6-Speed Coupe in March, 2013 with a few blemishes here and there: scratches, scuffs, improper front bumper alignment from a previously repaired minor fender bender, a little wear on the seats, etc.
So in July, 2013, I removed every panel, gasket, badge and piece of trim, had everything re-sprayed factory Machine Silver, cleared, buffed then reassembled with all new gaskets, badges and trim, where applicable (Basically anything with a flaw visible from a few feet away was replaced).
I installed LLumar ATR-40 window film on all side and rear windows, and SunTek HP-70 on the entire windshield. I typically recommend LLumar AIR-80 for the front windshield since it is virtually clear and still offers 43% Total Solar Energy Rejection but had some HP-70 in stock to give it a slightly “darker” appearance (though still fairly clear as roughly 70% of light is allowed through the windshield).
I installed LEDs in every applicable exterior and interior location, then installed new Slotted Brake Rotors and new Brake Pads, painted the Brake Calipers Silver and installed brand new 2011 C6 wheels and Michelin Pilot Sport ZP tires.
Exterior Now:
Since the exterior looks GREAT now, last month I started some interior upgrades to include the following:
- Kenwood DNX890HD Double-DIN Navigation/Multimedia System
- SIRIUSXM SXV200V1 Satellite Radio Tuner Module (I installed the SiriusXM Antenna during the body work last year)
- JL Audio XD500/3 3-Channel Amplifier mounted in place of the factory-installed amplifier in front of the passenger floorboard
- JL Audio C2-650CSi 6.5” Component Speakers (Front)
- JL Audio TR525-CXi 5.25" Coaxial Rear Speakers (Rear)
- JL Audio C6 Corvette Stealthbox
- Dynamat XTreme and DynaPad Noise Deadening Throughout
- OEM Heads-Up Display Kit
- MGW Short Shift Kit
- New Black/Gray Leather Seat Covers
What the car looked like in getting ready for all of this:
While I was at it, I decided to upgrade to Heated Seats since I would have the seats out for the noise deadening and re-upholstering, and I can’t stand not having every useful option available!
I know the question has been posed many, many times about adding aftermarket heated seats and utilizing factory switches, and the answer is always “It is possible, but extremely complicated”.
“Challenge…ACCEPTED!!”
First, I had to figure out exactly how Aftermarket Heated Seat Kits work. I have installed several of these and there are some variations, but here I will explain the most common Aftermarket Heated Seat Kit available online at eBay and elsewhere:
- Switched Power and Ground are sourced for input to the switch, which in this example is a Two-Way “High/Low/Off” switch.
- A relay is installed underneath the seat.
- A heating pad is installed within the bottom and back of the seat.
See my wiring diagram for this type of Aftermarket Heated Seat Kit BELOW:
Look at my diagram above and think of each Seat Heating Pad as a very large Resistor for the following explanation of how exactly this type of Aftermarket Seat Heater Kit works:
- In the “Off ” position, no voltage is present at any point past the switch.
- In the “High” position, 12V (+) is directed to the Yellow wires. Since the Black wire at Seat Heating Pad Plug “A” is at Ground and the Red wire of Seat Heating Pad Plug “B” is resting at Ground via Pin 30 of the Relay (through Ground at 87a), the two Yellow Wires being energized to 12V (+) provides power in PARALLEL to each seat: 12V (+) AND Ground are available at BOTH Plugs “A” and “B”, therefore creating the maximum heat possible for each seat.
- In the “Low” position, 12V (+) is directed to the White wire, thereby energizing the Relay, changing the Red wire at Seat Heating Pad Plug “B” to 12V (+). Since the Yellow wires are linked together at all times and this circuit goes to an open state from any other circuit while the switch is in the “Low” position, and the Black Wire at Seat Heating Pad Plug “A” is always at Ground, power is provided in SERIES to both seats: 12V (+) is available at the Red Wire at Plug “B”, the current streams from one Seat Heating Pad to the next via the linked Yellow Wires, and the Black Ground Wire at Plug “A” completes the circuit, providing low heat for both Seat Heating Pads.
Next, I had to understand exactly what goes into and out of the factory switch. There is no point even attempting to understand the role of the seat control modules and other related components of a C6 equipped with Heated Seats from the factory, as there would be no way to replicate it’s processes without buying hundreds OR thousands of dollars in components and harnesses from a dealer, along with who knows what else!
So my main objective was to obtain a pin-out of the factory Heated Seat Switch connector, test it and adapt it.
See my diagram which includes the GM diagram and explanation of each pin’s role BELOW:
Then, I arrived at the hardest part. How to adapt the inputs and outputs of the factory switch to an Aftermarket Heated Seat Kit. From my experience with Latching Relay Modules, Programmable Trigger Modules and Relays, I knew it COULD be done. It was just a matter of setting aside the time to figure it out.
I proceeded to design, build, test, design, build, test, design, build, test and FINALLY created a working prototype.
Here is a picture of one of my tests in progress for an early design:
After roughly 3 weeks of effort in my “free” time between appointments and everything else (probably 40+ hours of designing, building and testing), I eventually created a few configurations that worked, most of the time. I had issues with devices resting at what they shouldn’t be due to relay current backfeed, timing of pulses, and overall just trying to produce consistent results from a finished product that I knew would work every single time.
My most consistent and predictable operation was achieved with the following items:
- ONE Factory C6 Heated Seat Switch/Ashtray Center Console Panel
- TWO Universal Aftermarket Heated Seat Kits (ONLY the TWO Seat Heating Pads are required from each kit, so four Seat Heating Pads purchased without the switches and relays would work too!)
- TWO PAC TR-7 Programmable Trigger Modules
- Four DEI 611T Latching Relay Modules (I could also have used a PAC TR-7 Programmable Trigger Module in place of each 611T, but the 611T is extremely reliable from my experience and having three PAC TR-7 modules for each seat would have introduced far too many variables in the testing and troubleshooting phases.)
- TWO DEI 451-M Relay Packs (These are simply mini relays assembled in pairs, typically used for many aftermarket Keyless Entry/Alarm door lock integrations and easily used for any purpose standard Bosch-style relays could be used for)
- FOUR Bosch-style 5-pin Relays
- TWO spare DEI 6-Pin Connectors I had laying around for the C6 Heated Seat Switches (You could probably source the factory connectors somewhere, but I found that some spare wiring connectors from old Viper Alarm/Remote Start systems and many other vehicle electronic accessories had the exact type of metal pins and plastic surround that fit the factory connector pins perfectly)
- 22 Diodes
- 4 470-ohm Resistors
- Lots of Wiring, Shrink Wrap, Electrical Tape, Zip Ties and Miscellaneous Hardware for mounting assembling everything
I have drawn a diagram of the completed, working assembly BELOW:
- Note that wires are color-coded in the most sensible way possible: The wire colors of the C6 Factory Heated Seat Switch correspond to the Driver Side, but pins are labeled and are identical for the Passenger Side. The wire colors of the DEI 611T Latching Relay Modules, DEI 451-M Relay Packs, and PAC TR-7 Programmable Trigger Modules ARE ACCURATE to each module’s respective wire colors, but Relay and Seat Heating Pad Plug wiring colors will vary, so these items are labeled accordingly.
- In my diagram, if two wires are EXACTLY THE SAME COLOR and cross or form a perpendicular joint, they ARE connected. If two wires are NOT EXACTLY THE SAME COLOR and cross, they ARE NOT connected UNLESS there is a BLACK CIRCLE which represents a connection between those two or more wires.
- I used A LOT of Diodes in this system. The reason is that as mentioned above, I experienced some current backfeed and some other unexplainable phenomena during testing of all of the design variations, so diode-isolating just about every circuit possible was the best way I found to make everything work perfectly, every time.
- DEI 611T Latching Relay Module Dip Switch Settings (Same for ALL FOUR 611T Latching Relay Modules):
o Dip Switches 1, 2 and 3 OFF (UP)
o Dip Switch 4 ON (Down)
- PAC TR-7 Programmable Trigger Interface:
o Option 14 – “Pulses to Pulse Output”
o After 14 is selected, select Number of Pulses to TWO
o After programming, TWO consecutive (-) Pulses within 5 seconds to the Brown Wire will result in ONE (-) Pulse from the White Wire
As of right now, I am awaiting my seat covers and so have not completely reassembled the car. However, I have performed 25-30+ tests with the above systems in the car and this design WORKS PERFECTLY. Operation is not exactly like it would be from the factory, but its close enough!
- With the car running or in the ON position, you can press the “High/Low” Button ONCE and the Seat Heater will turn on High. The RED “High” Indicator LED on the switch will illuminate.
- Press the “High/Low” Button a SECOND TIME within 5 seconds of the first press and the Seat Heater will turn on Low. The YELLOW “Low” Indicator LED on the switch will illuminate.
- Press the “O” Button in EITHER “High” or “Low” mode and the Seat Heater will turn OFF
- Anytime the Parking Lights/Headlights are turned ON and the dash lights illuminate, the Factory Seat Heater Switch Backlights illuminate.
- THE ONLY DRAWBACK to this system is that when you have a Seat Heater in the “Low” position, you cannot press the “High/Low” Button again to set the Seat Heater to “High”—you must turn Off with “O” then press “High/Low” Button. A small price to pay!
I have provided some pictures of the installed components BELOW:
Driver Side: Limited room underneath seat so I made a plate from ABS plastic that spanned left to right below the front of the seat foam (about 1.5-2.0" below the front edge of the support springs)
Passenger Side: Manual Seat so there was sufficient room for mounting the components under the seat so as not to affect the movement of te seat or related components
The purpose of this post is to be informative, and to share what I have learned and created. If you wish to attempt this and have technical questions, I will do my best to assist but my troubleshooting ability will be limited due to the complex nature of these components and countless variables.
If someone has any suggestions for others or wishes to add to my post with their findings, feel free!
Last edited by shadesoundsecurity; 04-18-2014 at 12:42 AM.
 04-18-2014, 12:27 AM
#2
Tech Contributor

Wow  That's one heck of a project! Nicely down and extremely professional in execution
That's one heck of a project! Nicely down and extremely professional in execution
07-21-2018, 09:40 AM
#3
Cruising

Member Since: Oct 2017
Posts: 13
Likes: 0
Received 0 Likes
on
0 Posts
whoa, not I�m concered with my project. I have a factory heated seat C6. I�m removing those seats and installing Corbeau seats with heated pads. They too have high and low. I thought it would be a simple match up the wires and connect them.