
Yet another C6 fuel pump removal story
 05-12-2015, 12:24 PM
#1

2009 C6 Z51 manual w/ 75k miles
Started smelling very strong gas fumes in garage.
Seemed roughly related to gas level being above 1/2 full.
I referred to two different threads for info on how to do this. I have not done an exhaustive search and read every thread I could find. So my notes here are just what I found when I did it. Hopefully they can help someone else either do a smoother job or get some insight into making it smoother. Mine did not go as smooth as I'd like.
Note: I'm doing this from memory the next day so hopefully I didnt forget anything.
Drivers fuel pump removal steps I followed:
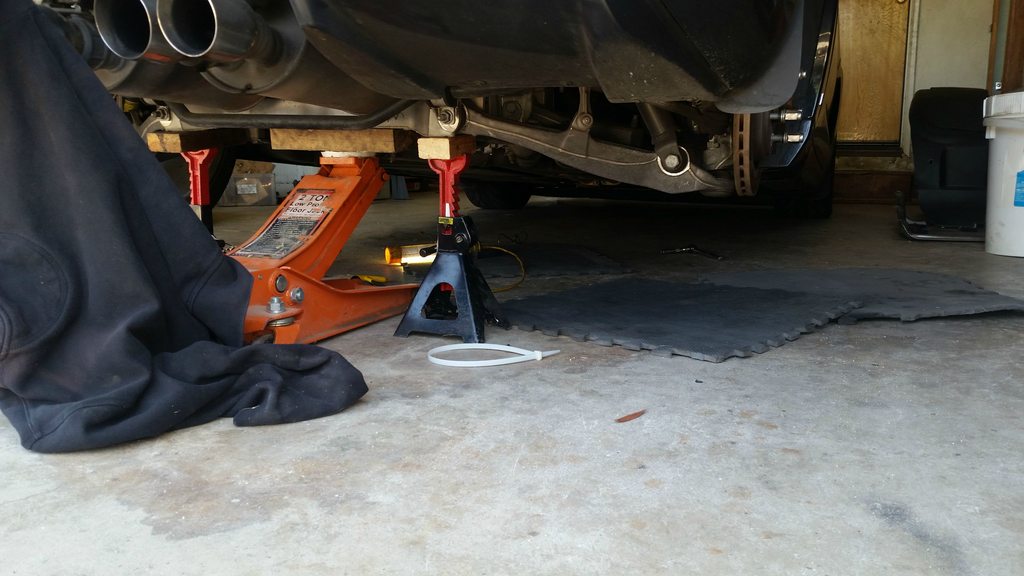
jack rear up by long 2x4 bridging rear cast aluminum cross member
place jack stand under drivers lower rear wheel crossmember rear mounting point with 2x4 pad
remove wheel
remove drivers rear wheel well liner (easy, 2 min)
disconnect fuel fill pipe and nearby evap line (easy, <1 min)
remove drivers fuel tank formed aluminum plate/support (easy, 2 min)
disconnect fuel feed line on rear of tank that goes down then up (SEE NOTES)
remove passenger side tank aluminum plate/support (easy, < 2min)
pop crossover pipe out of chassis mounted clamp (easy, < 1min)
unlock crossover pipe from drivers tank (SEE NOTES)
pull crossover pipe out of drivers tank (SEE NOTES)
drop drivers tank down enough to reach up and disconnect evap line (easy, < 2mins)
tilt tank over and pull out from under vehicle, towards drivers side (sort of under rotor) (easy if theres only a couple gallons in tank)
remove pump lock ring (SEE NOTES)
pull pump out, disconnecting fuel lines/wires from it as needed. (SEE NOTES)
NOTES
GAS IN THE TANK
I only had about 2 gallons of gas in the tank. The less the better! First off, I had to tip the tank over sideways to slide it out under the car, which would have been much less fun if it had alot of gas in it. Also, wiggling it around is helpful (I think) during crossover tube disconnection. If it were full of gas and very heavy, it would be alot harder to jiggle.
CLEARANCE FOR TANK REMOVAL
I was able to pull the drivers tank out with about 16 inches (+/- 1 inch) between the jackstand supported spot on the crossmember and the floor. I only had about 2 gallons of gas in the tank though. Some other procedures say 24". I'm not sure about the passenger side needing 24", but the drivers side seemed to only need about 16".
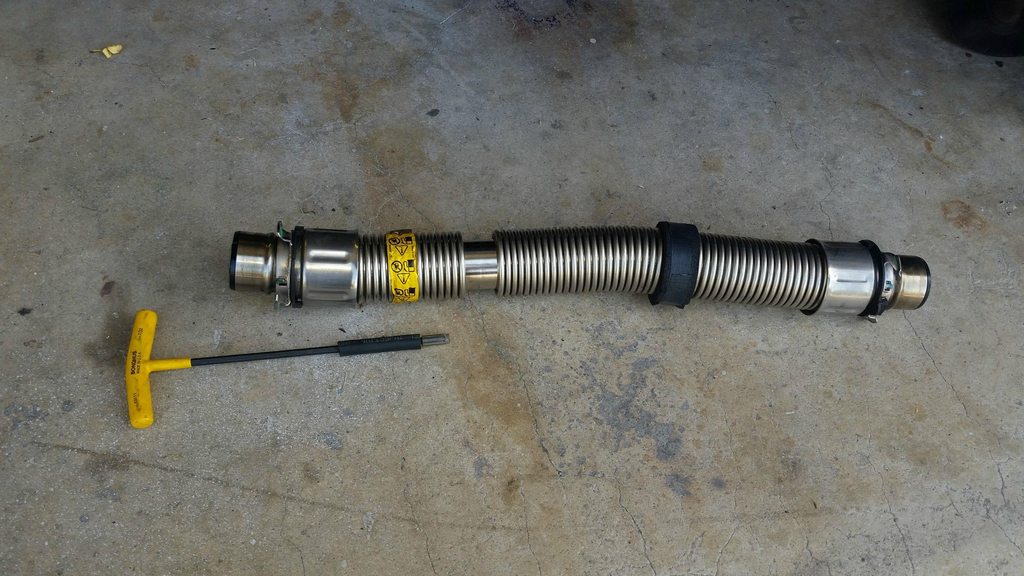
THE CROSSOVER TUBE
Yes, the infamous nemesis the cross over tube. I did not have a fun time removing it. I am pretty sure I over-stressed the internal fuel lines and they will need to be replaced. So from that perspective, I can only offer what I think are the issues. No solutions yet.
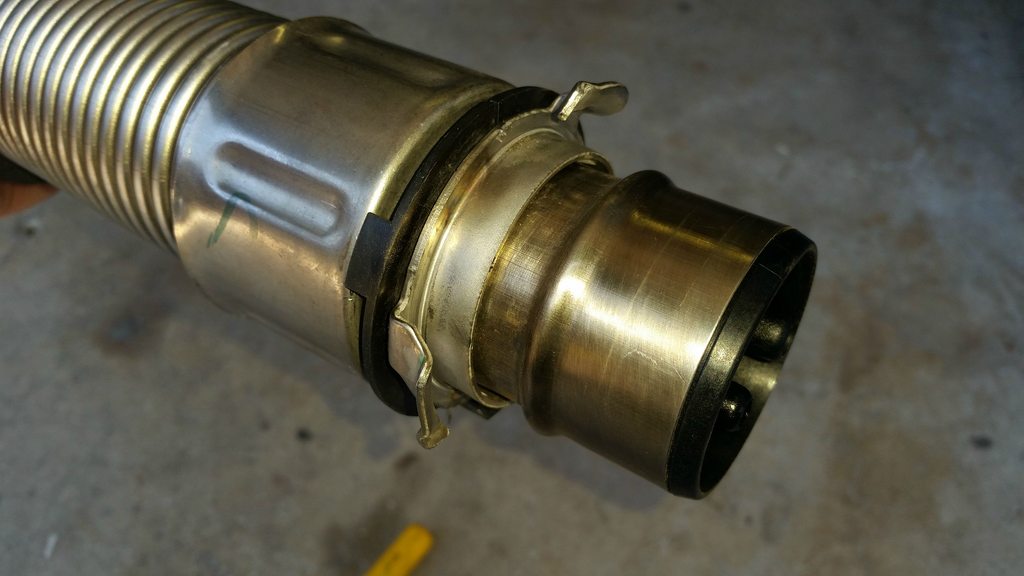
First off, is unlocking the tube, before you can pull it out of the tank. If you look at pics from other threads, you can see there is this black plastic ring, with a rectangular tab on it. That tab interferes (intentionally) with the metal tangs on the tube that lock into the nylon fitting on the tank. It prevents the tangs from rotating, and thus they stay locked. The thing I see that is not made very clear in the other procedures (at least that I read), is that the rectangular tang has its own detent and does not slide easily out of the way. I could not pull it out by hand, I had to use a screwdriver. Some other posts describe it as being very flexible and easy to move, which is true about the ring once its already popped out of its detent, or the parts of the ring besides the rectangular tab. But that tab is rock solid when its locked in place, and feels like it must be stuck on something, like the chassis, which is right next to it. But thats not the case. Its just on its detent. I used a flat head placed right up close to the tab, between in at the nylon, and rotated, popping it out. Its a 10 second job once you know what to do.
Then, rotate the metal collar, which unlocks the tubes metal tangs from the tanks nylon fitting. Confirm that its unlocked using a mirror and flashlight.
Now we come to the most difficult part, pulling out the tube from the tank.
The tube has internal fuel lines that are mated into fittings on the tank. So you need to pull it out quite a bit for the tank to be free of the tube and have enough clearance to be dropped out of the vehicle. The cross over tube compresses a little bit, but not much. Its connected to the passenger tank and thats a hard stop. Another procedure suggested dropping the passenger tank a bit and also popping the crossover tube out of its C hook, to get a little more movement. I did both and it was not enough. I simply could not pull the tube out far enough to clear the tank. Things got cocked and I eventually damaged some of the lines. I think doing this right may require attempting to remove the passenger tank entirely, or doing something which gives much more clearance to pull the tube out.
DISCONNECTING THE FUEL FEED LINE
I went to horrible freight and bought the little plastic fuel line disconnect assortment. http://www.harborfreight.com/6-piece...ool-97576.html
I tried the blue 3/8 one. No luck. I pushed and rotated. Nothing. So then I decided to actually use my brain and look at whats going on. The fitting has 4 spring tabs that pop over a flange on the tube to prevent it from pulling out. The little cylinder on the plastic tools are meant to simultaneously push all 4 tubes radially outward, so the tube can pull out. But the 3/8 one was too small, it simply wasnt pushing on those tabs. The next size up in the kit as 1/2, and it was too big. Maybe a 7/16" would be right?
There isnt much space, I would think the wrench-style tools wouldn't fit. There may be a possibility of disconnecting the line at another point above the tank where there is more space, I didnt check.
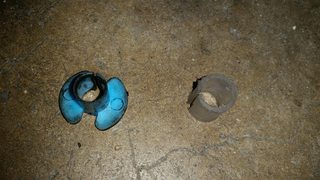
So I just looked around for something I could use to compress the tangs. I tried tweezers and such but its too awkward to get them to do all 4 and then not fall out while you pull the tube. Eventually I found a little plastic hose barb that I cut up to make a cylinder with a slit. It worked perfect, letting me pull the tube out in a few seconds. This is definitely a case of right-tool-for-the-job. So familiarize yourself with whats going on in the fitting, and make sure that whatever disconnect tool you use/make, is going to compress all 4 tangs, and operate in the space you have.
Quite a bit of gas came out, although I hadn't depressurized the system. I would say some kind of absorbent material is a must, like a plastic bag filled with kitty litter than you can dump the fuel into and then immediately move to somewhere safe.
REMOVE PUMP LOCK RING
I tried a dowel and hammer for 10 minutes. It just didnt pop the ring off. I think its because the tank is very light when its empty/near empty and you are just bouncing the tank around when you hammer on the ring. I eventually got it off by using a combination of levering the ring away from its locking tangs with a screwdriver, more hammering, and pre-lubing the interface with WD40.
REMOVE PUMP
The second most difficult part. The "basket" on the bottom of the pump, with its three tangs, is simply too big to fit through the pump hole. I had to unsnap it from the main pump body, then play games with an ice pick and screwdrivers to compress its full circumference into the hole and pull it out. It is a TIGHT fit. I recommend setting up a fan and wearing a chemical vapor mask, since you are basically huffing and puffing for 30 minutes right above an open gas tank generating all kinds of vapors. Various tubes and wires, and the float, need to be disconnected from the pump at various times in order to pull it out. This is easy, but just a warning. Make sure you arent pulling anything taut.
The pic shows the little tool I made next to the plastic tool I bought.
I need a much better process for removing the crossover tube. Im not sure how hard installing it will be. Or whats involved in pulling the passenger tank out. More to come!
Started smelling very strong gas fumes in garage.
Seemed roughly related to gas level being above 1/2 full.
I referred to two different threads for info on how to do this. I have not done an exhaustive search and read every thread I could find. So my notes here are just what I found when I did it. Hopefully they can help someone else either do a smoother job or get some insight into making it smoother. Mine did not go as smooth as I'd like.
Note: I'm doing this from memory the next day so hopefully I didnt forget anything.
Drivers fuel pump removal steps I followed:
jack rear up by long 2x4 bridging rear cast aluminum cross member
place jack stand under drivers lower rear wheel crossmember rear mounting point with 2x4 pad
remove wheel
remove drivers rear wheel well liner (easy, 2 min)
disconnect fuel fill pipe and nearby evap line (easy, <1 min)
remove drivers fuel tank formed aluminum plate/support (easy, 2 min)
disconnect fuel feed line on rear of tank that goes down then up (SEE NOTES)
remove passenger side tank aluminum plate/support (easy, < 2min)
pop crossover pipe out of chassis mounted clamp (easy, < 1min)
unlock crossover pipe from drivers tank (SEE NOTES)
pull crossover pipe out of drivers tank (SEE NOTES)
drop drivers tank down enough to reach up and disconnect evap line (easy, < 2mins)
tilt tank over and pull out from under vehicle, towards drivers side (sort of under rotor) (easy if theres only a couple gallons in tank)
remove pump lock ring (SEE NOTES)
pull pump out, disconnecting fuel lines/wires from it as needed. (SEE NOTES)
NOTES
GAS IN THE TANK
I only had about 2 gallons of gas in the tank. The less the better! First off, I had to tip the tank over sideways to slide it out under the car, which would have been much less fun if it had alot of gas in it. Also, wiggling it around is helpful (I think) during crossover tube disconnection. If it were full of gas and very heavy, it would be alot harder to jiggle.
CLEARANCE FOR TANK REMOVAL
I was able to pull the drivers tank out with about 16 inches (+/- 1 inch) between the jackstand supported spot on the crossmember and the floor. I only had about 2 gallons of gas in the tank though. Some other procedures say 24". I'm not sure about the passenger side needing 24", but the drivers side seemed to only need about 16".
THE CROSSOVER TUBE
Yes, the infamous nemesis the cross over tube. I did not have a fun time removing it. I am pretty sure I over-stressed the internal fuel lines and they will need to be replaced. So from that perspective, I can only offer what I think are the issues. No solutions yet.
First off, is unlocking the tube, before you can pull it out of the tank. If you look at pics from other threads, you can see there is this black plastic ring, with a rectangular tab on it. That tab interferes (intentionally) with the metal tangs on the tube that lock into the nylon fitting on the tank. It prevents the tangs from rotating, and thus they stay locked. The thing I see that is not made very clear in the other procedures (at least that I read), is that the rectangular tang has its own detent and does not slide easily out of the way. I could not pull it out by hand, I had to use a screwdriver. Some other posts describe it as being very flexible and easy to move, which is true about the ring once its already popped out of its detent, or the parts of the ring besides the rectangular tab. But that tab is rock solid when its locked in place, and feels like it must be stuck on something, like the chassis, which is right next to it. But thats not the case. Its just on its detent. I used a flat head placed right up close to the tab, between in at the nylon, and rotated, popping it out. Its a 10 second job once you know what to do.
Then, rotate the metal collar, which unlocks the tubes metal tangs from the tanks nylon fitting. Confirm that its unlocked using a mirror and flashlight.
Now we come to the most difficult part, pulling out the tube from the tank.
The tube has internal fuel lines that are mated into fittings on the tank. So you need to pull it out quite a bit for the tank to be free of the tube and have enough clearance to be dropped out of the vehicle. The cross over tube compresses a little bit, but not much. Its connected to the passenger tank and thats a hard stop. Another procedure suggested dropping the passenger tank a bit and also popping the crossover tube out of its C hook, to get a little more movement. I did both and it was not enough. I simply could not pull the tube out far enough to clear the tank. Things got cocked and I eventually damaged some of the lines. I think doing this right may require attempting to remove the passenger tank entirely, or doing something which gives much more clearance to pull the tube out.
DISCONNECTING THE FUEL FEED LINE
I went to horrible freight and bought the little plastic fuel line disconnect assortment. http://www.harborfreight.com/6-piece...ool-97576.html
I tried the blue 3/8 one. No luck. I pushed and rotated. Nothing. So then I decided to actually use my brain and look at whats going on. The fitting has 4 spring tabs that pop over a flange on the tube to prevent it from pulling out. The little cylinder on the plastic tools are meant to simultaneously push all 4 tubes radially outward, so the tube can pull out. But the 3/8 one was too small, it simply wasnt pushing on those tabs. The next size up in the kit as 1/2, and it was too big. Maybe a 7/16" would be right?
There isnt much space, I would think the wrench-style tools wouldn't fit. There may be a possibility of disconnecting the line at another point above the tank where there is more space, I didnt check.
So I just looked around for something I could use to compress the tangs. I tried tweezers and such but its too awkward to get them to do all 4 and then not fall out while you pull the tube. Eventually I found a little plastic hose barb that I cut up to make a cylinder with a slit. It worked perfect, letting me pull the tube out in a few seconds. This is definitely a case of right-tool-for-the-job. So familiarize yourself with whats going on in the fitting, and make sure that whatever disconnect tool you use/make, is going to compress all 4 tangs, and operate in the space you have.
Quite a bit of gas came out, although I hadn't depressurized the system. I would say some kind of absorbent material is a must, like a plastic bag filled with kitty litter than you can dump the fuel into and then immediately move to somewhere safe.
REMOVE PUMP LOCK RING
I tried a dowel and hammer for 10 minutes. It just didnt pop the ring off. I think its because the tank is very light when its empty/near empty and you are just bouncing the tank around when you hammer on the ring. I eventually got it off by using a combination of levering the ring away from its locking tangs with a screwdriver, more hammering, and pre-lubing the interface with WD40.
REMOVE PUMP
The second most difficult part. The "basket" on the bottom of the pump, with its three tangs, is simply too big to fit through the pump hole. I had to unsnap it from the main pump body, then play games with an ice pick and screwdrivers to compress its full circumference into the hole and pull it out. It is a TIGHT fit. I recommend setting up a fan and wearing a chemical vapor mask, since you are basically huffing and puffing for 30 minutes right above an open gas tank generating all kinds of vapors. Various tubes and wires, and the float, need to be disconnected from the pump at various times in order to pull it out. This is easy, but just a warning. Make sure you arent pulling anything taut.
The pic shows the little tool I made next to the plastic tool I bought.
I need a much better process for removing the crossover tube. Im not sure how hard installing it will be. Or whats involved in pulling the passenger tank out. More to come!

The following 2 users liked this post by PatientZero:
NYC6 (10-16-2020),
Telepierre (05-16-2016)
 05-12-2015, 02:51 PM
#3
You can also prepare whatever tool you will need for the rear fuel line fitting, to make sure whatever you will use will work right, without taking anything off.
You could also remove the wheel well liner off with very little effort, but theres not much reason to "practice" that. It comes off easy and the stuff you get access to behind it is very easy as well (filler hose and evap line).
Im trying to keep this thread focused just on the procedure for this.
But I started another thread to document whats actually wrong with my pump/causing the smell, and also to collect part numbers:
https://www.corvetteforum.com/forums...ump-09-c6.html
The remainder of this procedure, at a minimum will be:
-remove crossover tube entirely from vehicle for inspection (i'm concerned I may have damaged the drivers side fittings on its internal lines)
-replace internal lines in cross over tube
-install new pump in drivers side tank
-reinstall cross over tube and drivers side tank/pump assy
-reinstall crossover tube in drivers tank (this is going to be the hard part)
I may or may not drop the passenger tank. I probably should to inspect it. I think it would be much easier than the drivers tank, if I have the crossover tube completely out before attempting it. Plus it should be even emptier than the drivers tank was, and it has no filler hose. But who knows.
05-12-2015, 05:55 PM
#5
No prob, continuing on....
So at this time my vettes drivers tank is out. The passenger tank is installed, but missing the bottom aluminum support plate. The crossover tube is still attached to the passenger tank.
I'd like to remove the passenger tank and the crossover tube for inspection, to see if either also have cracks that are leading to gas smell.
The passenger tank appears to have the same black ring/tab locking mechanism for the crossover tube.
I struggled for with a flashlight, worklight, mirror, and flat head screwdriver. I could see what I was doing, but I just couldnt seem to get the screwdriver in a spot that would pop the tab out. I reinstalled the tank support because it moved the tank back up and gave me clearance to reach the tab better.
Finally, after about 30 minutes of struggling and having no improvement, I noticed that I could pretty well see the black tab without using a mirror. This is laying on my back, with my head pointed towards the drivers wheel, legs sticking out on passenger side.
So instead of using the mirror, I just leaned up as much as I could, and stabbed the flathead screwdriver right into the bottom corner of the black tab where it meets its black ring. Then I rotated the screwdriver and POP the tab moved away.
Its just a matter of getting the right angle, you'll see what I mean. You need to put alot of leverage between the black tab and the nylon in order to snap it out of its detent. There is less room on the passenger side because some large relay/solenoid is in the way. So you have to come at it from a different angle than the drivers side. Illumination is required so you can see where to put the screwdriver. But in my case, things went better without a mirror.
Another 10 second job when you do it right. Or 30mins plus of uselessness when done wrong.
So then I rotated the crossover metal sleeve and unlocked it.
Somehow the tube had popped back into its c-clip. I popped it back out.
So now to pull the crossover tube out of the tank.....
This time I wanted to do it right, without damaging anything or jerking stuff around and kinking the internal connections right at the crossover/tank junction.
But its in TIGHT. I tried prying a bit with a screwdriver between the nylon and the end of the metal tube but it doesnt do much, I cant put even pressure because I can only really get to one side.
Hmmmm...
I would really prefer not to drop the passenger tank and play jerk-everything-around until something breaks again. I think the tool to do this would be shaped like a larger spanner with a semicircular cutout, that you could pry against the frame and push the crossover tube out with. I wonder if thats a GM tool?
Now to look around and see if I have anything that would fit the bill. I have a machine shop so I could definitely make something, but it would be much faster to just cut something up quickly or maybe I even have something thats close enough?
05-12-2015, 06:47 PM
#6
Burning Brakes


would it be easier to just cut the internal crossover lines that are in the metal crossover tube since the lines are relatively inexpensive to replace vs the time to remove without breaking?
05-12-2015, 07:26 PM
#7
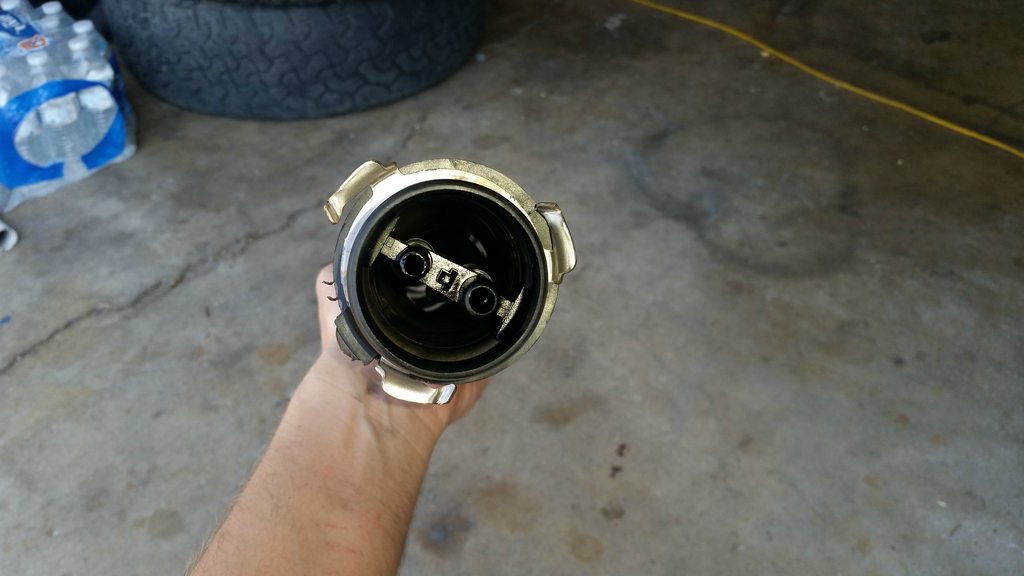
There are two tubes in the cross over tube.
They dont just pass through the tube, they actually end right at the end of each side of the cross over tube, with special fittings at the end that mate with fittings on the tank.
So you would actually be destroying the internal crossover tubes, as well as the tubes that go into the fuel tank.
But really, its not possible to cut them anyway. If I get what you mean, you mean like sliding a razor blade in the the little gap between crossover and tank, and slicing them? That would be a difficult job even outside the vehicle. But when its all in-vehicle, its impossible. Theres no way to get a cutting tool up there.
So what I did, instead of spending time to make a proper tool, was to jury-rig something out of something. I just needed a long thin stiff bar, to pry with, and something to protect the frame from dents and paint chipping where I use it as a fulcrum. So I took a long allen wrench and put some rubber hose on it.
It did not work anywhere near perfectly, but it did work. Using it I was able to pry the tube bit by bit. After a certain point, it was loose enough to where full-strength wiggling of the tube by hand had an effect. Before that point, it felt rock solid. And then once it gets really loose, just start wiggling it by hand until it pops out. If it wont pop out, go back to your pry instrument and pry some more.
It was still a difficult, frustrating, and long process. Its always worst the first time around, and I bet the second time it wouldn't seem nearly so annoying. But I didn't break anything, and I did it with the passenger tank support plate installed almost completely, to where I could barely move the tank at all.
Then, once its popped out, you can remove it laterally to the drivers side through the hole the drivers tank filler pipe goes through.
It will catch on everything it can as you try to slide it out, most significantly, the C-clip that normally holds it, and what I think is the diff vent tube that sticks up vertically. Its foam insulators will also catch on stuff. So prepare yourself for snagging.
So, the crossover tube is out. Looks like one of its foam things fell off.
I think the key to making this an easy process is having the right tool. a proper pry bar that fits around as much of the crossover sleeve as possible, and with a pivot point on the frame, would make this alot easier.
Body position becomes important. Left-hand wiggling is much easier but thats a very different position than the one used for prying with the tool. Sliding around to get the best arm shot really helps.
Next: removing the passenger tank.
Last edited by PatientZero; 05-12-2015 at 07:33 PM.
05-12-2015, 08:01 PM
#8
okay I made a video trying to show what you are dealing with in regards to unlocking the crossover tube and pulling it out
https://*******/K9hk
https://*******/K9hk
05-12-2015, 10:14 PM
#9
okay passenger tank out
I was able to pull it out with only 15" of clearance from the floor to the rearmost lower control arm mount
the tank was literally empty
once the crossover tube is removed the tank really does drop down and is held up only by the hoses and harnesses connected to it, as well as the support plate
if it was full of gas, I would imagine it would break everything connected to it. so just run your vette until the gas is nearly empty, then do all this
remove the passenger rear wheel liner, then the other little liner behind it. this gives you access to the top of the tank to disconnect various things
things to disconnect:
pump connector on top of pump
pressure sensor connector to sensor on top of pump
big evap line on canister (using quick connect..dont try to disconnect the barb side)
little evap line up near middle of chassis away from tank (this may be stuck..mine did not come out easy)
inspect each connector carefully to figure out how to disconnect it. the electrical connectors disconnect in different ways, and the two evap lines disconnect by pushing on the wide spot then pulling apart. may help to push in first.
then drop the tank, tip it over, and finagle it out towards the passenger side
make sure everything is disconnected before you drop the tank too far!! you can break stuff!
06-02-2015, 07:48 PM
#10
I should now have all the parts I need to put everything back together.
I tried to find good re-installation info online but there doesn't seem to be that much. So I'm going to make this up as I go.
My first best guess, will be:
-drivers tank
-evap crossover (small line) to drivers tank
-big crossover into drivers tank
-passenger tank
-evap crossover (small line) to passenger tank
I attempted to put the drivers tank in. This is with things on jackstands and about 18" clearance to the floor.
I tried sliding it in under/forward of the brake rotor, like I took it out.
It took a couple tries and I had to jack the car up off the stands a couple inches.
But it wasn't that bad. Eventually got it under its pocket, oriented correctly, and ready to be pushed up.
The tank has the ribber filler hose and evap line connected to it, which I figured would hang up on stuff and cause issues. **NOTE!! It just occured to me that I forgot to plug in the drivers fuel pump electrical harness into the pump!! Luckily I remembered this before proceeding further. I doubt it can be plugged in with the tank installed in the car!
After some experimenting I found that kneeling facing the wheel well, with left arm inside the hole the filler tube comes out of, and right arm pushing up on the tank, lets you guide the filler tube and evap line out of the tank pocket, so they dont hang up on a big lip in the pocket. Not too bad.
The filler tube is fairly stiff and if its hitting the metal filler funnel connection, you wont be able to push the tank up all the way. So lube the rubber hose and slide it at least partially onto the funnel neck so it has somewhere to go as you push up on the tank. The evap line isn't in the way, not an issue, at least on the outboard side.
Now get under the car and wiggle the tank around until you can get all the foam pieces to hit frame and you know its seating correctly
Next: I'll see how difficult it is to install the crossover tube into the drivers tank.
Keep in mind: this entire procedure is not difficult because its technical, its difficult because its frustrating and physically awkward and uncomfortable. Rebuilding the engine is far more technical, and much more enjoyable, because you can sit there with your starbucks and calmly work through the steps practically brain dead. This is the exact opposite of that. You are lucky if you can even get a clear shot to see where your hands are, and if you can still MOVE your hands where they are, consider yourself lucky, and keep it up for another 30 mins and you might finish whatever part of the procedure you are attempting.The more you can step back and take a break, the easier it will go.
I am purposely not taking pictures for this, because if you are this far into the procedure, you should be reading and thinking, not eyeballing and going for it. Trust me.
Im expecting major pain from the crossover tube and its going to come in two parts:
part A) getting it into the drivers tank
part B), the much MUCH more difficult part, getting it into the passenger tank, when its already installed in the drivers tank
I'm going to try and find a way to make the job easier, but I don't have high hopes for that.
06-02-2015, 08:47 PM
#11
Racer

ill say it, i hate this ****ing job. done it too many times on jack stands with and without thetrans/drivetrain in the car. next im i have to do a fuel system in my car, my nitrous bottles are going where the passenger seat is, and im doing a 15 gal. fuel cell in the rear.
06-02-2015, 09:03 PM
#12
ill say it, i hate this ****ing job. done it too many times on jack stands with and without thetrans/drivetrain in the car. next im i have to do a fuel system in my car, my nitrous bottles are going where the passenger seat is, and im doing a 15 gal. fuel cell in the rear.
 ((
((I have a feeling this wont be the last time I do this.
I'd say we are one discussion with a Chevy service tech away from knowing how to do it better. Anyone having to do this on a regular basis while on the clock is going to either lose their mind or figure out a way to make it much easier.
06-02-2015, 10:02 PM
#13
Okay got crossover tube installed into drivers tank.
The way I did it:
Install drivers tank as previously described.
Bolt in sheet metal support completely (fully tight).
Install small evap crossover line ***NOTE: I do not know where this line snaps into for support, if at all. The way I did it its just hanging out in mid-air. So try and see if it clips into anything before you take yours out!
Slide crossover tube through passenger tank pocket so its up where it should be.
Push it into drivers tank and lock its metal ring. Then snap the black plastic safety clip into place.
CRITICAL NOTES:
-I lubed cross over tube outer steel surface that seals with orings in tank, and inner blast plastic tubes, with WD40.
-Sliding the crossover tube through the passenger tank hole isnt that bad. It will catch on that C-clip in the middle though, so you need to arrange your arms so you can guide it around/through it as needed. I notice that a body position with your head pointed towards the passenger wheel and your legs sticking out the drivers wheel side, with your body parallel to the rear axles, seems to work for getting the crossover tube into the hole, then sliding it towards the drivers side, and finally pushing it into the drivers side tank and locking it. As you proceed, you will find that scooching a bit towards the drivers wheel as you get the tube moving gets your arms in the right holes/positions.
-The internal tubes in the crossover tube need to line up with the tank tubes, obviously. But you cant see them when you are installing them into the tank. Recipe for disaster. So I took a permanent marker and made a line on the crossover tube steel outer oring surface to show me the plane the two internal tubes were in, and also which one should be on the bottom. Its not perfect, because you cant see the tank side, but its better than nothing and gets you into the ballpark as far as crossover rotation before installation.
-If you do it wrong, you can unlock the internal tubes from the crossover and pop them out, possibly with no warning that they arent connected internally, even though the crossover tube is locked in place. So make an extra special effort here to feel that they are installing into the tank tubes!! Otherwise you wont find out its wrong until you start 'er up!
-Make sure the tank is fully seated before you tighten the sheet metal support bolts. I found there was some compression of the foam required, but you should still make sure that the tank isnt sticking on something like a tube/harness or whatever.
-For practice, when the tanks and crossover were out of the car, I examined how the crossover went in easiest into the tank. I think a slow, forceful, radial motion/wiggle, with axial push, gets things seated the easiest. PRACTICE THIS before doing it in-vehicle! Get an idea what it feels like to connect them!
-The C-Clamp reallly gets in the way. Both in sliding the tube over, and in wiggling the tube to install it. Prepare yourself to pop the tube out of it and/or reinstall it into it as needed several times.
-I repeated the crossover install about 3 times just to see if I could get better at it. My final time only took about 3 minutes from tube out of the vehicle, to fully installed in the drivers tank and locked in place! Hopefully the internal tubes are also secured, because the first time I dont think they were!
So now I'm left with the drivers tank basically done, the crossover tube installed into it, and now to install the passenger tank. This is going to be rough. The passenger side of the crossover tube has very little radial or axial movement available. So I think this may mean that the passenger tank will be wiggling into order to install itself onto it. I may even have to remove the drivers tank support plate so it can allow even more wiggling, as well as pop the tube out of the C-clamp..
06-04-2015, 11:54 PM
#14
Forgot to discuss getting the new pump with its new lines into the tank.
The problem is the basket on the pump is basically the same diameter as the hole in the tank it goes into. Practically a press fit.
But there are two fuel lines that need to connect to the pump, inside the tank.
So how do you connect them, if the pump is in the tank, and the lines need to go inside the tank to connect to the pump, but there is no room to pass them through?
Well, its not fun. I believe MotorHead has described this procedure, and mine is basically the same.
First, drop the pump halfway into the tank, so the basket is all the way through.
Then, get a long, flexible wire, and pass into the tank x-over hole and out the pump hole.
Then attach a string to that wire, and pull the string through.
Now tie the string around the fuel line that has the quick connect on it, right up near the fitting.
Now wrangler the two lines into the x-over hole and try to get them to come out the pump hole. Of course, the pump is in the way, and you cant really get your hands in there. So its not fun.
One line quick-connects, the other goes into the basket and clips into that gray clip.
Motorhead mentions removing that clip, and I think, clipping it to the line where it normally sits, then once the line is in the basket, pushing the clip into the pump. I didnt do that, and I think it would be easier to do that. So next time I will. Its very difficult to get the line bend into that clip and lock the clip with things the way they are.
06-11-2015, 08:05 PM
#15
update:
I tried to finish the tanks + crossover tube install today.
So drivers tank was fully installed and bolted down.
Crossover tube was installed into drivers tank and locked in place.
And that was the starting point, to get the passenger tank in and install the crossover tube into it.
Passenger tank went in easy, again on jackstands, maybe 18" or so of clearance.
Then I tried to figure out how to get the crossover tube into the passenger tank.
It doesnt compress along its length very well and so therefore its too long to get into the passenger tank by about the same length as it seats inside the passenger tank when its fully installed, or about 1.25".
It was in its C-clamp so I popped it out, but it still was pinned by the springy c-clamp. So I unbolted the c-clamp and took it out of the vehicle. 10mm + 1/4" ratchet. There is a hard plastic tube that the C-clamp also is secured to which needed to be popped out.
Now I could wiggle the tube more up and down but not lengthwise still. And going into the tank at an angle seems like a really bad idea given the internal tubes.
So then I decided to take off the drivers tank support plate and see if that gave more lengthwise movement in the crossover tube.
Nope..barely any change. Not surprising since when the tanks are up high enough to mate with the crossover tube, they are intentionally prevented from moving.
I read another thread where he said to connect the crossover tube to the passenger tank first, then the drivers tank. So the opposite order I am attempting. I will try that next. There is more room to work on the drivers tank crossover connection, so maybe I can really compress the tube lengthwise if I can get my arms up there.
So things that didnt help in this situation (drivers tank installed, crossover tube installed into drivers tank, attempting to install crossover tube into passenger tank)
-popping crossover tube out of c-clamp
-removing c-clamp from vehicle
-removing drivers tank support plate
06-11-2015, 09:07 PM
#16
Race Director

Member Since: May 2004
Location: Raleigh, NC
Posts: 16,664
Received 1,194 Likes
on
1,053 Posts
St. Jude Donor '15

It's possible to put the passenger tank in with the driver tank already in. I've done it. I have scars on my arms from it. I'll drop the drivetrain before I do that again.
I don't remember if loosening the driver tank bottom cover thing helped or not. It seems like it going down actually made the metal tube end up in a worse position when trying to install the passenger tank
You'll have to find something to pry on the metal tube with to push it towards the driver side tank. It's too stiff to do without some kind of lever. I ended up with a piece of metal bar that was maybe 3/4" wide, 1/8" thick that I finally got bent up just right to fit up there and work
It's a pain.
06-11-2015, 09:14 PM
#17
It's possible to put the passenger tank in with the driver tank already in. I've done it. I have scars on my arms from it. I'll drop the drivetrain before I do that again.
I don't remember if loosening the driver tank bottom cover thing helped or not. It seems like it going down actually made the metal tube end up in a worse position when trying to install the passenger tank
You'll have to find something to pry on the metal tube with to push it towards the driver side tank. It's too stiff to do without some kind of lever. I ended up with a piece of metal bar that was maybe 3/4" wide, 1/8" thick that I finally got bent up just right to fit up there and work
It's a pain.
I don't remember if loosening the driver tank bottom cover thing helped or not. It seems like it going down actually made the metal tube end up in a worse position when trying to install the passenger tank
You'll have to find something to pry on the metal tube with to push it towards the driver side tank. It's too stiff to do without some kind of lever. I ended up with a piece of metal bar that was maybe 3/4" wide, 1/8" thick that I finally got bent up just right to fit up there and work
It's a pain.
Since the vette is not my only car (its been up on jackstands now for a month+), I'm not in a rush. I'd like to figure out a way to do this that makes it easy.
Its seeming like its all coming down to compressing the crossover tube. Which is what it sounds like you did with the tool you described. Loosening the tanks and taking out the c-clamp doesn't seem to help. I dont see any other options.
I would imagine, that at the factory, with the body in the air above their head and no transmission in place, it would be possible to really put alot of force on the tube to compress it, just with your hands/body, and pop it into the tank, all in one motion. I've got to imagine thats how they are doing it on the assembly line. Or like you said, using a tool and really man handling the situation I would imagine. I want to avoid that because the internal tubes seem VERY sensitive to alignment. They just seem to rotate out of their locks, and its blind, so then its pure luck and the odds aren't in your favor that its all going to line up.
I think I'm going to try and make a tool that lets you calmly and precisely compress the crossover tube. I saw in another thread that someone made something like that, but they didn't provide any other details.
It doesn't have to be complicated. A long piece of threaded rod and two clamps of some sort that grab the tube, should do it. That would essentially turn this job into almost 100% easy, assuming the tool lets you compress or expand the crossover tube at will with no fuss. The next hardest part would be popping the black locks off, but thats pretty easy once you know right where to put the screwdriver. The rest is no big deal. I dont want to have to avoid this procedure in the future. Since I have the opportunity here to take my time, I'm going to see what might be possible so to speak...
06-11-2015, 09:34 PM
#18
Race Director
Member Since: May 2004
Location: Raleigh, NC
Posts: 16,664
Received 1,194 Likes
on
1,053 Posts
St. Jude Donor '15
At the factory they put the tanks + tube together off of the car then just put the whole assembly in place. Easy to do with the drivetrain out of the way.
Honestly if you've dropped the rear cradle a time or two and know how to do it, it's easier to just drop it to get it out of the way. That way you have plenty of space to put the pipe on then you can push the whole assembly up in place. Some shops do it that way just to be sure they don't pinch or screw up any o-rings, etc. along the way
I found this thread when I was messing with mine. One of the shops on here came up with a tool that compressed the tube but they didn't sell them so that didn't do me much good.
https://www.corvetteforum.com/forums...ion-trick.html
06-11-2015, 09:40 PM
#19
At the factory they put the tanks + tube together off of the car then just put the whole assembly in place. Easy to do with the drivetrain out of the way.
Honestly if you've dropped the rear cradle a time or two and know how to do it, it's easier to just drop it to get it out of the way. That way you have plenty of space to put the pipe on then you can push the whole assembly up in place. Some shops do it that way just to be sure they don't pinch or screw up any o-rings, etc. along the way
I found this thread when I was messing with mine. One of the shops on here came up with a tool that compressed the tube but they didn't sell them so that didn't do me much good.
https://www.corvetteforum.com/forums...ion-trick.html
Honestly if you've dropped the rear cradle a time or two and know how to do it, it's easier to just drop it to get it out of the way. That way you have plenty of space to put the pipe on then you can push the whole assembly up in place. Some shops do it that way just to be sure they don't pinch or screw up any o-rings, etc. along the way
I found this thread when I was messing with mine. One of the shops on here came up with a tool that compressed the tube but they didn't sell them so that didn't do me much good.
https://www.corvetteforum.com/forums...ion-trick.html
How can the install the tanks and tube as an assembly? Do you mean from above with the body off? It looks like the tube connection points are surrounded on all sides by frame and welded body panels? I probably just need to look at it again to see what you mean. I cant think of it in my head right now though.
06-11-2015, 09:47 PM
#20
Le Mans Master


How can the install the tanks and tube as an assembly? Do you mean from above with the body off? It looks like the tube connection points are surrounded on all sides by frame and welded body panels? I probably just need to look at it again to see what you mean. I cant think of it in my head right now though.