
[Z06] Z06 "targa" - Preliminary Pics and Write-up!
 09-17-2008, 11:16 PM
#1
Drifting

Thread Starter

Hey guys - I still have a few details to complete, but I wanted to get this posted as soon as possible.
The final weight and cost analysis will come next week, but I am certain that the weight and cost will be very impressive.
Enjoy!


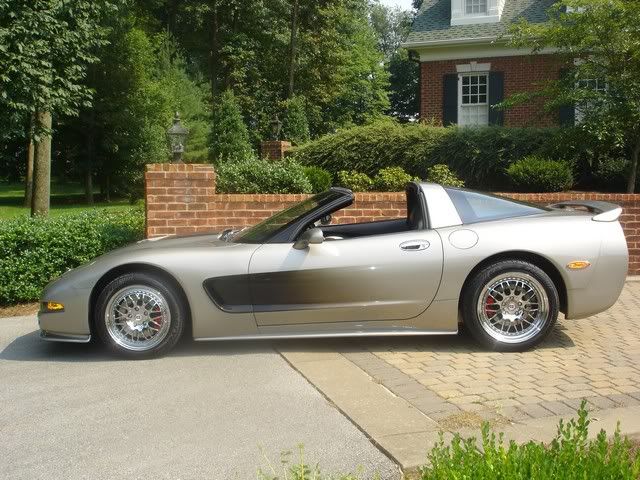
The Z06 Targa
My Z06 Targa (Z06-T) project started more than six months ago. I currently have an 2002 Coupe, which is mostly a “garage queen”. I have begun to get a little tired of being a “waxer”.
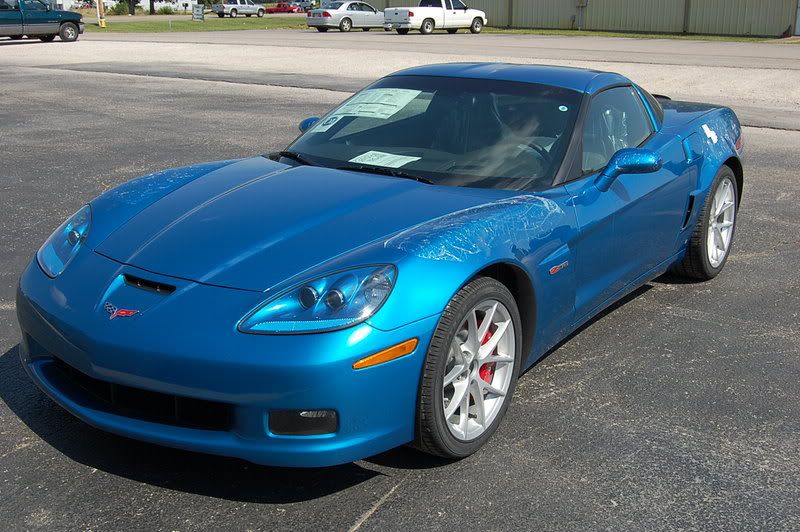
I decided that I wanted a new C6, something that I could drive every day, but it had to have a removable top. The two reasons: First, I just love the open top and second, at 6’5” I need all the headroom that I can get. After my initial shopping for a C6, I began to really appreciate the lines of the Z06, but I did not think that I needed all that performance. So I spent a couple of months studying the full “widebody” conversion of a C6 Coupe. After a couple of months of research and cost analysis, I realized that the cost of a C6 widebody was only about $10-12,000. less than a Z06. Plus, I didn’t really feel comfortable with the “poser” factor. The decision was made, and the whole process started all over. I took delivery of my ’09 JSB 3LZ Z06 on August 21st for the estimated three week conversion.
To digress for a moment, I am just an average Corvette enthusiast, not an engineer, not a mechanic or a body shop guy, not even much of a “do it yourself” person. What I am is a person who is willing to think “outside of the box” and someone who is obsessive and persistent. With that said, everything that I have learned about the Corvette C6 Coupe and Z06, I have learned from a whole bunch of very smart people, or I have read it in the dozens of publications which I have studied during the past few months.
The people who have advised me (and you know who you are) have given me great insight into the design of both the steel and the aluminum frames. I have agreed not to disclose or directly quote the GM or Dana employees who have advised me, but I will suffice it to say that their input was critical to the success of this project.
I discovered much of the research data from referrals by fellow forum members, GM and Dana employees, and general internet research. As a result of my inquiries, I am now a member in good standing of the Society of Automotive Engineers (who, me?). I just wish they would stop inviting me to their seminars. In total, I have studied more than a hundred articles, SAE publications, patents and other relevant materials. Although I have learned a lot, I still feel that I am nowhere near an expert and there is much more that I would like to learn.
I have attended more plant tours than I care to recall, and I have been scolded more than a few times for not keeping up with my group. I have visited the NCM dozens of times to examine and take pictures and measurements of the open C5 and C6 Z06 frames, which was extremely helpful. I was also reprimanded by the NCM staff for crawling under the Z06 frame! I have attended every Bowling Green show (Cruise-in, Corvette Homecoming, Anniversary, Z06-Fest, etc.) and Bloomington Gold in Chicago. At every show, I have attended relevant seminars, and managed to get in as many questions and “one-on-one” time as I could get. In a few cases, I probably made a nuisance of myself, but I was “a man on a mission”!
….and so it began.
What I Learned (or at least what I think I learned)
I am not going to rehash a lot of detail or specifics about the relative strength of steel vs. aluminum or the differences in the Coupe vs. Z06 frame. First, I am not smart enough. Second, someone else will just pick it apart. Third, there are many publicly available sources for this information. Rather, I will just make some anecdotal observations about what I have learned.
It is widely known that when the first C5 steel frames were introduced, they were significantly stronger than the C4 frames, which were notorious for the excessive flex in the frame. In fact, the open C5 frame on display at the NCM indicates that the C5 steel frame is 400% stronger than the C4 frame. Now, it must be noted that the C5 steel frame was designed for the “worst case” scenario, that being the convertible. Further, the design parameters for one “lifetime” of the vehicle is 250,000 miles, and for the most extreme driving conditions. It is pretty obvious that very few cars would ever approach this threshold.
The C6 Z06 frame, of course, is a completely different animal. The coupe and the convertible on an aluminum frame were never even designed for. However, again at the open frame Z06 display at the NCM, it indicates that the Z06 aluminum frame is 50% stronger than the C5 steel frame. However, the word “strength” can be very subjective and must be operationally defined in order to make a rational comparison.
Within the context of the Z06 “targa” project, it is not possible to avoid the discussion of the relative strength of the hydroformed aluminum frame as compared to the C6 steel frame. For those who have studied the development of the initial aluminum frame by Dana, it was concluded that the frame could be produced that would weigh 135 pounds less, and the frame would be within 5% of the overall strength of the steel frame. It was noted that if ten more kilograms (22 pounds) were added to the aluminum frame, the overall strength would have been equal to the steel frame. Many have speculated as to why this adjustment was not made. It has also been reported that the total Z06 frame (including the windshield, B pillar, etc.) is within 3% of the overall strength of the steel frame. Therefore, could one conclude that to achieve the same results as GM design (without the roof) would only result in a difference of 2% (97% - 95%)? Interesting. It should also be noted that GM has reported that the addition of the many other body parts, suspension, etc. on the Z06 model adds more rigidity to the frame than on the other C6 models.
The comparison of the steel vs. aluminum must also be addressed. Steel and aluminum can both achieve the targeted design strength in an automotive frame, with one key distinction. Both steel and aluminum are subject to deflection and torsional forces. However, after steel is subjected to deflection and/or torsion, it returns to its original shape and retains 100% of its strength ad infinitum. Aluminum, on the other hand, after subjected to deflection and/or torsion also returns to its original shape, but over an extended number of deflections and/or torsions (cycles), the aluminum will weaken and will ultimately fail, commonly referred to as metal fatigue. It is this metal fatigue and the difference in the overall chassis strength that must be analyzed.
But if 2% is all we are trying to compensate for, what is the big deal? Surely I would not be pushing my Z06 that hard. Or would I? Two stories come to mind that bear repeating. The first, a guy pulls up next to me in a gas station in what looks like a Z06 “targa”. I asked him, who did the conversion? Is it a widebody with Z06 badges? “No, he said, I just unbolted the top, changed the latches, and “voila”! He reported no problems at all after four months of normal driving. This correlates to the GM engineer that commented that for the daily driver, it would probably never be a problem. I don’t really think that he was being completely serious, but he did say that both the steel frames and the aluminum frames were significantly “overdesigned” for any type of normal driving. It is mainly a result of the potential GM liability in the event of catastrophic frame failures.
The second story resulted in more dramatic consequences. A GM engineer told me that in “experiment” they pulled the top off a Z06 and subjected it to several laps of high performance driving. In less than thirty minutes, the car was not drivable (due to distortion of the frame). While I may never drive my Z06 under such conditions, it is this story that would inevitably dictate my approach.
Although I do not intend to try to explain the metallurgic differences between aluminum and steel, I will simply quote a few passages from a fellow forum member regarding the analysis of the metal fatigue properties and concerns of aluminum:
…”As is, deflections of the aluminum frame without the magnesium roof structure are within 5% of those for the steel frame…. Also, the side rails are not AA5754 but AA6063-T5 (4 mm). AA6063-T5 has a higher yield strength but LOWER fatigue strength (at 10^7 cycles). My read on this is that the vast majority of cycles are well below the fatigue strength of AA6063-T5 and a 5-10% loss in fatigue strength was worth the increased yield strength. This increased yield strength probably helped the weight loss (AA6xxx alloys help weight loss more than AA5xxx alloys)…”
“Ultimately, there are thresholds for both deflections and first mode frequencies… again, the aluminum frame used a good bit of tooling that is used for the steel frame… in designing the steel C6 frame, some compromises were made to allow a more optimal aluminum frame design… I think the steel C6 frame is a bit overdesigned for not just the coupe but the convertible also... The final Z06 frame including the magnesium roof structure is 97% as stiff (frequencies not force per unit displacement or moment per unit angular rotation) as the steel C6 frame. It appears that the fixed magnesium roof structure increased the first mode frequencies by about 4%. “
“Another thing to remember here is that the loss in stiffness of the frame when it is built up into a full C5 or C6 is influenced by the stiffness of the subsystems for the vehicle (C6 has a stiffer rear composite structure) as well as the mass caught up in the front and rear overhangs. C6 loses less stiffness than C5 upon building the full vehicle. (The frame doesn't really lose stiffness. The first mode frequencies of the frame are generally much higher than the full vehicle because of all of the stuff now attached to the frame. It is this difference to which I refer.)”
“The frequencies that were mentioned by DETLTU were a bit misleading. The numbers 22.9Hz (bending) and 28.3Hz (torsion) were the program objectives but the final numbers were 4% higher. Also, these numbers were not for the frame alone. They are the frame, the entire roof, the windshield, the entire rear of the car behind the driver minus the drivetrain, and parts of the front fenders…”
Admittedly, a good portion of the technical terminology is a couple of notches above my pay grade, but with the help of some much smarter and very patient people, I have begun to be able to wrap my brain around these concepts. My philosophy is that you don’t have to be real smart as long as you know some real smart people and you are willing to listen (and ask a lot of questions).
The Diagnosis
My research concluded that in order to do the “targa” conversion, I would need to do substantial reinforcement of the frame in order to recover the loss in rigidity resulting from the removal of the roof. It was determined that the most effective approach was to add significant reinforcement to the tunnel area, along with additional support and bracing to the outer frame rails in specific areas. Since it was obvious that I did not have the benefit of a team of engineers to perform a “scientific” design, or the use of the computer simulation program used by Alcoa to test frame designs, or the use of a bunch of spare frames to conduct stress testing, or the use of the validation process used by GM to approve designs, I determined that the only reliable alternative was to design a system that added significantly more strength than was lost. If the loss in rigidity was 2-3%, it was my goal to recover at least triple that amount, or no less than a 10% improvement.
The Team
Since I am not much of a DIY guy, even somewhat “mechanically challenged”, I had to enlist the support of a couple of highly qualified shops to help me with this project. The major frame reinforcement system was designed and installed by Steve Matukas (Matukas Motorsports) in Bowling Green. Steve is primarily a race car builder, and he is an expert at designing and installing roll cage systems. Working with Steve was a pleasure and together we managed to design a system which met all of our project goals. In a sense, my car was his “test mule” for the reinforcement system which he will soon be making available to the Corvette community.
The second shop was Mike Rankin at 3B Automotive, also located in Bowling Green. Mike has worked on my heavily modded ’02 Coupe for several years, and his shop does excellent work. Mike was responsible for the removal of the fixed roof, removal of seats and carpeting, installation of the removable roof hardware and trim, insulation, LG World Challenge hood, APR chin spoiler, chassis bar, custom painting, and reassembly of the car. Mike is another great guy to work with.
The Project Objectives
The first objective, as stated above, was to reinforce the frame by no less than triple the loss in rigidity resulting from the removal of the fixed roof.
The second objective was to add as little weight as possible to the car, with a goal of adding no more than one hundred pounds net gain.
The third objective, in medical parlance was to “do no harm”. In other words, other than removing the fixed roof, no other part of the car would be compromised. No bracing was cut, no parts were removed. The entire reinforcement system would be an “add on”. In addition, the system must maintain complete functionality of the jacking and tie down points on the underside of the frame rails.
The fourth objective was that the reinforcement system would extend no lower than �” below the frame. This dimension was determined by the fact that a realistic “frame rail saver” (used to protect the underside of the rocker panels) would be �”, therefore the remainder of the system would also be within this dimension.
The fifth objective was to make the reinforcement system completely portable. It would be able to be installed on a car on jack stands in the garage. It must also be simple to remove, either in part or in whole, to be able to service the exhaust, etc.
The final objective, of course, is that the system would be cost effective.
The Build
I picked up my 2009 Z06 at the NCM on August 21st. I chose the 3LZ package, Jetstream Blue with an ebony/dark titanium interior. I drove it straight from the museum to 3B Automotive, not wanting to lose my courage by driving the car and potentially changing my mind. Within two days, the complete interior, the rear fascia and the roof had been removed. The car was then trailered to Matukas Motorsports for the frame reinforcement. All components were constructed out of �” 6061 T6 aluminum, with the exception of the chassis bar, which is made of 1 5/8” 4130 chromoly steel. The underbody reinforcement (numbers 1,2,3,4) is considered to be the essential portion of the system. The chassis bar (number 5) is optional and is also intended to be used for the attachment of racing seat belts (HPDE, etc.). The reinforcement of the outer frame rails (number 6) is in the category of “overkill”.
1. In the tunnel area, a box frame was built. This frame support system surrounds the exhaust system, with the top of the box replacing the stock 1/8” tunnel plate. This frame is bolted in the tunnel with the eighteen stock bolts on each side.
2. Below the exhaust, a cover plate forms the bottom of the box frame. This plate is cut out to allow for the escape of exhaust heat. The cover plate is attached with 5/16” stainless steel bolts which are countersunk to the frame using nutserts.
3. There are two diagonal braces on each side which connect the tunnel plate area to the outer frame rails.
4. There are two frame rails covers which connect with the diagonal braces. These covers also serve the same purpose as the aftermarket “frame rail savers”, which protect the underside of the rocker panels from speed bumps, etc. These covers are also attached to the frame with 5/16” bolts and nutserts.
5. There is a chassis bar system installed in the cargo area, bolted to the area behind the seats and bolted to the rear frame rails. The chassis bar is made out of 1 5/8” 4130 (.83T) chromoly steel tubing.
6. There are 3” braces welded to the inner side of the outer frame rails, in the interior, running from the firewall to the wall behind the seats. These �” thick braces are almost double the thickness of the outer frame rails (4mm = .157”). These are the only welded pieces. Another option to attach these rails would have been the use of self piercing rivets.
The Extras (while I was at it)
While doing the “targa” project, I wanted to do some extras, some because it was convenient and some because they were part of the bigger picture.
1. I added interior insulation from Exotic Vette. It was convenient while I had the interior taken apart.
2. I added extra insulation in the tunnel area to address the dreaded hot console problem. Also convenient.
3. Ceramic coating on the exhaust manifolds and exhaust system in the tunnel area. Also convenient.
4. Added the optional chassis bar, mainly for the racing belts and the aggressive look.
5. Added the outer frame rail braces. While the interior was taken out, I just could not resist. (less than 2 pounds each)
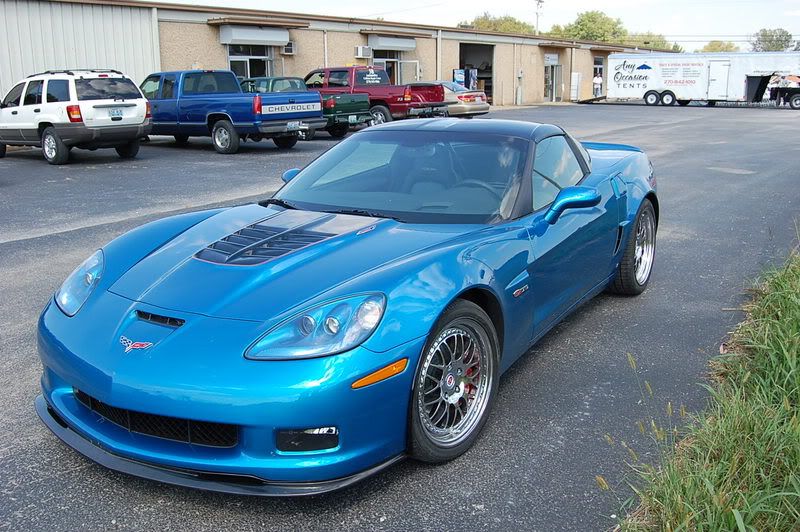
6. Added the LG World Challenge hood, painted louvers black.
7. Added HRE 540s, stock Z06 sizes.
8. Added APR Performance carbon fiber front chin spoiler.
9. Painted halo, splash guards and rear fascia black.
10. Added 3M clear bra. (TBD)
11. Added tint, 25% sides and rear. (TBD)
12. Added Lloyds mats, M2W, CAGS, taillight louvers, full length racing spoiler, 427 emblems, etc.
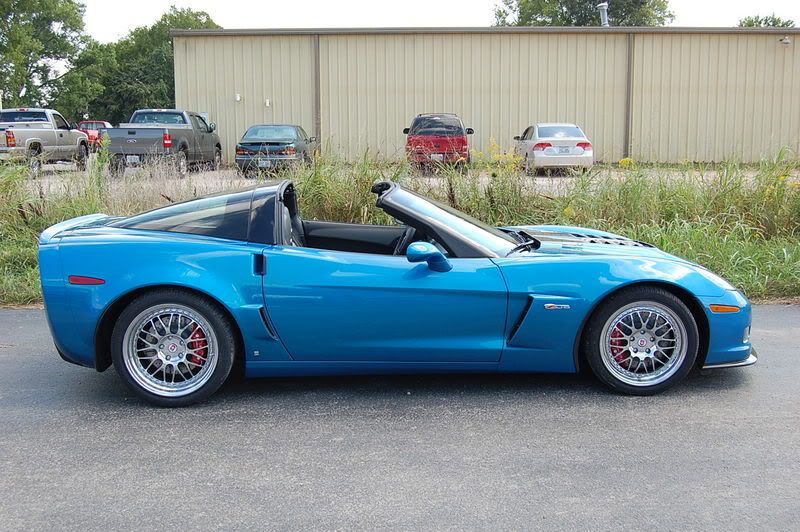
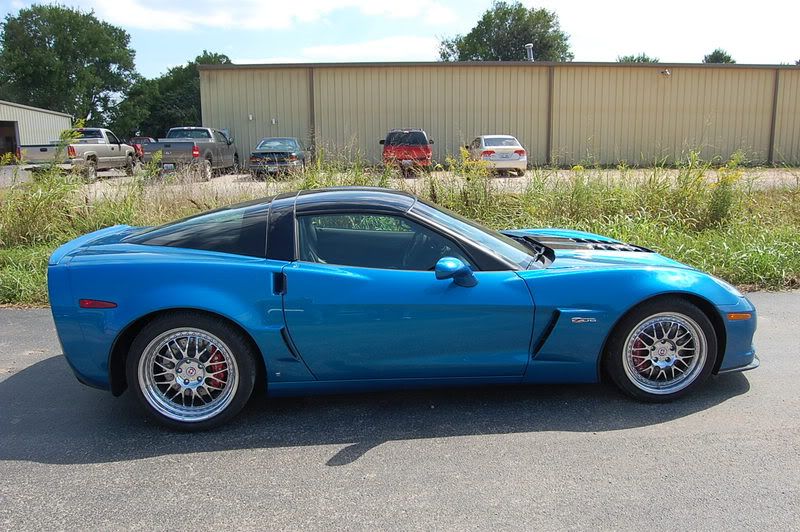
13. Added the transparent top, the best mod of all.
What I Learned the Hard Way (trial and error)
You know what they say about “the best laid plans”, well this project was no exception. Nothing major, but a few frustrations.
I did not realize that the C6 removable top is 15% larger than the C5 removable top. I also did not realize that the top is stowed in a flat position, unlike the C5. Once I learned this, I ordered the correct mounting hardware for the cargo area and proceeded. The stowing of the top also had a direct effect on the design of the chassis bar. In the end, it worked out very well, as we were able to achieve a good angle between the chassis bar and the rear frame rails.
The first installation of the tunnel reinforcement resulted in too much heat in the console. The stock ’09 Z06 has more heat insulation in the tunnel area, but it is still not enough. So we take it back apart, add Heatmaster insulation and ceramic coat exhaust in the tunnel area.
Lots of parts to order, hard to think of everything on the first try. Forgot a couple of trim pieces, a few more were hard to locate in the GM supply chain. Some days, no parts = no progress.
I have been unable to locate ZR1 style side skirts to match the APR front chin spoiler. I would have thought an aftermarket supplier would have come up with something by now, like the ACI side skirts on the C5, but so far no luck. They are really important to complete the “lowered look”, and to enhance the black accents on the car.
The painting of the louvered area of the LG World Challenge hood was done in black and then clearcoated with a gloss finish. It is a great look, but the glossy black finish overpowered the jetstream blue. So it was back to the paint booth to re-do the clearcoat in a satin finish. Much better result.
Weights and Measures
…to be continued in a few days.
The final weight and cost analysis will come next week, but I am certain that the weight and cost will be very impressive.
Enjoy!
The Z06 Targa
My Z06 Targa (Z06-T) project started more than six months ago. I currently have an 2002 Coupe, which is mostly a “garage queen”. I have begun to get a little tired of being a “waxer”.
I decided that I wanted a new C6, something that I could drive every day, but it had to have a removable top. The two reasons: First, I just love the open top and second, at 6’5” I need all the headroom that I can get. After my initial shopping for a C6, I began to really appreciate the lines of the Z06, but I did not think that I needed all that performance. So I spent a couple of months studying the full “widebody” conversion of a C6 Coupe. After a couple of months of research and cost analysis, I realized that the cost of a C6 widebody was only about $10-12,000. less than a Z06. Plus, I didn’t really feel comfortable with the “poser” factor. The decision was made, and the whole process started all over. I took delivery of my ’09 JSB 3LZ Z06 on August 21st for the estimated three week conversion.
To digress for a moment, I am just an average Corvette enthusiast, not an engineer, not a mechanic or a body shop guy, not even much of a “do it yourself” person. What I am is a person who is willing to think “outside of the box” and someone who is obsessive and persistent. With that said, everything that I have learned about the Corvette C6 Coupe and Z06, I have learned from a whole bunch of very smart people, or I have read it in the dozens of publications which I have studied during the past few months.
The people who have advised me (and you know who you are) have given me great insight into the design of both the steel and the aluminum frames. I have agreed not to disclose or directly quote the GM or Dana employees who have advised me, but I will suffice it to say that their input was critical to the success of this project.
I discovered much of the research data from referrals by fellow forum members, GM and Dana employees, and general internet research. As a result of my inquiries, I am now a member in good standing of the Society of Automotive Engineers (who, me?). I just wish they would stop inviting me to their seminars. In total, I have studied more than a hundred articles, SAE publications, patents and other relevant materials. Although I have learned a lot, I still feel that I am nowhere near an expert and there is much more that I would like to learn.
I have attended more plant tours than I care to recall, and I have been scolded more than a few times for not keeping up with my group. I have visited the NCM dozens of times to examine and take pictures and measurements of the open C5 and C6 Z06 frames, which was extremely helpful. I was also reprimanded by the NCM staff for crawling under the Z06 frame! I have attended every Bowling Green show (Cruise-in, Corvette Homecoming, Anniversary, Z06-Fest, etc.) and Bloomington Gold in Chicago. At every show, I have attended relevant seminars, and managed to get in as many questions and “one-on-one” time as I could get. In a few cases, I probably made a nuisance of myself, but I was “a man on a mission”!
….and so it began.
What I Learned (or at least what I think I learned)
I am not going to rehash a lot of detail or specifics about the relative strength of steel vs. aluminum or the differences in the Coupe vs. Z06 frame. First, I am not smart enough. Second, someone else will just pick it apart. Third, there are many publicly available sources for this information. Rather, I will just make some anecdotal observations about what I have learned.
It is widely known that when the first C5 steel frames were introduced, they were significantly stronger than the C4 frames, which were notorious for the excessive flex in the frame. In fact, the open C5 frame on display at the NCM indicates that the C5 steel frame is 400% stronger than the C4 frame. Now, it must be noted that the C5 steel frame was designed for the “worst case” scenario, that being the convertible. Further, the design parameters for one “lifetime” of the vehicle is 250,000 miles, and for the most extreme driving conditions. It is pretty obvious that very few cars would ever approach this threshold.
The C6 Z06 frame, of course, is a completely different animal. The coupe and the convertible on an aluminum frame were never even designed for. However, again at the open frame Z06 display at the NCM, it indicates that the Z06 aluminum frame is 50% stronger than the C5 steel frame. However, the word “strength” can be very subjective and must be operationally defined in order to make a rational comparison.
Within the context of the Z06 “targa” project, it is not possible to avoid the discussion of the relative strength of the hydroformed aluminum frame as compared to the C6 steel frame. For those who have studied the development of the initial aluminum frame by Dana, it was concluded that the frame could be produced that would weigh 135 pounds less, and the frame would be within 5% of the overall strength of the steel frame. It was noted that if ten more kilograms (22 pounds) were added to the aluminum frame, the overall strength would have been equal to the steel frame. Many have speculated as to why this adjustment was not made. It has also been reported that the total Z06 frame (including the windshield, B pillar, etc.) is within 3% of the overall strength of the steel frame. Therefore, could one conclude that to achieve the same results as GM design (without the roof) would only result in a difference of 2% (97% - 95%)? Interesting. It should also be noted that GM has reported that the addition of the many other body parts, suspension, etc. on the Z06 model adds more rigidity to the frame than on the other C6 models.
The comparison of the steel vs. aluminum must also be addressed. Steel and aluminum can both achieve the targeted design strength in an automotive frame, with one key distinction. Both steel and aluminum are subject to deflection and torsional forces. However, after steel is subjected to deflection and/or torsion, it returns to its original shape and retains 100% of its strength ad infinitum. Aluminum, on the other hand, after subjected to deflection and/or torsion also returns to its original shape, but over an extended number of deflections and/or torsions (cycles), the aluminum will weaken and will ultimately fail, commonly referred to as metal fatigue. It is this metal fatigue and the difference in the overall chassis strength that must be analyzed.
But if 2% is all we are trying to compensate for, what is the big deal? Surely I would not be pushing my Z06 that hard. Or would I? Two stories come to mind that bear repeating. The first, a guy pulls up next to me in a gas station in what looks like a Z06 “targa”. I asked him, who did the conversion? Is it a widebody with Z06 badges? “No, he said, I just unbolted the top, changed the latches, and “voila”! He reported no problems at all after four months of normal driving. This correlates to the GM engineer that commented that for the daily driver, it would probably never be a problem. I don’t really think that he was being completely serious, but he did say that both the steel frames and the aluminum frames were significantly “overdesigned” for any type of normal driving. It is mainly a result of the potential GM liability in the event of catastrophic frame failures.
The second story resulted in more dramatic consequences. A GM engineer told me that in “experiment” they pulled the top off a Z06 and subjected it to several laps of high performance driving. In less than thirty minutes, the car was not drivable (due to distortion of the frame). While I may never drive my Z06 under such conditions, it is this story that would inevitably dictate my approach.
Although I do not intend to try to explain the metallurgic differences between aluminum and steel, I will simply quote a few passages from a fellow forum member regarding the analysis of the metal fatigue properties and concerns of aluminum:
…”As is, deflections of the aluminum frame without the magnesium roof structure are within 5% of those for the steel frame…. Also, the side rails are not AA5754 but AA6063-T5 (4 mm). AA6063-T5 has a higher yield strength but LOWER fatigue strength (at 10^7 cycles). My read on this is that the vast majority of cycles are well below the fatigue strength of AA6063-T5 and a 5-10% loss in fatigue strength was worth the increased yield strength. This increased yield strength probably helped the weight loss (AA6xxx alloys help weight loss more than AA5xxx alloys)…”
“Ultimately, there are thresholds for both deflections and first mode frequencies… again, the aluminum frame used a good bit of tooling that is used for the steel frame… in designing the steel C6 frame, some compromises were made to allow a more optimal aluminum frame design… I think the steel C6 frame is a bit overdesigned for not just the coupe but the convertible also... The final Z06 frame including the magnesium roof structure is 97% as stiff (frequencies not force per unit displacement or moment per unit angular rotation) as the steel C6 frame. It appears that the fixed magnesium roof structure increased the first mode frequencies by about 4%. “
“Another thing to remember here is that the loss in stiffness of the frame when it is built up into a full C5 or C6 is influenced by the stiffness of the subsystems for the vehicle (C6 has a stiffer rear composite structure) as well as the mass caught up in the front and rear overhangs. C6 loses less stiffness than C5 upon building the full vehicle. (The frame doesn't really lose stiffness. The first mode frequencies of the frame are generally much higher than the full vehicle because of all of the stuff now attached to the frame. It is this difference to which I refer.)”
“The frequencies that were mentioned by DETLTU were a bit misleading. The numbers 22.9Hz (bending) and 28.3Hz (torsion) were the program objectives but the final numbers were 4% higher. Also, these numbers were not for the frame alone. They are the frame, the entire roof, the windshield, the entire rear of the car behind the driver minus the drivetrain, and parts of the front fenders…”
Admittedly, a good portion of the technical terminology is a couple of notches above my pay grade, but with the help of some much smarter and very patient people, I have begun to be able to wrap my brain around these concepts. My philosophy is that you don’t have to be real smart as long as you know some real smart people and you are willing to listen (and ask a lot of questions).
The Diagnosis
My research concluded that in order to do the “targa” conversion, I would need to do substantial reinforcement of the frame in order to recover the loss in rigidity resulting from the removal of the roof. It was determined that the most effective approach was to add significant reinforcement to the tunnel area, along with additional support and bracing to the outer frame rails in specific areas. Since it was obvious that I did not have the benefit of a team of engineers to perform a “scientific” design, or the use of the computer simulation program used by Alcoa to test frame designs, or the use of a bunch of spare frames to conduct stress testing, or the use of the validation process used by GM to approve designs, I determined that the only reliable alternative was to design a system that added significantly more strength than was lost. If the loss in rigidity was 2-3%, it was my goal to recover at least triple that amount, or no less than a 10% improvement.
The Team
Since I am not much of a DIY guy, even somewhat “mechanically challenged”, I had to enlist the support of a couple of highly qualified shops to help me with this project. The major frame reinforcement system was designed and installed by Steve Matukas (Matukas Motorsports) in Bowling Green. Steve is primarily a race car builder, and he is an expert at designing and installing roll cage systems. Working with Steve was a pleasure and together we managed to design a system which met all of our project goals. In a sense, my car was his “test mule” for the reinforcement system which he will soon be making available to the Corvette community.
The second shop was Mike Rankin at 3B Automotive, also located in Bowling Green. Mike has worked on my heavily modded ’02 Coupe for several years, and his shop does excellent work. Mike was responsible for the removal of the fixed roof, removal of seats and carpeting, installation of the removable roof hardware and trim, insulation, LG World Challenge hood, APR chin spoiler, chassis bar, custom painting, and reassembly of the car. Mike is another great guy to work with.
The Project Objectives
The first objective, as stated above, was to reinforce the frame by no less than triple the loss in rigidity resulting from the removal of the fixed roof.
The second objective was to add as little weight as possible to the car, with a goal of adding no more than one hundred pounds net gain.
The third objective, in medical parlance was to “do no harm”. In other words, other than removing the fixed roof, no other part of the car would be compromised. No bracing was cut, no parts were removed. The entire reinforcement system would be an “add on”. In addition, the system must maintain complete functionality of the jacking and tie down points on the underside of the frame rails.
The fourth objective was that the reinforcement system would extend no lower than �” below the frame. This dimension was determined by the fact that a realistic “frame rail saver” (used to protect the underside of the rocker panels) would be �”, therefore the remainder of the system would also be within this dimension.
The fifth objective was to make the reinforcement system completely portable. It would be able to be installed on a car on jack stands in the garage. It must also be simple to remove, either in part or in whole, to be able to service the exhaust, etc.
The final objective, of course, is that the system would be cost effective.
The Build
I picked up my 2009 Z06 at the NCM on August 21st. I chose the 3LZ package, Jetstream Blue with an ebony/dark titanium interior. I drove it straight from the museum to 3B Automotive, not wanting to lose my courage by driving the car and potentially changing my mind. Within two days, the complete interior, the rear fascia and the roof had been removed. The car was then trailered to Matukas Motorsports for the frame reinforcement. All components were constructed out of �” 6061 T6 aluminum, with the exception of the chassis bar, which is made of 1 5/8” 4130 chromoly steel. The underbody reinforcement (numbers 1,2,3,4) is considered to be the essential portion of the system. The chassis bar (number 5) is optional and is also intended to be used for the attachment of racing seat belts (HPDE, etc.). The reinforcement of the outer frame rails (number 6) is in the category of “overkill”.
1. In the tunnel area, a box frame was built. This frame support system surrounds the exhaust system, with the top of the box replacing the stock 1/8” tunnel plate. This frame is bolted in the tunnel with the eighteen stock bolts on each side.
2. Below the exhaust, a cover plate forms the bottom of the box frame. This plate is cut out to allow for the escape of exhaust heat. The cover plate is attached with 5/16” stainless steel bolts which are countersunk to the frame using nutserts.
3. There are two diagonal braces on each side which connect the tunnel plate area to the outer frame rails.
4. There are two frame rails covers which connect with the diagonal braces. These covers also serve the same purpose as the aftermarket “frame rail savers”, which protect the underside of the rocker panels from speed bumps, etc. These covers are also attached to the frame with 5/16” bolts and nutserts.
5. There is a chassis bar system installed in the cargo area, bolted to the area behind the seats and bolted to the rear frame rails. The chassis bar is made out of 1 5/8” 4130 (.83T) chromoly steel tubing.
6. There are 3” braces welded to the inner side of the outer frame rails, in the interior, running from the firewall to the wall behind the seats. These �” thick braces are almost double the thickness of the outer frame rails (4mm = .157”). These are the only welded pieces. Another option to attach these rails would have been the use of self piercing rivets.
The Extras (while I was at it)
While doing the “targa” project, I wanted to do some extras, some because it was convenient and some because they were part of the bigger picture.
1. I added interior insulation from Exotic Vette. It was convenient while I had the interior taken apart.
2. I added extra insulation in the tunnel area to address the dreaded hot console problem. Also convenient.
3. Ceramic coating on the exhaust manifolds and exhaust system in the tunnel area. Also convenient.
4. Added the optional chassis bar, mainly for the racing belts and the aggressive look.
5. Added the outer frame rail braces. While the interior was taken out, I just could not resist. (less than 2 pounds each)
6. Added the LG World Challenge hood, painted louvers black.
7. Added HRE 540s, stock Z06 sizes.
8. Added APR Performance carbon fiber front chin spoiler.
9. Painted halo, splash guards and rear fascia black.
10. Added 3M clear bra. (TBD)
11. Added tint, 25% sides and rear. (TBD)
12. Added Lloyds mats, M2W, CAGS, taillight louvers, full length racing spoiler, 427 emblems, etc.
13. Added the transparent top, the best mod of all.
What I Learned the Hard Way (trial and error)
You know what they say about “the best laid plans”, well this project was no exception. Nothing major, but a few frustrations.
I did not realize that the C6 removable top is 15% larger than the C5 removable top. I also did not realize that the top is stowed in a flat position, unlike the C5. Once I learned this, I ordered the correct mounting hardware for the cargo area and proceeded. The stowing of the top also had a direct effect on the design of the chassis bar. In the end, it worked out very well, as we were able to achieve a good angle between the chassis bar and the rear frame rails.
The first installation of the tunnel reinforcement resulted in too much heat in the console. The stock ’09 Z06 has more heat insulation in the tunnel area, but it is still not enough. So we take it back apart, add Heatmaster insulation and ceramic coat exhaust in the tunnel area.
Lots of parts to order, hard to think of everything on the first try. Forgot a couple of trim pieces, a few more were hard to locate in the GM supply chain. Some days, no parts = no progress.
I have been unable to locate ZR1 style side skirts to match the APR front chin spoiler. I would have thought an aftermarket supplier would have come up with something by now, like the ACI side skirts on the C5, but so far no luck. They are really important to complete the “lowered look”, and to enhance the black accents on the car.
The painting of the louvered area of the LG World Challenge hood was done in black and then clearcoated with a gloss finish. It is a great look, but the glossy black finish overpowered the jetstream blue. So it was back to the paint booth to re-do the clearcoat in a satin finish. Much better result.
Weights and Measures
…to be continued in a few days.
Last edited by NVR2L8; 09-18-2008 at 01:59 AM.
 09-17-2008, 11:26 PM
#2
Team Owner

WOW, what a great write up, a lot of thought and DD went into your project! I have no idea if it works, only you will know after you get some miles on it. But, it looks fantastic.  Great job!
 I await part two.
Great job! I await part two.
09-17-2008, 11:49 PM
#4
Safety Car

Well, i'd say persistence is not a way to describe this.... OCD, maybe, nutz, sure... but some times the best things in life come people like yourself.
Great job. Cannot wait for further testing.
A.
Great job. Cannot wait for further testing.
A.
09-18-2008, 12:04 AM
#5
Racer

Member Since: Mar 2006
Location: North TX
Posts: 344
Likes: 0
Received 0 Likes
on
0 Posts

Damn Tom, now that is a write up! I wasn't sure if it was intentional until I read the last part of your post but it looks very ZR1ish. Love the hood! I'll be watching intently as you add to this post. Great work. 
I'll be watching intently as you add to this post. Great work.
09-18-2008, 12:15 AM
#6
Pro

Member Since: Apr 2007
Location: Las Vegas
Posts: 525
Likes: 0
Received 0 Likes
on
0 Posts
 09-18-2008, 12:17 AM
#7
Drifting
Thread Starter
Thanks, and I know that there will be some that will make the ZR1 comparison, and that is OK with me. I guess for $100k less, I like my version.I actually had my design in my head before I saw the first ZR1 this spring. My C5 coupe shows that I like the spoiler and side skirts look.
 09-18-2008, 07:50 AM
#10
Former Vendor

Member Since: Oct 2005
Posts: 11
Likes: 0
Received 0 Likes
on
0 Posts
Amazing!
You even put the roof clips in the rear hatch! Well done.
Thanks for the write up - maybe the two shops could get together and offer a package conversion. I'd be interested.
You even put the roof clips in the rear hatch! Well done.
Thanks for the write up - maybe the two shops could get together and offer a package conversion. I'd be interested.

 09-21-2008, 01:00 AM
#13
Team Owner
Member Since: Mar 2001
Location: Virginia Beach
Posts: 25,889
Likes: 0
Received 5 Likes
on
5 Posts
CI 3-5-6-7-8 Veteran
Truly awesome man If they build it they will come! You have just cemented my next car. I was going back and forth between JSB C6Z or a SRT-10 Viper.
We've spoken a few times.... I'm the guy who cut my C5Z roof out w/ a sawzall and made my own targa w/ the help of some buddies. Love the open air Z06.
I love that you've posted pics vs. Caravaggio who kept mum on what they did to the car.
If they build it they will come! You have just cemented my next car. I was going back and forth between JSB C6Z or a SRT-10 Viper.We've spoken a few times.... I'm the guy who cut my C5Z roof out w/ a sawzall and made my own targa w/ the help of some buddies. Love the open air Z06.
I love that you've posted pics vs. Caravaggio who kept mum on what they did to the car.


 09-21-2008, 09:06 PM
#19
Drifting
Thread Starter
 That is hilarious because you've got me nailed spot on! OCD, ADD, **** retentive, and about a dozen other maladies. It can be my best friend or worst enemy, as you suggest.
Regarding further testing, the car with be pushed to it's limits at the HPDE at Putnam Park, IN the first week in October. I will post up the results.
