
[Z06] DIY: Oil Preheater Install
 03-02-2014, 01:43 PM
#1
Burning Brakes

Thread Starter

Hey Folks, I'm tired of waiting for the oil to heat up in my '07Z. Our ’06 to ’10 Z06s have air-to-air oil coolers and either the 8.5 or 11.5 quart dry sump tanks. The combination of the highly effective oil cooler and an external tank results in an oil supply that is very slow to heat up. The fact that the oil cooler is so effective is great for track use, but it doesn’t seem optimum for street-driven cars.
It wasn’t until the 2011 Z07 package and 2012+ that the ZR1 LS9 radiator made it into the Z06. The LS9 radiator actually warms the oil with the coolant in a liquid-to-liquid manner and therefore heats up in a much shorter timeframe. Owners of cars with these coolers have told me that indeed, the oil temp rises much more quickly.
In cool to moderate Colorado weather, after thirty minutes of warmup driving, the oil temp gauge slowly increases from 54 to just barely 150 degrees. As you may know, 150 is the minimum oil temp that should be attained before performance driving. Since most of my drives are around a half hour, I wanted the oil to heat quicker so that I could enjoy the engine more without abuse.
I considered the LS9 and a similar radiator made by Dewitts, but these options looked to be around $1000 to install. After reading about dry sump oil tanks, I decided on an oil preheater ($75). In fact, some aftermarket dry sump tanks are built with an integrated heater. I believe the only reason we don’t have one from the factory is the added cost and the dilemma about what to tell would-be owners that they need to heat up their car before taking it out. I’m sure the Canadians would think nothing of it, but I’m surprised those of you from Florida, California, Texas, etc are still reading.
After having my new oil preheater plugged in for an hour, I started my car and the gauge read 140. It went down a bit as the preheated oil got mixed with the rest of the car, but then got to 150 much sooner. I could also hear the engine running smoother immediately after startup without that uncomfortable cold-start period. Anyway, I thought I'd include some DIY instructions in case anyone is interested in doing the same thing.
DISCLAIMER: ALL STANDARD DISCLAIMERS APPLY: IF YOU DO THIS, YOU DO SO AT YOUR OWN RISK. I WILL NOT BE LIABLE FOR DAMAGED CARS OR PROPERTY, VOIDED WARRANTIES, PERSONAL INJURIES, OR ANYTHING ELSE.
PARTS:
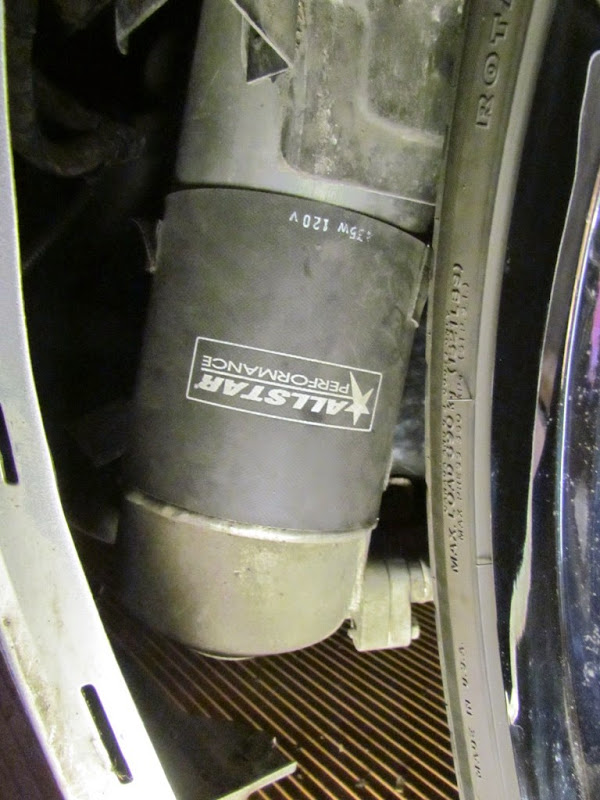
Oil Preheater Pad – I got an All Star Performance pad from PitStopUSA.com. It has a 435W heating element and attaches with Velcro wrapped around the dry sump tank. Other pads attach with adhesive which looked like it could get messy and hard to remove.
SAFETY FIRST: Do not turn on the heater without it being installed first as it gets very hot extremely quickly!
Outdoor Extension Cord –a cord to run from the heater to the outside of the car. A black cord 6 feet long works well.
Another outdoor extension cord – to plug the car into the wall.
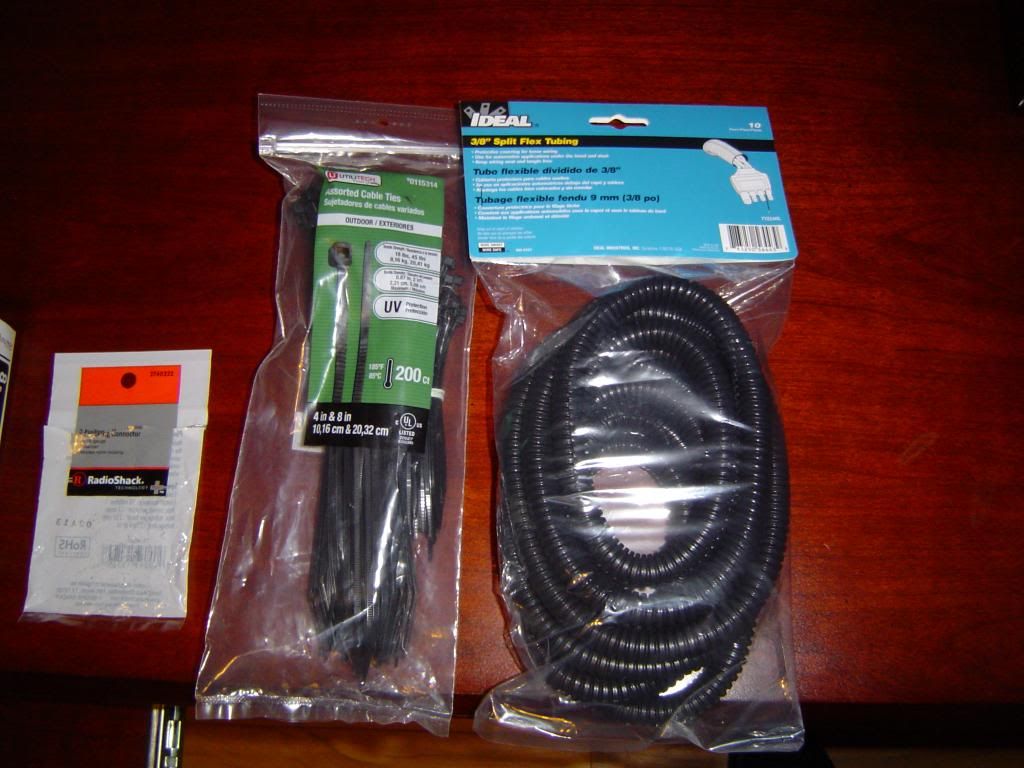
Split Flex Tubing – the black plastic conduits for automotive wiring under the hood.
Timed outlet – I plan on using a timed-outlet to automatically turn my heater on and shut it off. An important safety concern is to make sure your heater gets shut off if you forget to turn it off.
Electrical tape – to cover connections.
Zip ties – to hold the wiring in place.

TOOLS:
7 and 10 mm sockets
INSTRUCTIONS
1. Lift the vehicle and support it securely on jack stands. SAFETY FIRST: if you don’t know how to properly lift and support the car, do not attempt these instructions, as you could be seriously injured or killed.
2. I did not have to remove the front passenger side wheel, but I did have to turn it to the side. Removing it would make the job a bit easier.
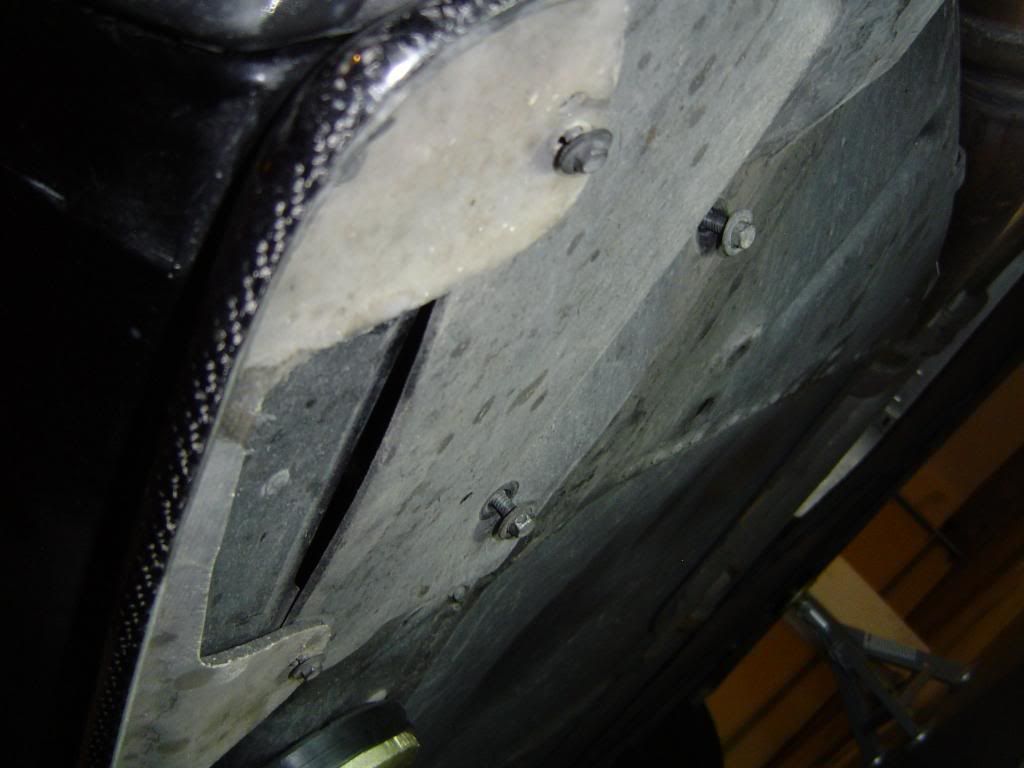
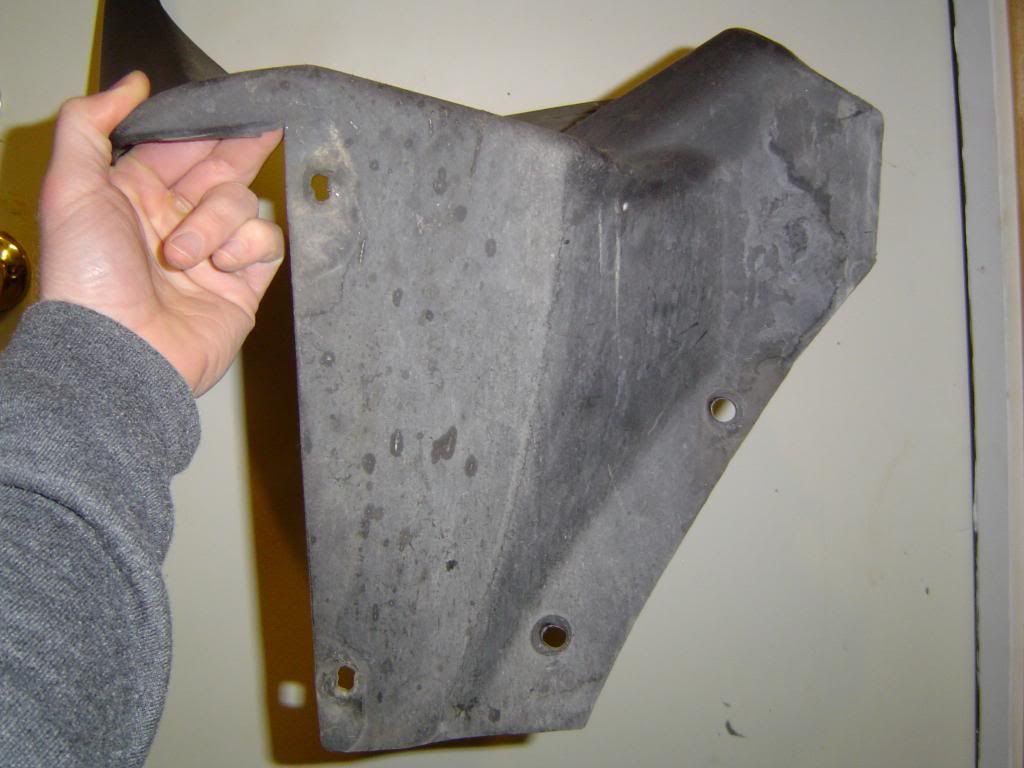
3. Remove your Apsis or RPI splash guard on the right front fender if you have them.
4. Remove the two 7 mm screws and two 10mm bolts holding the fender liner to the bottom of the car.
5. Gently tug on the liner to disengage the metal clips from the fender body.
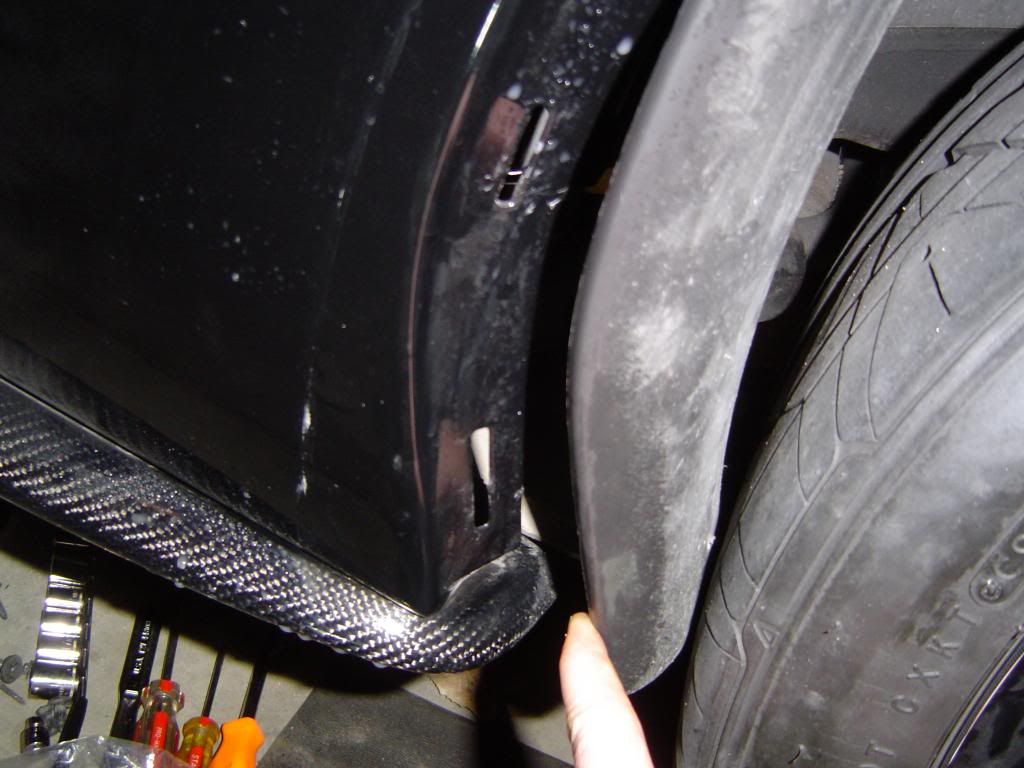
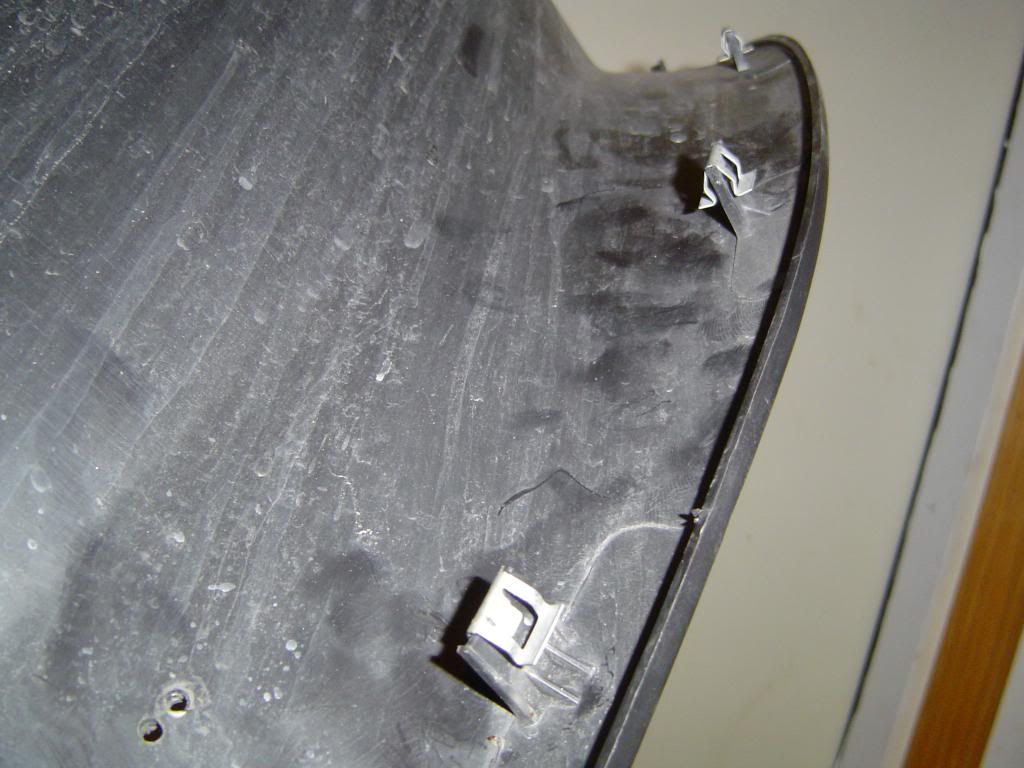
6. Remove the fender liner completely from the vehicle.
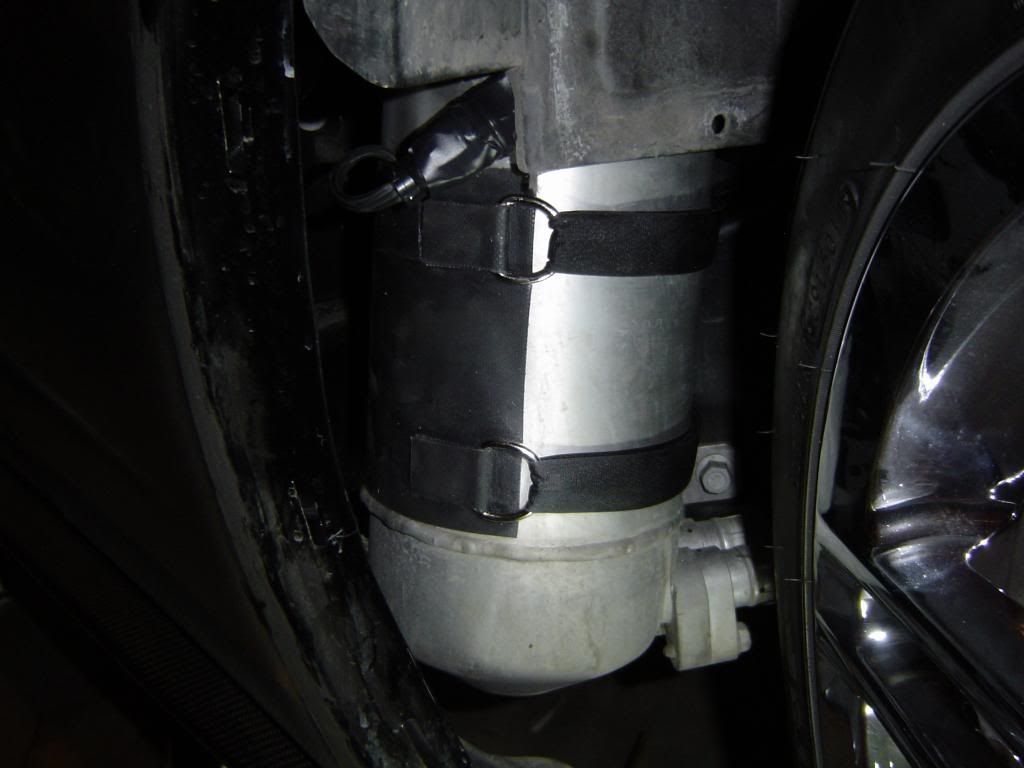
7. Install the heater pad tightly around the dry sump tank close to the bottom, as heat rises and this will heat the oil more effectively. The All Star pad attaches by simply strapping the Velcro around the tank. Make sure nothing that could melt (around 250 degrees F) is touching the heater pad.
8. Insert the cord portion of the extension cord into the black plastic tubing to protect it from the elements and have a factory-like appearance.
9. Plug the extension cord onto the heater and wrap the connection with electrical tape.
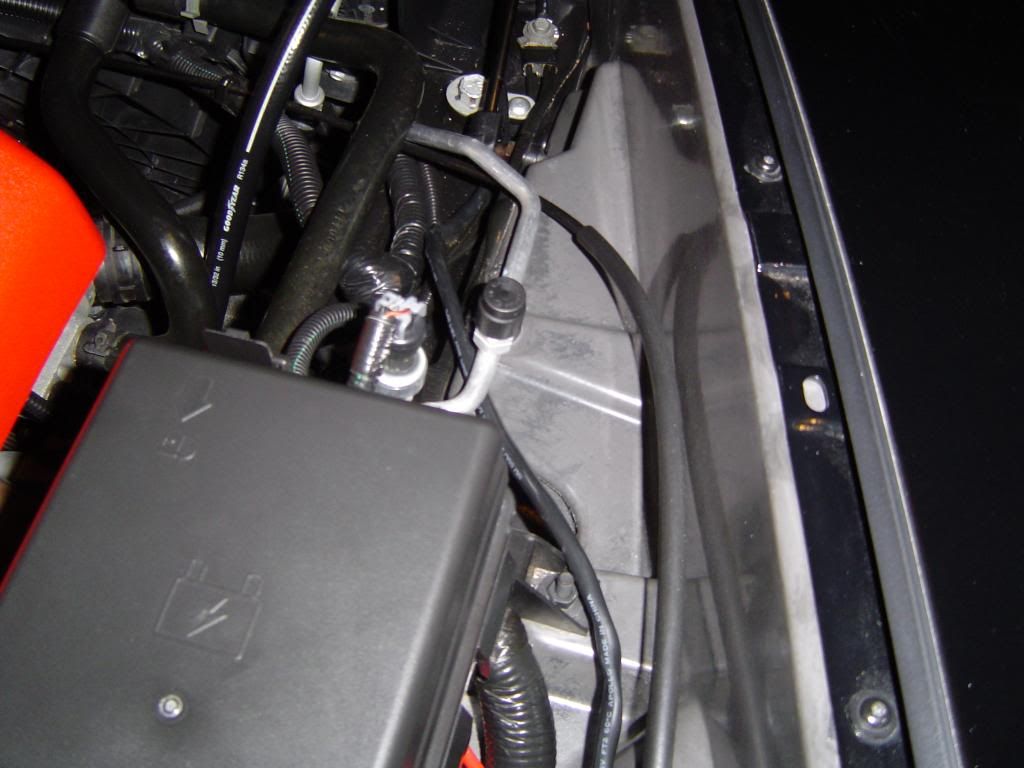
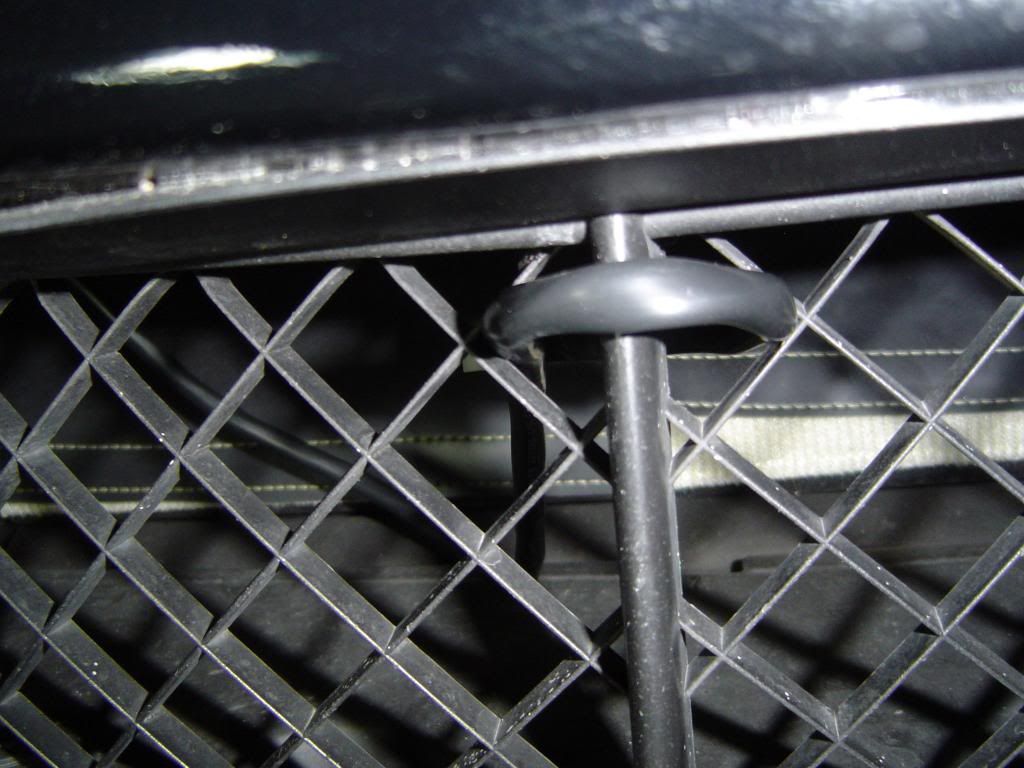
10. Run the extension cord up the opening by the dry sump tank, along the side of the engine bay with the other factory wiring.
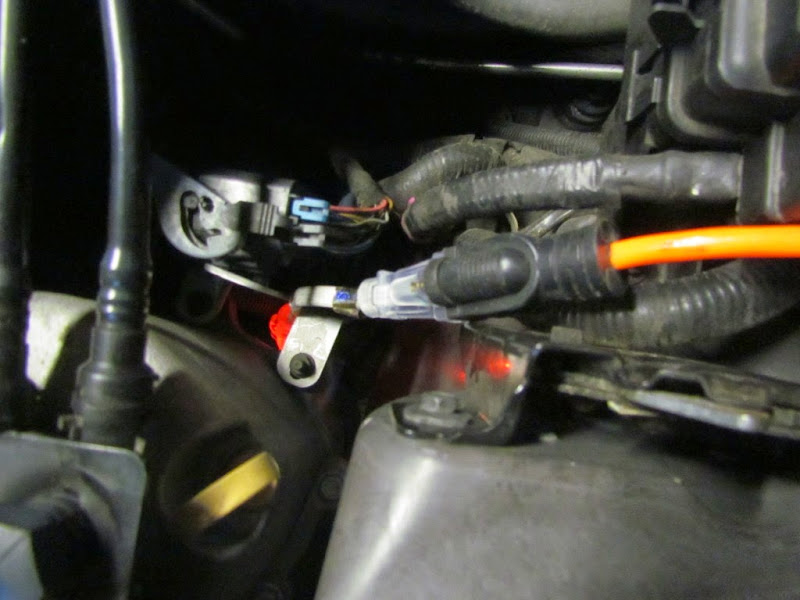
11. Ensure there is plenty of clearance between your cord and any hot engine parts (i.e. the engine, exhaust manifolds, radiator, etc). In the picture, I don't yet have the black plastic tubing installed, nor can you exactly what the path is, but you get the general idea.
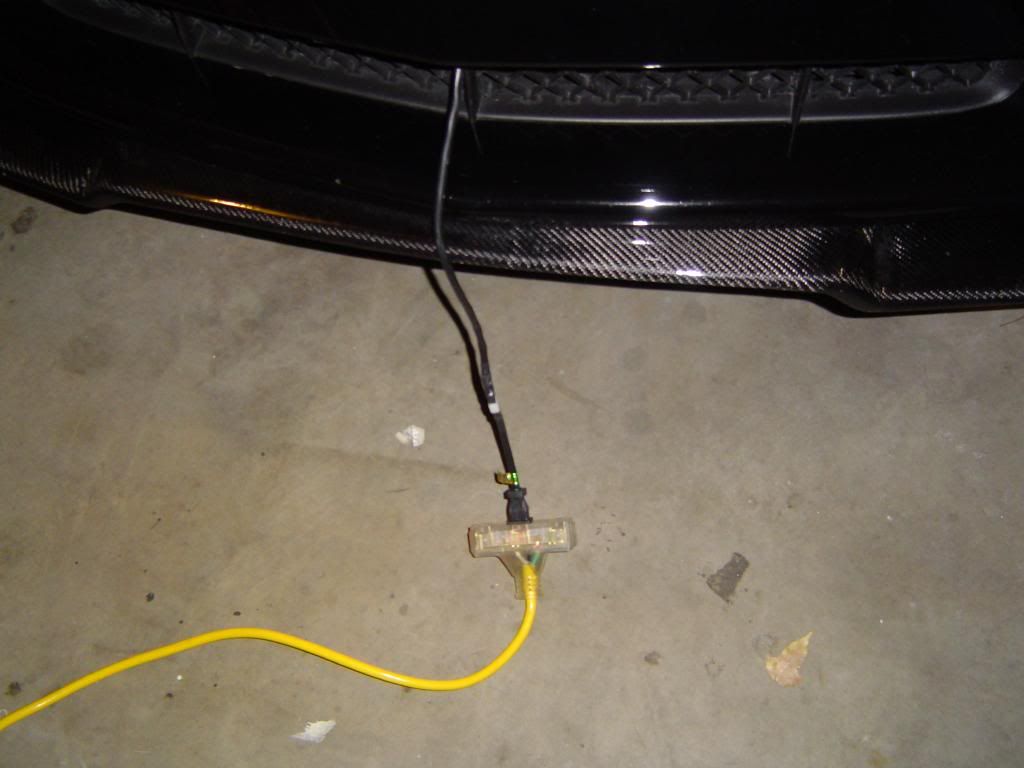
12. There is a small opening by the radiator shroud to get to the front grill. To find this opening, shine a light from the outside in. Run the cord through this opening and feed the plug through the grill. If the cord does not fit through the opening, you have a couple of options:
a. Take the car apart until it will fit – perhaps someone else can post these instructions.
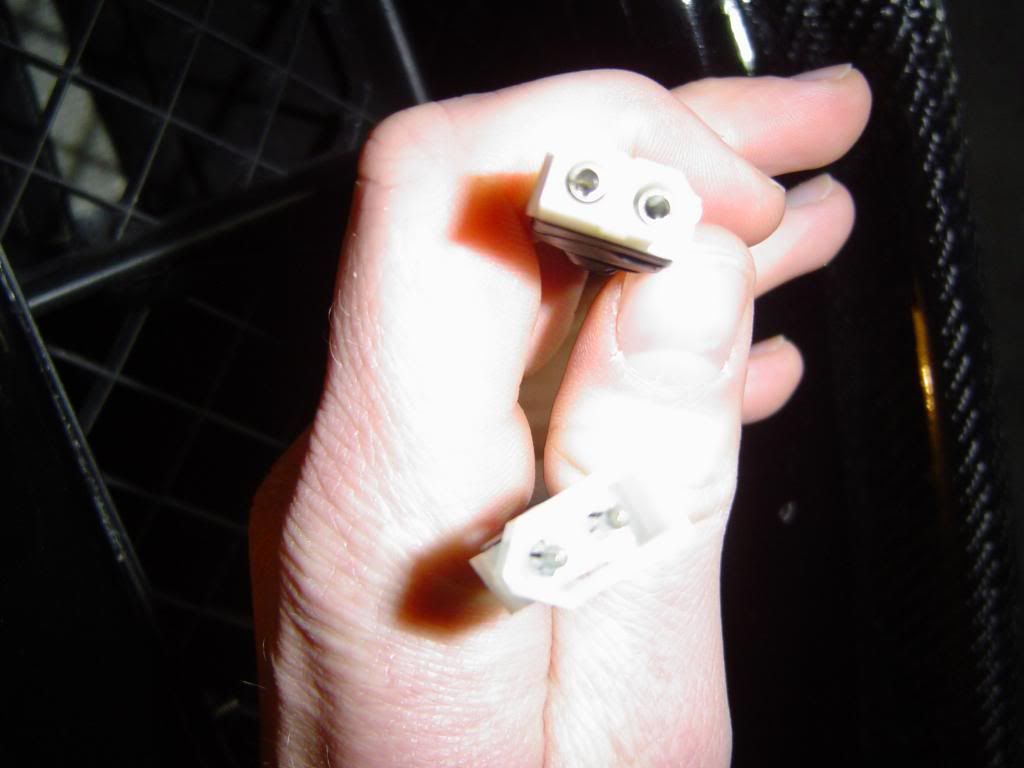
b. Cut the cord and reattach it. This is the option I chose. Remember, SAFETY FIRST: make sure the cord is not plugged in before you do this and do not connect the wrong wires together when reattaching. In my case, I had a friend install a mini-connector from Radio Shack into the extension cord line which is small enough to fit through the grill opening. After getting the cord through the grill, tape off the mini connector with electrical tape and do not use it as the plug. Remember, if you do this, you do so at your own risk as with anything else in these instructions.


13. Zip tie the cord into place so that it does not obstruct anything under the hood or drag at the front of the car.
14. Check your circuit for correctness and ensure the heater is tightly installed against the tank. Plug the extension cord on the car into another extension cord, and then into an outlet in your garage. Make sure everything is correct and if anything is wrong, immediately pull the cord out of the wall.
15. Reinstall the fender liner and the Apsis or RPI guards.
16. The cord coming out the front grill will need some protection. I plan on using Velcro to hold the cord behind my front license plate when the car is on the road. A cap for the plug would also be good, but I have yet to find one. With my mini-connector, I just wrapped the cord around the grill to temporarily hold it till I find someting better.
17. Install your timed outlet on the wall and program it so that it automatically shuts off in case you forget to turn it off.
18. Let the oil heat for an hour and let me know how it works.
19. One last thing, don't forget to unplug the car before you drive off!!
Special thanks to BassMechanic for coming up with the idea for the min-connector and installing it. Also, thanks to Jason Swindle of Unbalanced Engineering (it is their oil cooler cover you see in the picture) and all the members discussing the cold oil issue.
It wasn’t until the 2011 Z07 package and 2012+ that the ZR1 LS9 radiator made it into the Z06. The LS9 radiator actually warms the oil with the coolant in a liquid-to-liquid manner and therefore heats up in a much shorter timeframe. Owners of cars with these coolers have told me that indeed, the oil temp rises much more quickly.
In cool to moderate Colorado weather, after thirty minutes of warmup driving, the oil temp gauge slowly increases from 54 to just barely 150 degrees. As you may know, 150 is the minimum oil temp that should be attained before performance driving. Since most of my drives are around a half hour, I wanted the oil to heat quicker so that I could enjoy the engine more without abuse.
I considered the LS9 and a similar radiator made by Dewitts, but these options looked to be around $1000 to install. After reading about dry sump oil tanks, I decided on an oil preheater ($75). In fact, some aftermarket dry sump tanks are built with an integrated heater. I believe the only reason we don’t have one from the factory is the added cost and the dilemma about what to tell would-be owners that they need to heat up their car before taking it out. I’m sure the Canadians would think nothing of it, but I’m surprised those of you from Florida, California, Texas, etc are still reading.
After having my new oil preheater plugged in for an hour, I started my car and the gauge read 140. It went down a bit as the preheated oil got mixed with the rest of the car, but then got to 150 much sooner. I could also hear the engine running smoother immediately after startup without that uncomfortable cold-start period. Anyway, I thought I'd include some DIY instructions in case anyone is interested in doing the same thing.
DISCLAIMER: ALL STANDARD DISCLAIMERS APPLY: IF YOU DO THIS, YOU DO SO AT YOUR OWN RISK. I WILL NOT BE LIABLE FOR DAMAGED CARS OR PROPERTY, VOIDED WARRANTIES, PERSONAL INJURIES, OR ANYTHING ELSE.
PARTS:
Oil Preheater Pad – I got an All Star Performance pad from PitStopUSA.com. It has a 435W heating element and attaches with Velcro wrapped around the dry sump tank. Other pads attach with adhesive which looked like it could get messy and hard to remove.
SAFETY FIRST: Do not turn on the heater without it being installed first as it gets very hot extremely quickly!
Outdoor Extension Cord –a cord to run from the heater to the outside of the car. A black cord 6 feet long works well.
Another outdoor extension cord – to plug the car into the wall.
Split Flex Tubing – the black plastic conduits for automotive wiring under the hood.
Timed outlet – I plan on using a timed-outlet to automatically turn my heater on and shut it off. An important safety concern is to make sure your heater gets shut off if you forget to turn it off.
Electrical tape – to cover connections.
Zip ties – to hold the wiring in place.
TOOLS:
7 and 10 mm sockets
INSTRUCTIONS
1. Lift the vehicle and support it securely on jack stands. SAFETY FIRST: if you don’t know how to properly lift and support the car, do not attempt these instructions, as you could be seriously injured or killed.
2. I did not have to remove the front passenger side wheel, but I did have to turn it to the side. Removing it would make the job a bit easier.
3. Remove your Apsis or RPI splash guard on the right front fender if you have them.
4. Remove the two 7 mm screws and two 10mm bolts holding the fender liner to the bottom of the car.
5. Gently tug on the liner to disengage the metal clips from the fender body.
6. Remove the fender liner completely from the vehicle.
7. Install the heater pad tightly around the dry sump tank close to the bottom, as heat rises and this will heat the oil more effectively. The All Star pad attaches by simply strapping the Velcro around the tank. Make sure nothing that could melt (around 250 degrees F) is touching the heater pad.
8. Insert the cord portion of the extension cord into the black plastic tubing to protect it from the elements and have a factory-like appearance.
9. Plug the extension cord onto the heater and wrap the connection with electrical tape.
10. Run the extension cord up the opening by the dry sump tank, along the side of the engine bay with the other factory wiring.
11. Ensure there is plenty of clearance between your cord and any hot engine parts (i.e. the engine, exhaust manifolds, radiator, etc). In the picture, I don't yet have the black plastic tubing installed, nor can you exactly what the path is, but you get the general idea.
12. There is a small opening by the radiator shroud to get to the front grill. To find this opening, shine a light from the outside in. Run the cord through this opening and feed the plug through the grill. If the cord does not fit through the opening, you have a couple of options:
a. Take the car apart until it will fit – perhaps someone else can post these instructions.
b. Cut the cord and reattach it. This is the option I chose. Remember, SAFETY FIRST: make sure the cord is not plugged in before you do this and do not connect the wrong wires together when reattaching. In my case, I had a friend install a mini-connector from Radio Shack into the extension cord line which is small enough to fit through the grill opening. After getting the cord through the grill, tape off the mini connector with electrical tape and do not use it as the plug. Remember, if you do this, you do so at your own risk as with anything else in these instructions.
13. Zip tie the cord into place so that it does not obstruct anything under the hood or drag at the front of the car.
14. Check your circuit for correctness and ensure the heater is tightly installed against the tank. Plug the extension cord on the car into another extension cord, and then into an outlet in your garage. Make sure everything is correct and if anything is wrong, immediately pull the cord out of the wall.
15. Reinstall the fender liner and the Apsis or RPI guards.
16. The cord coming out the front grill will need some protection. I plan on using Velcro to hold the cord behind my front license plate when the car is on the road. A cap for the plug would also be good, but I have yet to find one. With my mini-connector, I just wrapped the cord around the grill to temporarily hold it till I find someting better.
17. Install your timed outlet on the wall and program it so that it automatically shuts off in case you forget to turn it off.
18. Let the oil heat for an hour and let me know how it works.
19. One last thing, don't forget to unplug the car before you drive off!!
Special thanks to BassMechanic for coming up with the idea for the min-connector and installing it. Also, thanks to Jason Swindle of Unbalanced Engineering (it is their oil cooler cover you see in the picture) and all the members discussing the cold oil issue.
 03-02-2014, 02:45 PM
#2
Team Owner

Nice. I just finished removing my oil cooler about 10 minutes ago.
03-03-2014, 08:55 PM
#3
Safety Car

Member Since: Aug 2009
Location: Chester County Pennsylvania
Posts: 4,993
Received 793 Likes
on
537 Posts
2020 C5 of the Year Finalist - Unmodified

Great write up rockinSeat, great step by step with photos. After all the discussion about oil temps, I checked my Z07, which has the external ZR1 oil cooler and at 80 degrees ambient my oil temps were running between 185 and 205 with a 10-15 minute run.
03-04-2014, 09:42 AM
#4
Burning Brakes
Thread Starter
Thanks TooFast. This morning, timed outlet came on at 5am and my heater had my tank heated to 176 on a 30 degree day. After circulation, that was warm enough to keep the oil gauge over 100 the whole time. The car sounded a lot better too.
03-04-2014, 04:46 PM
#5
Racer

Question though; I understand the oil in the oil tank bleeds back into the engine sump over night, which would make your heater not work so well, or am I misinformed?
BTW, I wish all my vehicles had some kind of block heater. I really like the concept.
03-04-2014, 10:04 PM
#6
Burning Brakes
Thread Starter
Nice job. I respect that you understand the problem and attacked it with both fists.
Question though; I understand the oil in the oil tank bleeds back into the engine sump over night, which would make your heater not work so well, or am I misinformed?
BTW, I wish all my vehicles had some kind of block heater. I really like the concept.
Question though; I understand the oil in the oil tank bleeds back into the engine sump over night, which would make your heater not work so well, or am I misinformed?
BTW, I wish all my vehicles had some kind of block heater. I really like the concept.
God that is a fun drive though - I love to rev it up when sufficiently warm
 01-18-2015, 10:56 AM
#7
Pro

Last edited by bjmsam; 01-18-2015 at 12:12 PM. Reason: trying to fix second link - wtf?

 [/URL]
01-19-2015, 11:15 PM
[/URL]
01-19-2015, 11:15 PM
#12
Burning Brakes
Thread Starter
Thanks for the write-up! Do you think the Allstar Performance ALL76424 6" x 12" 435W Velcro Heating Pad would fit inside the Unbalanced Engineering Corvette C6 Z06 and Grand Sport Oil Reservoir Cover? With the former in place, is there any need to have the latter?
01-21-2015, 06:49 PM
#13
Pro
Thanks! I went ahead and installed the pad and see (well, feel) what you mean about clearance so won't bother ordering the reservoir cover. Your wiring through the grill is slick but I will likely just stick with a direct connection.
The pad's cord is very short, so the plug ends up here (there is plenty of room for one hand but not two, so connecting an extension cord would be tricky):
Permanent use of an 8" extension is perfect for accessibility:
I will eventually install a thermostat to keep the oil hot while driving on the street in the colder months (yet have maximum cooling while driving on the circuit in the hotter months), but for now I blocked the oil cooler with a sheet of 21.5" x 6" x .25" plywood covered with heavy-duty aluminum foil and a sticker to make it look legit.


Thanks again for your write-up! This was a great mod: cheap, easy and effective.
The pad's cord is very short, so the plug ends up here (there is plenty of room for one hand but not two, so connecting an extension cord would be tricky):
Permanent use of an 8" extension is perfect for accessibility:
I will eventually install a thermostat to keep the oil hot while driving on the street in the colder months (yet have maximum cooling while driving on the circuit in the hotter months), but for now I blocked the oil cooler with a sheet of 21.5" x 6" x .25" plywood covered with heavy-duty aluminum foil and a sticker to make it look legit.
Thanks again for your write-up! This was a great mod: cheap, easy and effective.
02-07-2015, 05:15 PM
#14
Pro
Today I finally had an opportunity to test things out (winter =  ). The air temperature was 37°F, the coolant temperature was 34°F, and the heater was connected for about an hour. The DIC reported an initial oil temperature of 140°F when the engine started and 88°F after idling for a few minutes. With the cooler blocker zip-tied in place, the oil temperature after 5 miles at 40 MPH and 10 miles at 75 MPH was 156°F. After a few short trips in town and the same route home with air temperatures in the mid-40°s, the oil temperature was 178°F.
). The air temperature was 37°F, the coolant temperature was 34°F, and the heater was connected for about an hour. The DIC reported an initial oil temperature of 140°F when the engine started and 88°F after idling for a few minutes. With the cooler blocker zip-tied in place, the oil temperature after 5 miles at 40 MPH and 10 miles at 75 MPH was 156°F. After a few short trips in town and the same route home with air temperatures in the mid-40°s, the oil temperature was 178°F.