
C7 Corvette...Cure for the common curb....Curb Alert
 03-25-2014, 06:34 PM
#21
Race Director


Member Since: Sep 2013
Location: Ft Lauderdale
Posts: 10,423
Received 922 Likes
on
481 Posts
Tech Contributor

OK got the kit and decided to fabricate some of my own stuff to make this work. It's pretty easy - not ready for pics but here's a few tips.
1. Use the front pos lead on the rear of the fuse box and the neg post near the alternator. Fabricate a harness that attaches to their pos and neg wire with fuse holder. The unit turns on when it sees 13.5 so no switches necessary...
2. DO NOT try and unbolt the nut on the pos post - just get another nut to fit over it. It is over torqued and you will hear the fuse box plastic straining before it breaks free. I stopped before damage. Use ring terminals over both pos and neg with a little loctite red and you'll be good.
3. calibrating is easy - i threw their instructions out, and got just a bit farther up on a curb than I like, and just dialed down the sensor on it's mount until it beeped....done....
not happy with how it mounts in grill - sticks out too much...is gonna take some fabrication/remounting to get it clean looking....stay tuned...
Last edited by Glen e; 03-25-2014 at 06:56 PM.
 03-25-2014, 06:40 PM
#22
Race Director
Member Since: Mar 2002
Location: Retired Suffolk County Police Dept NY South Carolina
Posts: 14,611
Likes: 0
Received 3 Likes
on
3 Posts

This is something I am going to add to my car when I get it. I have seen a lot of useless stuff that some people sell for Corvettes and this is something that can save many times it's cost on repairs.
 03-26-2014, 01:54 PM
#24
OK got the kit and decided to fabricate some of my own stuff to make this work. It's pretty easy - not ready for pics but here's a few tips.
1. Use the front pos lead on the rear of the fuse box and the neg post near the alternator. Fabricate a harness that attaches to their pos and neg wire with fuse holder. The unit turns on when it sees 13.5 so no switches necessary...
2. DO NOT try and unbolt the nut on the pos post - just get another nut to fit over it. It is over torqued and you will hear the fuse box plastic straining before it breaks free. I stopped before damage. Use ring terminals over both pos and neg with a little loctite red and you'll be good.
3. calibrating is easy - i threw their instructions out, and got just a bit farther up on a curb than I like, and just dialed down the sensor on it's mount until it beeped....done....
not happy with how it mounts in grill - sticks out too much...is gonna take some fabrication/remounting to get it clean looking....stay tuned...
1. Use the front pos lead on the rear of the fuse box and the neg post near the alternator. Fabricate a harness that attaches to their pos and neg wire with fuse holder. The unit turns on when it sees 13.5 so no switches necessary...
2. DO NOT try and unbolt the nut on the pos post - just get another nut to fit over it. It is over torqued and you will hear the fuse box plastic straining before it breaks free. I stopped before damage. Use ring terminals over both pos and neg with a little loctite red and you'll be good.
3. calibrating is easy - i threw their instructions out, and got just a bit farther up on a curb than I like, and just dialed down the sensor on it's mount until it beeped....done....
not happy with how it mounts in grill - sticks out too much...is gonna take some fabrication/remounting to get it clean looking....stay tuned...
Last edited by sccaracer46; 03-26-2014 at 01:55 PM. Reason: grammer
03-26-2014, 02:07 PM
#25
Race Director
Member Since: Sep 2013
Location: Ft Lauderdale
Posts: 10,423
Received 922 Likes
on
481 Posts
Tech Contributor
don't drill anything just mount it on the sidewall of the pass compartment - run the wire under the trim pieces - open the door and run it in the door jamb into the engine bay under the trim...only you will know it's there, and you don't cut/mod the car - this minor exposed wire is fine with me, I don't have people on their knees looking in the pass well, the rest is totally hidden...In fact, mount the speaker higher in the well and it would be hidden...you have to use some common sense on this install....curb alert says the control box can go in engine bay like mine or can mount in pass compartment...so it all depends where you put the stuff , what wires pass thru the jamb...

wires go under here and into jamb:
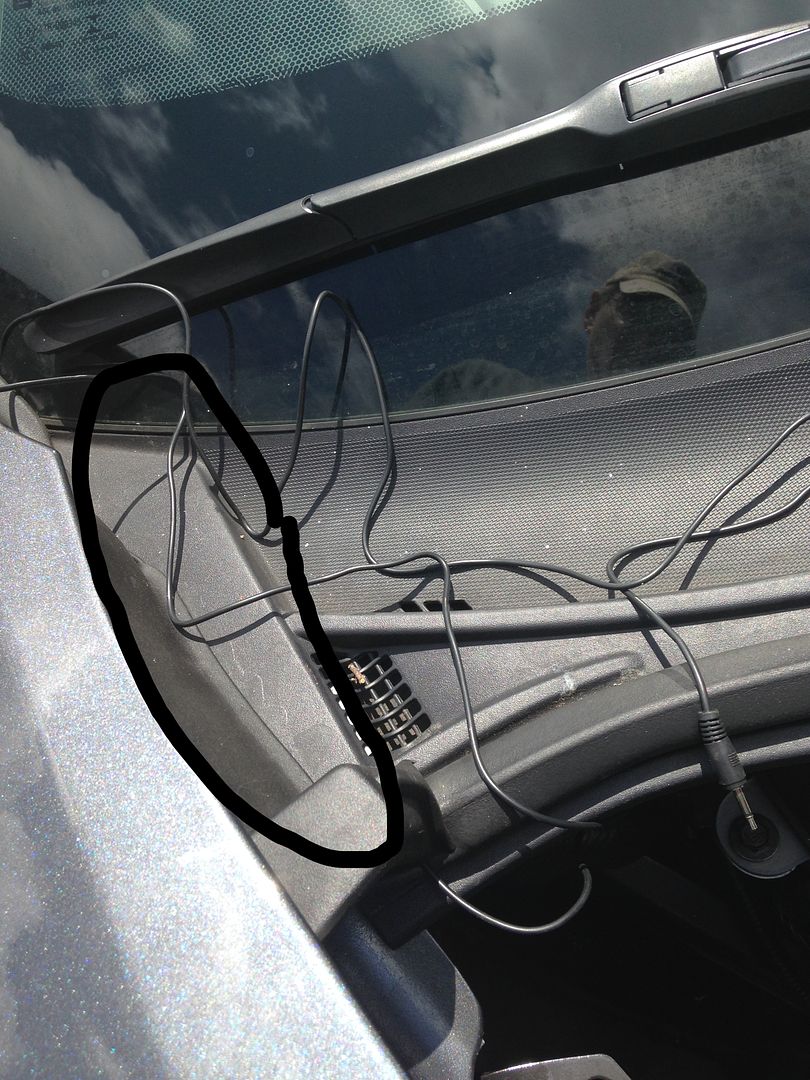

wires go under here and into jamb:

Last edited by Glen e; 03-26-2014 at 02:23 PM.
03-26-2014, 02:31 PM
#26
Safety Car

How did you route the cable from the control unit to the "beeper" that has to reside in the cabin. I can not find an accessible location for the cable to pass through the firewall. I would like to have this feature, but I don't want to chance drilling a hole in the firewall!
03-26-2014, 04:42 PM
#27
Race Director
Member Since: Sep 2013
Location: Ft Lauderdale
Posts: 10,423
Received 922 Likes
on
481 Posts
Tech Contributor
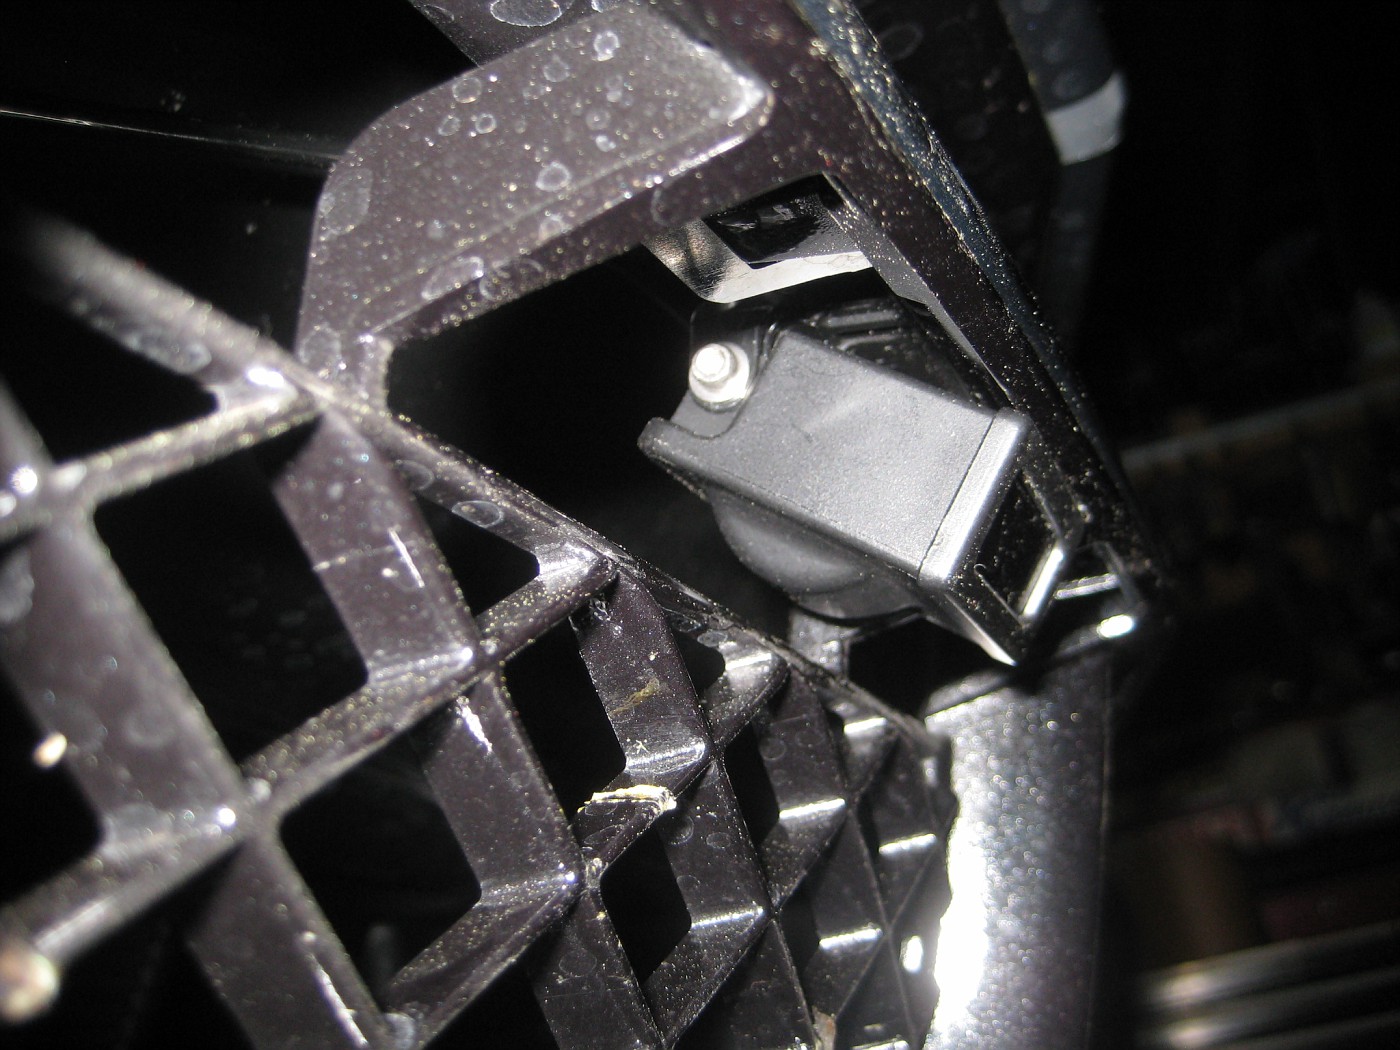
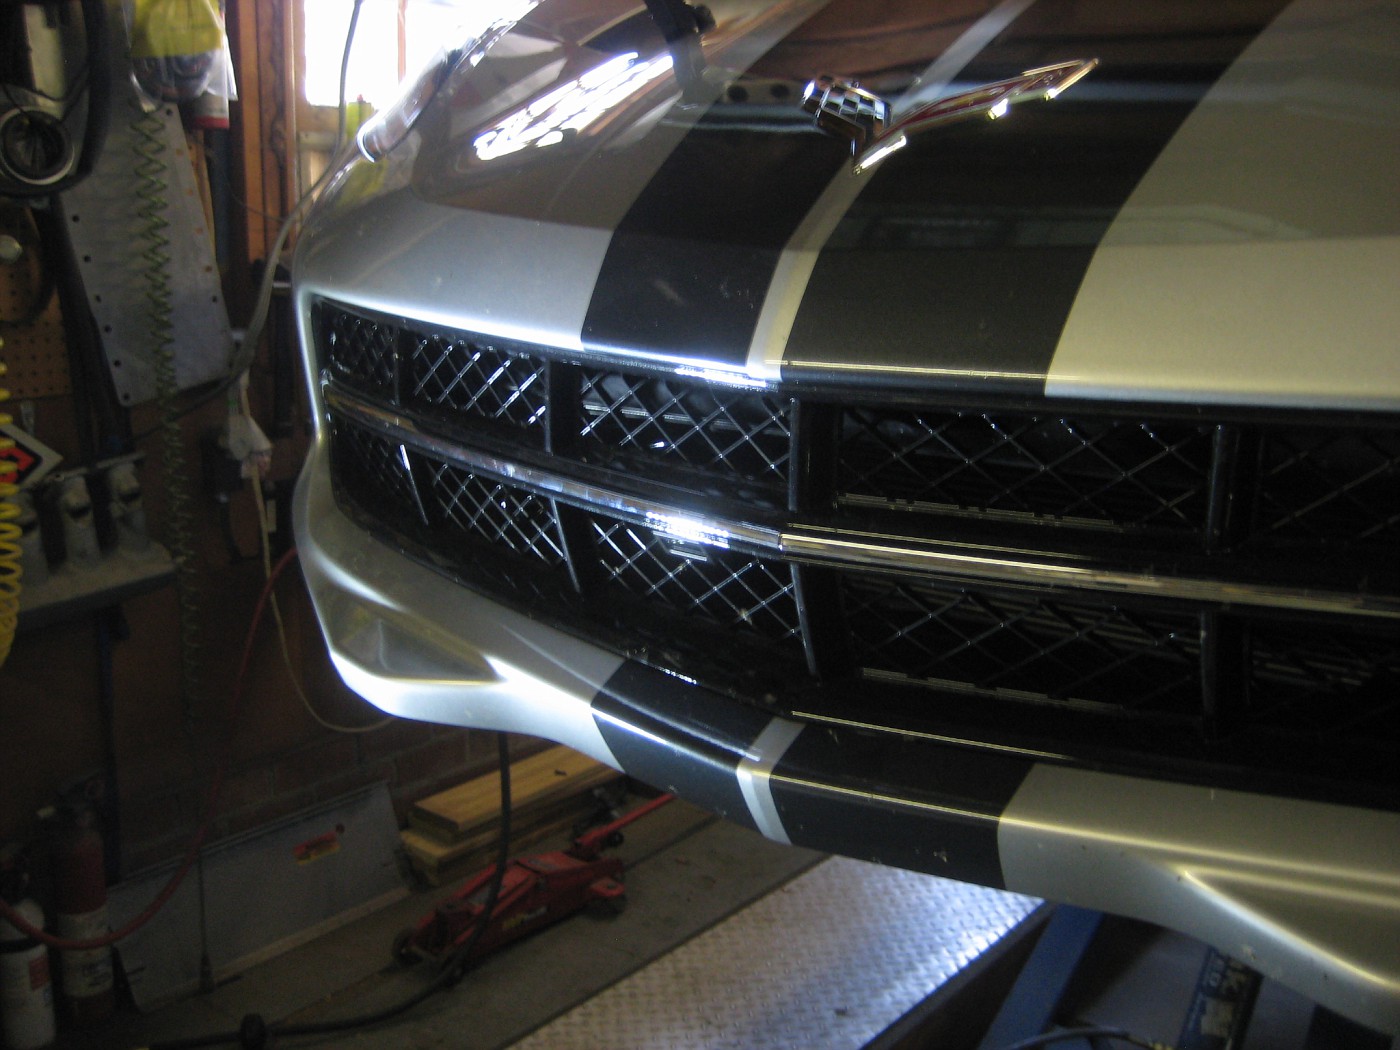
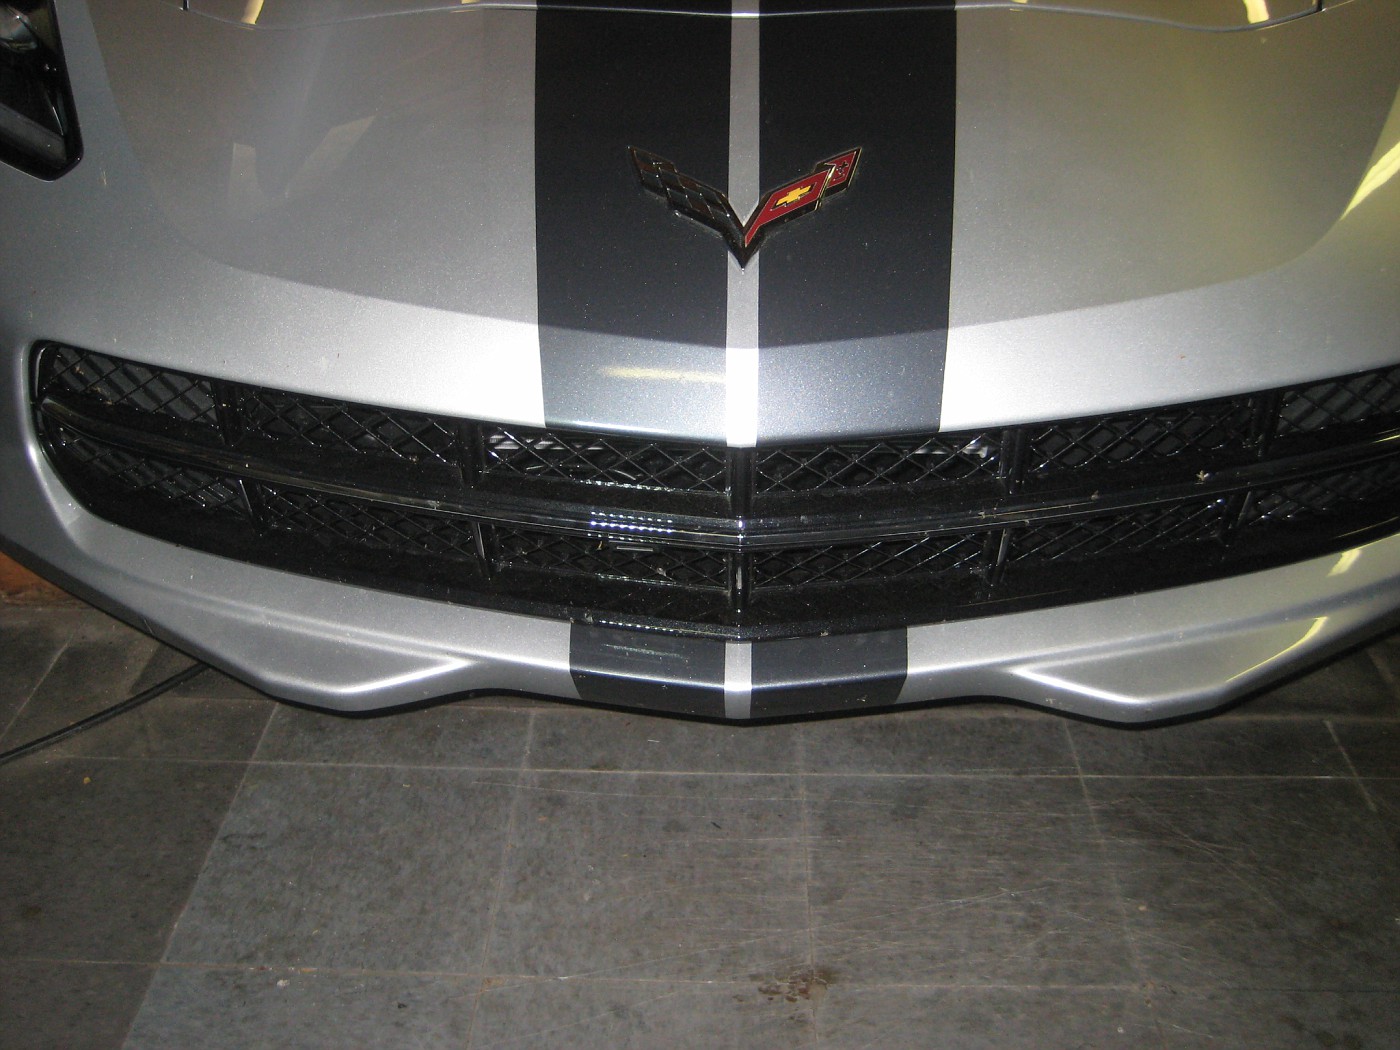
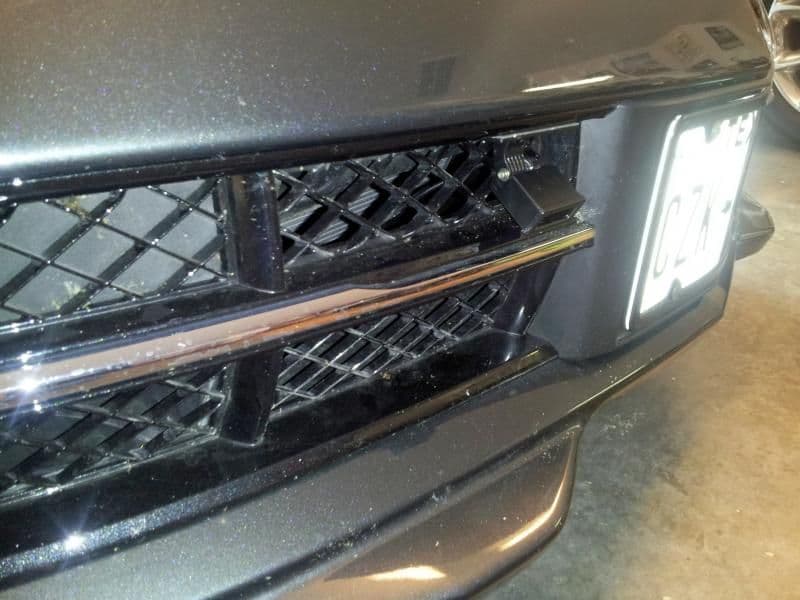
Done - grill cut, sensor nestled back in - nice and unobtrusive = alarm goes off with fangs 2 inches from parking ingots....
by the way, there is a pic somewhere on the web with the sensor mounted on a C7 under the top grill piece with sensor seeing straight ahead - that won't work picking up ingots and such, just walls ahead of you..and if you can't see a wall ahead of you, you've got bigger problems that what this device shows you...LOL....It has to angle 45 degree down.

by the way, there is a pic somewhere on the web with the sensor mounted on a C7 under the top grill piece with sensor seeing straight ahead - that won't work picking up ingots and such, just walls ahead of you..and if you can't see a wall ahead of you, you've got bigger problems that what this device shows you...LOL....It has to angle 45 degree down.
Last edited by Glen e; 03-26-2014 at 04:45 PM.
03-26-2014, 11:49 PM
#28
[QUOTE=Glen e;1586502295]don't drill anything just mount it on the sidewall of the pass compartment - run the wire under the trim pieces - open the door and run it in the door jamb into the engine bay under the trim...only you will know it's there, and you don't cut/mod the car - this minor exposed wire is fine with me, I don't have people on their knees looking in the pass well, the rest is totally hidden...In fact, mount the speaker higher in the well and it would be hidden...you have to use some common sense on this install....curb alert says the control box can go in engine bay like mine or can mount in pass compartment...so it all depends where you put the stuff , what wires pass thru the jamb...
wires go under here and into jamb:
Thanks for the information! Just placed my order!
wires go under here and into jamb:
Thanks for the information! Just placed my order!
04-01-2014, 11:42 AM
#30
Thanks, Southern Car Parts for the prompt shipment of the Curb Alert System! Ordered Wednesday evening and received Saturday morning! Installed the Control unit in the engine bay, "beeper" in the passenger side foot well, wires completely hidden going to the Control unit in the engine bay (thanks Glen e)! Mounted the Sensor at lowest point on the grill. I thought about cutting the grill and setting it back, but after mounting in front of grill decided it was not very noticeable, so will leave it there. It works great! I then replaced my damaged air dam for the first and hopefully the LAST time! This is a very good and useful product!
04-13-2014, 10:03 PM
#31
Race Director

Member Since: Aug 1999
Location: Bluffton SC via Canton Oh
Posts: 11,348
Received 1,981 Likes
on
1,141 Posts

I just ran across this thread again and had to add some detailed instructions. I just installed mine today and just went out to the garage for some pictures which are poor....dark does that!!!
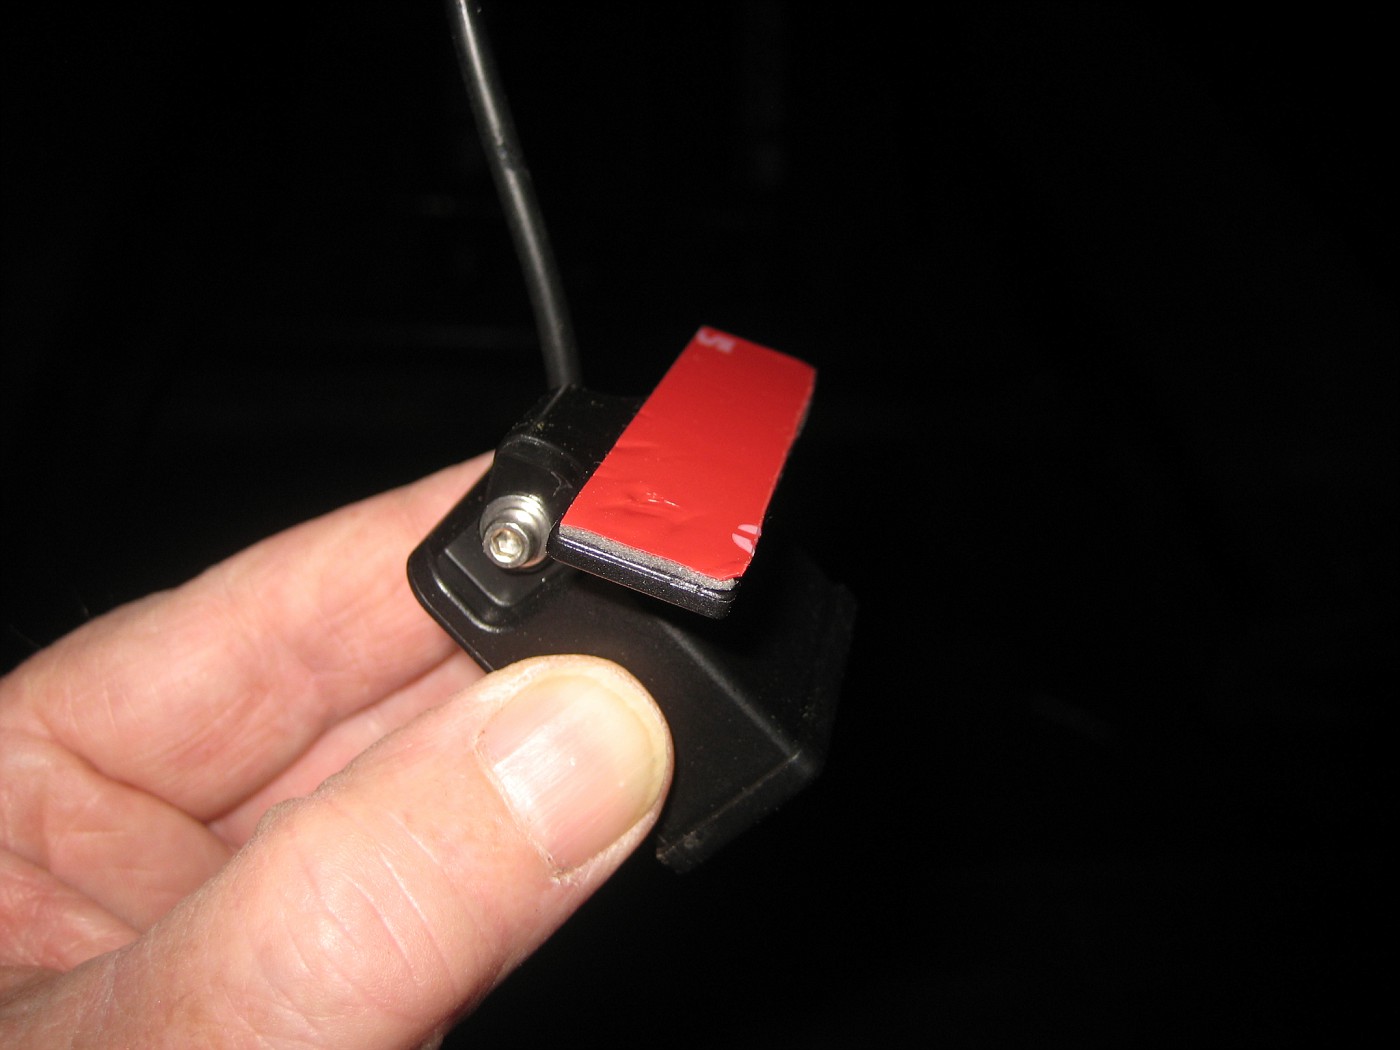
1. Where Glen shows the sensor installed is the best place. It is almost if the grill was cut out for the sensor. TIP: angle the sensor at 45 degrees and do not remove the tape, yet. When you go to set the sensor 45 degrees it will be about perfect. NOTE set the sensor for 12 to 18 inches out, depending on your preference. 2 inches is too close of a call. Give yourself some added warning. I look at the sensor as a backup and a reminder the few times I have a brain fart and forget I am coming close to a curb. The best defense is still to back in!!!
2. To pass the sensor wire thru the grill in the lower right side of the grill is a square cut out... look from the engine and you will see it. I used an extender gripper, you can buy at Harbour Freight to grab the wire and feed it through. You will want to run the wire under the fenders. Just loosen the two bolts and snug the wire under the fenders and snug not tighten down.
Here is the wire coming out of the fender and going under the rubber molding on the right side of the firewall:

Here is the rubber molding you need to push the wire under. I used a screw driver to show the lip.... the wire is under there already.

You feed the wire over the top of the fender in the door jam. There is actually a slit at the top of the fender where the wire fits right into. (sorry about the pic quality it was night)

You want your sensor to be on the kick panel with the volume switch accessible.

I got interrupted today and this is not the final product...... but it is what happens when you come off fuse 37 in the rear compartment. There is not enough wire with my unit to get it all the way up front. I recycled my unit from my C6 so maybe there is more wire on the new units. But what is important with this picture is the where the arrow shows the seam in the plastic moldings..... that is where you gently pull up to loosen this panel all the way to the door jam to get the wires from the engine compartment. There are 3 snaps on the back of the plastic molding..... easy out and easy snap in.

Power source. I looked at the tap off the fuse box and actually pulled the counsel out to tap into the accessory plug there. I figured I wanted to use the extra fuse #37 in the back and took that opportunity to explore the car some more. It's fine either way whatever source you chose.
Turn the unit on and calibrate it per the instructions. I think you will find the 45 degrees is pretty much right on. Remove the sticky tape and firm up the front sensor.
Take you time not that big of a job.
More Help:
http://forums.corvetteforum.com/c7-t...t-install.html
1. Where Glen shows the sensor installed is the best place. It is almost if the grill was cut out for the sensor. TIP: angle the sensor at 45 degrees and do not remove the tape, yet. When you go to set the sensor 45 degrees it will be about perfect. NOTE set the sensor for 12 to 18 inches out, depending on your preference. 2 inches is too close of a call. Give yourself some added warning. I look at the sensor as a backup and a reminder the few times I have a brain fart and forget I am coming close to a curb. The best defense is still to back in!!!
2. To pass the sensor wire thru the grill in the lower right side of the grill is a square cut out... look from the engine and you will see it. I used an extender gripper, you can buy at Harbour Freight to grab the wire and feed it through. You will want to run the wire under the fenders. Just loosen the two bolts and snug the wire under the fenders and snug not tighten down.
Here is the wire coming out of the fender and going under the rubber molding on the right side of the firewall:
Here is the rubber molding you need to push the wire under. I used a screw driver to show the lip.... the wire is under there already.
You feed the wire over the top of the fender in the door jam. There is actually a slit at the top of the fender where the wire fits right into. (sorry about the pic quality it was night)
You want your sensor to be on the kick panel with the volume switch accessible.
I got interrupted today and this is not the final product...... but it is what happens when you come off fuse 37 in the rear compartment. There is not enough wire with my unit to get it all the way up front. I recycled my unit from my C6 so maybe there is more wire on the new units. But what is important with this picture is the where the arrow shows the seam in the plastic moldings..... that is where you gently pull up to loosen this panel all the way to the door jam to get the wires from the engine compartment. There are 3 snaps on the back of the plastic molding..... easy out and easy snap in.
Power source. I looked at the tap off the fuse box and actually pulled the counsel out to tap into the accessory plug there. I figured I wanted to use the extra fuse #37 in the back and took that opportunity to explore the car some more. It's fine either way whatever source you chose.
Turn the unit on and calibrate it per the instructions. I think you will find the 45 degrees is pretty much right on. Remove the sticky tape and firm up the front sensor.
Take you time not that big of a job.
More Help:
http://forums.corvetteforum.com/c7-t...t-install.html
Last edited by Greg00Coupe; 04-13-2014 at 10:11 PM.
04-14-2014, 01:38 PM
#32
Drifting


It looks as though the Aero Plate takes up all the room between the upper and lower valance. Do you install the curb alert off center away from the plate or can you you install it under the lower valance?
04-16-2014, 01:12 PM
#33
Safety Car
Use this mount:
Mount here:
Almost invisible when mounted this way:
Do all your wiring under the hood as has been pointed out previously. Works great!
More pics: http://public.fotki.com/ttschwing/co...alert-install/
Tuck all wires away, and mount the beeper inside..:

Last edited by Modshack; 04-16-2014 at 01:18 PM.
04-16-2014, 02:33 PM
#35
Race Director


Actually the 7 sits a lot higher then a c6 GS, and I have lowered mine all the way down. I have my curb alert from my 6 and planned to install it on the 7....... but to be honest not sure I need it. I constanted scraped the 6 and had to do the side shuffle over curbs, entry ways etc. Had to be on the alert anywhere I turned........but not with the 7.
Install has to be the same as on the 6.
Install has to be the same as on the 6.
 I've parked/driven the C7 in places that would have destroyed the nose of my C6 GS. You still have to worry, but not nearly as much.
05-10-2014, 10:12 PM
I've parked/driven the C7 in places that would have destroyed the nose of my C6 GS. You still have to worry, but not nearly as much.
05-10-2014, 10:12 PM
#37
Supporting Vendor
Thread Starter
Member Since: Jun 2005
Location: Marietta Georgia
Posts: 20,631
Received 315 Likes
on
288 Posts
St. Jude Donor '06-'07, '13, '15
I just ran across this thread again and had to add some detailed instructions. I just installed mine today and just went out to the garage for some pictures which are poor....dark does that!!!
1. Where Glen shows the sensor installed is the best place. It is almost if the grill was cut out for the sensor. TIP: angle the sensor at 45 degrees and do not remove the tape, yet. When you go to set the sensor 45 degrees it will be about perfect. NOTE set the sensor for 12 to 18 inches out, depending on your preference. 2 inches is too close of a call. Give yourself some added warning. I look at the sensor as a backup and a reminder the few times I have a brain fart and forget I am coming close to a curb. The best defense is still to back in!!!
2. To pass the sensor wire thru the grill in the lower right side of the grill is a square cut out... look from the engine and you will see it. I used an extender gripper, you can buy at Harbour Freight to grab the wire and feed it through. You will want to run the wire under the fenders. Just loosen the two bolts and snug the wire under the fenders and snug not tighten down.
Here is the wire coming out of the fender and going under the rubber molding on the right side of the firewall:
Here is the rubber molding you need to push the wire under. I used a screw driver to show the lip.... the wire is under there already.
You feed the wire over the top of the fender in the door jam. There is actually a slit at the top of the fender where the wire fits right into. (sorry about the pic quality it was night)
You want your sensor to be on the kick panel with the volume switch accessible.
I got interrupted today and this is not the final product...... but it is what happens when you come off fuse 37 in the rear compartment. There is not enough wire with my unit to get it all the way up front. I recycled my unit from my C6 so maybe there is more wire on the new units. But what is important with this picture is the where the arrow shows the seam in the plastic moldings..... that is where you gently pull up to loosen this panel all the way to the door jam to get the wires from the engine compartment. There are 3 snaps on the back of the plastic molding..... easy out and easy snap in.
Power source. I looked at the tap off the fuse box and actually pulled the counsel out to tap into the accessory plug there. I figured I wanted to use the extra fuse #37 in the back and took that opportunity to explore the car some more. It's fine either way whatever source you chose.
Turn the unit on and calibrate it per the instructions. I think you will find the 45 degrees is pretty much right on. Remove the sticky tape and firm up the front sensor.
Take you time not that big of a job.
More Help:
http://forums.corvetteforum.com/c7-t...t-install.html
05-16-2014, 09:21 AM
#38
Supporting Vendor
Thread Starter
Member Since: Jun 2005
Location: Marietta Georgia
Posts: 20,631
Received 315 Likes
on
288 Posts
St. Jude Donor '06-'07, '13, '15
C7 Corvette Curb Alert
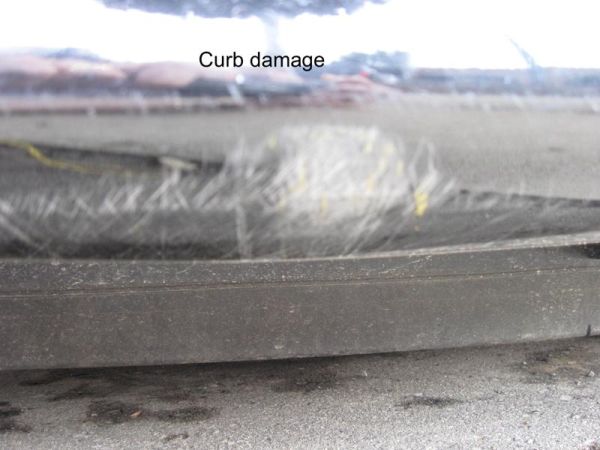
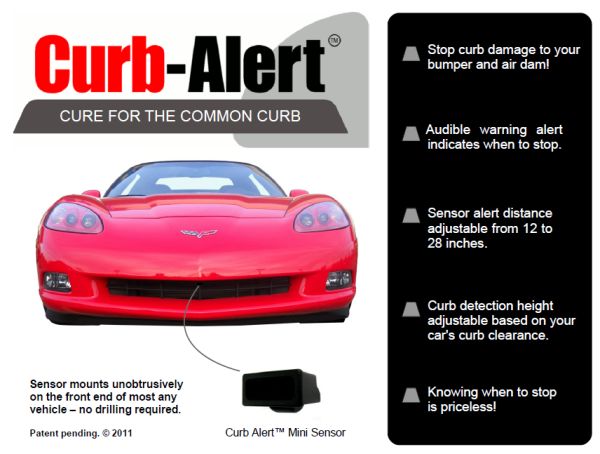
Introducing the "Cure for the Common Curb". Front end damage when parking is a very real problem for many cars on the road today, especially for vehicles who have installed ground effects or aerodynamic profile improvements on their vehicles. Curbs are something that are one of those road hazards that do more damage to sports cars than any other hazard on the road.
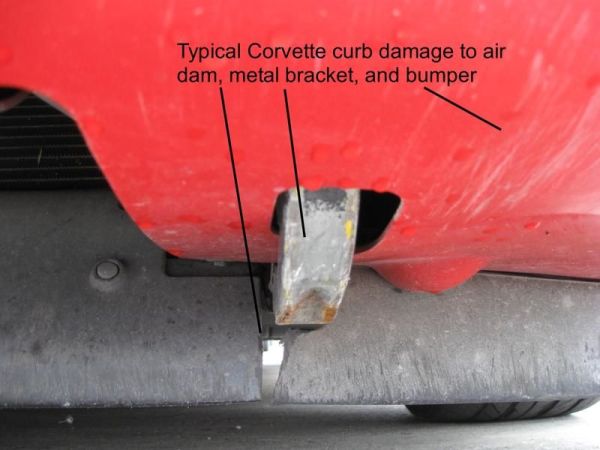
In fact, just a simple trip to the corner store can become a costly errand if you over-estimate your front end clearance when parking: damage repairs could easily run $1000 or more; however, Curb Alert provides you a warning system that gives you three-deep warning tones as you approach too close to a curb.
The Curb Alert is very easy to install and does not put a drain on your battery when the car is not on. Using a patented infrared technology, the front mounted sensor is calibrated to a warning distance of anywhere from 8-28" (you decide with whatever you feel comfortable with). The warning alarm is hidden in the car and will give you three gentle tones when you are within a specified distance to the curb. The system gives you a short beep every time you start your car to let you know the system is active.

The Curb Alert is one of a kind and is a gadget that will save you money in the long run, preventing front end damage to any car that is low enough to be vulnerable to a Curb. Do not take a chance, get the Curb Alert to prevent curb damage.
This is not one of those gimmicky products, we have installed it on a Corvette C6 Z06, Nissan GTR, and a Dodge Challenger. In all instances it works exactly as described (we wanted to test it ourselves before we opened the flood gates ) It is the real deal and will save you money in the long run. Heck it might it even give you enough confidence to let your significant other take the car for spin (my biggest worry letting someone else drive my car is there lack of familiarity with judging the curb distance when parking)
Installation Instructions (we are the only ones offering Custom Install packages and videos to install on the C5, C6 and Camaro) and videos are at the link below
We have the Curb Alert in stock for 149.99 with free shipping.... at the link below...Also have a great video that shows how the system works and another video on how to calibrate it once installed.
Mini Curb Alert
Thanks,
Jim
Introducing the "Cure for the Common Curb". Front end damage when parking is a very real problem for many cars on the road today, especially for vehicles who have installed ground effects or aerodynamic profile improvements on their vehicles. Curbs are something that are one of those road hazards that do more damage to sports cars than any other hazard on the road.
In fact, just a simple trip to the corner store can become a costly errand if you over-estimate your front end clearance when parking: damage repairs could easily run $1000 or more; however, Curb Alert provides you a warning system that gives you three-deep warning tones as you approach too close to a curb.
The Curb Alert is very easy to install and does not put a drain on your battery when the car is not on. Using a patented infrared technology, the front mounted sensor is calibrated to a warning distance of anywhere from 8-28" (you decide with whatever you feel comfortable with). The warning alarm is hidden in the car and will give you three gentle tones when you are within a specified distance to the curb. The system gives you a short beep every time you start your car to let you know the system is active.
The Curb Alert is one of a kind and is a gadget that will save you money in the long run, preventing front end damage to any car that is low enough to be vulnerable to a Curb. Do not take a chance, get the Curb Alert to prevent curb damage.
This is not one of those gimmicky products, we have installed it on a Corvette C6 Z06, Nissan GTR, and a Dodge Challenger. In all instances it works exactly as described (we wanted to test it ourselves before we opened the flood gates
) It is the real deal and will save you money in the long run. Heck it might it even give you enough confidence to let your significant other take the car for spin (my biggest worry letting someone else drive my car is there lack of familiarity with judging the curb distance when parking)Installation Instructions (we are the only ones offering Custom Install packages and videos to install on the C5, C6 and Camaro) and videos are at the link below
We have the Curb Alert in stock for 149.99 with free shipping.... at the link below...Also have a great video that shows how the system works and another video on how to calibrate it once installed.
Mini Curb Alert
Thanks,
Jim
05-16-2014, 04:53 PM
#39
Instructor


I just received my Curb Alert and looking at the positive power, it has one of these fuse taps for a Mini fuse. Did anyone with a C7 order one and get this setup? I'm not sure what fuse to tap into at the box. Or should I just cut this fuse tab off, insert an inline fuse holder and run the power to the positive lug in front of the engine compartment fuse box?
Thanks in advance for any help.
Jim
Thanks in advance for any help.
Jim
05-22-2014, 07:07 PM
#40
Drifting
Member Since: Sep 1999
Location: Weatherford TX
Posts: 1,841
Likes: 0
Received 217 Likes
on
85 Posts
Here is photo I just took of my 12 volt power tap using this post info. 8MM nut.

Good info to have; saved me a lot of extra work. Although does take a bit of work to get the wires in right places.
I run a front lic plate so had to install it off center. Not real happy with it being so high up in the grill. May try mounting it down on the lip of front valance.
Good info to have; saved me a lot of extra work. Although does take a bit of work to get the wires in right places.
I run a front lic plate so had to install it off center. Not real happy with it being so high up in the grill. May try mounting it down on the lip of front valance.
OK got the kit and decided to fabricate some of my own stuff to make this work. It's pretty easy - not ready for pics but here's a few tips.
1. Use the front pos lead on the rear of the fuse box and the neg post near the alternator. Fabricate a harness that attaches to their pos and neg wire with fuse holder. The unit turns on when it sees 13.5 so no switches necessary...
2. DO NOT try and unbolt the nut on the pos post - just get another nut to fit over it. It is over torqued and you will hear the fuse box plastic straining before it breaks free. I stopped before damage. Use ring terminals over both pos and neg with a little loctite red and you'll be good.
3. calibrating is easy - i threw their instructions out, and got just a bit farther up on a curb than I like, and just dialed down the sensor on it's mount until it beeped....done....
not happy with how it mounts in grill - sticks out too much...is gonna take some fabrication/remounting to get it clean looking....stay tuned...
1. Use the front pos lead on the rear of the fuse box and the neg post near the alternator. Fabricate a harness that attaches to their pos and neg wire with fuse holder. The unit turns on when it sees 13.5 so no switches necessary...
2. DO NOT try and unbolt the nut on the pos post - just get another nut to fit over it. It is over torqued and you will hear the fuse box plastic straining before it breaks free. I stopped before damage. Use ring terminals over both pos and neg with a little loctite red and you'll be good.
3. calibrating is easy - i threw their instructions out, and got just a bit farther up on a curb than I like, and just dialed down the sensor on it's mount until it beeped....done....
not happy with how it mounts in grill - sticks out too much...is gonna take some fabrication/remounting to get it clean looking....stay tuned...
Last edited by kenrobb; 05-24-2014 at 01:39 PM.