
How to Take Better Pictures of Your Car Using Your iPhone or Adobe Lightroom
 10-11-2014, 02:51 PM
#1
Racer

Thread Starter

I originally included this as a reply to another thread, but I thought it might be helpful enough to post as a separate item. The first part covers how to use Adobe Lightroom to improve your car photos. The second part covers how to do this using only your iPhone (as long as you have iOS 8).
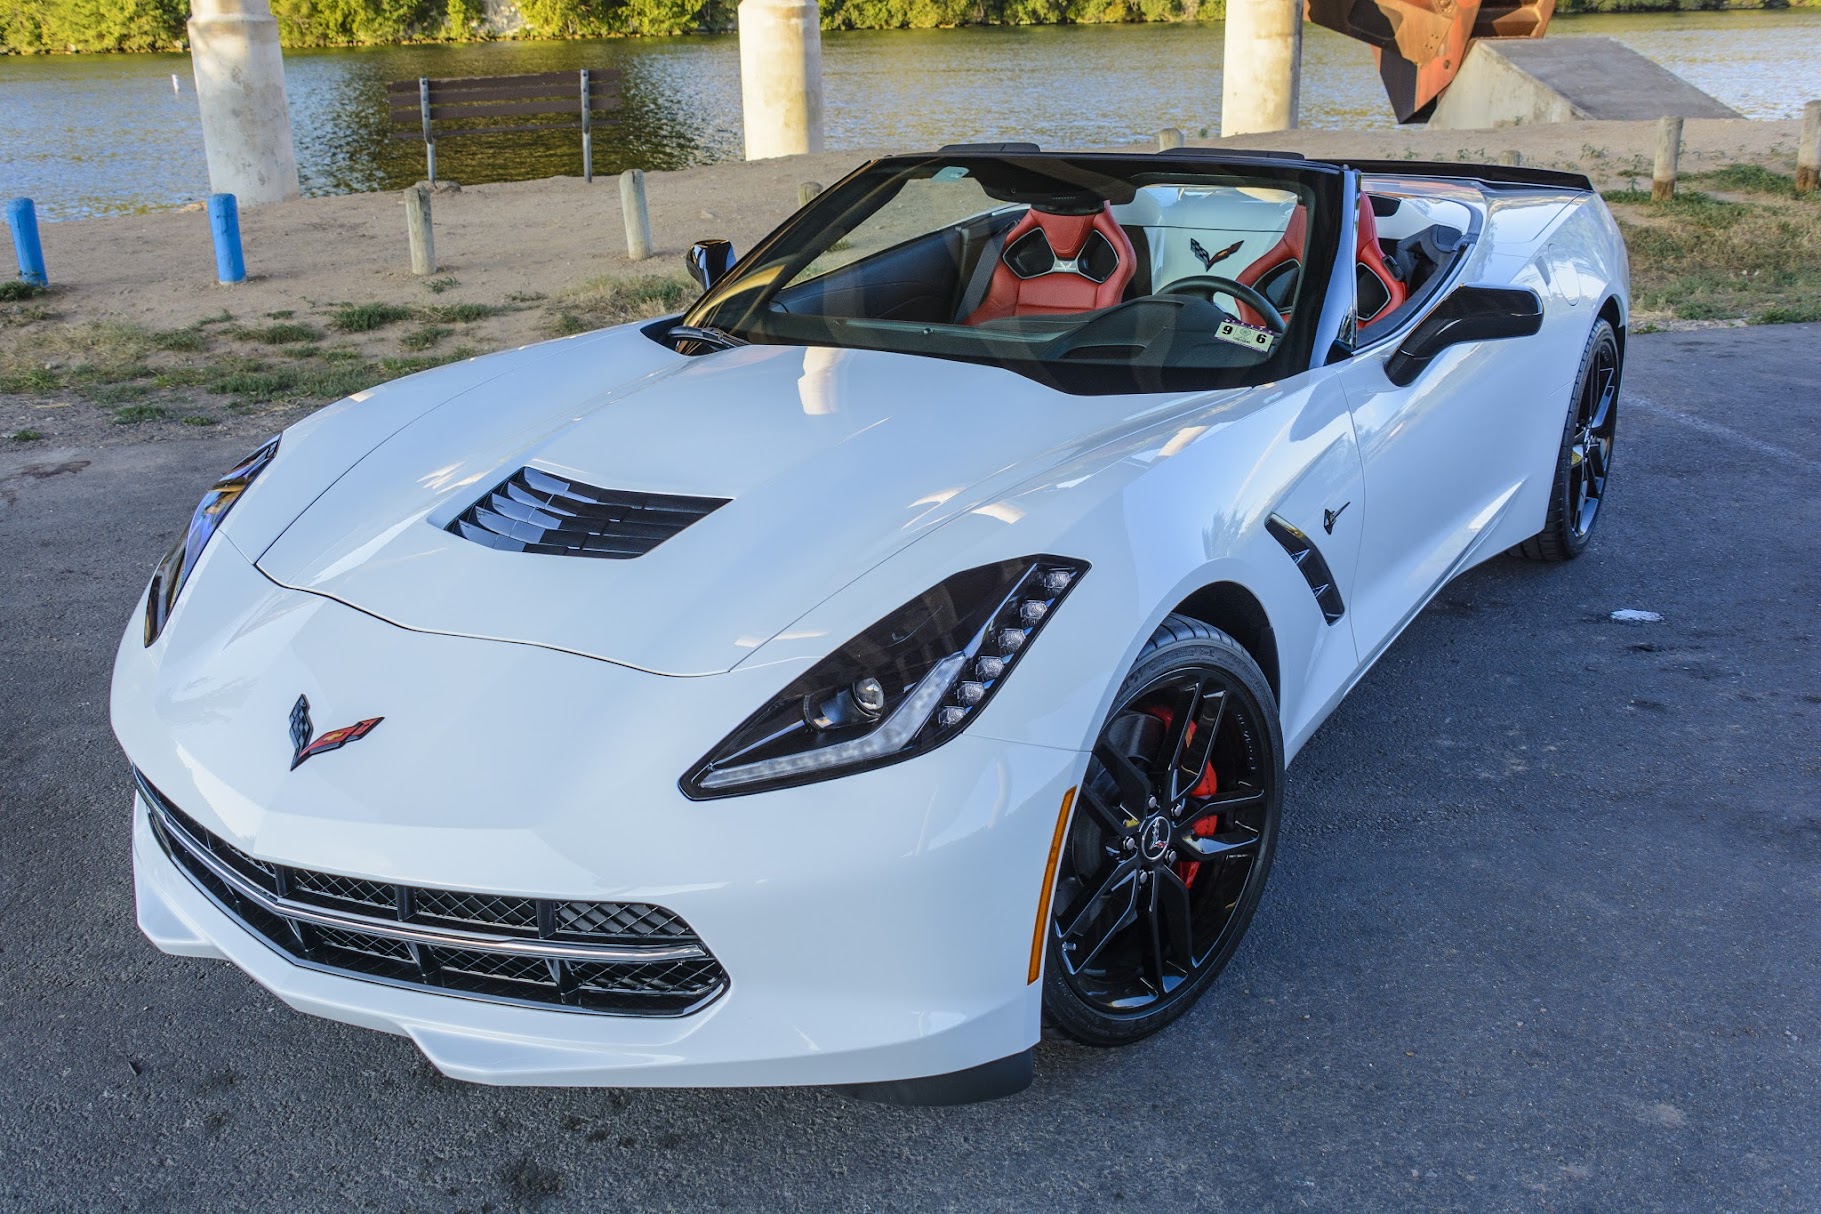
The first photo is the image that I shot as it came out of the camera in RAW format. The first thing to notice is that the exposure is set purely to get the white parts of the car exposed correctly. The goal is to get the highlights and reflections in the paint. Because the white is so bright, setting the exposure for the white ends up making the rest of the photo too dark. The black wheels, tail lights and interior lose detail.

If you shoot RAW and try to get the dark parts of the car brighter, you end up with the photo below. You pick up a little bit of detail in the dash, tires, tail lights and diffuser, but you lose some detail in the reflections on the paint. Compare the left side of the car in the first picture with the one in the second picture, and you see that the reflected horizon is now completely missing. This is what most pictures of white cars with dark wheels ends up looking like. The camera will try to make a best compromise and you end up with paint that is overexposed and black areas that are still a little underexposed. Exposure issues are much less of a problem if your paint is about as dark as your wheels. So it is much easier to get proper exposure in a white car with chrome wheels or a black car with black wheels.

What Lightroom (and photo editing software in general) does is get the best of both. Detail in the reflections in the white paint and in the dark parts of the car. So in literally 60 seconds, you can get the photo to look like the final version. Starting from the first picture (the one with the detail in the reflections), you selectively increase the brightness of the dark areas without affecting the brighter areas of the photo. Then you just apply some increased contrast in the mid tones, increase vibrance and sharpen the photo. It's a few sliders and you're done. I also cropped out the top of the photo because the sign is ugly. There is some aliasing in the photo, but that's simply because the forum software is reducing the size of the 24mp image in a way that causes the aliasing. Incidentally, most photographers use Lightroom for the bulk of their work, and only use Photoshop when specific needs come up.

Here is another example of an "after" photo. Key here is that there are details in the headlights and grille that are typically lost, and the selective contrast adjustments do a better job of emphasizing the contours in the seats.
If you do not plan to edit your photos, do NOT use the RAW format on your camera. RAW bypasses some image enhancements that your camera does automatically. Shooting in JPG format, your camera will actually try to balance the darks and lights on its own. The only issue with the automatic adjustments is that the camera won't know exactly how much you want to increase the brightness in the dark areas and decrease them in the light areas.
So what do you do if you don't want to pay for Lightroom, and mostly use your iPhone for pictures? Well, you can actually achieve the similar results with your iPhone. I took the liberty of starting with a picture that gateman7 posted in the original thread that started all this. https://www.corvetteforum.com/forums...t-just-me.html
Here is the original photo. As car forums go, it's an above average photo, but the camera (like all cameras) had issues trying to balance the exposure on the white body and the black wheels.

Here is how you work the photo on an iPhone. I just opened this up in the Photos app on my iPhone. Select the photo, then touch anywhere on the photo and the Edit option should show up on the top right. Tap Edit.

Now on the left side, you'll see what looks like a volume **** on the lower left above the Cancel text. Tap the ****.

You'll see some new options. Now tap on the arrow next to Light, and you'll see some things we can adjust.

The biggest issue with the pictures, is that the dark portions of the car like the interior and the wheels are just pitch black. You can't see any of the detail. (In fact, I couldn't even tell from the original photo that the car had skirts.) So tap on the shadows line and drag the slider to make the dark areas brighter. Already you can see the spokes of the wheels and the skirt.

Now hit the three dashed lines at the top to get back to the other options and select Highlights. Here we want to make things darker so we can see more of a color gradient in the sky. (In Lightroom, this would help bring out some of the reflections in the car body, but iOS isn't as good at this.)

Now go back out the the menu to the Color section. Increase saturation to make it a bit more colorful. Not too much or it looks crazy. You want somewhere between SEC football coverage and a music video level of color.

Then, as a matter of personal taste, I always will make my sunset pictures have more of a red cast. Just makes it look more like sunset.

So the final shot looks like this. Not as good as with a big camera and Lightroom, but considering we started with a 66kb image I took from the forum, it's a big improvement. I put the original immediately below for comparison. The downside of the iPhone method is that iOS doesn't keep the adjustments as independent as Lightroom does. So when you adjust the shadows to be a little brighter, you end up making some of the bright parts of the image brighter as well. So on the iPhone you have to compromise a bit more and not get everything you want out of the image.

The first photo is the image that I shot as it came out of the camera in RAW format. The first thing to notice is that the exposure is set purely to get the white parts of the car exposed correctly. The goal is to get the highlights and reflections in the paint. Because the white is so bright, setting the exposure for the white ends up making the rest of the photo too dark. The black wheels, tail lights and interior lose detail.
If you shoot RAW and try to get the dark parts of the car brighter, you end up with the photo below. You pick up a little bit of detail in the dash, tires, tail lights and diffuser, but you lose some detail in the reflections on the paint. Compare the left side of the car in the first picture with the one in the second picture, and you see that the reflected horizon is now completely missing. This is what most pictures of white cars with dark wheels ends up looking like. The camera will try to make a best compromise and you end up with paint that is overexposed and black areas that are still a little underexposed. Exposure issues are much less of a problem if your paint is about as dark as your wheels. So it is much easier to get proper exposure in a white car with chrome wheels or a black car with black wheels.
What Lightroom (and photo editing software in general) does is get the best of both. Detail in the reflections in the white paint and in the dark parts of the car. So in literally 60 seconds, you can get the photo to look like the final version. Starting from the first picture (the one with the detail in the reflections), you selectively increase the brightness of the dark areas without affecting the brighter areas of the photo. Then you just apply some increased contrast in the mid tones, increase vibrance and sharpen the photo. It's a few sliders and you're done. I also cropped out the top of the photo because the sign is ugly. There is some aliasing in the photo, but that's simply because the forum software is reducing the size of the 24mp image in a way that causes the aliasing. Incidentally, most photographers use Lightroom for the bulk of their work, and only use Photoshop when specific needs come up.
Here is another example of an "after" photo. Key here is that there are details in the headlights and grille that are typically lost, and the selective contrast adjustments do a better job of emphasizing the contours in the seats.
If you do not plan to edit your photos, do NOT use the RAW format on your camera. RAW bypasses some image enhancements that your camera does automatically. Shooting in JPG format, your camera will actually try to balance the darks and lights on its own. The only issue with the automatic adjustments is that the camera won't know exactly how much you want to increase the brightness in the dark areas and decrease them in the light areas.
So what do you do if you don't want to pay for Lightroom, and mostly use your iPhone for pictures? Well, you can actually achieve the similar results with your iPhone. I took the liberty of starting with a picture that gateman7 posted in the original thread that started all this. https://www.corvetteforum.com/forums...t-just-me.html
Here is the original photo. As car forums go, it's an above average photo, but the camera (like all cameras) had issues trying to balance the exposure on the white body and the black wheels.
Here is how you work the photo on an iPhone. I just opened this up in the Photos app on my iPhone. Select the photo, then touch anywhere on the photo and the Edit option should show up on the top right. Tap Edit.
Now on the left side, you'll see what looks like a volume **** on the lower left above the Cancel text. Tap the ****.
You'll see some new options. Now tap on the arrow next to Light, and you'll see some things we can adjust.
The biggest issue with the pictures, is that the dark portions of the car like the interior and the wheels are just pitch black. You can't see any of the detail. (In fact, I couldn't even tell from the original photo that the car had skirts.) So tap on the shadows line and drag the slider to make the dark areas brighter. Already you can see the spokes of the wheels and the skirt.
Now hit the three dashed lines at the top to get back to the other options and select Highlights. Here we want to make things darker so we can see more of a color gradient in the sky. (In Lightroom, this would help bring out some of the reflections in the car body, but iOS isn't as good at this.)
Now go back out the the menu to the Color section. Increase saturation to make it a bit more colorful. Not too much or it looks crazy. You want somewhere between SEC football coverage and a music video level of color.
Then, as a matter of personal taste, I always will make my sunset pictures have more of a red cast. Just makes it look more like sunset.
So the final shot looks like this. Not as good as with a big camera and Lightroom, but considering we started with a 66kb image I took from the forum, it's a big improvement. I put the original immediately below for comparison. The downside of the iPhone method is that iOS doesn't keep the adjustments as independent as Lightroom does. So when you adjust the shadows to be a little brighter, you end up making some of the bright parts of the image brighter as well. So on the iPhone you have to compromise a bit more and not get everything you want out of the image.
Last edited by AustinVettes; 10-11-2014 at 03:10 PM.
 10-11-2014, 03:14 PM
#2
Safety Car

Member Since: Aug 2004
Location: SouthEast PA
Posts: 3,966
Received 1,293 Likes
on
722 Posts
Unmodified C8 of the Year 2021 Finalist
2018 C7 of Year Finalist

Thank You!!
I just got a new iPhone 5s with iOS 8.0.2 that I transferred pictures from my iPad iOS 5.1.1 using iCloud. Wow! Your write up was great modding my pics!

I just got a new iPhone 5s with iOS 8.0.2 that I transferred pictures from my iPad iOS 5.1.1 using iCloud. Wow! Your write up was great modding my pics!
10-11-2014, 03:21 PM
#3
Team Owner


Member Since: Oct 2013
Location: Kansas City, Missouri
Posts: 25,359
Received 7,752 Likes
on
4,181 Posts
CORVETTE TODAY Host
St. Jude Donor'15

Awesome!
10-11-2014, 07:00 PM
#5
Racer
Thread Starter
10-11-2014, 09:33 PM
#6
Instructor
AustinVettes, that is amazing. You called it, my wheels were black holes against the white of the car and with software you were able to have them show up in the enhanced picture. Thank you for taking the time to explain it and post a "a how to" for us, Terrific Job!
10-11-2014, 10:47 PM
#8
Racer
Thread Starter
Well, unless I'm mistaken, those appear to be C7's in the pictures. If showing pictures of C7's and trying to help folks take better pictures shouldn't be in this section, then the moderators are welcom to move the thread.
10-11-2014, 10:59 PM
#9
Le Mans Master


 However, it could also be a C6, C5, etc. It's about photography and not Corvettes at all.
It is a well written and illustrated post, and you need not attack me for asking a simple question.
 10-11-2014, 11:29 PM
#11
Race Director


Here is another example of an "after" photo. Key here is that there are details in the headlights and grille that are typically lost, and the selective contrast adjustments do a better job of emphasizing the contours in the seats.
Excellent tips and tricks for those who are looking to expand their knowledge using post-processing software or techniques. With that being said, I felt an itch that needed to be scrathed in your "After" photo above.
While your "After" photo does a great job of capturing the highlights and overall image itself, your BLUEs and CYANs are stealing from an otherwise awesome photo.
This is a WickedFRC "corrected" version of your image above. The ONLY changes made were using Adobe Photshop CS3 in this manner:
1. Auto Color
2. Hue/Saturation: - 50 BLUE, - 50 CYAN
3. UNSHARP MASK (Set at 50)
This is the final result for 15 seconds effort. I hope you can clearly see the overall difference in image quality from your original "After" photo.

Last edited by WICKEDFRC; 10-11-2014 at 11:31 PM.
10-11-2014, 11:42 PM
#12
Racer
Thread Starter
Here is another example of an "after" photo. Key here is that there are details in the headlights and grille that are typically lost, and the selective contrast adjustments do a better job of emphasizing the contours in the seats.
Excellent tips and tricks for those who are looking to expand their knowledge using post-processing software or techniques. With that being said, I felt an itch that needed to be scrathed in your "After" photo above.
While your "After" photo does a great job of capturing the highlights and overall image itself, your BLUEs and CYANs are stealing from an otherwise awesome photo.
This is a WickedFRC "corrected" version of your image above. The ONLY changes made were using Adobe Photshop CS3 in this manner:
1. Auto Color
2. Hue/Saturation: - 50 BLUE, - 50 CYAN
3. UNSHARP MASK (Set at 50)
This is the final result for 15 seconds effort. I hope you can clearly see the overall difference in image quality from your original "After" photo.
The sharpness settings are also incorrect for the picture size that is being displayed here. Was just too lazy to create a version sized and appropriately sharpened for the smaller image.
Last edited by AustinVettes; 10-11-2014 at 11:51 PM.