
Joemosfet's DIY widebody conversion project
 05-23-2017, 04:22 PM
#1
Burning Brakes

Thread Starter

I love my C7 Stingray. It's badass, it's lightweight, it's quick, and it's a fully loaded 3LT Z51 Premiere Edition (for whatever that's worth), and more than that, it's mine. But, I always felt it was lacking power - something that all cars suffer from at my altitude, but I digress. So, summer of 2016, I decided to put a supercharger on there and fix that problem.
But, after getting a A&A kit with the Ti blower and small pulley, headers, and methanol cooling, I quickly found that there was far more power than the tires could handle. Well, there are a few ways to fix this, from running stickier tires, to better throttle control, to oversized tires. But I figured why not go whole hog and do a Z06/GS widebody conversion?
It was about this time that Bill aka Jet Vet started posted his widebody conversion adventure on his '15 Z51. I watched closely and intently at his slow but steady progress and I knew it was a project I could easily handle, plus it would be a great excuse to spend quality time with my dad - something that is priceless to me.
So, decision made, it was time to research. I spent the winter putting together parts lists, with price lists, from various venders who sold full Z06 widebody kits, aftermarket kits. I quickly decided that the aftermarket widebody solutions, while nice, lacked the polish and finish that the Z06 parts have.
After checking with several vendors who sold Z06 widebody kits, and the various dealerships, local and on the internet, I soon found that Rick at Suburban Chevrolet (subchev) had the absolute best prices for these parts hands down - and that's by a couple of thousand dollars compared to another dealership popular on this forum. After ordering the parts and being blown away by the price, even after shipping ($4700), I had some extra cash to put down on some carbon fiber parts (front & rear spoiler, side skirts) most from C7Carbon - another great deal with shipping ($2100), plus their quality is top notch. I also picked up a set of Z06 wheels with mounted tires and TPMS sensors from Keith at FloridaSpeed (DocZ), also great price shipped ($2600).
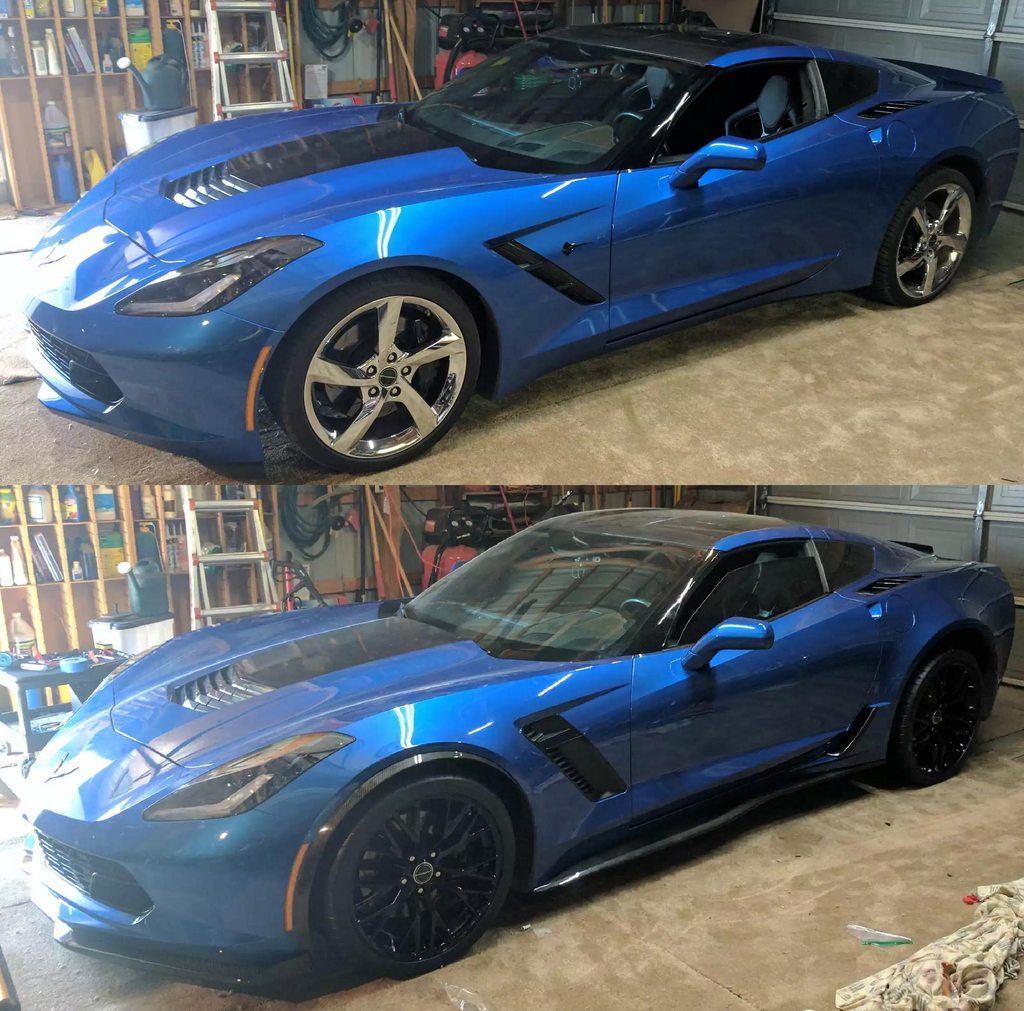
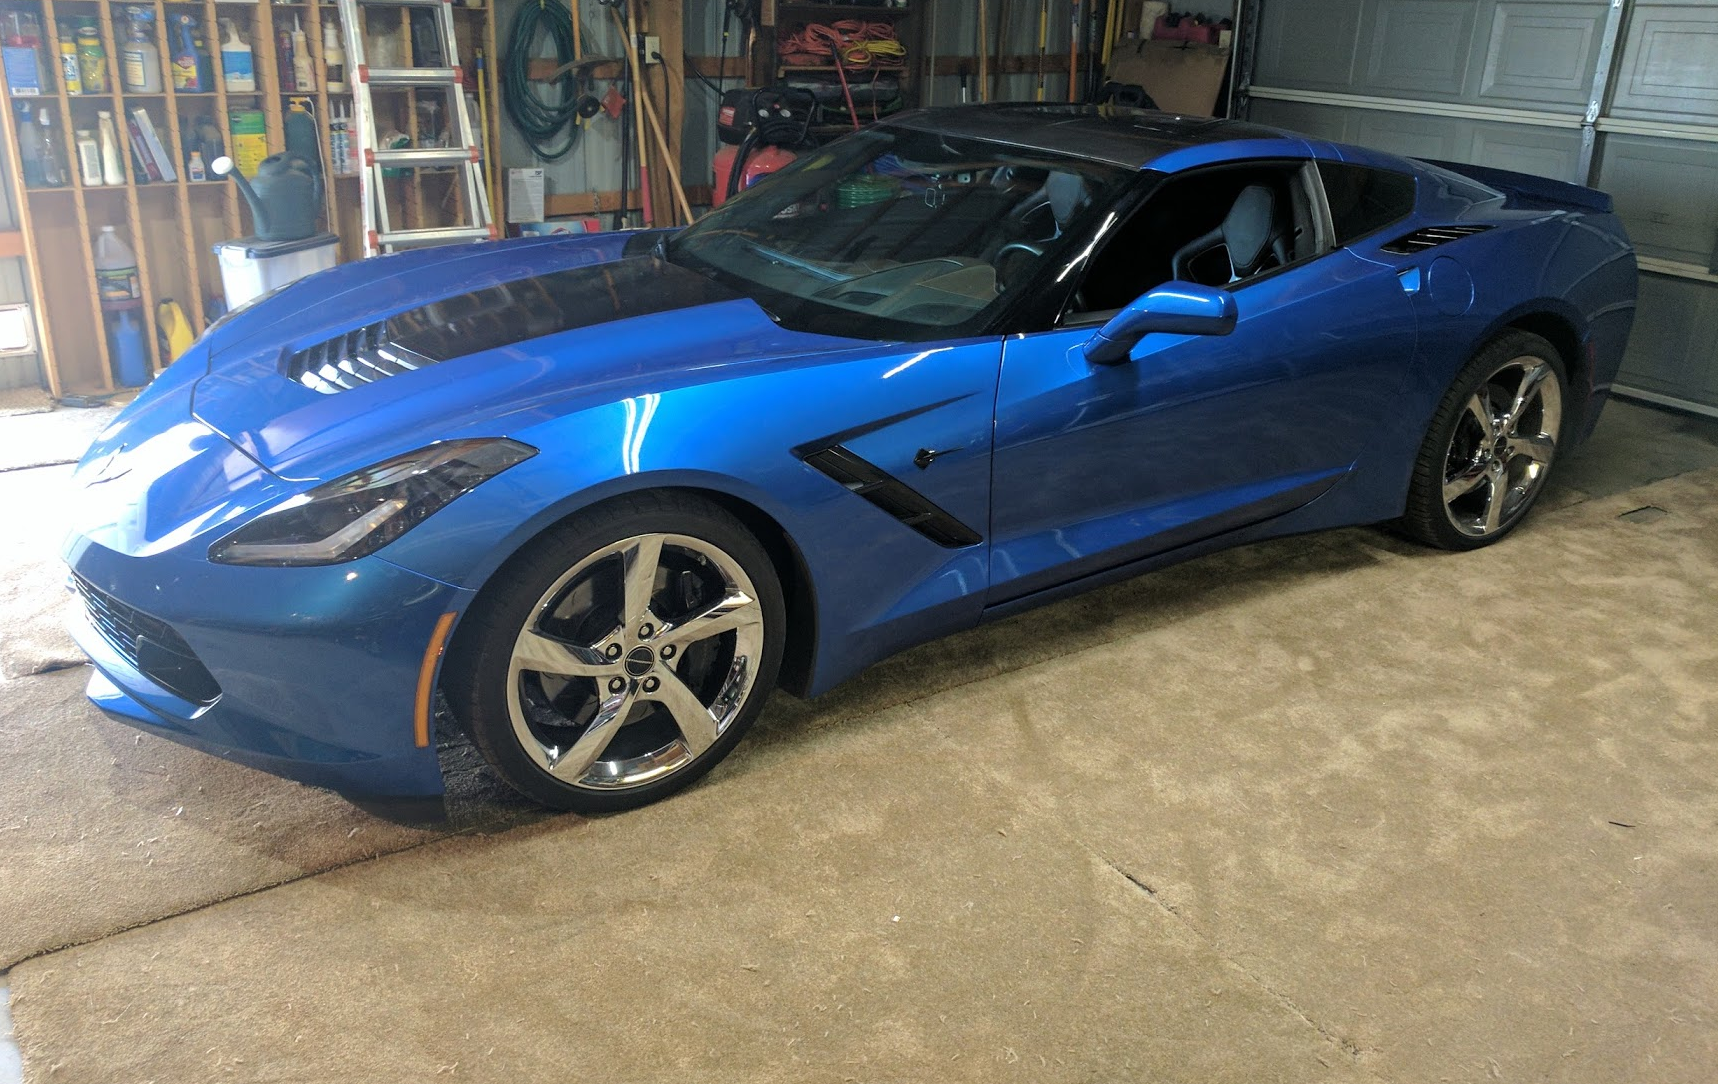
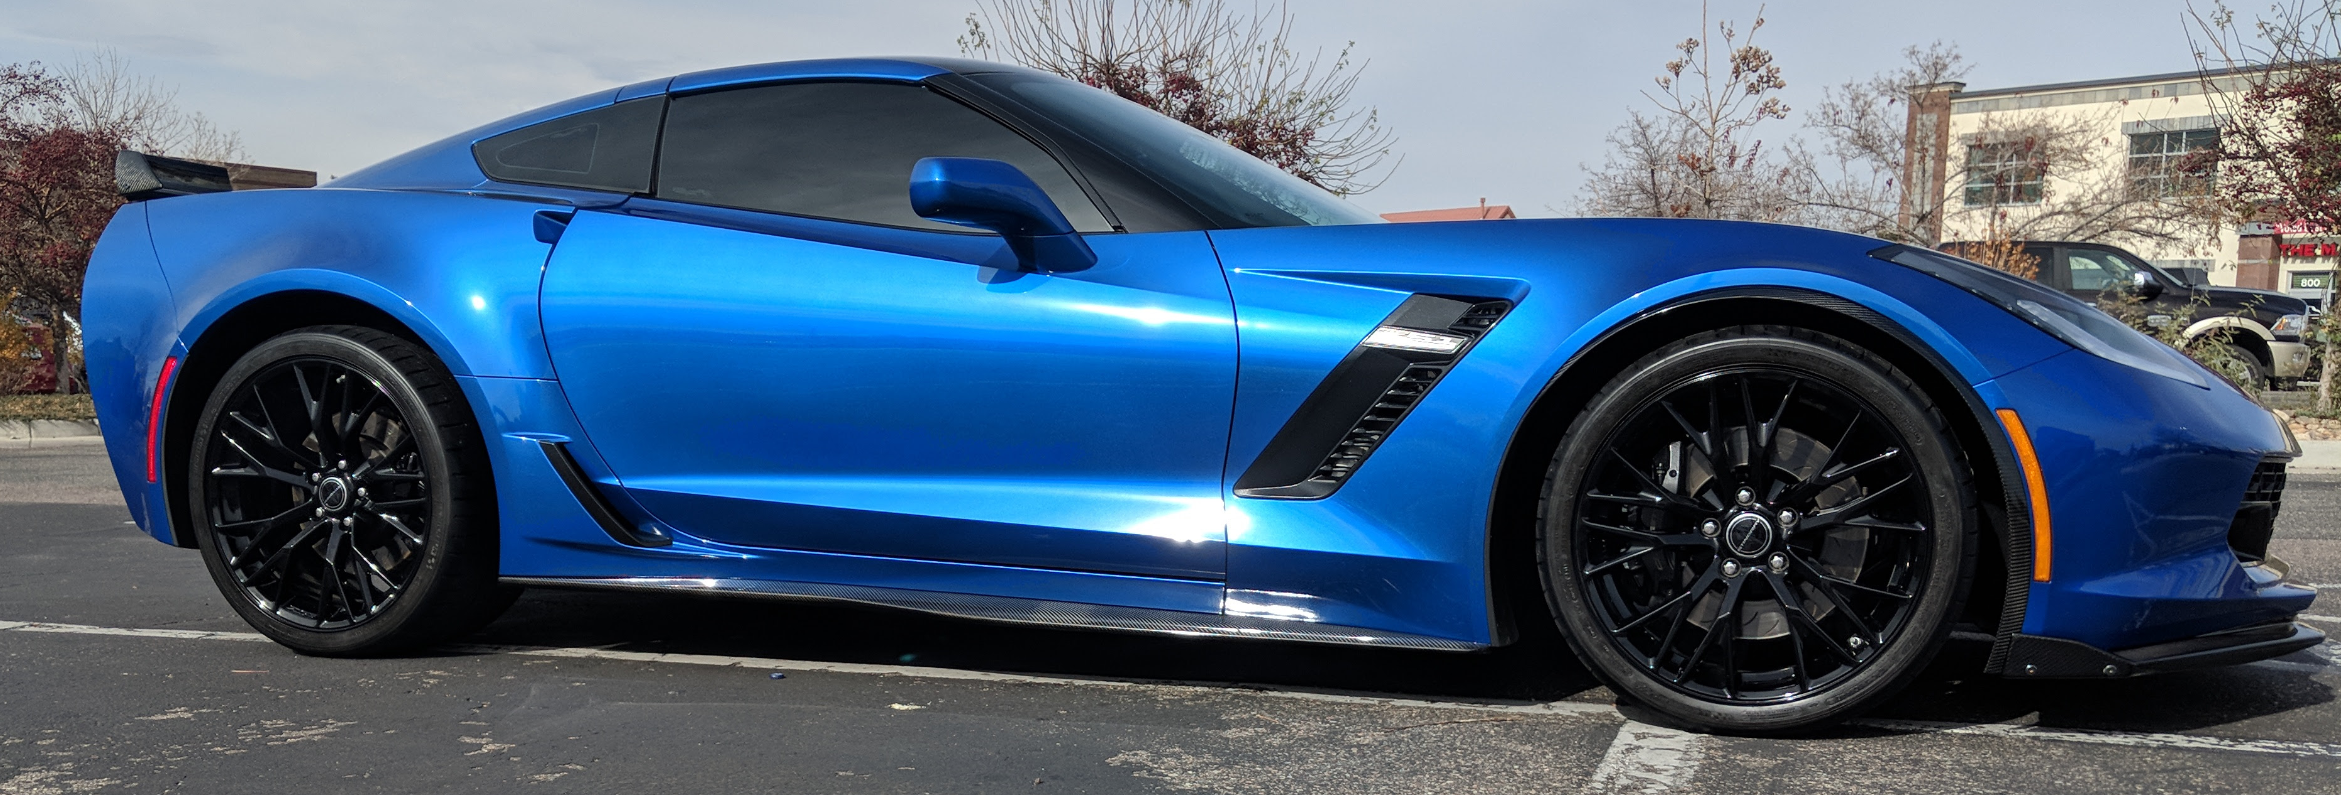
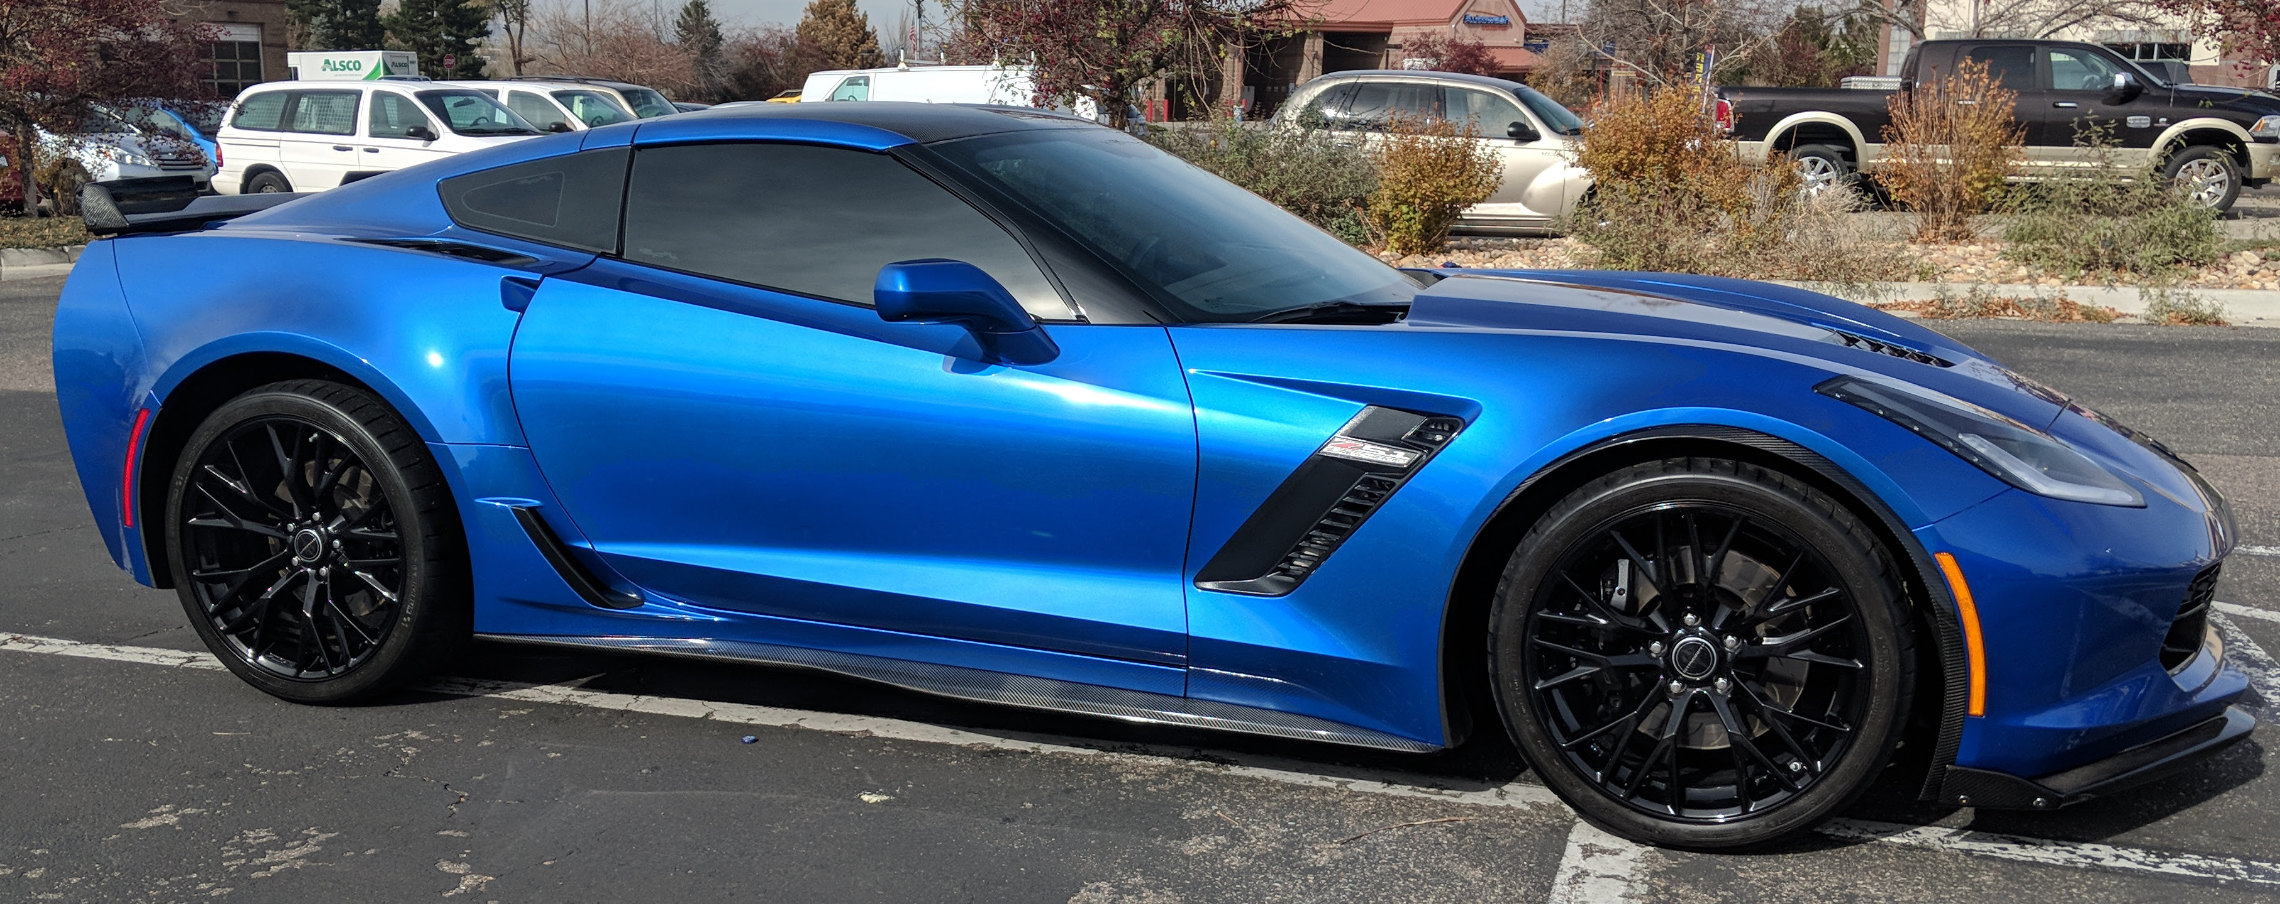
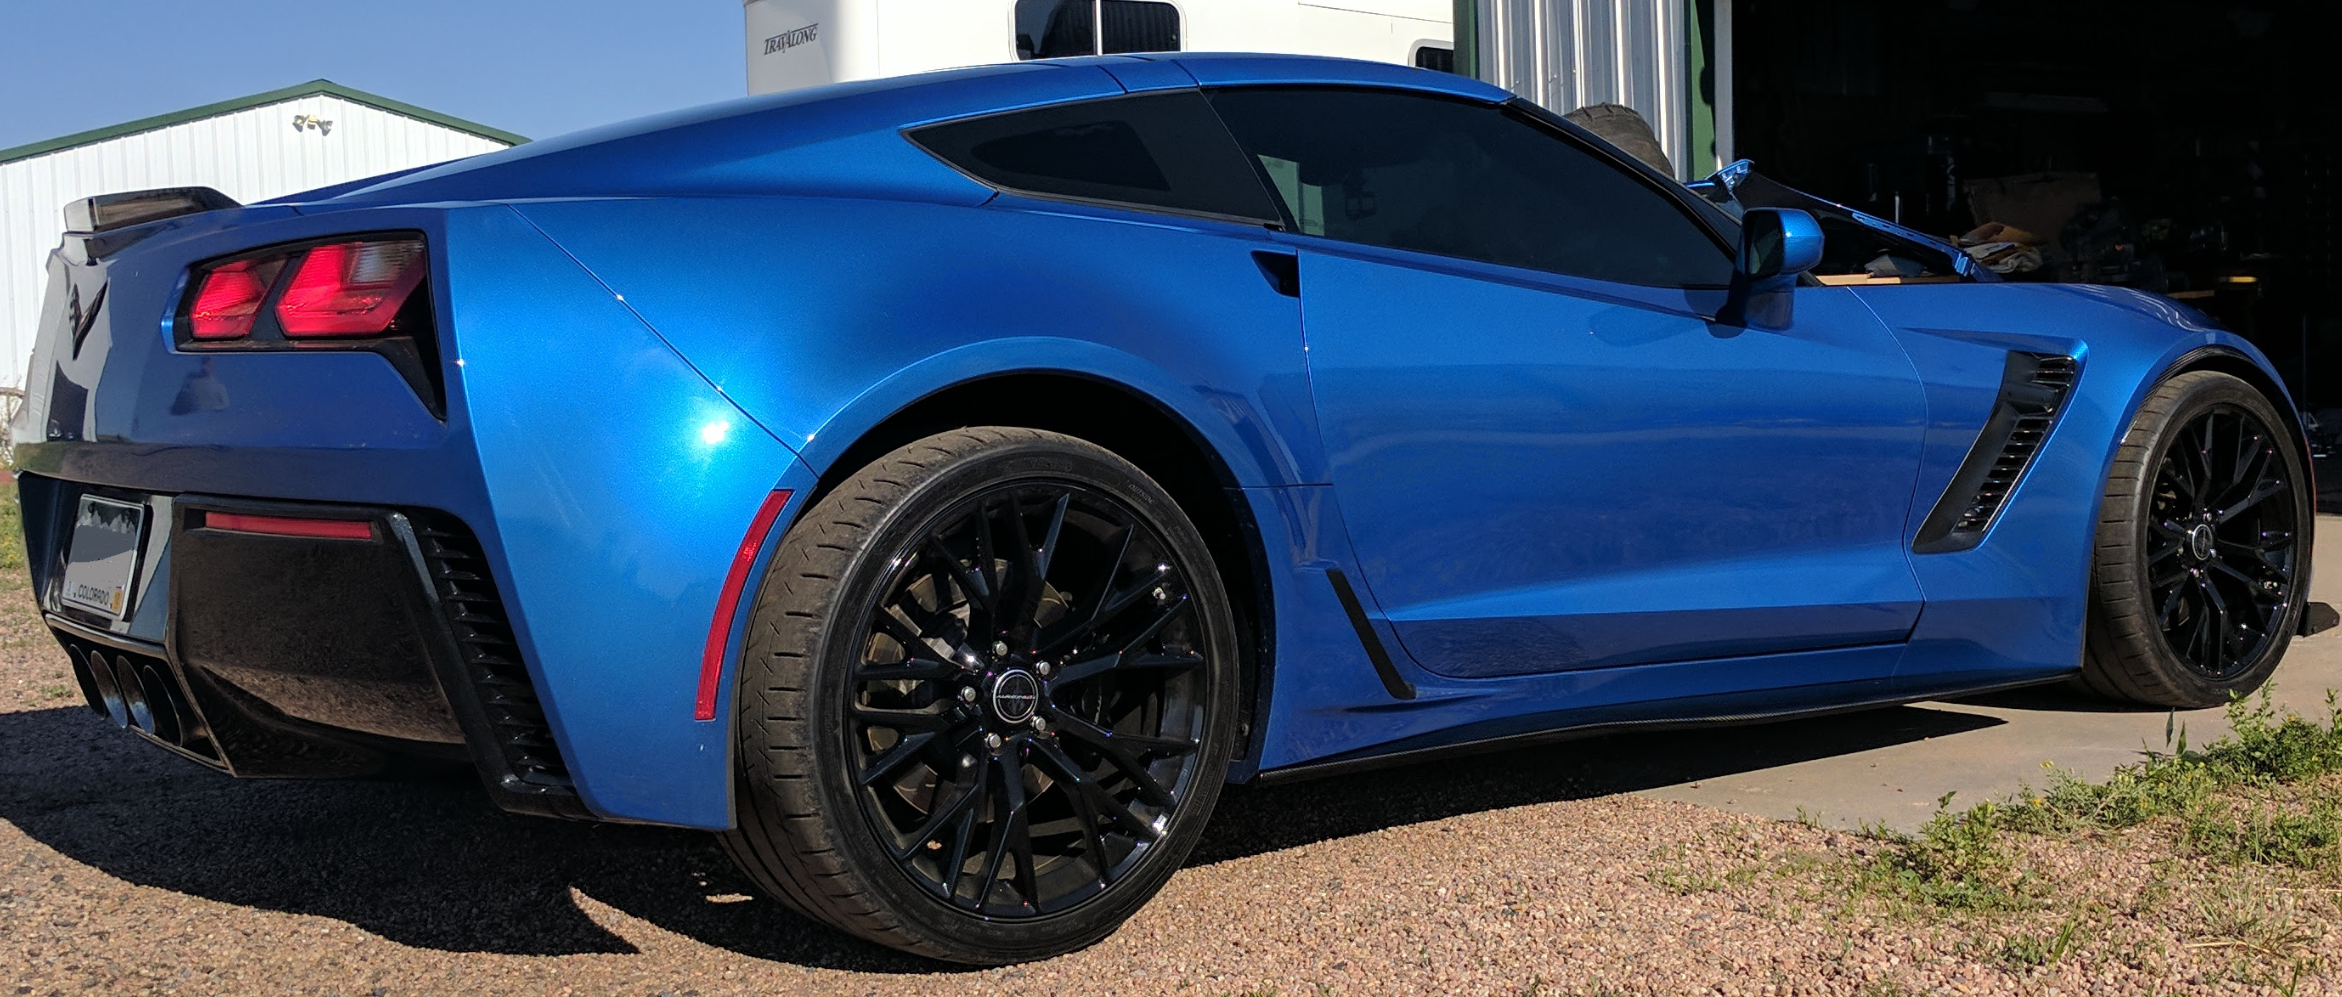
Before and After Photo: For those people who don't want to scroll.
And now for around 60 more pics, presented chronologically. Starting with the deliveries. So many boxes.
To view these photos on imgur, head over here: https://imgur.com/a/42yCm
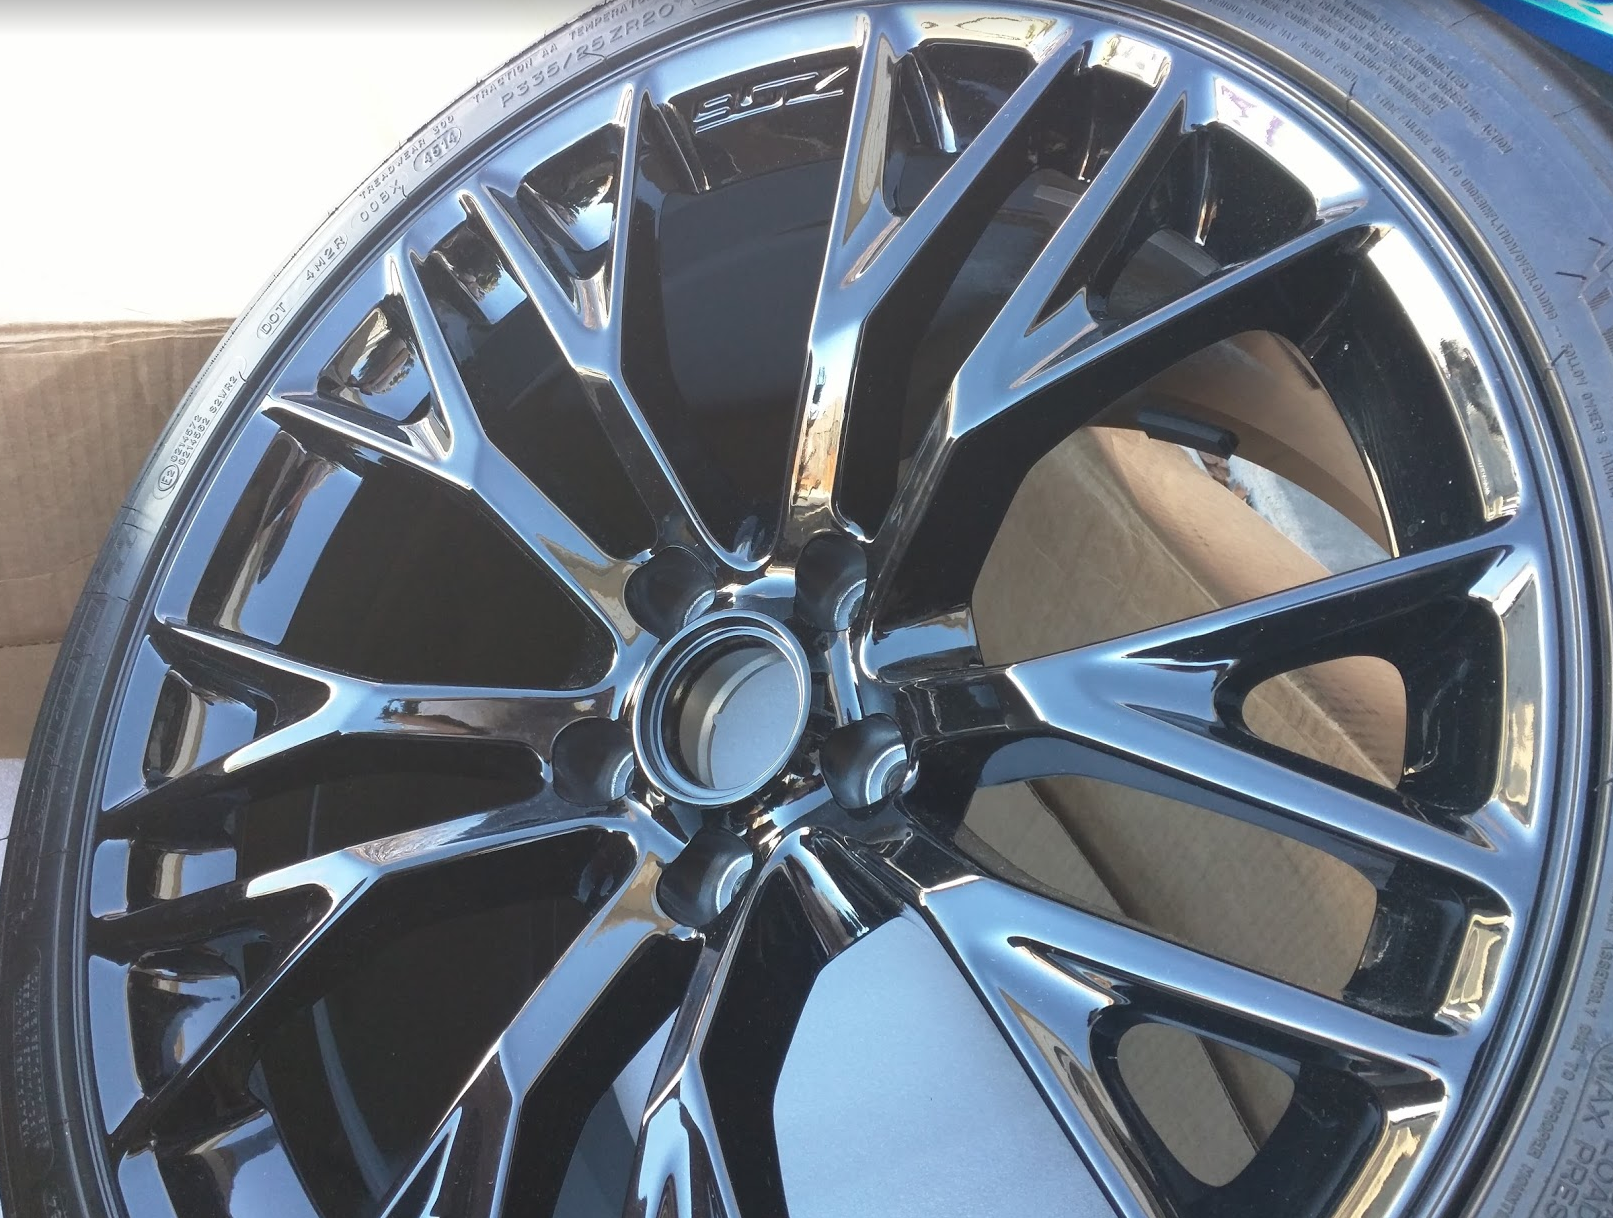
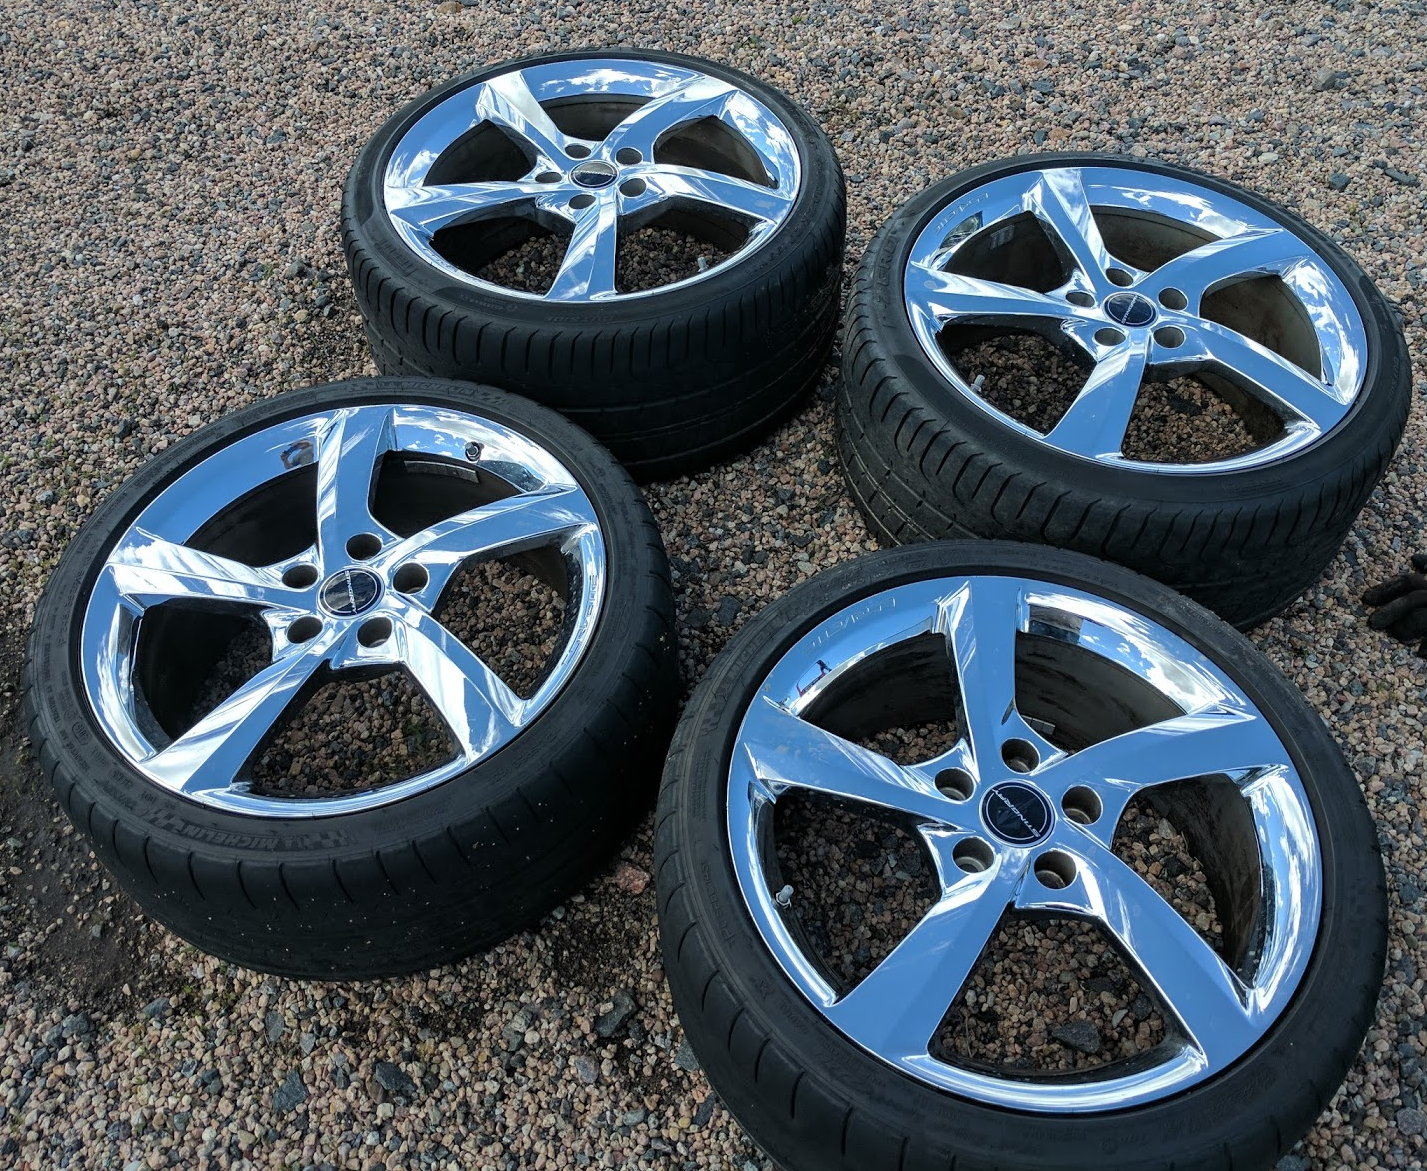
First to arrive were the wheels. Gorgeous, and what's hilarious is, when they're stacked up and stowed away, they make a tower taller than the car they're going on.


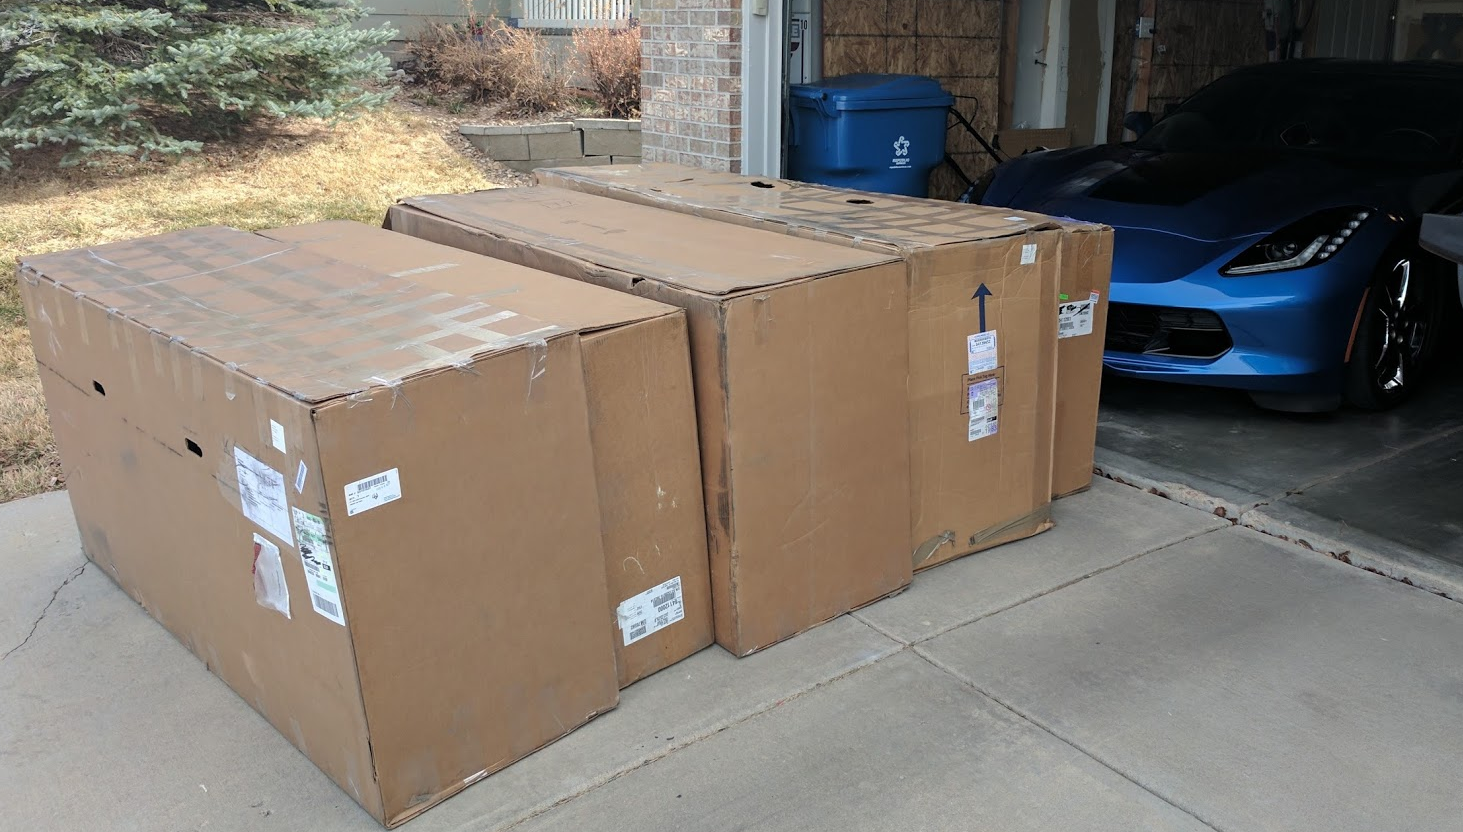
Those of you might remember back in the middle of March when I posted this pic, delivery day from the freight carrier with some absolutely massive boxes, certainly larger than I expected:

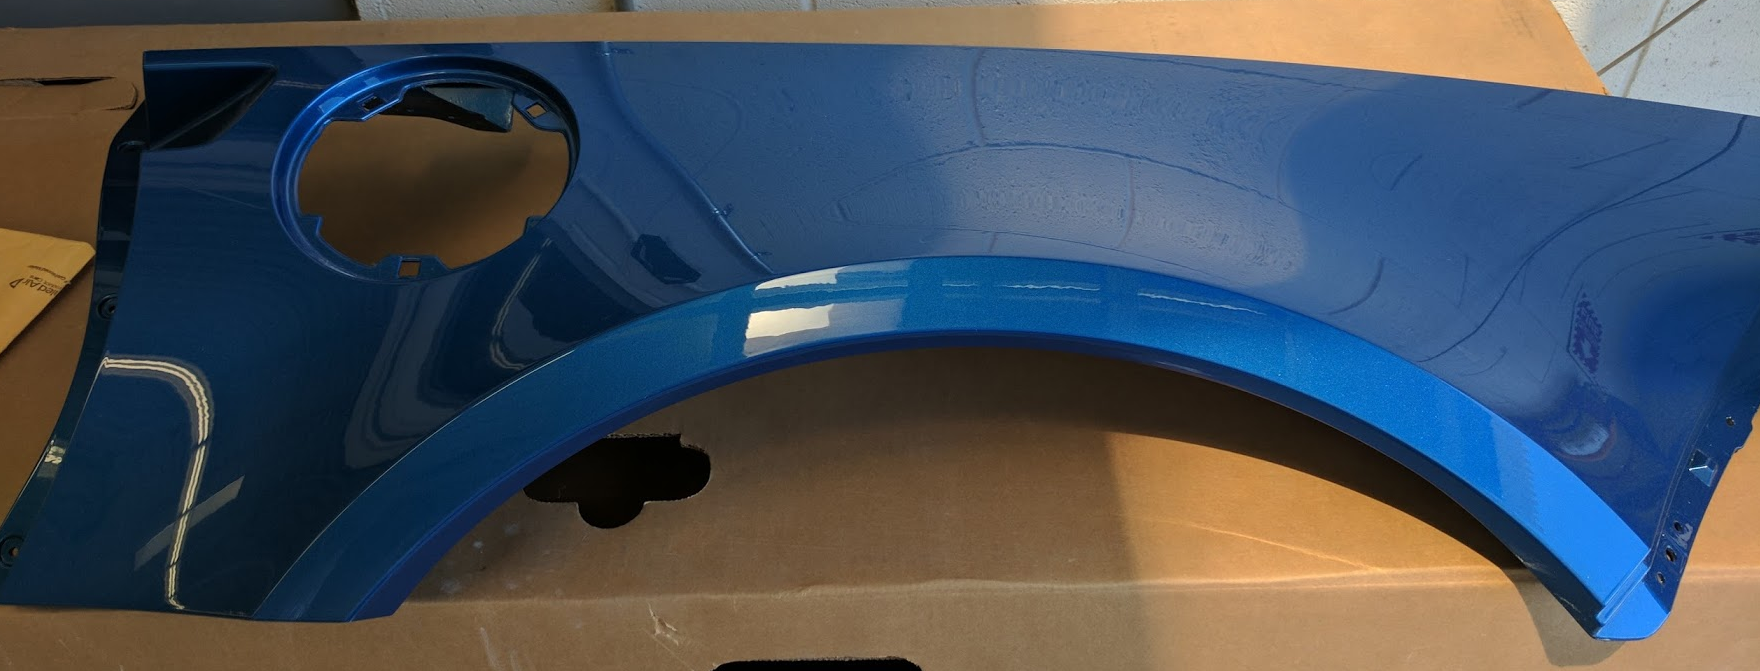
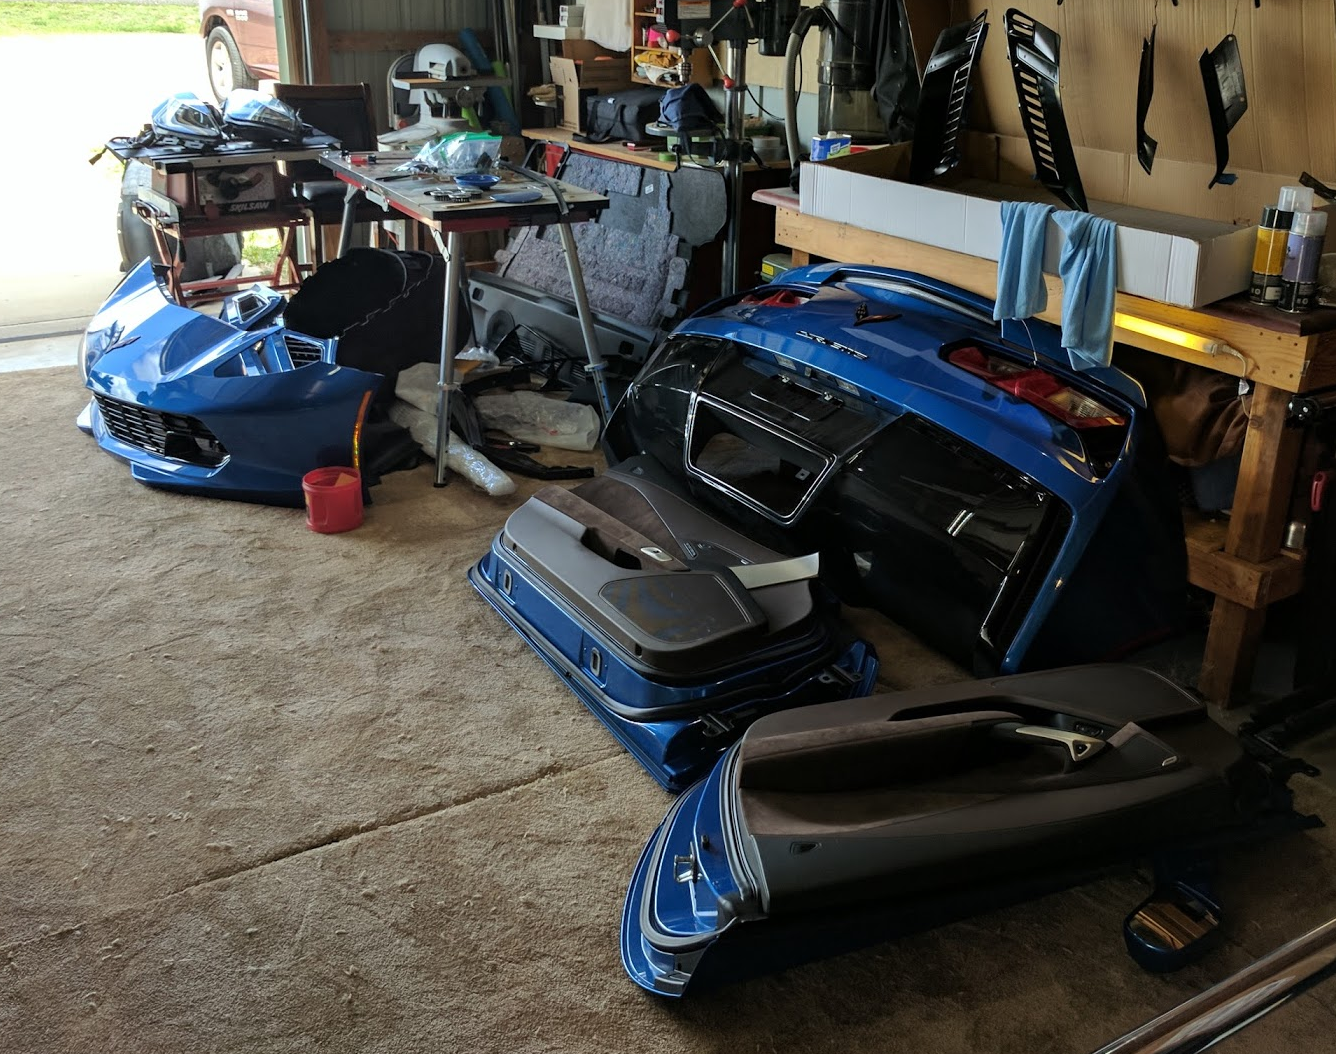
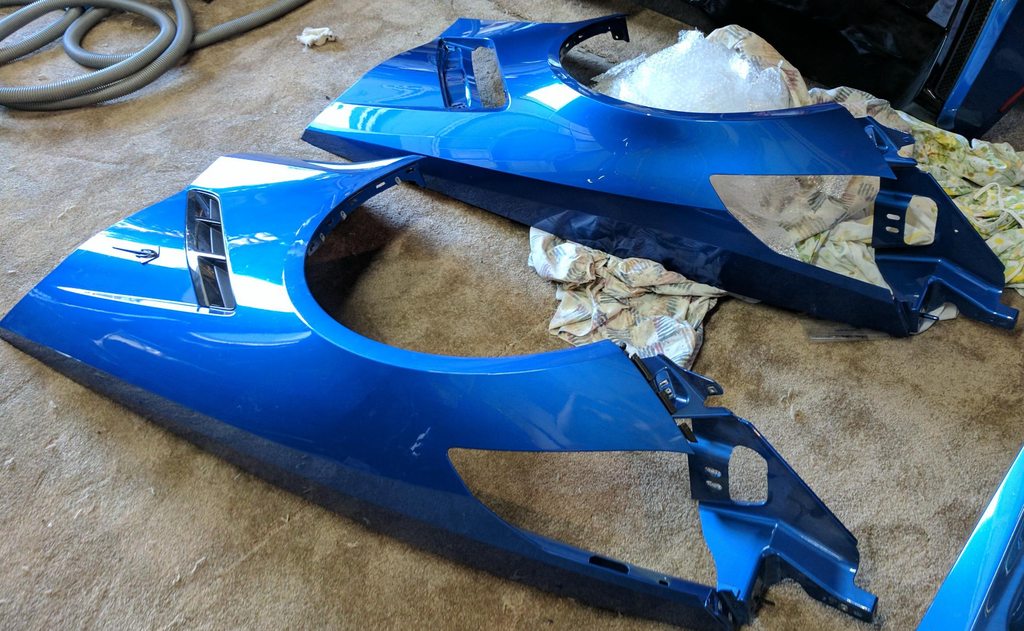
But the contents were gold:

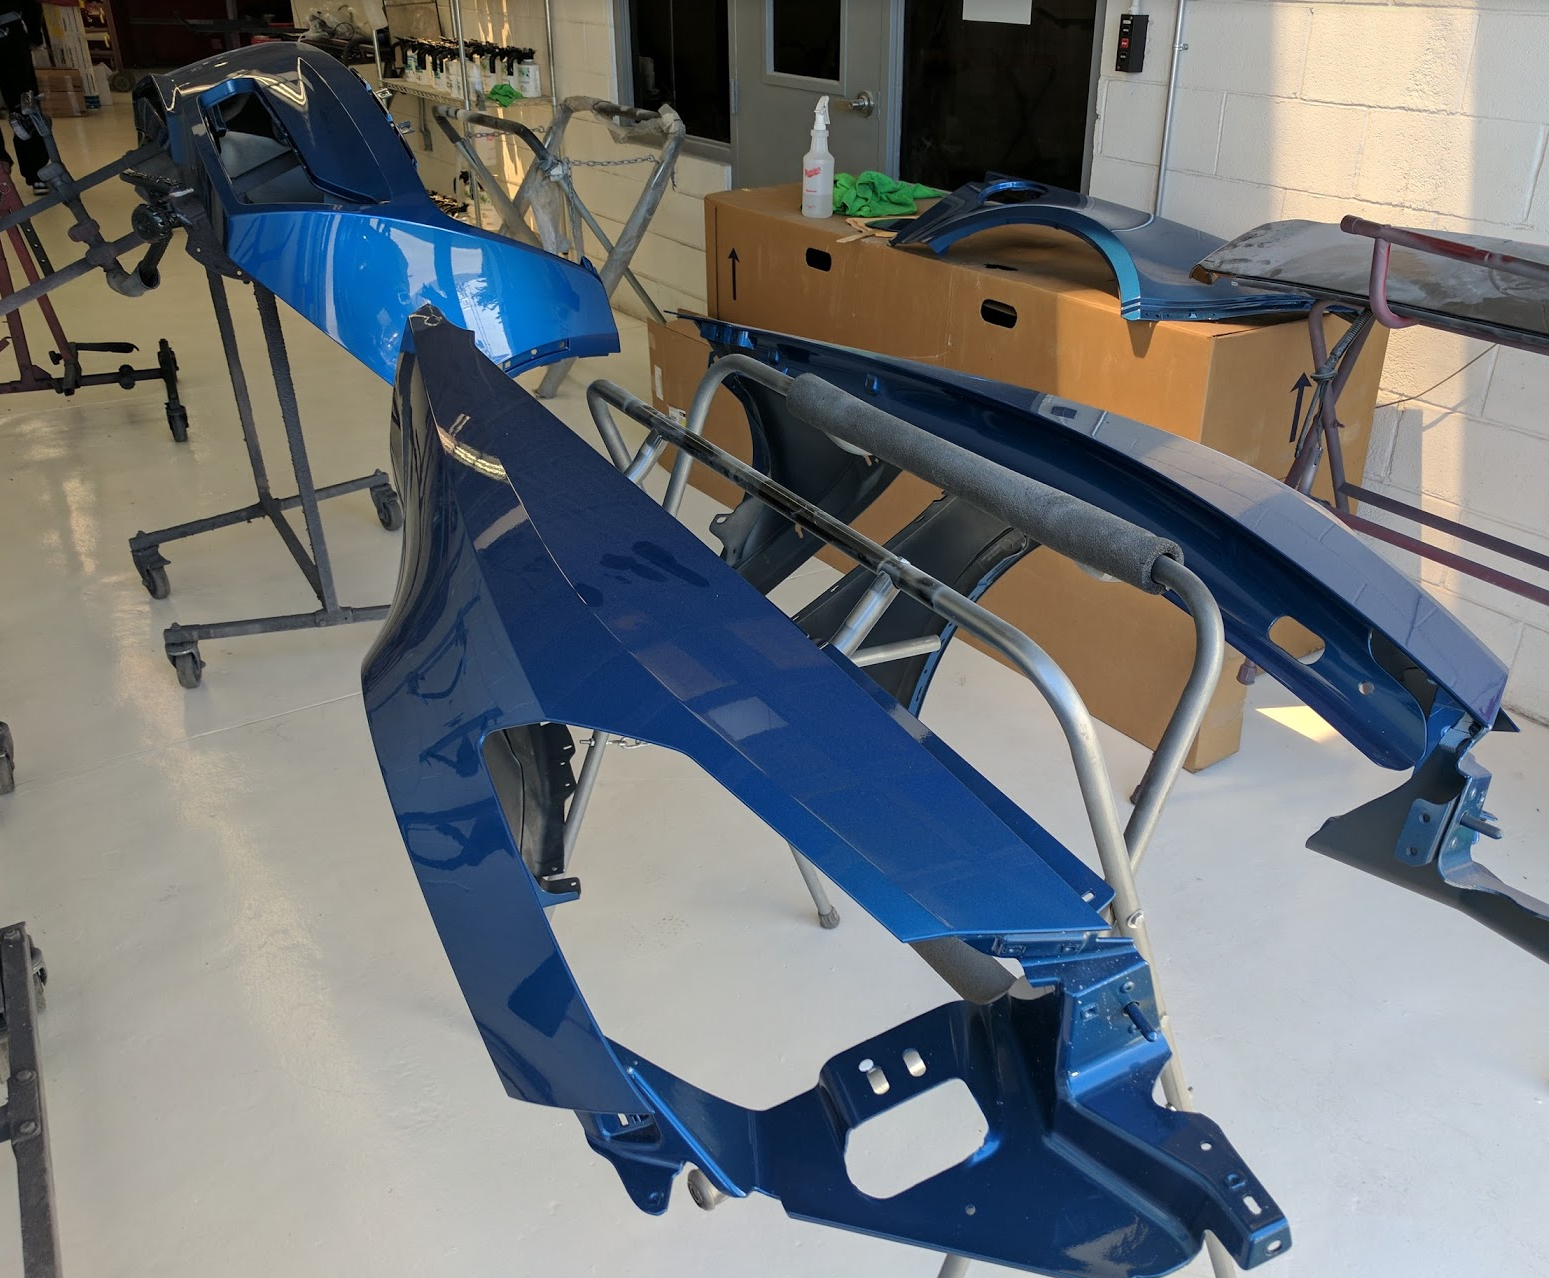
Ok, it's carbonite filled composite but, gold to me. However, this gold is fragile, so I immediately took them to the body shop for painting. I took them to Ed Bozarth's collision center body shop in Aurora, Colorado, since they did the front bumper with awesome results when I first got the car, I should take it back to them. He charged me $1300 for the two fenders, two aperture panels, two quarter panels, fuel door, and rear upper fascia, which I thought was an absolutely fantastic price. I told them to take their time as this is a show car and it needs to be top notch.
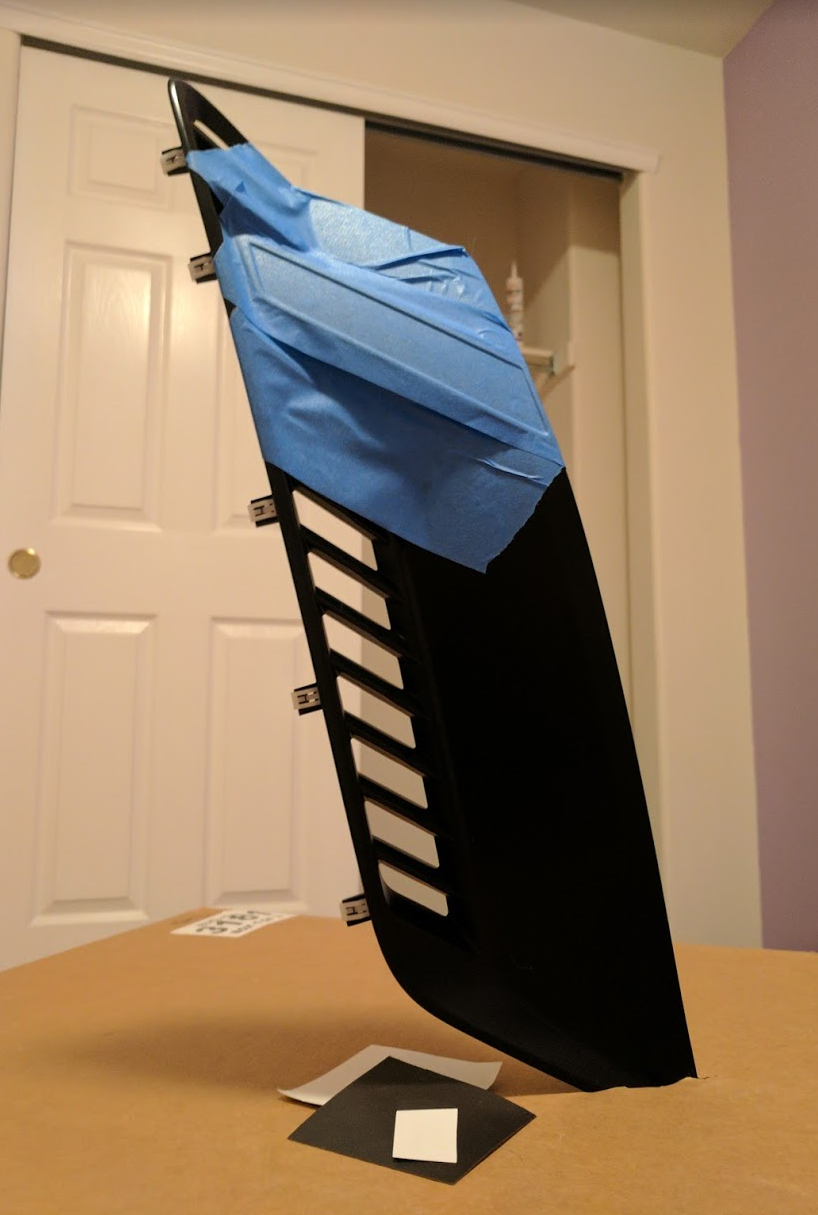
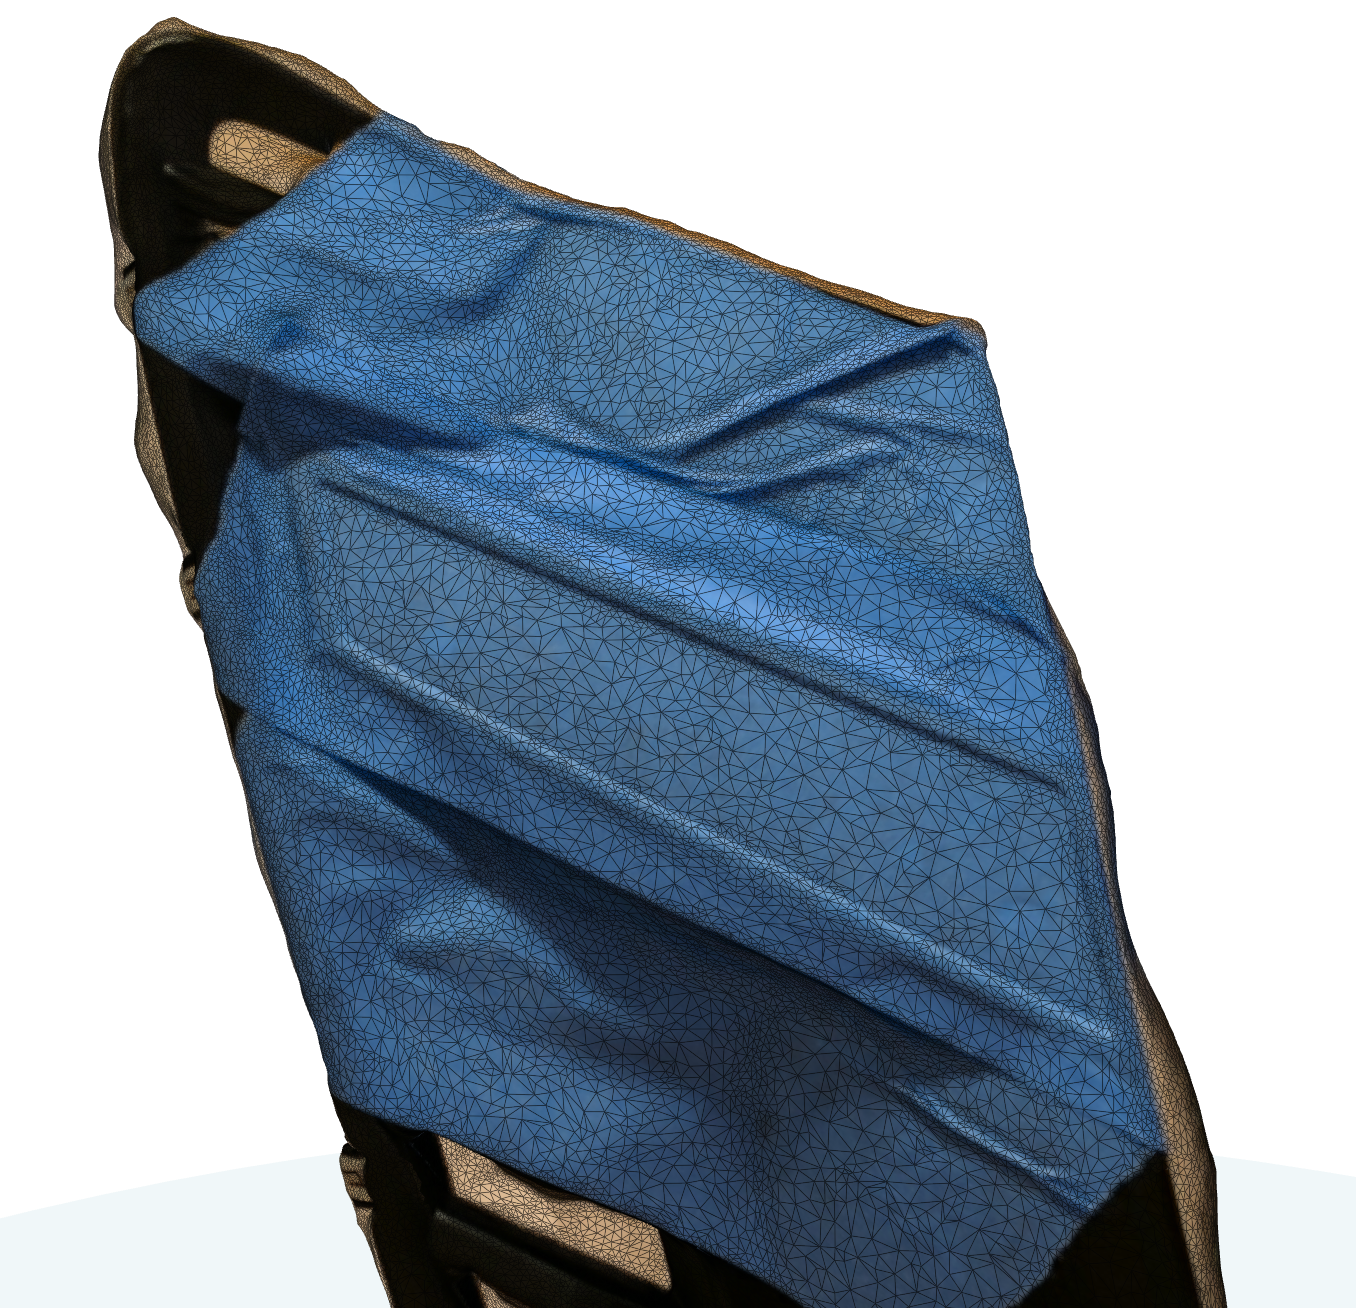
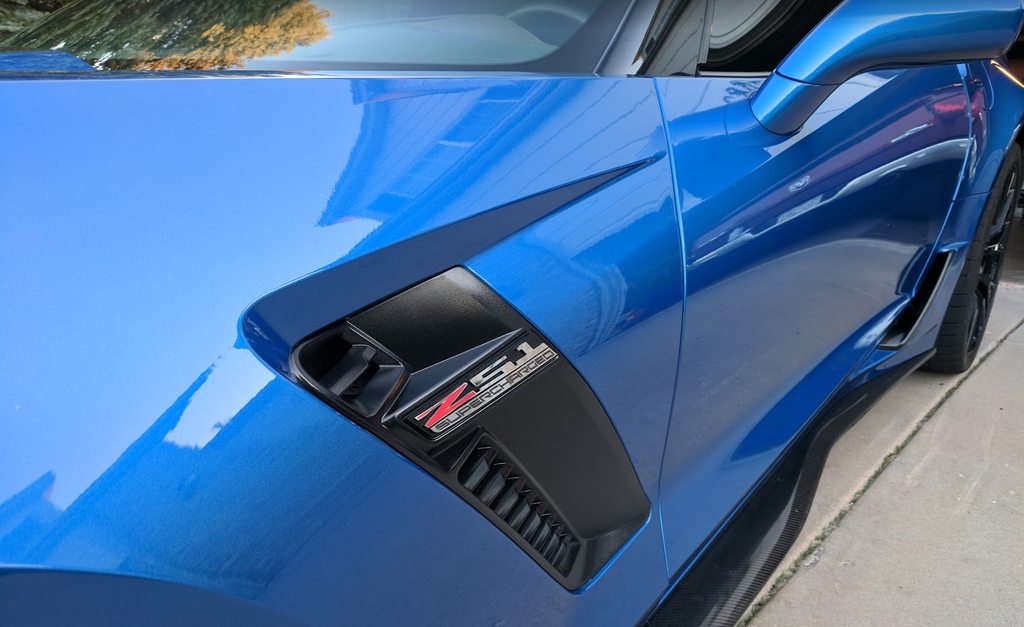
Meanwhile, I took a bunch of photos of the fender vent from different angles in order to generate a 3d model so I can design a custom badge that fits the contours and curves of the vent, and then get it made from aluminum and polished up.


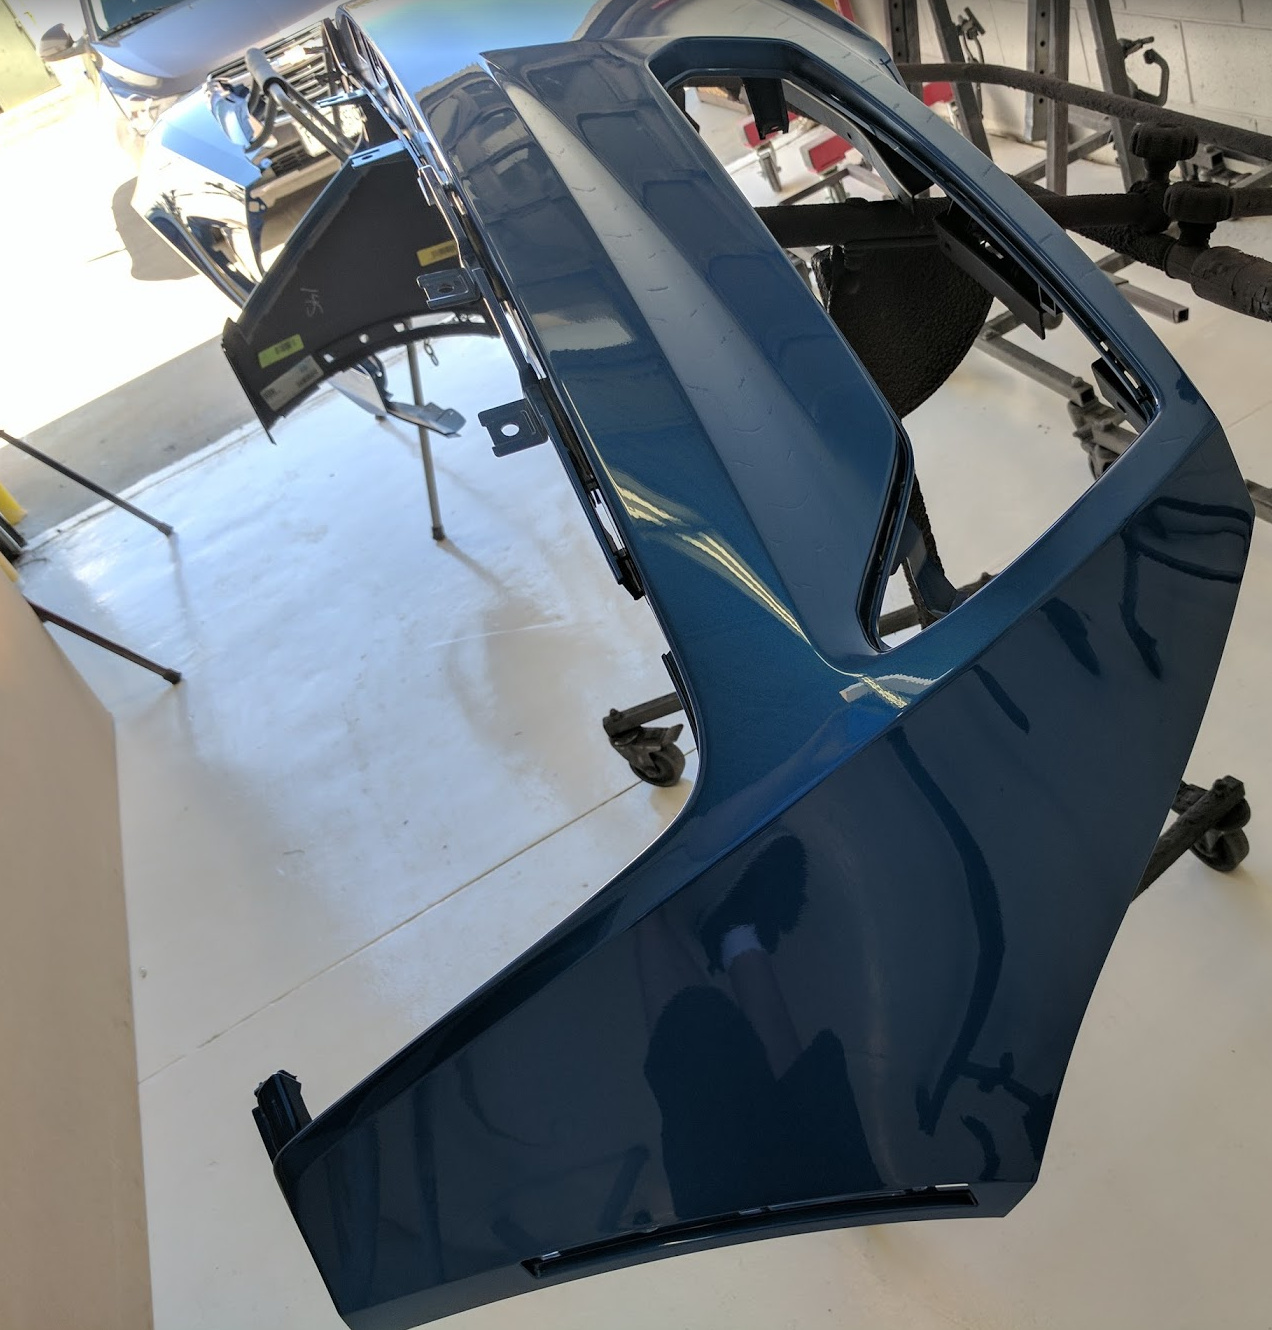
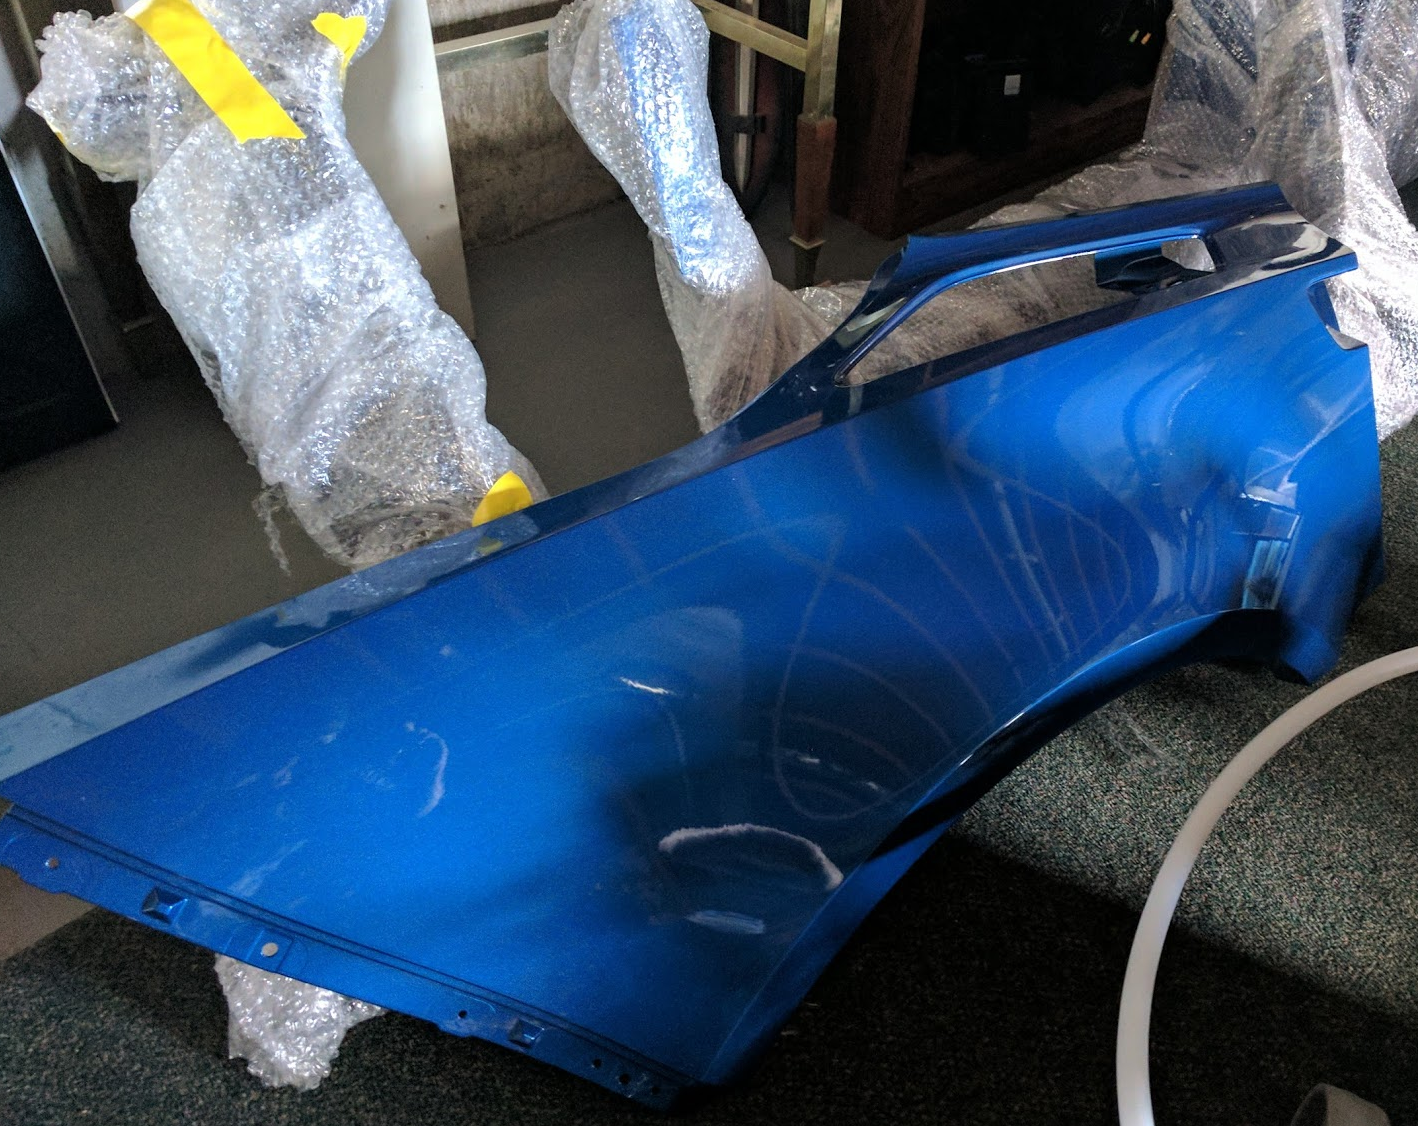
Eventually the body shop called, and had me come down to inspect the parts. A little dusty on the first one, but that was before he blew away the dusty polishing compound.


It took two trips to get them home, but no scratches, no scuffs!

And thus begins my adventure.
Day 1: A bit of painting, and removal of the rear fascia and quarter panels, about 2 hours
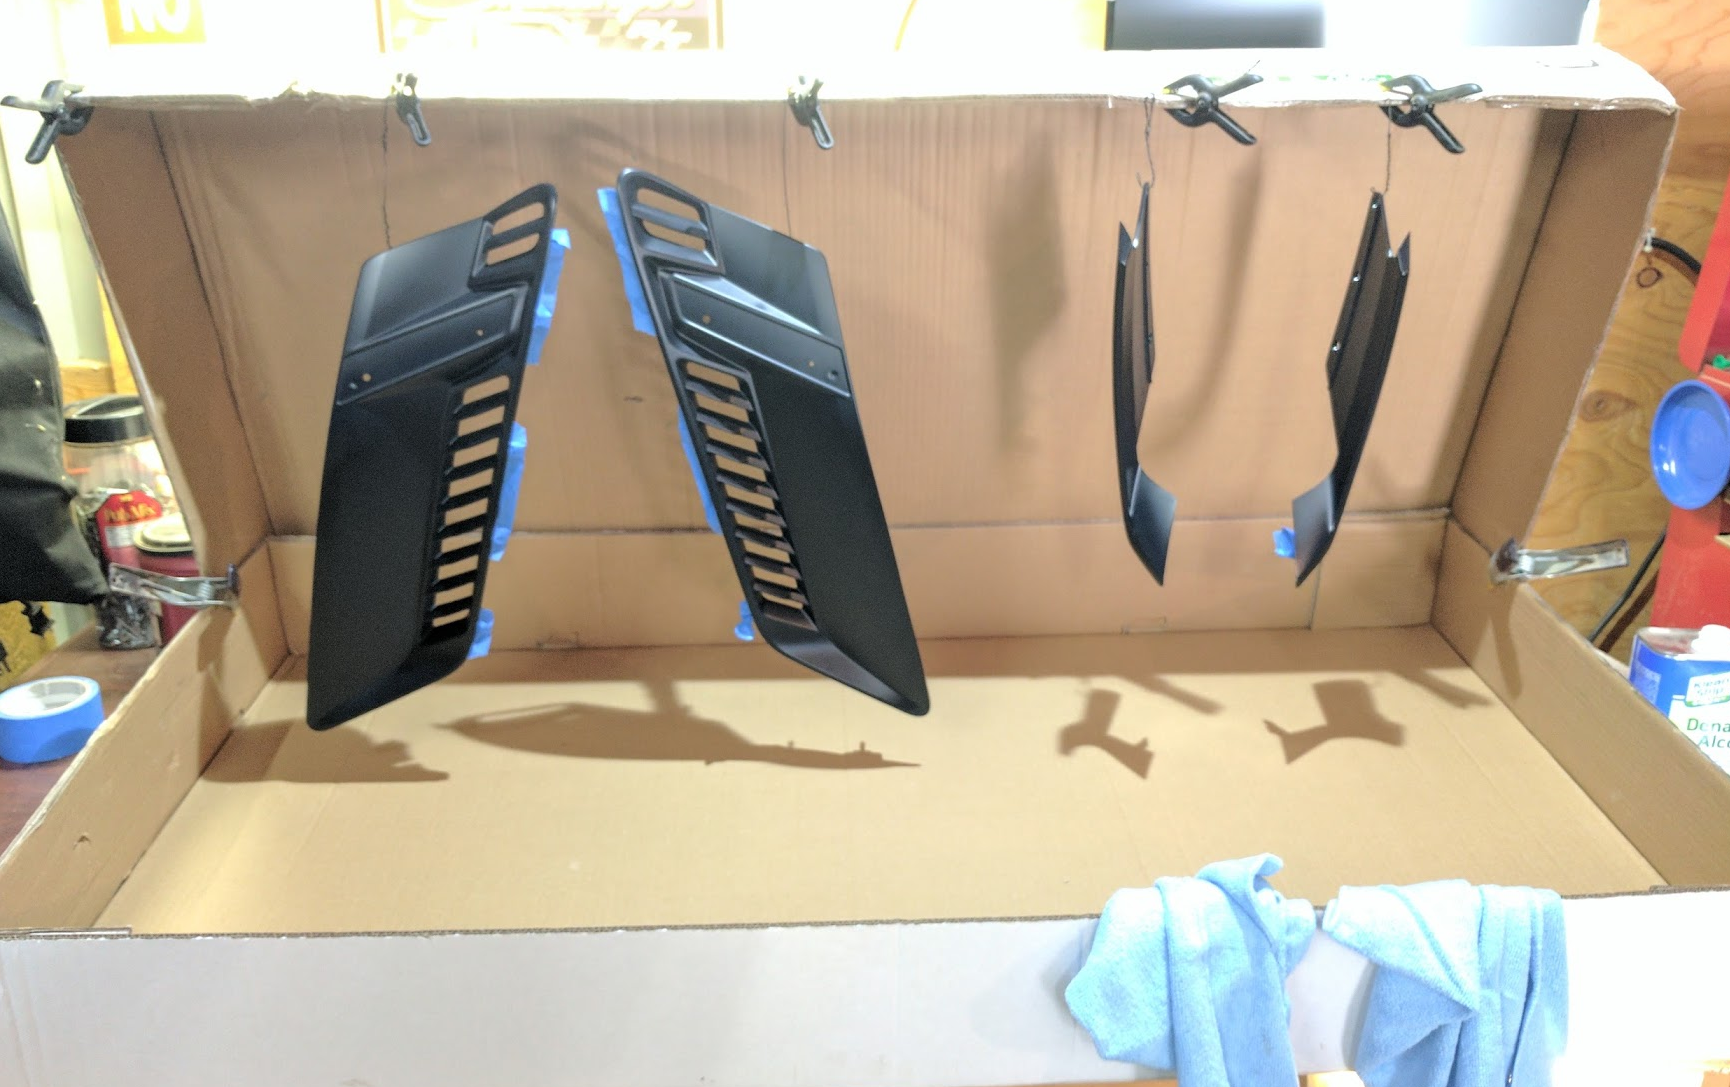
I decided to paint the flat black vents in Carbon Flash metallic. I'd have gotten them in carbon fiber, but those pieces are rather expensive for what they are. Maybe I'll upgrade them to CF one day.

An interesting story, my dad recently got new carpet in his house. However, the carpet was defective and the installers ended up putting in new-new carpet a week later. Of course, they left the original new carpet behind, which we gladly put down on the cement garage and put the car on it. Working on soft, clean, fluffy carpet when working on cars without a lift is the way to go!

First is off with the wheels!

This is the last time these wheels will be on this car. Bittersweet. Anybody wanna buy em?

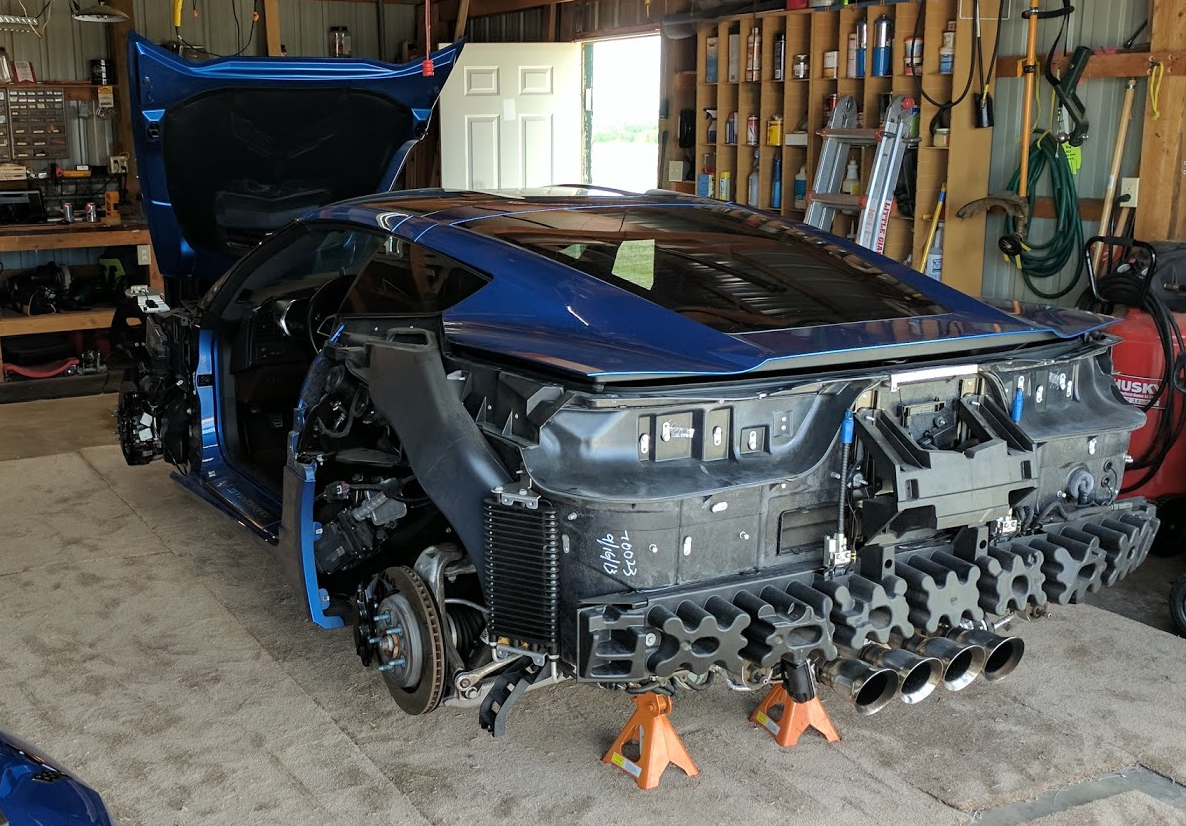
Thanks to Bill's wonderful documentation and many pictures, taking the bolt-on panels off was easy easy. First up was the rear fascia. Some bolts and a yank, a couple of cables to disconnect and the Stingray's butt is exposed:

And off with the quarter panels, just a bunch of screws, and some fiddling with the fuel door.

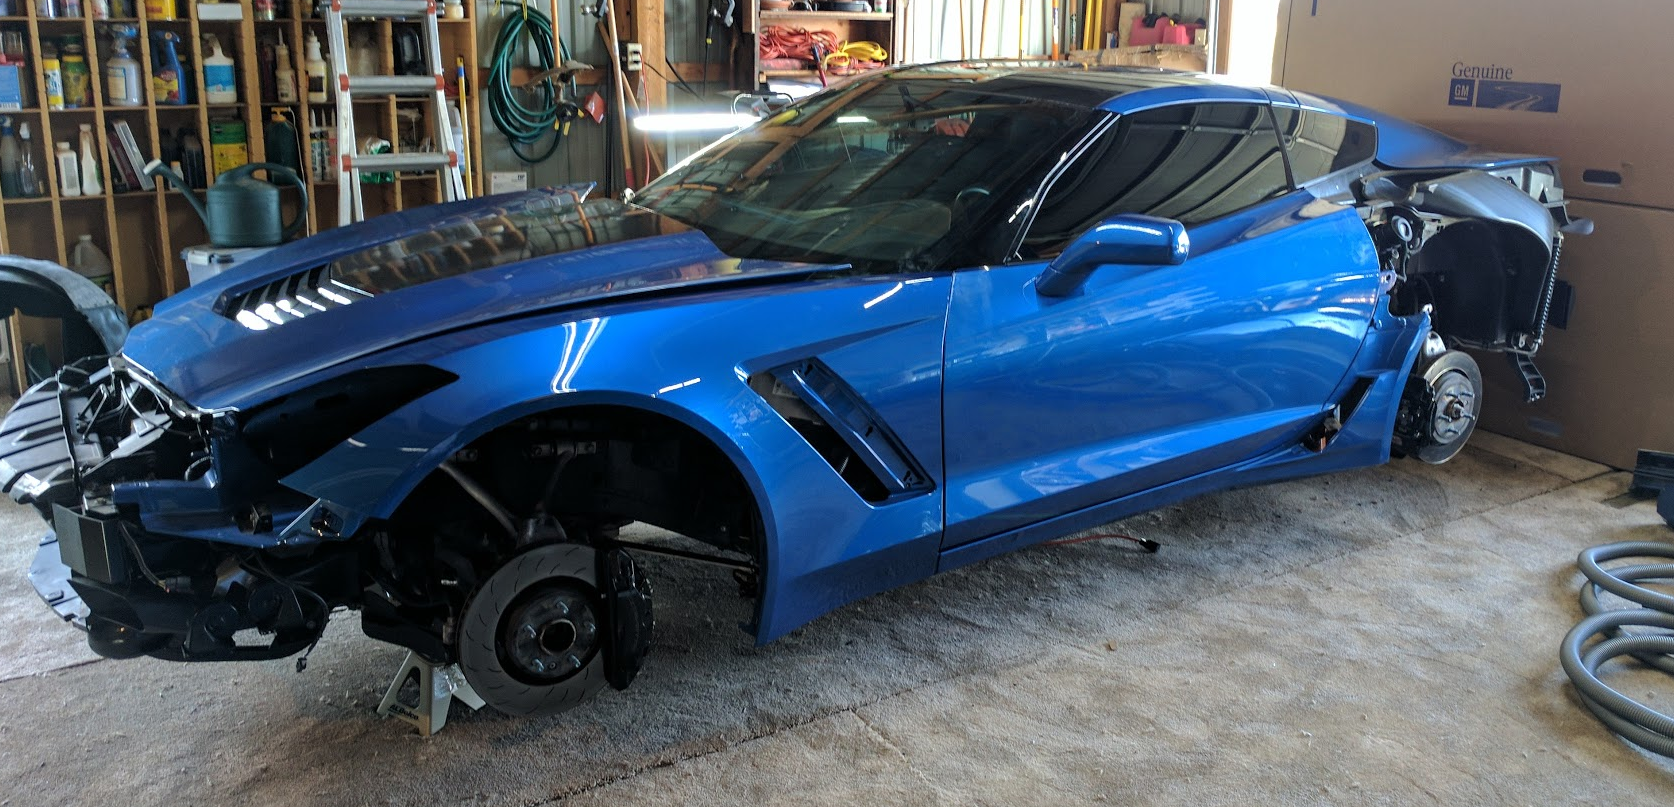
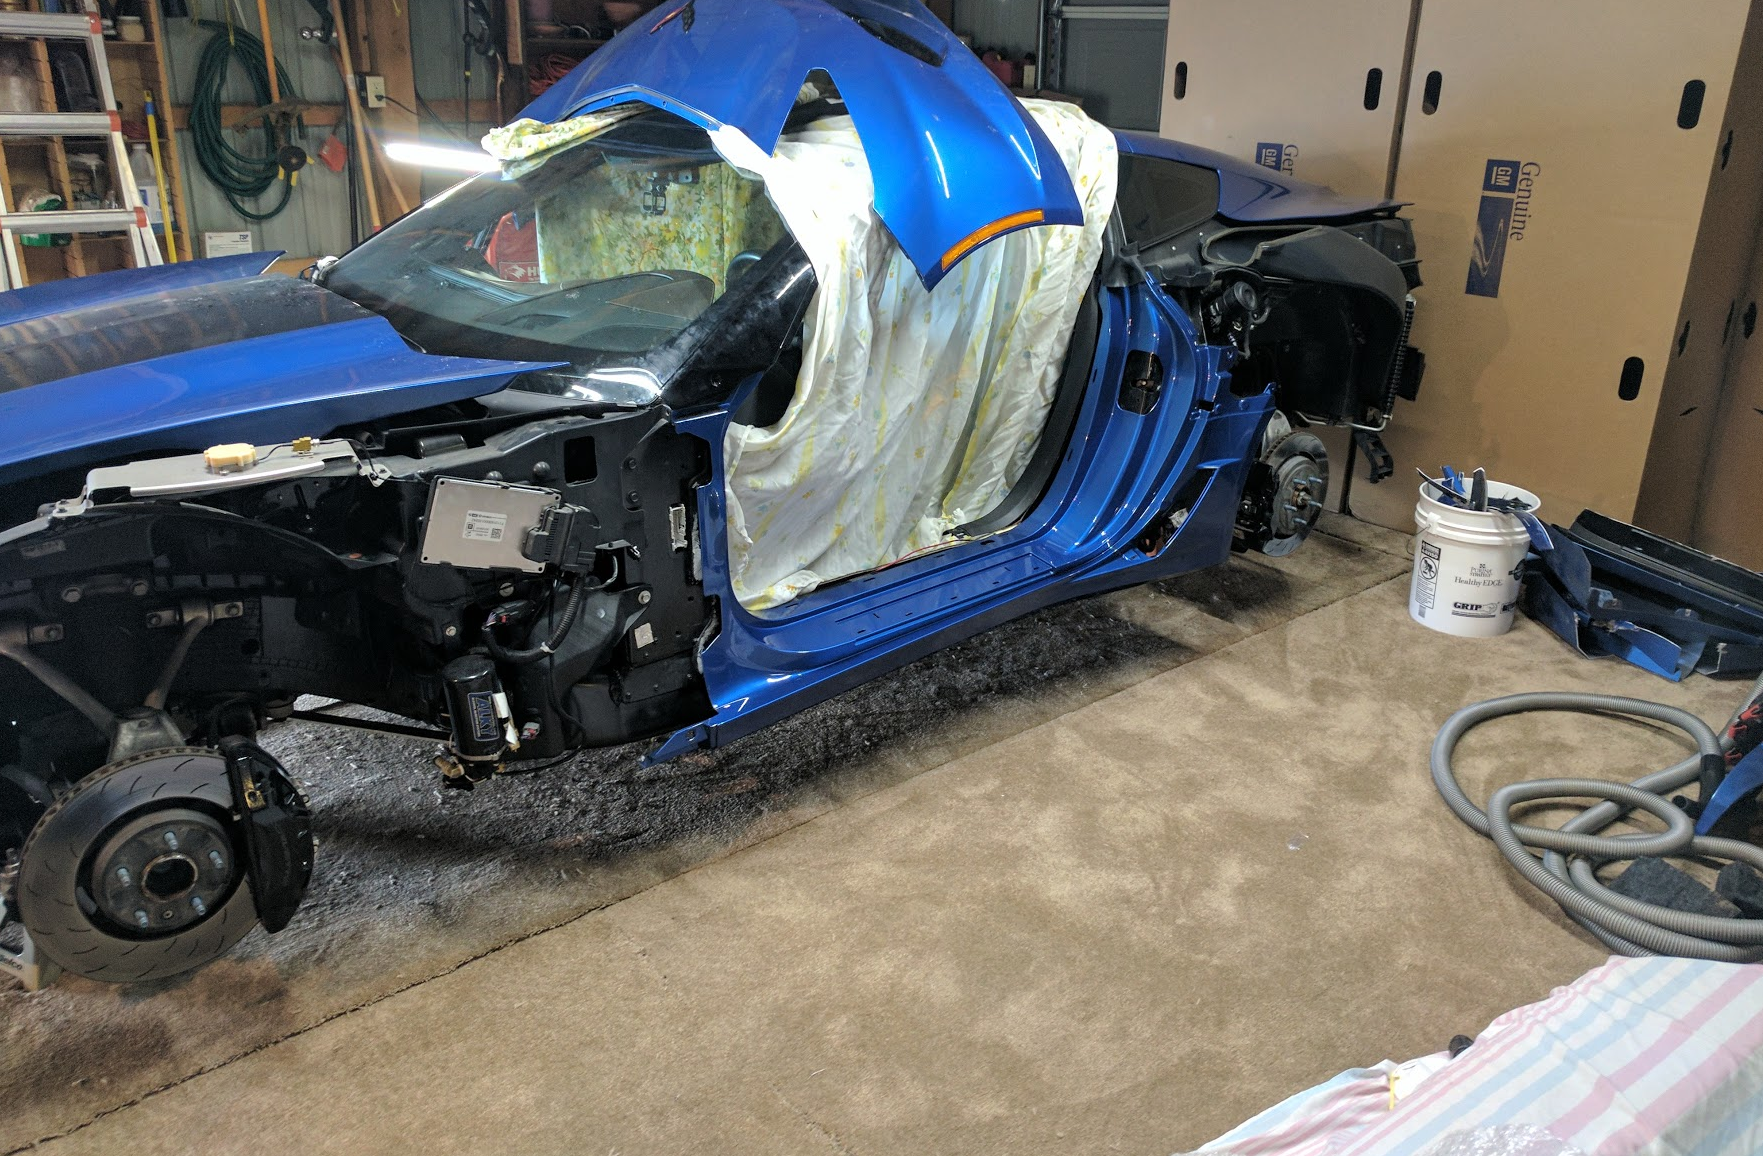
Day 2: Front fascia removal, fender removal, doors removed, interior removed (trim and seats), driver's apeture panel cut and removed, about 4 hours
Off with the front fascia:

And the fenders, wow these were held on by quite a few screws:

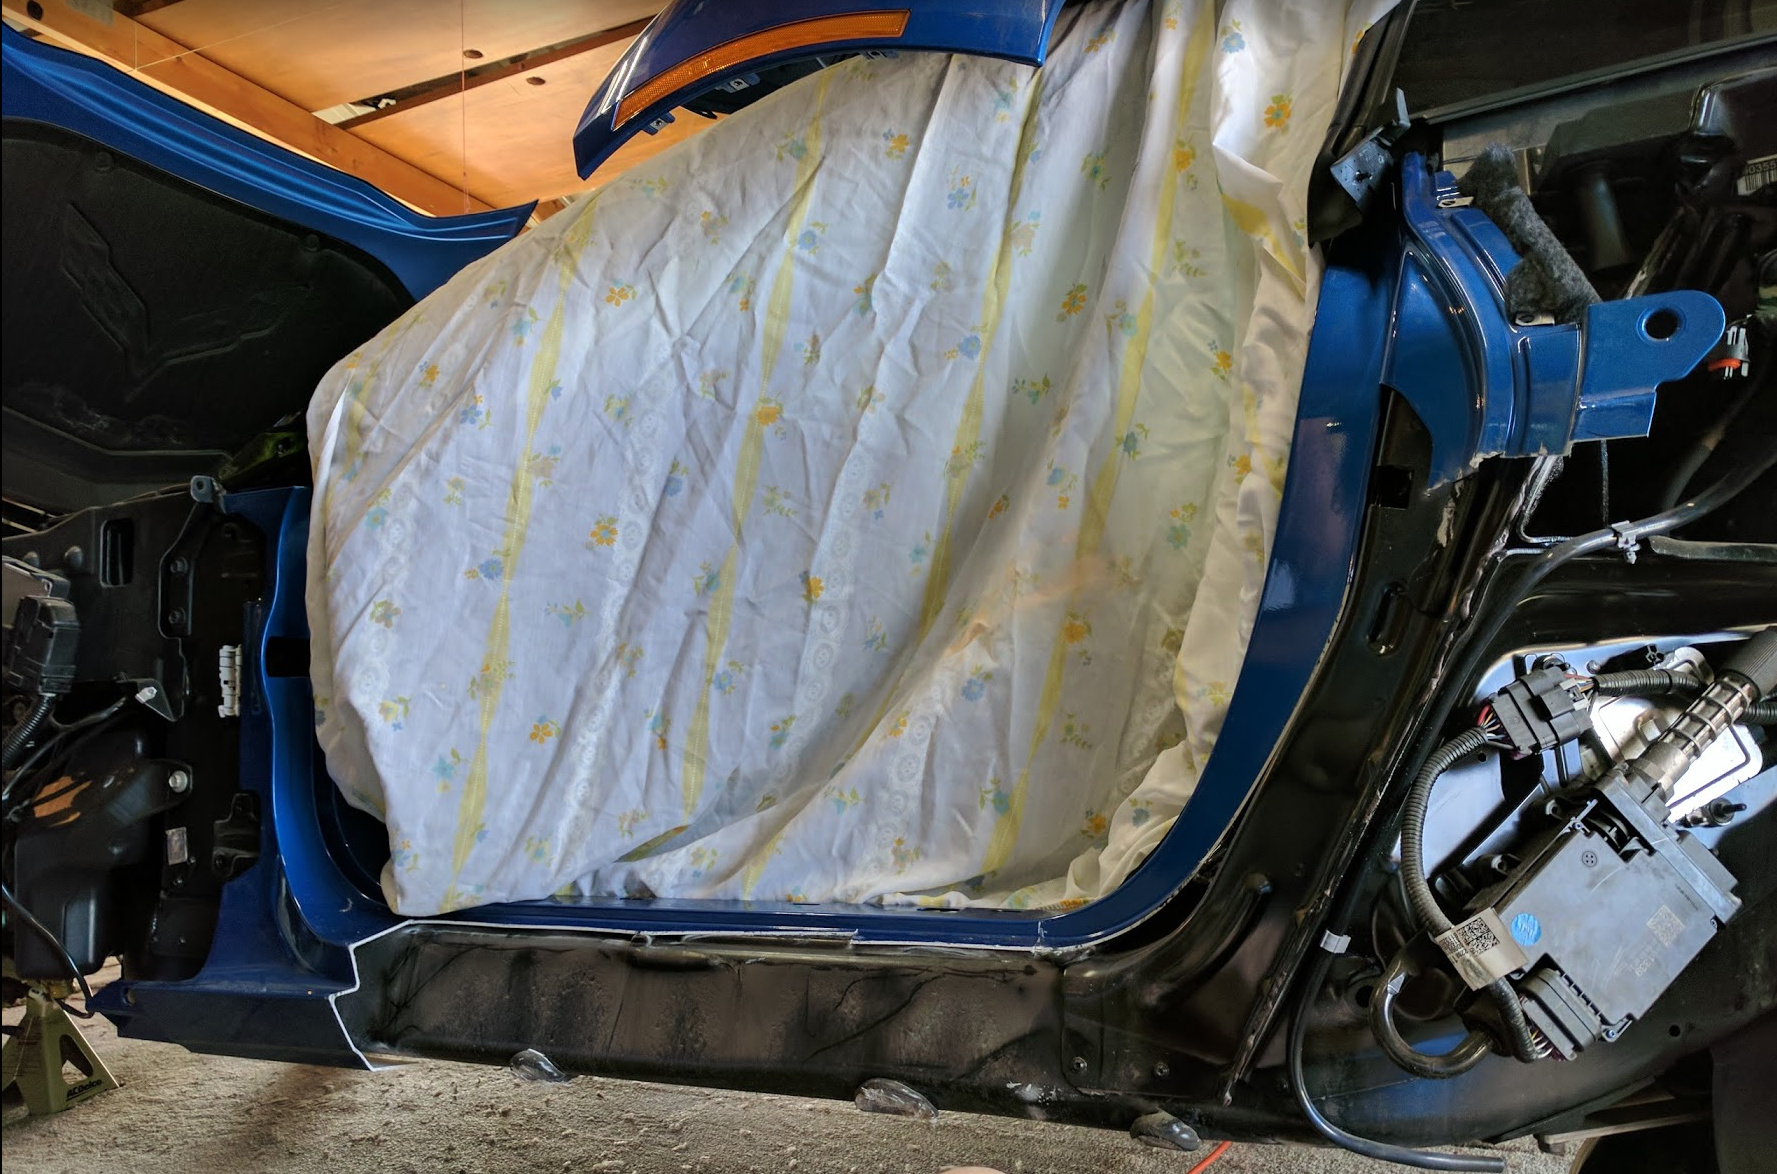
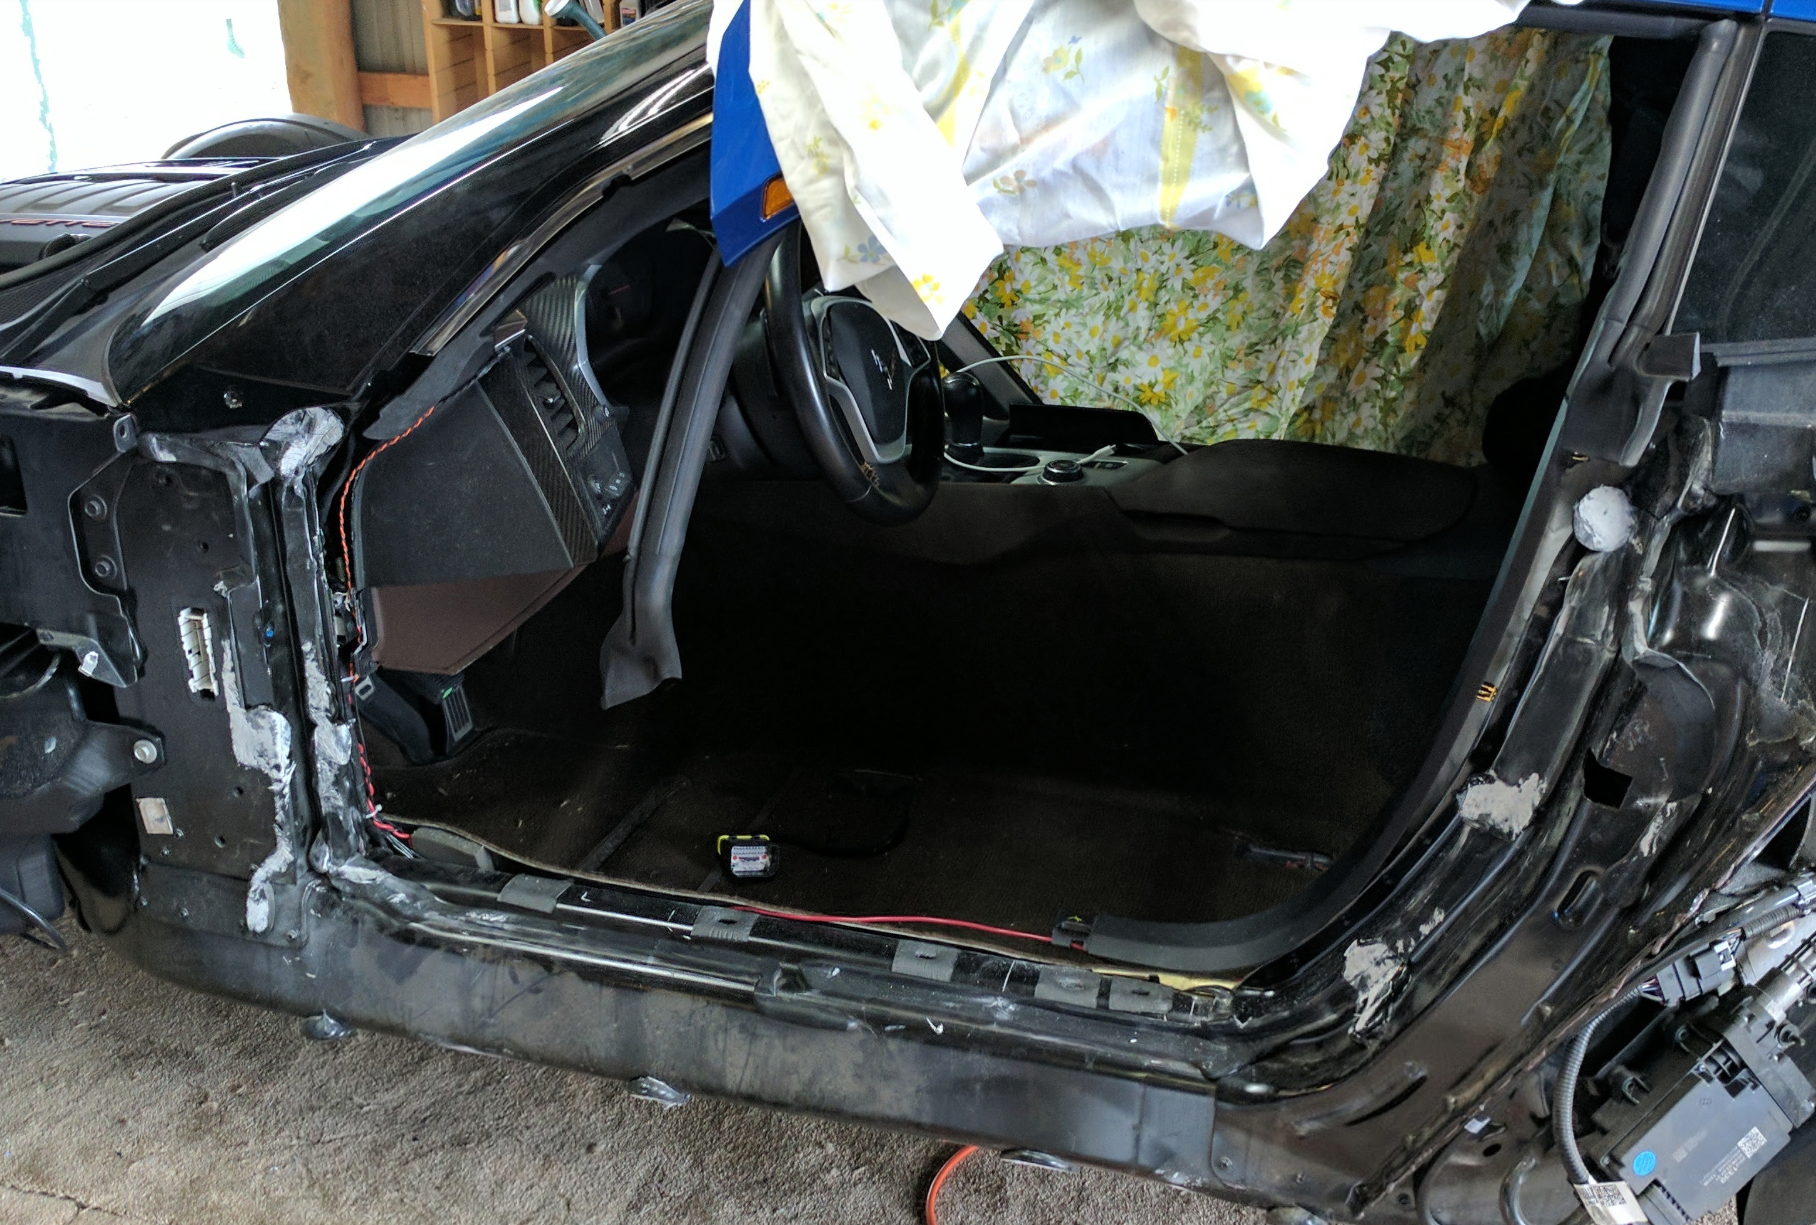
And finally the doors. This is really where the carpeted floor comes in handy, no scratching here:

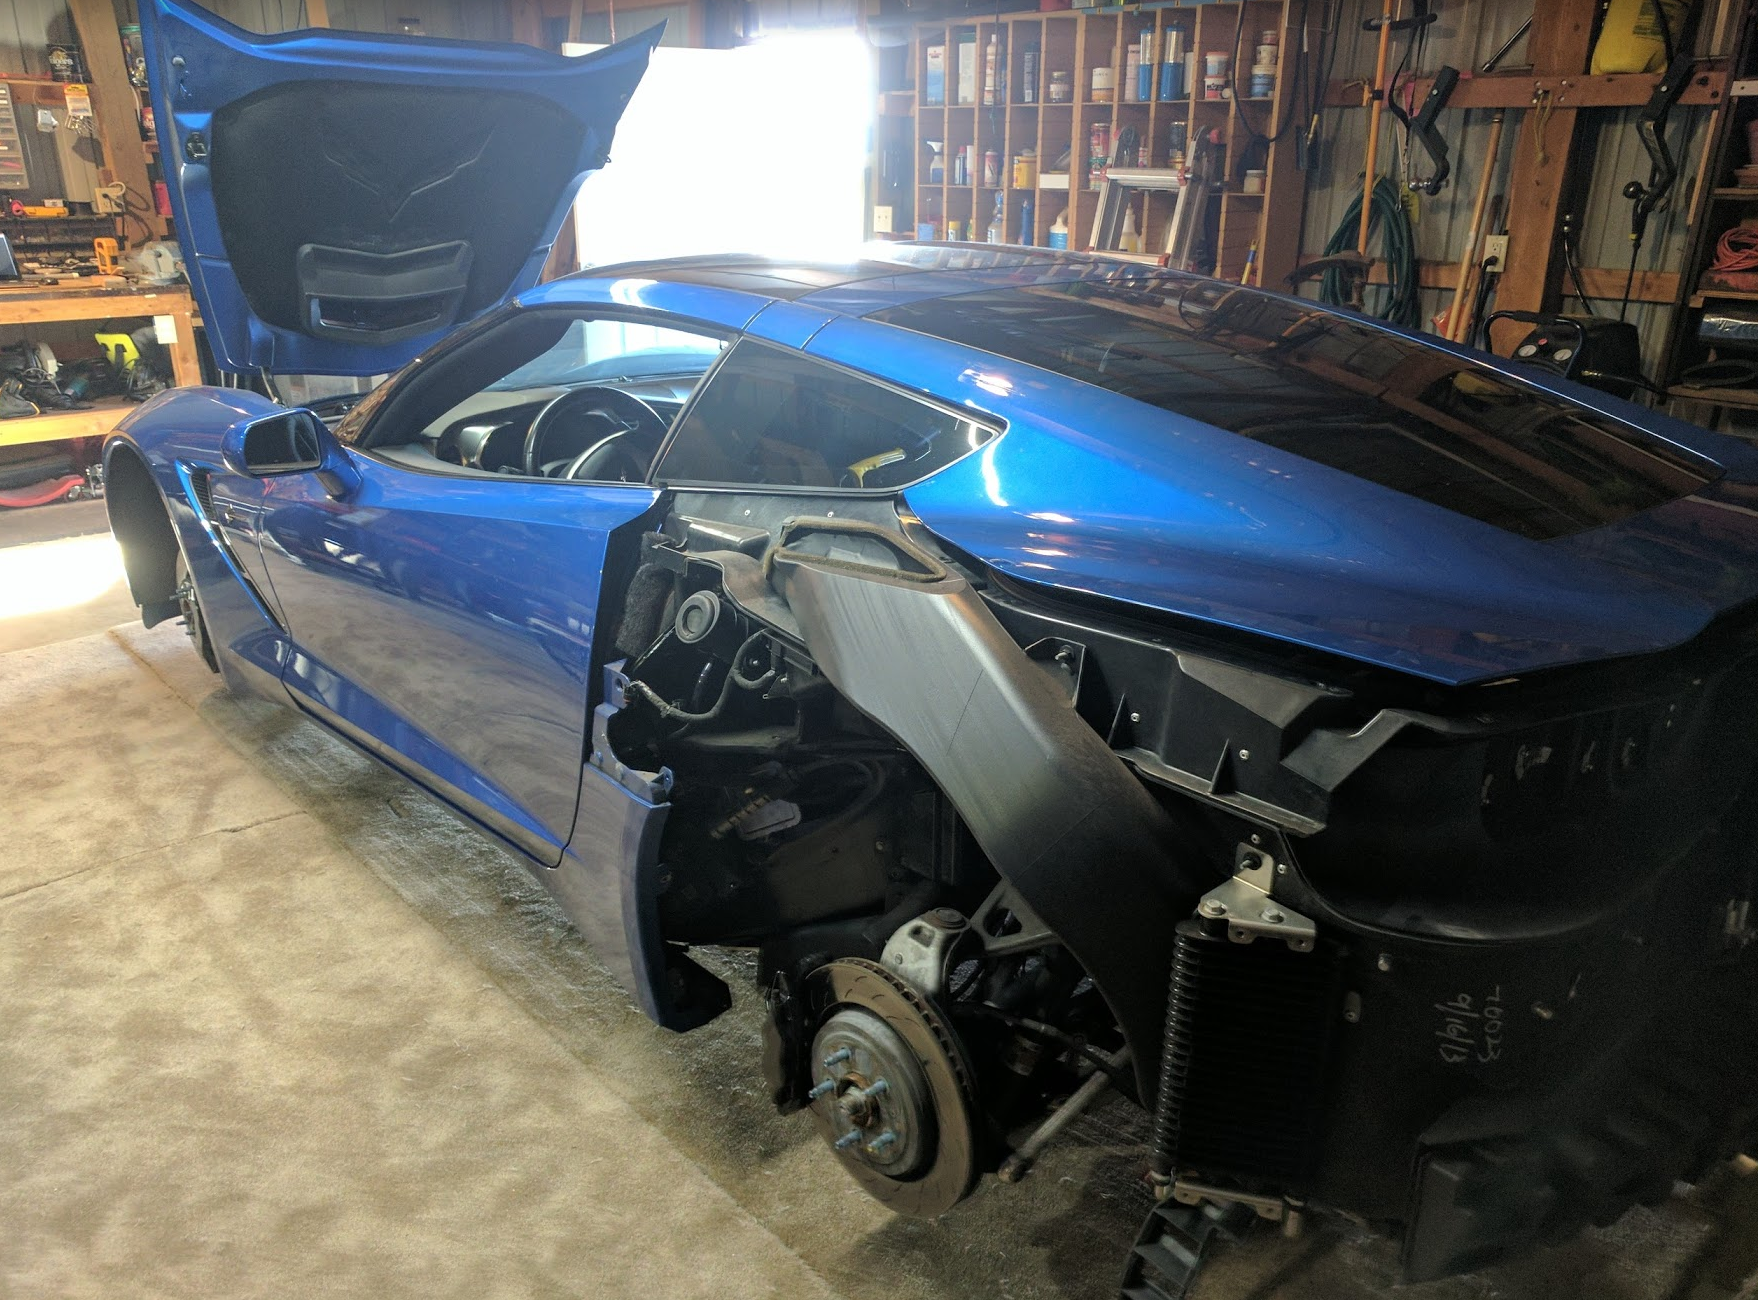
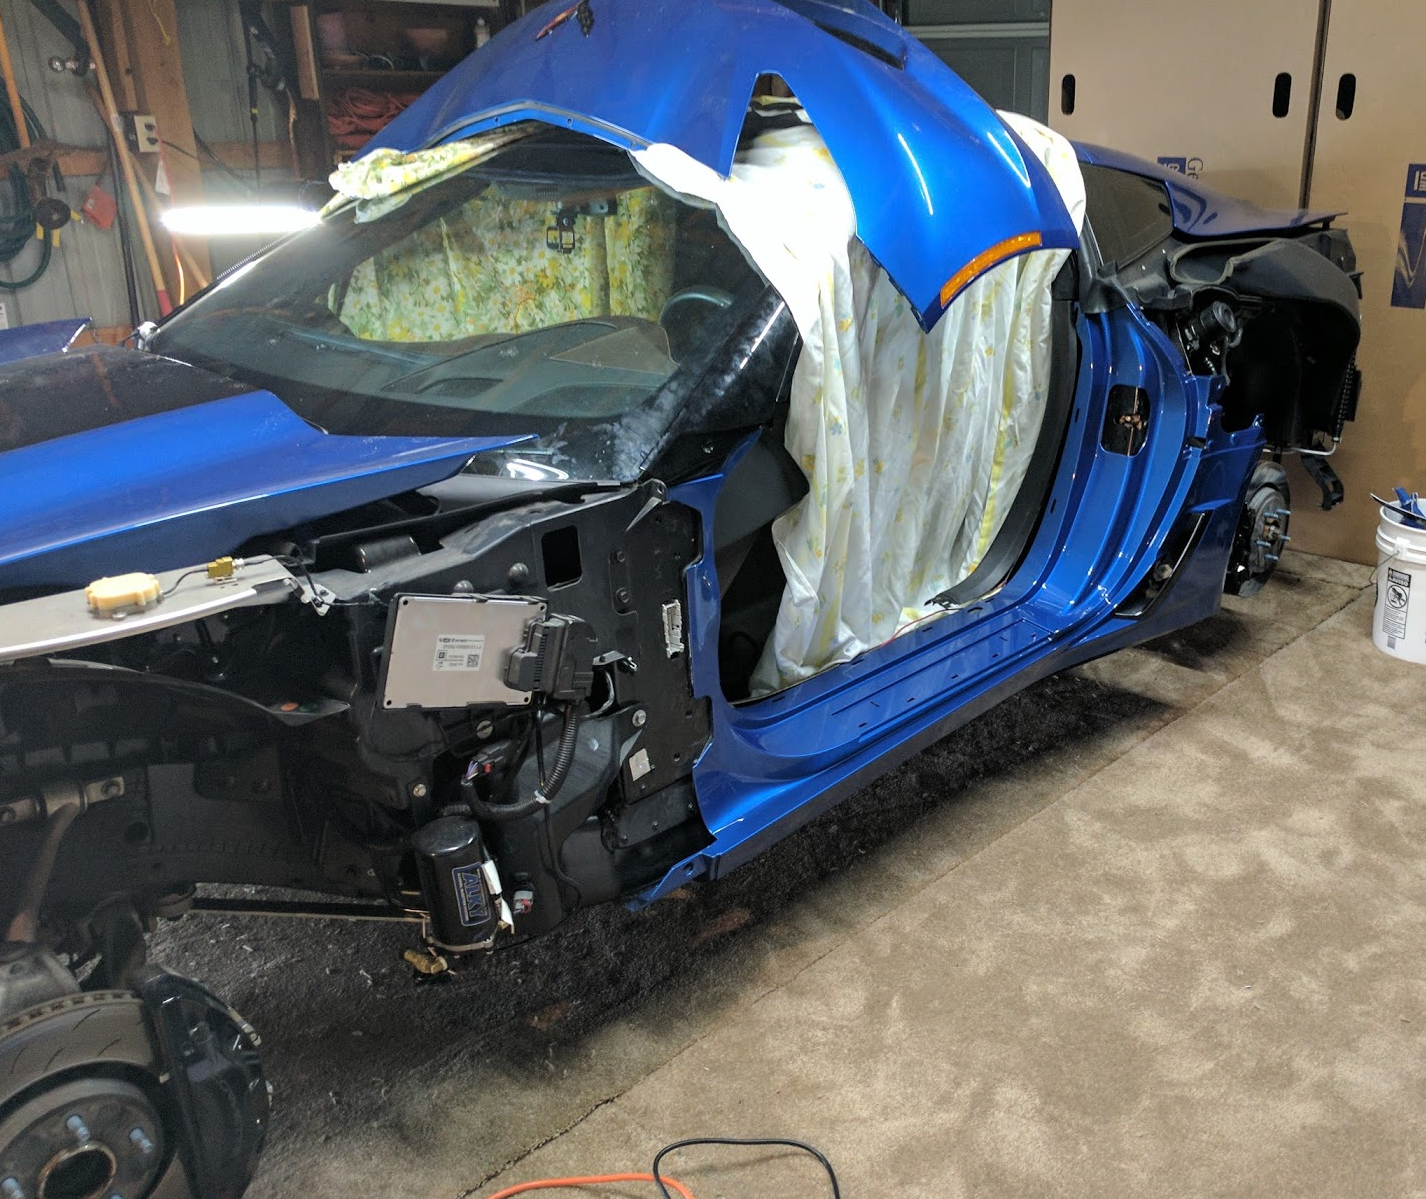
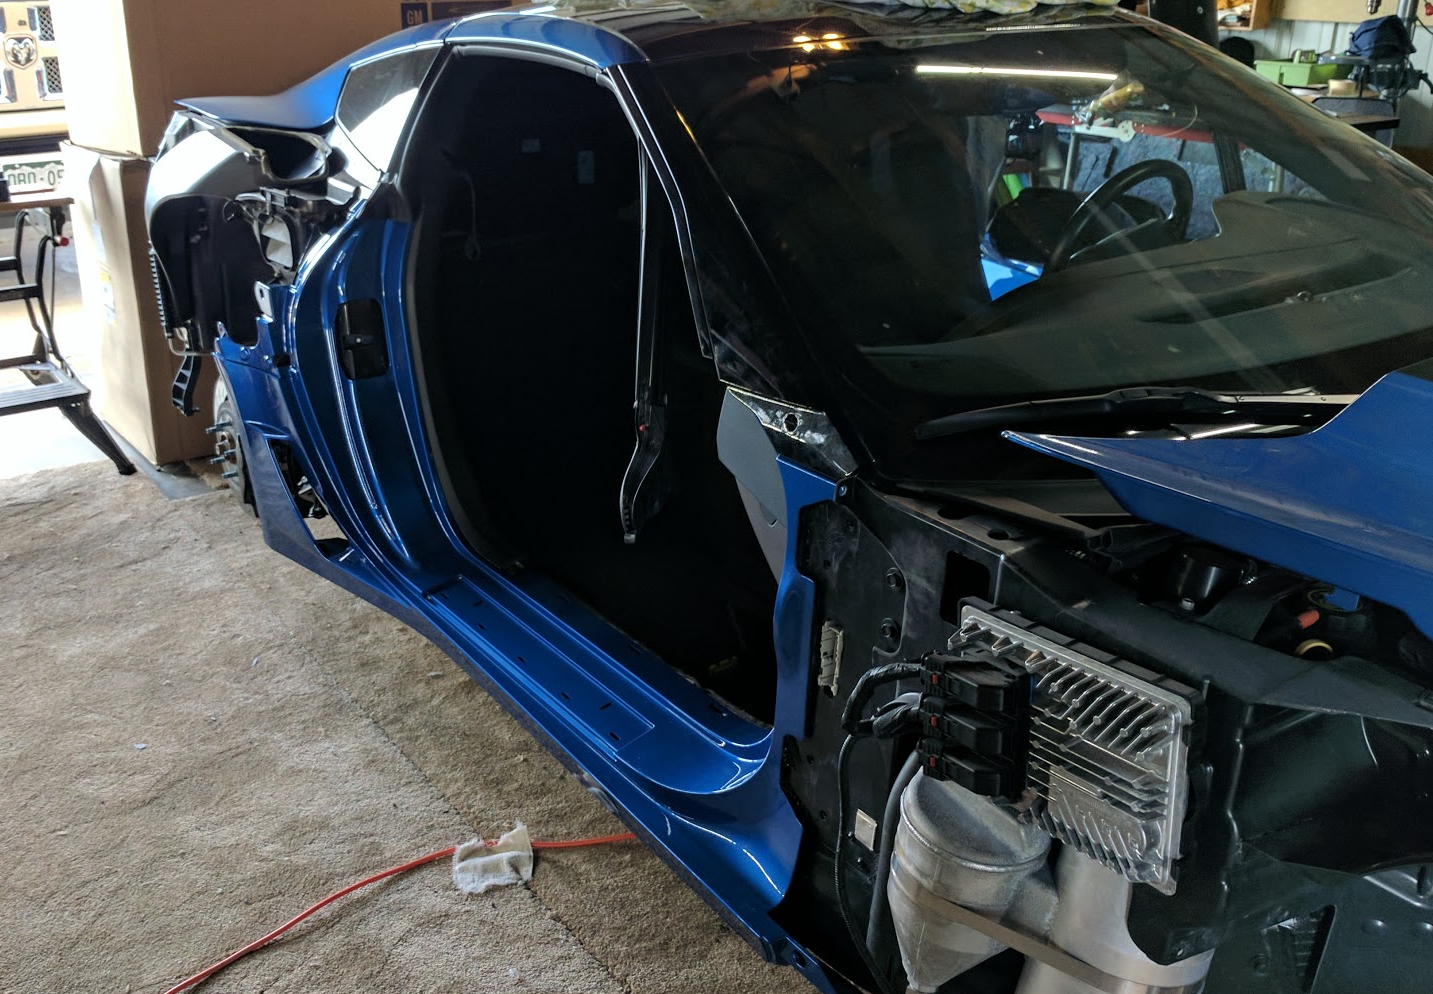
In preparation for removing the aperture panels, I'm realizing how odd my car looks:

And this is why it looks so strange:

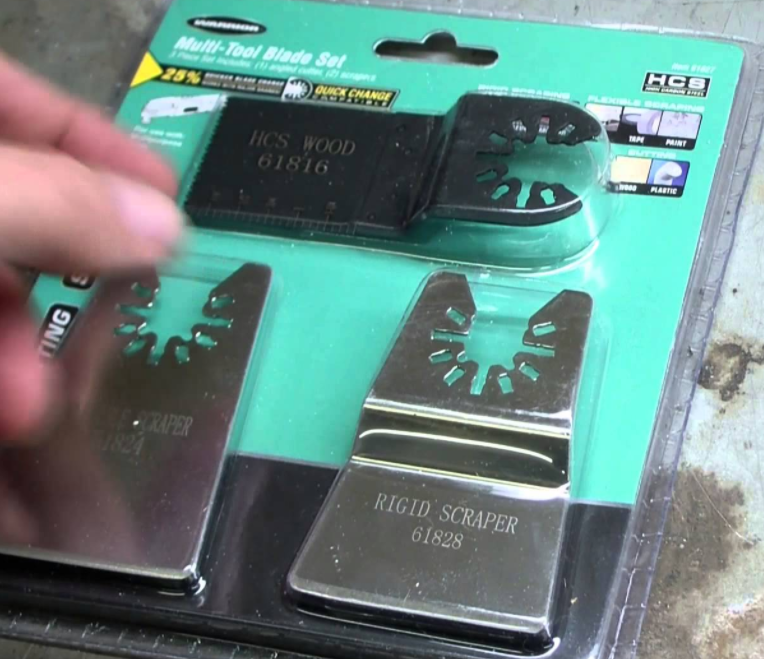
The first cuts were made on the aperture panel. Here is where I deviated from Jet Vet's method. I made the cuts where he recommends, but instead of an angle grinder, I'm using a oscillating multipurpose tool - a very clean and safe way to cut the panels, never cutting too deep, and very accurate.

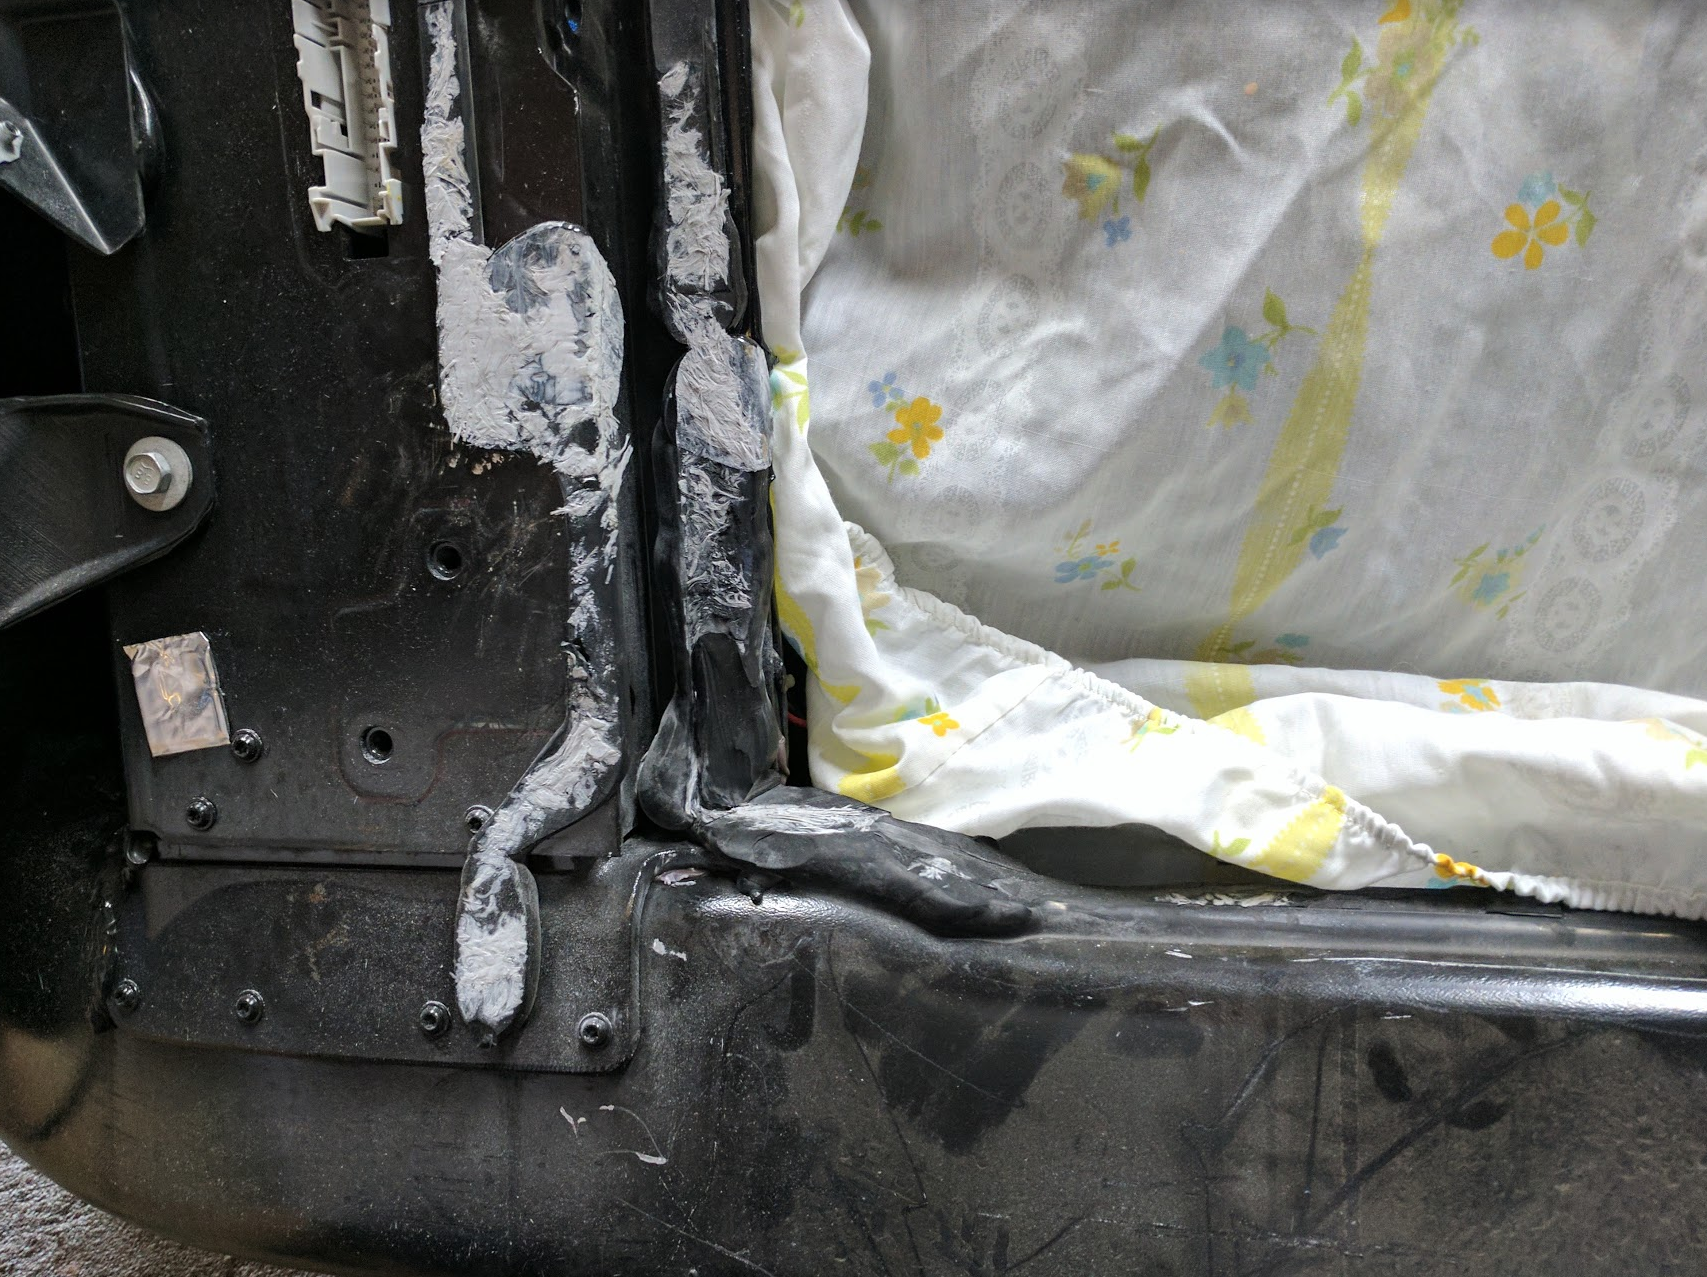
I used this with the toothed tool to cut the panels around the urethane and epoxy blobs. I then switched to a sharp chisel / knife blade on the multipurpose tool and used that to slice the urethane away from the body panel. This made for very clean and very fast work, I'd say we had the aperture panel completely off in about 20 minutes, no heat gun or yanking and pulling required:

The current state of the old driver's side aperture panel:

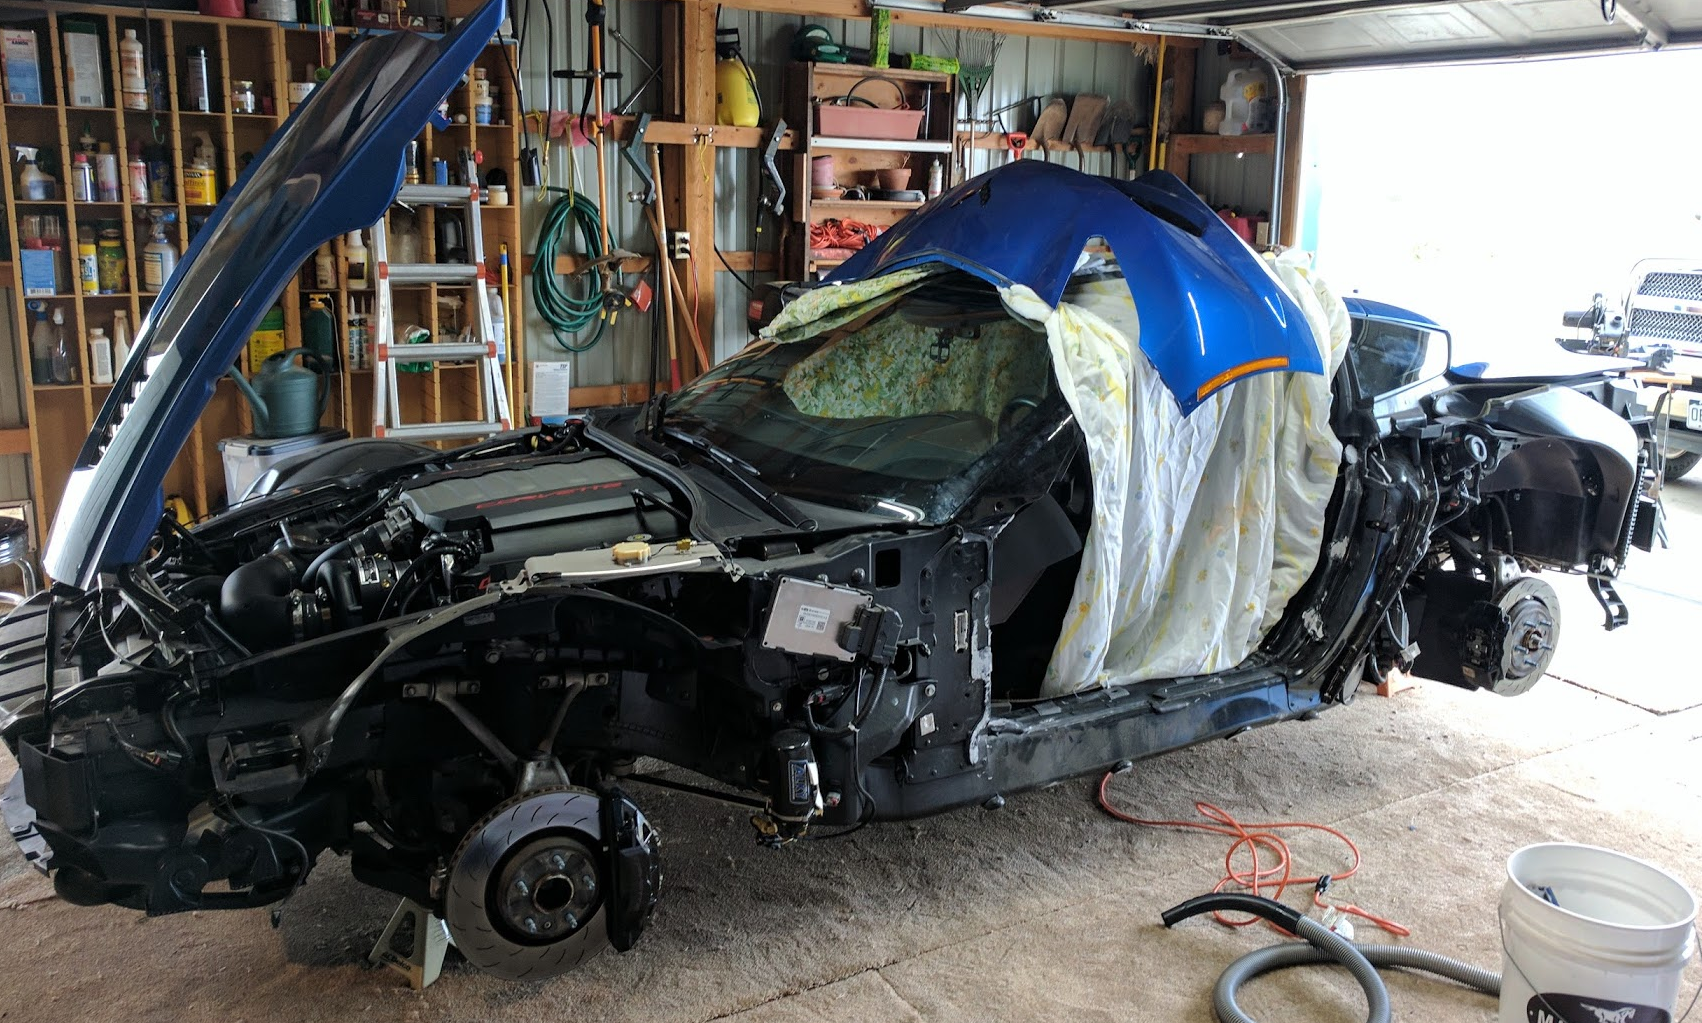
And the current state of my car (yes the front fascia is on the roof, there isn't enough carpeted area in the garage for all these things!):

Not bad for a weekend's worth of work, eh? Next week will be cleaning up the urethane and gluing the new panels into place, then reassembly and the installation of the carbon fiber parts.
I have to say, this is going a lot easier than I expected, this is not a difficult project at all, though it looks daunting, thus far it's been a pleasant experience.
Again, a big thanks to Bill aka Jet Vet, Rick aka SubChev, and C7Carbon. Stay tuned for more!
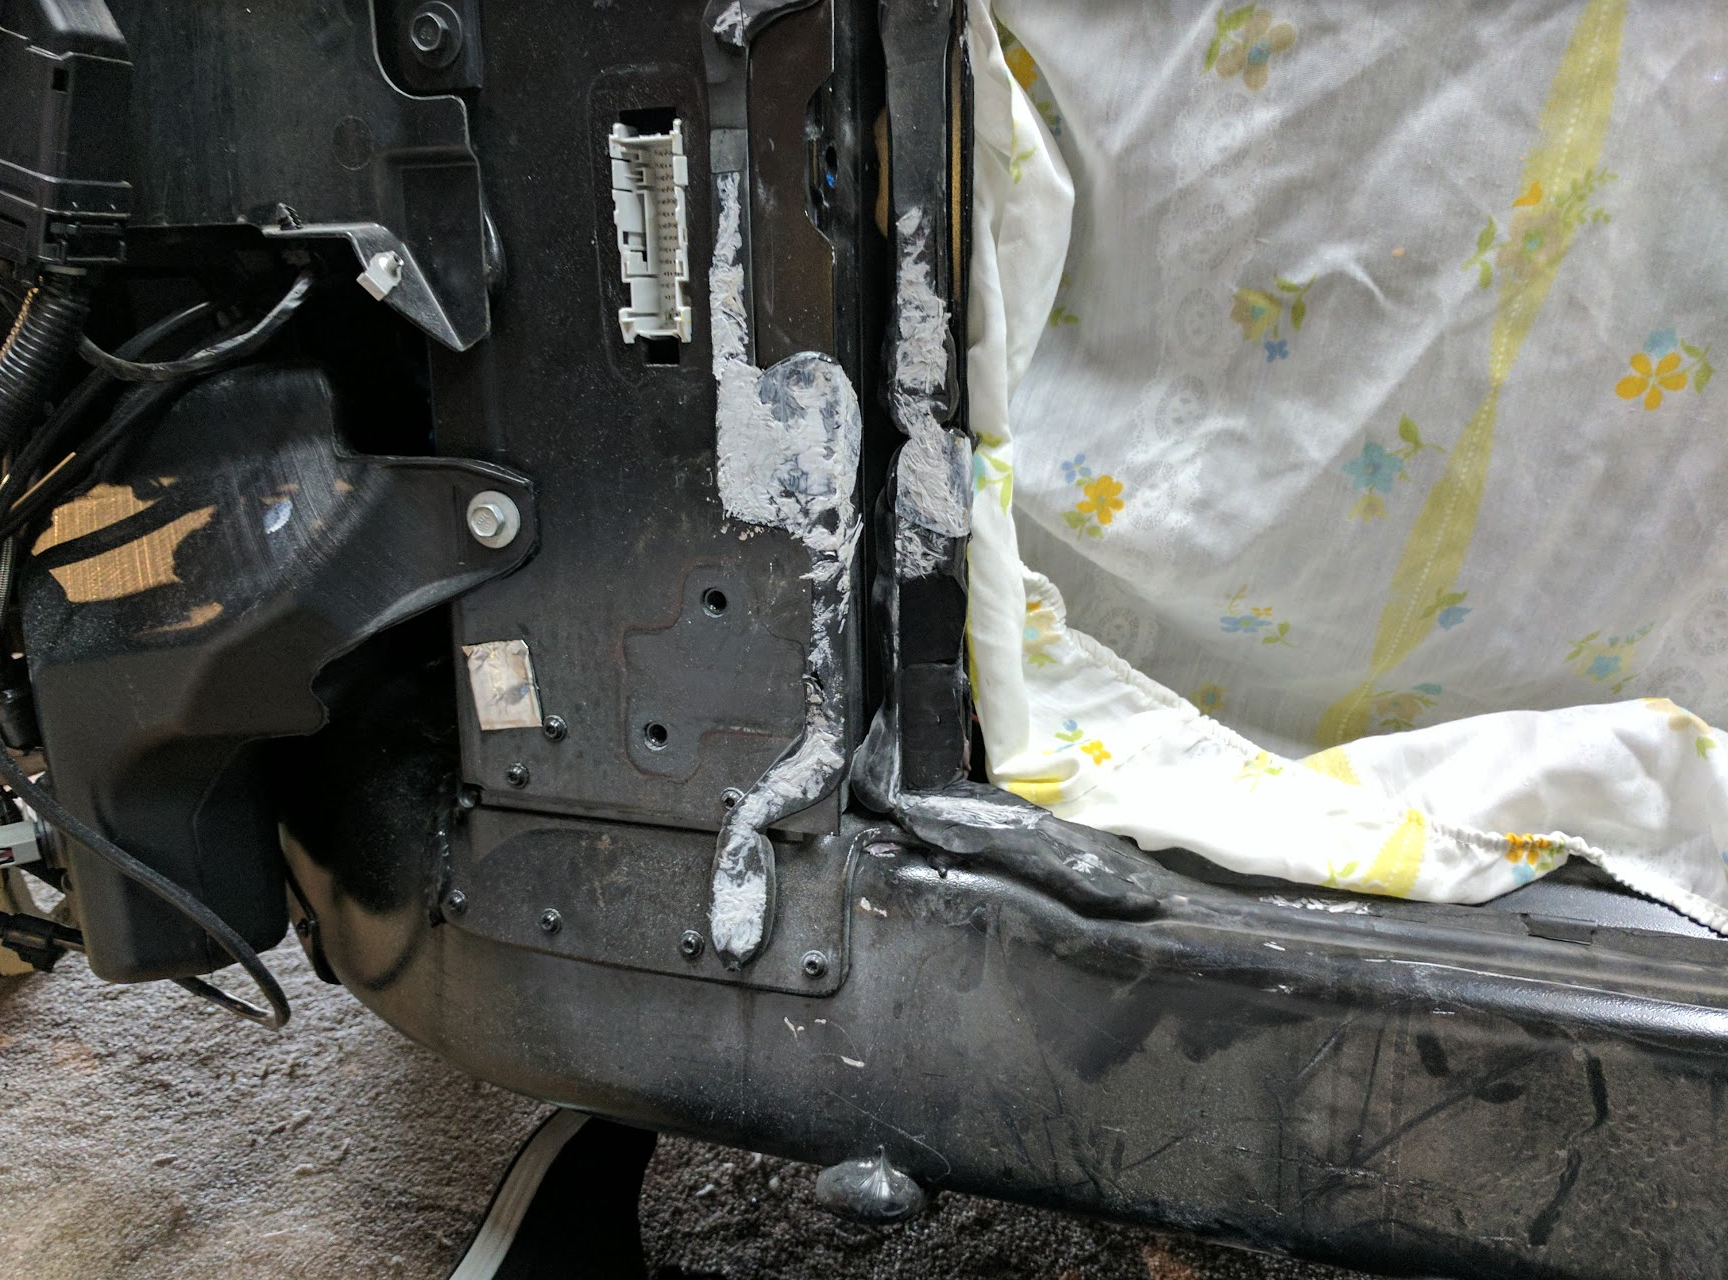
Day 3: Passenger apeture panel removal, urethane cleanup, about an hour
Today (Friday), I managed to push off early and removed the other aperture panel. And, as expected, this side went quicker as I made many of my cuts first and then switched to the chisel blade to cut it off the urethane, but overall it took more time, as I was working solo and had to cut with the oscillating tool in one hand and work the sucker in the other.
Since I knew where the urethane was, I was able to make cuts exactly where I needed to to leave a minimal amount of body left, so that I could cut the urethane and remove the panel at the same time. I was sure to leave some spots un-cut for positioning, but this method was so much better than ripping fiberglass pieces away from hot urethane. I didn't even touch the heat gun for this side. About 90 minutes to cut the panel, cut the urethane, pull it all off, clean up the mess.
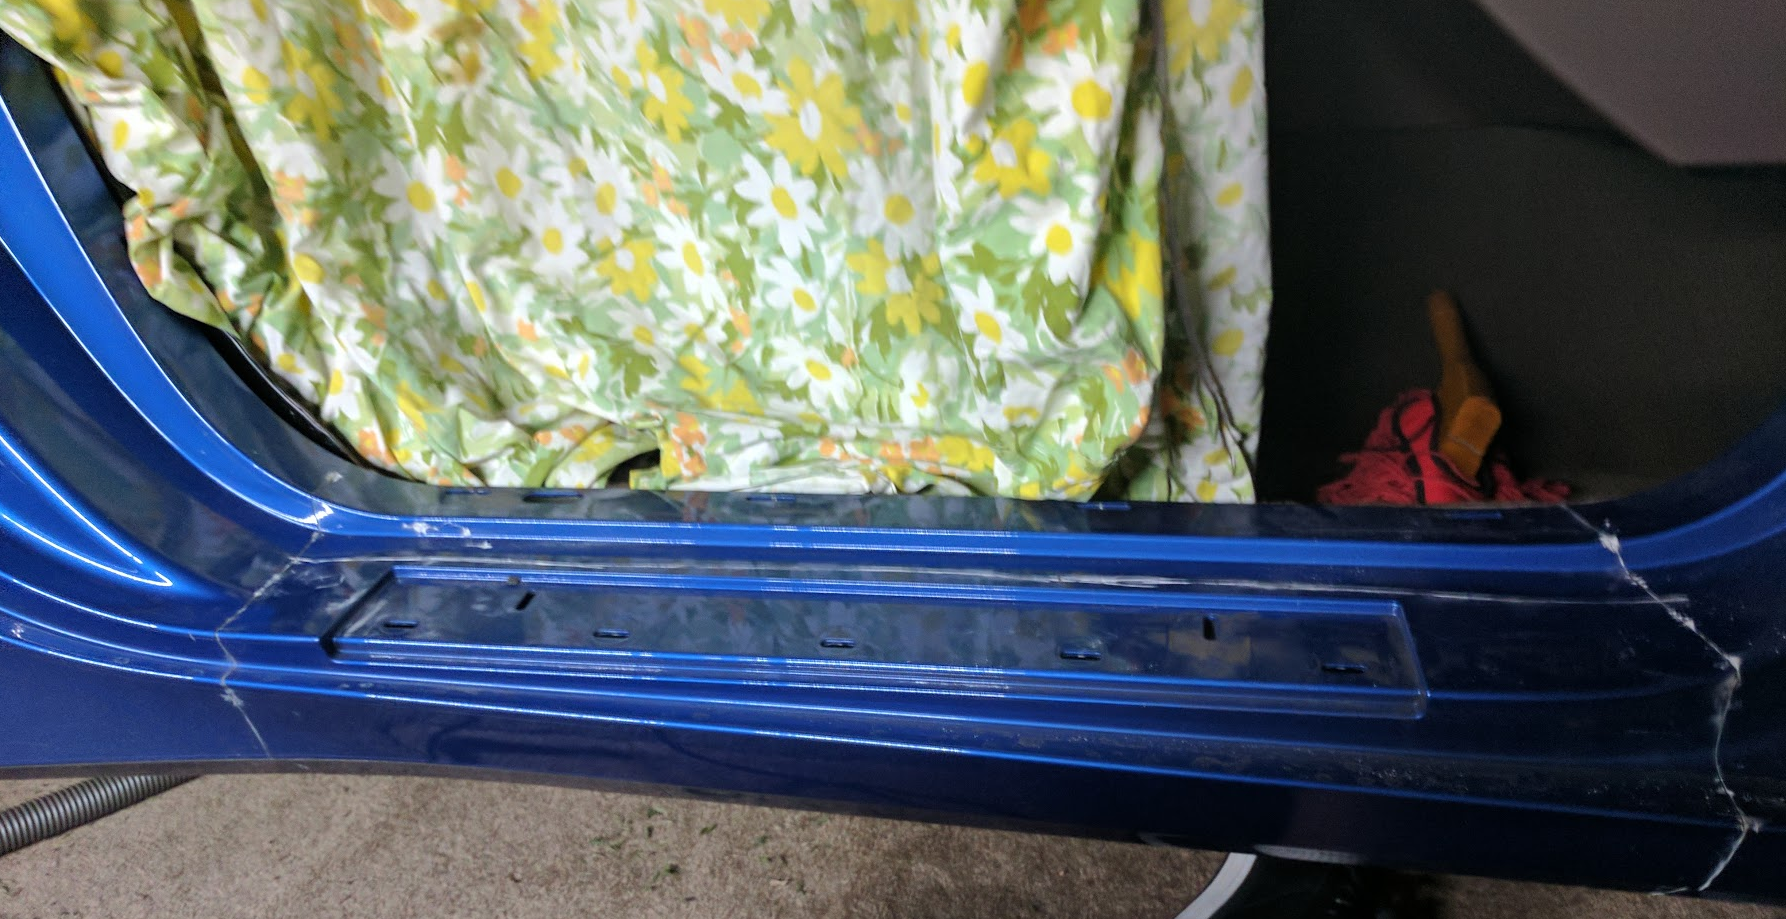
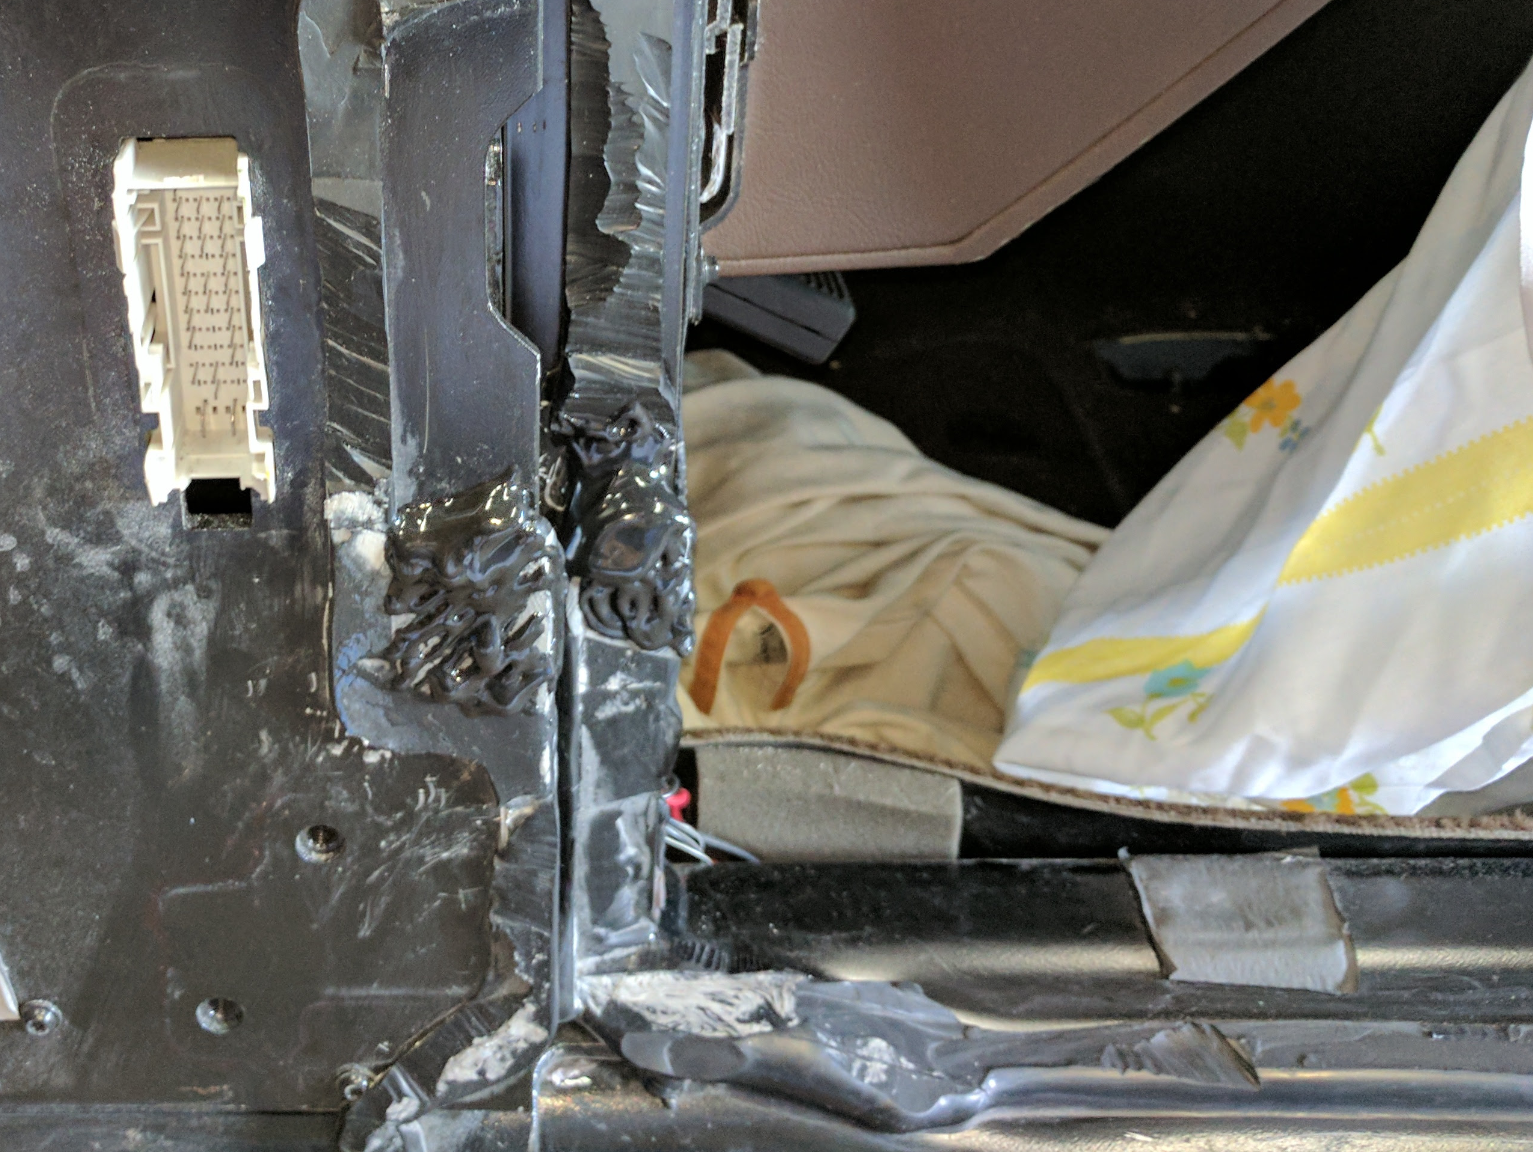
Here you can see my first cuts (using my x-ray vision) right along the urethane:

Look at it now (lower right) and see i cut the inboard side too, leaving about a 1" wide strip of panel stuck to urethane below it. Easy.

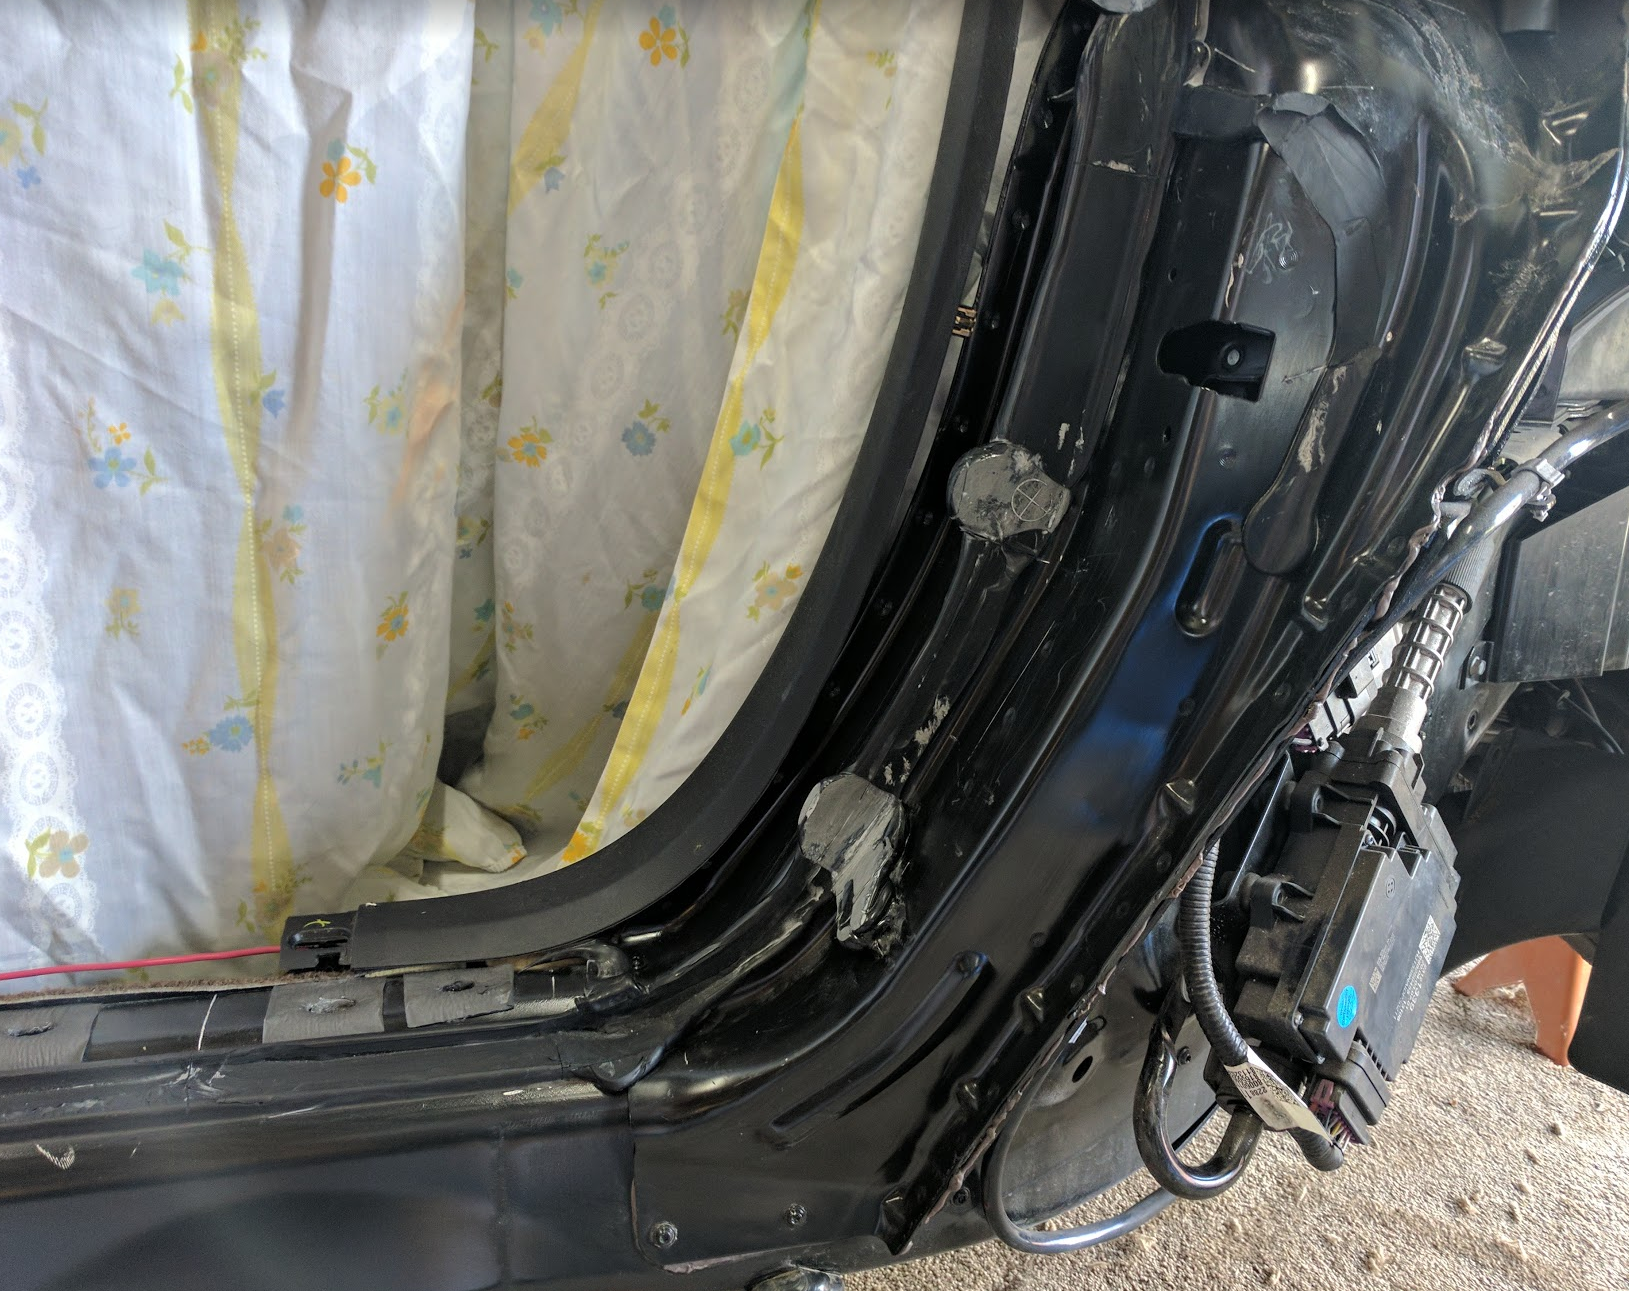
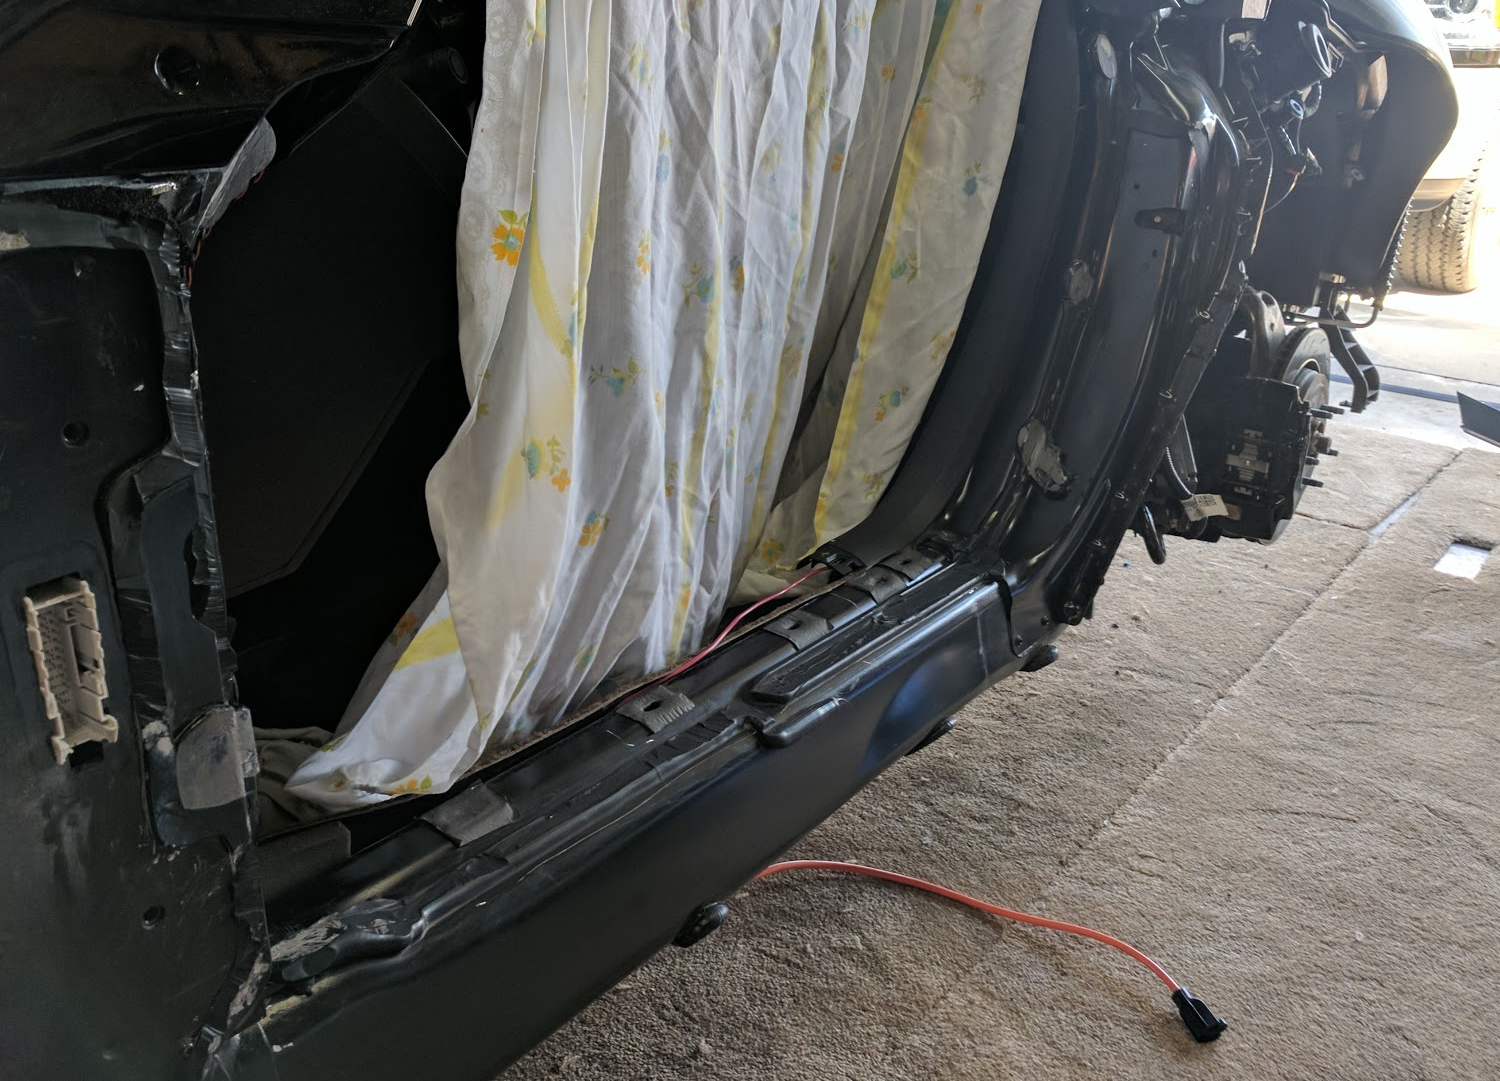
I then cut upwards towards the lock area, and like magic....

That piece basically fell off. With the passenger side cut off, it leaves this:

And with a little bit of cleanup on the urethane corners (pics coming soon) the disassembly, and thus part 1, is complete.
But, after getting a A&A kit with the Ti blower and small pulley, headers, and methanol cooling, I quickly found that there was far more power than the tires could handle. Well, there are a few ways to fix this, from running stickier tires, to better throttle control, to oversized tires. But I figured why not go whole hog and do a Z06/GS widebody conversion?
It was about this time that Bill aka Jet Vet started posted his widebody conversion adventure on his '15 Z51. I watched closely and intently at his slow but steady progress and I knew it was a project I could easily handle, plus it would be a great excuse to spend quality time with my dad - something that is priceless to me.
So, decision made, it was time to research. I spent the winter putting together parts lists, with price lists, from various venders who sold full Z06 widebody kits, aftermarket kits. I quickly decided that the aftermarket widebody solutions, while nice, lacked the polish and finish that the Z06 parts have.
After checking with several vendors who sold Z06 widebody kits, and the various dealerships, local and on the internet, I soon found that Rick at Suburban Chevrolet (subchev) had the absolute best prices for these parts hands down - and that's by a couple of thousand dollars compared to another dealership popular on this forum. After ordering the parts and being blown away by the price, even after shipping ($4700), I had some extra cash to put down on some carbon fiber parts (front & rear spoiler, side skirts) most from C7Carbon - another great deal with shipping ($2100), plus their quality is top notch. I also picked up a set of Z06 wheels with mounted tires and TPMS sensors from Keith at FloridaSpeed (DocZ), also great price shipped ($2600).
Before and After Photo: For those people who don't want to scroll.

And now for around 60 more pics, presented chronologically. Starting with the deliveries. So many boxes.
To view these photos on imgur, head over here: https://imgur.com/a/42yCm
First to arrive were the wheels. Gorgeous, and what's hilarious is, when they're stacked up and stowed away, they make a tower taller than the car they're going on.

Those of you might remember back in the middle of March when I posted this pic, delivery day from the freight carrier with some absolutely massive boxes, certainly larger than I expected:
But the contents were gold:
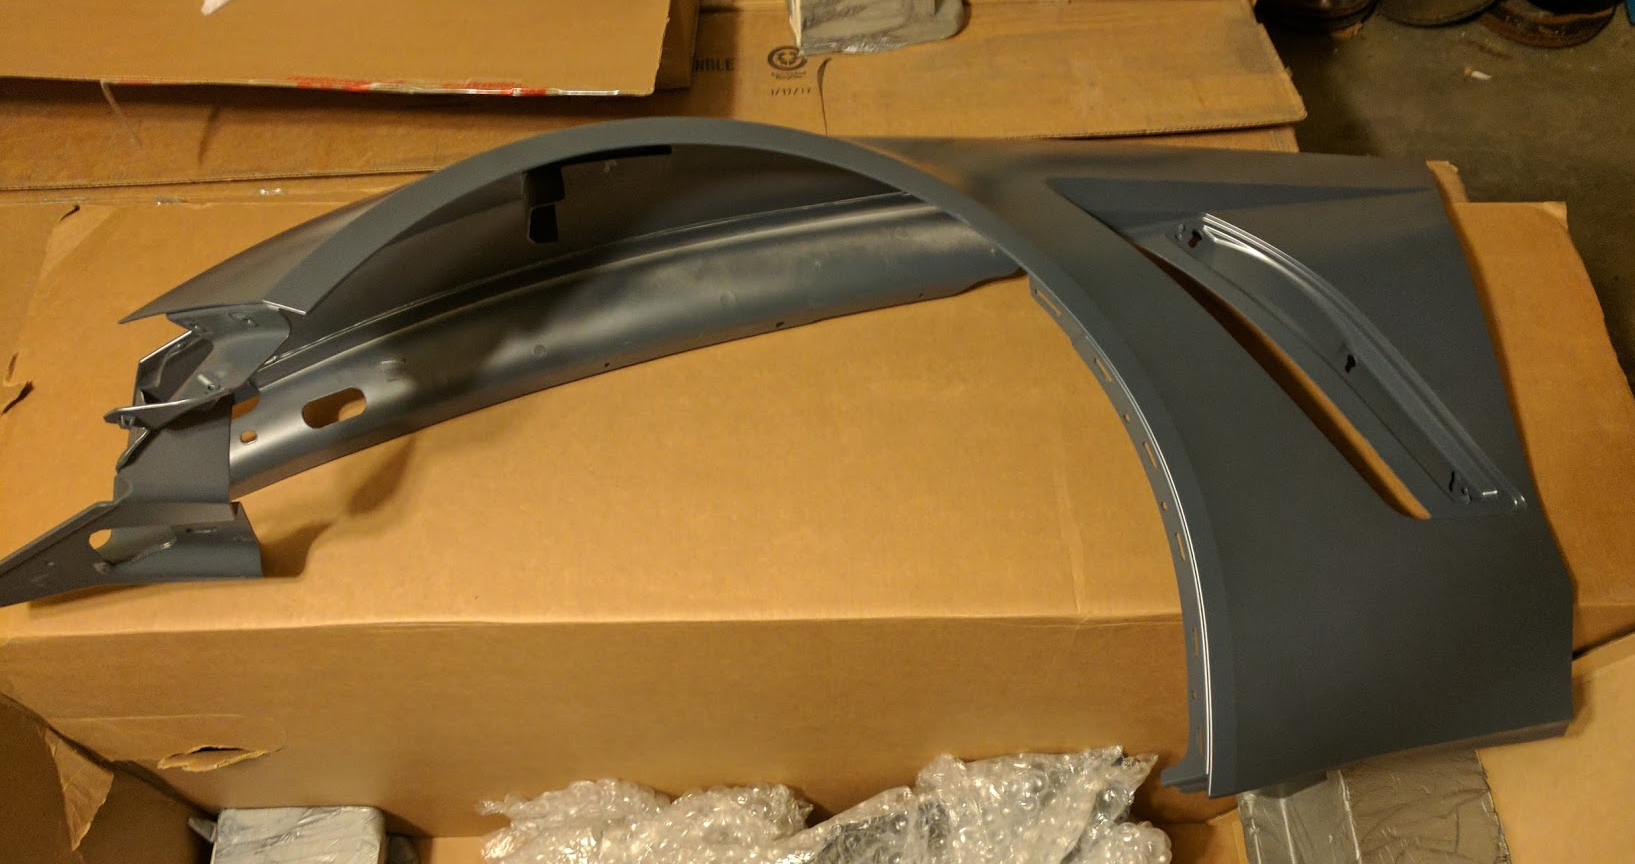
Ok, it's carbonite filled composite but, gold to me. However, this gold is fragile, so I immediately took them to the body shop for painting. I took them to Ed Bozarth's collision center body shop in Aurora, Colorado, since they did the front bumper with awesome results when I first got the car, I should take it back to them. He charged me $1300 for the two fenders, two aperture panels, two quarter panels, fuel door, and rear upper fascia, which I thought was an absolutely fantastic price. I told them to take their time as this is a show car and it needs to be top notch.
Meanwhile, I took a bunch of photos of the fender vent from different angles in order to generate a 3d model so I can design a custom badge that fits the contours and curves of the vent, and then get it made from aluminum and polished up.
Eventually the body shop called, and had me come down to inspect the parts. A little dusty on the first one, but that was before he blew away the dusty polishing compound.
It took two trips to get them home, but no scratches, no scuffs!
And thus begins my adventure.
Day 1: A bit of painting, and removal of the rear fascia and quarter panels, about 2 hours
I decided to paint the flat black vents in Carbon Flash metallic. I'd have gotten them in carbon fiber, but those pieces are rather expensive for what they are. Maybe I'll upgrade them to CF one day.
An interesting story, my dad recently got new carpet in his house. However, the carpet was defective and the installers ended up putting in new-new carpet a week later. Of course, they left the original new carpet behind, which we gladly put down on the cement garage and put the car on it. Working on soft, clean, fluffy carpet when working on cars without a lift is the way to go!
First is off with the wheels!
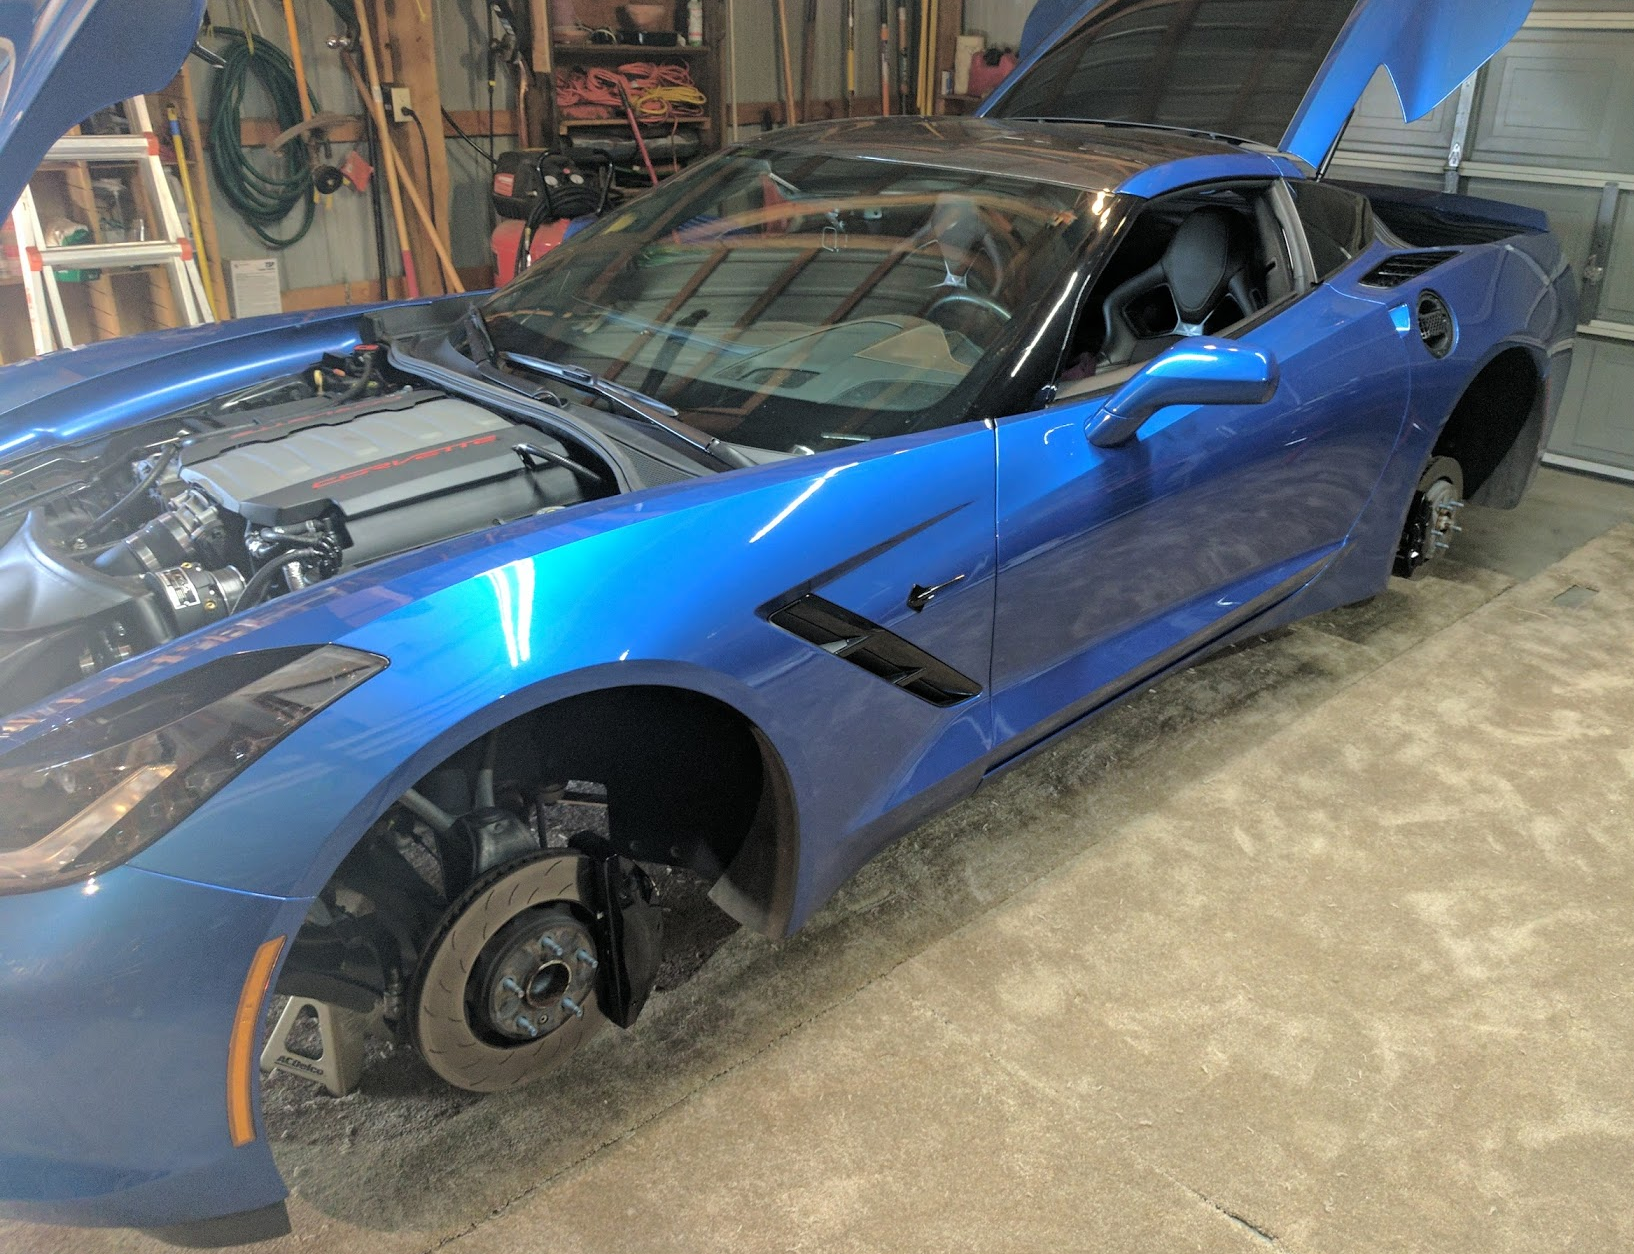
This is the last time these wheels will be on this car. Bittersweet. Anybody wanna buy em?
Thanks to Bill's wonderful documentation and many pictures, taking the bolt-on panels off was easy easy. First up was the rear fascia. Some bolts and a yank, a couple of cables to disconnect and the Stingray's butt is exposed:
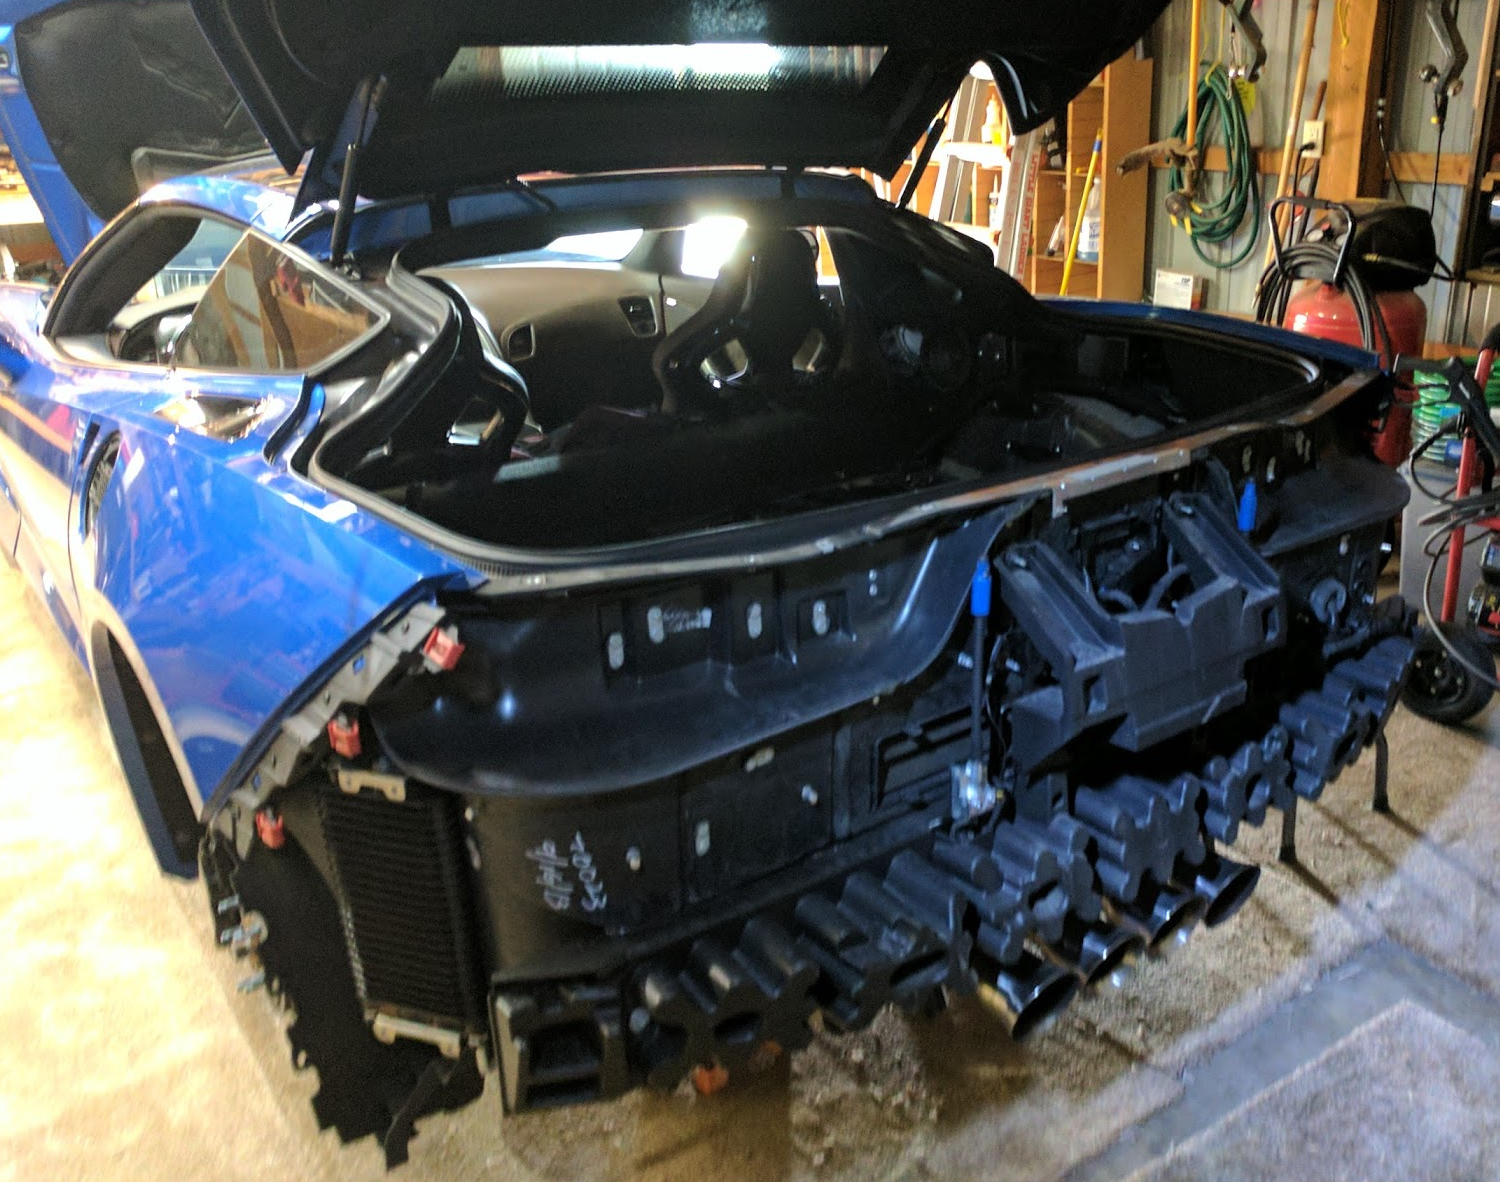
And off with the quarter panels, just a bunch of screws, and some fiddling with the fuel door.
Day 2: Front fascia removal, fender removal, doors removed, interior removed (trim and seats), driver's apeture panel cut and removed, about 4 hours
Off with the front fascia:
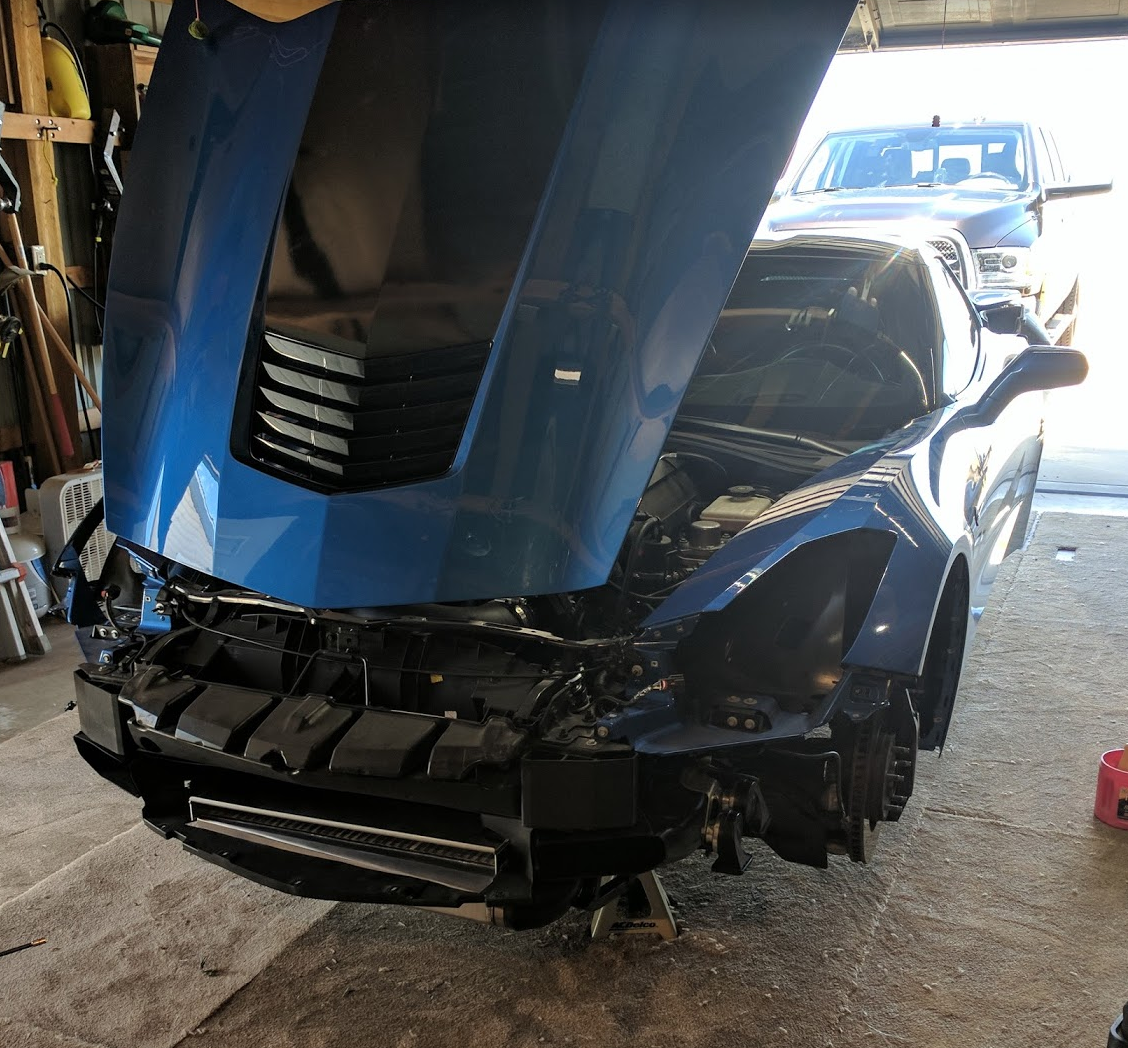
And the fenders, wow these were held on by quite a few screws:

And finally the doors. This is really where the carpeted floor comes in handy, no scratching here:
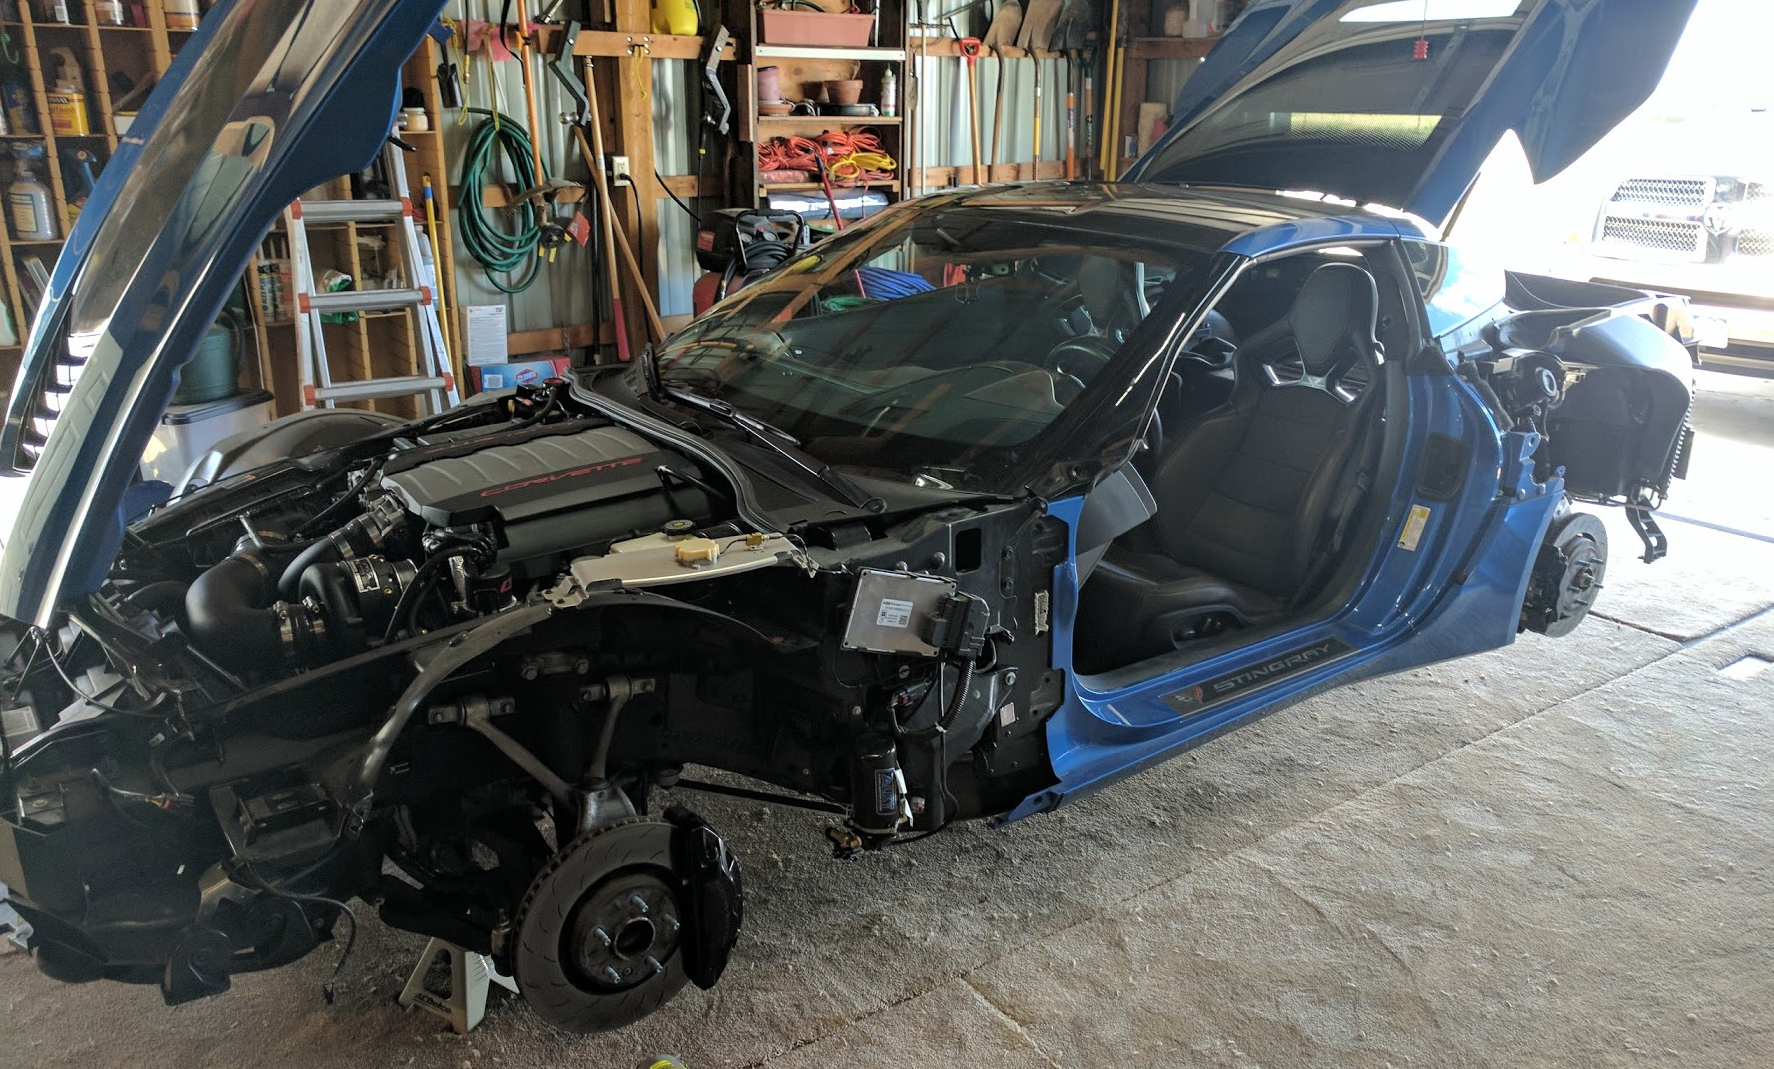
In preparation for removing the aperture panels, I'm realizing how odd my car looks:
And this is why it looks so strange:
The first cuts were made on the aperture panel. Here is where I deviated from Jet Vet's method. I made the cuts where he recommends, but instead of an angle grinder, I'm using a oscillating multipurpose tool - a very clean and safe way to cut the panels, never cutting too deep, and very accurate.
I used this with the toothed tool to cut the panels around the urethane and epoxy blobs. I then switched to a sharp chisel / knife blade on the multipurpose tool and used that to slice the urethane away from the body panel. This made for very clean and very fast work, I'd say we had the aperture panel completely off in about 20 minutes, no heat gun or yanking and pulling required:
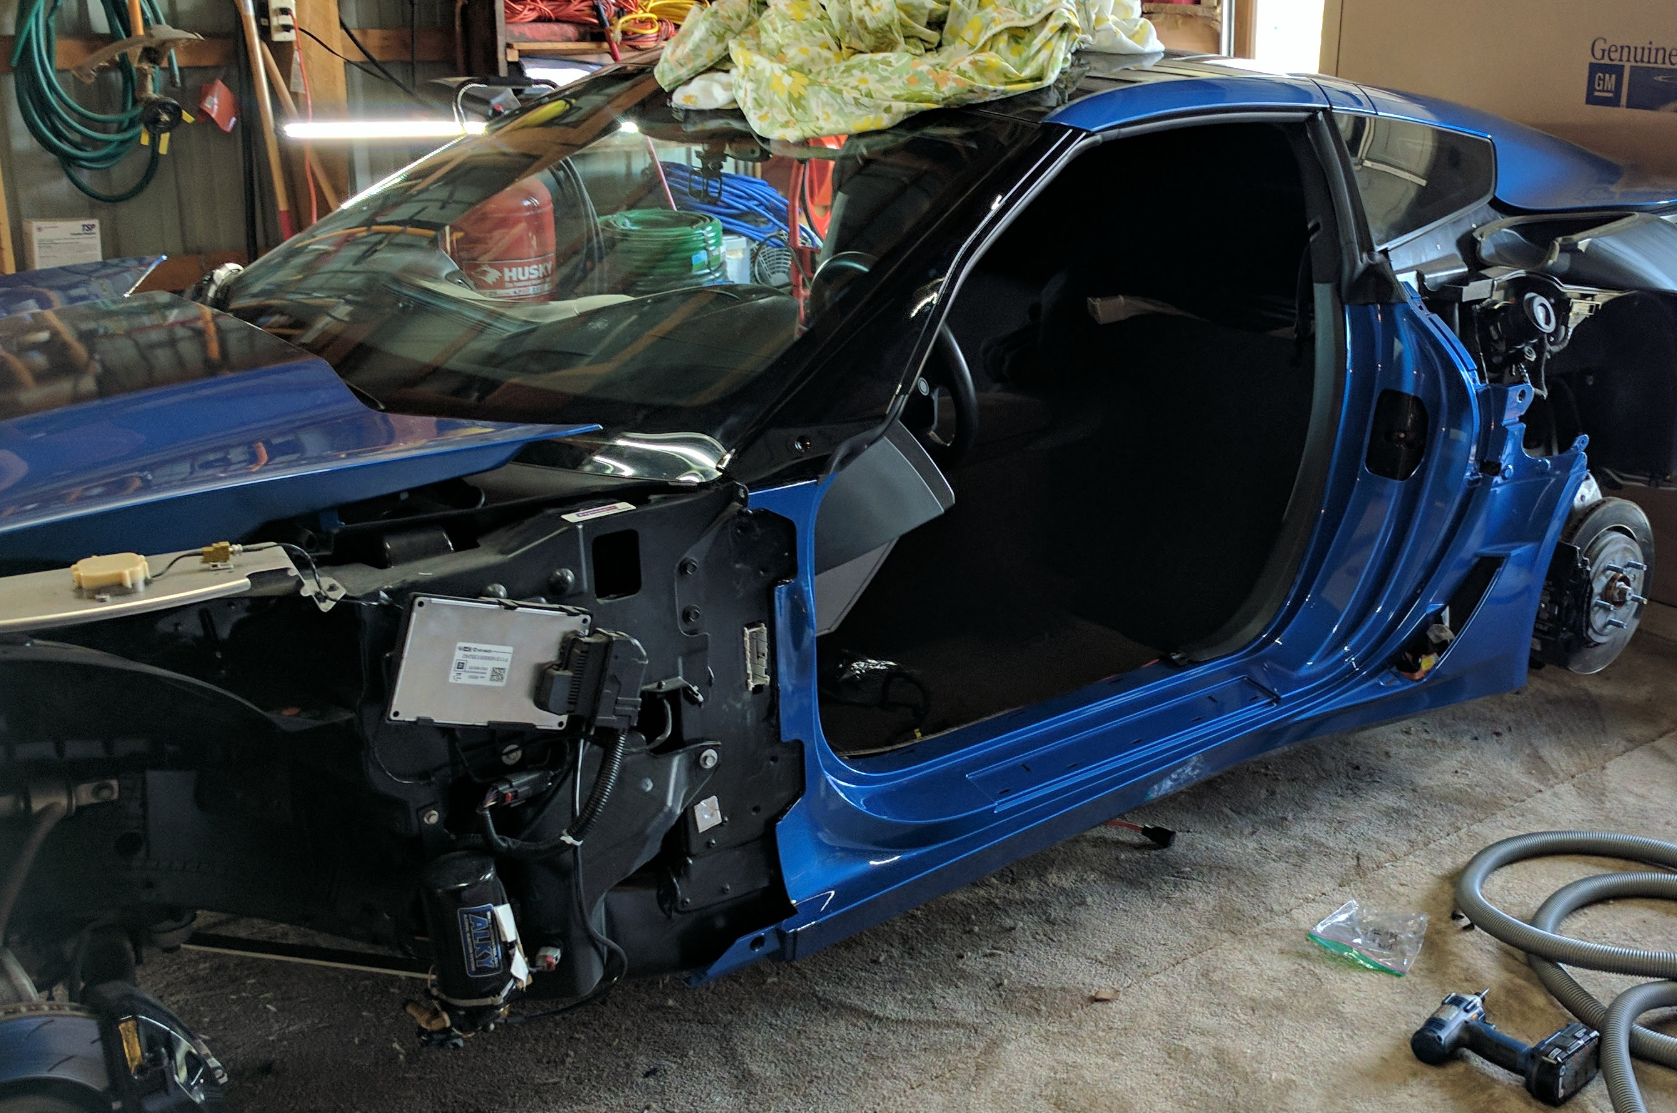
The current state of the old driver's side aperture panel:

And the current state of my car (yes the front fascia is on the roof, there isn't enough carpeted area in the garage for all these things!):
Not bad for a weekend's worth of work, eh? Next week will be cleaning up the urethane and gluing the new panels into place, then reassembly and the installation of the carbon fiber parts.
I have to say, this is going a lot easier than I expected, this is not a difficult project at all, though it looks daunting, thus far it's been a pleasant experience.
Again, a big thanks to Bill aka Jet Vet, Rick aka SubChev, and C7Carbon. Stay tuned for more!
But I know there will be the guy who will ask "why didn't you just get a Z06 or Grand Sport?" Well, I hope the answers are evident, but in case not, the following is true:
Anyway, thank's for reading this far, I'll be taking lots of pics of my install and posting my experience here, for anybody else who wants to do this project.
TL;DR: It's Z06 parts for full widebody conversion ($4700), C7Carbon splitter, skirts, spoiler ($2100), Z06 wheels from DOC-Z ($2600), DIY install based on Jet Vet's post, more pics later!
- The C7 Corvette was already over my original car purchase price budget, and I had to save for 8 months in order to put a down payment that got me a monthly payment that didn't make me feel like I had to cut back elsewhere.
- A Used Z06 3LZ price, at the time, was near 80k, and still is over 70k (and might have less options!)
- Had I gotten a Z06, I would have still likely wanted to put on an aftermarket blower for more power.. more money...
- I have a numbered Premiere Edition vehicle. Maybe this doesn't mean much to Corvette folks, but it sure is impressive to non-Corvette folks, and I like it
- I enjoy working on my car, especially since it gives me an excuse to spend a bunch of time with my Dad, which is invaluable to me, so I save a boatload on labor
- I like my total cost of ~$67,000 for a fully Premiere Edition DIY GS/Z06 that can handle just as well and has more power
- It's less than a used Z06 3LZ, and I can say my pops and I did it ourselves
- Selling my current Torque wheels, and putting my current body parts on Ebay will knock my cost down even more
Anyway, thank's for reading this far, I'll be taking lots of pics of my install and posting my experience here, for anybody else who wants to do this project.
TL;DR: It's Z06 parts for full widebody conversion ($4700), C7Carbon splitter, skirts, spoiler ($2100), Z06 wheels from DOC-Z ($2600), DIY install based on Jet Vet's post, more pics later!
Day 3: Passenger apeture panel removal, urethane cleanup, about an hour
Today (Friday), I managed to push off early and removed the other aperture panel. And, as expected, this side went quicker as I made many of my cuts first and then switched to the chisel blade to cut it off the urethane, but overall it took more time, as I was working solo and had to cut with the oscillating tool in one hand and work the sucker in the other.
Since I knew where the urethane was, I was able to make cuts exactly where I needed to to leave a minimal amount of body left, so that I could cut the urethane and remove the panel at the same time. I was sure to leave some spots un-cut for positioning, but this method was so much better than ripping fiberglass pieces away from hot urethane. I didn't even touch the heat gun for this side. About 90 minutes to cut the panel, cut the urethane, pull it all off, clean up the mess.
Here you can see my first cuts (using my x-ray vision) right along the urethane:
Look at it now (lower right) and see i cut the inboard side too, leaving about a 1" wide strip of panel stuck to urethane below it. Easy.
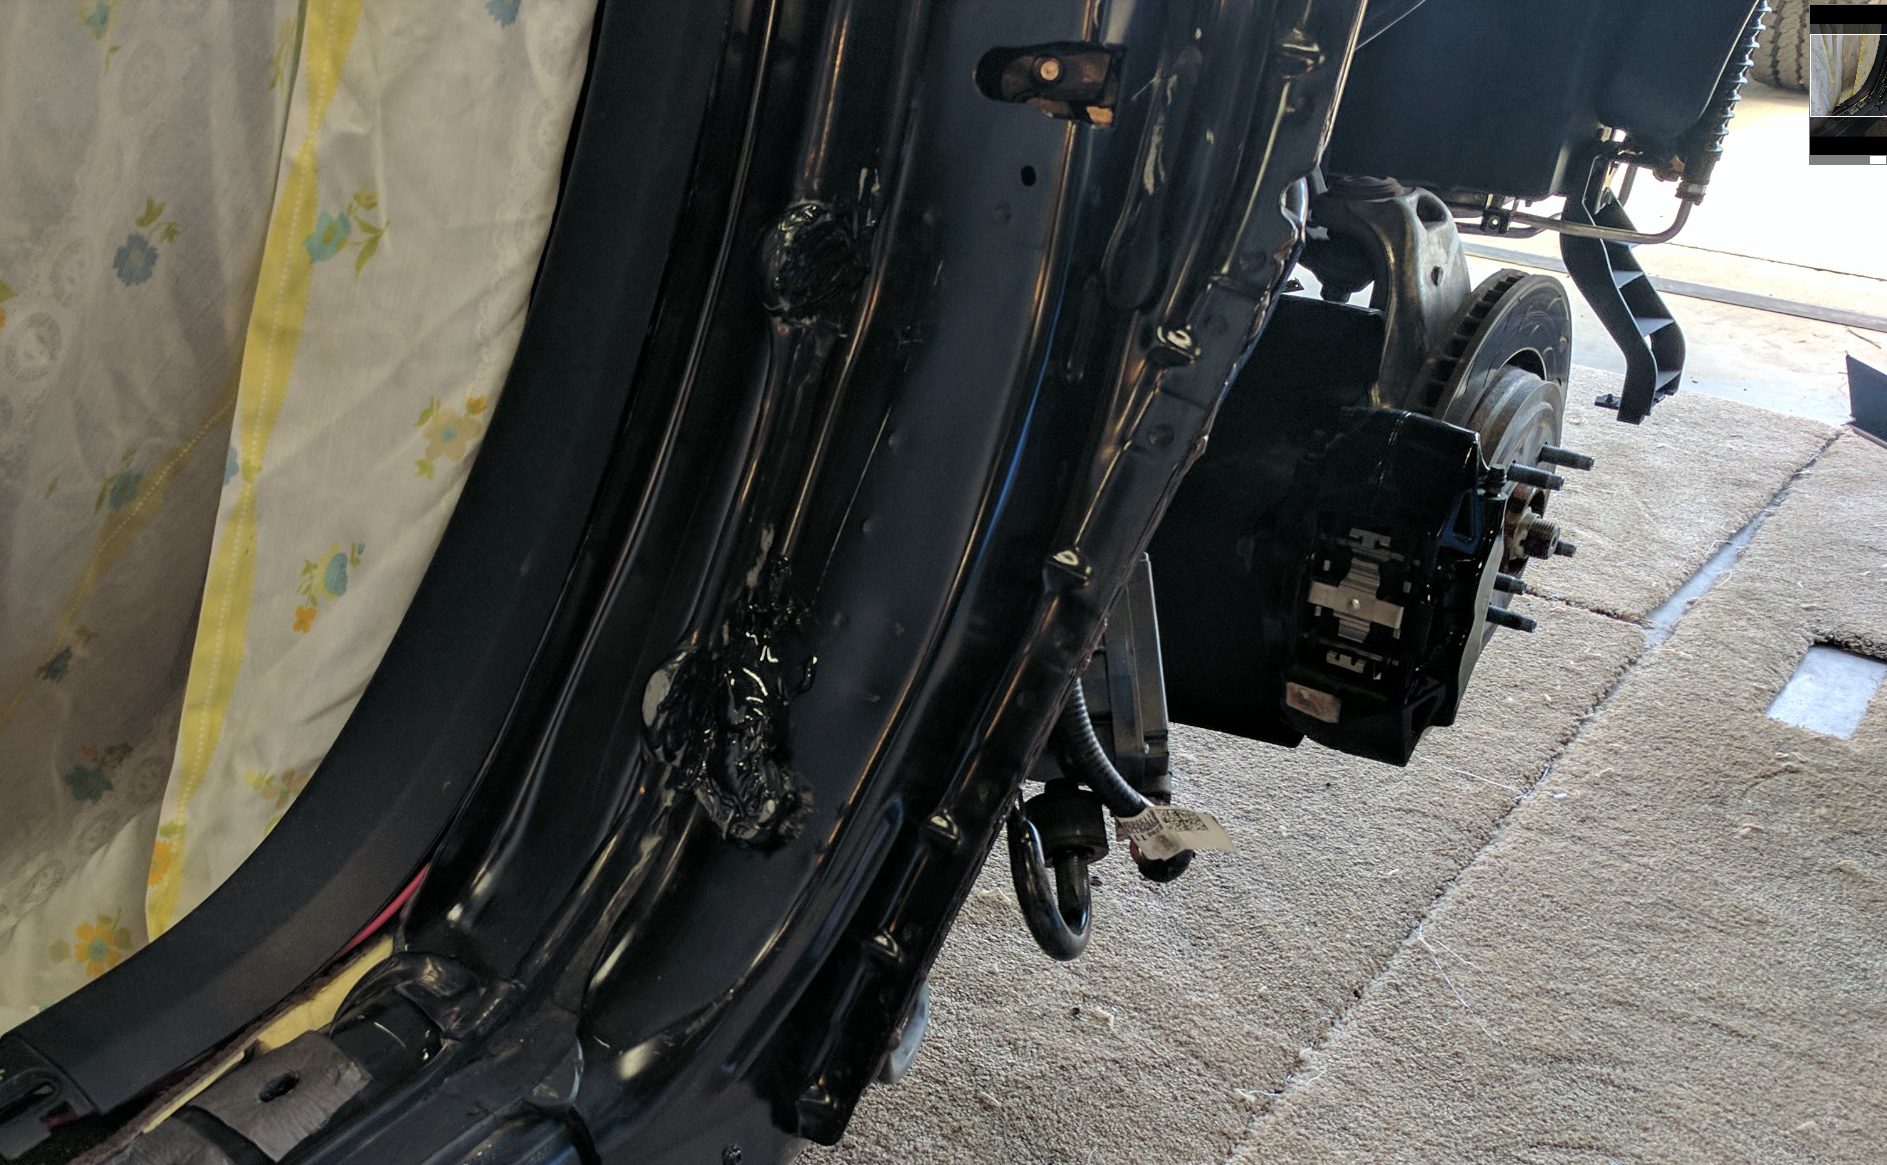
I then cut upwards towards the lock area, and like magic....

That piece basically fell off. With the passenger side cut off, it leaves this:
And with a little bit of cleanup on the urethane corners (pics coming soon) the disassembly, and thus part 1, is complete.
Last edited by joemosfet; 07-02-2017 at 09:52 AM.


Popular Reply
05-23-2017, 04:22 PM
Burning Brakes
Thread Starter
Part 2: The Reassembly
Now that the panels are all off, I can work on putting the new ones on. I'll put on the aperture panels, and while those cure / affix, I'll start moving stuff from the old panels to the new panels: fasteners, clips, etc.
Day 4: Mock up apeture panels, plan and clean more urethane, about an hour
I only worked on the car for about an hour today, fitting the new panels up and cleaning up the urethane and epoxy bits getting ready for the glue up.
As you can see from this pic, fitting the panels, the front part of the aperture won't go into place and sit flush with the body:

there is a "corner" on the panel that gets pressed into the urethane and gets urethane on both sides.
The new panel can't easily slide back into the groove the old panel makes:

After cutting the inside part of the urethane, looks like this:

And then the panel sits flush:

I finished cleaning up the area and planning my urethane and epoxy application process. I'll be putting down urethane exactly where i cut the old urethane and a tiny bit around the "shims" to make sure they get tight, then splat some blobs of epoxy next to the old epoxy blobs and press into place. As for clamping it down, I have some plans there. We'll see.
Day 5: Glue the aperture panels on, put the doors back on, interior (trim and seats) replaced, mocked up both Stingray and Z06 fenders (Stingray fenders won't work with Z06 aperture panels!). about 4 hours of work and another hour of playing with fenders
Got the important bits done today!
After cleaning up the urethane, I took the multipurpose oscillating tool, this time with the coarse sandpaper tool, and cleaned up all the epoxy and urethane shims, removing any leftover fiberglass composite.

Next was cleaning with denatured alcohol to remove any oils and prepare the urethane for some new new.

First up was some new thin layer of epoxy on all the epoxy shims and a blob next to each shim. This stuff has a longer setup time than the urethane, so I applied it first.

It is pretty viscous and doesn't stand up well, but it sticks good enough if you don't blob it too much.

Drivers side is up and clamped. The back part was held in by the trim, it pulled it nice and tight. The shims are doing their job, the panel only fits in one place and it fits tight.

I didn't grab a pic of the urethane because of it's quick setup time, I wish I had though. I used an entire cartridge of urethane on each panel, trying to lay a nice thick bead on top of the old urethane. The passenger side is up.

After the urethane set, i pulled the clamps off and admired our work.

Looking good, the panels are exactly where they belong.

Putting the doors on was easy, however they do need to be perfectly lined up where they used to be. Marker around the hinges before removing them allowed this. I used a red sharpie. Make sure you don't wipe it off with the solvent when you clean up the urethane.

Seats are in, trim is back in, in the garage there is so much more room for activities.

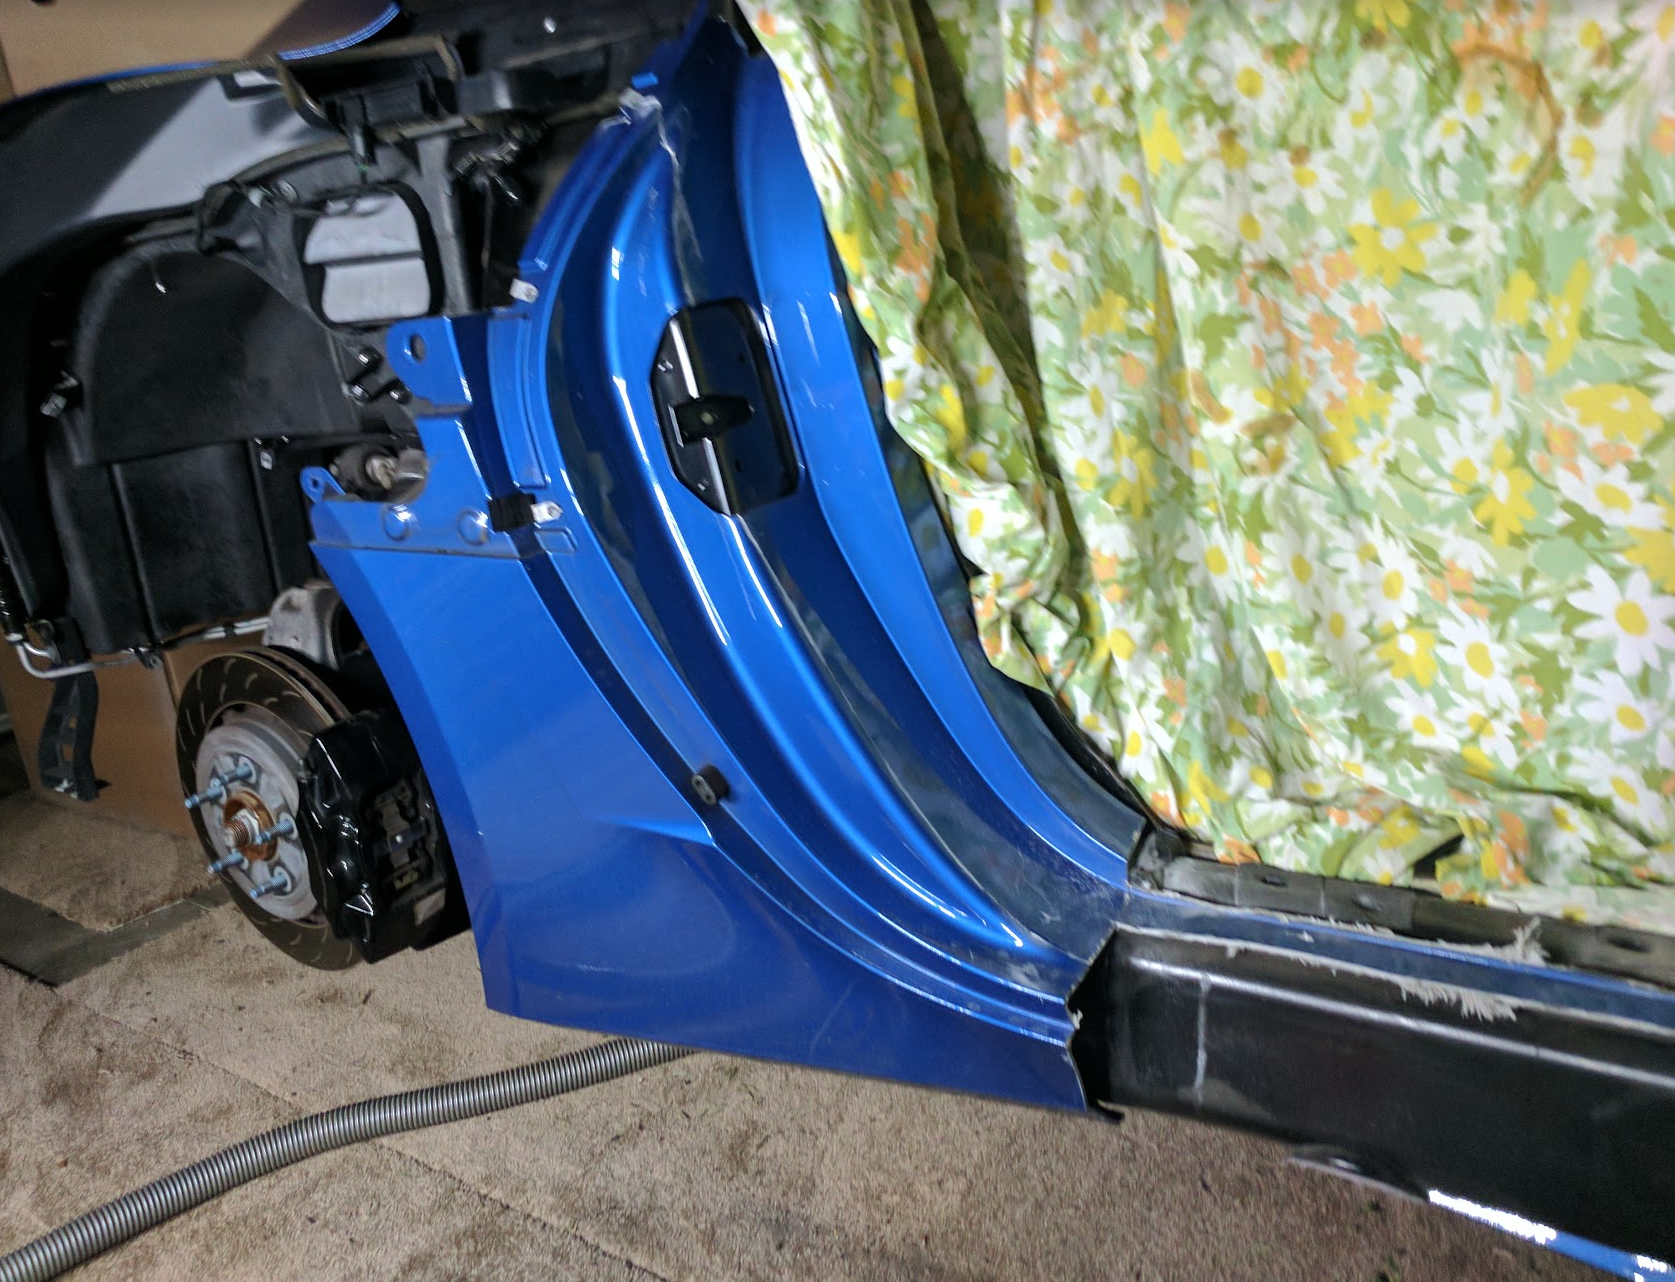
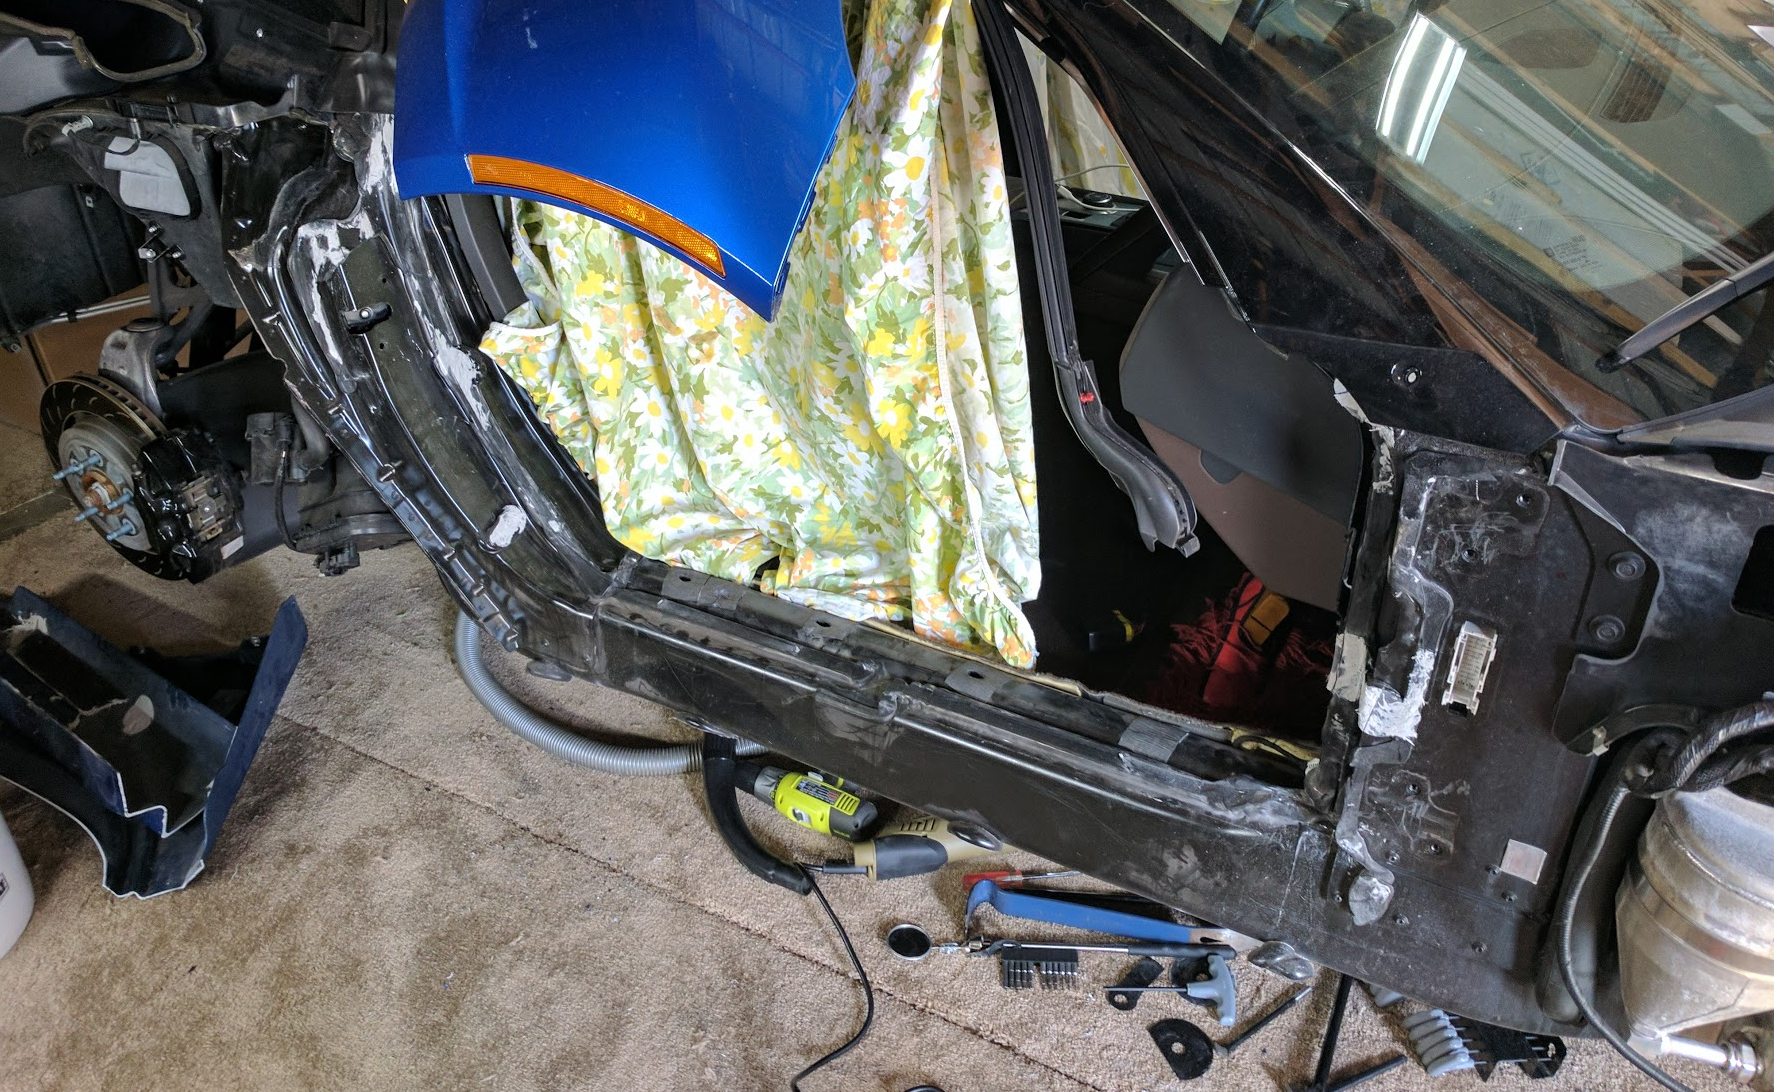
Now here is an interesting thing. I was fairly certain that a person desired, he could could do a rear+aperture only widebody and leave the Stingray front fenders on, as the added width is only from the wheel extensions. Turns out this isn't the case, the Z06 front fenders are wider, and not just because of the wheel extensions. Take a look here (might want to click to zoom):

Ok, so I was thinking, maybe you could still do the rear+aperture only widebody only and use Stingray front fenders + wheels, and do Z06 wheels in the rear. Nope, even though the fender/door line is the same between a Stingray and Z06, the lower part, the fender->aperture line is not.
This is how the Z06 front fender fits, and how it should fit

But the Stingray fender wants to sit behind the aperture line:

Or, if i force it on top, i get this gap between the panels. It's obvious the curve of the Z06 aperture panel is different than the Stingray, and somewhat dramatically.

So there you go. If you want to Z06 / GS widebody, you must do the front fenders as well.
I used the front fender to check and tweak the alignment on the door and we're in good shape there. Unfortunately, that's all I had time for today, so the Z06 fender is currently just mocked up and not bolted in place. However, from our fitment tests, the door might need a very slight adjustment upwards. (Again, this pic, the Z06 fender is just set in place, and not lined up with the bolt holes or anything, and is why the gap is inconsistent.)

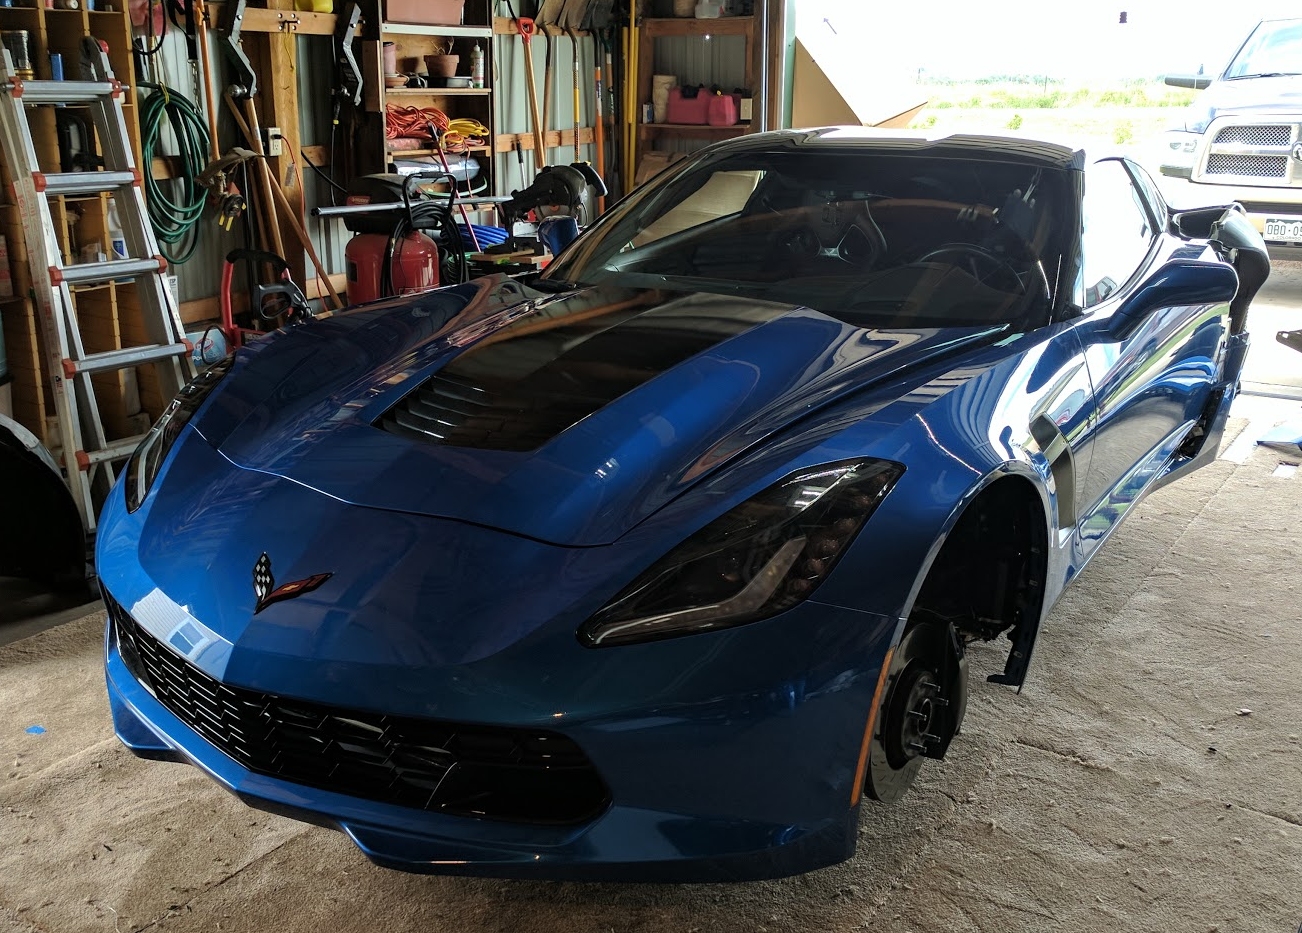
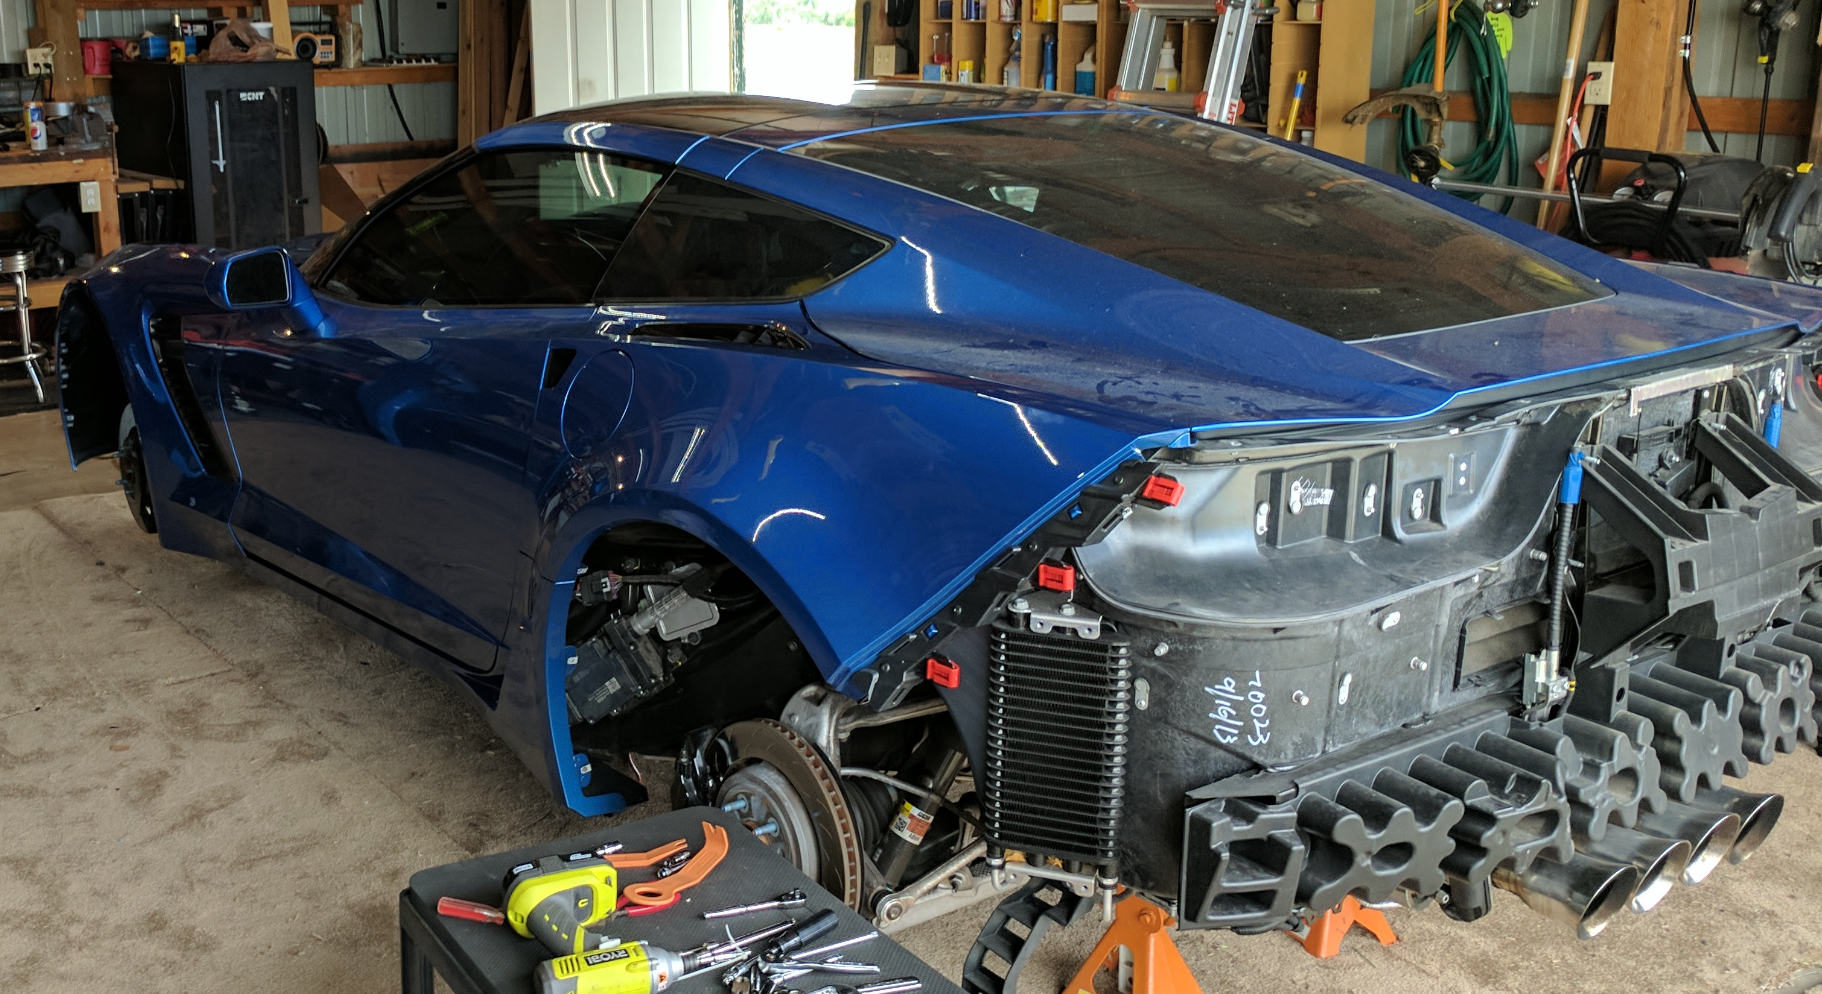
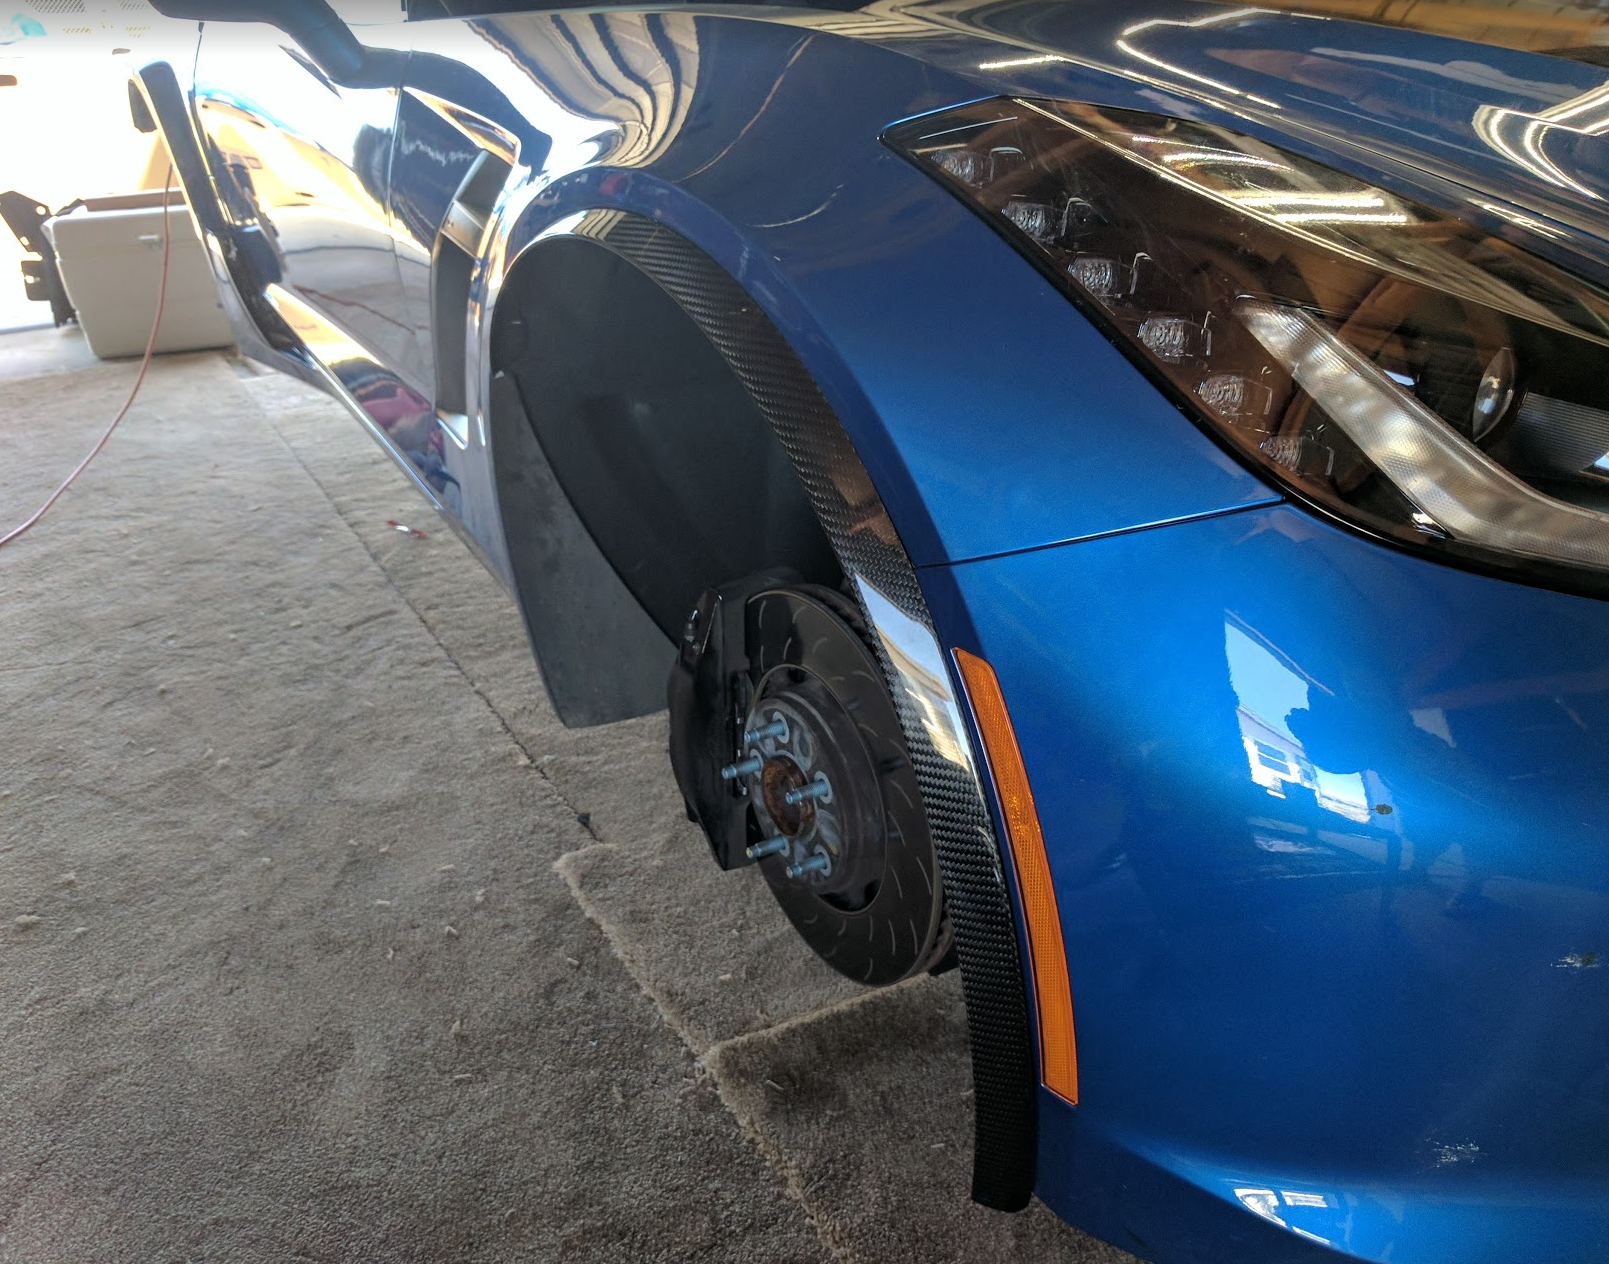
Day 6: Front fenders on, Aligned the doors, front fascia on, front wheel well liners in, rear quarter panels assembled and on, fuel door on, mockup carbon fiber wheel extensions, about 3 hours
I managed to get a few more hours of work in today, though we're having a crawfish boil so I didn't get too much done, but definitely some progress.
Fenders are on and in place. I had to remove the driver's side a couple of times in order to adjust the position of the door to get a perfect gap. This is what took the bulk of the time, getting a perfectly even gap around the door. However, on the passenger's side, after I figured out the best way to adjust the door, it went very quickly. Only one fitment and adjustment was needed. (Hint, use the top and bottom bolts on each hinge as pivot points, while having a jack underneath hold up the door. This makes it easy to adjust the rotation and updown/leftright of the door)

Front fascia and headlights back in.

Rear quarter panels bolted on with the new Z06 hardware

Woo, starting to look nice and wide!

Wheel wells are in and here I am mocking up the CF fender extensions. Pretty.

That's it for today! Next up is the rear fascia, and then the carbon fiber skirts and splitter. Hopefully my CF spoiler will arrive in the next week so I can complete this on the weekend.
Day 7: I got tired of waiting for the C7Carbon Z06 spoiler (they're still working on it, can't rush perfection!) so I decided to finish reassembly. Rear fascia, wheel weels, carbon fiber splitter, carbon fiber side skirts, wheels
C7Carbon is still working on their CF Z06 spoilers, and might take another few weeks for them to ship it out, but that's ok, I don't mind. But, Since the bbq weekend is here, and I want to show off my car to the family at our bbq, I decided to finish it up, sans spoiler.
Stuck in the fender wells in using the applied 3m automotive body tape, and make sure the fender and front fascia fit into the groove, and bolt the fender wells in:

After an adventure in figuring out how to open the hatch when the battery is dead, and you have removed the manual trunk release, I got the rear fascia on:

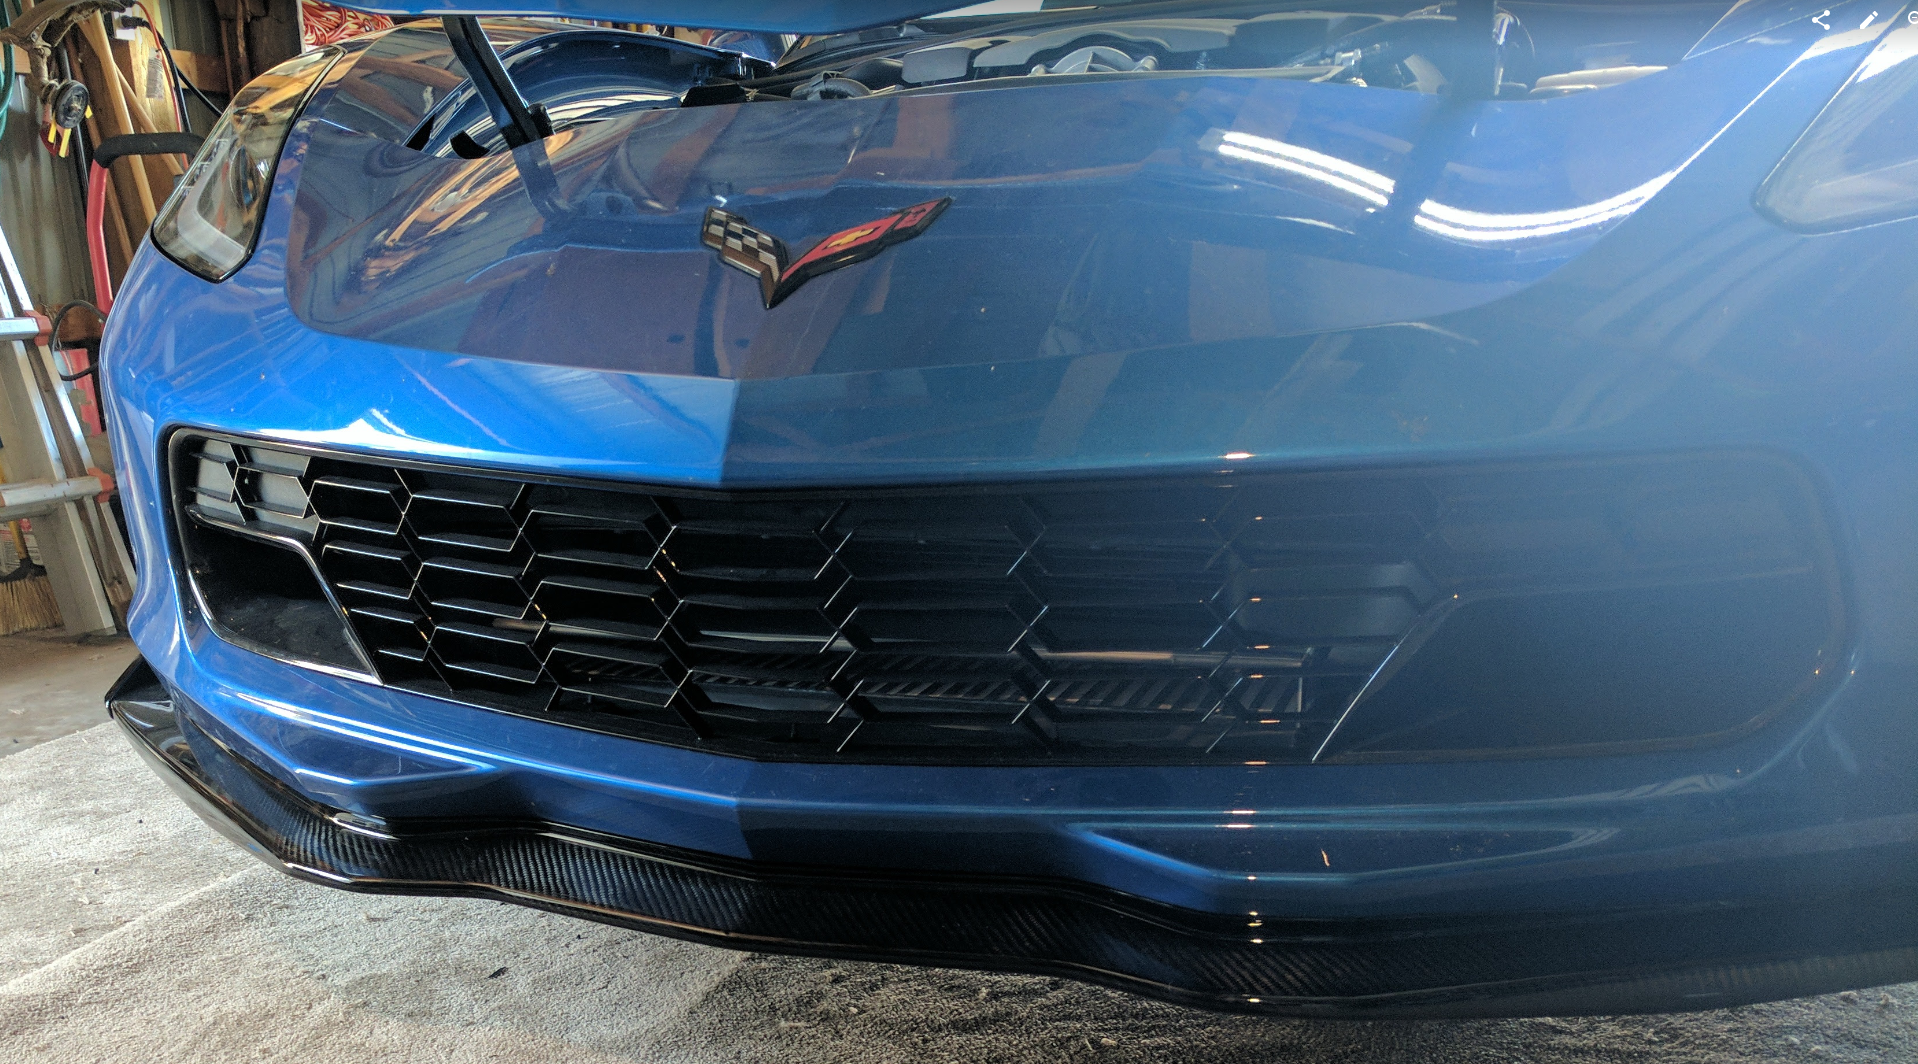
And that's pretty much it. Reassemble the trunk area, and finish bolting in the new wheel well liners, and the widebody is done. Now on to more fun parts. The carbon fiber front splitter just bolts on.

Finally, rivet on the side skirts (i can't believe I drilled holes into my bran-new aperture panels...) and bolt on the wheels, and it's done (save for the CF spoiler). Pneumatic riveter was pretty much required on the side skirts.

Compare that to how it looked when I started:

After a few loose ends (rear emblem, a couple of things under the hood), a quick trip to the carwash, and a loose spark plug wire scare, and...

Pretty. Now, once the spoiler arrives, I'll head over to The Man Cave to get the paint corrected on the doors and hood and hatch, and get a candy coat of quartz on.

I had emblems pro whip me up a set of badges, I just don't have time to chooch them myself. Perhaps one day.


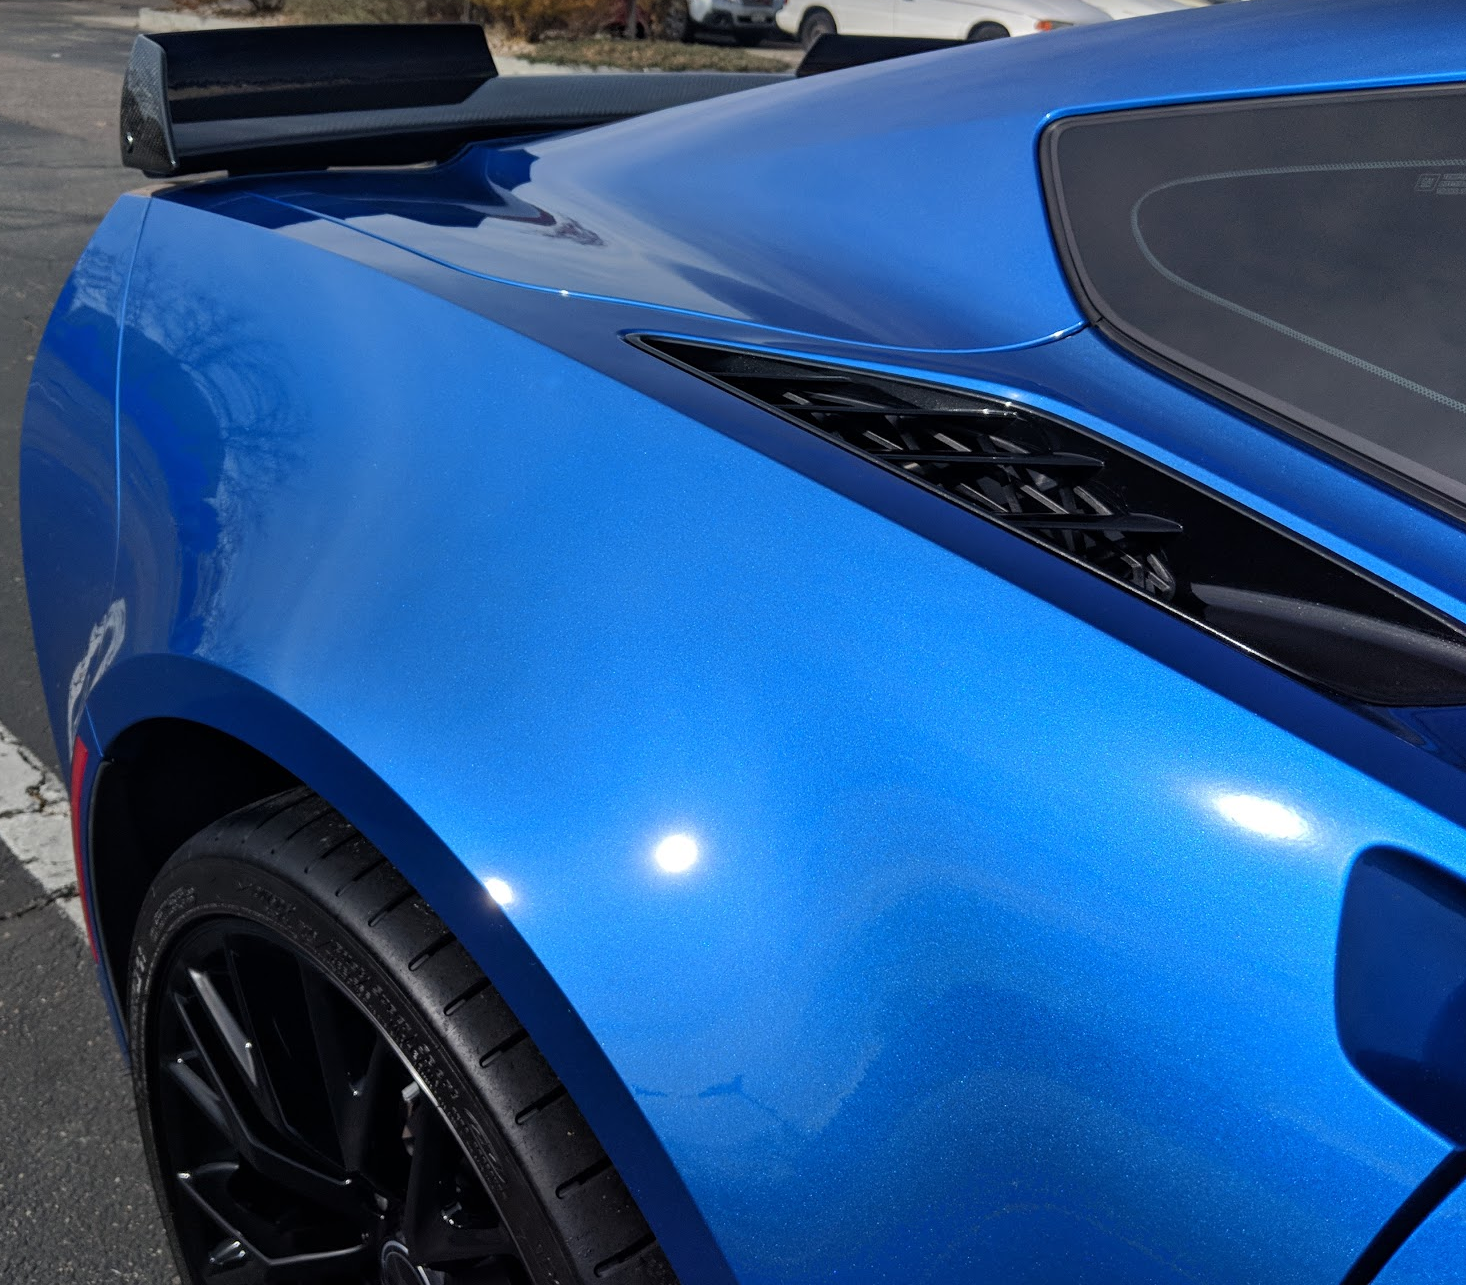
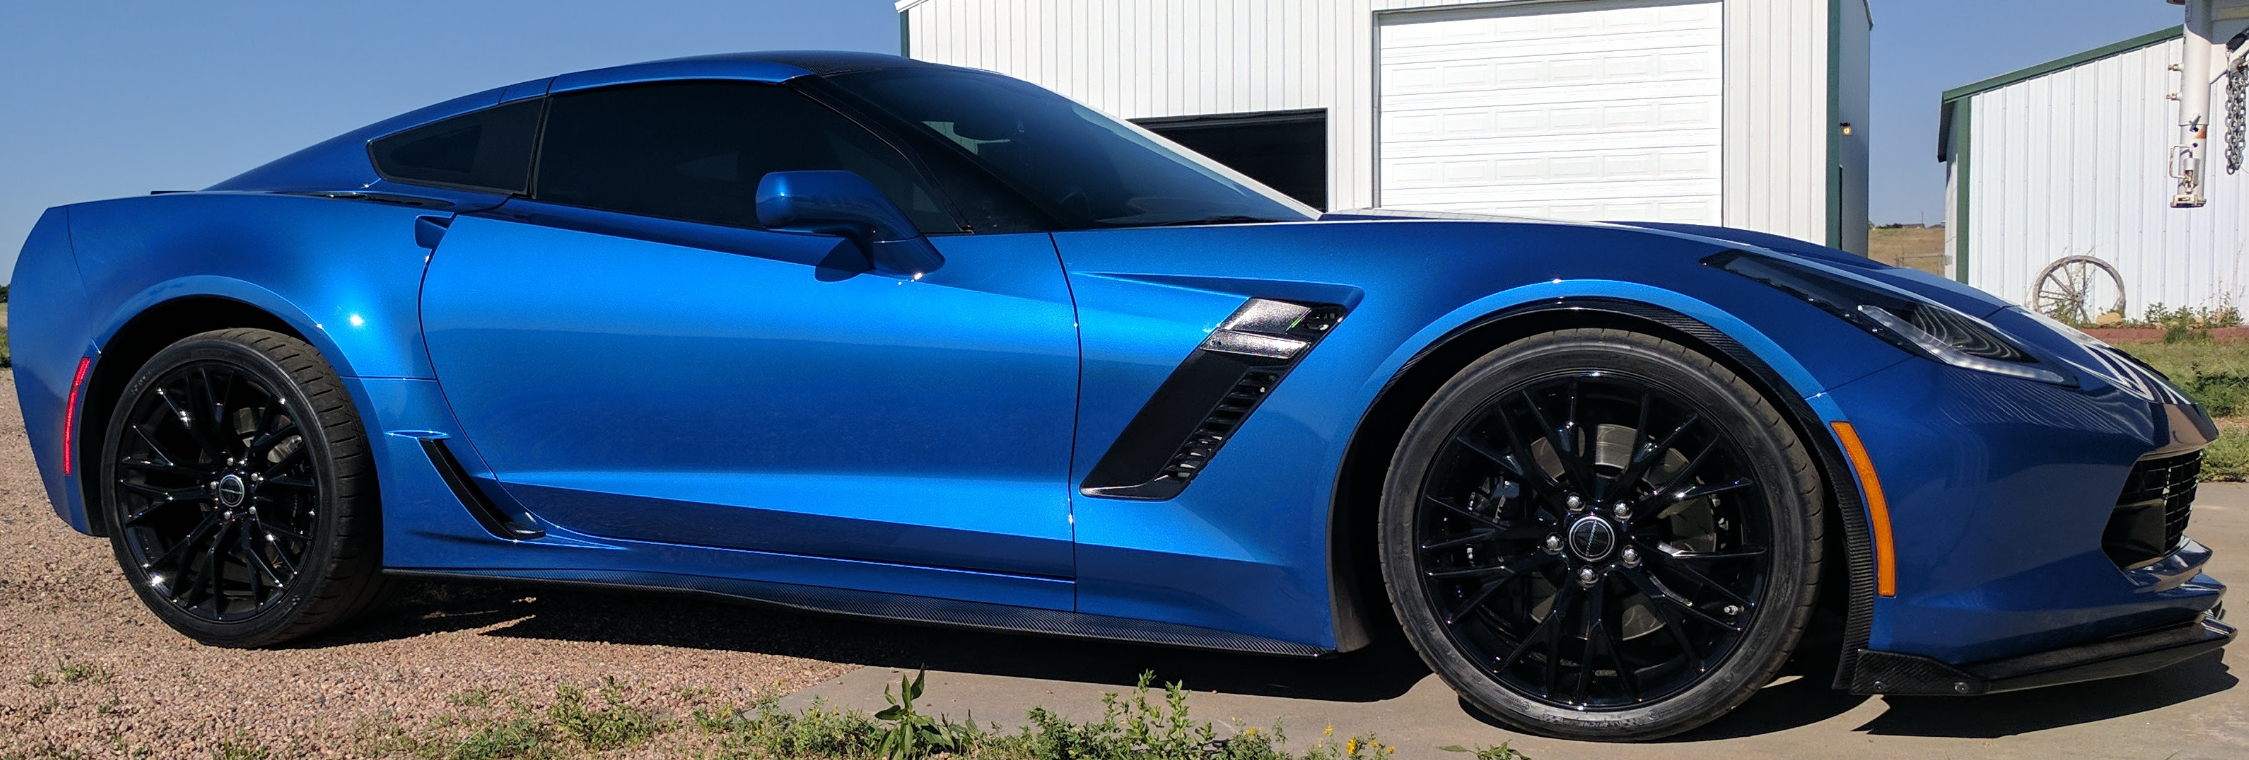
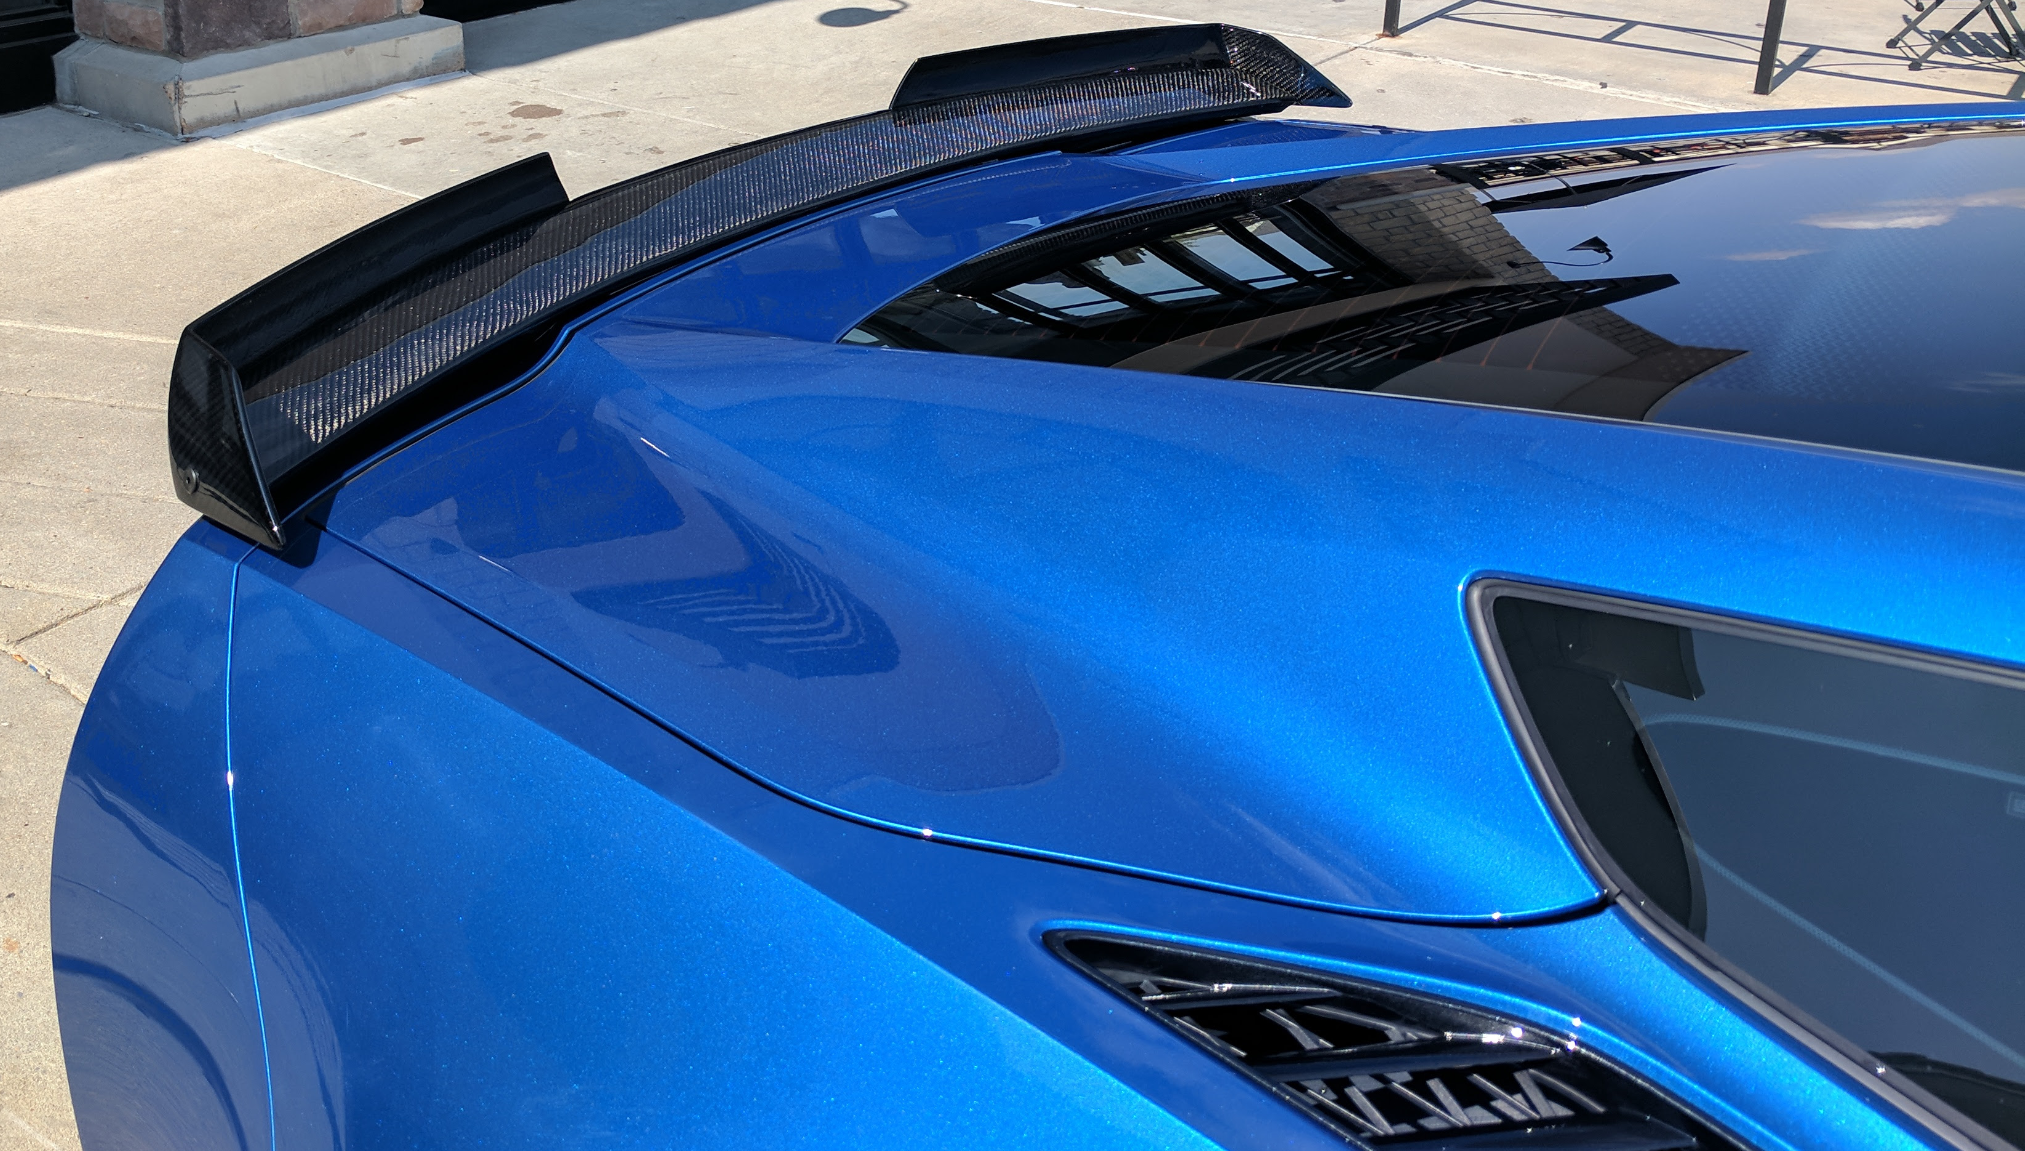
Finally, my Stage 2 spoiler arrived from C7Carbon, and I got it installed! Looks great!


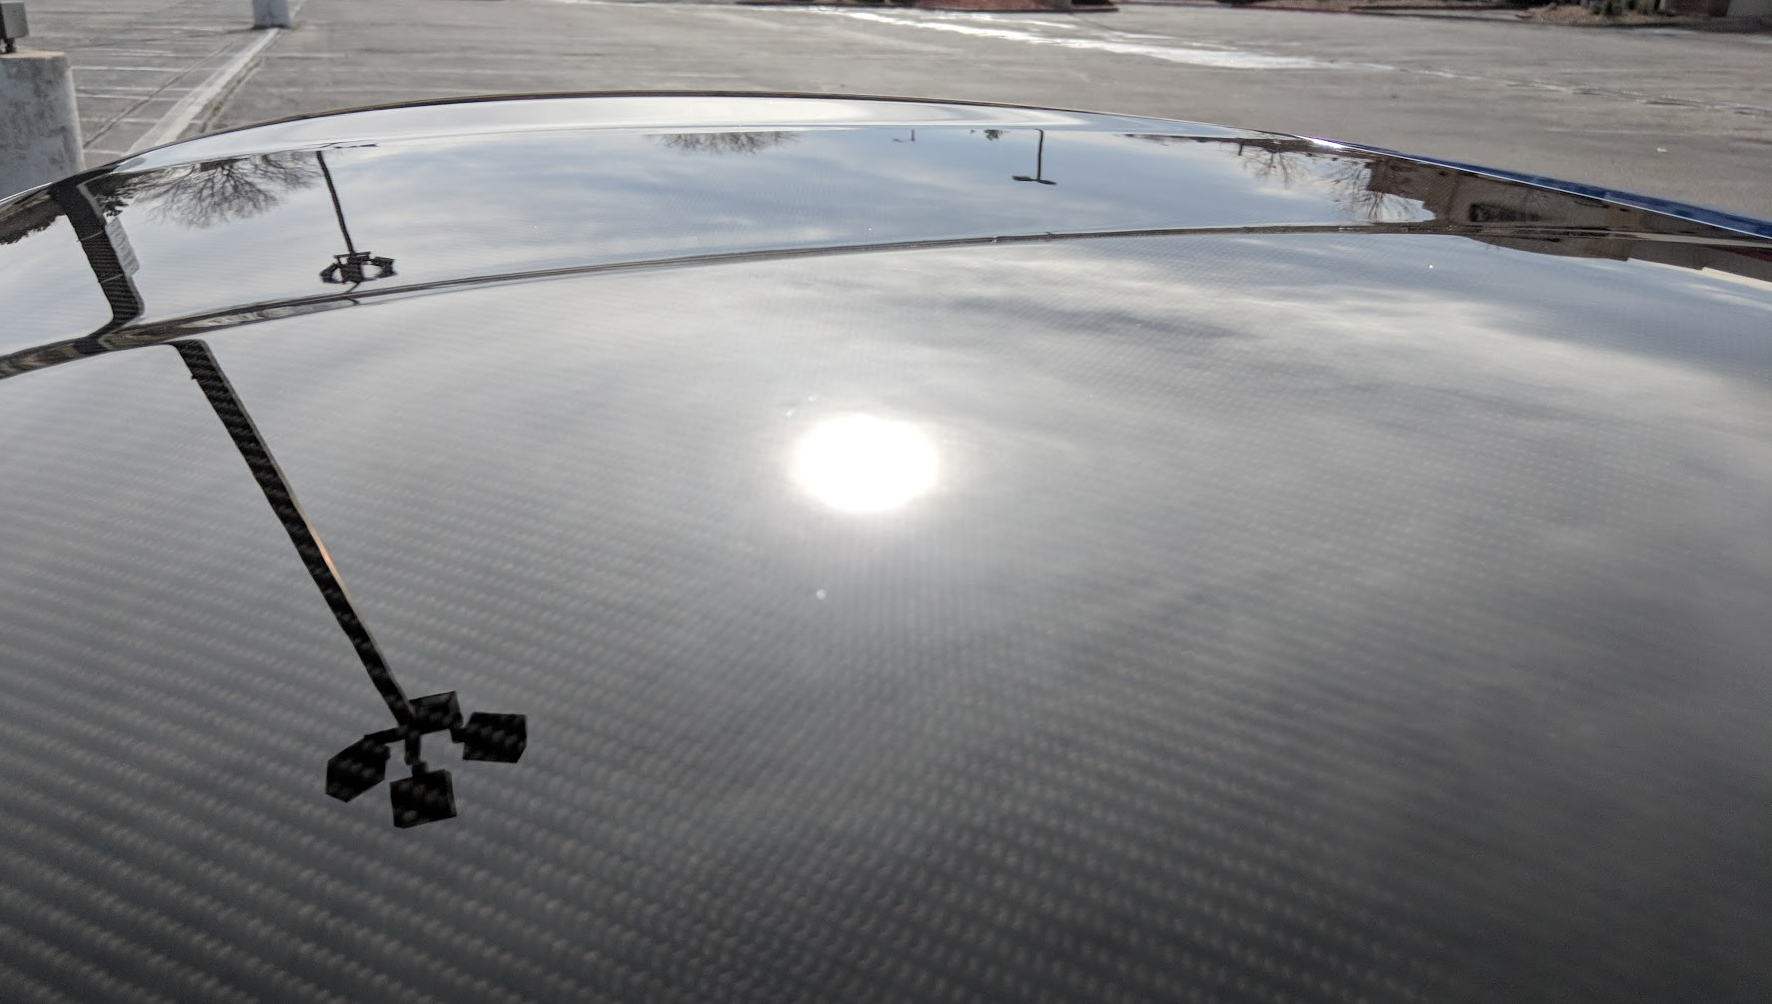
Got the paint correction done, and a quartz coating applied, so here's a few more pics:

The roof was arguably the most swirled up of all:
Now that the panels are all off, I can work on putting the new ones on. I'll put on the aperture panels, and while those cure / affix, I'll start moving stuff from the old panels to the new panels: fasteners, clips, etc.
Day 4: Mock up apeture panels, plan and clean more urethane, about an hour
I only worked on the car for about an hour today, fitting the new panels up and cleaning up the urethane and epoxy bits getting ready for the glue up.
As you can see from this pic, fitting the panels, the front part of the aperture won't go into place and sit flush with the body:

there is a "corner" on the panel that gets pressed into the urethane and gets urethane on both sides.
The new panel can't easily slide back into the groove the old panel makes:
After cutting the inside part of the urethane, looks like this:
And then the panel sits flush:
I finished cleaning up the area and planning my urethane and epoxy application process. I'll be putting down urethane exactly where i cut the old urethane and a tiny bit around the "shims" to make sure they get tight, then splat some blobs of epoxy next to the old epoxy blobs and press into place. As for clamping it down, I have some plans there. We'll see.
Day 5: Glue the aperture panels on, put the doors back on, interior (trim and seats) replaced, mocked up both Stingray and Z06 fenders (Stingray fenders won't work with Z06 aperture panels!). about 4 hours of work and another hour of playing with fenders
Got the important bits done today!
After cleaning up the urethane, I took the multipurpose oscillating tool, this time with the coarse sandpaper tool, and cleaned up all the epoxy and urethane shims, removing any leftover fiberglass composite.
Next was cleaning with denatured alcohol to remove any oils and prepare the urethane for some new new.
First up was some new thin layer of epoxy on all the epoxy shims and a blob next to each shim. This stuff has a longer setup time than the urethane, so I applied it first.
It is pretty viscous and doesn't stand up well, but it sticks good enough if you don't blob it too much.
Drivers side is up and clamped. The back part was held in by the trim, it pulled it nice and tight. The shims are doing their job, the panel only fits in one place and it fits tight.

I didn't grab a pic of the urethane because of it's quick setup time, I wish I had though. I used an entire cartridge of urethane on each panel, trying to lay a nice thick bead on top of the old urethane. The passenger side is up.

After the urethane set, i pulled the clamps off and admired our work.
Looking good, the panels are exactly where they belong.
Putting the doors on was easy, however they do need to be perfectly lined up where they used to be. Marker around the hinges before removing them allowed this. I used a red sharpie. Make sure you don't wipe it off with the solvent when you clean up the urethane.

Seats are in, trim is back in, in the garage there is so much more room for activities.

Now here is an interesting thing. I was fairly certain that a person desired, he could could do a rear+aperture only widebody and leave the Stingray front fenders on, as the added width is only from the wheel extensions. Turns out this isn't the case, the Z06 front fenders are wider, and not just because of the wheel extensions. Take a look here (might want to click to zoom):


Ok, so I was thinking, maybe you could still do the rear+aperture only widebody only and use Stingray front fenders + wheels, and do Z06 wheels in the rear. Nope, even though the fender/door line is the same between a Stingray and Z06, the lower part, the fender->aperture line is not.
This is how the Z06 front fender fits, and how it should fit
But the Stingray fender wants to sit behind the aperture line:

Or, if i force it on top, i get this gap between the panels. It's obvious the curve of the Z06 aperture panel is different than the Stingray, and somewhat dramatically.

So there you go. If you want to Z06 / GS widebody, you must do the front fenders as well.
I used the front fender to check and tweak the alignment on the door and we're in good shape there. Unfortunately, that's all I had time for today, so the Z06 fender is currently just mocked up and not bolted in place. However, from our fitment tests, the door might need a very slight adjustment upwards. (Again, this pic, the Z06 fender is just set in place, and not lined up with the bolt holes or anything, and is why the gap is inconsistent.)
Day 6: Front fenders on, Aligned the doors, front fascia on, front wheel well liners in, rear quarter panels assembled and on, fuel door on, mockup carbon fiber wheel extensions, about 3 hours
I managed to get a few more hours of work in today, though we're having a crawfish boil so I didn't get too much done, but definitely some progress.
Fenders are on and in place. I had to remove the driver's side a couple of times in order to adjust the position of the door to get a perfect gap. This is what took the bulk of the time, getting a perfectly even gap around the door. However, on the passenger's side, after I figured out the best way to adjust the door, it went very quickly. Only one fitment and adjustment was needed. (Hint, use the top and bottom bolts on each hinge as pivot points, while having a jack underneath hold up the door. This makes it easy to adjust the rotation and updown/leftright of the door)

Front fascia and headlights back in.
Rear quarter panels bolted on with the new Z06 hardware
Woo, starting to look nice and wide!

Wheel wells are in and here I am mocking up the CF fender extensions. Pretty.

That's it for today! Next up is the rear fascia, and then the carbon fiber skirts and splitter. Hopefully my CF spoiler will arrive in the next week so I can complete this on the weekend.
Day 7: I got tired of waiting for the C7Carbon Z06 spoiler (they're still working on it, can't rush perfection!) so I decided to finish reassembly. Rear fascia, wheel weels, carbon fiber splitter, carbon fiber side skirts, wheels
C7Carbon is still working on their CF Z06 spoilers, and might take another few weeks for them to ship it out, but that's ok, I don't mind. But, Since the bbq weekend is here, and I want to show off my car to the family at our bbq, I decided to finish it up, sans spoiler.
Stuck in the fender wells in using the applied 3m automotive body tape, and make sure the fender and front fascia fit into the groove, and bolt the fender wells in:
After an adventure in figuring out how to open the hatch when the battery is dead, and you have removed the manual trunk release, I got the rear fascia on:

And that's pretty much it. Reassemble the trunk area, and finish bolting in the new wheel well liners, and the widebody is done. Now on to more fun parts. The carbon fiber front splitter just bolts on.
Finally, rivet on the side skirts (i can't believe I drilled holes into my bran-new aperture panels...) and bolt on the wheels, and it's done (save for the CF spoiler). Pneumatic riveter was pretty much required on the side skirts.
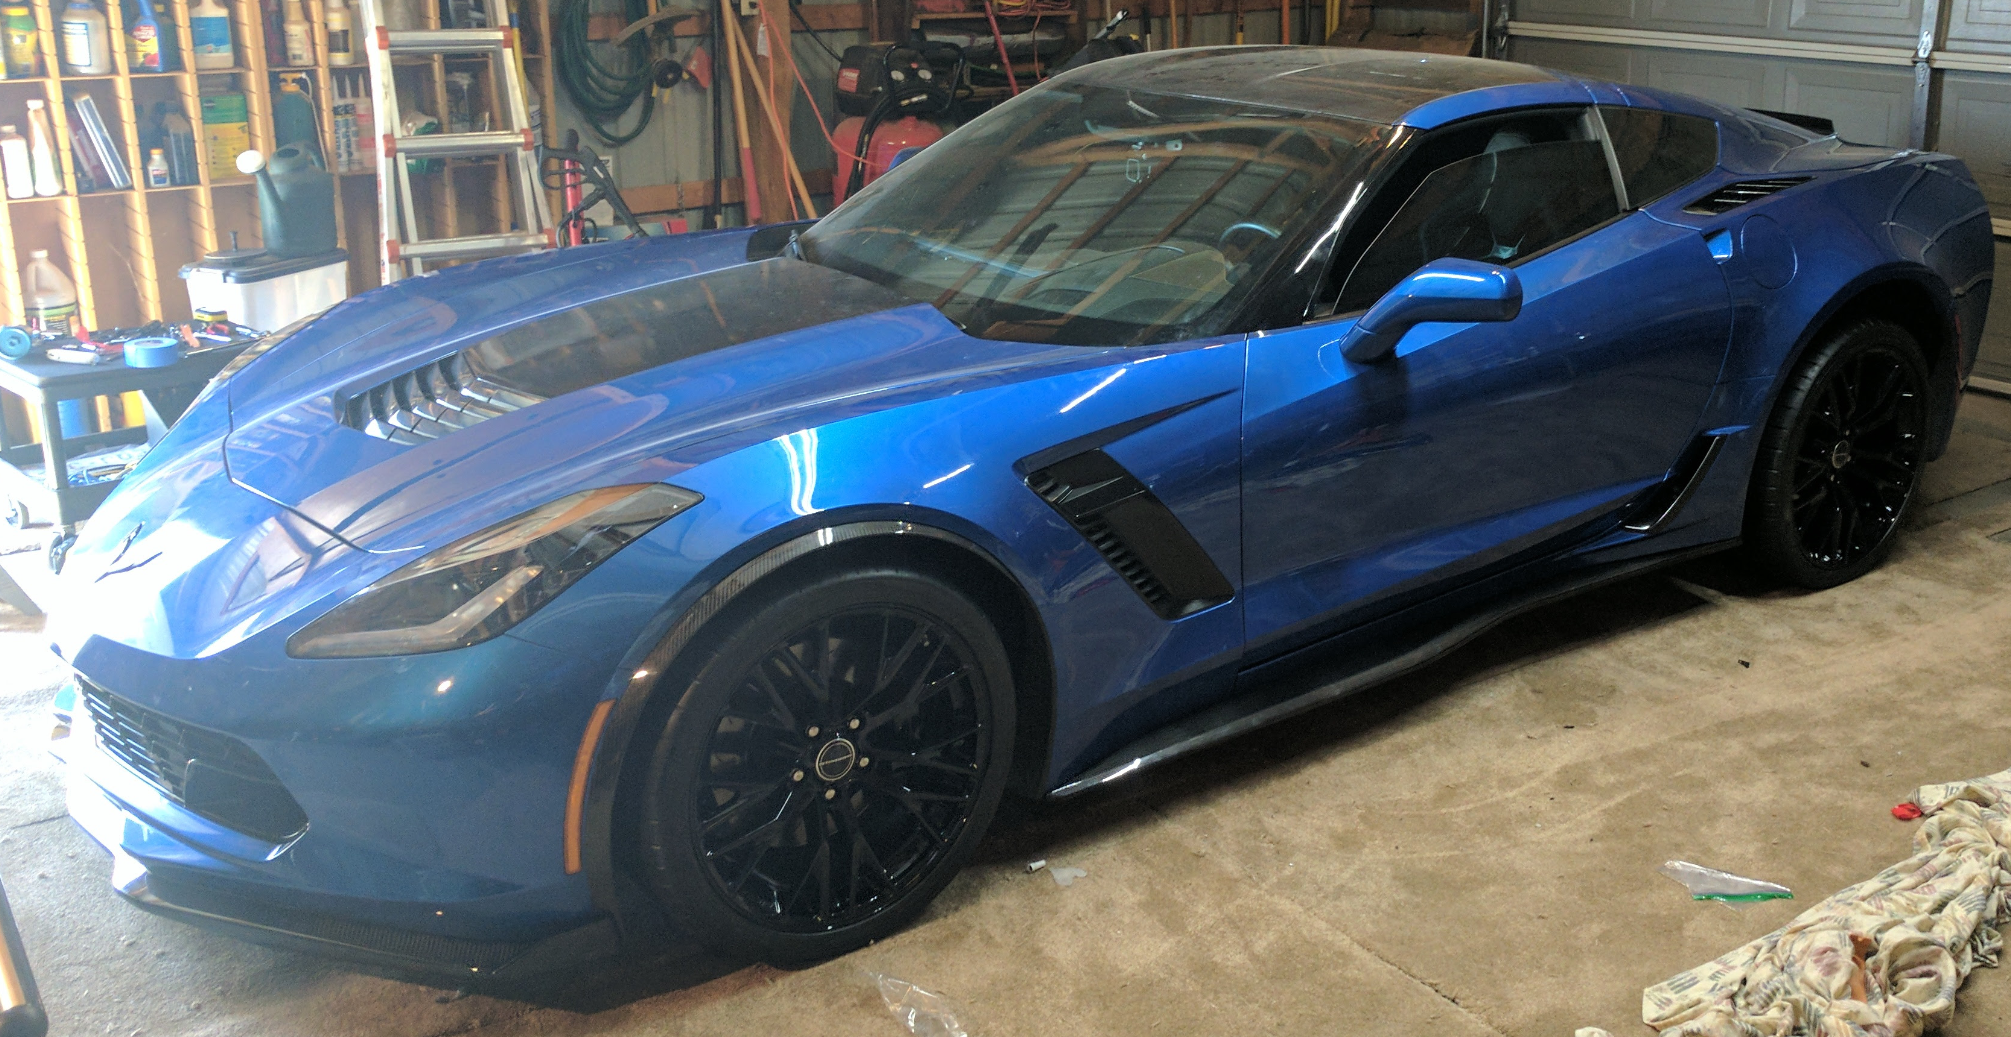
Compare that to how it looked when I started:

After a few loose ends (rear emblem, a couple of things under the hood), a quick trip to the carwash, and a loose spark plug wire scare, and...
Pretty. Now, once the spoiler arrives, I'll head over to The Man Cave to get the paint corrected on the doors and hood and hatch, and get a candy coat of quartz on.
I had emblems pro whip me up a set of badges, I just don't have time to chooch them myself. Perhaps one day.
Finally, my Stage 2 spoiler arrived from C7Carbon, and I got it installed! Looks great!

Got the paint correction done, and a quartz coating applied, so here's a few more pics:
The roof was arguably the most swirled up of all:
05-23-2017, 04:22 PM
#2
Burning Brakes
Thread Starter
Part 2: The Reassembly
Now that the panels are all off, I can work on putting the new ones on. I'll put on the aperture panels, and while those cure / affix, I'll start moving stuff from the old panels to the new panels: fasteners, clips, etc.
Day 4: Mock up apeture panels, plan and clean more urethane, about an hour
I only worked on the car for about an hour today, fitting the new panels up and cleaning up the urethane and epoxy bits getting ready for the glue up.
As you can see from this pic, fitting the panels, the front part of the aperture won't go into place and sit flush with the body:
there is a "corner" on the panel that gets pressed into the urethane and gets urethane on both sides.
The new panel can't easily slide back into the groove the old panel makes:
After cutting the inside part of the urethane, looks like this:
And then the panel sits flush:
I finished cleaning up the area and planning my urethane and epoxy application process. I'll be putting down urethane exactly where i cut the old urethane and a tiny bit around the "shims" to make sure they get tight, then splat some blobs of epoxy next to the old epoxy blobs and press into place. As for clamping it down, I have some plans there. We'll see.
Day 5: Glue the aperture panels on, put the doors back on, interior (trim and seats) replaced, mocked up both Stingray and Z06 fenders (Stingray fenders won't work with Z06 aperture panels!). about 4 hours of work and another hour of playing with fenders
Got the important bits done today!
After cleaning up the urethane, I took the multipurpose oscillating tool, this time with the coarse sandpaper tool, and cleaned up all the epoxy and urethane shims, removing any leftover fiberglass composite.
Next was cleaning with denatured alcohol to remove any oils and prepare the urethane for some new new.
First up was some new thin layer of epoxy on all the epoxy shims and a blob next to each shim. This stuff has a longer setup time than the urethane, so I applied it first.
It is pretty viscous and doesn't stand up well, but it sticks good enough if you don't blob it too much.
Drivers side is up and clamped. The back part was held in by the trim, it pulled it nice and tight. The shims are doing their job, the panel only fits in one place and it fits tight.
I didn't grab a pic of the urethane because of it's quick setup time, I wish I had though. I used an entire cartridge of urethane on each panel, trying to lay a nice thick bead on top of the old urethane. The passenger side is up.
After the urethane set, i pulled the clamps off and admired our work.
Looking good, the panels are exactly where they belong.
Putting the doors on was easy, however they do need to be perfectly lined up where they used to be. Marker around the hinges before removing them allowed this. I used a red sharpie. Make sure you don't wipe it off with the solvent when you clean up the urethane.
Seats are in, trim is back in, in the garage there is so much more room for activities.
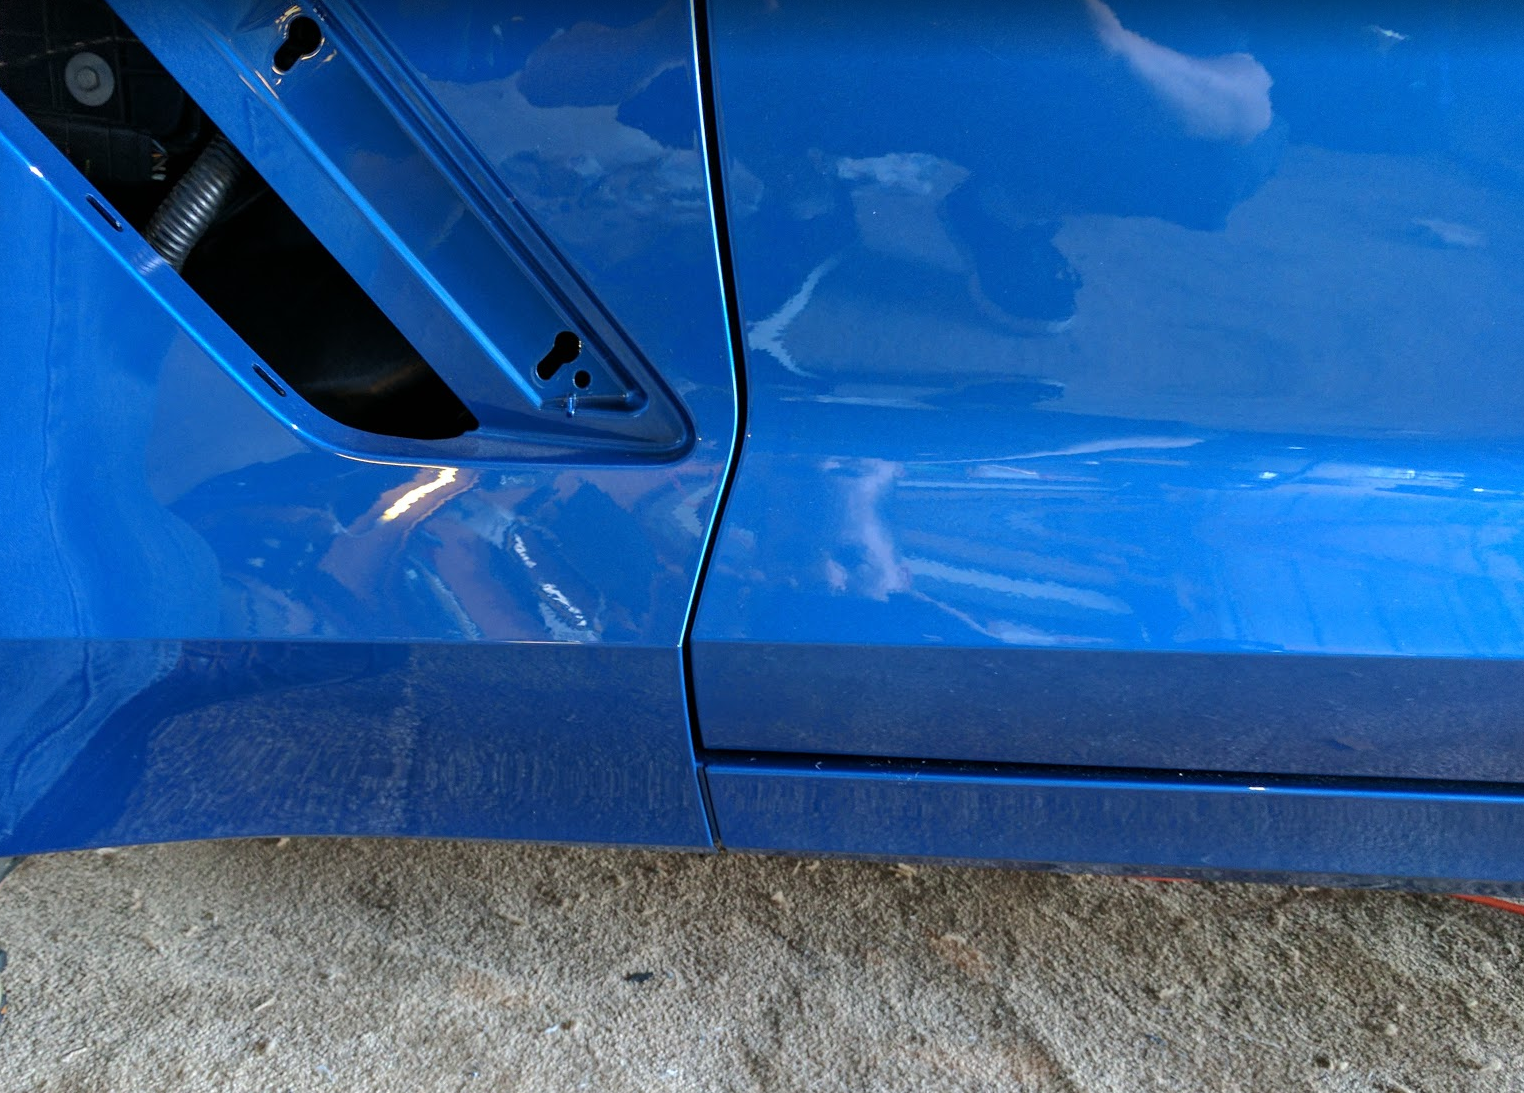
Now here is an interesting thing. I was fairly certain that a person desired, he could could do a rear+aperture only widebody and leave the Stingray front fenders on, as the added width is only from the wheel extensions. Turns out this isn't the case, the Z06 front fenders are wider, and not just because of the wheel extensions. Take a look here (might want to click to zoom):
Attachment 48344747
Ok, so I was thinking, maybe you could still do the rear+aperture only widebody only and use Stingray front fenders + wheels, and do Z06 wheels in the rear. Nope, even though the fender/door line is the same between a Stingray and Z06, the lower part, the fender->aperture line is not.
This is how the Z06 front fender fits, and how it should fit
But the Stingray fender wants to sit behind the aperture line:
Or, if i force it on top, i get this gap between the panels. It's obvious the curve of the Z06 aperture panel is different than the Stingray, and somewhat dramatically.
So there you go. If you want to Z06 / GS widebody, you must do the front fenders as well.
I used the front fender to check and tweak the alignment on the door and we're in good shape there. Unfortunately, that's all I had time for today, so the Z06 fender is currently just mocked up and not bolted in place. However, from our fitment tests, the door might need a very slight adjustment upwards. (Again, this pic, the Z06 fender is just set in place, and not lined up with the bolt holes or anything, and is why the gap is inconsistent.)
Day 6: Front fenders on, Aligned the doors, front fascia on, front wheel well liners in, rear quarter panels assembled and on, fuel door on, mockup carbon fiber wheel extensions, about 3 hours
I managed to get a few more hours of work in today, though we're having a crawfish boil so I didn't get too much done, but definitely some progress.
Fenders are on and in place. I had to remove the driver's side a couple of times in order to adjust the position of the door to get a perfect gap. This is what took the bulk of the time, getting a perfectly even gap around the door. However, on the passenger's side, after I figured out the best way to adjust the door, it went very quickly. Only one fitment and adjustment was needed. (Hint, use the top and bottom bolts on each hinge as pivot points, while having a jack underneath hold up the door. This makes it easy to adjust the rotation and updown/leftright of the door)
Front fascia and headlights back in.
Rear quarter panels bolted on with the new Z06 hardware
Woo, starting to look nice and wide!
Wheel wells are in and here I am mocking up the CF fender extensions. Pretty.
That's it for today! Next up is the rear fascia, and then the carbon fiber skirts and splitter. Hopefully my CF spoiler will arrive in the next week so I can complete this on the weekend.
Day 7: I got tired of waiting for the C7Carbon Z06 spoiler (they're still working on it, can't rush perfection!) so I decided to finish reassembly. Rear fascia, wheel weels, carbon fiber splitter, carbon fiber side skirts, wheels
C7Carbon is still working on their CF Z06 spoilers, and might take another few weeks for them to ship it out, but that's ok, I don't mind. But, Since the bbq weekend is here, and I want to show off my car to the family at our bbq, I decided to finish it up, sans spoiler.
Stuck in the fender wells in using the applied 3m automotive body tape, and make sure the fender and front fascia fit into the groove, and bolt the fender wells in:
After an adventure in figuring out how to open the hatch when the battery is dead, and you have removed the manual trunk release, I got the rear fascia on:
And that's pretty much it. Reassemble the trunk area, and finish bolting in the new wheel well liners, and the widebody is done. Now on to more fun parts. The carbon fiber front splitter just bolts on.
Finally, rivet on the side skirts (i can't believe I drilled holes into my bran-new aperture panels...) and bolt on the wheels, and it's done (save for the CF spoiler). Pneumatic riveter was pretty much required on the side skirts.
Compare that to how it looked when I started:
After a few loose ends (rear emblem, a couple of things under the hood), a quick trip to the carwash, and a loose spark plug wire scare, and...
Pretty. Now, once the spoiler arrives, I'll head over to The Man Cave to get the paint corrected on the doors and hood and hatch, and get a candy coat of quartz on.
I had emblems pro whip me up a set of badges, I just don't have time to chooch them myself. Perhaps one day.
Finally, my Stage 2 spoiler arrived from C7Carbon, and I got it installed! Looks great!
Got the paint correction done, and a quartz coating applied, so here's a few more pics:
Attachment 48352519
Attachment 48352516
Attachment 48355766
The roof was arguably the most swirled up of all:
Attachment 48355767
Attachment 48355768
Now that the panels are all off, I can work on putting the new ones on. I'll put on the aperture panels, and while those cure / affix, I'll start moving stuff from the old panels to the new panels: fasteners, clips, etc.
Day 4: Mock up apeture panels, plan and clean more urethane, about an hour
I only worked on the car for about an hour today, fitting the new panels up and cleaning up the urethane and epoxy bits getting ready for the glue up.
As you can see from this pic, fitting the panels, the front part of the aperture won't go into place and sit flush with the body:
there is a "corner" on the panel that gets pressed into the urethane and gets urethane on both sides.
The new panel can't easily slide back into the groove the old panel makes:
After cutting the inside part of the urethane, looks like this:
And then the panel sits flush:
I finished cleaning up the area and planning my urethane and epoxy application process. I'll be putting down urethane exactly where i cut the old urethane and a tiny bit around the "shims" to make sure they get tight, then splat some blobs of epoxy next to the old epoxy blobs and press into place. As for clamping it down, I have some plans there. We'll see.
Day 5: Glue the aperture panels on, put the doors back on, interior (trim and seats) replaced, mocked up both Stingray and Z06 fenders (Stingray fenders won't work with Z06 aperture panels!). about 4 hours of work and another hour of playing with fenders
Got the important bits done today!
After cleaning up the urethane, I took the multipurpose oscillating tool, this time with the coarse sandpaper tool, and cleaned up all the epoxy and urethane shims, removing any leftover fiberglass composite.
Next was cleaning with denatured alcohol to remove any oils and prepare the urethane for some new new.
First up was some new thin layer of epoxy on all the epoxy shims and a blob next to each shim. This stuff has a longer setup time than the urethane, so I applied it first.
It is pretty viscous and doesn't stand up well, but it sticks good enough if you don't blob it too much.
Drivers side is up and clamped. The back part was held in by the trim, it pulled it nice and tight. The shims are doing their job, the panel only fits in one place and it fits tight.
I didn't grab a pic of the urethane because of it's quick setup time, I wish I had though. I used an entire cartridge of urethane on each panel, trying to lay a nice thick bead on top of the old urethane. The passenger side is up.
After the urethane set, i pulled the clamps off and admired our work.
Looking good, the panels are exactly where they belong.
Putting the doors on was easy, however they do need to be perfectly lined up where they used to be. Marker around the hinges before removing them allowed this. I used a red sharpie. Make sure you don't wipe it off with the solvent when you clean up the urethane.
Seats are in, trim is back in, in the garage there is so much more room for activities.
Now here is an interesting thing. I was fairly certain that a person desired, he could could do a rear+aperture only widebody and leave the Stingray front fenders on, as the added width is only from the wheel extensions. Turns out this isn't the case, the Z06 front fenders are wider, and not just because of the wheel extensions. Take a look here (might want to click to zoom):
Attachment 48344747
Ok, so I was thinking, maybe you could still do the rear+aperture only widebody only and use Stingray front fenders + wheels, and do Z06 wheels in the rear. Nope, even though the fender/door line is the same between a Stingray and Z06, the lower part, the fender->aperture line is not.
This is how the Z06 front fender fits, and how it should fit
But the Stingray fender wants to sit behind the aperture line:
Or, if i force it on top, i get this gap between the panels. It's obvious the curve of the Z06 aperture panel is different than the Stingray, and somewhat dramatically.
So there you go. If you want to Z06 / GS widebody, you must do the front fenders as well.
I used the front fender to check and tweak the alignment on the door and we're in good shape there. Unfortunately, that's all I had time for today, so the Z06 fender is currently just mocked up and not bolted in place. However, from our fitment tests, the door might need a very slight adjustment upwards. (Again, this pic, the Z06 fender is just set in place, and not lined up with the bolt holes or anything, and is why the gap is inconsistent.)
Day 6: Front fenders on, Aligned the doors, front fascia on, front wheel well liners in, rear quarter panels assembled and on, fuel door on, mockup carbon fiber wheel extensions, about 3 hours
I managed to get a few more hours of work in today, though we're having a crawfish boil so I didn't get too much done, but definitely some progress.
Fenders are on and in place. I had to remove the driver's side a couple of times in order to adjust the position of the door to get a perfect gap. This is what took the bulk of the time, getting a perfectly even gap around the door. However, on the passenger's side, after I figured out the best way to adjust the door, it went very quickly. Only one fitment and adjustment was needed. (Hint, use the top and bottom bolts on each hinge as pivot points, while having a jack underneath hold up the door. This makes it easy to adjust the rotation and updown/leftright of the door)
Front fascia and headlights back in.
Rear quarter panels bolted on with the new Z06 hardware
Woo, starting to look nice and wide!
Wheel wells are in and here I am mocking up the CF fender extensions. Pretty.
That's it for today! Next up is the rear fascia, and then the carbon fiber skirts and splitter. Hopefully my CF spoiler will arrive in the next week so I can complete this on the weekend.
Day 7: I got tired of waiting for the C7Carbon Z06 spoiler (they're still working on it, can't rush perfection!) so I decided to finish reassembly. Rear fascia, wheel weels, carbon fiber splitter, carbon fiber side skirts, wheels
C7Carbon is still working on their CF Z06 spoilers, and might take another few weeks for them to ship it out, but that's ok, I don't mind. But, Since the bbq weekend is here, and I want to show off my car to the family at our bbq, I decided to finish it up, sans spoiler.
Stuck in the fender wells in using the applied 3m automotive body tape, and make sure the fender and front fascia fit into the groove, and bolt the fender wells in:
After an adventure in figuring out how to open the hatch when the battery is dead, and you have removed the manual trunk release, I got the rear fascia on:
And that's pretty much it. Reassemble the trunk area, and finish bolting in the new wheel well liners, and the widebody is done. Now on to more fun parts. The carbon fiber front splitter just bolts on.
Finally, rivet on the side skirts (i can't believe I drilled holes into my bran-new aperture panels...) and bolt on the wheels, and it's done (save for the CF spoiler). Pneumatic riveter was pretty much required on the side skirts.
Compare that to how it looked when I started:
After a few loose ends (rear emblem, a couple of things under the hood), a quick trip to the carwash, and a loose spark plug wire scare, and...
Pretty. Now, once the spoiler arrives, I'll head over to The Man Cave to get the paint corrected on the doors and hood and hatch, and get a candy coat of quartz on.
I had emblems pro whip me up a set of badges, I just don't have time to chooch them myself. Perhaps one day.
Finally, my Stage 2 spoiler arrived from C7Carbon, and I got it installed! Looks great!
Got the paint correction done, and a quartz coating applied, so here's a few more pics:
Attachment 48352519
Attachment 48352516
Attachment 48355766
The roof was arguably the most swirled up of all:
Attachment 48355767
Attachment 48355768
Last edited by joemosfet; 10-31-2017 at 04:41 PM.
The following 13 users liked this post by joemosfet:
7LitreC5 (05-28-2017),
89talon (08-10-2017),
Blackbird13 (04-19-2023),
blkvet6 (05-29-2017),
CorvetteMike2024 (05-01-2022),
and 8 others liked this post.
05-23-2017, 04:34 PM
#3
Le Mans Master


Now that is a quite the modification. Good luck. Cutting into a perfectly good C7 makes me cringe 
The following users liked this post:
joemosfet (05-24-2017)
The following users liked this post:
joemosfet (05-24-2017)

The following users liked this post:
joemosfet (05-23-2017)
05-23-2017, 07:31 PM
#6
Le Mans Master
Member Since: Jul 2015
Location: Northern California
Posts: 6,223
Received 1,694 Likes
on
1,240 Posts
St. Jude Donor '15
What an awesome project, I look forward to seeing it finished!
The following users liked this post:
joemosfet (05-24-2017)
05-23-2017, 07:50 PM
#7
Team Owner


Member Since: Jan 2007
Location: cookeville tennessee
Posts: 28,846
Received 1,762 Likes
on
1,529 Posts

Nice job man hope to have all my parts from trunk monkey this week. I really don't know if I will start on this same job then are hold off until this winter.
OP looks like you have it going on here. Please more pic's & info on any easy way around the over all job. Robert
OP looks like you have it going on here. Please more pic's & info on any easy way around the over all job. Robert
The following users liked this post:
joemosfet (05-24-2017)
05-23-2017, 07:52 PM
#8
Drifting


I never have problems taking parts off, only breaking a few, but putting them back on is another story. Looks like you are doing a great job. Looking forward to the next part.
The following users liked this post:
joemosfet (05-24-2017)
05-23-2017, 08:41 PM
#9
Great. I'm doing wide body conversion also and my car will be the same color as yours. Can you please give a name of the tool used to cut off the panels and where do I purchase. Also what attachments ( blades ) would I need to purchase for the cutting tool. 20 min per panel sounds great. What year is your car ? I'm doing tow hook in while car is apart.
05-23-2017, 08:44 PM
#10
I'm looking forward to seeing the fender emblems. As of now I decided on GS emblems.
The following users liked this post:
joemosfet (05-24-2017)
05-23-2017, 11:39 PM
#11

Well done, my friend and can't wait for the next installment. These are the kind of threads I enjoy the most around here.
The following users liked this post:
joemosfet (05-24-2017)
05-24-2017, 12:10 AM
#12
Burning Brakes
Thread Starter
Nice job man hope to have all my parts from trunk monkey this week. I really don't know if I will start on this same job then are hold off until this winter.
OP looks like you have it going on here. Please more pic's & info on any easy way around the over all job. Robert
OP looks like you have it going on here. Please more pic's & info on any easy way around the over all job. Robert
Great. I'm doing wide body conversion also and my car will be the same color as yours. Can you please give a name of the tool used to cut off the panels and where do I purchase. Also what attachments ( blades ) would I need to purchase for the cutting tool. 20 min per panel sounds great. What year is your car ? I'm doing tow hook in while car is apart.

As for the blades, I use the narrow cutting blade for cutting the panel next to the eurethane, then I use the "flexible scraper" to cut the panel away from the urethane, makes quick work of it. In this pic, the top blade is the cutting one, and the bottom left is the flexible scraping one:
Thanks for the support to you and every one else! It's an exciting project and I can't wait to see the results.
Last edited by joemosfet; 05-24-2017 at 12:12 AM.

 OK, I'm in for this one...great post!
05-26-2017, 11:41 PM
OK, I'm in for this one...great post!
05-26-2017, 11:41 PM
#15
Burning Brakes
Thread Starter
Today I got the other apeture panel removed and some of the urethane cleaned up. I updated post #1 a few pics.
Also, here's a preview of what I'll be doing tomorrow:
Also, here's a preview of what I'll be doing tomorrow:
 05-26-2017, 11:53 PM
#16

Awesome work my friend.
The following users liked this post:
joemosfet (05-26-2017)

The following users liked this post:
joemosfet (05-27-2017)
05-27-2017, 01:51 AM
#18
That may be the right thing for you or even most people, but I gotta admire folks who have a good car, love it, and enjoy the process of doing the work themselves to transform it.
What Joe and Jet Vet did themselves in their own garages gives them the equivalent of what GM does on the assembly line in BG. After all, every C7 is built on an identical platform, and everything else is just bolted on parts.
What Joe and Jet Vet did themselves in their own garages gives them the equivalent of what GM does on the assembly line in BG. After all, every C7 is built on an identical platform, and everything else is just bolted on parts.
05-27-2017, 05:59 AM
#19
Thanks for sharing the knowledge you've gained during this project.
The following users liked this post:
joemosfet (05-27-2017)
05-27-2017, 07:01 AM
#20
I'm Batman..
Pro Mechanic

Member Since: Apr 2014
Location: Lehigh Acres FL
Posts: 6,130
Received 908 Likes
on
561 Posts
Tech Contributor

That may be the right thing for you or even most people, but I gotta admire folks who have a good car, love it, and enjoy the process of doing the work themselves to transform it.
What Joe and Jet Vet did themselves in their own garages gives them the equivalent of what GM does on the assembly line in BG. After all, every C7 is built on an identical platform, and everything else is just bolted on parts.
What Joe and Jet Vet did themselves in their own garages gives them the equivalent of what GM does on the assembly line in BG. After all, every C7 is built on an identical platform, and everything else is just bolted on parts.

The following 3 users liked this post by FYREANT: