When you click on links to various merchants on this site and make a purchase, this can result in this site earning a commission. Affiliate programs and affiliations include, but are not limited to, the eBay Partner Network.
HOW TO: Installing JW Motorsports Stage 2 (and Stage 3) Front Splitter on a C7
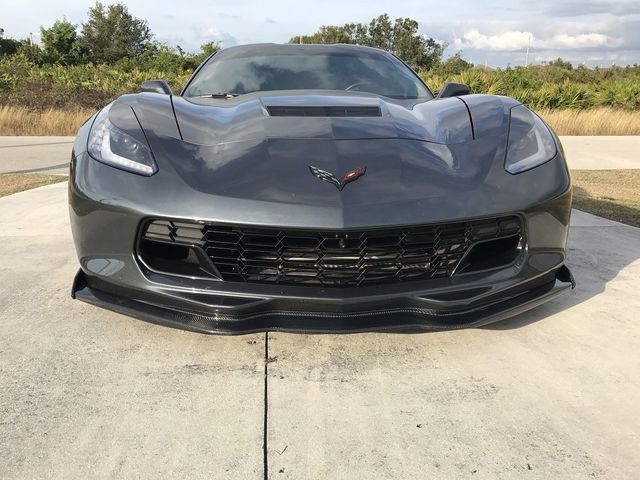
I picked up a new stage 2 carbon fiber front splitter from JW Motorsports after I had just recently installed the carbon fiber JWM side skirts. I’ll go over how to install it in this guide on my Stingray, but these instructions should apply to all C7 models except the new ZR1 since we all share the same front bumper fascia. When the splitter arrives it will be in a large box, very well protected. Unbox the splitter and carefully unwrap it. I would recommend against using any type of razor blade to cut the plastic off so that you do not damage the splitter.
***NOTE: Instructions for installing the Stage 3 Winglets are towards the end of the document!***
In order to install the small side “wings” you’ll need to go to the hardware store for a few things as these ship pre-drilled, but without hardware. Specifically, what you will need is:
• 4 black bolts, M6-1.00 x 30
• 8 black neoprene (rubber) washers - Ľ” ID / ˝” OD
• 4 (any color) stop nuts (nylon insert type) M6-1.00 pitch
I got all my hardware at Ace Hardware to the tune of about $10.00. Here is the actual barcodes you are looking for if you go to Ace Hardware.
Ok, let’s get started. First we will get the Stage 2 wings mounted up. Unwrap your wings, and ensure that all your holes line up properly. Again, these are pre-drilled, but you may need to use a drill to enlarge the holes a pinch and/or make fine adjustments. We'll be going over installing the Stage 3 winglets a little further in the guide if you are doing those.
The wings can technically be installed incorrectly (on wrong sides) if you are not careful. Use the picture below to ensure you have the wings on the right sides and oriented properly.
Now it’s time to use the hardware we got from Ace. Put a rubber washer on your bolts and slide them through the pre-drilled holes in the wings. Then, put another rubber washer on the inside of the splitter, and then cap it off with a stop nut.
Tighten the stop nut until the wings are held into place properly. Remember, we are using nylon inserted nuts that will prevent the nut from working its way off. Because of this there is NO NEED to overtighten these nuts! Do not expect to tighten the nut “until it stops” because the wings are hollow and could collapse if you keep cranking down on them. Tight them up just enough so that the wings do not move and there is no play in the bolt.
Below is a picture of what they will look like when mounted up. Ooooohhhhh……. Ahhhhhhhh……
Ok, out to the garage! Put the car up on jack stands to ensure it is properly secured. Remember, do you try to do this with just a floor jack holding up the car!
The below pic shows a comparison of the C7 Z06 stage 1 “poverty” splitter that I removed from my car in favor of the new one. You can see the new stage 2 resembles it, but is much more aggressive looking!
In the below picture, you will need to remove all the bolts circled in blue. You will need a 7MM socket for this. The last bolt on the outer edges of each side also holds the small air dams on.
Also, if you already have an existing splitter on your car, you may need to remove additional fasteners as circled in orange below. If your orange fasteners are rivets, you will need to drill them out. If they are “snap clips” then they can be removed pretty easily.
(NOTE: If you do not currently have holes where the orange circles are, you will by the end of this guide!)
In the below pic you can see I did my classic move of using some wood to lend a hand since I did this solo. That being said, I will still recommend you have help to hold the splitter up to the car while you get the first couple bolts in.
We are going to need to drill out holes for where the orange circles were at two pictures up, so we need to get the splitter secured to the car first, and then we can use the holes as a template for the drill. To do this, hold the splitter up and bolt in and snug four bolts in the locations indicated in green in the below two pictures. This will hold the splitter up enough for now.
Ok, now that we have the splitter bolted in place temporarily, it’s time to drill our holes. There will be 5 holes on each side for a total of 10 holes to drill indicated by the orange arrows:
- If you are using pop-rivets, you will need to check your pop-rivet packaging to ensure you use the right drill-bit size for the rivet hole. Additionally, you may also optionally choose to add a stainless steel washer to the pop-rivets to give them a larger area to grab and better distribute the clamping force.
- In my case, I previously chose to use “Snap clips” for my stage 1 poverty splitter.
- Snap clips require you to drill out the hole much larger than the pop rivets would so I would recommend using pop-rivets and NOT snap clips if possible. Since I previously use snap clips, there’s no going back to pop-rivets at that point since my holes are already drilled out too large. That being said, I re-used my snap clips. The only time I would recommend using snap clips is if you know that you will frequently be removing either the front splitter or front fascia from the car as they can save a bunch of time.
Once you get all your holes drilled, I would recommend taking the splitter back off and cleaning up any loose debris from drilling the holes and clean the area so you don’t get anything trapped between the splitter and bumper that could cause any long term damage or scratches.
Then, you are free to mount it back up again, this time securing all bolts in blue, and all pop-rivets/snap clips in orange.
Once that is all squared away you’re all done! Your splitter should look like it is properly mounted, and should be held on there pretty securely.
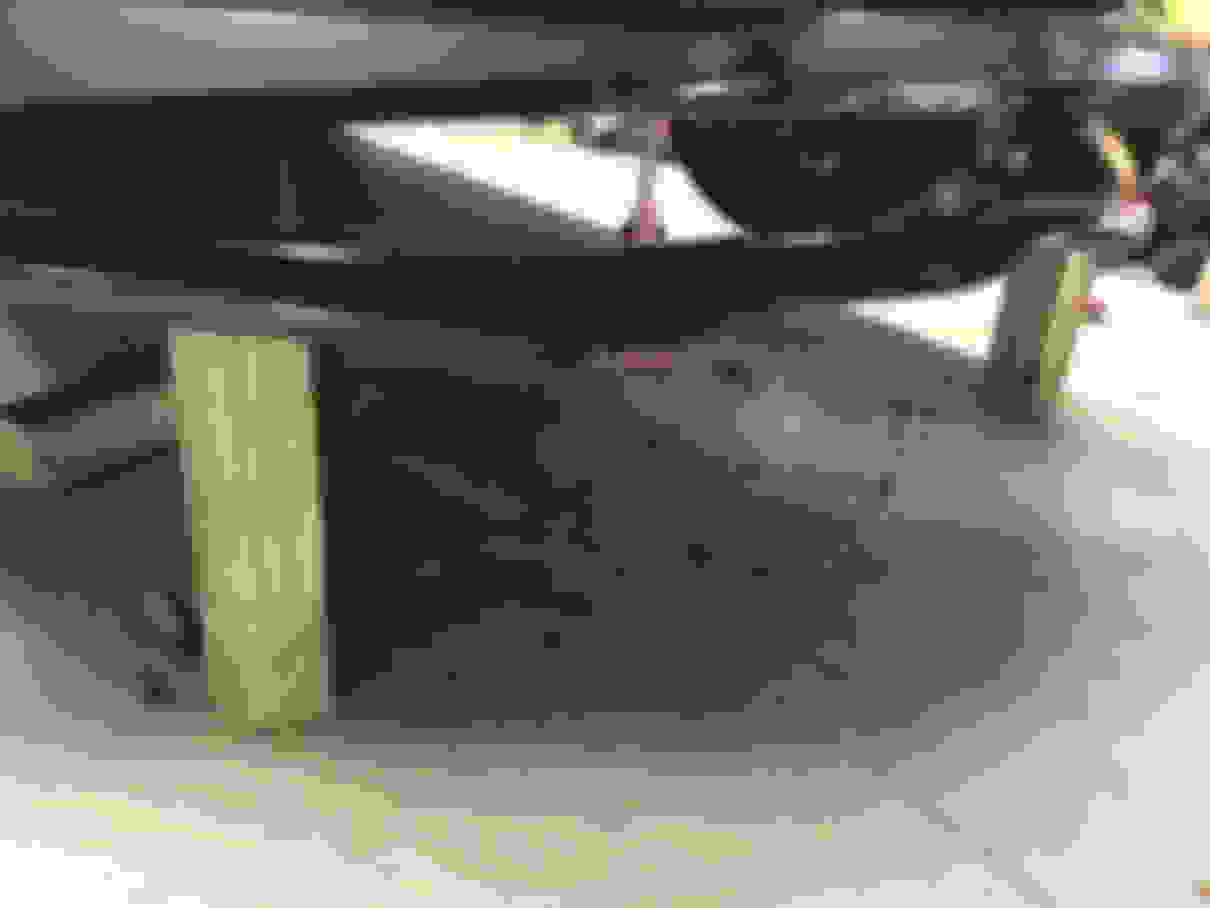
Now go ahead and lower the car down. BE VERY CAREFUL as now you have a splitter on the front which will make the car even lower under the front bumper! If you care is lowered, you may not even be able to fit the jack under the car with it all the way down!
What I do since my car is lowered is use a 9” block of 4” x 4” wood standing on its end right under the engine cradle. I jack the car up, remove the jack stands, and then lower it down onto the 4x4. Then, I take the jack out, go to the side of the car, and jack it up by the jacking puck just on the one side until the weight is off the 4x4 and then I pull it out and lower the car the rest of the way.
Having ground effects beautifully accentuate the body lines on this car, but be forewarned, they are VERY EASY to damage if you are not extra cautious. The splitter is made from carbon fiber and is cleared coated. Its good and sturdy, but it is not very thick material so any type of rubbing it on bumps in the road will damage the splitter more than you would think. For example, scraping the front of it pulling out of an inclined driveway wont just scuff up the bottom edge, it can cause the clear coat to crack across a 6"-12" section. Remember that all carbon fiber parts are like this so this is more just being noted so you are prepared for the caution that you must take.
My driveway is at an angle and my stage 1 poverty splitter would always scrap a little bit coming in and out of the driveway. The poverty splitter is plastic and more forgiving than carbon fiber. Carbon fiber is rigid due to the clear coating. I’ve already damaged my new splitter on both sides because of how low my car is and how unforgiving carbon fiber is. So take this as your warning to be cautious!!
Here are some pics of my car after the install. I love how it looks now!
Hope this guide has helped you install your new JW Motorsports Stage 2 front splitter!
STAGE 3 WINGLETS:
If you decided to buy the Stage 3 winglets instead of the Stage 2 wings, then these next couple steps will help you get those mounted up.
In order to install the Stage 3 wings, you will need to first mount the splitter to the car as the wings are easiest installed after the fact. That being said, you will want to be at this point of the install when you are ready to attach the Stage 3 wings:
There are three Torx bolts holding on the wheel well liner in front of the front wheels. Its important to note that you MAY need to go get some different screws to use for mounting the wings as the recesses in the wings are not big enough for the bolts you took out for you to be able to reuse them. Maybe only the top bolt. After removing these bolts, I held the first Stage 3 winglet in place and put the first bolt into the top to hold it in place as shown below:
With that bolt holding it in place, I was then able to put the lower bolts in to hold it to the splitter. This part requires you to be able to get under there so don't put the car down off the jack stands yet! Here you can see in the next two pictures that I have put the bolts previously used back in, aligned everything, and tightened them up. I did not re-use the neoprene washers this time, I went straight for some solid metal washers. This is because these bolts will no longer be visible once everything is assembled.
Now that you have those bolts in and tightened up, It's time to put the other two bolts in for the back of the winglet. Once all three are in, you're all done. Here's how your winglets should look!
This guide will be added to the How To sticky thread at the top of the C7 General section for easy reference.
Just curious what wheel are you running in the front? 18x9.5? oem rear wheels?
I think if you remove the stingray decal from the fender, it'll look even badass! Just my .02..
Thank you!
The fish on the side is actually hydrocarbon fiber so it sort of matches actually. 19" x 10" Z51 replica rears and 20" XO XF1 front wheels. Think they are 9.5" wide.
Lol, I've been waiting to see what you come up with on that, I think it'll look great with your new Carbon pieces.
So the fender flares are still coming lol! And yes there will be a How To for them LOL. I had to order Z06 width wheels since thats the whole reason i'm doing the flares (went with a custom sized set of Forgestar F14's in piano black). I've got the rear wheels and a set of front runners.
I've ordered tires for the front runners. I haven't decided what i'm doing for rear tires yet though. Now I am thinking I need to order an additional set of front F14's in a wider size + tires so i'm not driving around on pizza cutters up there all the time.
The fender flares being in carbon fiber is what set the carbon fiber skirts and lip in motion though actually. One thing that I hadn't checked yet was how the flares will fit together with the new lip since the flares cover the total wheel opening. The lip will cause an issue though as the wings don't have enough clearance to fit the flares. I'll have to figure something out..
Nice write up.May i add a stainless fender washer to each rivet.Rivet heads are very small diameter.Adding the washer increases the pinch area for a stronger,longer hold.
Your brave updating the poverty splitter while rubbing to go even lower.
So the fender flares are still coming lol! And yes there will be a How To for them LOL. I had to order Z06 width wheels since thats the whole reason i'm doing the flares (went with a custom sized set of Forgestar F14's in piano black). I've got the rear wheels and a set of front runners.
I've ordered tires for the front runners. I haven't decided what i'm doing for rear tires yet though. Now I am thinking I need to order an additional set of front F14's in a wider size + tires so i'm not driving around on pizza cutters up there all the time.
The fender flares being in carbon fiber is what set the carbon fiber skirts and lip in motion though actually. One thing that I hadn't checked yet was how the flares will fit together with the new lip since the flares cover the total wheel opening. The lip will cause an issue though as the wings don't have enough clearance to fit the flares. I'll have to figure something out..
Ant
Ahh, dang it! Lol, get the dremmel out. If it were me, I'd cut that sucker and paint the area that you cut to blend in. Tape it off and cut it Anyway can't wait to see your setup when done, lol I may copy it, haha. My oem tires are pretty worthless with the blower...I'm thinking next summer I'll order some HRE's so been patiently waiting to see you finish.
Nice write up.May i add a stainless fender washer to each rivet.Rivet heads are very small diameter.Adding the washer increases the pinch area for a stronger,longer hold.
Your brave updating the poverty splitter while rubbing to go even lower.
Done. I've added verbiage to the guide for this. Thanks!
Originally Posted by JW Motorsports
Looks good! Thanks for taking the time to document the install.
For anyone looking for one of these splitters we have them on sale right now
Ahh, dang it! Lol, get the dremmel out. If it were me, I'd cut that sucker and paint the area that you cut to blend in. Tape it off and cut it Anyway can't wait to see your setup when done, lol I may copy it, haha. My oem tires are pretty worthless with the blower...I'm thinking next summer I'll order some HRE's so been patiently waiting to see you finish.
I've been going through all the options in my head lol. I've thought about modifying the flares, or maybe trying to make a spacer for the splitter wings (which I think may be the way to go). I'm sure I will figure something out here soon.
I'd be done already if the darn planets would align lol. I either don't have all the money to do everything I want all at once, or When I do have the loot the parts aren't available and are backordered haha. My goal is to have everything wrapped up in the next 60 days as far as wheels and body parts go.
There is an option to metal rivets, and the larger holes for the plastic rivets. I used the same small bumper cover screws with a flat washer and u-nut used as a lock washer inside the bumper cover. You only need a 1/8" hole which is smaller than for the metal rivets...
I reached through the opening behind the lower air dams to install the washer and nut.

 12-24-2017, 04:57 PM


 Anyway can't wait to see your setup when done, lol I may copy it, haha. My oem tires are pretty worthless with the blower...I'm thinking next summer I'll order some HRE's so been patiently waiting to see you finish.