When you click on links to various merchants on this site and make a purchase, this can result in this site earning a commission. Affiliate programs and affiliations include, but are not limited to, the eBay Partner Network.
As the title says i have seen some schematics on here when i was searching but not a complete walk through with pictures so i thought i would try to add some info.
Step1 Carefully pop the clips off around the rear pocket.
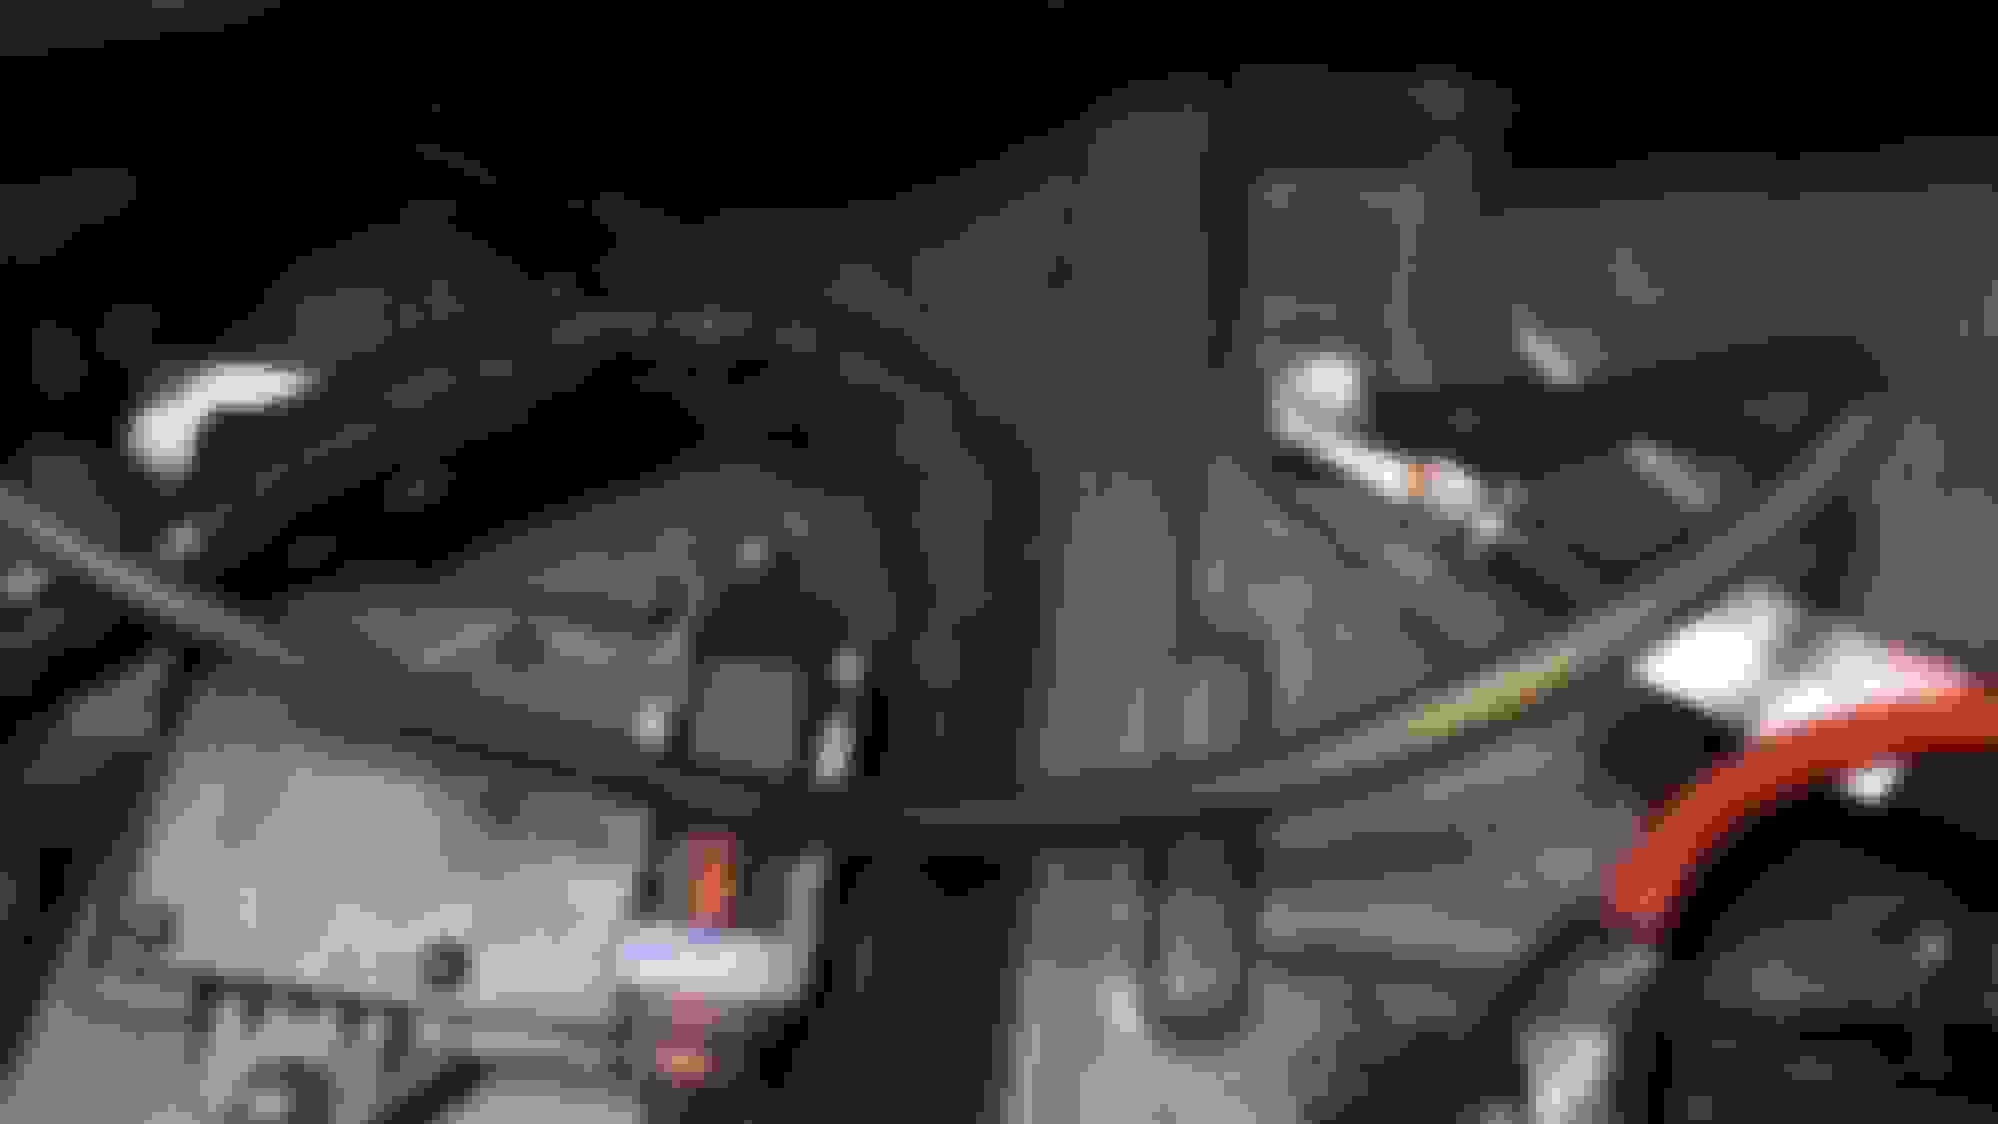
Step 2 Pull up on the rear carpet at the middle of the car by the factory sub. As you do this the carpet will pull out from under the side cover panels and allow you to get to the Battery and the cover panel for the factory amp. Once the battery and factory amp cover are removed it will look like the first pick.
Step 3 find and attach Ground wire. This is very straight forward as the factory ground is right there to access.
Step 3 Buy the m5 nut to mount on the factory fuse location
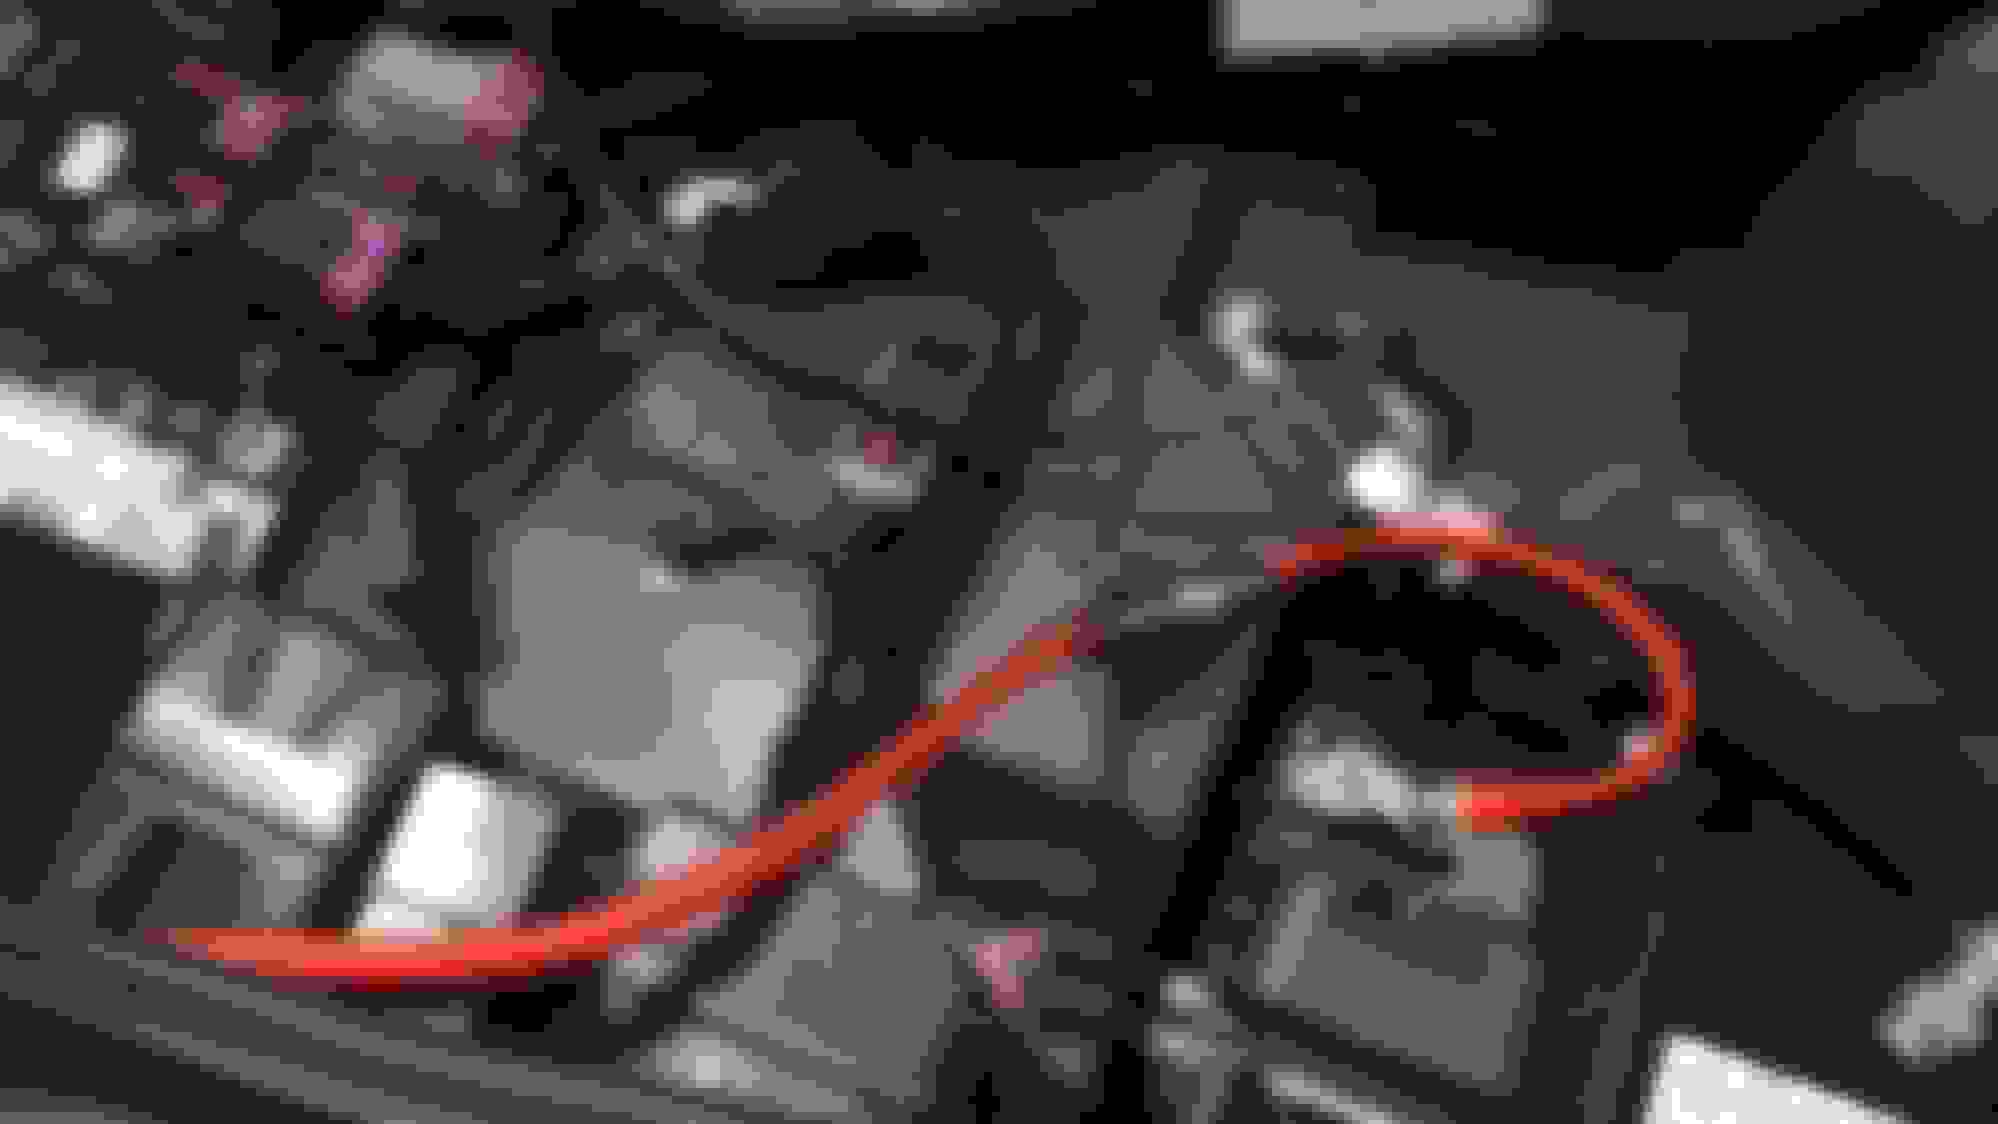
Step 4 Find and tap audio signal for sub. Now this is a bit more complicated than just tagging the sub output wire. This is because Bose has added a couple of features in this new system. The first is time delay the second is active noise canceling. The time delay is a small issue as it will just cause the imaging of the bass notes to be pulled to the rear. You can minimize this by using the front right door sub for your sub signal.This signal is on the X1 plug and is yellow with stripe in color. The active noise canceling is a larger issue as it plays through all three bass drivers in the car. What this means is at idle and low rpm on the highway they use the subs to play low frequency information to offset the exhaust and road noise. This is fine at factory power but with 500 or 1000 watts it is very loud and causes the music to sound muddy. So to fix this you need to disable this feature the way I found to do this is as follows.
4.1 remove the plug called X3 in this plug you will find 5 wires. You need to remove the pins in location 4 and 5. To do this you need to pull the white locking tab all the way off the connector by prying it forward. Once this is off you need to use a sharp pick tool to pull up the locking tabs at the same time as pulling on the wire. Once these two wires are removed you can tape them up so they wont touch anything and reinstall the connector into the amp.
5 With this done all you need to do is hook everything up. In my case i used a Kicker PX500.1 as its very small in size and I could mount it to the mounts. I also ran the Bass **** upfront and installed it in the Power outlet.
I originally tried using the factory 8 inch sub signal for my input but found that Bose has added a lot of EQ to this signal and it causes a larger more powerful sub to sound very bad. The door woofers are much cleaner signal. One thing to note plug X4 is all most and Lan data and should not be messed with.
The system is not done as I still need to clean up some of the install but this will give you a idea of how it was done. All in all besides the bass **** this can be done in under 30 minutes and only adds 17 pounds to the car. Let me know if you have any questions.
I'm running a 5-channel amp behind a 3sixty.3 DSP.
I am using one of the sub outputs as input. (still do not understand why there are two sub input channels for a single speaker)...
How did you determine there was a bunch of EQ added to the sub channel(s)? Assuming you simply split one of the front sub outputs for you input?
I have not noticed any muddiness in the bass but have not deactivated the noise cancellation. Does it make a noticeable difference doing so by removing the pins as you described?
I used a RTA to look at the signal out of each speaker output while playing pink noise from the radio. This allows you to see the EQ applied to each channel.
For Time delay I played a pulse note and measured the time between the channels when it reached the output. This allows you to measure the delay the factory applied to each speaker in their DSP. One thing to note the time changes when you change the DSP settings called NORMAL, CENTER, DRIVER. So I use Driver at this point, This system is just a first step i fully expect that i will end up running some of the new Kicker DSP amplifiers. They are basically a 360 built into the amp.
And yes i just used the passenger side 10 inch signal to run my sub as the signal and the delay were the best match for the system in the car.
As for the Noise canceling it was a huge improvement when i disabled it. This is the same theory as noise canceling headphones if you read reviews almost all talk about how the active noise canceling causes the audio to sound muddy. This is the same in the car as the new sub you added is trying to play the opposite tones of the exhaust and road noise that the mics are picking up. Not only is this being done at a greater output than intended by the Bose engineers when you add a sub but it causes the actual music to be colored.
Thank you for sharing this and the pictures. I am planning on doing something similar with my JL HD750 amp to drive a 13TW5. Any reason not to use the rear passenger speaker as the input for the amp and using the built-in low pass filter? I am a little worried that the car will sound like something is missing with the passenger woofer and the rears are advertised as full range.
Originally Posted by joesgtech
I used a RTA to look at the signal out of each speaker output while playing pink noise from the radio. This allows you to see the EQ applied to each channel.
For Time delay I played a pulse note and measured the time between the channels when it reached the output. This allows you to measure the delay the factory applied to each speaker in their DSP. One thing to note the time changes when you change the DSP settings called NORMAL, CENTER, DRIVER. So I use Driver at this point, This system is just a first step i fully expect that i will end up running some of the new Kicker DSP amplifiers. They are basically a 360 built into the amp.
And yes i just used the passenger side 10 inch signal to run my sub as the signal and the delay were the best match for the system in the car.
As for the Noise canceling it was a huge improvement when i disabled it. This is the same theory as noise canceling headphones if you read reviews almost all talk about how the active noise canceling causes the audio to sound muddy. This is the same in the car as the new sub you added is trying to play the opposite tones of the exhaust and road noise that the mics are picking up. Not only is this being done at a greater output than intended by the Bose engineers when you add a sub but it causes the actual music to be colored.
So I read your amp install post like 4 times and feel confident I can do mine. My question is how do I tap the LOC converter? Do I just tap into the right door sub for my sub signal right before the green connector? So I tie the loc into the right door sub before the connector and leaving the wire still going to the connector intact then plug it back into the stock amplifier? And instead of removing the pins in location 4 and 5 for the noise cancellation, couldn't I just cut those 2 wires before the connector going into the stock amp and tape it up? Thanks ahead of time for the help!
it worked perfectly on my 2017 C7 Z06. The solid yellow wire from X1connector from factory amp is the +right front door sub and the yellow with black stripe is the -right front door sub. Here are the pics of my install with close up of the speaker wire you tap into and my ground and power. From the +yellow and -yellow and black speaker wire I used a LC2i. So the +yellow and -black and yellow wires go into the LC2i speaker wire positive and negative locations. I powered the LC2i straight to my battery just like My amp and the LC2i ground went into the same ground as amp. The LC2i remote wire "OUT" went into my amp remote wire in, to turn my amp on. The LC2i WILL NOT TURN ON until music is coming out of the speaker wires. It senses a current from the speaker wire and that what turns the LC2i on. The LC2i will not turn on with just with power and ground hooked up. (I thought mine was a dud because I hooked up the power and ground but NOTHING happened. Not until I put the speaker wire from the +yellow and the -yellow and black, did the LC2i turn on.) you then put the RCA sub out from the LC2i to your amp. When the LC2i senses music it will then turn on then turn on your amp. Remember remote wire out from LC2i to remote wire in to your amp or your amp will not turn on. I used the LC2i cause it sounded better than the $20 ones and it's adjustable and will turn your amp on. Here are some pics Ground goes here for amp and LC2i Power here This is from X1 connector and the 2 yellows you use are here This is from X1 connector and the 2 yellows you use are here The 2 yellows you tap into for your speaker wires Ground Power The LC2i Power
Great write up, thank you. Two questions: does your roof panel still fit in the back? Any pics/instructions on the bass **** install?
I have not took my top off yet since my car is so new but the makers of the sub box says it fits just fine. I didn't have to install a bass **** because the LC2i has its OWN sub control so I tuned it with the LC2i and if the bass is a little loud I just turn the bass down a little with the stock corvette stereo deck. If you wanted to install a bass **** you can just run it out from the LC2i OR from your amp out. You can buy any kind of bass ***** and they will work with your LC2i or your amp. I recommend if anyone does this install to use a LC2i OR BETTER. Your working with 100K plus car so spend a little extra and get one. Also the cheap ones can catch fire any you don't want that.
I have NOT taken the roof off yet but the sub box is so solid and fits so tight that I almost couldn't get it out. That being said it it super tight and there is NO RATTLE AT ALL. When I take my tops off I will update but if It did make a noise I would just leave the top in the garage. I'm sure it won't. The bass is clean and hits very tight and nice. Box is great.

 10-27-2015, 10:33 PM